 Stefan Blattmann
Story
Attention
The following project is just a DIY project and did not replace certified smoke detectors. As I'm a voluntary firefighter, please keep your home safe and use high-quality certified smoke detectors. The sensor system which is developed by this project is only an addition.
Background
Smoke detectors save a lot of lives. For example, the number of fire victims fell by more than 48% in France from 1982 to 2012 and 56% in the UK from 1982 to 2013. These reductions can largely be linked to increased fire safety regulations and smoke detectors (Source). In the U.S. 96% of all homes have smoke alarms and approximately 20% of homes with smoke alarms have non-operational smoke alarms. It is estimated that if every home had working smoke alarms, U.S. residential fire deaths could drop by 36%, with nearly 1100 lives saved per year (Source). With an increasing number of smoke detectors, false alarms became a problem (Source). The number of false fire alarms is increasing continuously, which is a severe issue for firefighters.
Introduction
This project introduces a smoke detector based on ai sensor fusion to determine a fire alarm or not. The system is based on the Arduino Pro Nicla Sense ME board. For safety reasons, most of the sensors are redundant to ensure function even if one sensor is failing. This project focus on four different requirements:
- Reduce false alarms, based on ai sensor fusion
- Detect sensor errors or failures
- All process and ai tasks are calculated on the Arduino board
- Send Fire alarm via Bluetooth
Working principle
Traditional smoke detectors work with one of the two following detection principles.
Photoelectric
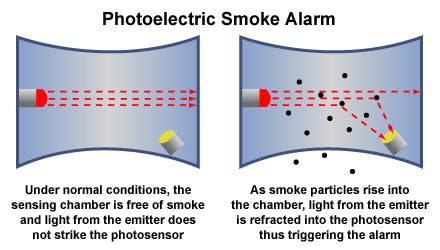
Source: https://homehazardprevention.com/fire-extinguishers/photoelectric-pic/
Photoelectric smoke detectors work based on a photoelectric sensor and a light path as the source. When a fire breaks out, smoke enters the device through the opening vent. Inside this vent is an optical chamber. As the smoke enters this optical chamber, it hits the light path, which causes the light to be scattered. This scattered light falls onto the photodiode. As the light hits the photodiode light receptor, a signal is generated, which causes the alarm.
Ionization
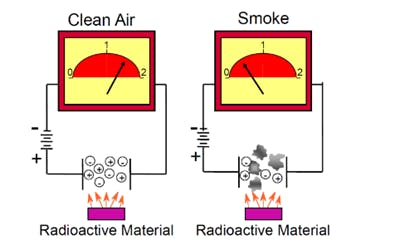
Source: https://www.nfpa.org
Ionization smoke detectors work with two electrodes that are connected to a battery. Normally no current is flowing, because the circuit is open (between the electrodes is only air). But if the air is ionized with Americium-21 (radioactive material) the circuit is closed. Because the ionized air allows current flow. During a fire, smoke enters the detector. It disturbs the ionization process, the circuit breaks, and an alarm is generated.
False Alarms
Both working principles are affected by the following effects:
- Overcooked food
- Steam or high humidity
- Pesky insects
- A buildup of dust
- Strong chemicals nearby
All of these external triggers can cause a false alarm.
Project Overview
The following chapters describe the used hardware, dataset collection, and ai model training and ai model inference on a device.
Overview
The main measurement principle of the smoke detector is realized with the Sensirion SPS30. This sensor is used to measure particulate matter in the air. The SPS30 works in the same manner as photoelectric smoke detectors. The SPS30 measures the aerosol concentration in the air and returns the number of particles and their size. In other words, the SPS30 is an advanced smoke detector. The data output of the SPS is particular matter (PM): PM1.0 / PM2.5 and number concentration (NC): NC 0.5 / NC1.0 / NC2.5. More about the SPS30. Around the SPS30 different Sensors are used to measure "meta" data around the particles to classify the environment. To make the system more reliable most of the sensors are redundant, to ensure faulty readings are detected.
The following list shows the redundant sensors
- Humidity/Temperature: BME688 and SHT31
- Air Pressure: BMP390 and BMP388
- Gas (VOC): SPG30 and BME688
Because of internal measurement methods and calibration, the Gas sensor readings from SPG30 and BME688 are not 100% comparable. So I decided to use the calculated VOC and check if the reading difference is greater than 10%.
As there is no fallback for the SPS30 "smoke sensor", the sensor readings must be unique. Otherwise, a sensor error must be generated.
_uBLXRUN6tN.jpg?auto=compress%2Cformat&w=740&h=555&fit=max)
block diagram
Sensors:
Arduino Nicla Sense ME
- Bosch BHI260AP: 6 axis IMU (3-Axis Accelerometer + 3-Axis Gyroscope) + MCU
- Bosch BMP390: Pressure sensor
- Bosch BMM150: Magnetometer
- Bosch BME688: Humidity, temperature, and gas sensor (VOC)
External Sensors
- Bosch BMP388: Pressure sensor
- Sensirion SPS30: Particular Matter sensor (Smoke detector)
- Sensirion SHT31: Humidity and temperature sensor
- Sensirion SPG30: Gas sensor (VOC)
- GPS: For Timesync of the sensor readings
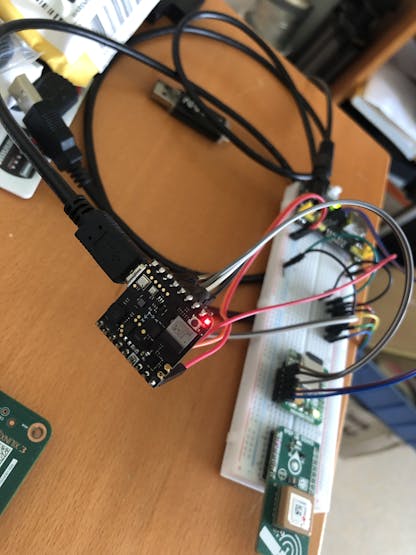
sensor mounting on breadboard
Sensor fusion
Sensor fusion is a very generic term.
"Sensor fusion is the process of combining sensor data or data derived from disparate sources such that the resulting information has less uncertainty than would be possible when these sources were used individually." (Source)
Putting sensor fusion in the context of this project is aimed at using different environmental information from different sensors, to improve fire detection. Sensor fusion algorithms can be implemented in different ways:
- (Non)-Linear functions, like x^2 + y
- Thresholds, like: if (x > 10)
- Linear Regression, like ai models
For this particular problem, the best case is to use a linear regression-based sensor fusion. Because the final output depends on a lot of sensor readings with different correlations, which cant be seen by humans easily.
Data collection
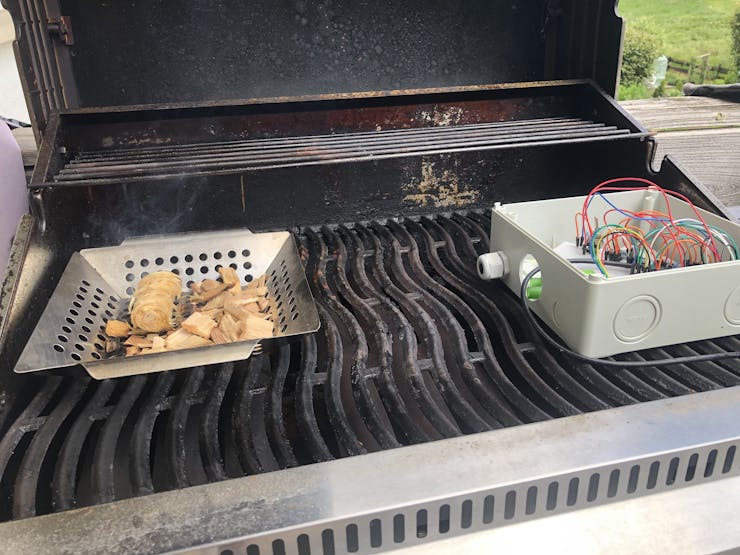
Collection training data for this system is not as easy as it seems. Many different environments and fire sources have to be sampled to ensure a good dataset for training. A short list of different scenarios which are captured:
- Normal indoor
- Normal outdoor
- Indoor wood fire, firefighter training area
- Indoor gas fire, firefighter training area
- Outdoor wood, coal, and gas grill
- Outdoor high humidity
- etc.
The dataset is nearly 60.000 readings long. The sample rate is 1Hz for all sensors. To keep track of the data, a UTC timestamp is added to every sensor reading.
Some impressions:
gas/wood fire
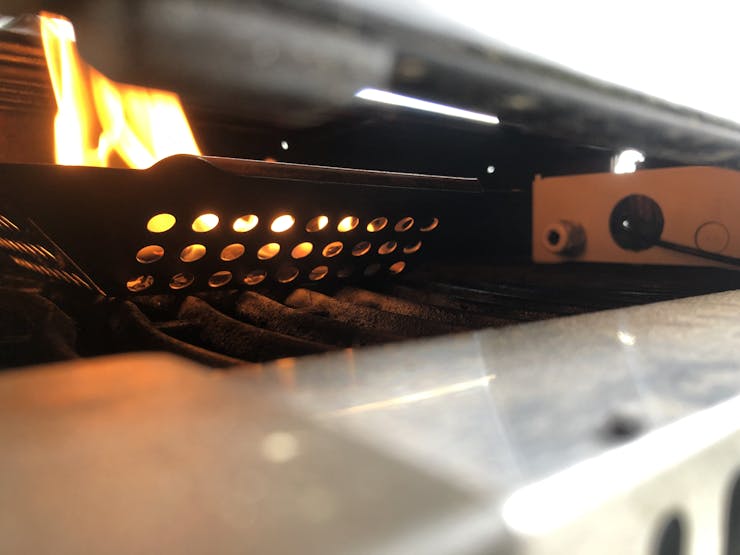
wood fire
profesional smoke maschine
Dataset
The data was saved in the CSV format, the default header is shown below.
CSV Data header
Temperature[C],Humidity[%],TVOC[ppb],eCO2[ppm],Raw H2,Raw Ethanol,Pressure[hPa],PM1.0,PM2.5,Fire Alarm,CNT,UTC,NC0.5,NC1.0,NC2.5
The dataset features in detail:
- Air Temperature
- Air Humidity
- TVOC: Total Volatile Organic Compounds; measured in parts per billion (Source)
- eCO2: co2 equivalent concentration; calculated from different values like TVCO
- Raw H2: raw molecular hydrogen; not compensated (Bias, temperature, etc.)
- Raw Ethanol: raw ethanol gas (Source)
- Air Pressure
- PM 1.0 and PM 2.5: particulate matter size < 1.0 µm (PM1.0). 1.0 µm < 2.5 µm (PM2.5)
- Fire Alarm: ground truth is "1" if a fire is there
- CNT: Sample counter
- UTC: Timestamp UTC seconds
- NC0.5/NC1.0 and NC2.5: Number concentration of particulate matter. This differs from PM because NC gives the actual number of particles in the air. The raw NC is also classified by the particle size: < 0.5 µm (NC0.5); 0.5 µm < 1.0 µm (NC1.0); 1.0 µm < 2.5 µm (NC2.5);
Training
We have a complex sensor fusion problem to solve. I’ve chosen Neutonas the solution for training a model and running it on a microcontroller free of charge. To train your dataset, you need a Google account and an activated Neuton Zero Gravity plan.
This section describes how to train a model with a custom dataset. It's super easy just to choose a CSV file and upload it to the Neuton platform.
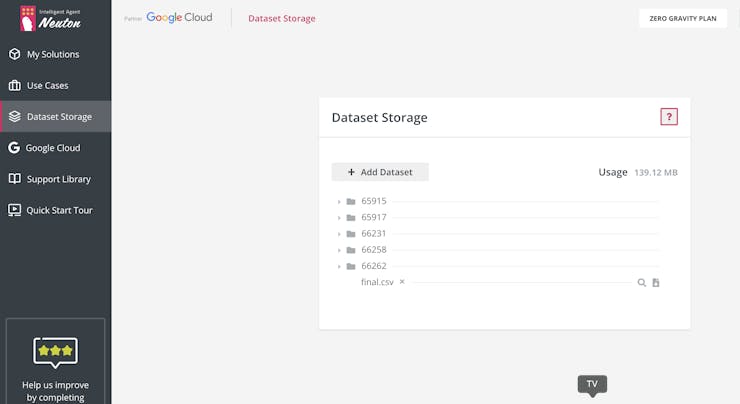
uploading the dataset
To set up a new model for training, use the "My Solution" tab and follow the instructions. The preloaded dataset can be found in "Select dataset from storage".
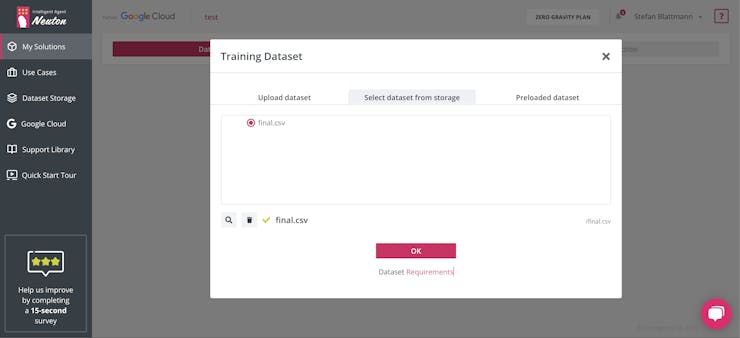
dataset selection
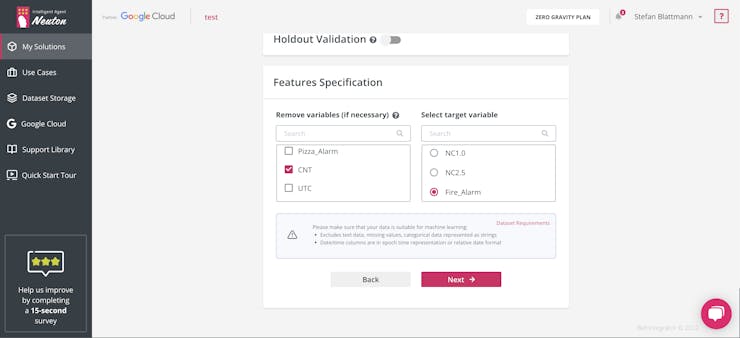
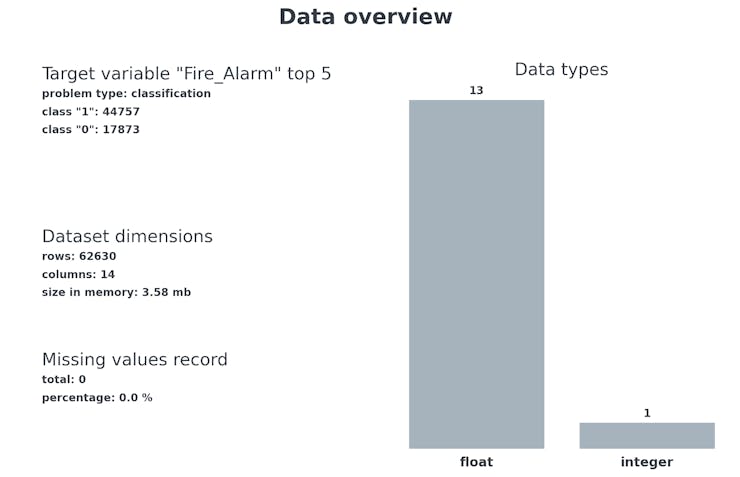
After selecting the dataset, Neuton analyzes your data and checks if everything is fine for training. Then, Neuton opens a new dialog to select the target variable which should be predicted by the model. For this project "fire alarm" is selected.
I added a counter variable in the dataset to check if any data is missing or not. This counter variable does not help to train the model and is not used in the application itself, so the "cnt" variable is disabled for training. This feature helps you keep a clean process for all kinds of extra "metadata".
The used dataset in this project is not split into training and validation, so "Holdout Validation" is disabled.
datset configuration
The next step is to configure the training and model configuration in detail. There are many options and configurations to fit your application.
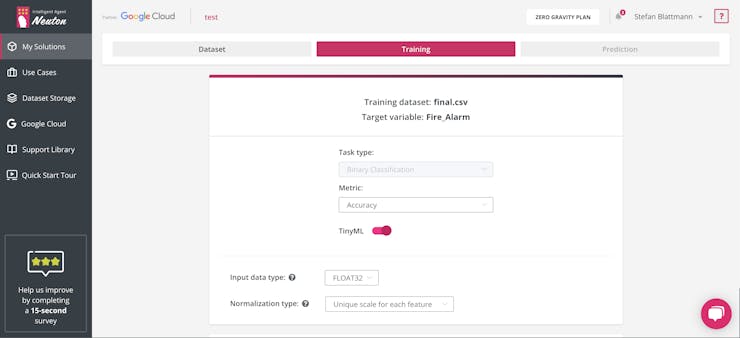
training setup I
First, the data type is selected, in this case: Float 32 bit. Also, the TinyML is activated because the model should run on the Arduino board. We select Accuracy because the fire alarm should be predicted as precisely as possible. For this kind of problem "Precision" would also work.
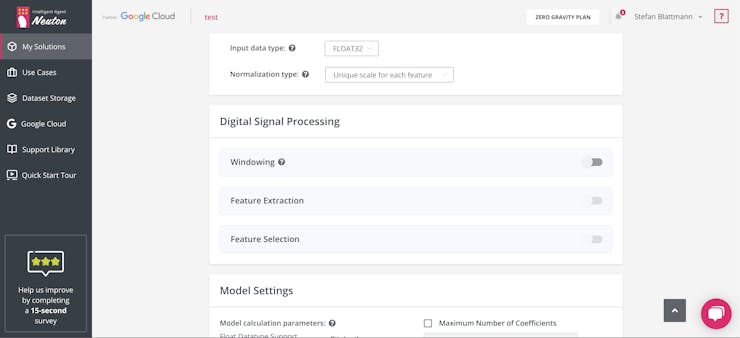
training setup II
The second part is about how the input data vector is generated. Most systems use a fixed sample rate. This rate defines at which frequency new input data is available and "fed" into the model. This project uses a fixed sample rate of 1 Hz, which means every second new sensor values are available and fed into the model. So there is no need for special digital signal processing.
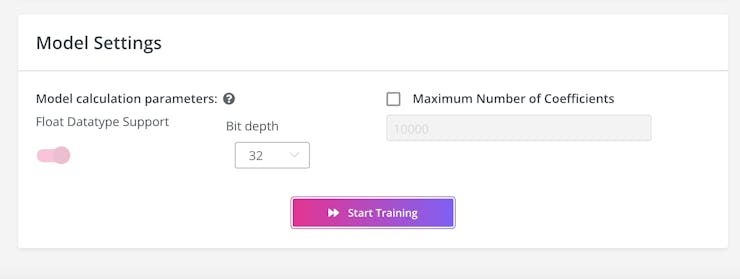
training setup III
The last step is to set up the model, as the Arduino Pro Nicla Sense ME MCU is a 32 Bit MCU with floating-point extension, the model can be set up to 32 Bit and floating-point numbers.
Let the magic begin, start training and let Neuton build a model for you.
Model details
During training, Neuton updates the model details and important parameters of the model. The training for this fire detection takes from four to five hours, so I use the SMS service from Neuton which sends me an SMS after the training process is finished. After training, the model can be explored in detail. This is really helpful to understand how the model is performing and how to get a better overview of the final result.
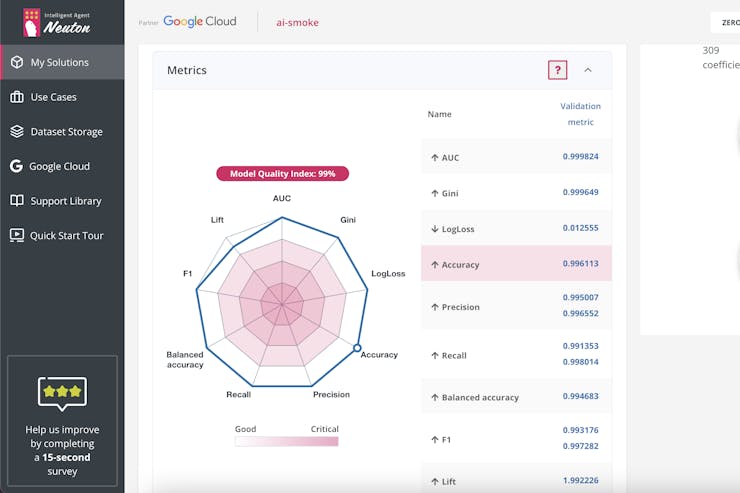
32-Bit model
The model overview shows the model performance and RAM/Flash consumption which is needed to run the model on the MCU. On the left-hand side, the radar diagram shows different metrics about the model. Here we found “Accuracy” highlighted because we have chosen it as the target metric. But the diagram shows all other metrics. This is very useful to understand if the model is working correctly. In this case, the model had a notch for the Lift metric. Lift measurer the ratio between a single model prediction versus all predictions with the same output in the dataset. This may relate to an unbalanced dataset, this will be discussed later on. The automatically generated c library can be directly downloaded and is ready to use. RAM/Flash footprint helps you precisely define the requirements of your system.

raw data analysis II
Let's get deep into our model and dataset, Neuton makes it really easy to get a deep understanding of how the prediction is working and what's going on. The "Exploratory Data Analysis" section is available after training. Only a few interesting parts are shown in this documentation. Please feel free to use the dataset and make your own experiments.
Three of the most important plots are shown below.
- Dataset overview, a detailed view of the dataset
- Target variable distribution: The dataset of our fire detector is unbalanced, a ideal dataset has a 50 % distribution of all target states.
- Correlation Heatmap (More): Here we see how the different input values correlate to each other. The Air humidity correlates most with the target while the eCO2 value least. In Simple words, a change in the humidity is significant to the fire alarm, while a change in the eCO2 gas is not really.
All this information is helpful to understand how the data affect the output and the prediction performance of the model. With Neuton, it's really easy to get a structured and helpful overview of the data.
Model Customization
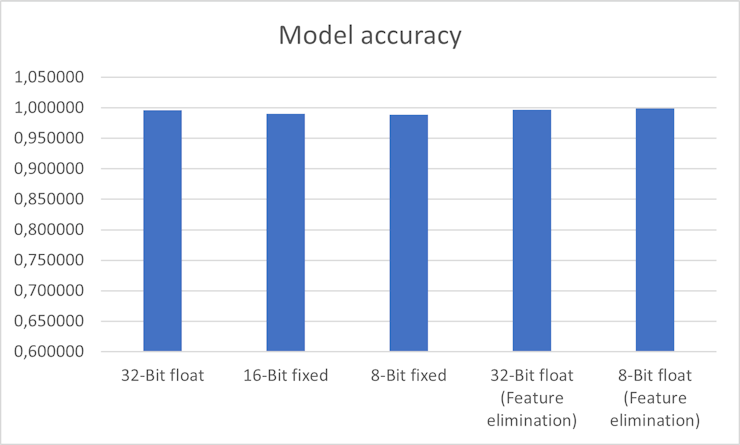
As our smoke detector is running on a battery power consumption, it makes sense to think about how to reduce the calculation time and complexity of the model while keeping the model accuracy high. This process can be very difficult to meet all requirements. Neuton allows to train models with different bit depths and settings. To compare different settings, the model is trained with three different settings:
- 32-Bit floating-point number
- 16-Bit fixed-point number
- 8-Bit fixed-point number
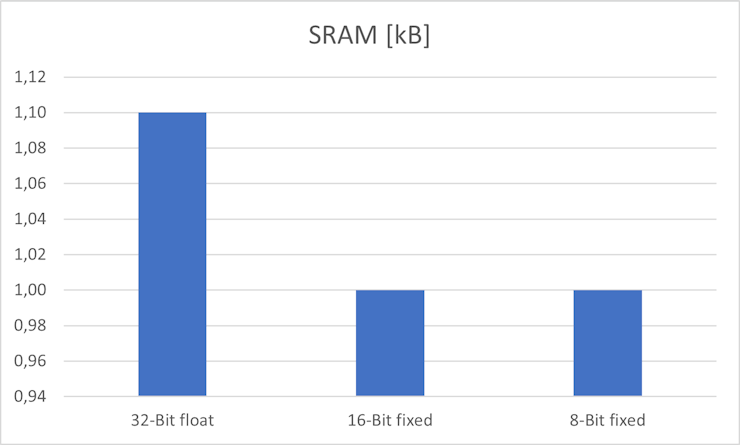
Comparing the three models in terms of accuracy, there is a drop from 0.996113 (32-Bit float) to 0.989032 (8-Bit fixed), a drop of 0.7 % in accuracy. The 8-bit model significantly reduces FLASH memory consumption and has better performance on 8-bit MCU architectures.
Model Customization Part 2 (Feature elimination)
For the smoke detector, the 8-Bit model is used because this reduces power consumption and calculation time, which results in longer battery life. The next step is to remove input values that are used by the model.
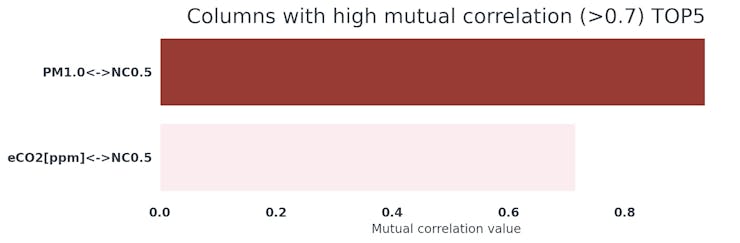
The graph above can be found in "Exploratory Data Analysis" section of Neuton, it shows the most correlated values. The PM1.0 and NC0.5 values are highly correlated, this relates to the measurement principle of the SPS30 sensor, the PM1.0 value is calculated from the NC0.5 value inside the SPS30. So Neuton gives us the hint to have an eye on these values. For further customization, the PM1.0 value and eCO2 will be removed for model input, because the information is redundant or useless. So this should help to improve the model size and memory usage.

customized 32-Bit model
The customized 32-Bit and 8-Bit models with a reduced input vector outperform the original 32-Bit model in terms of accuracy and memory usage.

customized 8-Bit model
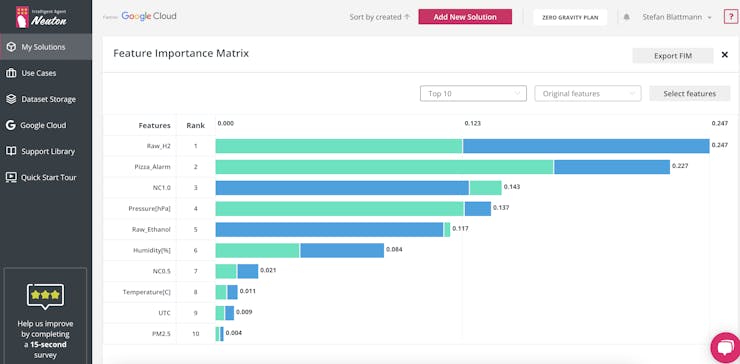
Feature Importance Matrix of the customized 8-Bit model (Top10)
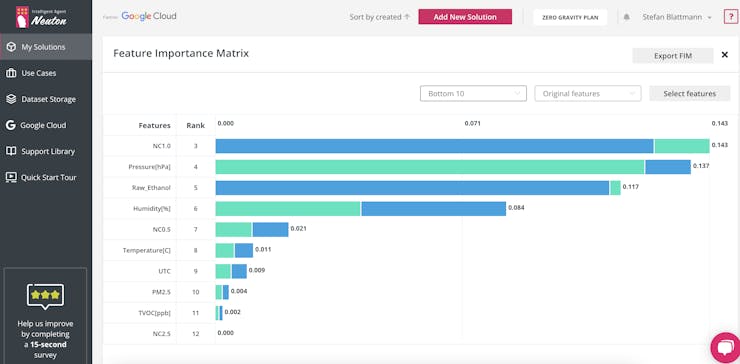
Feature Importance Matrix of the customized 8-Bit model (Bottom 10)
The Feature Importance Matrix gives a detailed overview of how every feature is correlated to the model output. For this case maybe some of the bottom 10 features can be dropped in the real application.
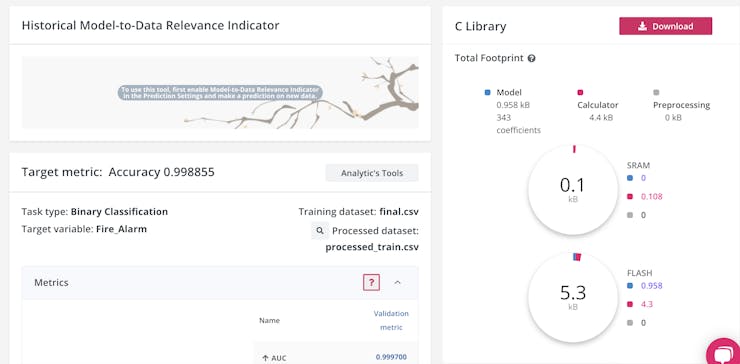
customized 8-Bit model footprint
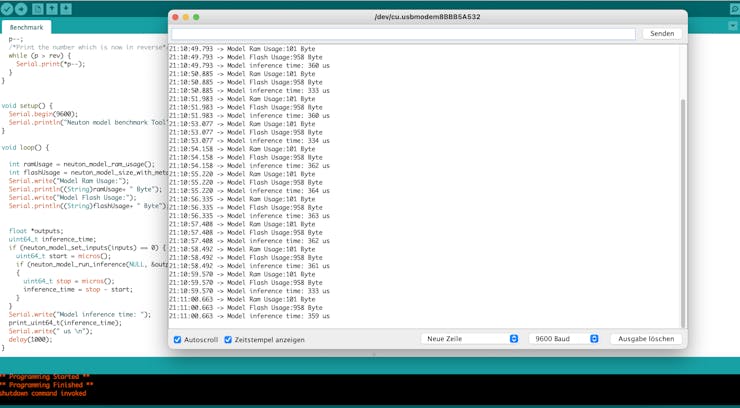
The final model needs only 101 Byte of Ram and 958 Byte of Flash memory on the Arduino Nical Sense ME. Inference time is around 360 us. The model proved to be ultra-compact and fast! The test code for Neuton models on an Arduino is located in the Github repo. (Project)
Arduino programming
As the Neuton community is growing fast, many Arduino inference examples exist official-git-repo and hackster.io. I used the arduino-example from the official repo for model inference. The detailed source code is available via the github-repo. The dataset and the data collector are also available.
Adding Bluetooth
The Arduino Pro Nicla Sense ME has the capability to send messages via Bluetooth to any kind of device. Programming Bluetooth with Arduino is simple, just follow the instruction on the Cheat Sheet. For testing purposes, the BlueSee MacOs X tool is used to read values from the Arduino via Bluetooth.
BLEService fire_service("fff0");BLEIntCharacteristic fire_characteristic("fff1", BLERead | BLEBroadcast);
The basic function is built around the BLe Service "fff0", which has a characteristic that is updated every time the model generates new output. The new value is Broadcasted to every connected Bluetooth device. This is a common way to send notifications and status events via Bluetooth.
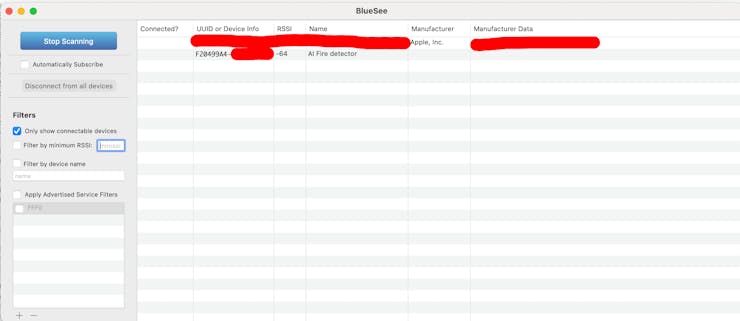
BlueSee Scan output
With BlueSee you can connect to the BLE device and read the current Service information. First, you have to connect to the device. BlueSee allows connecting to the BLE device. In the second step, the Service data can be read from the device
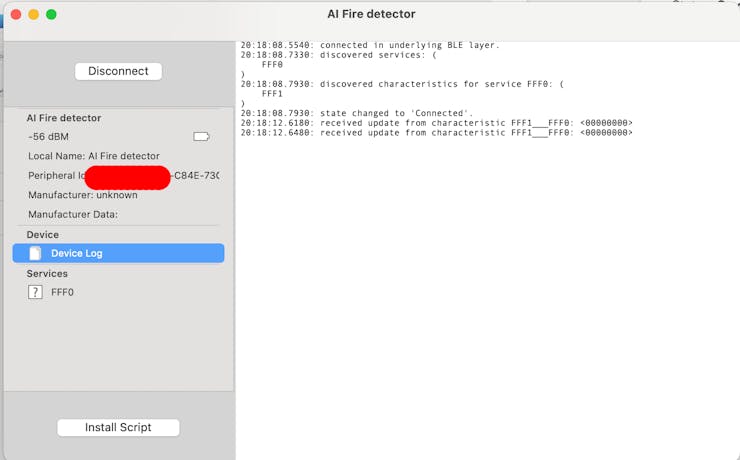
Connect to the BLE device
Reading the Service "fire alarm", the payload size is 32-bit, but we only use the MSB.
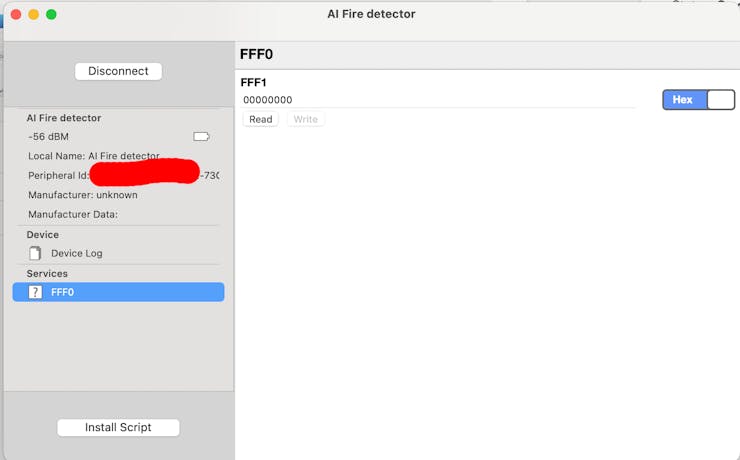
No fire alarm
In case of a fire alarm, the MSB is set to one and the information is sent.
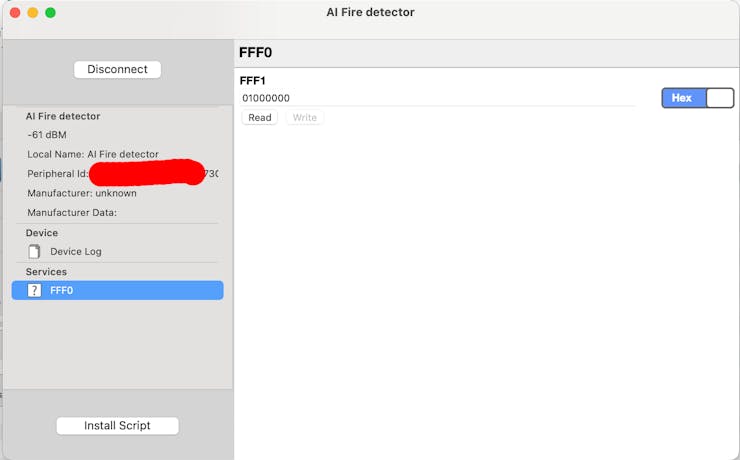
fire alarm
In final words, while testing the BLE Service there are a lot of sensor reading errors, because of the high power load of the system. One solution can be to upgrade the power distribution. Please check for updates.
Future work
As the Arduino Pro Nicla Sense ME uses a sensor fusion chip to control the sensor readings, the network can be directly implemented on the Bosch BHI260AP chip. The CPU which is built in the BHI260AP is capable of running custom code. In this scenario, the main CPU would be completely free to run the main application code, dramatically reducing power consumption and battery life.
Another goal is adding the pizza burning detection. The data is available in the dataset and must be extracted by the model. To do this, the dataset must be extended from a binary state to a multi-state target variable.
Implementation of the tiny 8-bit model on an FPGA and running the whole model in a small number of clock cycles are also planned. These steps can be implemented using the Xilinx finn framework.
Conclusion
This project shows that sensor fusion is a good way to solve complex problems by just using extra metadata. Adding metadata to the "smoke sensor" can help to reduce false alarms. Such kind of low-cost sensor systems can save lives because the system can be trained to detect fire gases that cause fainting. And it’s really cool that the process of building tiny neural networks can be so simple and automated.