 Ben Brooks
Recently I came across this Hackaday article by Elliot Williams linked from a more recent post. I’d considered roasting my own coffee in the past using the air popcorn popper method, but avoided it as I didn’t need yet another hobby/interest to take up my time. But after having done a fair bit of travelling around the US in an RV and striking out every time we bought coffee, the serendipity of reading that article inspired me to take the plunge (and make a bit of a project out of it too).
I more or less followed the original build, subbing components I either could get or already had on hand. I opted for the popper I got, mainly because it seemed to be the most ‘name-brand’ while still being inexpensive. I was also hoping the actual components MIGHT be slightly better and that the particular model more likely to find again if I need to buy another (to hopefully avoid redesigning/printing the enclosure I was going to make). One change from the source post that I made was a safety one: the original just bypassed a thermal fuse on the popper to allow for higher temps, but I went ahead and added a higher-temp thermal fuse instead. A pack of them was inexpensive and it seemed like a wise choice to have as many safety mechanisms (both physical and electronic) as possible, considering the high temps it will be operating at (think the highest setting on your oven). I also decided to not just enclose all the electronic bits, but the roasting chamber as well. The high temperatures it would be getting to and the fact that I planned to let it do it’s thing unsupervised, I really didn’t want it exposed (especially with little-ones around). Because the temperatures are north of the nozzle temperature for most printing materials, I ordered some high-temp thermal blanket material to wrap it with and hopefully keep the PLA I planned to print the enclosure out of from getting soft.
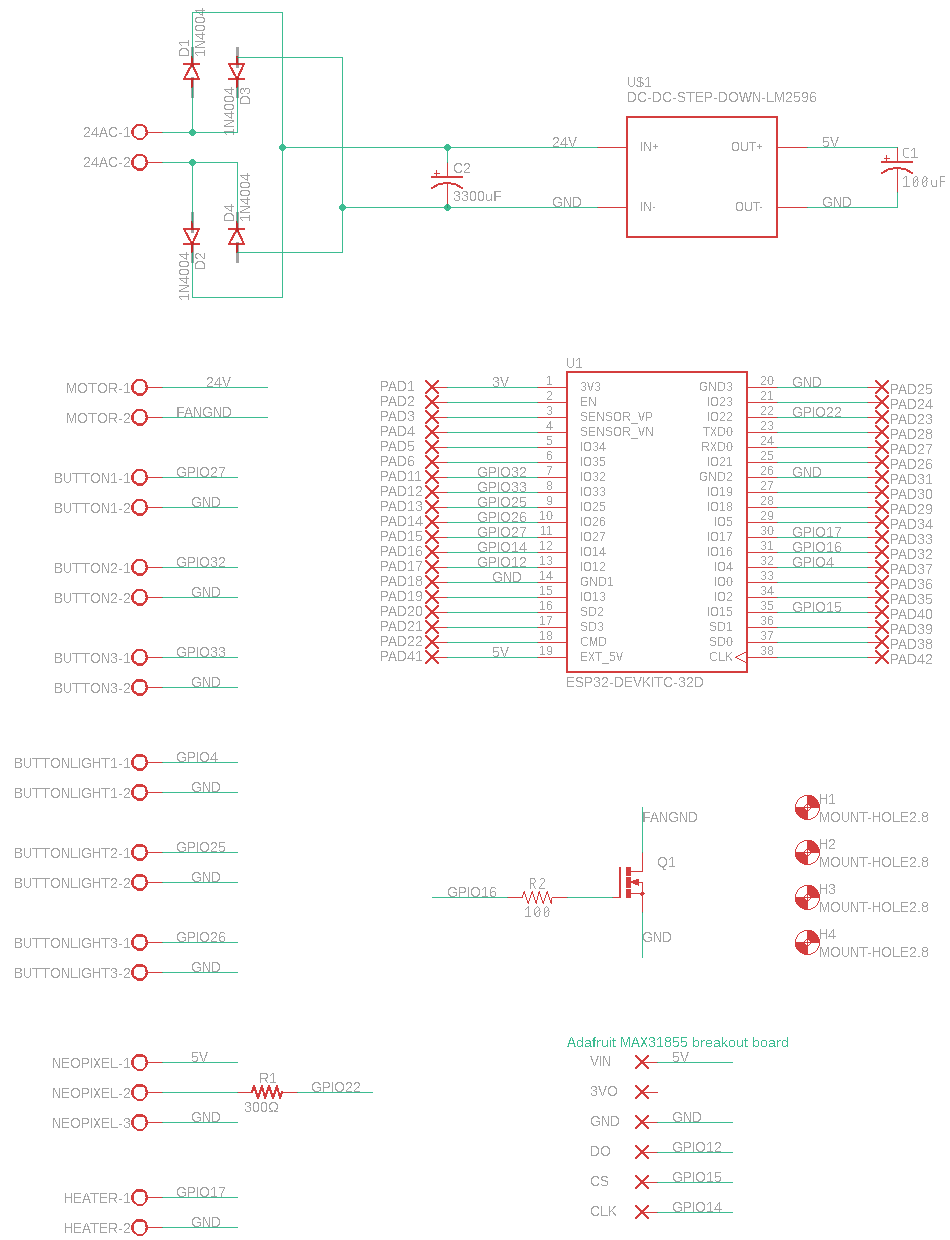
For the brains, I went with an ESP32 and for the code I went with ESPHome to make it play extra-nice with Home Assistant. While I’ve used ESPHome for lots of ‘dumb’ connected devices, this was my first time using it to do automation and control all locally: the only thing I’m using Home Assistant for is to visualize the data and as a way to make small changes to the roast setpoints and tell it to start the actual roast. It just makes sense for this type of project to have all the control done locally and not dependent on a wireless connection, but I also specifically wanted the ability to operate it wherever (say in an RV in the middle of nowhere). At the end of the day, it was quite easy automating it within ESPHome (minus the crazy-particular indentation syntax of YAML), but it took me quite a while to fully realize how to write it (I originally went down the path of using a custom component and writing the automation in C++ before realizing how easy it is to do natively). Part of the reason I chose the ESP32 instead of an 8266 was because I wanted to use the Web Server component of ESPHome, that way I have a simple UI to interact with it when not at home; the documentation warns away from doing so on an 8266. This was extra-important as I was going to be having the ESP render everything locally rather than pulling templates from the web.
As far as physical IO devices, I settled on having 3 lighted buttons that would be used to initiate 3 different roast profiles (with the lights indicating which one is currently running) and a single Neopixel LED that changes color based on the current state of the roast or to alert to any errors. Obviously, I can pull out my phone or laptop to get ALL the data, but at the end of the day I wanted it to be very ‘set it and forget it’ once I found what I liked; the end goal was to pull the roaster out, add some beans, select the roast and walk away until my phone tells me that it’s done. As a starting point, I used the original roasting profile from Elliot’s post but making the code customizable on-the-fly. So while the overall ‘idea’ of the roasting profile was hard-coded, all the relevant parameters (pre-heat temp, roasting temp, ramp rate to reach the roasting temp and fan speed) would be editable either within Home Assistant or by pulling up the web server component for the device.
Once I gathered/ordered all my components, I was fairly easily able to get a basic working setup, albeit with several breadboards and lots of stray wires. One issue that took me a while to troubleshoot (and by troubleshoot, I mean that I just went a different route), was getting the ESP32 to boot up with the 5V linear voltage regulator I started off using. With my voltmeter, I was never able to pin down the issue as the voltage seemed to stay well within range on both sides of the regulator, but I suspect there were just some weird fluctuations too quick for it to pick up that were causing the issues (yes, I tried multiple ones, including different manufacturers I happened to have). Ultimately, I just changed to a buck converter voltage regulator and it worked right away. While slightly more expensive and bigger, for my case none of that really mattered.
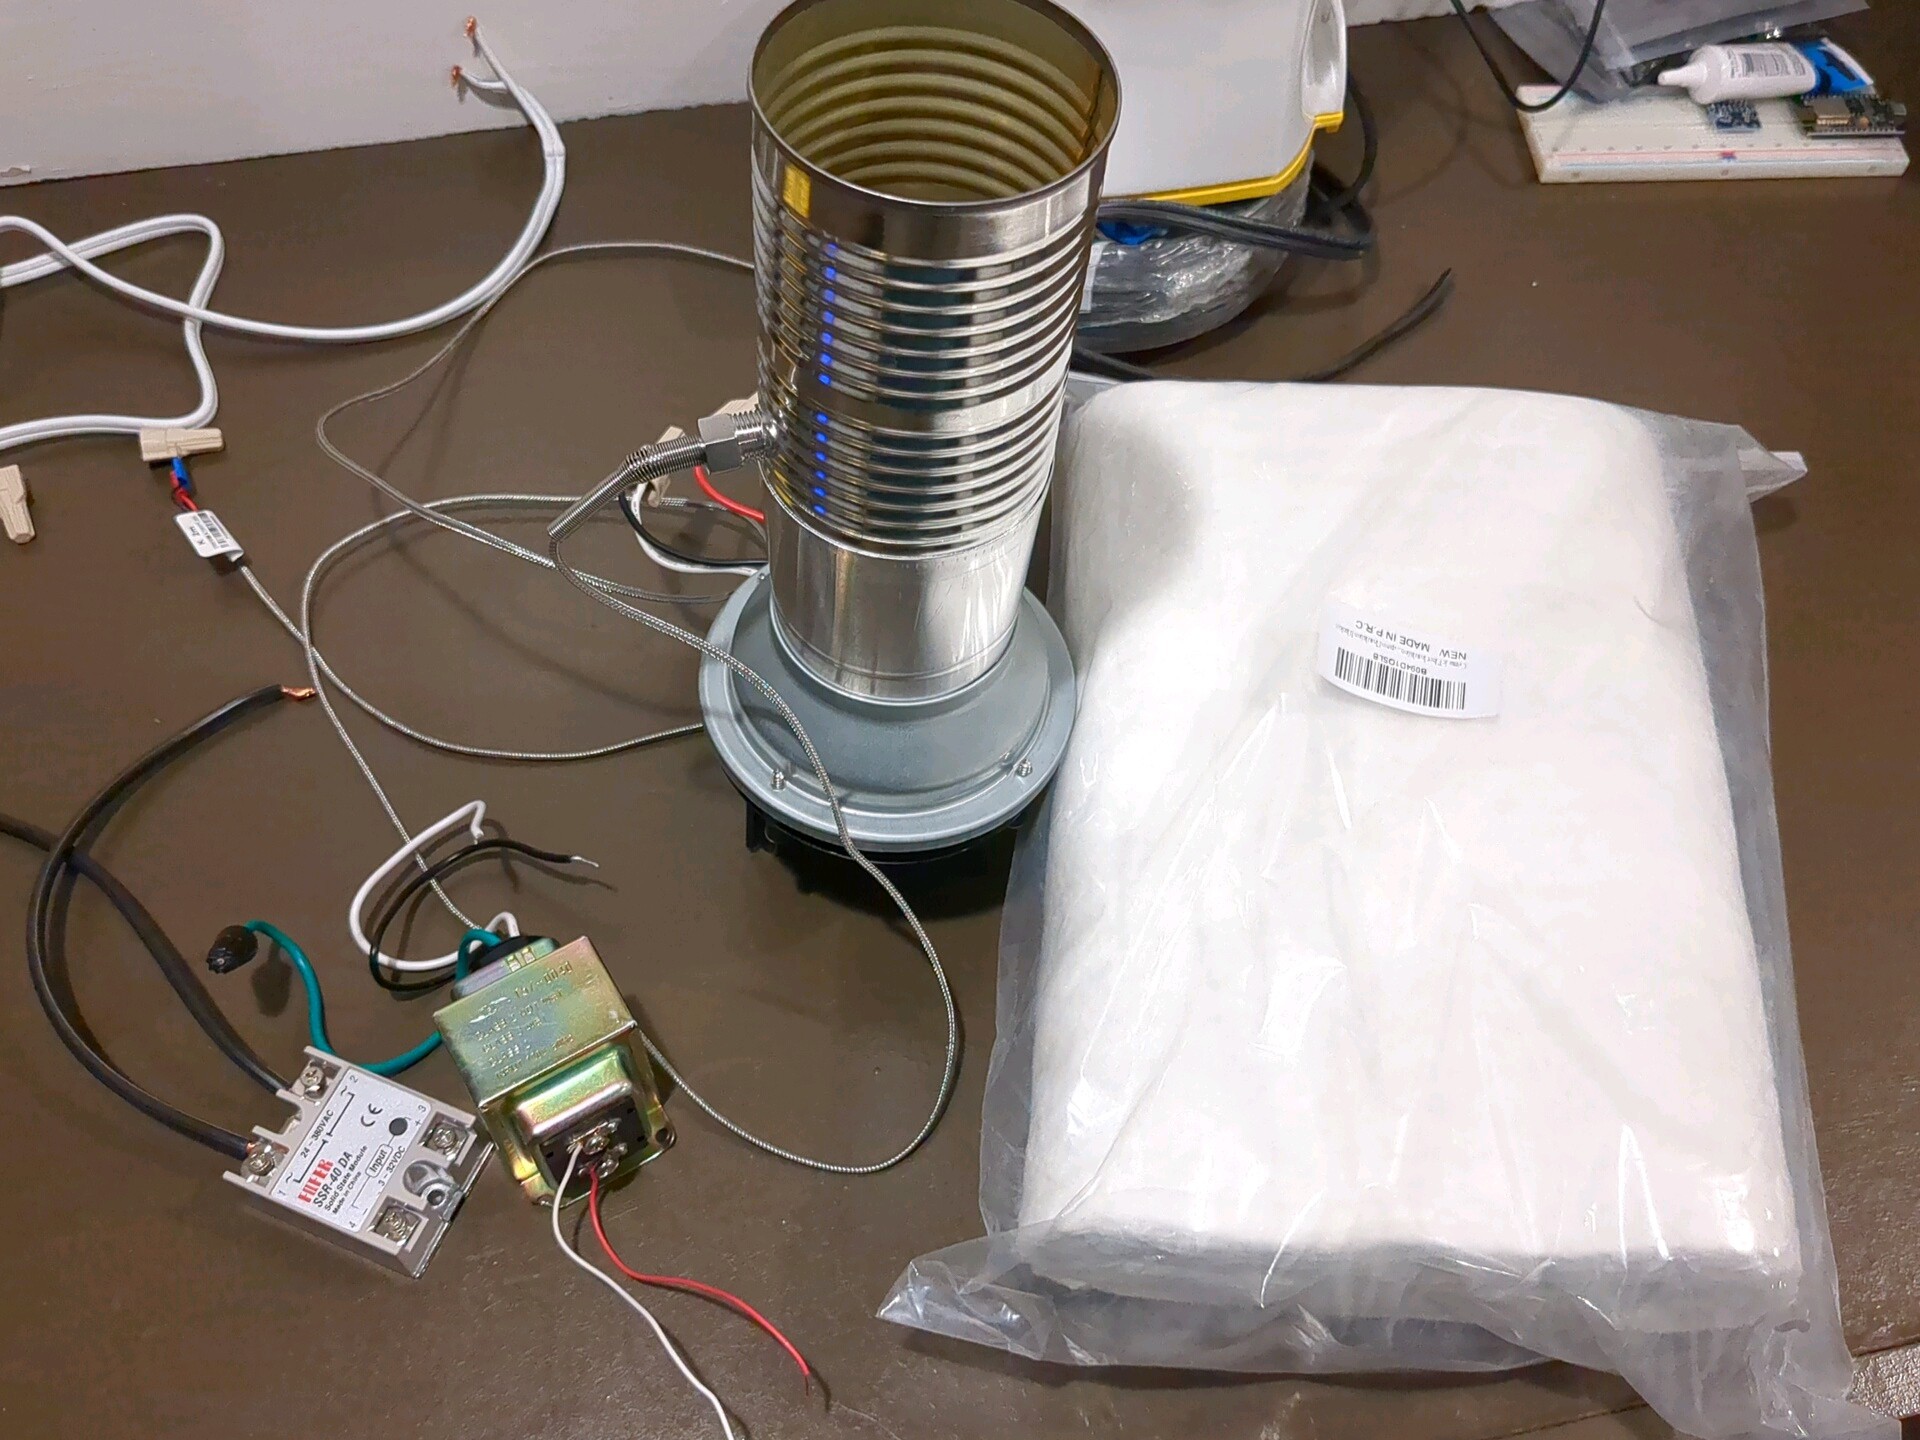
I had considered testing things out further before proceeding, but I ultimately chose to just dive into making both a PCB to clean things up as well as an enclosure to house everything in a more ‘kitchen appliance’ type form factor. Normally I would take smaller steps to make sure it works as intended, but since using popcorn poppers is a common way to roast, I felt pretty confident I wouldn’t overlook anything (luckily this got mostly proven correct). While there’s quite a bit on the PCB, it’s really pretty simple; lots of IO screw terminals more than anything. After ordering and waiting for it to transit across the sea, I proceeded with designing the enclosure.

While I didn’t have any specific size constraints that I was limited to (other than what I could fit on my print bed), I still wanted to make it as compact as possible, particularly so since I was considering taking it on the road in our RV. I also wanted it to be fairly robust; while I knew I could count on myself taking good care of it, the road can be hard on things and with it essentially being a kitchen appliance, it’s entirely possible someone else may interact with it too. On my kitchen table I played with the components, trying to decide on the most compact way to lay it out. The end result isn’t particularly inspired, but it seemed to be the most compact and stable layout I could come up with while using the components I had already chosen. I also wanted each of the components to be fully accessible, since things fail and I didn’t want to spend 4 hours swapping something out.
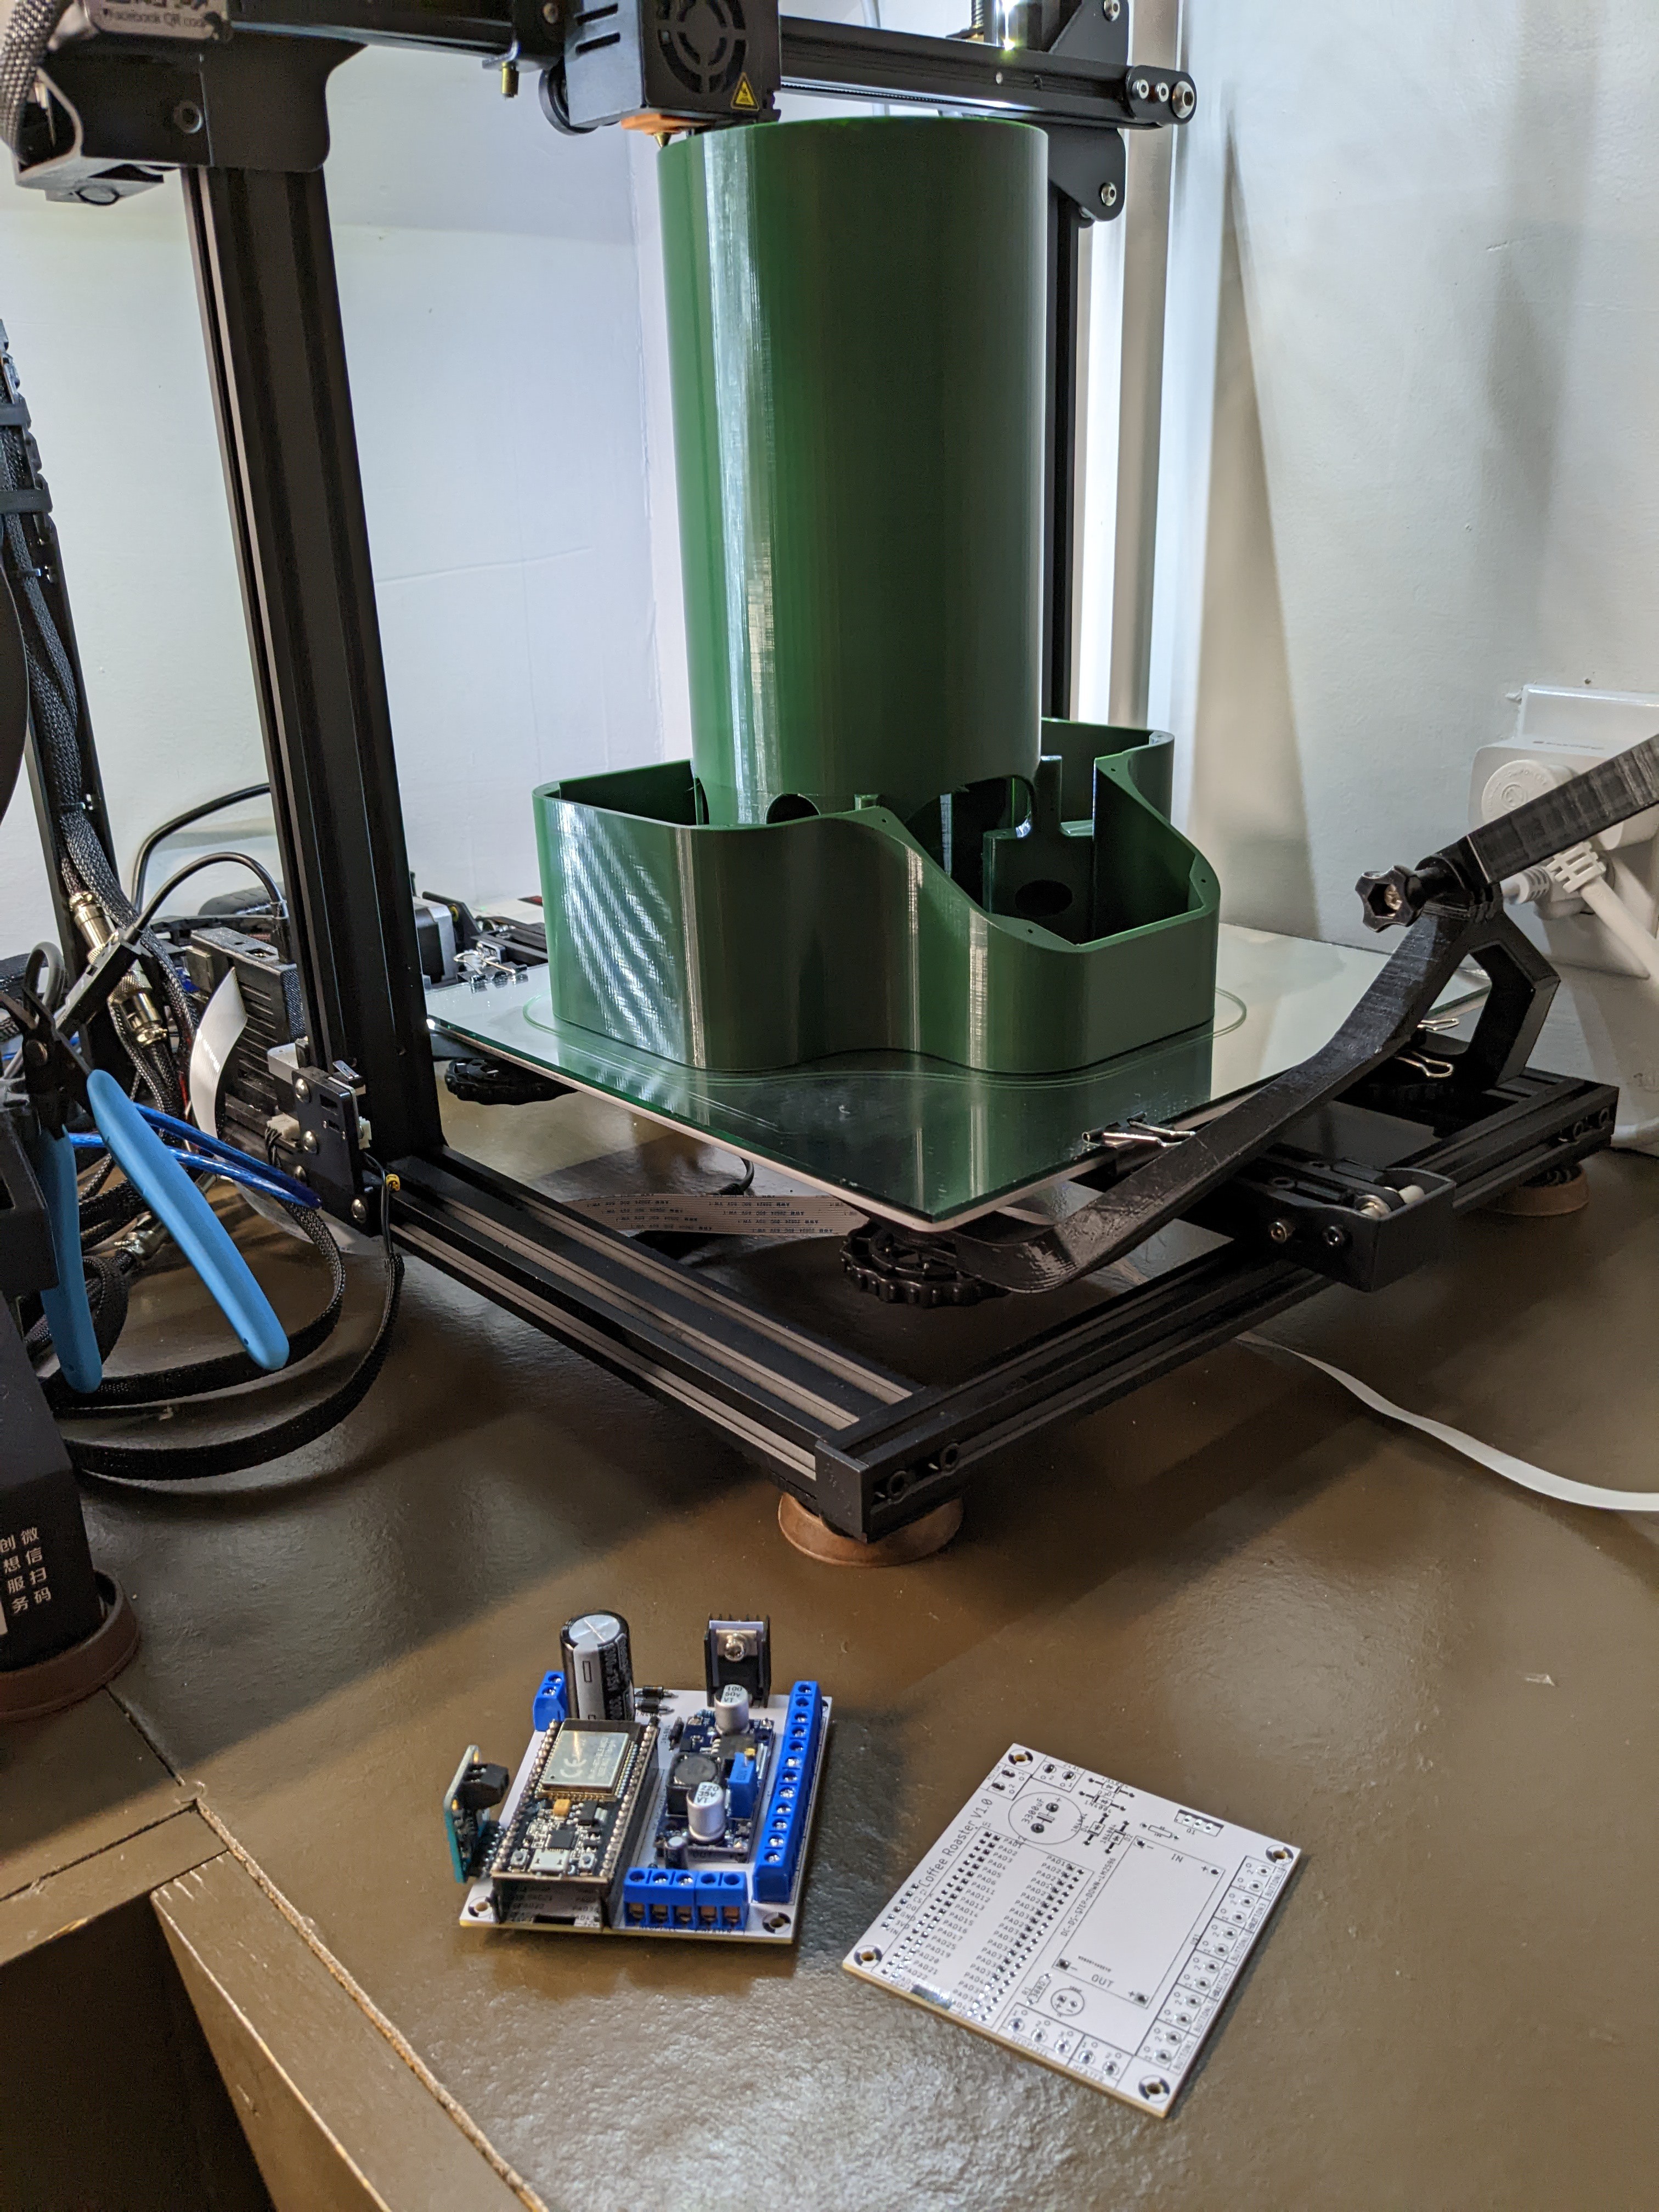
Once the printing was done and the PCB had arrived, assembly was fairly straight-forward (although it was a little tricky, due to how compact I made things). One trick I figured out was to use kabob skewers to hold the popcorn popper assembly together for putting down the ‘tube’ and aligning with the screw holes; for being a quick hack it actually worked quite well! After assembly and plugging it in, no smoke and it all seemed to work at a basic level! However, my excitement was lowered a bit after I started playing with it further; I just couldn’t hit roasting temperatures without lowering the fan speed to less than 5%. Feeling a bit defeated, I ultimately just threw in some beans and start playing with it and quickly found that the addition of the beans added enough air resistance that with the fan at 5% the beans started burning before I even got to a pre-heat temperature. A quick increase to 65% and I was able to get good aeration of the beans and surprisingly hit my target temp in a reasonable time; the first batch didn’t taste too bad either!
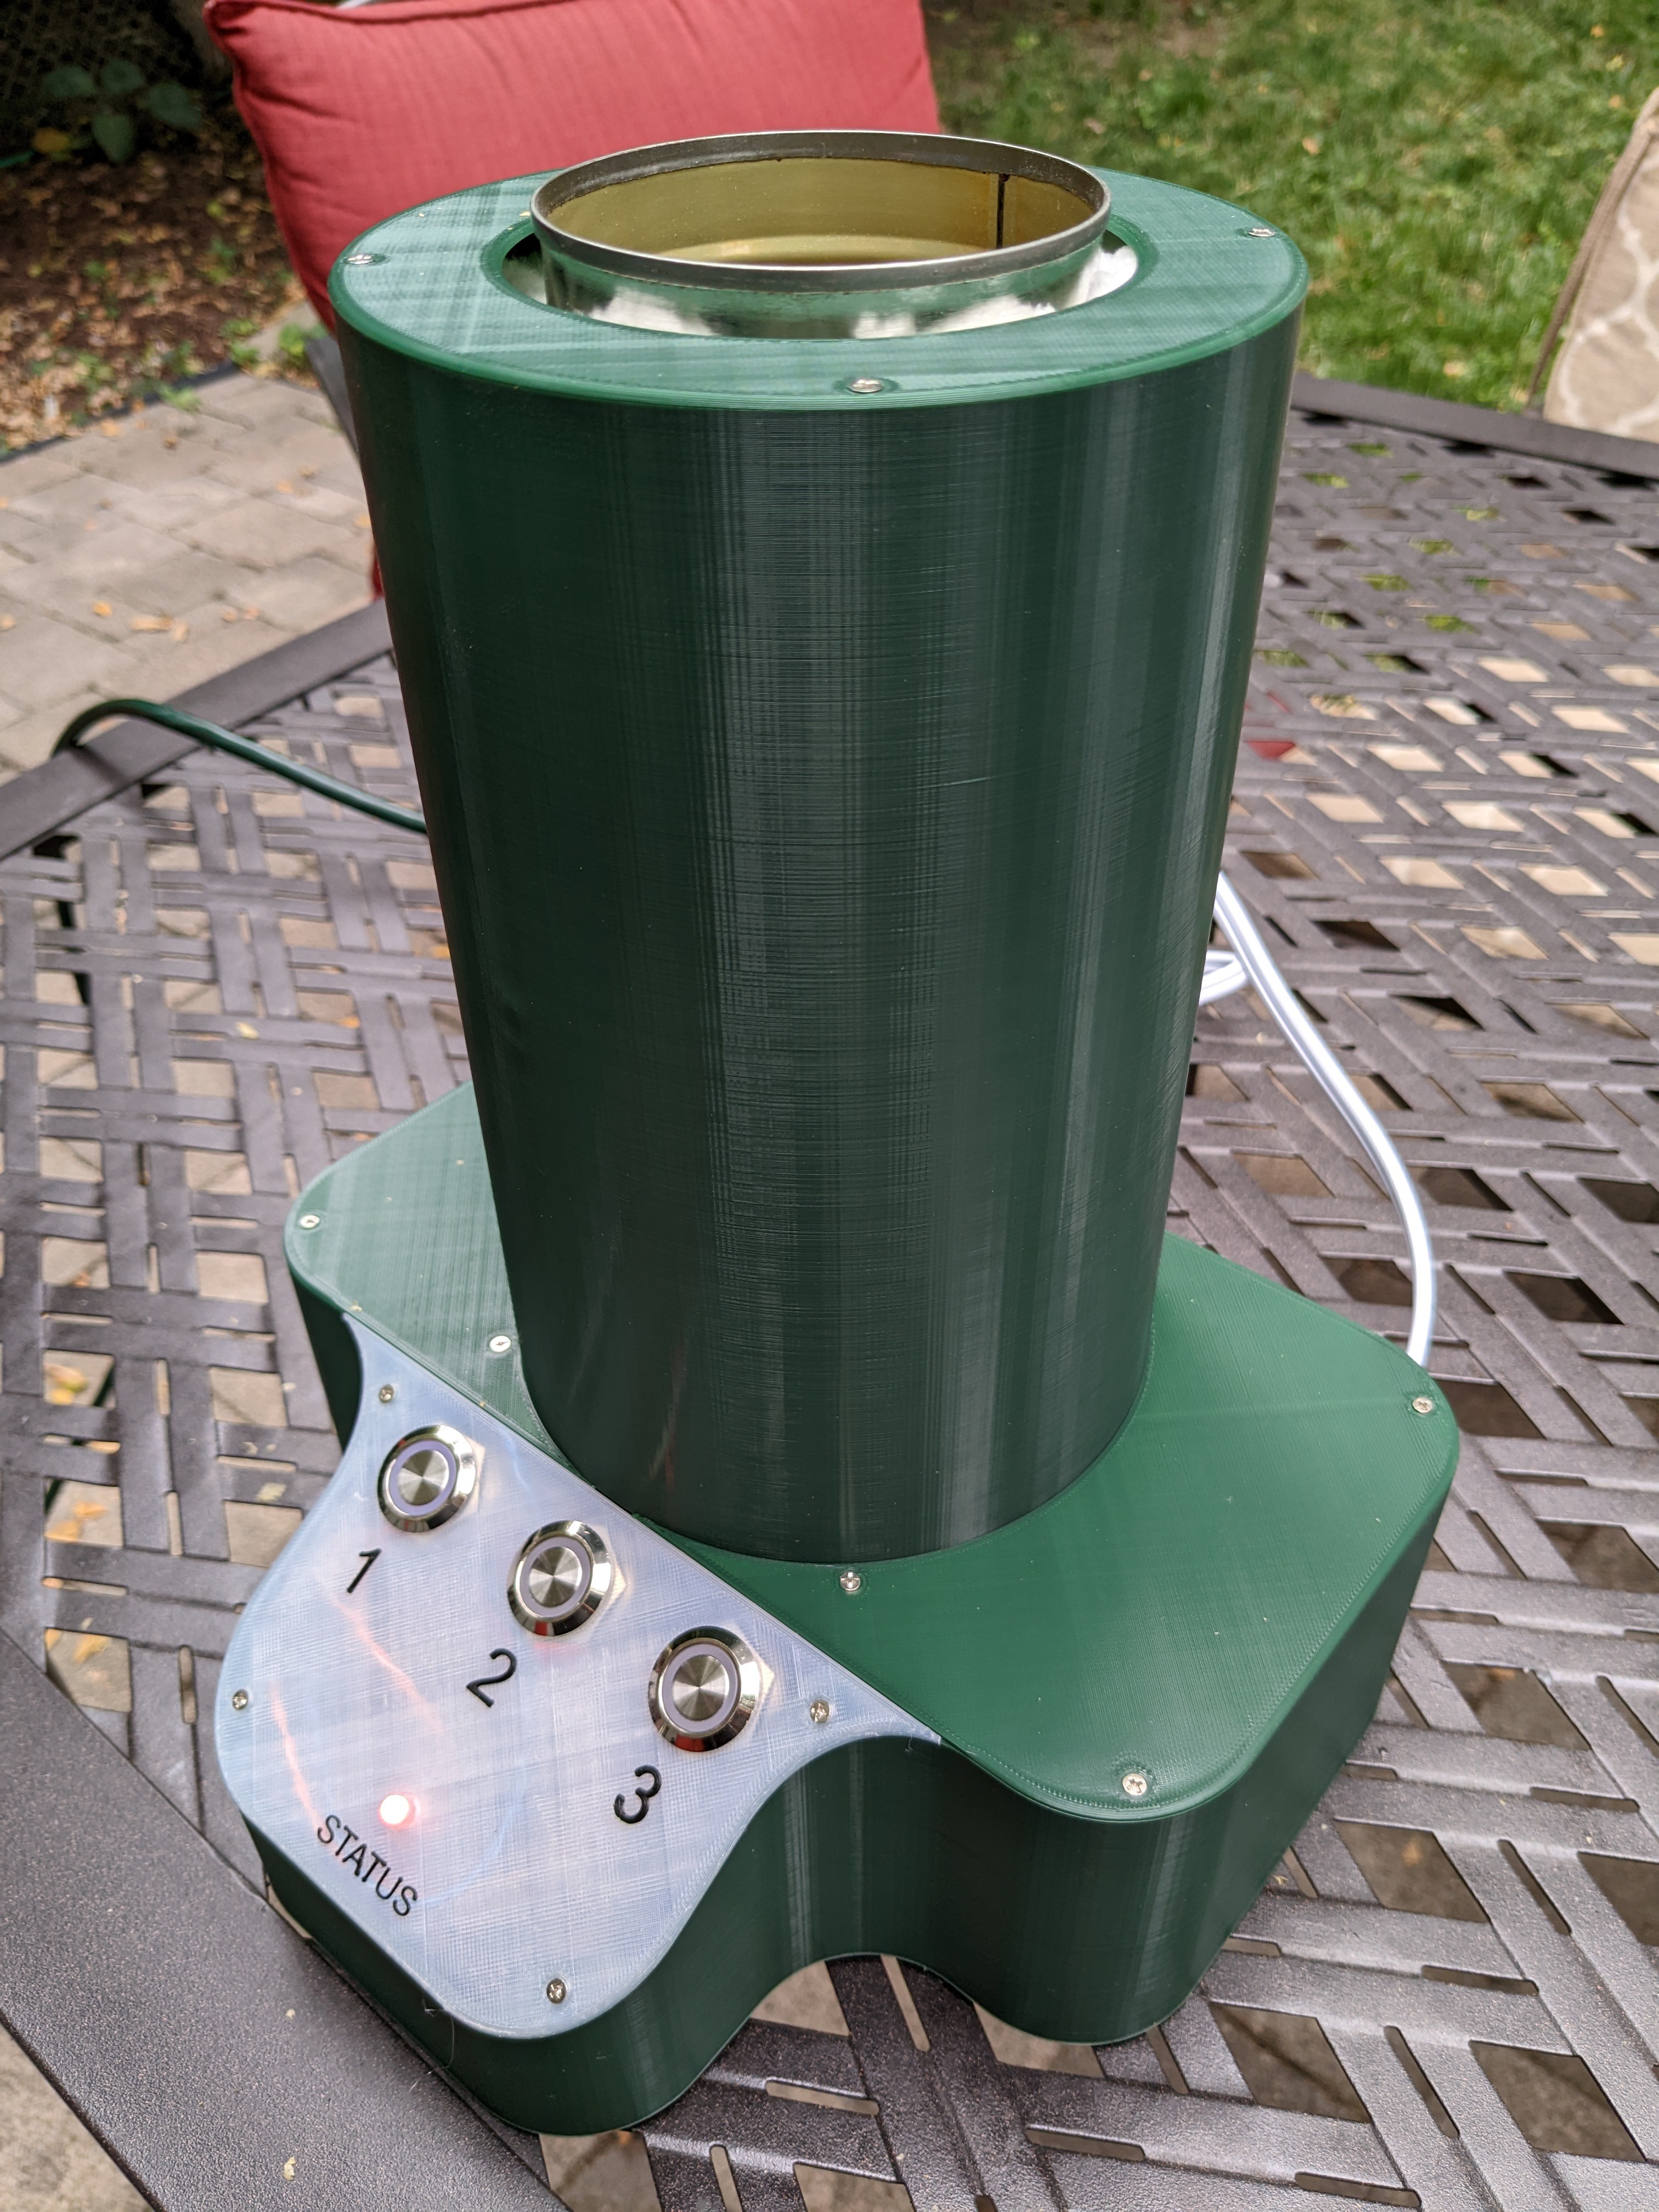
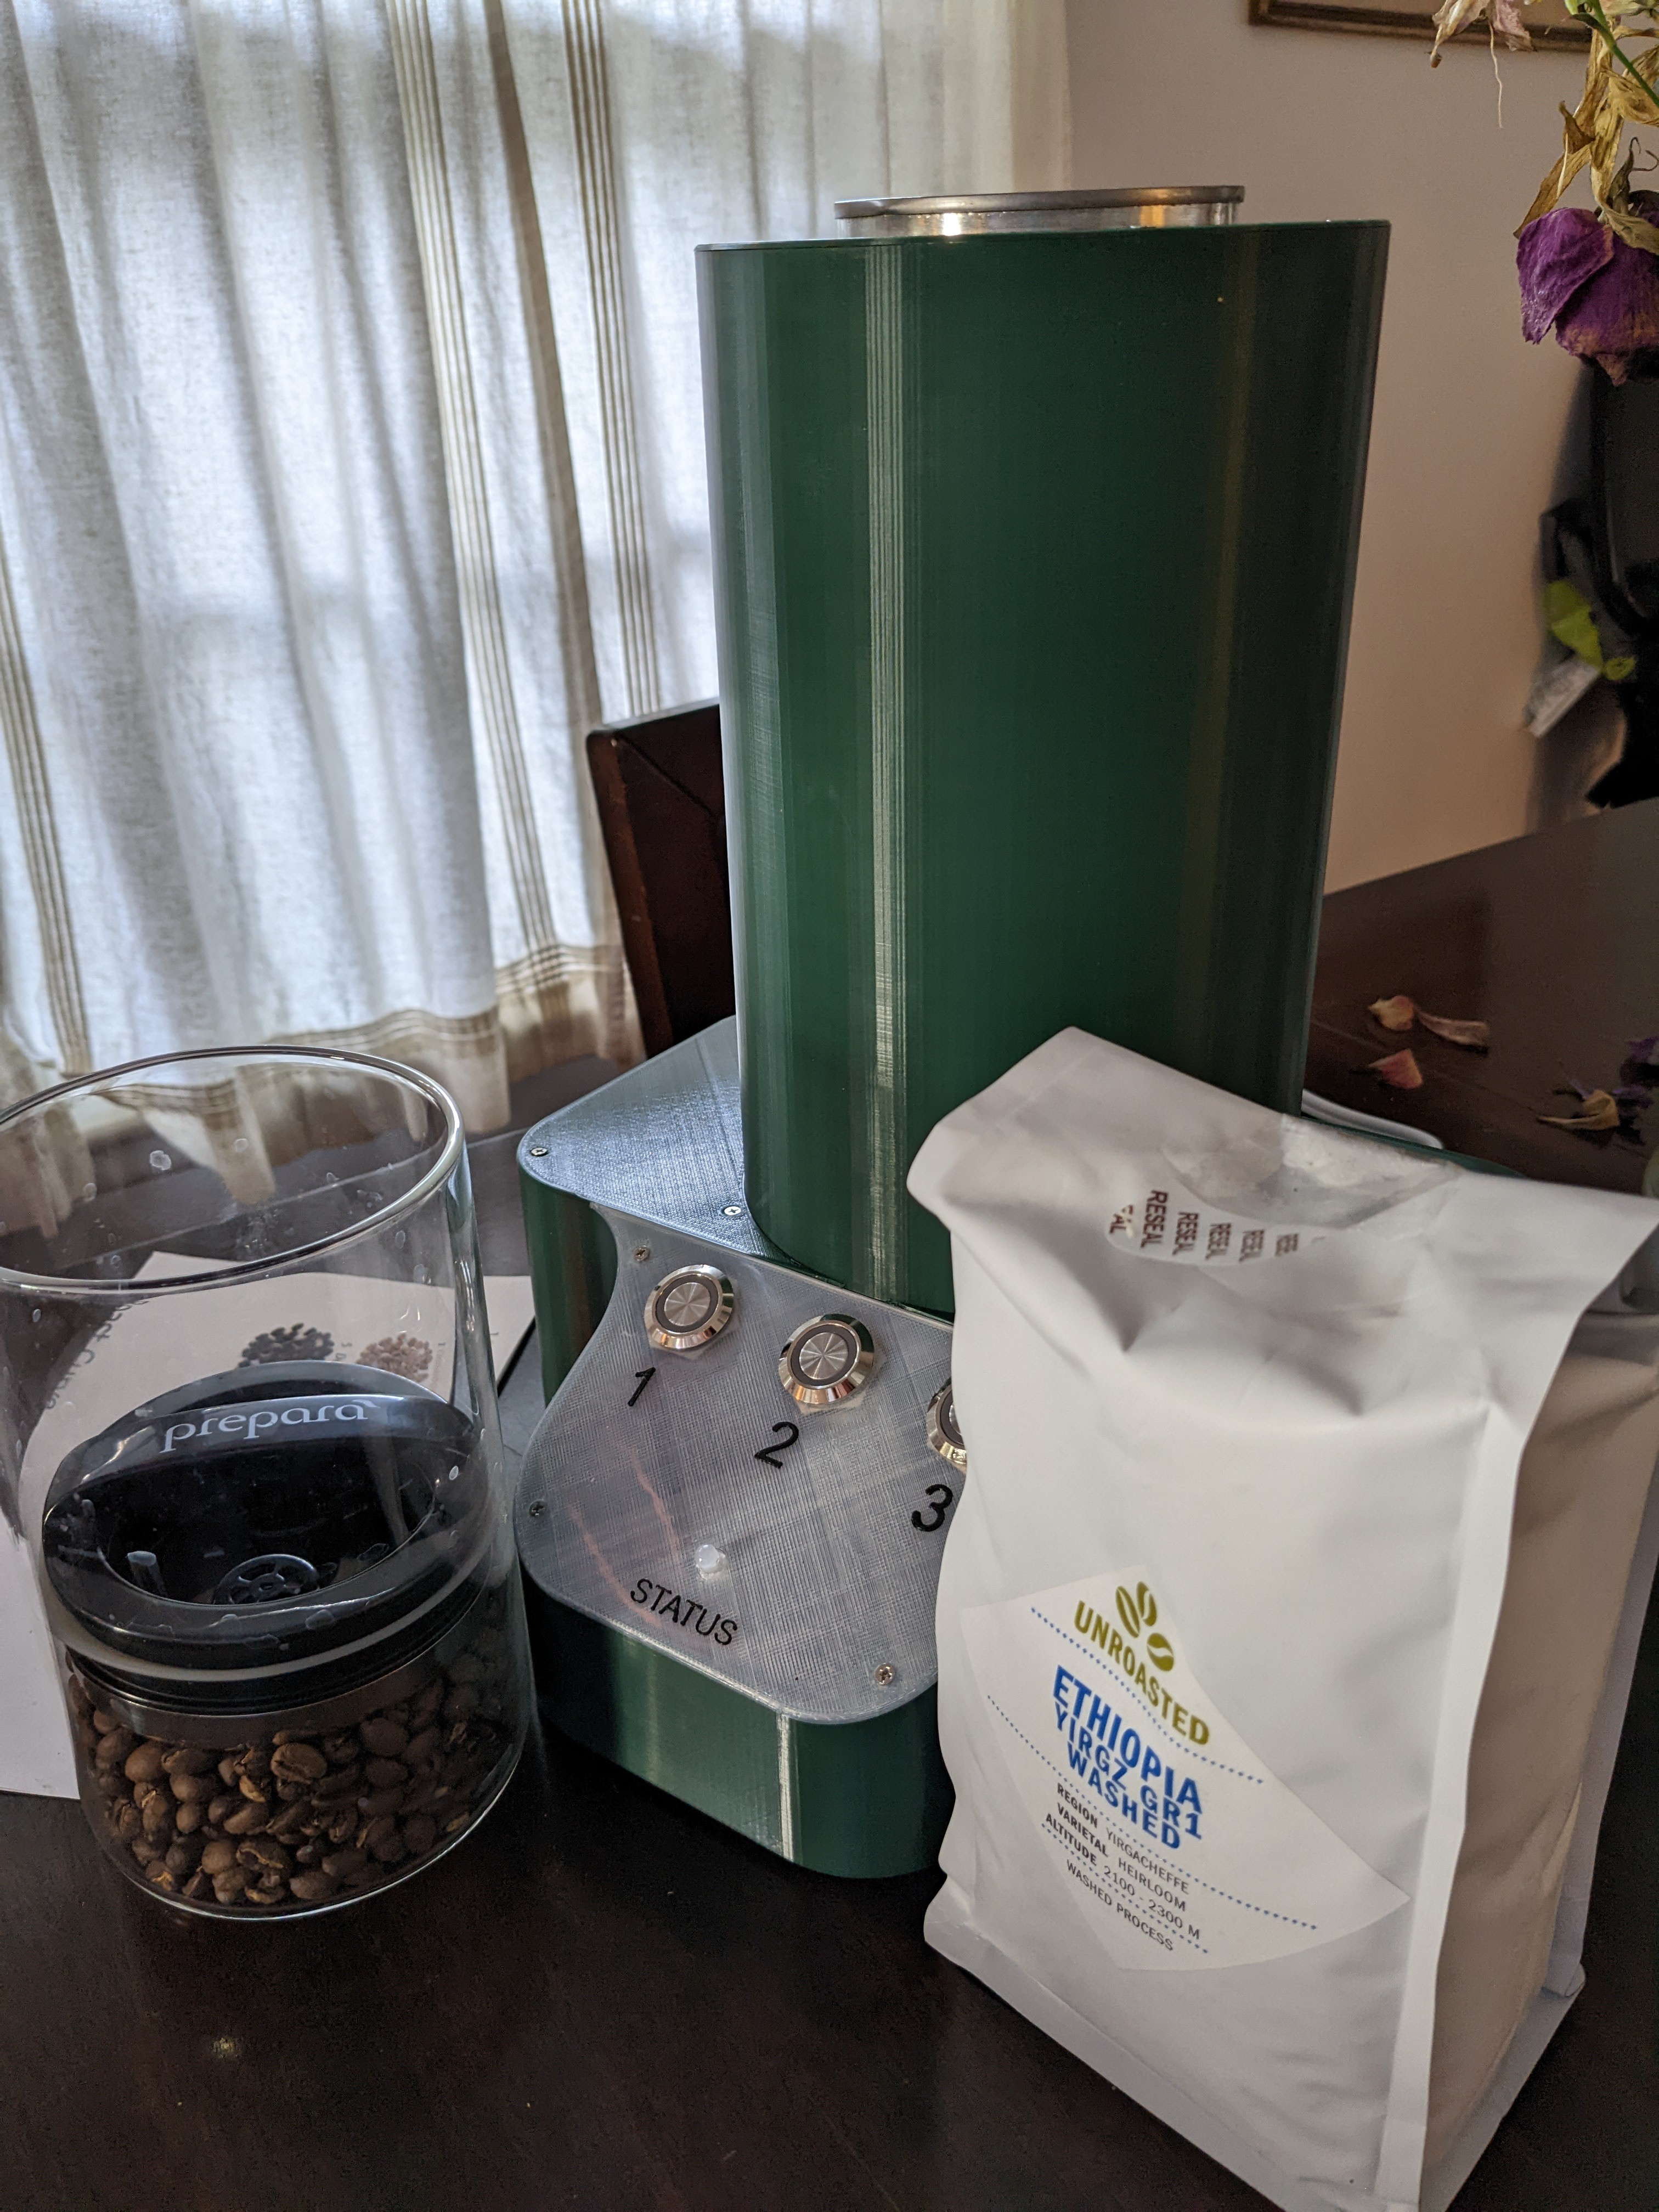

I’ve now entered the ‘commissioning’ phase of the project, which really just means tweaking various parameters to find a roast profile that I like (at least for a given bean) and drinking lots of coffee. There are a few minor tweaks I would make to the enclosure if I ever have to make it again, but no deal-breakers; for instance, the ‘control panel’ piece is a little thin, so it flexes particularly when pushing the middle button. No one but me will ever notice this, but if I ever decide to make other changes to this piece (for instance not printing it with translucent material which didn’t turn out looking quite as I envisioned), I would tweak the design accordingly.
Hopefully this project will help inspire someone to get into the hobby of roasting their own coffee, just like Elliot’s original post did for me. And don’t hesitate to reach out with any questions or clarifications; I’m also happy to mail a PCB if you decide to make your own as I’ve got several extras.