Close
0%
0%

Network Detached Storage Device

Ever wanted a self-hosting NAS robust enough you can throw it in your rucksack and forget about it?

Similar projects worth following
< fiction >
When I arrived in the bar Phil was already there. He had his datacom in one hand and a black coffee in the other.
"That EskarLife job was too close," he said as I approached, "the ban on private storage has made data exfiltration way to risky"
I sat down across the table from him.
"We'll find a way around that. The nerds are working on a better encryption"
He grimaced. We both knew that they'd said they were close six months ago, but every time someone trialled a black market datawall it wasn't long before they disappeared. Rumour had it that the Force had a new AI anti-encryption package they'd imported from somewhere.

I pulled out my datacom and the drinks menu popped up automatically. And then it hit me..... (continues in https://hackaday.io/project/186933/log/210058-story-log-1 )

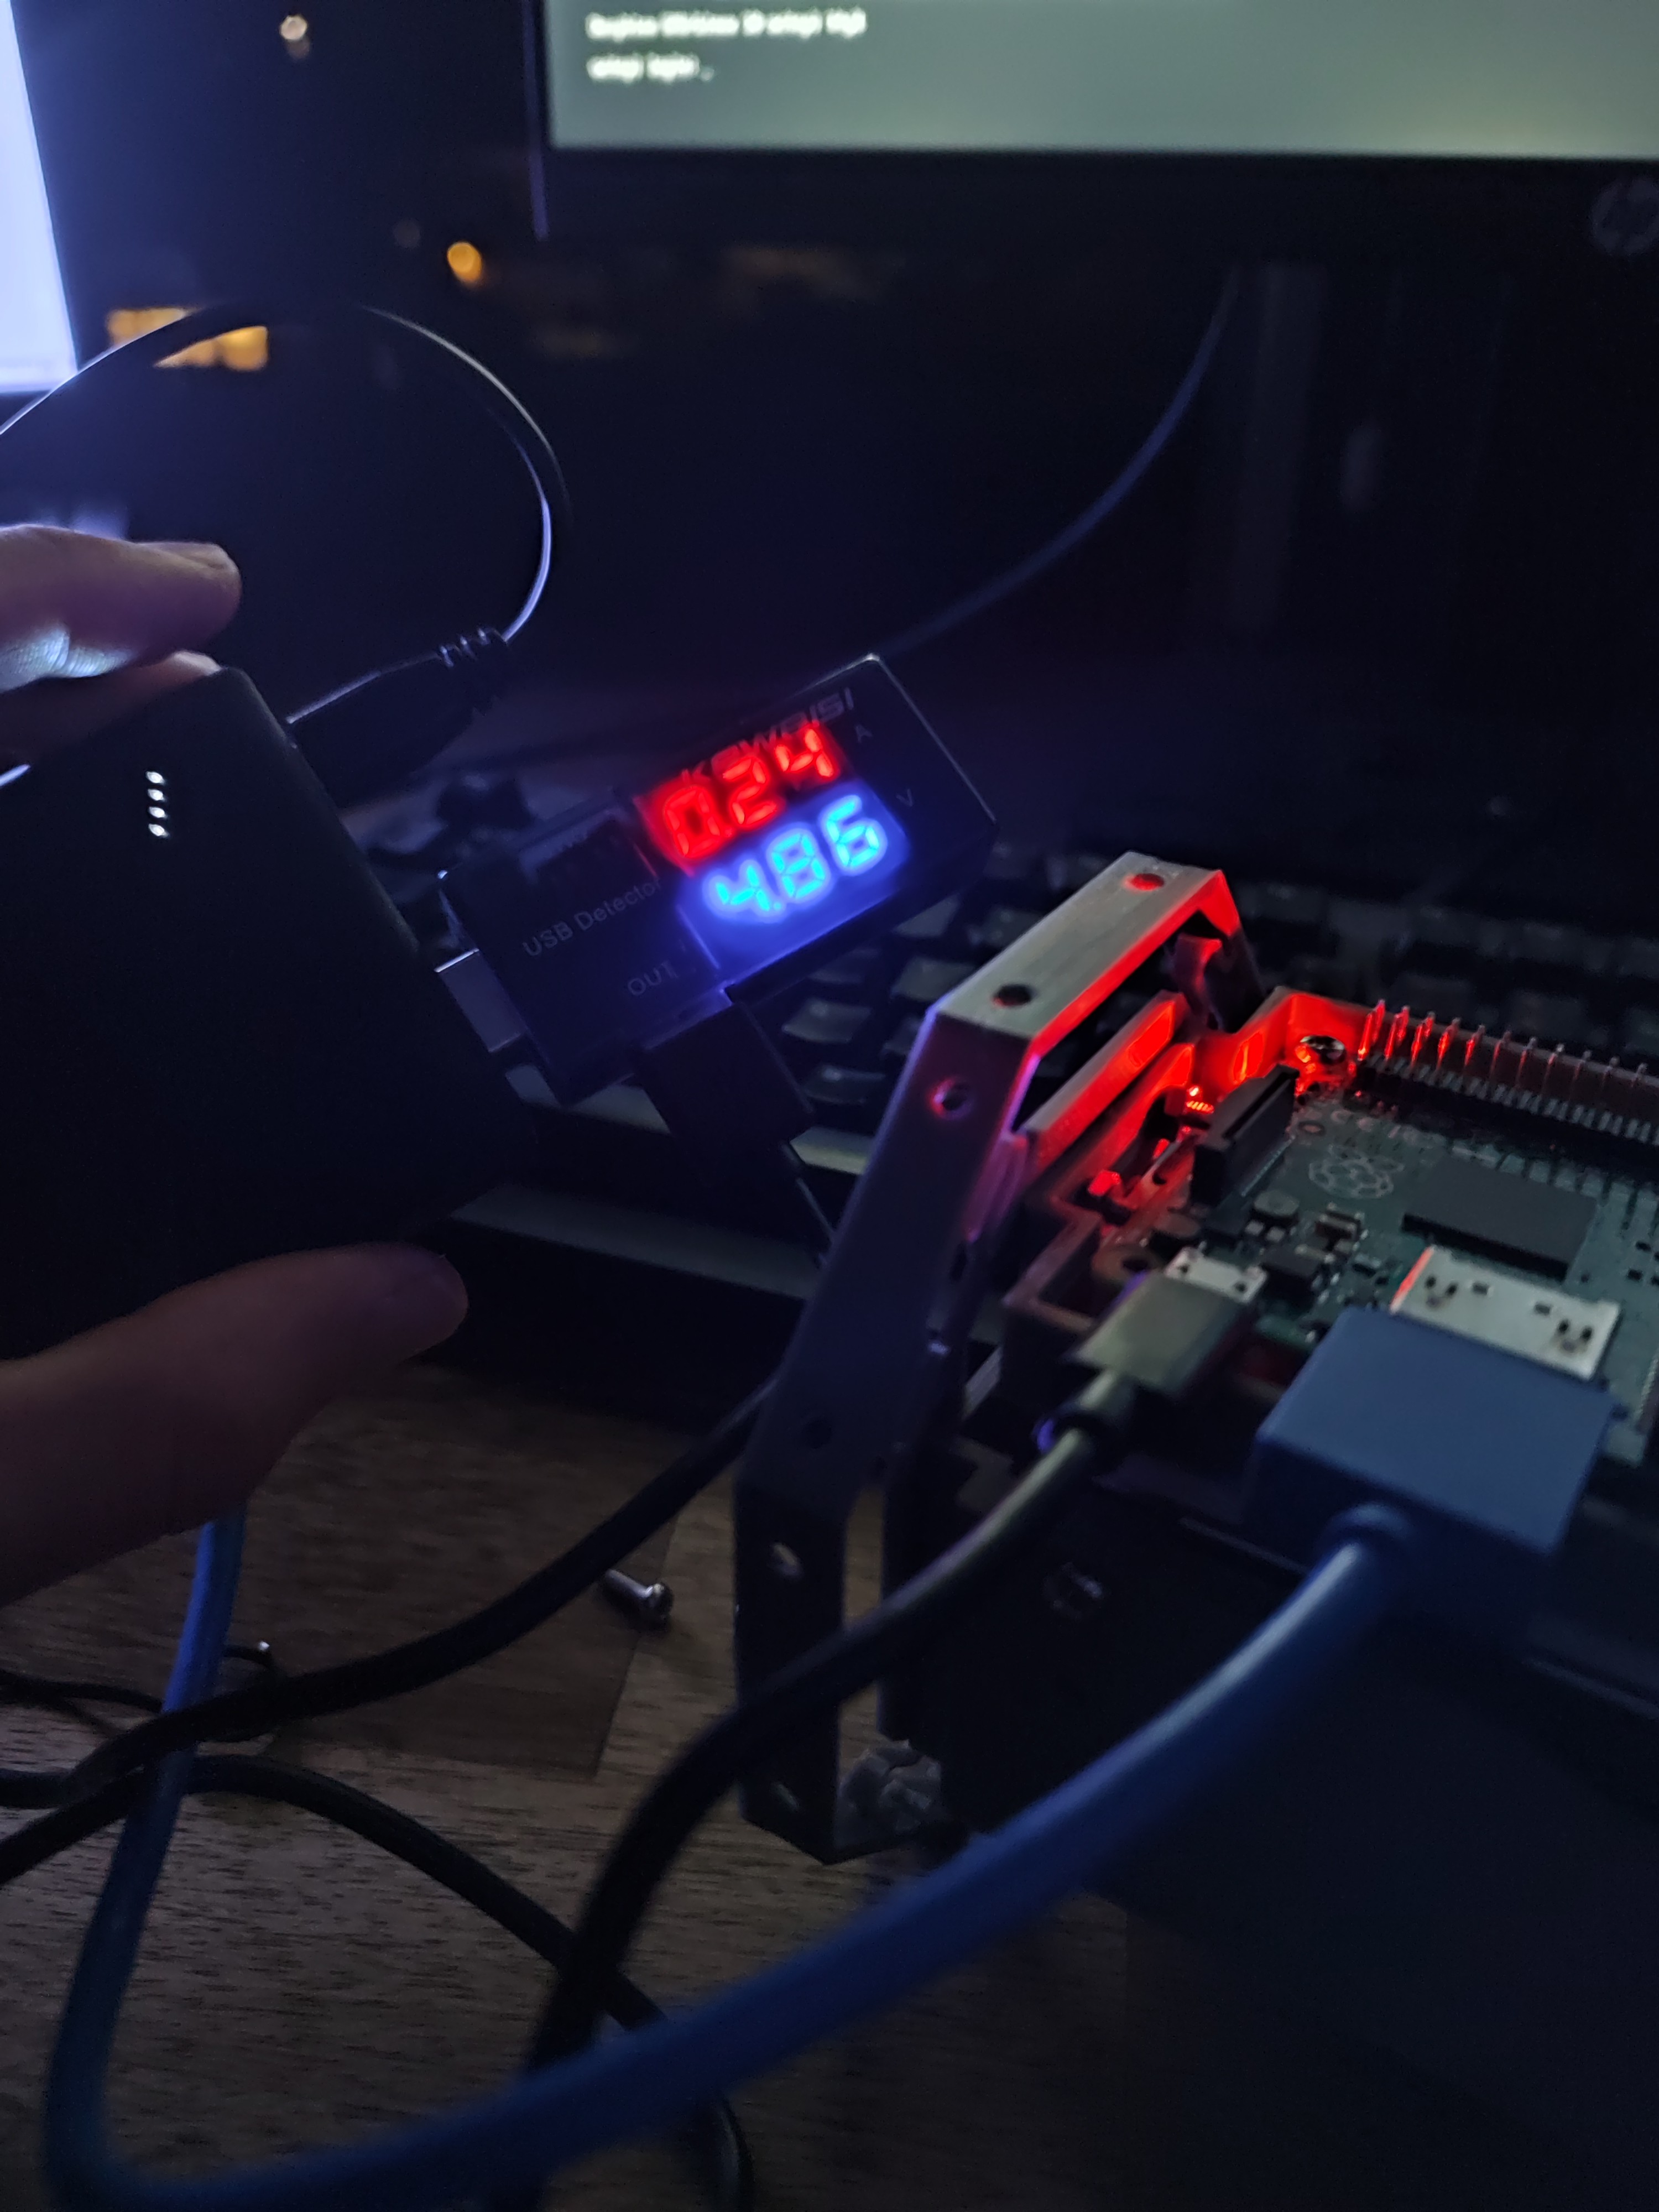
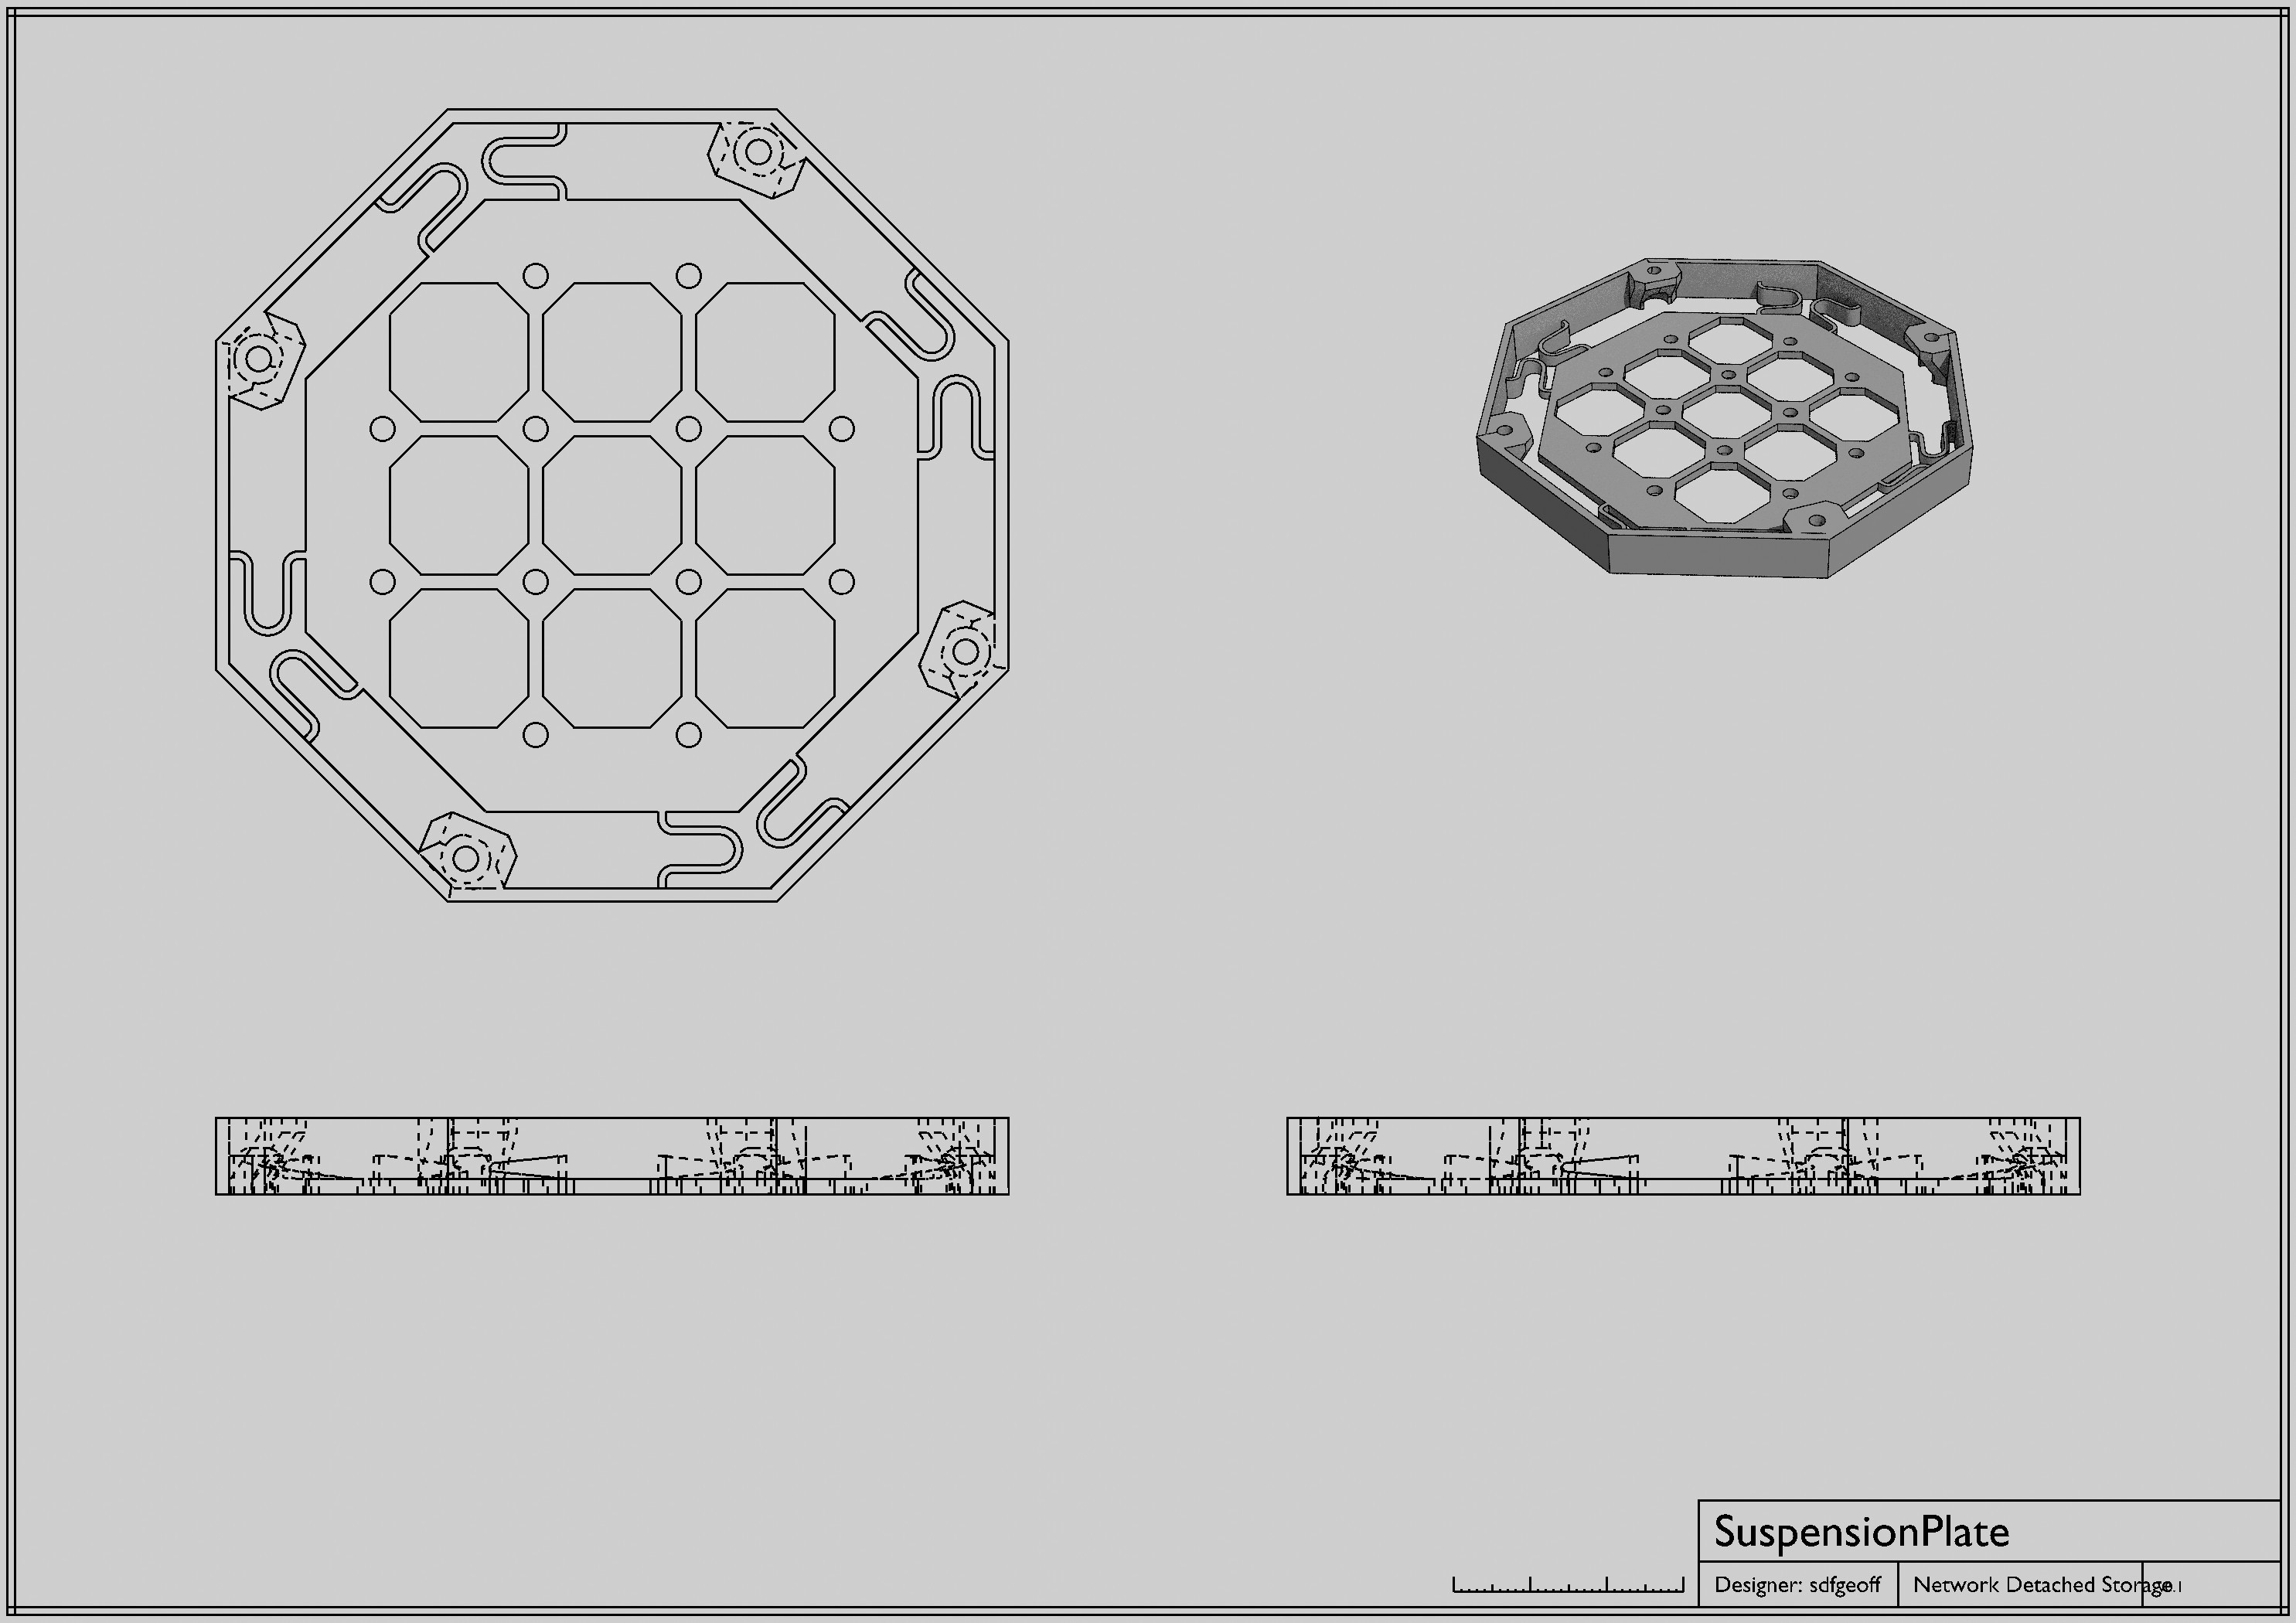
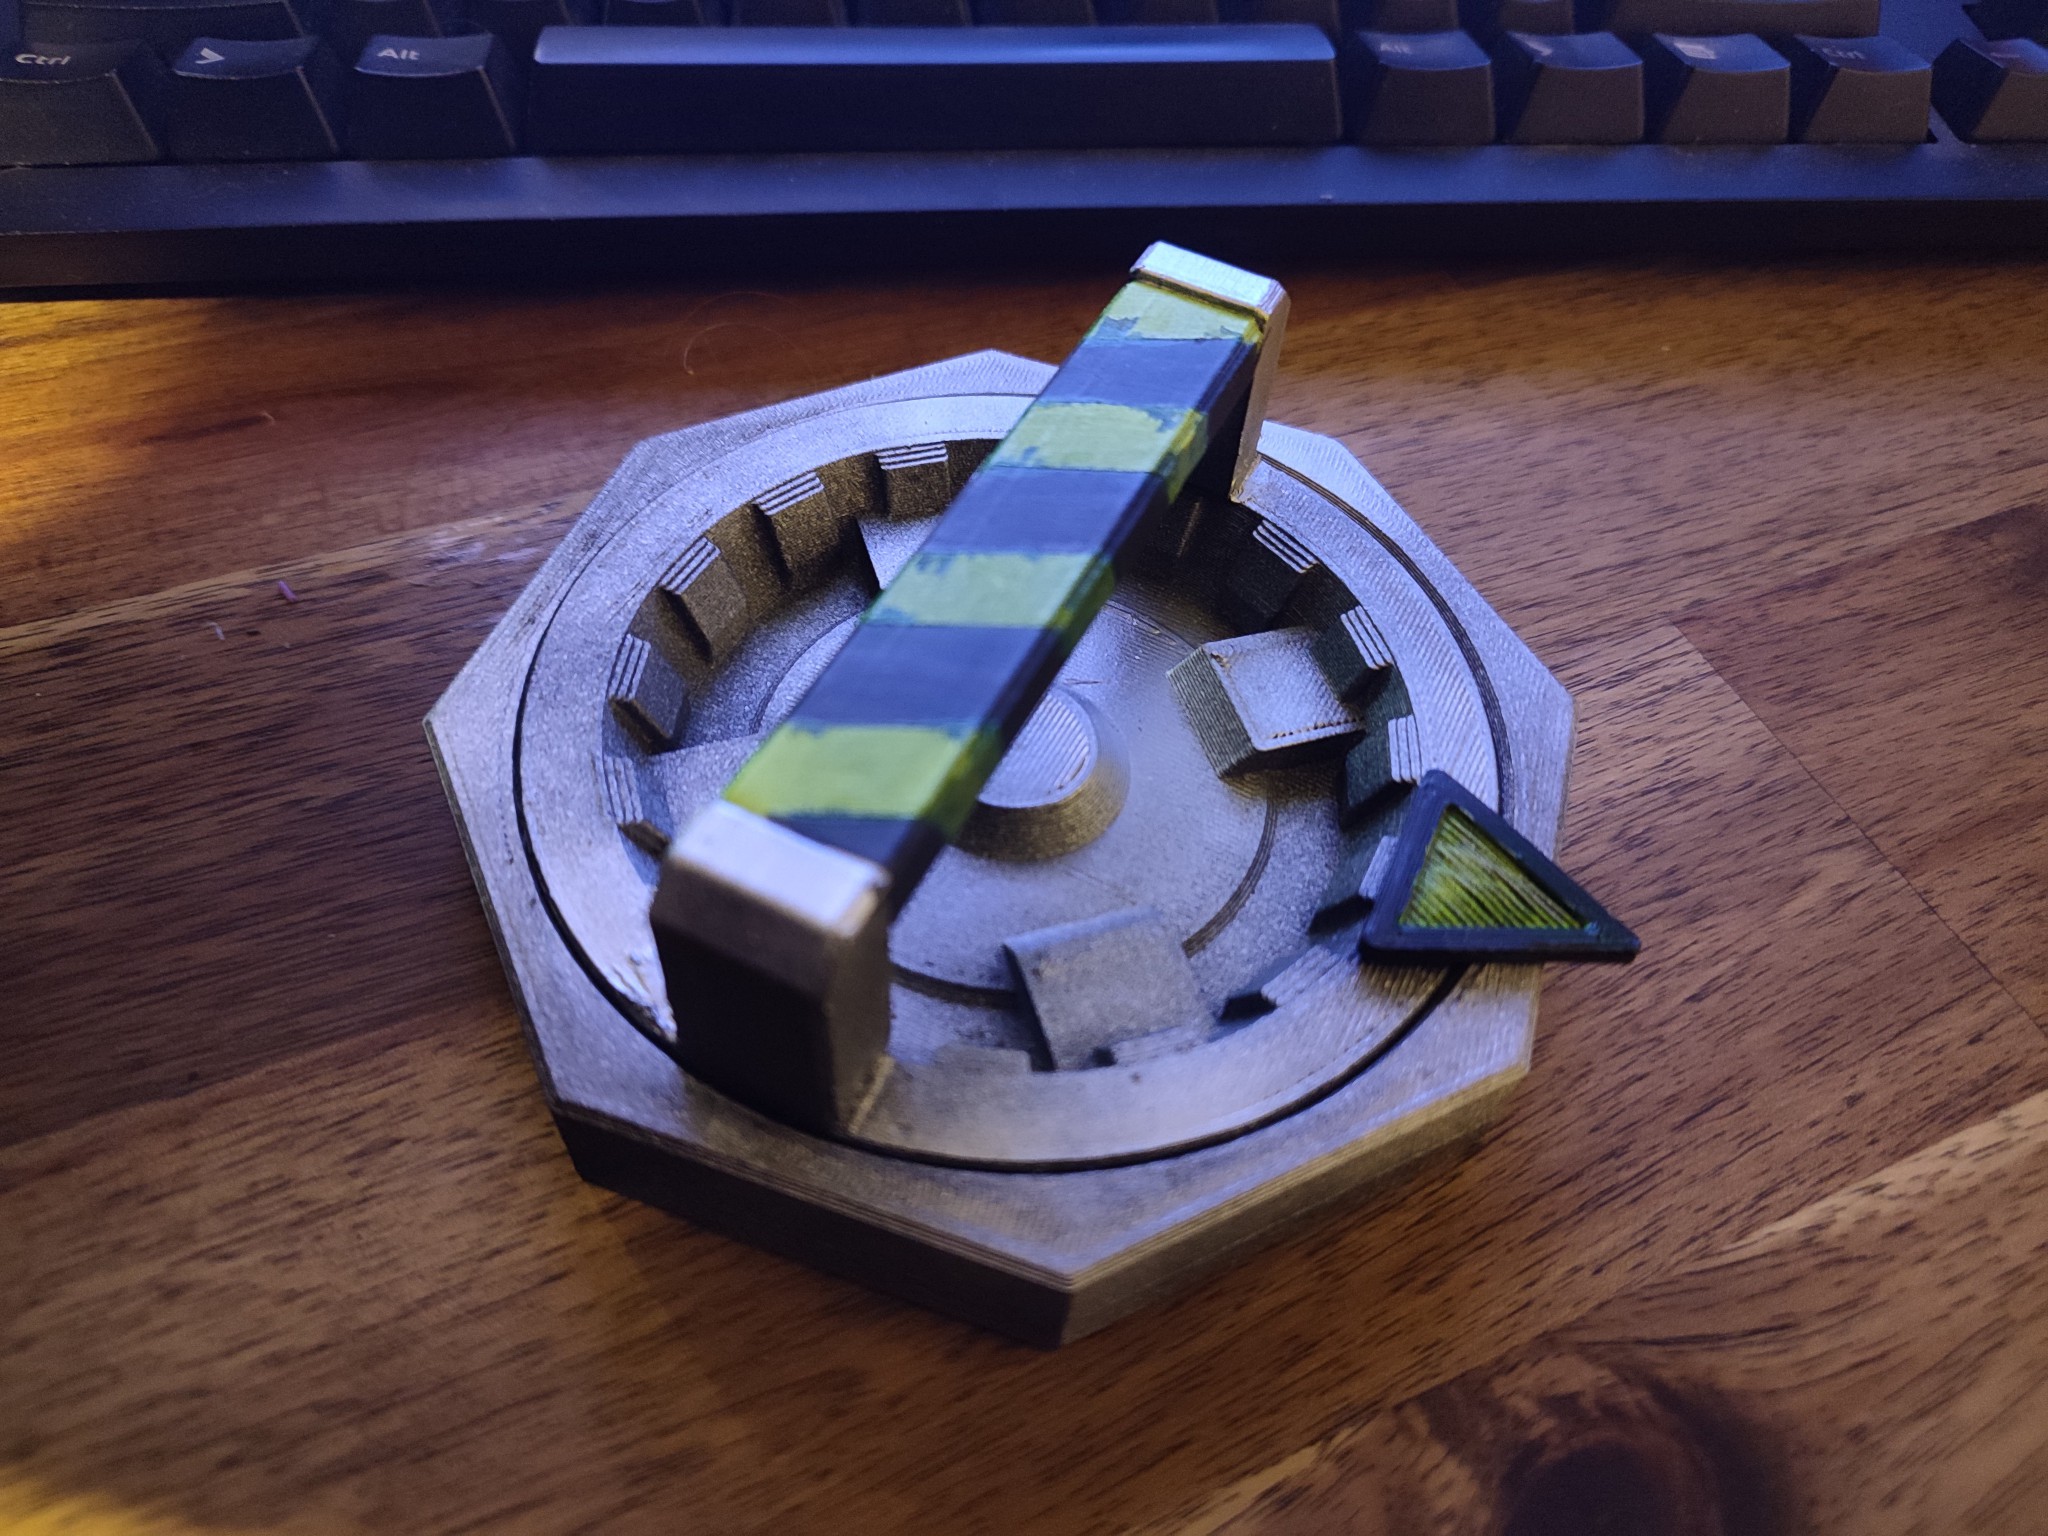
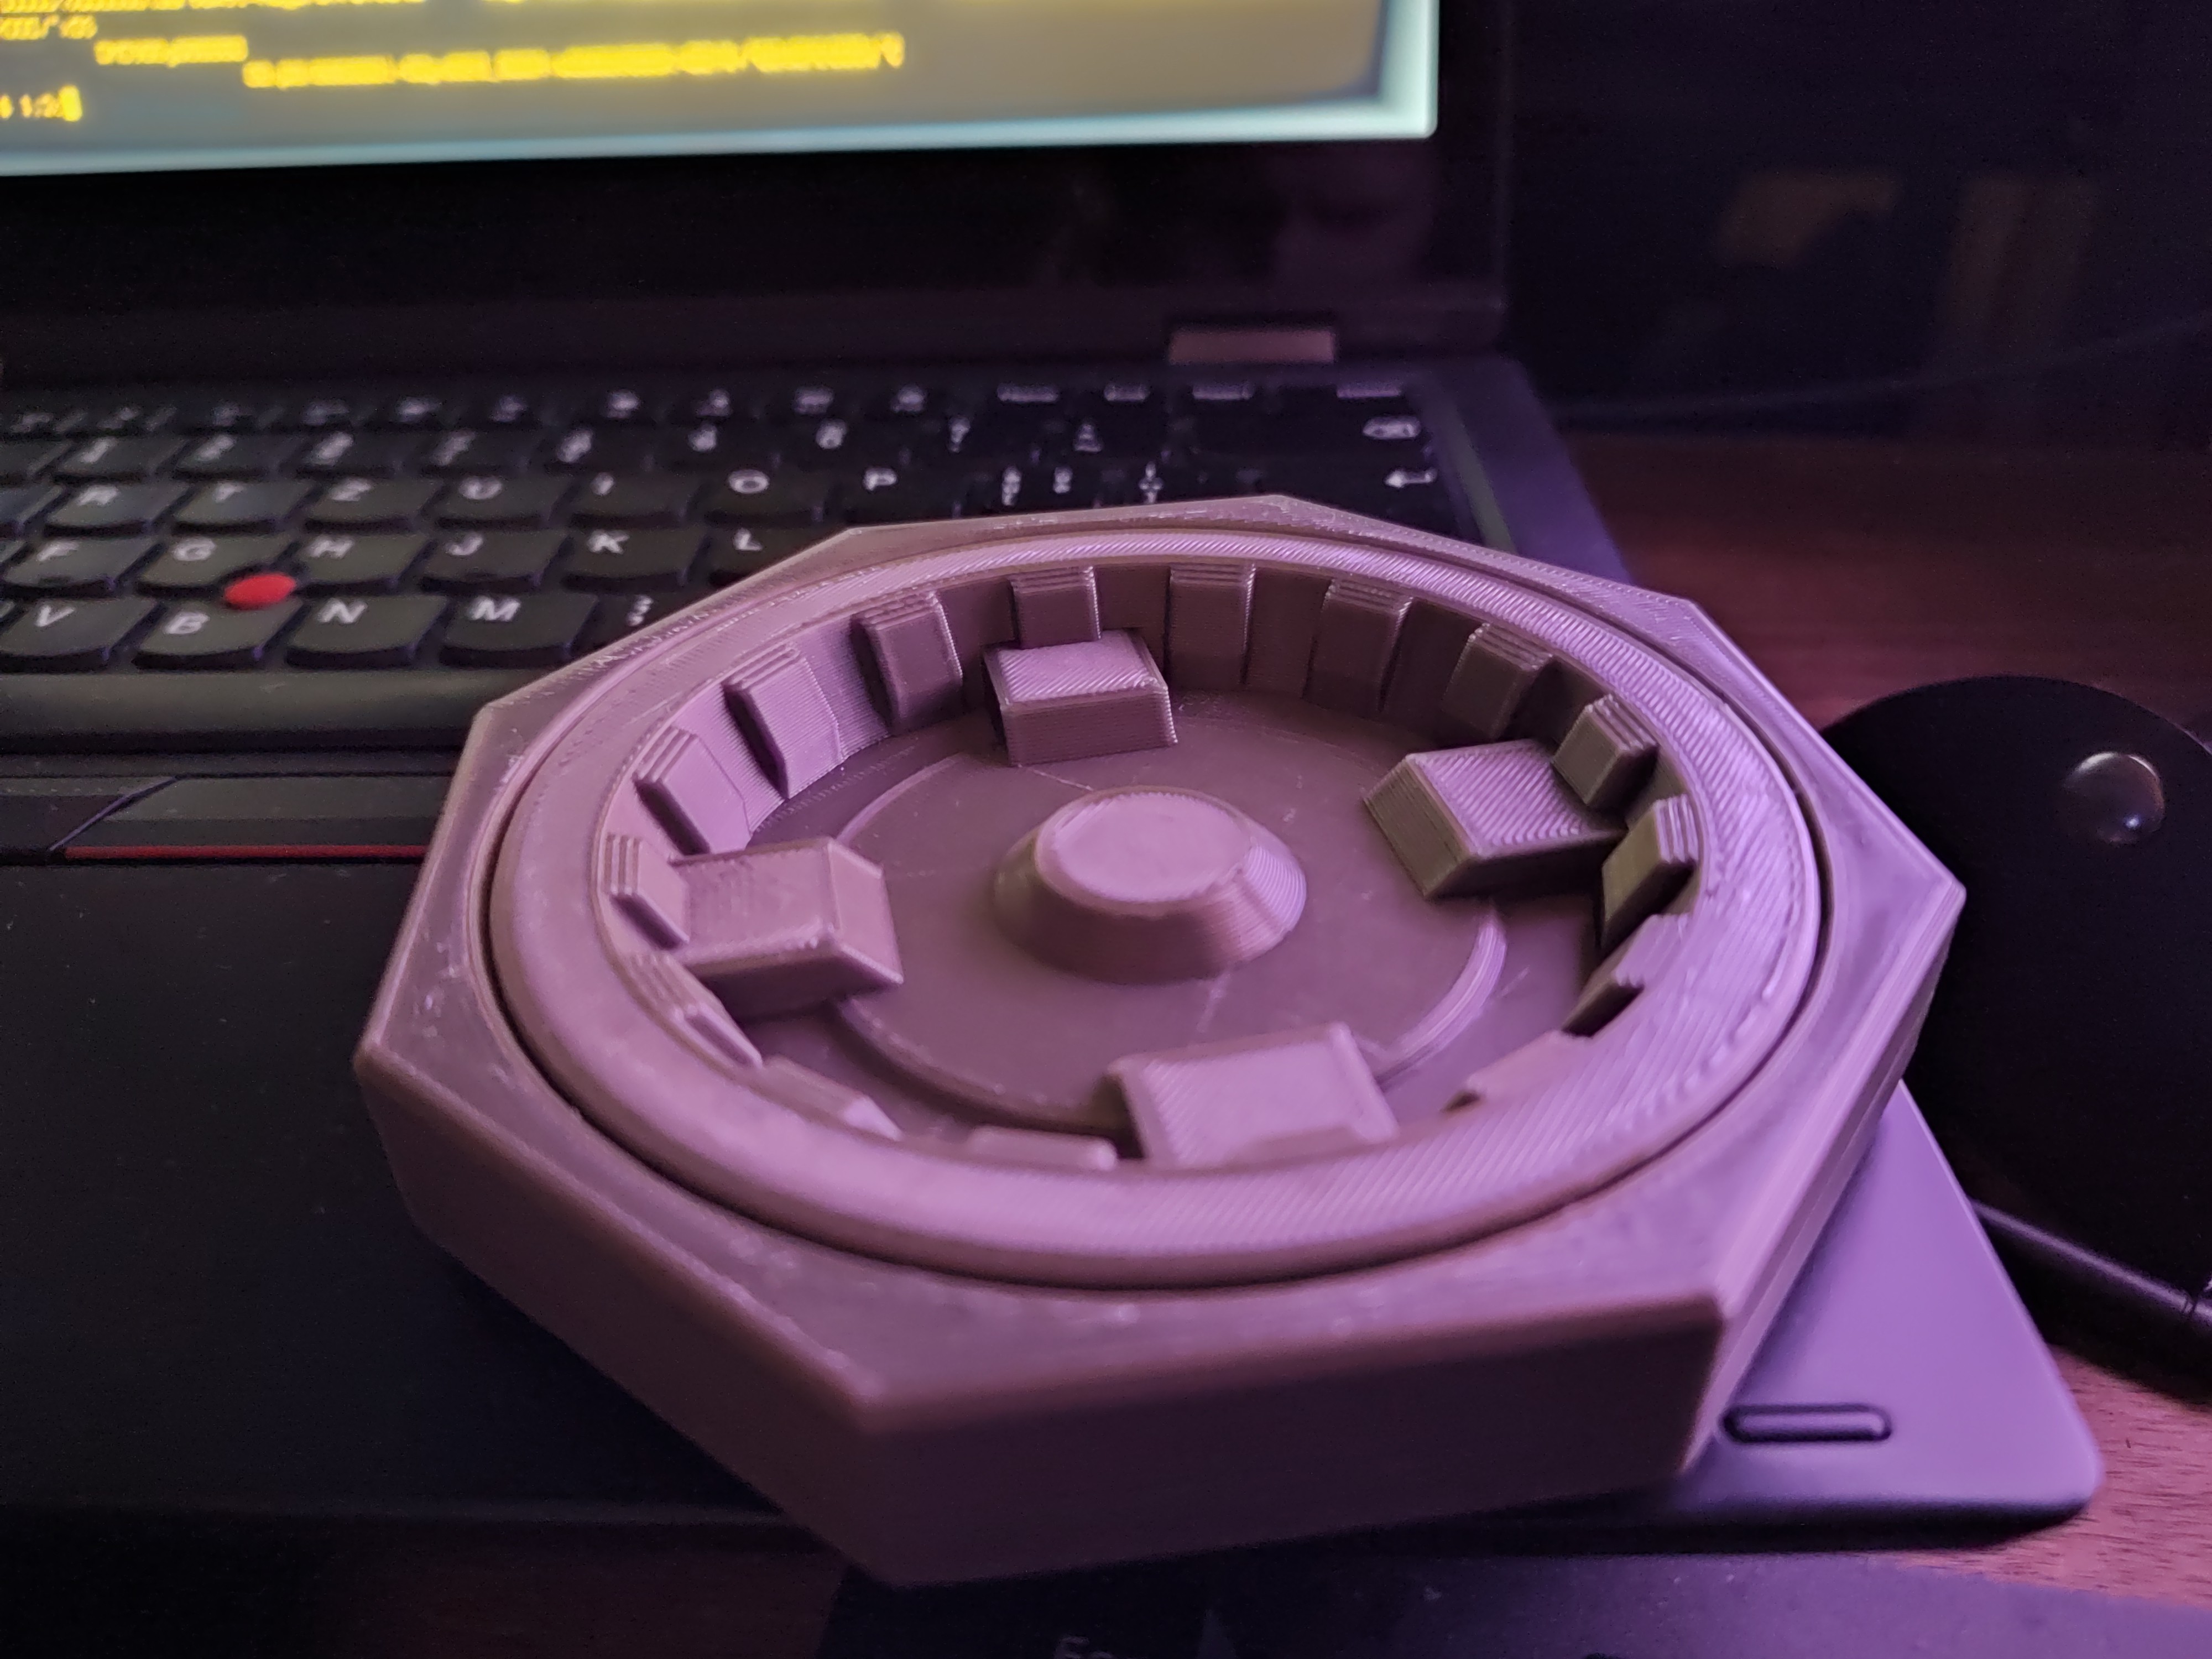
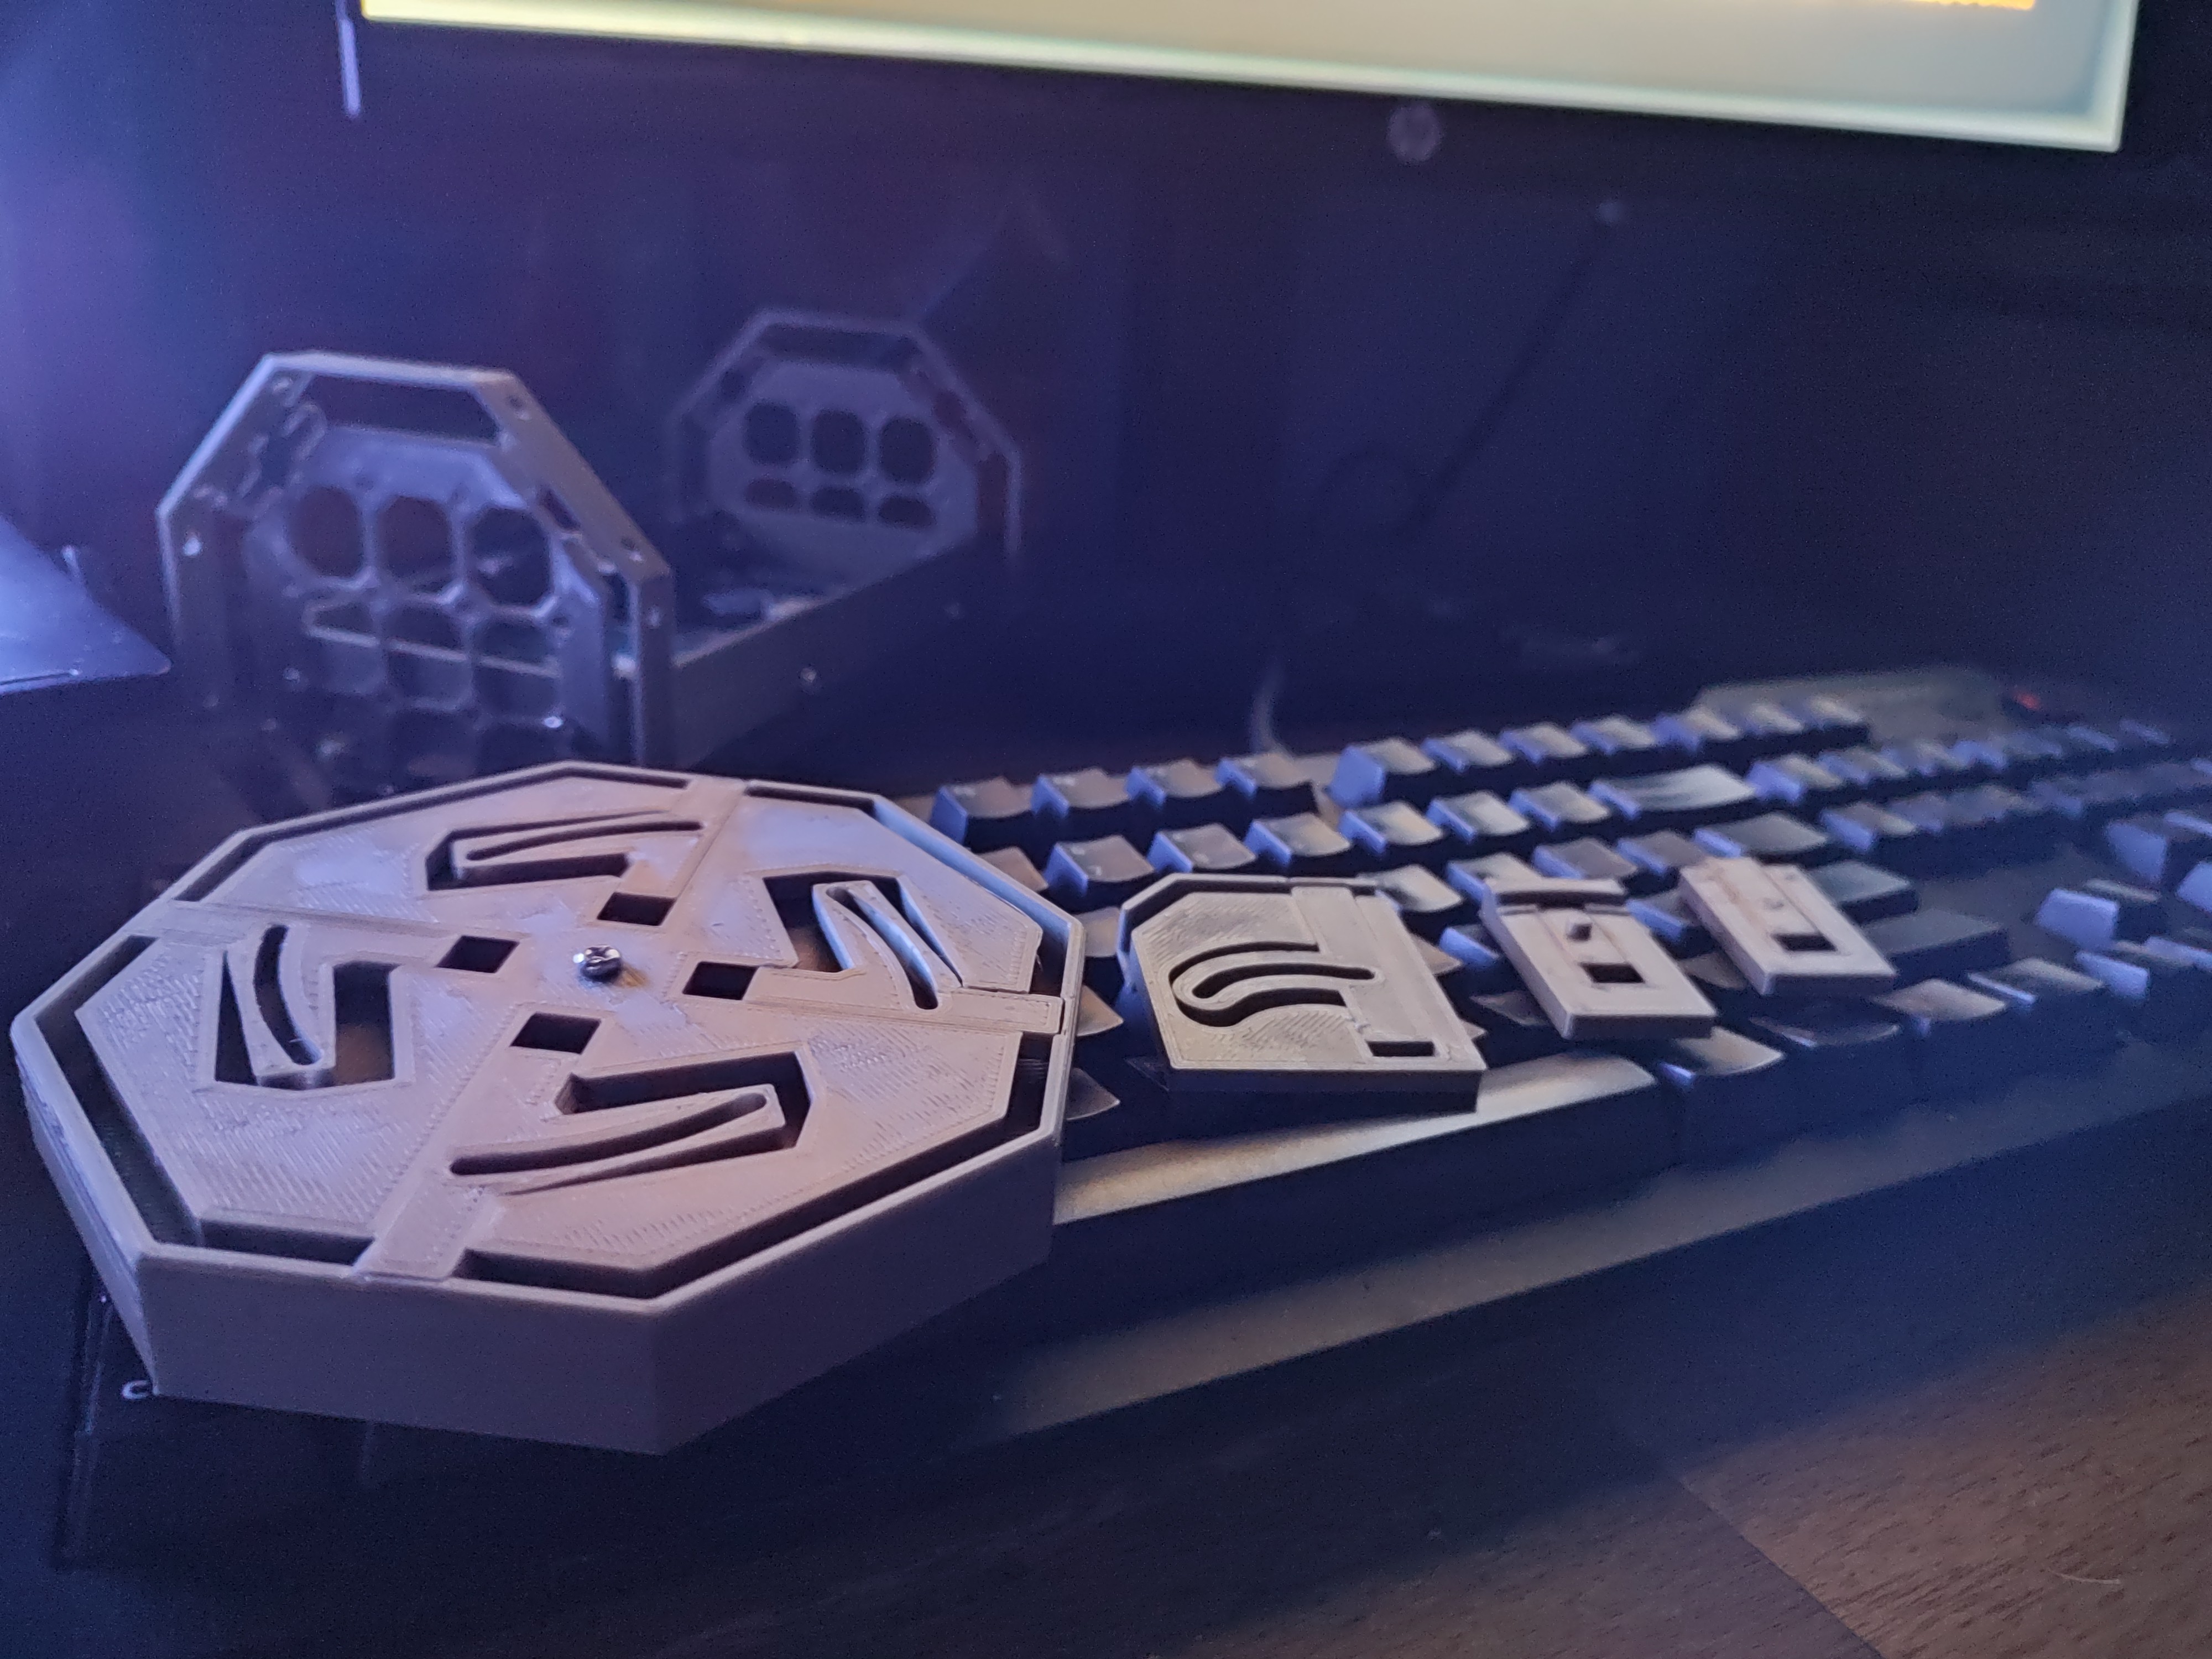
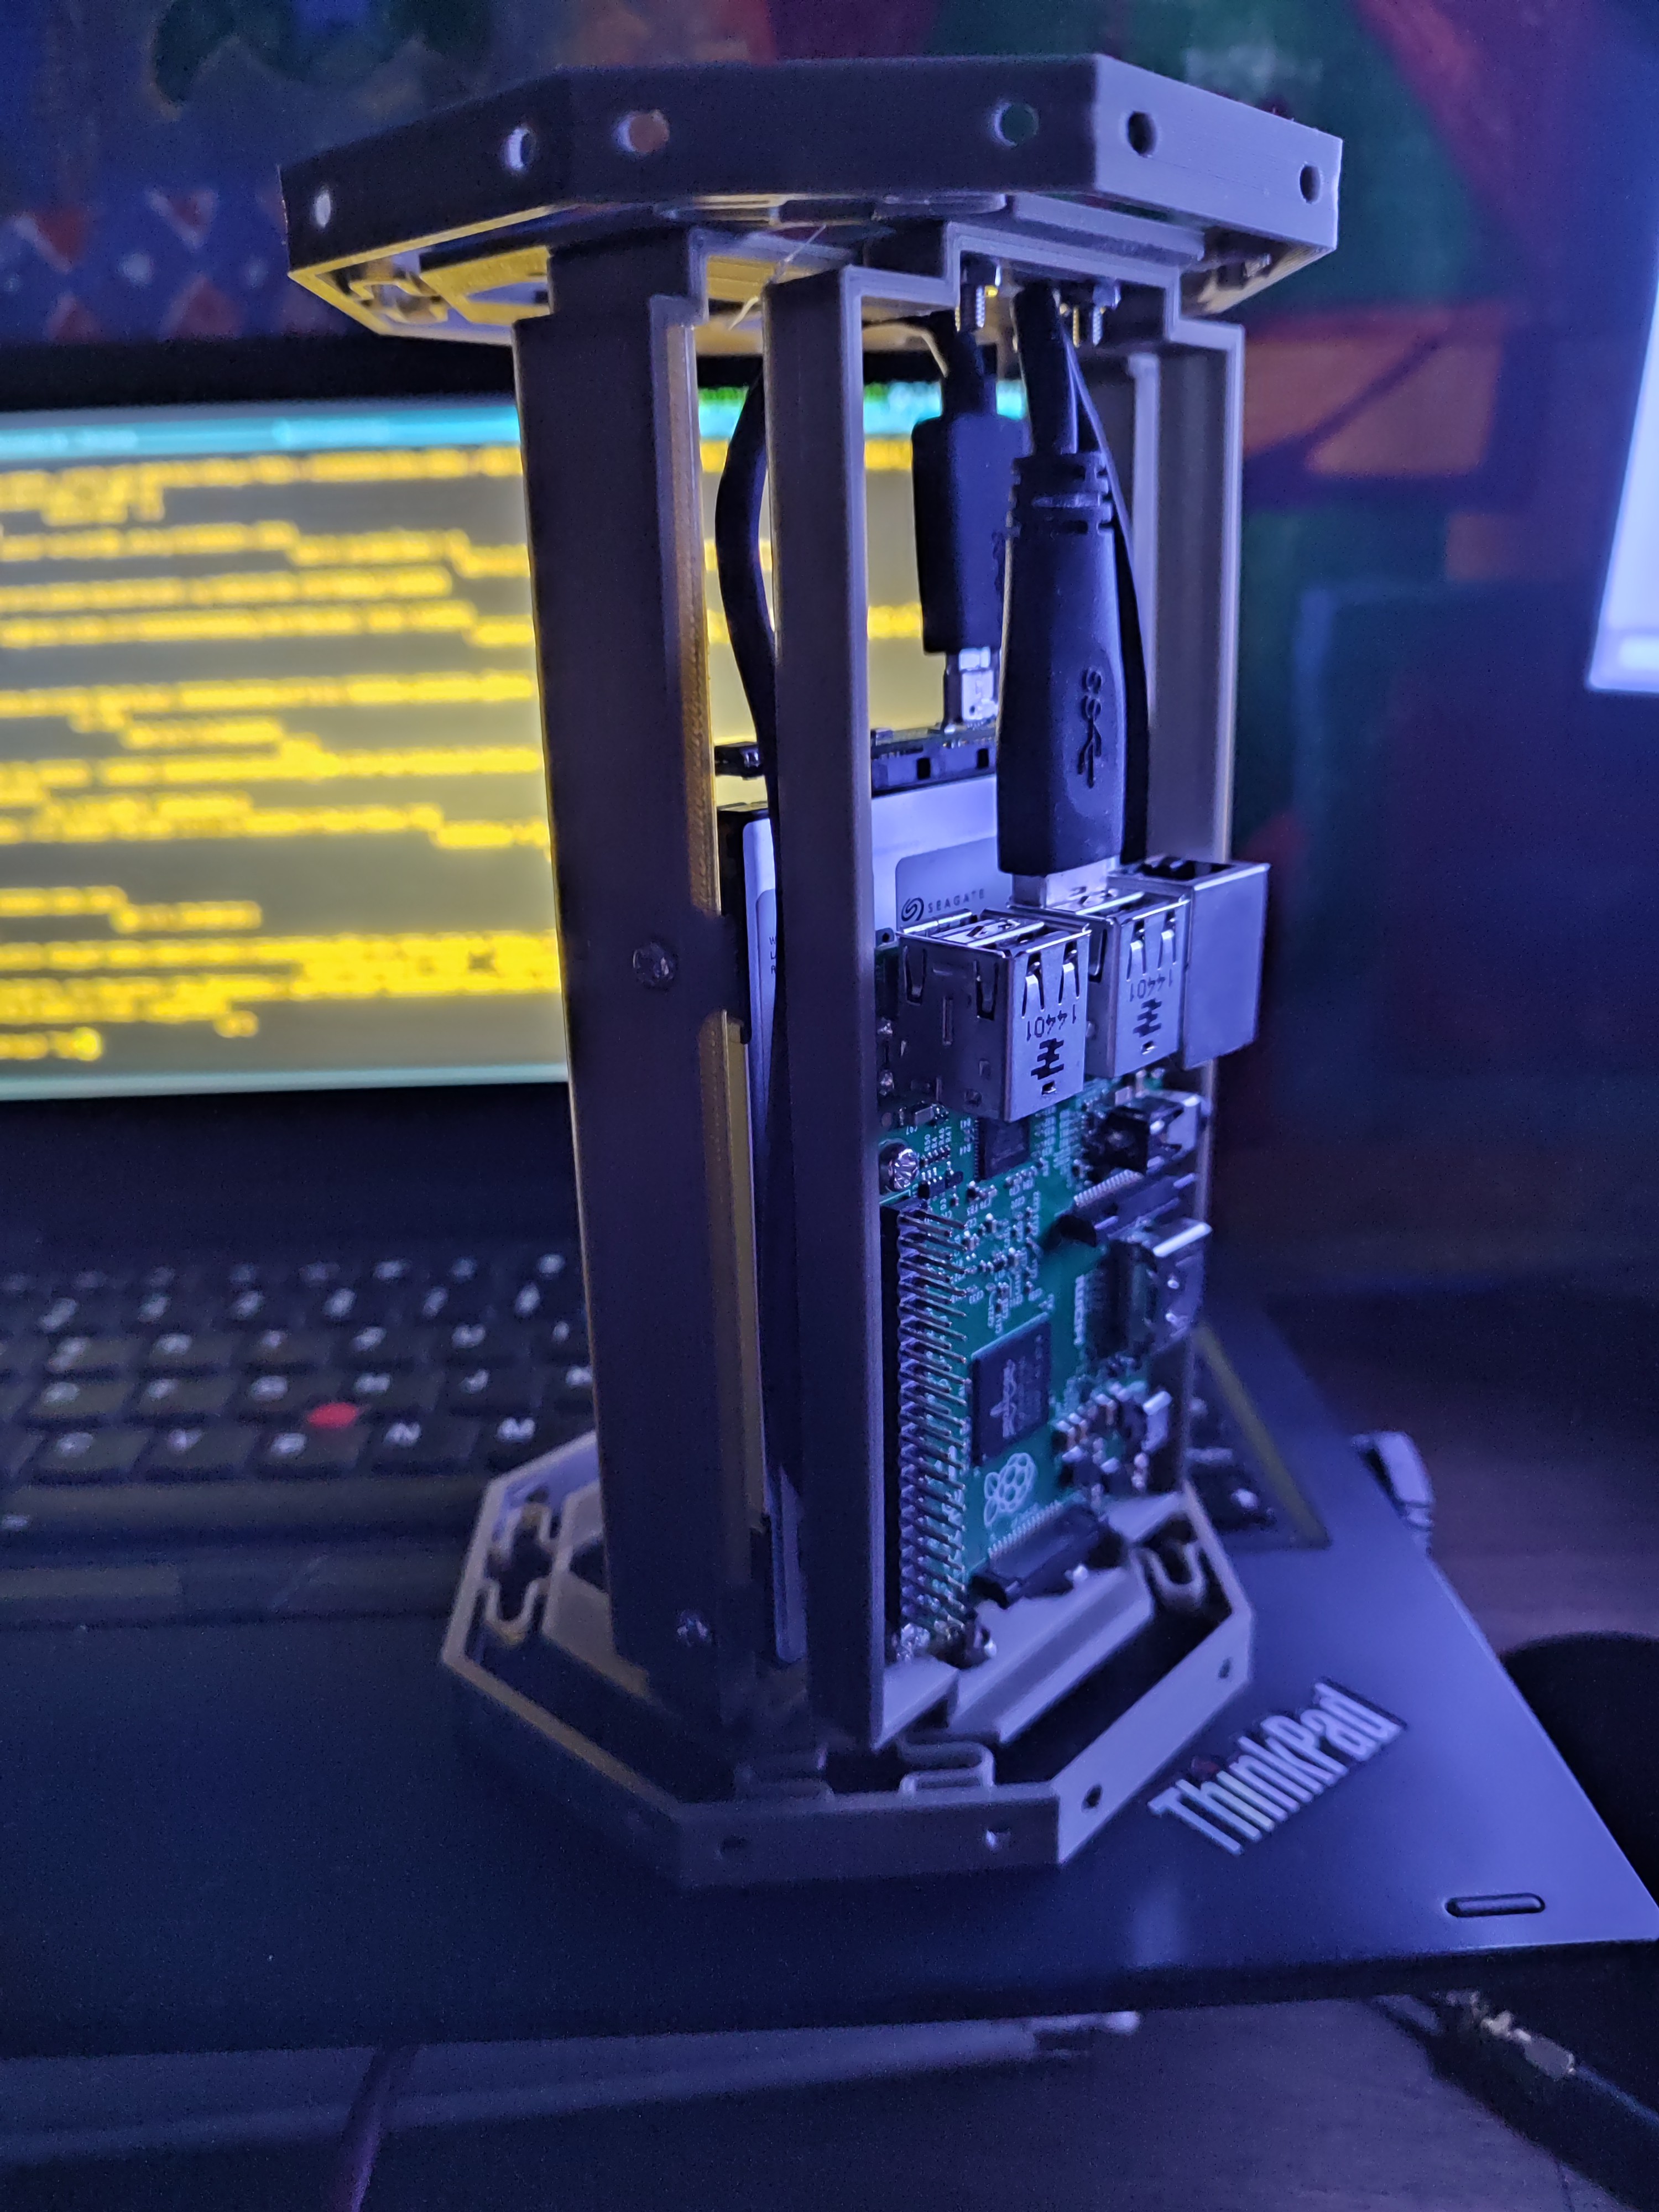
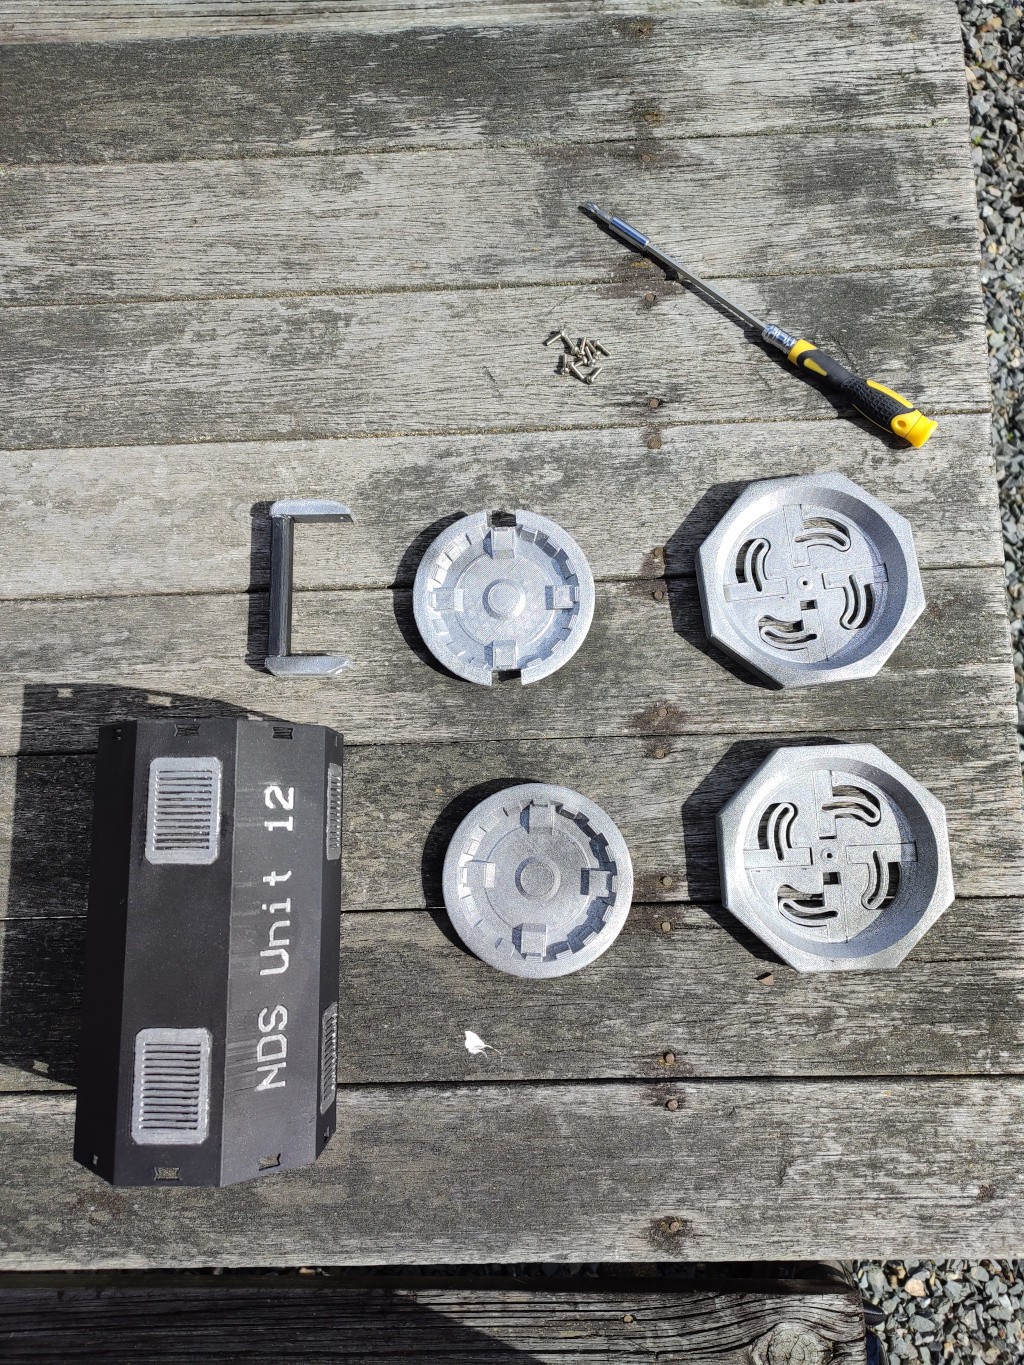
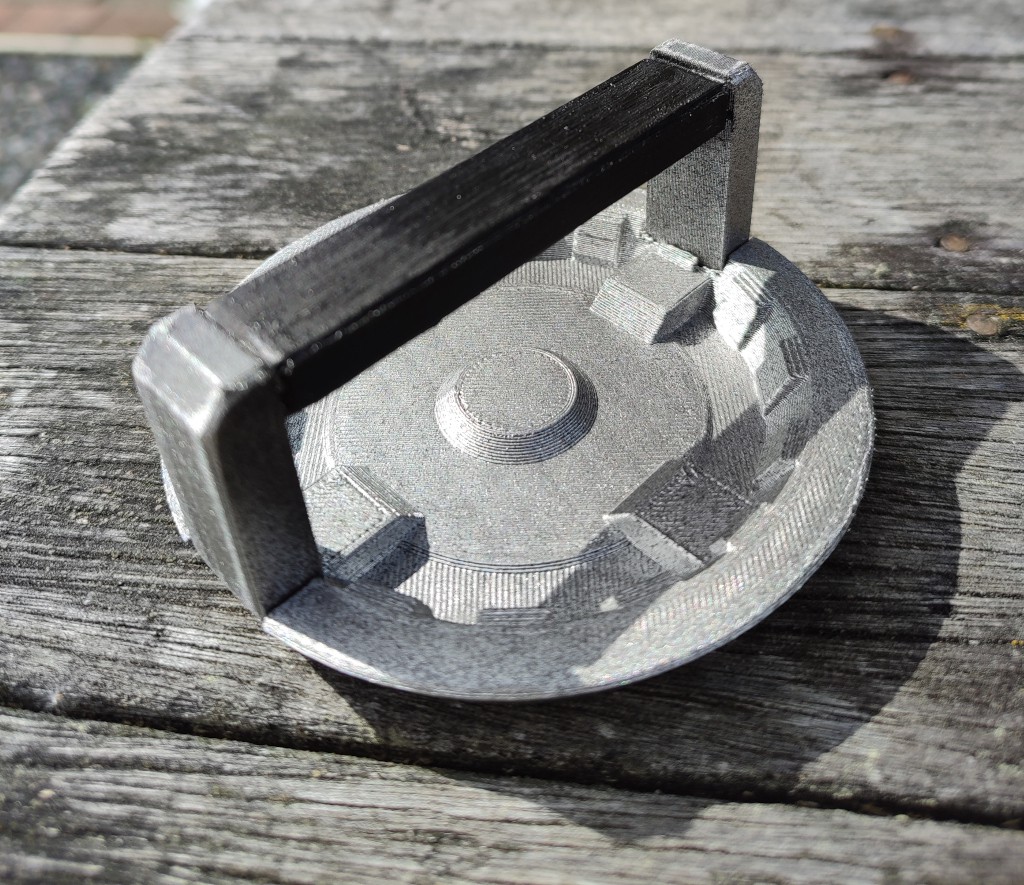
A NAS that hosts it's own network and can run on it's own power. It functions as a standalone server capable of hosting websites and bulk data storage without requiring internet connectivity or a reliable power supply.

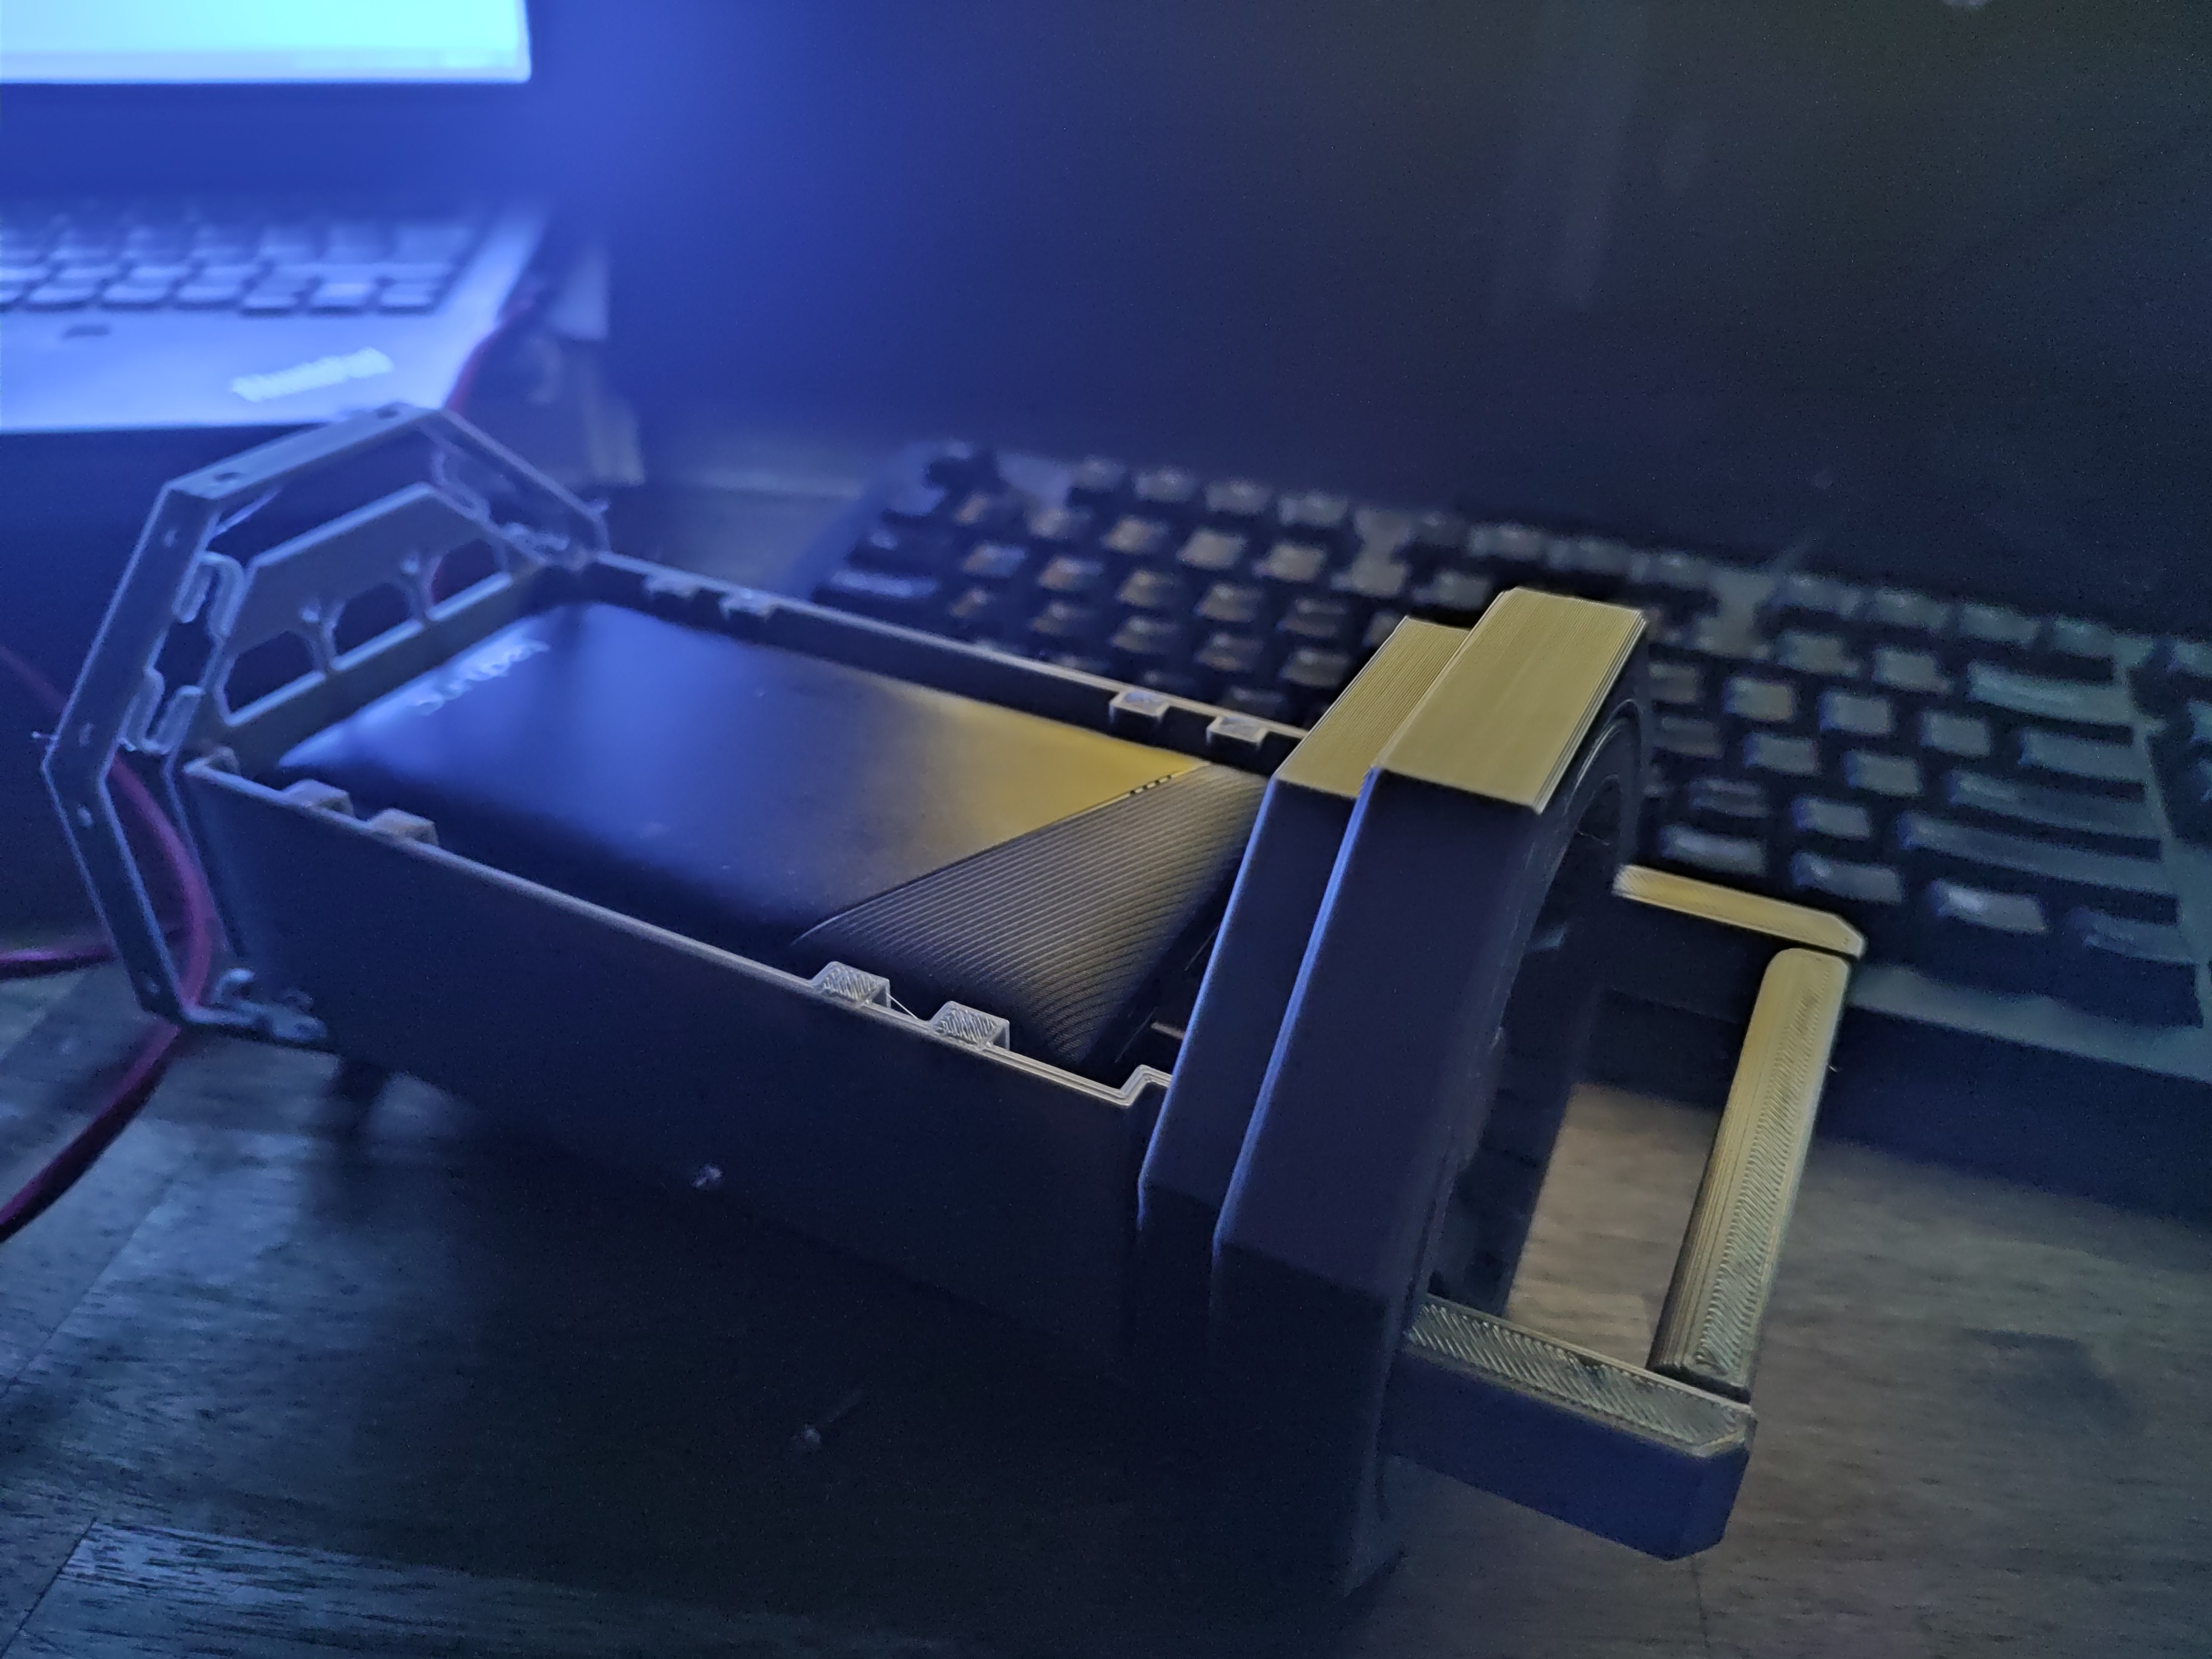
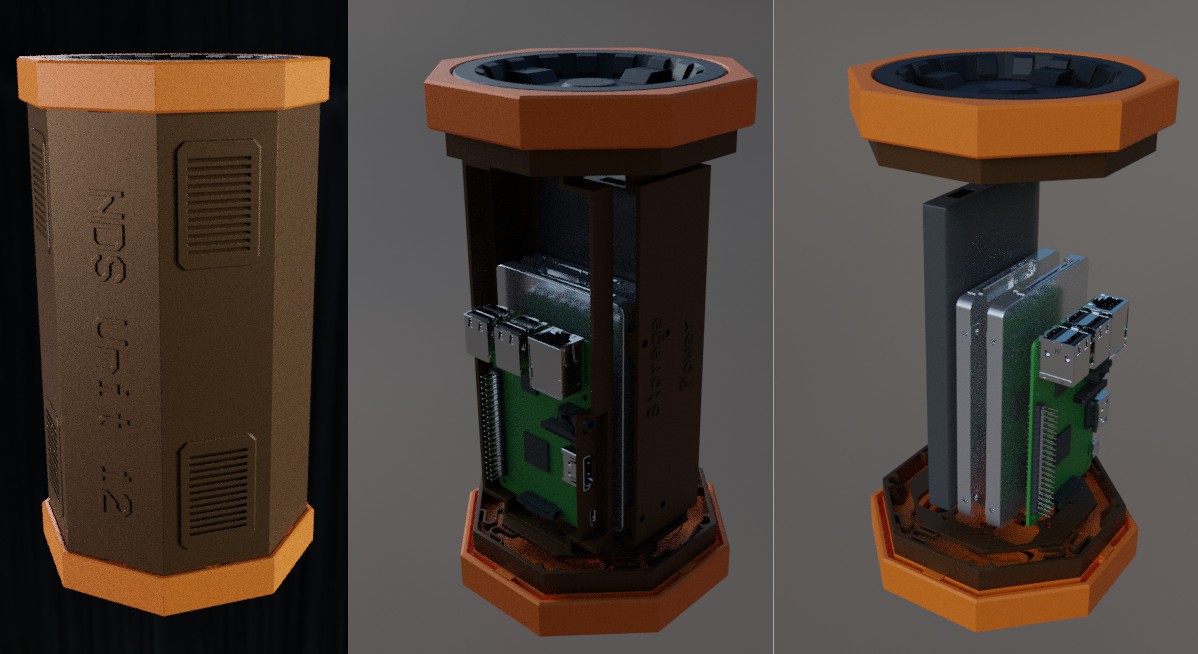
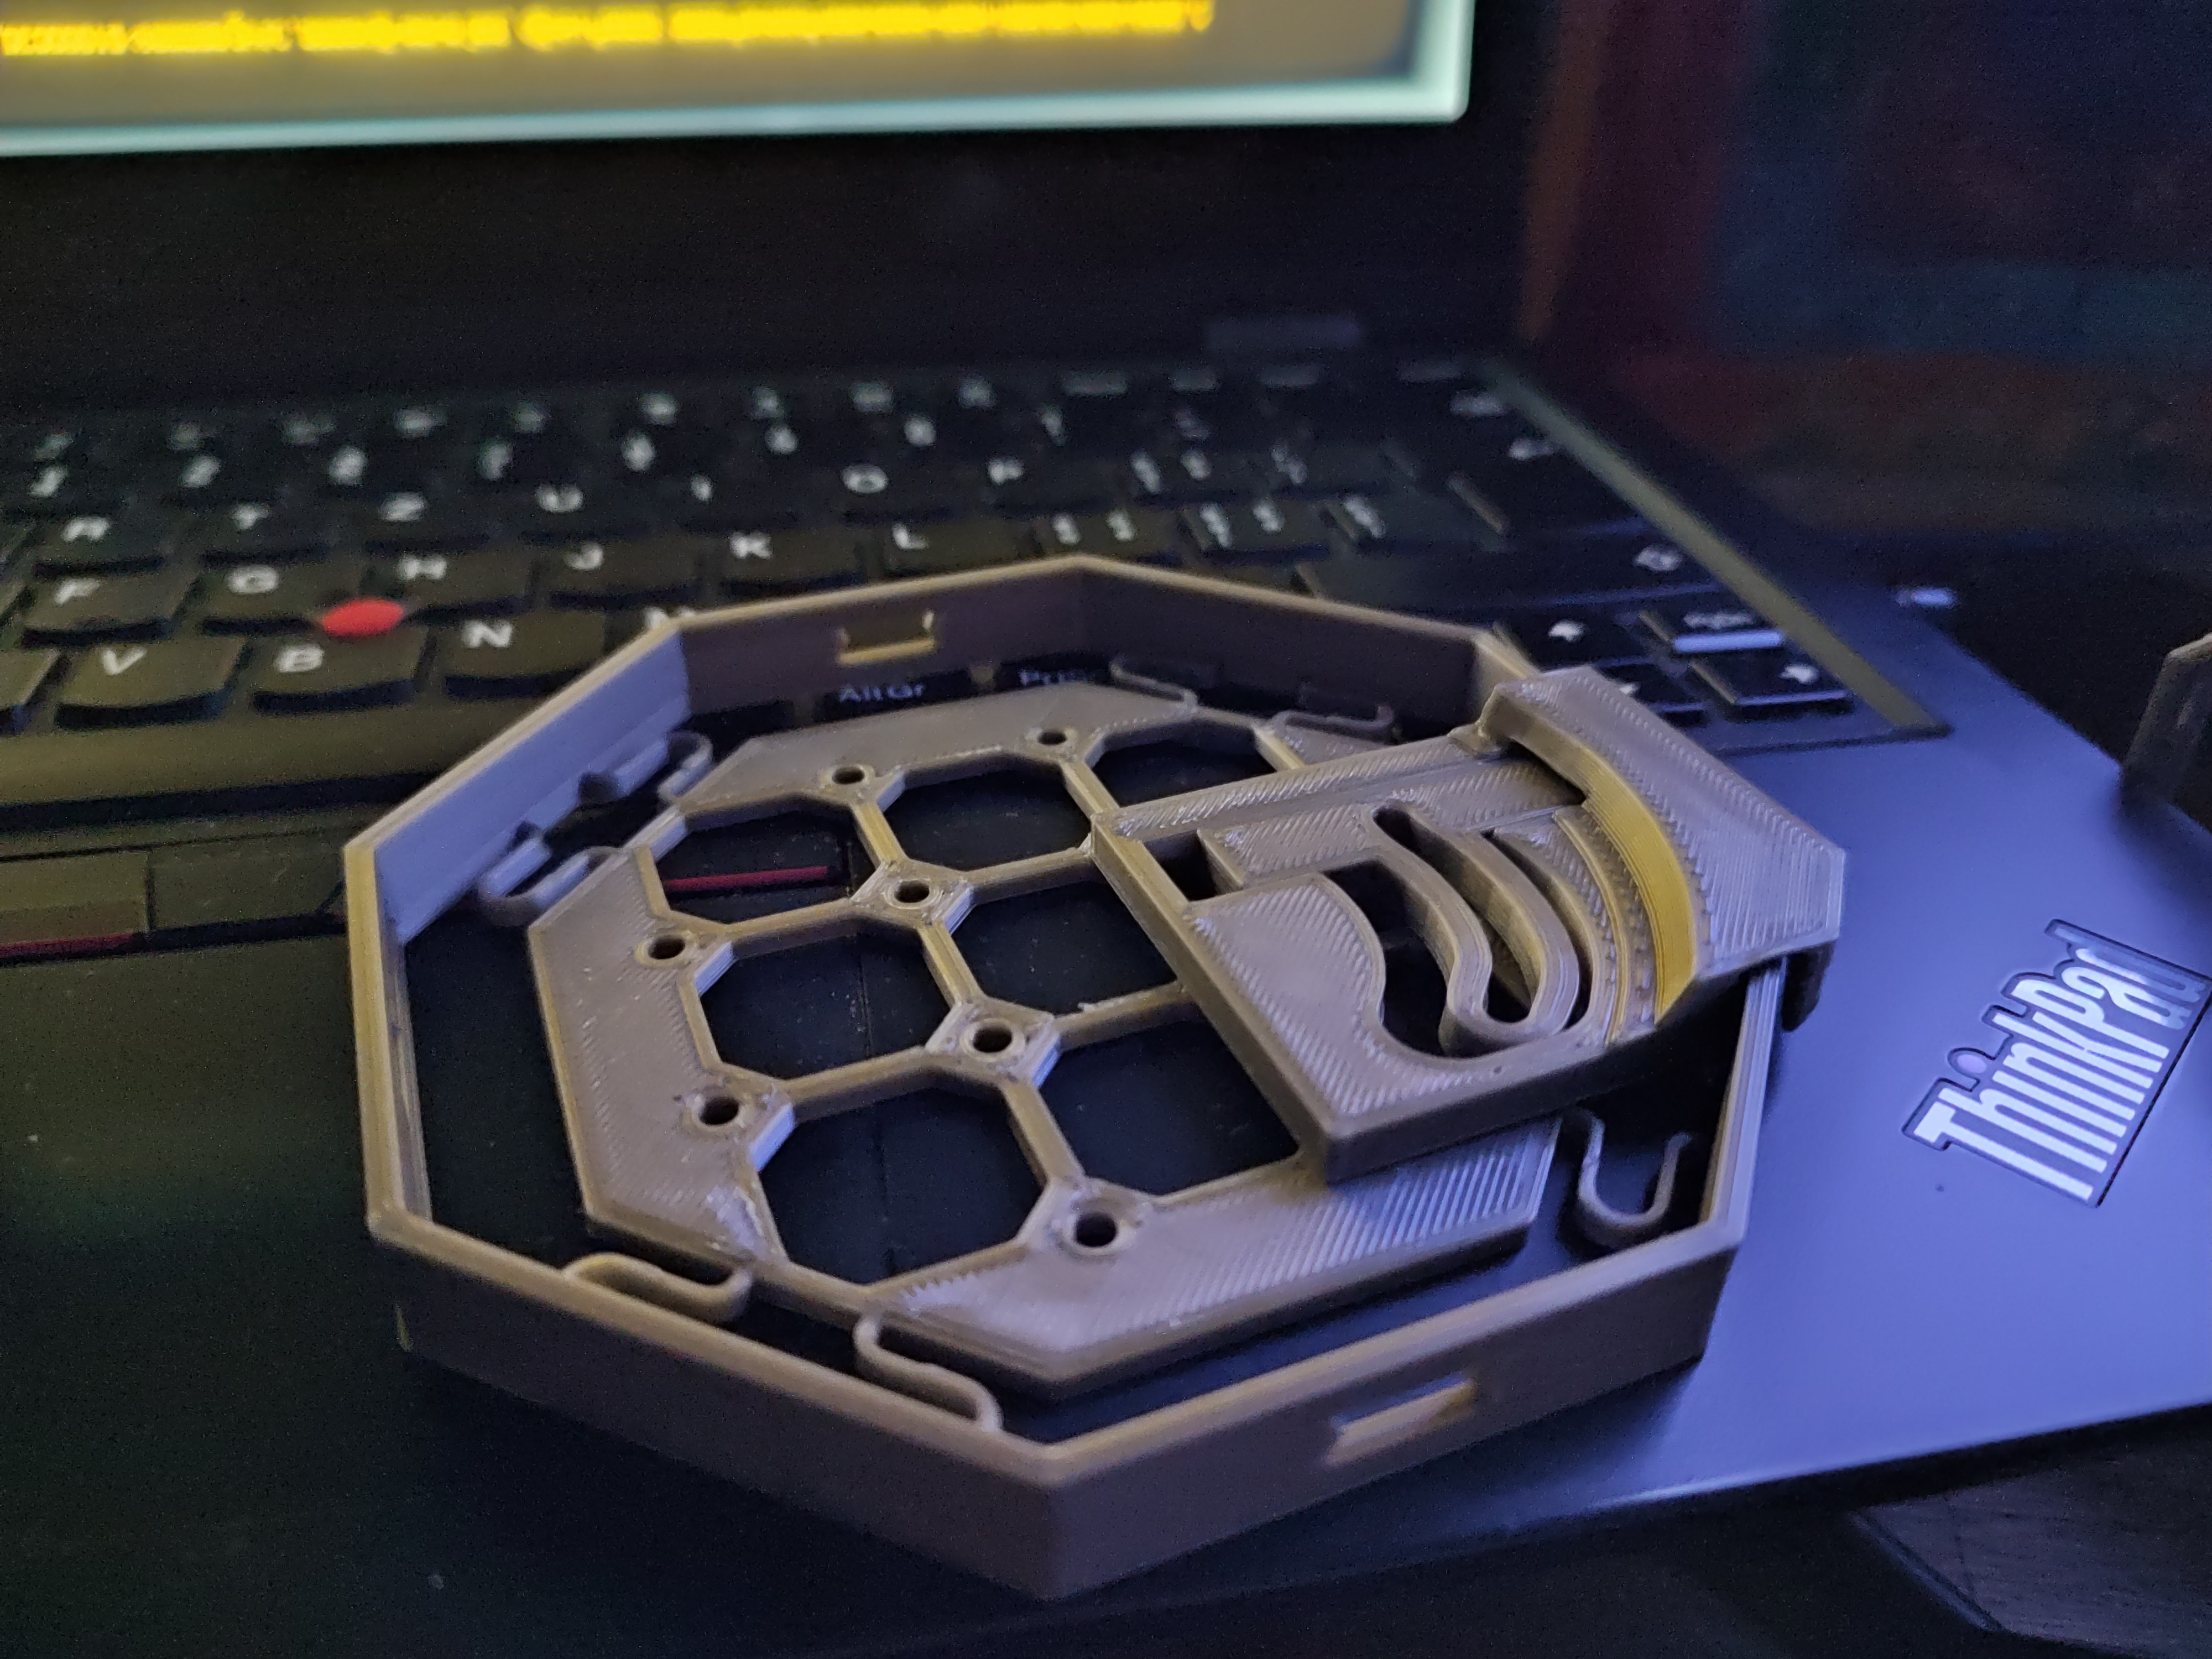
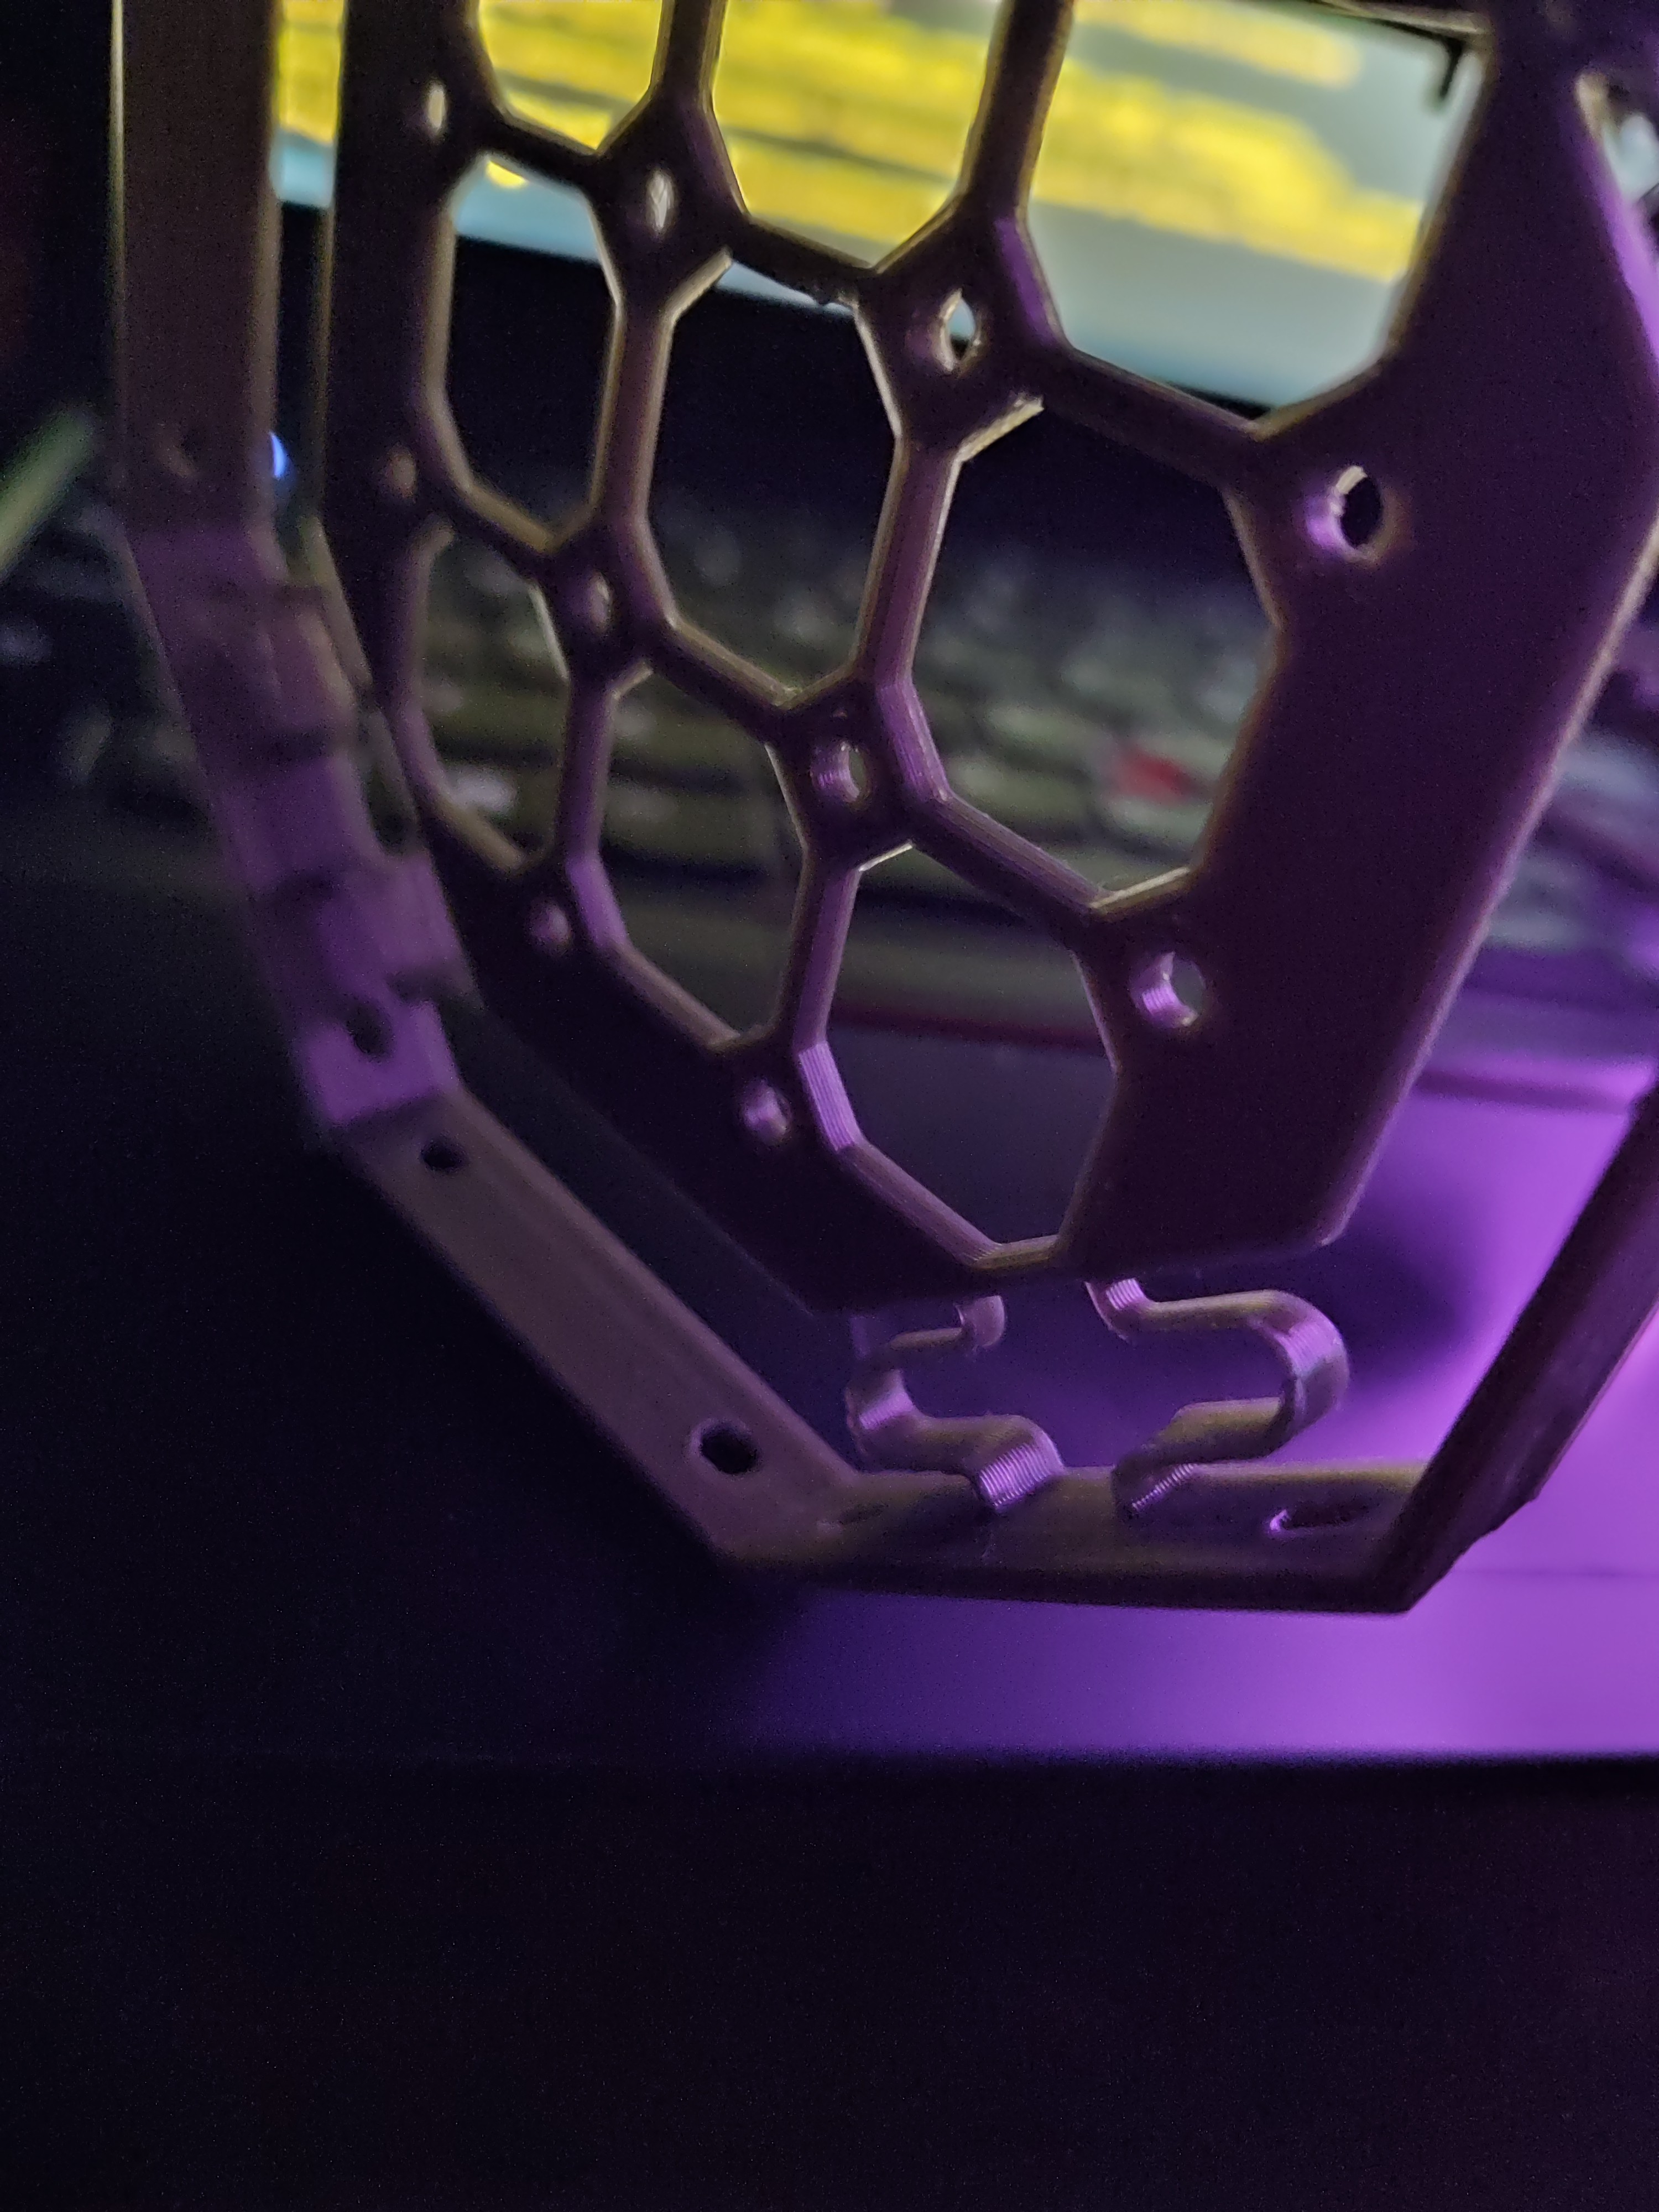
Built using random hardware i have lying around (raspberry pi 2 and some old 2.5" mechanical hard drives), and put in a robust sci-fi themed enclosure.

Inspired by the whole cyberdeck thing. If you have a cyberdeck, surely you need something to jack into?

  • Build log ?: Forum software exists!

    sdfgeoff09/26/2022 at 05:18 0 comments

    Well, the queen died which gave me a day off from work to sink into the software. It longer than anticipated, but I now have some simple forum software written in pure python with no external dependencies. (though it uses a stack of stdlib modules). 

    Building this software has shown me just how BIG building a complete forum software would be. I've implemented a tiny fraction - auth, sessions and text posts, and I've made shortcuts to get here: I don't parse the complete HTTP spec, I don't validate posts for malicious content, I don't support formatting. It is the bare minimum of a forum. It's probably still under a week of full-time work if you counted hours spent typing, but there's been a lot of thought going into it additional to that (gg research about password encryption and how INNER JOIN works). 

    One thing I've learned through this project is that it is hard to do encryption without access the internet. This is designed to be a standalone device, and so the normal TLS doesn't work as it depends on a centralised trust network. The only way I'd be able to implement forum software securely would be to roll my own encryption in the frontend - which is way above what I want to do here.

    Another lesson has been about how powerful modern CSS is, and how some older HTML technologies (forms, cookies) solve problems very neatly and efficiently.

    I reckon I'm unlikely to take this chunk of software much further as it fulfils it's goals of making this device capable of sending messages between people. I did have other goals for it (eg file sharing), but I've now sunk enough time into this and it's time for other projects (or other parts of this project....)

    Code is available on the project's github. It's about 2Kloc, which is a bit bigger than can fit into my working memory, but I'm rather happy with the code quality - it's all mypy compliant and has tests for all the SQL and auth. Tooling definitely makes things much easier.


  • Build Log 6: Password Auth with scrypt

    sdfgeoff09/13/2022 at 09:49 0 comments

    After some fiddling we have the ability to create a user and to see a fail/success page depending on if you enter the password correctly!

    There is no session management, so you don't "stay logged in" at all, but I'm pleased to get here.

    Cryptography is weird. Why? Well, my password DB looks like:

    1	oweritu     {"version": 1, "salt": "USj+tEYk7h8LthQi85qLXhD45uc4zh89EagdzirL9Vw=", "secret": "MgKvFO3L8AqVff4pfQ2iUoDNL7/B1O6XaPJ1kOSBUG/3dlanGMF6dQF4rDh+P2eqoiSFvBkvV9Nlf6g/CTTueg=="}
    2	testUser    {"version": 1, "salt": "/wyJHxr2tXThl5gKUUj7zk9/+quqh2EhCDnN/fA2CDM=", "secret": "vuWRHq1Zcxw6S74t+bITH9wpZLMYIV4B8UPUz50tlwwRevXJAQ7lv9inlPzkgt/MGTcQxZb0C0bEIYDps9xCCg=="}
    3	newUser     {"version": 1, "salt": "eEmsv1mi6QEhpSRNQ3W7+nqYr3o6yf97H2HZW+S655M=", "secret": "ZxQHddv9XMiZS0QecUW56mkEiE6GySp60KTRZzZGrz9SJ54Y7AeGg9Dh98w5s9PCTAtlApHNkBpfMqaSThfHqQ=="}

    (pulled straight from sqlite). 

    And I'm using the functions:

    def encode_password_v1(password: bytes) -> bytes:
        salt = os.urandom(32)
    
        raw_secret = hashlib.scrypt(password, salt=salt, n=2**14, r=8, p=4, dklen=64)
    
        bundle = {
            "version": 1,
            "salt": base64.b64encode(salt).decode("utf-8"),
            "secret": base64.b64encode(raw_secret).decode("utf-8"),
        }
        return json.dumps(bundle).encode("utf-8")
    
    
    def validate_password_v1(password: bytes, secret_bundle: bytes) -> bool:
        bundle = json.loads(secret_bundle.decode("utf-8"))
        assert bundle["version"] == 1
    
        salt = base64.b64decode(bundle["salt"])
        target_secret = base64.b64decode(bundle["secret"])
    
        this_secret = hashlib.scrypt(password, salt=salt, n=2**14, r=8, p=4, dklen=64)
        return this_secret == target_secret

    And even with all this information ... you still shouldn't be able to retrieve the username/password for those users. You have all the same data needed to prove that a user is who they say they are, but not enough to figure out what their magic password is that they're using to do so.

    At least, that's the theory. Do I trust my auth code? Well, enough for a non-internet-facing application. If this project was intended to be wider-web facing I'd probably want someone to give the code a review. So how about this: I legitimately have no idea what password I used for the user "oweritu". If you can provide me a password that works for that user and the above password DB, I'll paypal you $5. If you continue and help me make those functions more secure, then I'll paypal you an additional $15 (aka $20 total).

    Disclaimer: I am a complete security noob! Easy money for someone I'm sure (and hopefully a learning experience for me)

    Oh yeah, and the code for all this is up on the project's github

    ---------

    What's next? Sessions! Cookies!

  • Build Log 5: Developing a forum - how hard can it be?

    sdfgeoff09/12/2022 at 11:46 1 comment

    So the hardware is pretty much done. Or at least 'done enough', so it's time to build some software. The basic idea is simple: a web portal people can sign up to, post public messages in threads (aka a forum) and upload/post files.

    How hard can it be?

    If I were to be developing this normally, with AWS cognito for user sign in, with sqlalchemy, react+node, jwt's and all other good modern tech, probably not too bad! (Heck, at work the system we've build offers this functionality accidentally). But thus is a learning project! So it's all in python, with python's standard library and nothing else.

    So let's write a web server. We need to listen on port 80, and parse an HTTP request. Fortunately this is actually pretty simple because it was invented back in the dawn of time and is well documented (and I'll even do it non-blocking. Ooohhhh, green threads... trendy). Parsing the method, URL and headers is a tiny amount of code. Generating responses is equally trivial. And ... tada! We can serve static files such as this mock-up:

    As a bonus, I now know about 302 redirects. Large file support (range requests) and post content is waiting until I need to implement it.

    But serving static files isn't what we want to do. We want users to be able to log in. This means we need:

    1) A database (to store passwords, posts etc). Fortunately pythons stdlib has sqlite3, which should be fine for our use case.

     2) A method of encrypting passwords. Owasp has a great article on this: https://cheatsheetseries.owasp.org/cheatsheets/Password_Storage_Cheat_Sheet.html that outlines different methods and why we need to salt passwords. While python's stdlib doesn't have Argon2id, it does have hashlib.scrypt, so we should be good.

    3) A secure connection between a client and our server. Uhm, erm. This is hard. I want it to be an open wifi network so strangers can connect. This means the transport layer is unsecured. HTTPS would solve this, but we'd need to have a self-signed certificate and this makes big warnings on most browsers. I'm leaving this as an open problem for now. We may just end up transmitting passwords in the clear ..... to anyone wifi sniffing. There are solutions for this (Diffie–Hellman key exchange) but the level of effort required is high.

    4) Session management. After a user has sent their username/password combo, we need a cookie or toke or something to send with each request. If I were to use the modern approach (jwt's) I would need to be using a single page app and a bunch of JS, so I'm going to fall back to cookies, which browsers automatically send. The DB will then have to store a session -> user mapping along with an expiry date.

    Oh yeah and I'm going old-school with server-side rendering. If I only have one programming language (python) I think it will be easier/quicker/smaller.

    So anyway, on with the SQL writing!

    ------

    What is the difference between a social network and an online forum?

    I'm not actually too sure, but I think it has to do with data availability. On a forum, most posts are public, so everyone owns the data equally. On a social network the data is private to select users, so it seems strange when the company running the network 'steals' it. Oh yeah, and "..... news feeds ..... self reinforcing biases ..... Artificial Intelligence ...... evil"

  • Story Log 2

    sdfgeoff09/02/2022 at 22:19 0 comments

    The manufactory had done it's job well and most of the parts were lying on my desk. There was still one large part to manufacture and I wanted to supervise it closely - I was almost out of plastic #7 and I wanted to make sure the machines material depletion detection would function correctly. So I was stuck in my room sitting next to the machine while it worked. Not much of a bother - just slap on the headphones and turn up the music, but I'd need something to occupy myself. Clearly it was time to plan the next major part of the project: the software.

    I pulled out my VR headset, activated the scrambler and hit speed-dial for Phil. The construct I picked was nothing fancy, and when Phil appeared he told me so. "Surely we can go somewhere more interesting than this" he said, gesturing at the featureless walls. I pulled up the world selector and scrolled lazily through it. A few minutes later we were in a green park, done in 20's styling with large grassed areas and a few artfully scattered trees. On the one horizon was a cityscape, on the other some mountains. A pavilion was a short distance away, so we warped to it and sat down.

    I pulled up the CAD model of the Detached Storage Device and handed it to Phil. He twisted the handle and slid out the electronics chassis. "Nice engineering" he remarked, "but what do you need me for?"

    "At the moment it's just a portable server. It's clean but blank. We need to figure out how to make use of it."

    Phil looked at the device critically. "How long can it operate for? What sort of performance and storage are we looking at?"

    "I reckon 6-7 hours operation. We've got 2Tb of disk, and it's not up to modern computational standards"

    "I guess we're stuck with bulk storage then"

    "Unless you've got any other ideas"

    We sat there in silence for a few minutes. 

    "I've got four ideas" Phil said suddenly, "First, it's just storage for ex-filtration. We take it with us on a job, and transfer data to it. We can then hand it to one of the nerds for data analysis. Second it's a dead-drop. We leave it in silent mode at a known location. People who we've told about it can load it up with data or messages. Third it's a coordination device. When we get the crew together it can be used to develop and trade cryptoware."

    He paused

    "And fourth?" I prompted.

    "It's disappeared from my head. Hopefully I'll think of it again"

    "So I guess I'll build something like an old forum-cross-warez site, and we'll run with it from there...."

  • Build Log 4: The Handle with Handle Handle (and some power supply notes)

    sdfgeoff09/02/2022 at 10:41 0 comments

    It has a handle, so you can pick it up now. Twisting the handle relative to the body is super satisfying as it actuates the latches. It really feels like something you'd have mounted into the wall of some sci-fi vehicle. 

    "EMP incoming!" Jacob yelled over the intercom.
    I stood up from my station and started running towards the op-center. Maybe I could disconnect the equipment before the EMP arrived. I was just at the doorway when the floor jolted sideways by half a meter and I stumbled against a wall. I could already tell I was too late. Only one activity light was still glowing, and it was flickering in a haphazard mockery of it's normal pattern.
    I grabbed the handle of the nearest compute module, twisted it and slid it out. Nothing looked damaged, but I knew that inside the tracery of silicon had been destroyed. We had spares - there were spares of everything, thank goodness, but that'd count on us surviving the next few minutes.....

    Ahem, uh, wrong universe. Anyway.... handle. Yes:

    Fun fact: the 3D part that's actually the handle (the bit you grab) is ... "HandleWithHandleHandle.stl". yeah.

    And that's the battery bank you see in there as well. It's quite large, I'm going to need to make up a custom cable to be able to extract power from the USB ports on the top. How is the battery bank held in? Well at the moment it's just resting there. The easiest design that accommodates the largest variety of battery banks is .... zip ties! Yup. So underneath the battery bank is a platform with some holes in it, and you can zip tie in whatever power source you have.

    Another snag with this power bank is that while this battery bank can provide power to the pi while charging, it momentarily disconnects when you plug/unplug it. So I'm going to need some serious switchover capacitors or something.

    I grabbed my USB power analyzer (which I really don't trust, it was a $2 purchase), to see how long I expect the battery to last. Here it is with just the raspberry pi and no accessories (this is a pi2):

    So that's 1.25W.

    The battery bank I have claims 10,000mah (at 3.7v I assume), which is 37Wh. This gives an estimated time of operation of ... 29 hours if everything is 100% efficient. With the hard drive plugged in the current goes up to 0.66A (3.3w), and the estimated battery life drops to 11 hours if everything is 100% efficient. I still have to add a USB Wifi dongle as well.

    I'm guessing that at the end of the day we'll see closer to 5-6 hours operation.

    ------------------

    Software?

    Just a teaser. There really isn't much more than what you see in that screenshot. I need to write another story log before I can figure out what software is needed!

  • Build Log 3: Latches, Batteries, CAD and More

    sdfgeoff08/27/2022 at 11:51 0 comments

    We have the first functioning latches. Unfortunately my printer tolerance is still a little off, so even after some percussive maintenance (hitting it with a hammer) only three of the sliding bolts freed up. I'm pleased with the action - not so pleased with the print quality.

    I've also gone and found a power source for this build . It's a 10,000mah (claimed) battery bank and is (so far) the only item I've purchased for this build. It is an awkward rounded shape so mounting will be fun. I also need to figure out how I'm going to charge the device without having to remove it from the shell. Maybe some sort of exterior hatch?

    On that front, the CAD is nearly done. Lots of little problems were resolved. I'm doing all of this in blender3d. I find it way more enjoyable to work in blender and model precisely/parametrically using modifiers compared to working in freeCAD. Maybe it's just because I'm more familiar with blender?

    Fun fact: I've automated the export/slice process. I use the build system "tup" to automatically generate STL's from blender, to check the geometry is watertight, calculate some parameters (eg cost of each part), to slice them into GCODE and upload it  to octoprint. I can then review in octoprint's gcode viewer. No more "oh darn, I printed the old version" for me.

    As a bonus, it also generates technical-drawing-style images of each part. Here's the new suspension plate. It has slightly different springs and some mounting bolts on the top now.

    Hmm, I should really get it to put the cost/material estimations on the 'technical' drawing.

    Anyway, there's a whole stack of printing for my printer to do for the next few days!


    Off Topic:

    My day job involves AI, and we decided we needed a switch on the wall labelled "AI Emergency Disconnect." Seeing as I had a nice sci-fi looking thingo from this project I threw together a concept for this very ambiguous switch (does it switch the disconnect on or the AI on?):

    And today I threw some paint on the dud print:

    There was a lot of bleed-through on the masking of the stripes, so I'll need to do another bunch of coats of yellow. Oh well, I've learned something.

    I also think that the NDS handle will need to be slightly taller. You can't quite get your knuckles around it properly. 

  • Build Log 2: Latch Prototyping

    sdfgeoff08/24/2022 at 09:43 0 comments

    Rather than have to screw and unscrew something to get access to the internals, it would be cool to have a twist-lock mechanism: twist a handle by 45 degrees and the internals slides out on it's rack. 

    My first attempt at this involved printing out the whole lid mechanism. This would give me a size and visual appearance estimate:

    3 hours later I had a physical part. There are two parts here: the circular "handle" which can rotate relative to the octagonal "lid". The "lid" has some print-in-place sliding bolts that allow it to engage with another par. Unfortunately the tolerances were off, so it was non-functional (print in place parts were stuck together). Still, it allowed me to fiddle with something in my hands, and spurred a bunch of thinking about how the latch would work. So a bunch of latch test prints followed:

    These tried different tolerances and slide designs.

    From left to right:

    • Print 1. Initial print (incorrect tolerances). Additional bolts will go through the slots so that as the two parts are rotated relative to each other the pins are driven in/out.
    • Print 4. Final latch design, similar to the initial but the slider is shaped like >=< rather than <=> which gives better stiffness with less steep overhangs. It also has a flipped drive direction - the pin is extended when the bolt is in line with the pin. This means that any load on the pin is well supported by the mechanism.
    • Print 3. Printing an engage pin - the idea is that the slot would be on the circular handle part. This design reduces the part count, but results in their being exactly one bolt holding the handle on. As this is meant to be a rugged design I decided to go back to the slot and bolt design.
    • Print 2. Tolerance test print. 

    Then came printing a new suspension plate for it to mate with:

    Immediately after putting the two parts together I slapped my forehead. Duh! I'd forgotten to leave any space for the suspension plate to move, and there wasn't even room for the bolt heads!

    Well, that'll be tomorrows job. My printer is too loud to run at night.

    For maximum cyberpunk feels I'm taking these photos at night illuminated solely by my computer monitors. So while they sure aren't top quality images, I'm just going to say it: modern phone camera's are pretty amazing!

  • Build Log 1: Suspension Plate, Raspberry Pi and HDD Mounts

    sdfgeoff08/23/2022 at 09:37 0 comments

    The first part I worked on was the suspension mount. So here it is: an outer loop using thin pieces of PLA to hold an inner mounting shell. It's stiff, but I can get it to flex by a few mm without too much bother. 

    I made up a mount plate for the pi and HDD as well. I've drilled this Pi to accept M3 bolts through it's mounting holes, and they tap straight into the plastic. It would take a significant amount of force to remove it!.
    Normally 2.5" HDD's mount using 1/8" screws, but I don't have any. Turns out that M3 work well enough because the thread is only a couple mm long and the pitches appear to line up. Definitely a hack, but it works for me.

    The HDD mount can accept two HDD's, so you could easily stuff 4Tb of storage into this thing - and there's still half of the internal volume left over for the power supply.

    Next I need to figure out how the latch/un-latch will work.

  • Story Log 1

    sdfgeoff08/22/2022 at 19:59 0 comments

    Story Log 1:

    When I arrived in the bar, Phil was already there. He had his datacom in one hand and a black coffee in the other."That EskarLife job was too close," he said as I approached, "the ban on private storage has made data exfiltration way to risky" I sat down across the table from him. "We'll find a way around that. The nerds are working on a better encryption" He grimaced. We both knew that they'd said they were close six months ago, but every time someone trialled a black market datawall it wasn't long before they disappeared. Rumour had it that the Force had a new AI anti-encryption package they'd imported from somewhere.

    I pulled out my datacom and the drinks menu popped up automatically. And then it hit me.

    "The problem is that all the storage is online" I began.  Phill laughed drily, "And how would we get the data onto it? Where would even you get a processor you knew was clean? Nothing since '45 has safe microcode" "It's just storage Phill, any processor faster than a potato would do. Maybe someone's got a stack of archaic compute boards stashed up somewhere."

    --------

    Two weeks later my searching turned up the first hints of success. A stack of Av6 broadcom IC's had escaped the silicon shortage of the 20's and now there there was a good sized stash sitting under my desk. My manufactory hummed away gently next to me. I'd found the manufacturing shema for a compute board and tweaked it for the IC's I had. It would use up most  my supply of tantalum to produce the passives, but I'd worry about that later. The following nights found me alternatively hunched over a scope, or scratching my head as I waded through the reference manuals for a 30 year old kernel.

    Eventually I gave up, and gave Gregorio a call. He knew a lot more about this than I did, so I pushed the electrical side of the project over to him.

    -----------

    My manufactory still had plenty of hydrocarbons and metals, so I started thinking about the practicality of it. We would need a large storage capacity for some of our jobs, and as silicon manufacturing as locked down the only option was  the completely archaic magnetic drive. Magnetic drives aren't physically robust when operating, and we'd be slinging this thing around on jobs, so we'd need to suspend the internals on some sort of shock mount. 

    When on a job we'd need to be able to connect it to other equipment, so a quick way to expose and connect the data ports would be required. Either the housing would need external ports which would be vulnerable to damage, or some sort of quick-access latch would need to be built in. I liked the idea of a quick access system - it would make working on the system much easier.

    It was time to pull out the VR headset and start with the CAD.....

View all 9 project logs

  • 1
    Hardware Assembly

    Parts:

    • Raspberry Pi
    • HDD/SSD + cable
    • Power Bank
    • Printed Parts (available at https://github.com/sdfgeoff/network_detached_storage/tree/master/generated/stl ):
      • 2x Suspension Plate
      • 2x Lid
      • 1x HandleTooled
      • 1x HandleWithHandle
      • 1x HandleWithHandleHandle
      • 1x Shell
      • 1x InnerMountHDD
      • 1x InnerMountPowerTechInc10000mah (or modify InnerMountBlankLarge to fit your powerbank)
      • 1x InnerMountPi2 (or InnerMountAnyPii or modify InnerMountBlankSmall to fit your SBC)
    • A bunch of M3x10 bolts and nuts 

    3D Printing Notes

    Print out the parts.

    • All the parts are oriented for Z-up.
    • You may like to add a brim to shell.stl if you are worried about adhesion. Shell.stl takes ~9 hours and is the largest part
    • I suggest printing the LidMechanismTest.stl to check your printer tolerances. The two parts should be able to slide. 
    • No support needed on any part

  • 2
    Paint your Parts

    Make your prints look cool. I used matt black and metallic silver spray paint. I only bothered to paint the external parts

  • 3
    Assembly of the Exterior

    HandleWithHandle

    Bolt together the HandleWithHandle and the HandleWithHandleHandle. The bolt taps straight into the plastic.

    Lids

    Take the the HandleTooled.stl and the Lid.stl and use 5 bolts to bolt them together. The bolts tap straight into the plastic. Don't do them up super tight because the middle one has to rotate and the other four have to slide.

    Yeah, I only put in four because one of my sliding parts was fused in place! At this point rotating the Handle relative to the Lid should retract/extend the sliding pins.

    Repeat this assembly with the other lid mechanism.

    Test fit with the Shell

    You should be able to push the lids onto the shell and lock them in place by twisting the handles. The sliding pins slide into the bow-tie shaped holes in the top/bottom of the shell.

View all 6 instructions

Enjoy this project?

Share

Discussions

Tom Nardi wrote 09/18/2022 at 21:07 point

Absolutely love this aesthetic, very sci-fi/cyberpunk. 

  Are you sure? yes | no

Similar Projects

Does this project spark your interest?

Become a member to follow this project and never miss any updates