 Auron
Auron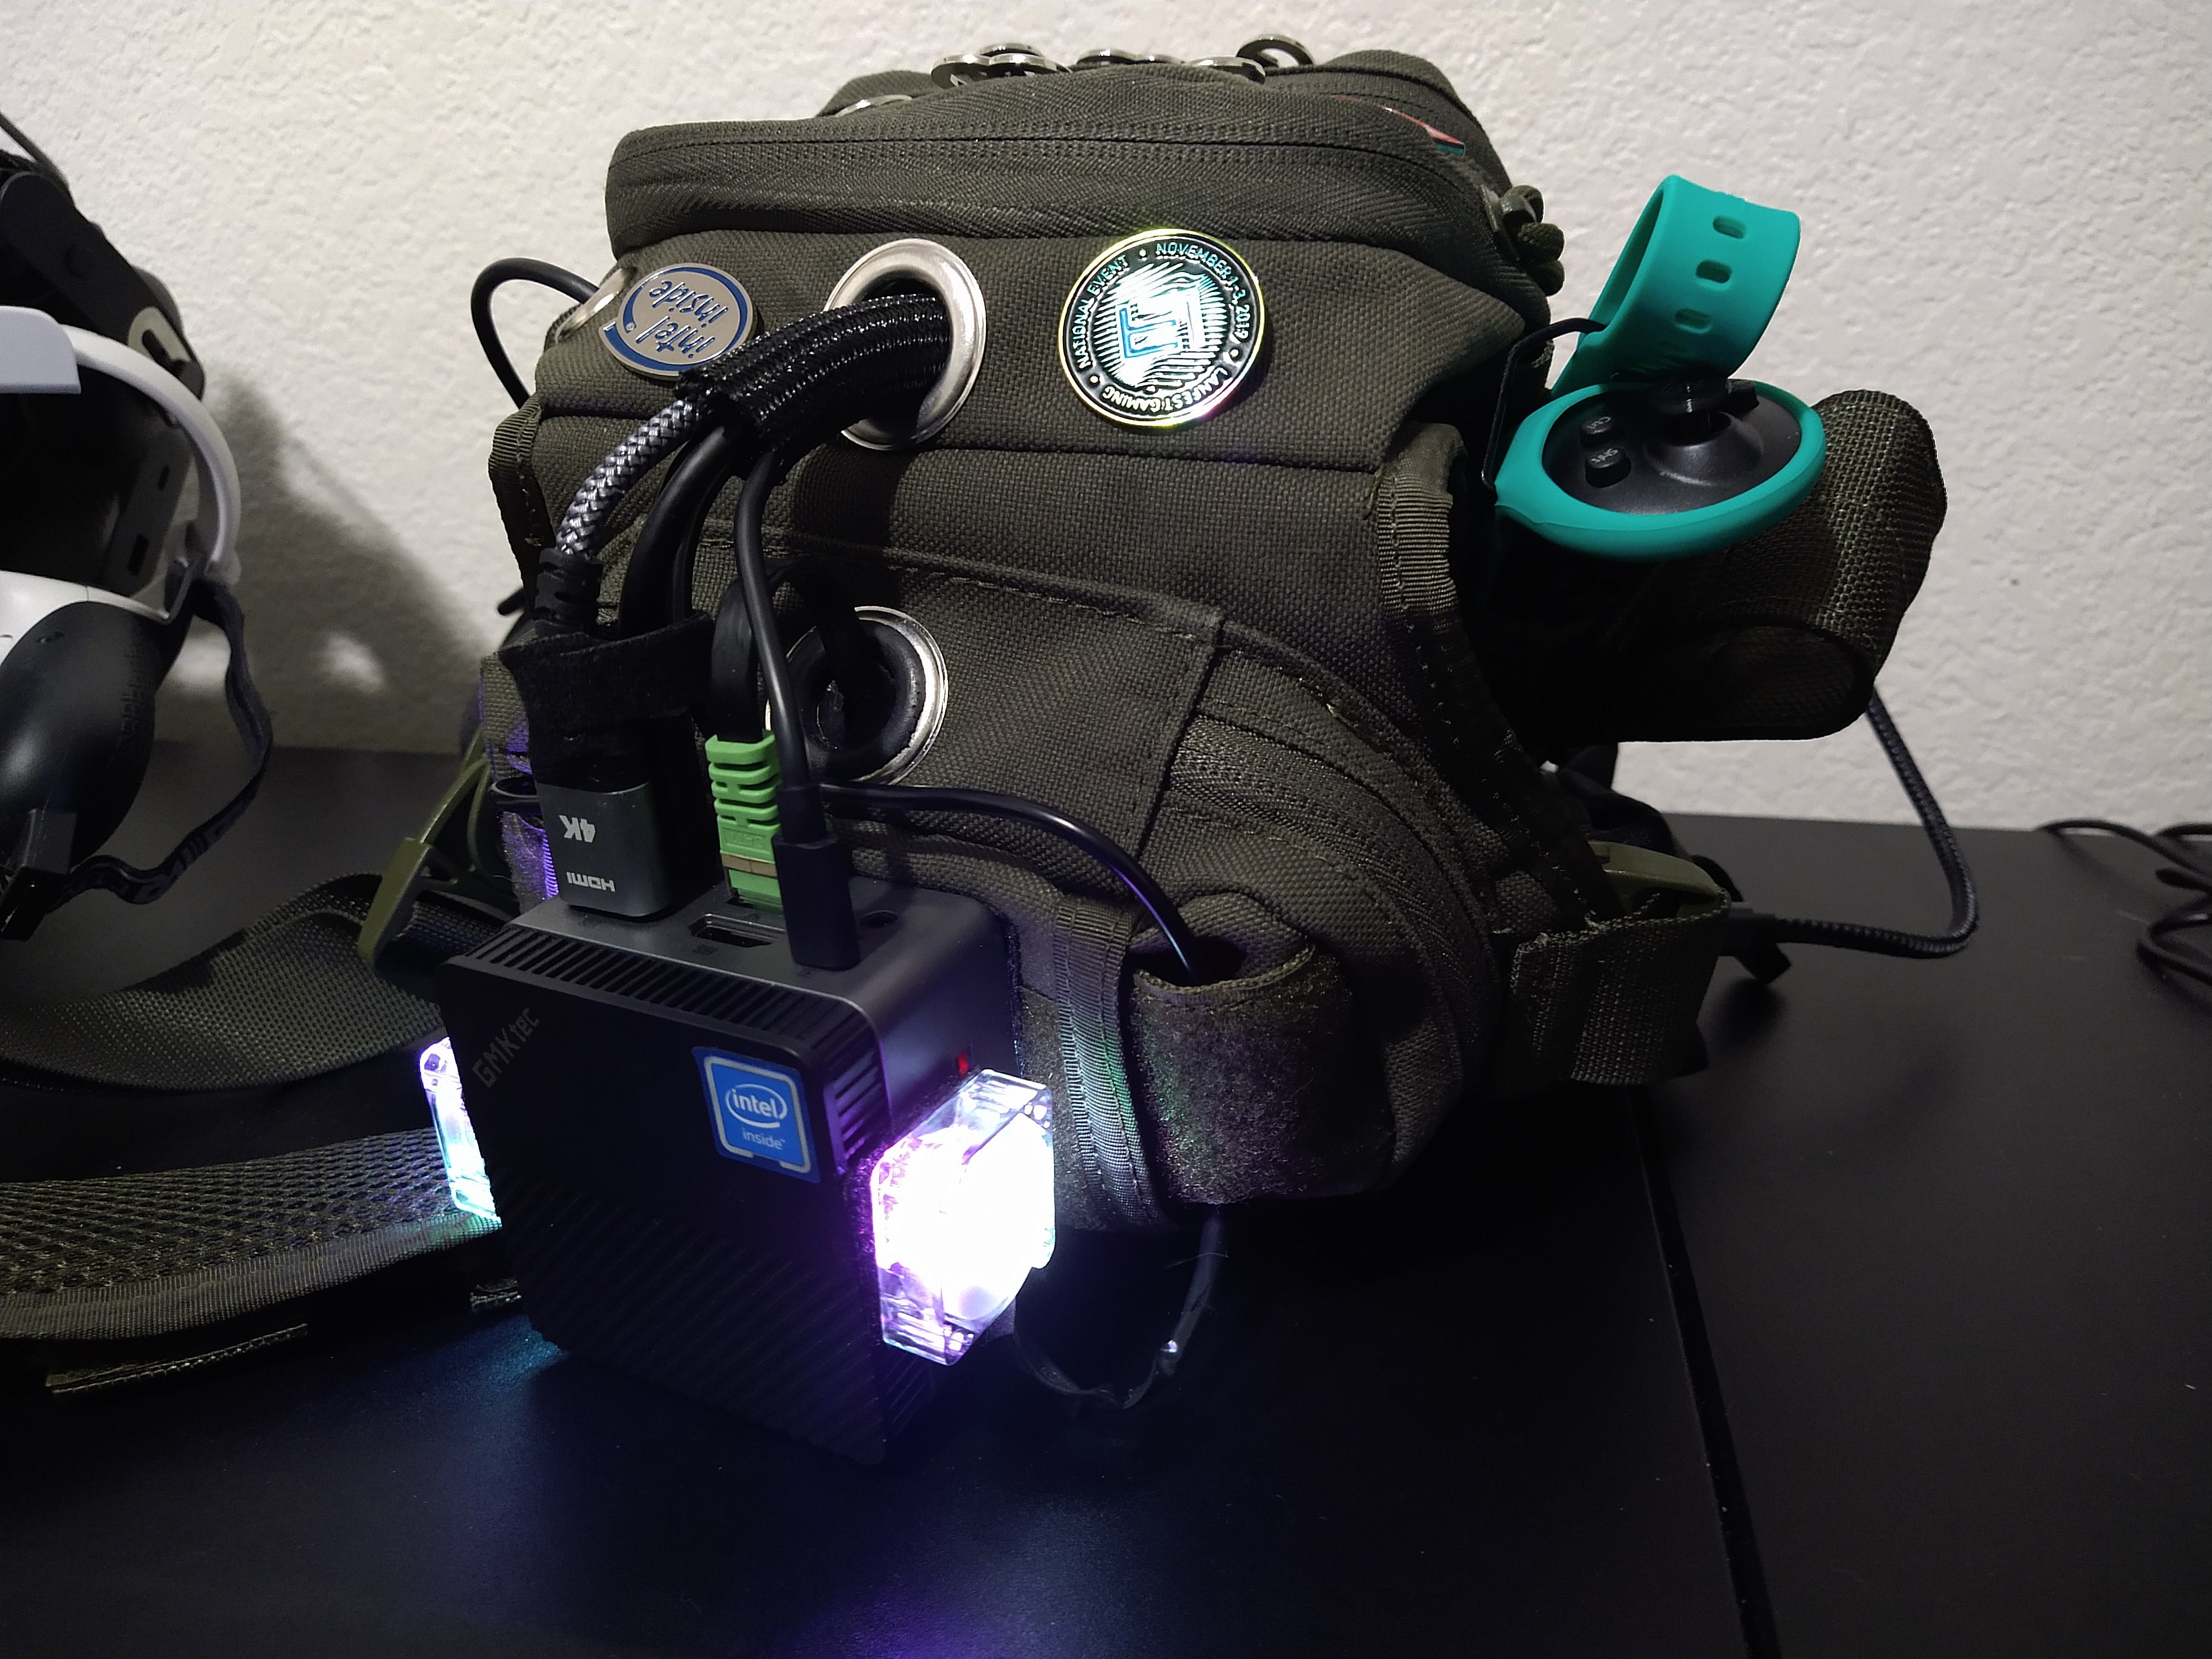
How it Started
Originally made as a portable wearable display into VR, this is a project that evolved into being an actual PC separate from VR, but can mesh with a VR headset as I'll outline further in this article.
1. What is it?
This is a modular wearable PC containing a full Windows 11 desktop PC, not your standard fare raspberry pi project. It's built into and outside of a Drop Leg tactical military bag - which I mainly got because I wanted a green bag with a bunch of pockets and ran across it online. It can be slung over a shoulder, worn on a leg (not pictured), or folded into a Desktop form when I don't want to wear it, or want to charge its battery and run it off another cable, or plug it into a wired network... etc. Various situations can come up, and I don't want any shortcomings for such situations. Often what I've seen at r/cyberdeck and other custom small builds online are really beautiful creations that are all tucked inside of a rigid box, often with a keyboard also built into it. Those are a build once kind of thing, and can never be changed or altered without ripping it apart and effectively redoing it. Some go extra lengths to actually have changeable custom parts. That's not something I wanted, and I wanted something wearable that can simply swap out standard parts as tech improves. I want the project to grow physically over time as I continue to get better tech and dive more into finer details to make the perfect always-worn kind of PC. While originally it was a project to get a flashy look on VR, it grew into something much much more.
2. Wearable?
Yup! Maybe not as fancy as you'd think, as until extremely recently I didn't even have a 3D printer, I can barely do any 3D modeling of any kind or CAD, I can't sew, I can't really draw, and I'm not very good at creating physical things without premade pieces and instructions. But I know how computer parts and cables work, and I can use a hammer with some other tools. Literally. So.. I did exactly that, except without the instructions. I took a tiny PC, figured out how to correctly power it with a fat battery and a USB power delivery decoy, and built it into a bag with a bunch of compartments that a tiny backpack wouldn't have, and that a standard backpack would be too bulky and large for. Something flexible, yet light enough to wear for most of a day while walking and standing around at a convention like a LAN event. Using it all day without having to take out my phone while also being able to sit down and game - and not change devices entirely like you normally would? That's the dream.
3. Specs? Modular?
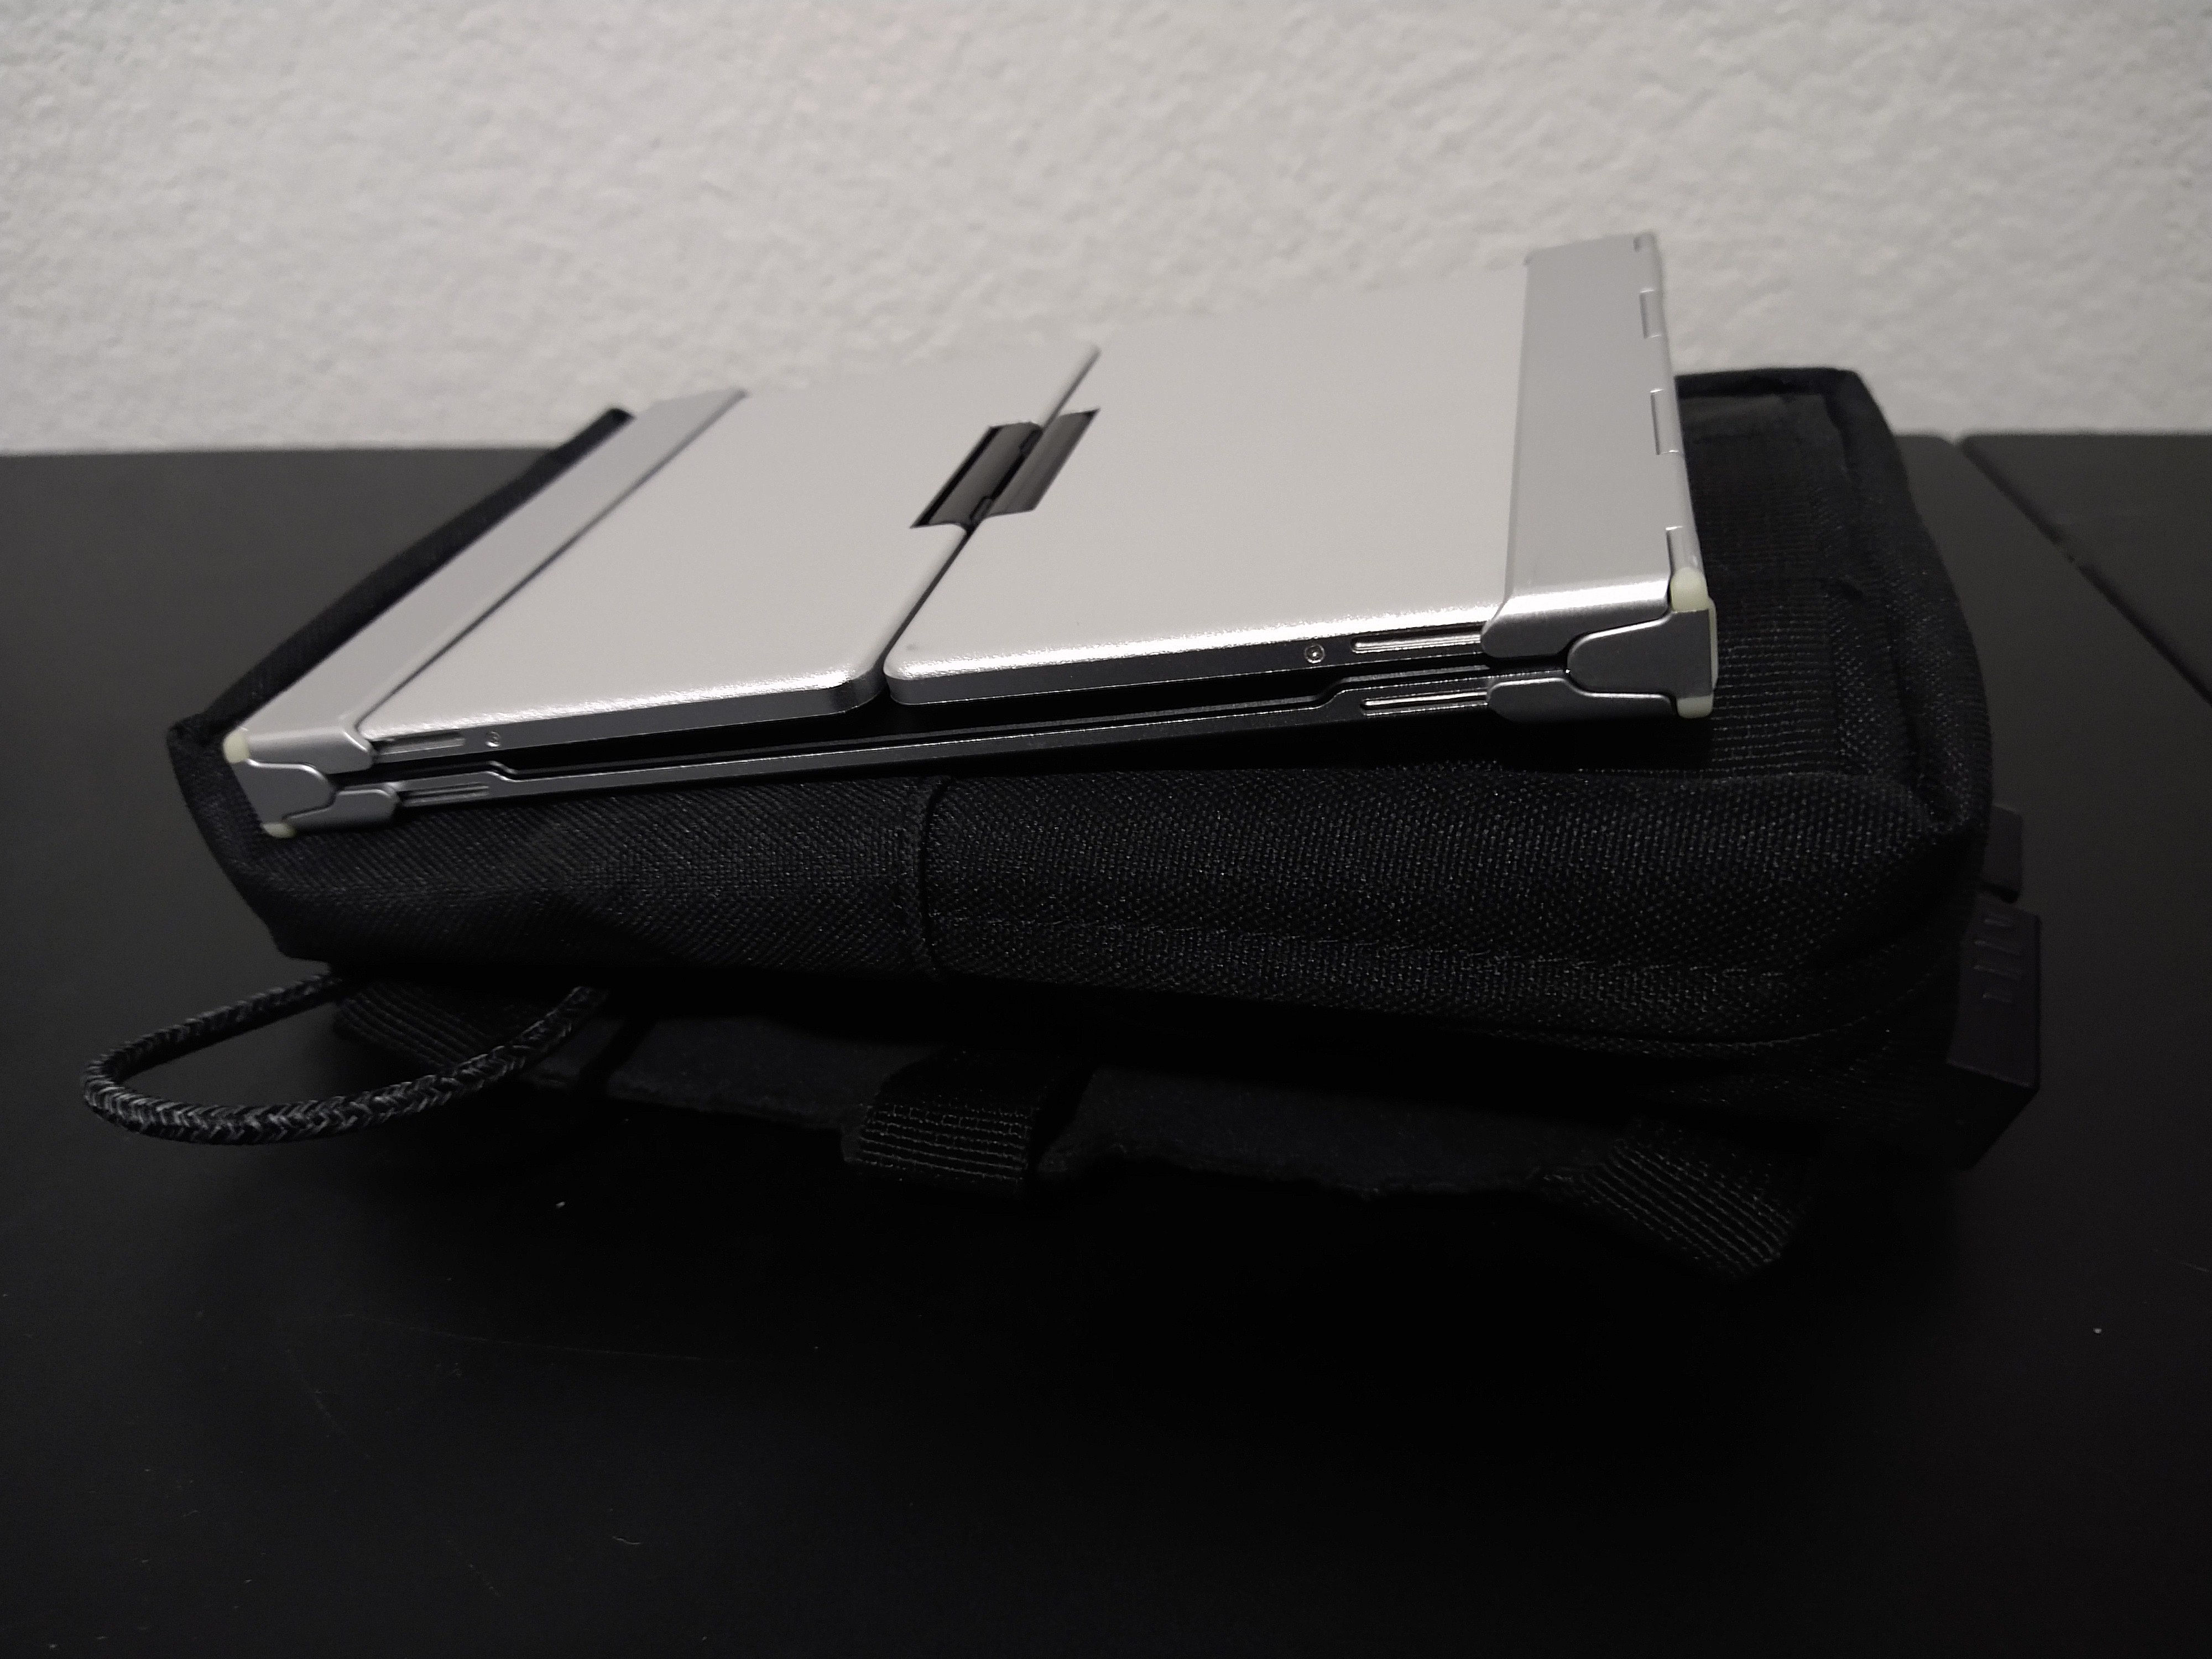
Well, it's a full Mini PC with an Intel N5105 processor, 8GB of LPDDR4, and 512GB of SSD storage with 2x HDMI, 3x USB3, gigabit ethernet, Bluetooth 5.2 support, Wifi 6 connectivity, and a microSD slot with a max power draw of 36W packed into a tiny cube. Usually it's only using around 10W, or even less if I set it in power saving mode. I designed it so that I can swap out the battery with another PD-supported battery, any HDMI display that can be plugged in, either for mirroring or extend additional screens, and basically any USB or bluetooth device can be augmented for input devices and audio. By attaching this Mini PC externally to the bag, I don't have to worry about thermals anywhere near as much as other wearables or boxed builds. The entire Mini PC cube weighs about 0.5lb and is attached with industrial strength velcro straight onto the bag that already has velcro by design - making this a perfect match. I have several different forms of compatible input, and several different outputs that I use with this project which I will detail further down. Because it's not an ARM processor, I can throw whatever OS I want on it. Out of laziness (and curiosity, as I'm a win10 user) I kept the Win11 Home install that it came with. And I fed the cabling to the interior so it can maintain flexibility without having a lot of exposed cables that can catch onto objects around me as I move around the world while wearing it.
4. Wearing a Display
Before I dig into what I am wearing in the main project photos, I want to go over the iterations I dug through to get here since this was an iterative and (expensive) learning experience. Because I don't want to crane down my neck like I'm looking at a phone quite often and strain my neck, or have to sit down on a surface to look at a display comfortably, I wanted a wearable display. Obviously VR comes to mind, but that's currently not something you can wear all day and effectively see through into the real world - so it's not practical for an all day use, much less walking around a whole convention without bumping into people or vendor booths! Ignoring the weight problem, something like the Quest for a VR headset ends up getting hot after an hour even if you're not doing much, and that wears down on you throughout the day too. Looking for cheap and light solutions, I first obtained a Vufine+ monocle wearable display.
Vufine - Not so Fine
It seemed neat that I could peer into what seemed like a crisp display in such a tiny space, and lose basically none of my normal vision at all, except the rubber mount piece for it broke within the first week, and didn't fit well on anything other than the non-Rx fake glasses it came with. It also almost never stayed lined up with my eye, and had a very tiny FOV. While it takes a 1280x720 signal (ONLY!), the display tucked inside is actually 960x540 and when you power it on, it starts in Zoom mode so it can render native pixels, but cuts off the edges. Then you can toggle between Stretch and Fit with a really, really crude power button that you have to hold the entire thing while pressing so you don't shove it off your face. There are so many UX design problems with the Vufine that I won't get into here, but what a waste of a potential product. I ended up hating this thing for being so close to discrete yet so, so poorly designed.

Avegant Glyph - Puzzling Power Problem
Ah, this one is exciting tech. As I explored wearable displays that don't cost over $1,000, I ran across this being mentioned on reddit and obtained a lightly used one for rather cheap.
Retinal projection display, 720p, extremely vivid color output, per-eye diopter adjustable lenses, and literally makes my eyeballs glow when looked upon from someone else's perspective. Yet.. awful weight distribution, and forces you to wear its built in bulky headphones to even wear it at all. Also, the company doesn't exist anymore, or at least doesn't do this stuff for consumers since its kickstarter that got confused with VR headsets back in 2016. No product support, limited quantity of these left in the world. But I REALLY loved the vibrant display output it was giving me as I stared into the bright sun, and if I could fix the lack of proper padding on the nose from the weight, and lower the weight and remove the headphones so I could use earbuds or something (and still hear around me! seriously, they cut out most of my hearing from wearing them). Yeah, let's just rip it apart piece by piece and even take away the battery since it'll need to be plugged in anyways.
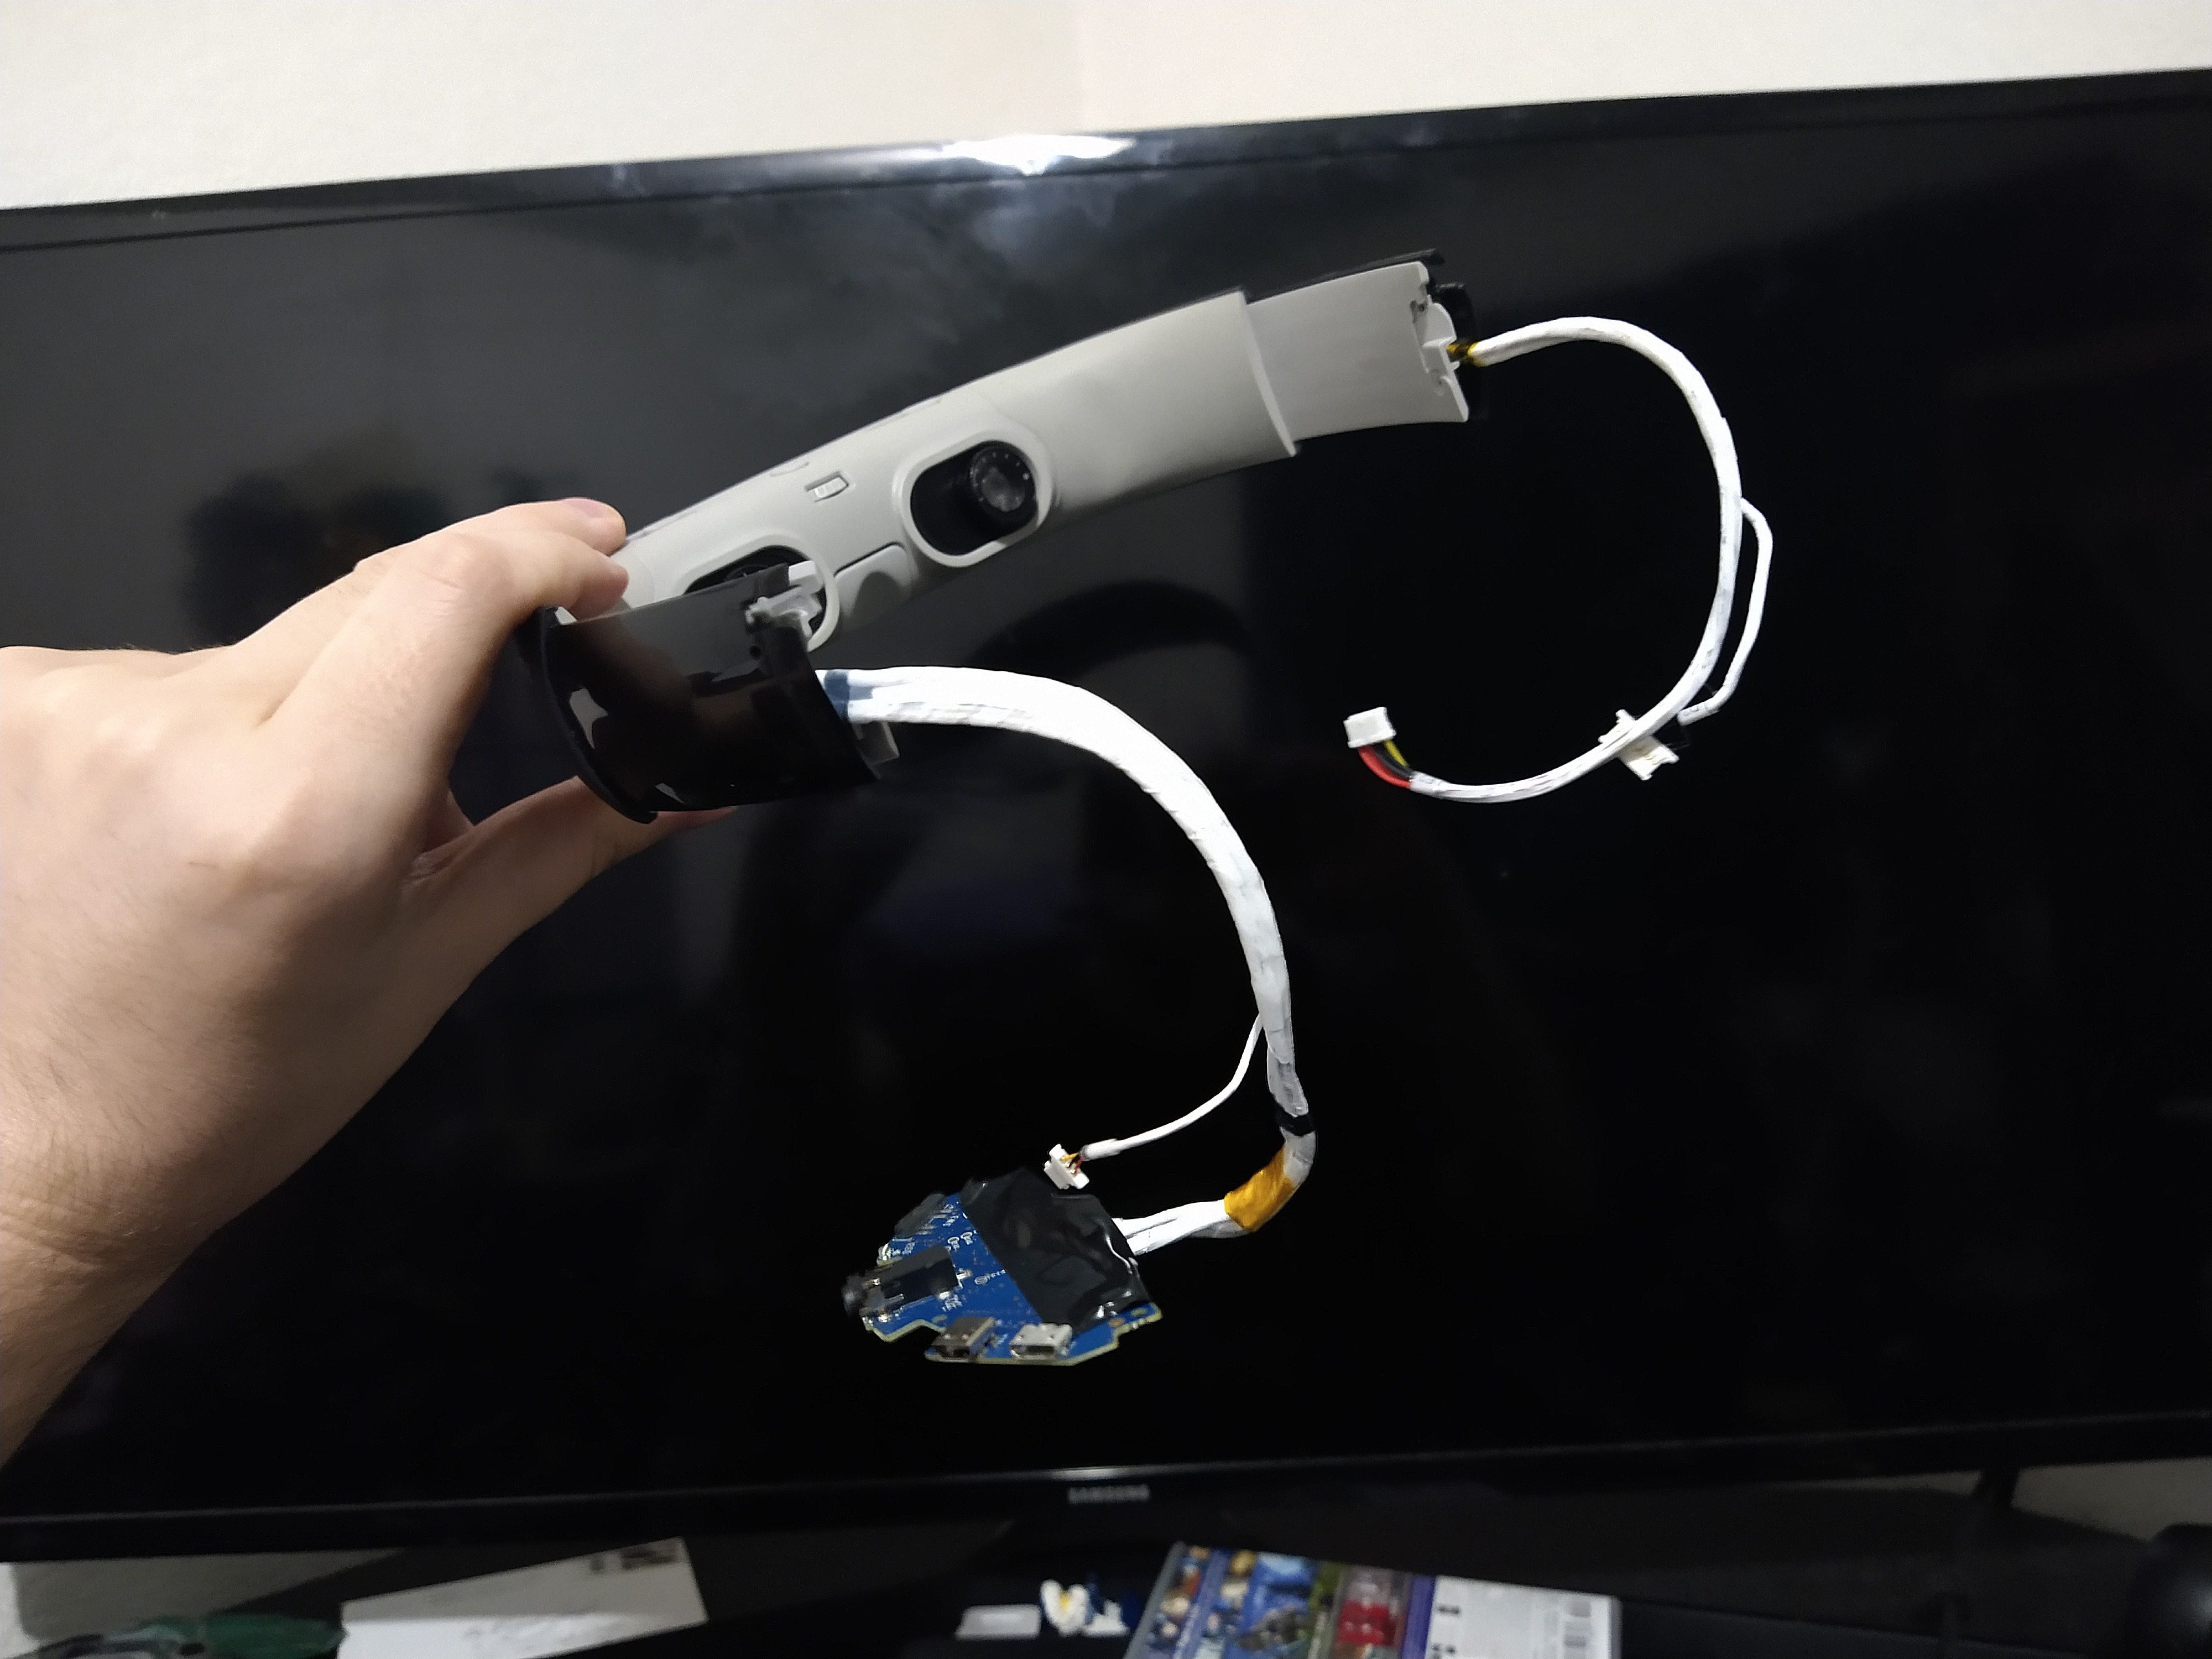
I decided to re-use some parts of things I've had, including an extra Vive Deluxe Audio Strap meant for a VR headset, which I also stripped down the use of its built in headphones as well, and came up with this gem of a wearable.
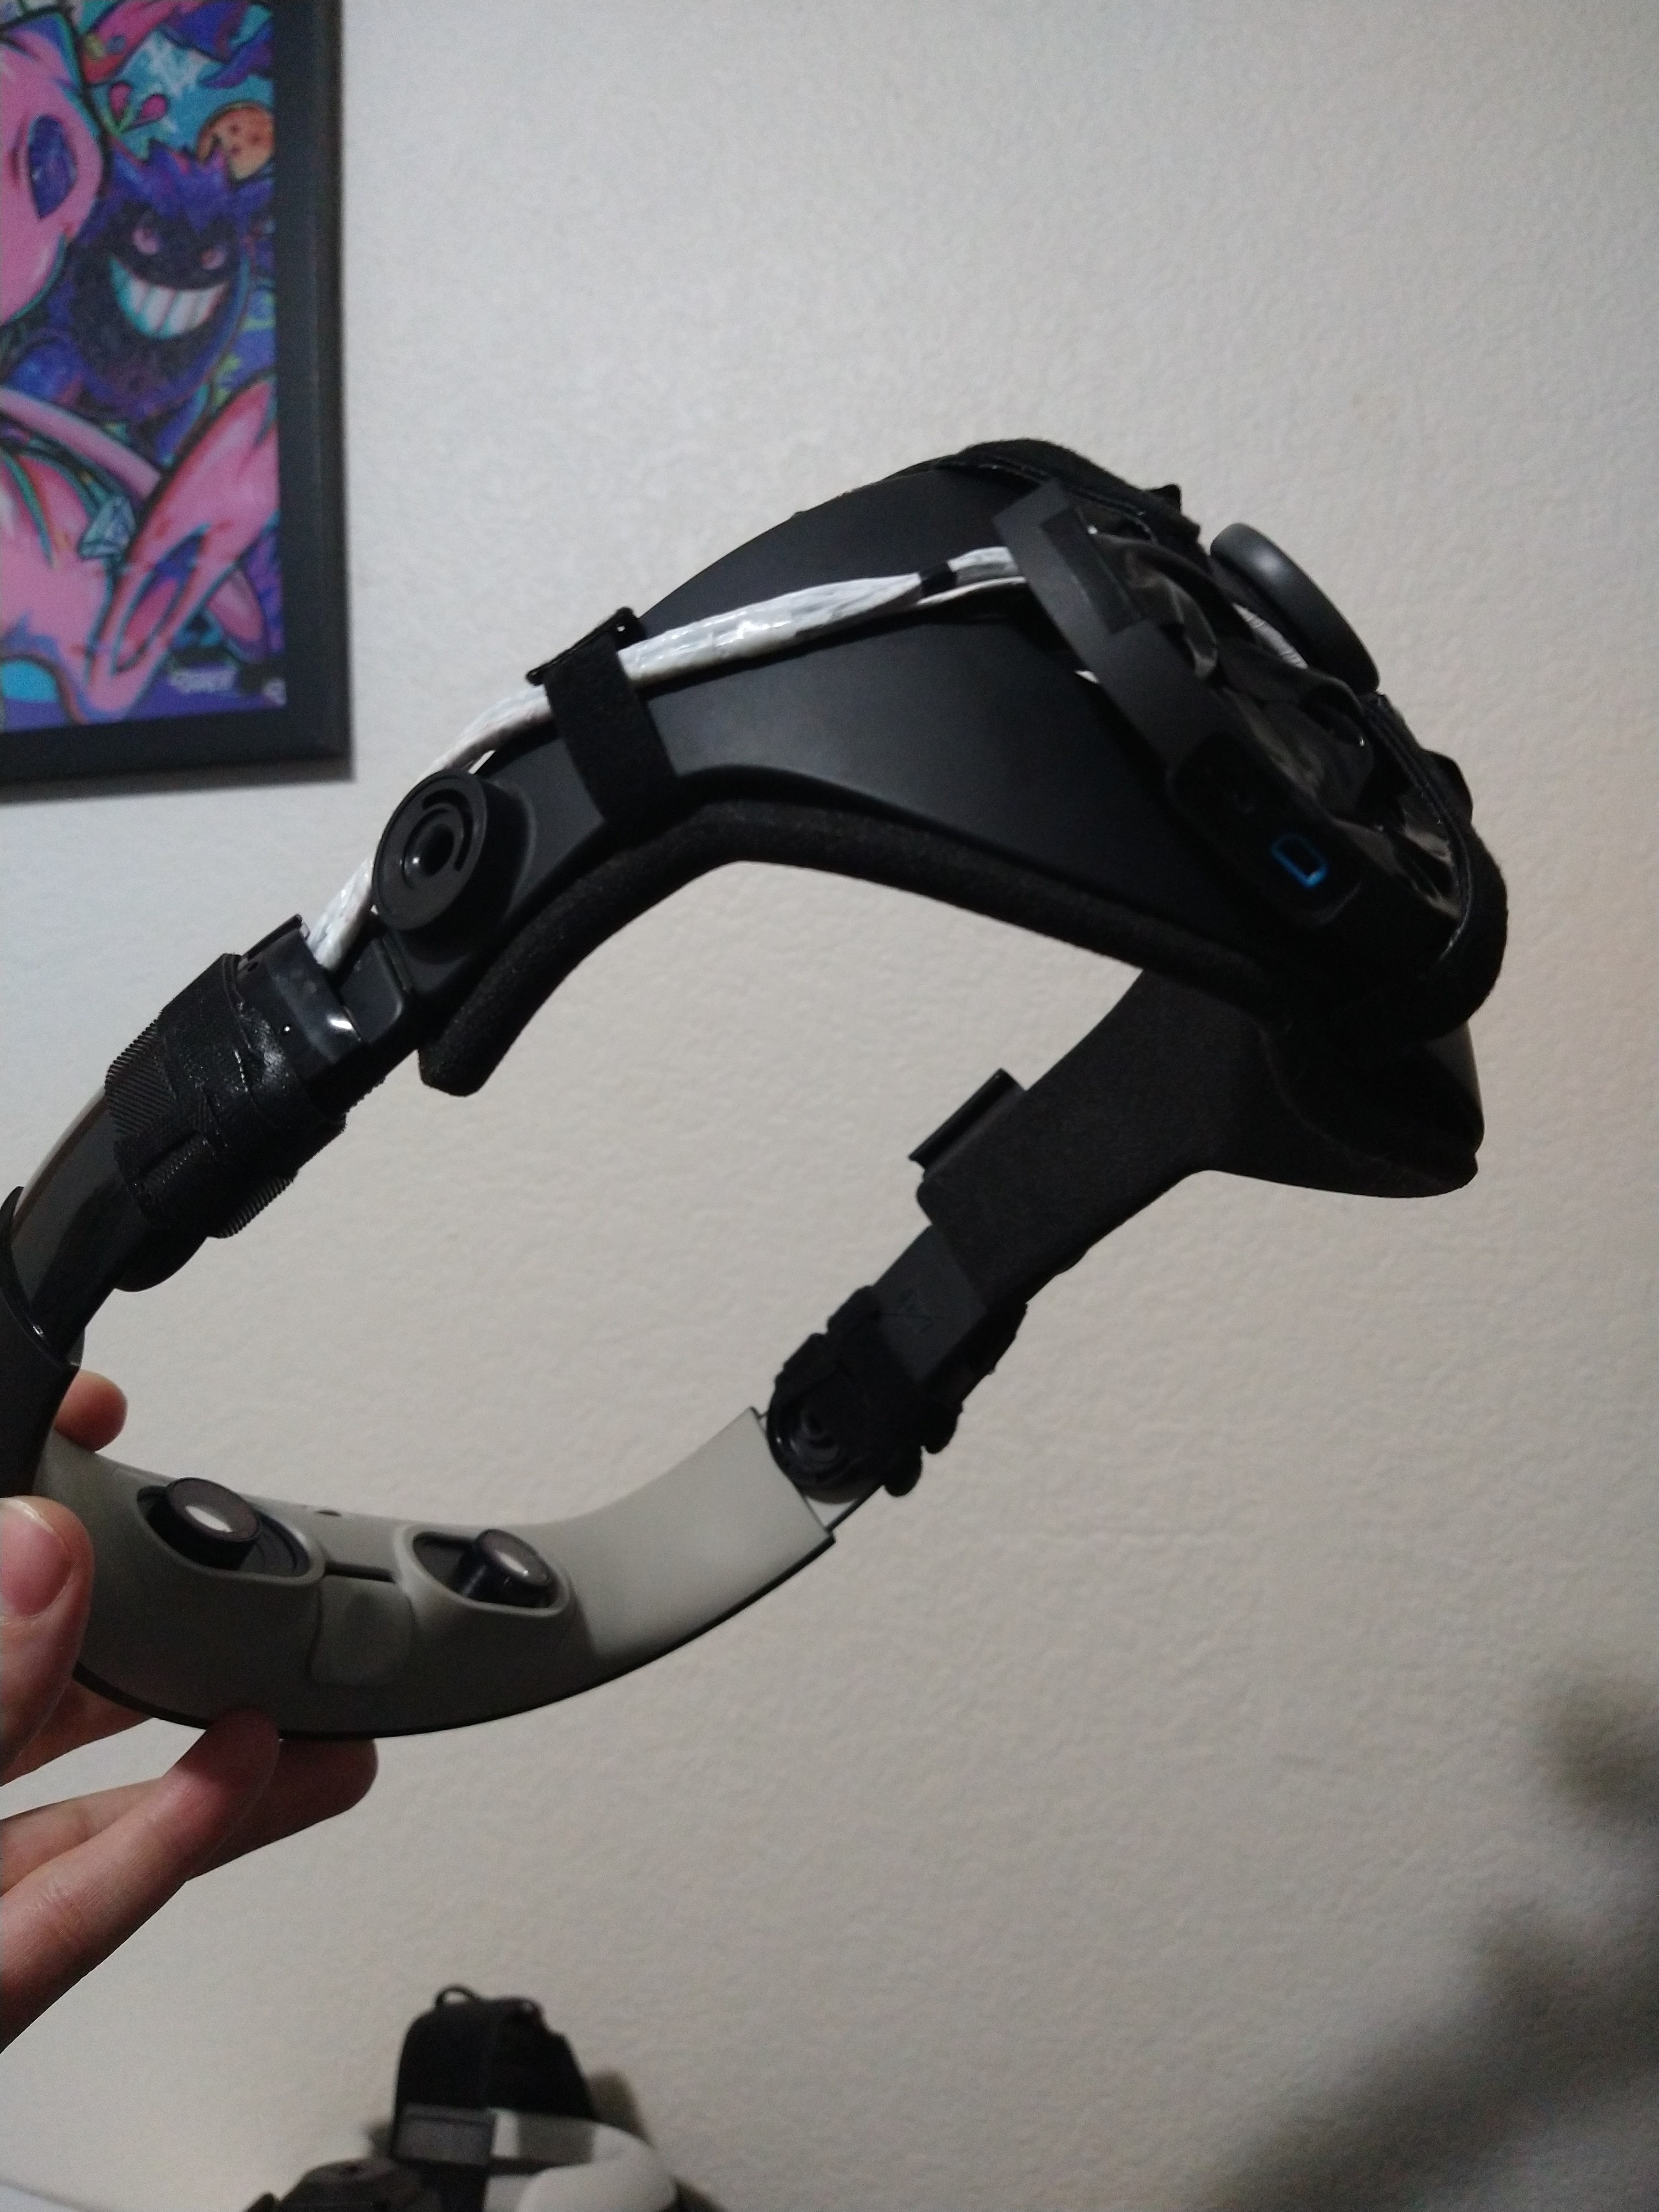
When worn it looked similar to Geordi LaForge's visor when I'm not basically wearing Beats headphones like the original design - although not integrated into my nervous system, just retinal projected light is all.
Super cool, and super great display! WHAT COULD GO WRONG?
Well, the display just simply not working at all. I couldn't power it through the USB ports off the mini PC. Not even if I used a y-splitter cable - although the y-splitter worked on a Nintendo Switch Dock, but not on the USB hub I use for my Steam Deck. Really annoying trying to power this thing, although I did take away its battery, so it might be a design related to bootup power requirements. Changing cables didn't help. Also, one of the eyes would randomly shut off. Or the display shutting off entirely after 10 seconds despite having solid power draw. From the same sources and cables, it could work for an hour or two, or continuously fail to work. I tried different micro USB cables for power. I tried different micro-HDMI cables in case it was a video signal problem. I'm still not sure what the cause is as I don't have the tools or knowledge to diagnose the circuitry, but I started having a ton of problems when I took it to a LAN event as a test run of EPI v0 in its early days.
This led me to eyeing other wearable displays, such as the Rokid or NReal wearables. There's also some higher end ones with some fancier built-in features, but they go anywhere from $1000 to $3000, and I am not a rich guy - I do like throwing money at tech, but not in that range for experimental stuff. Eventually I saved up for my birthday present to myself, a Rokid Air on sale!
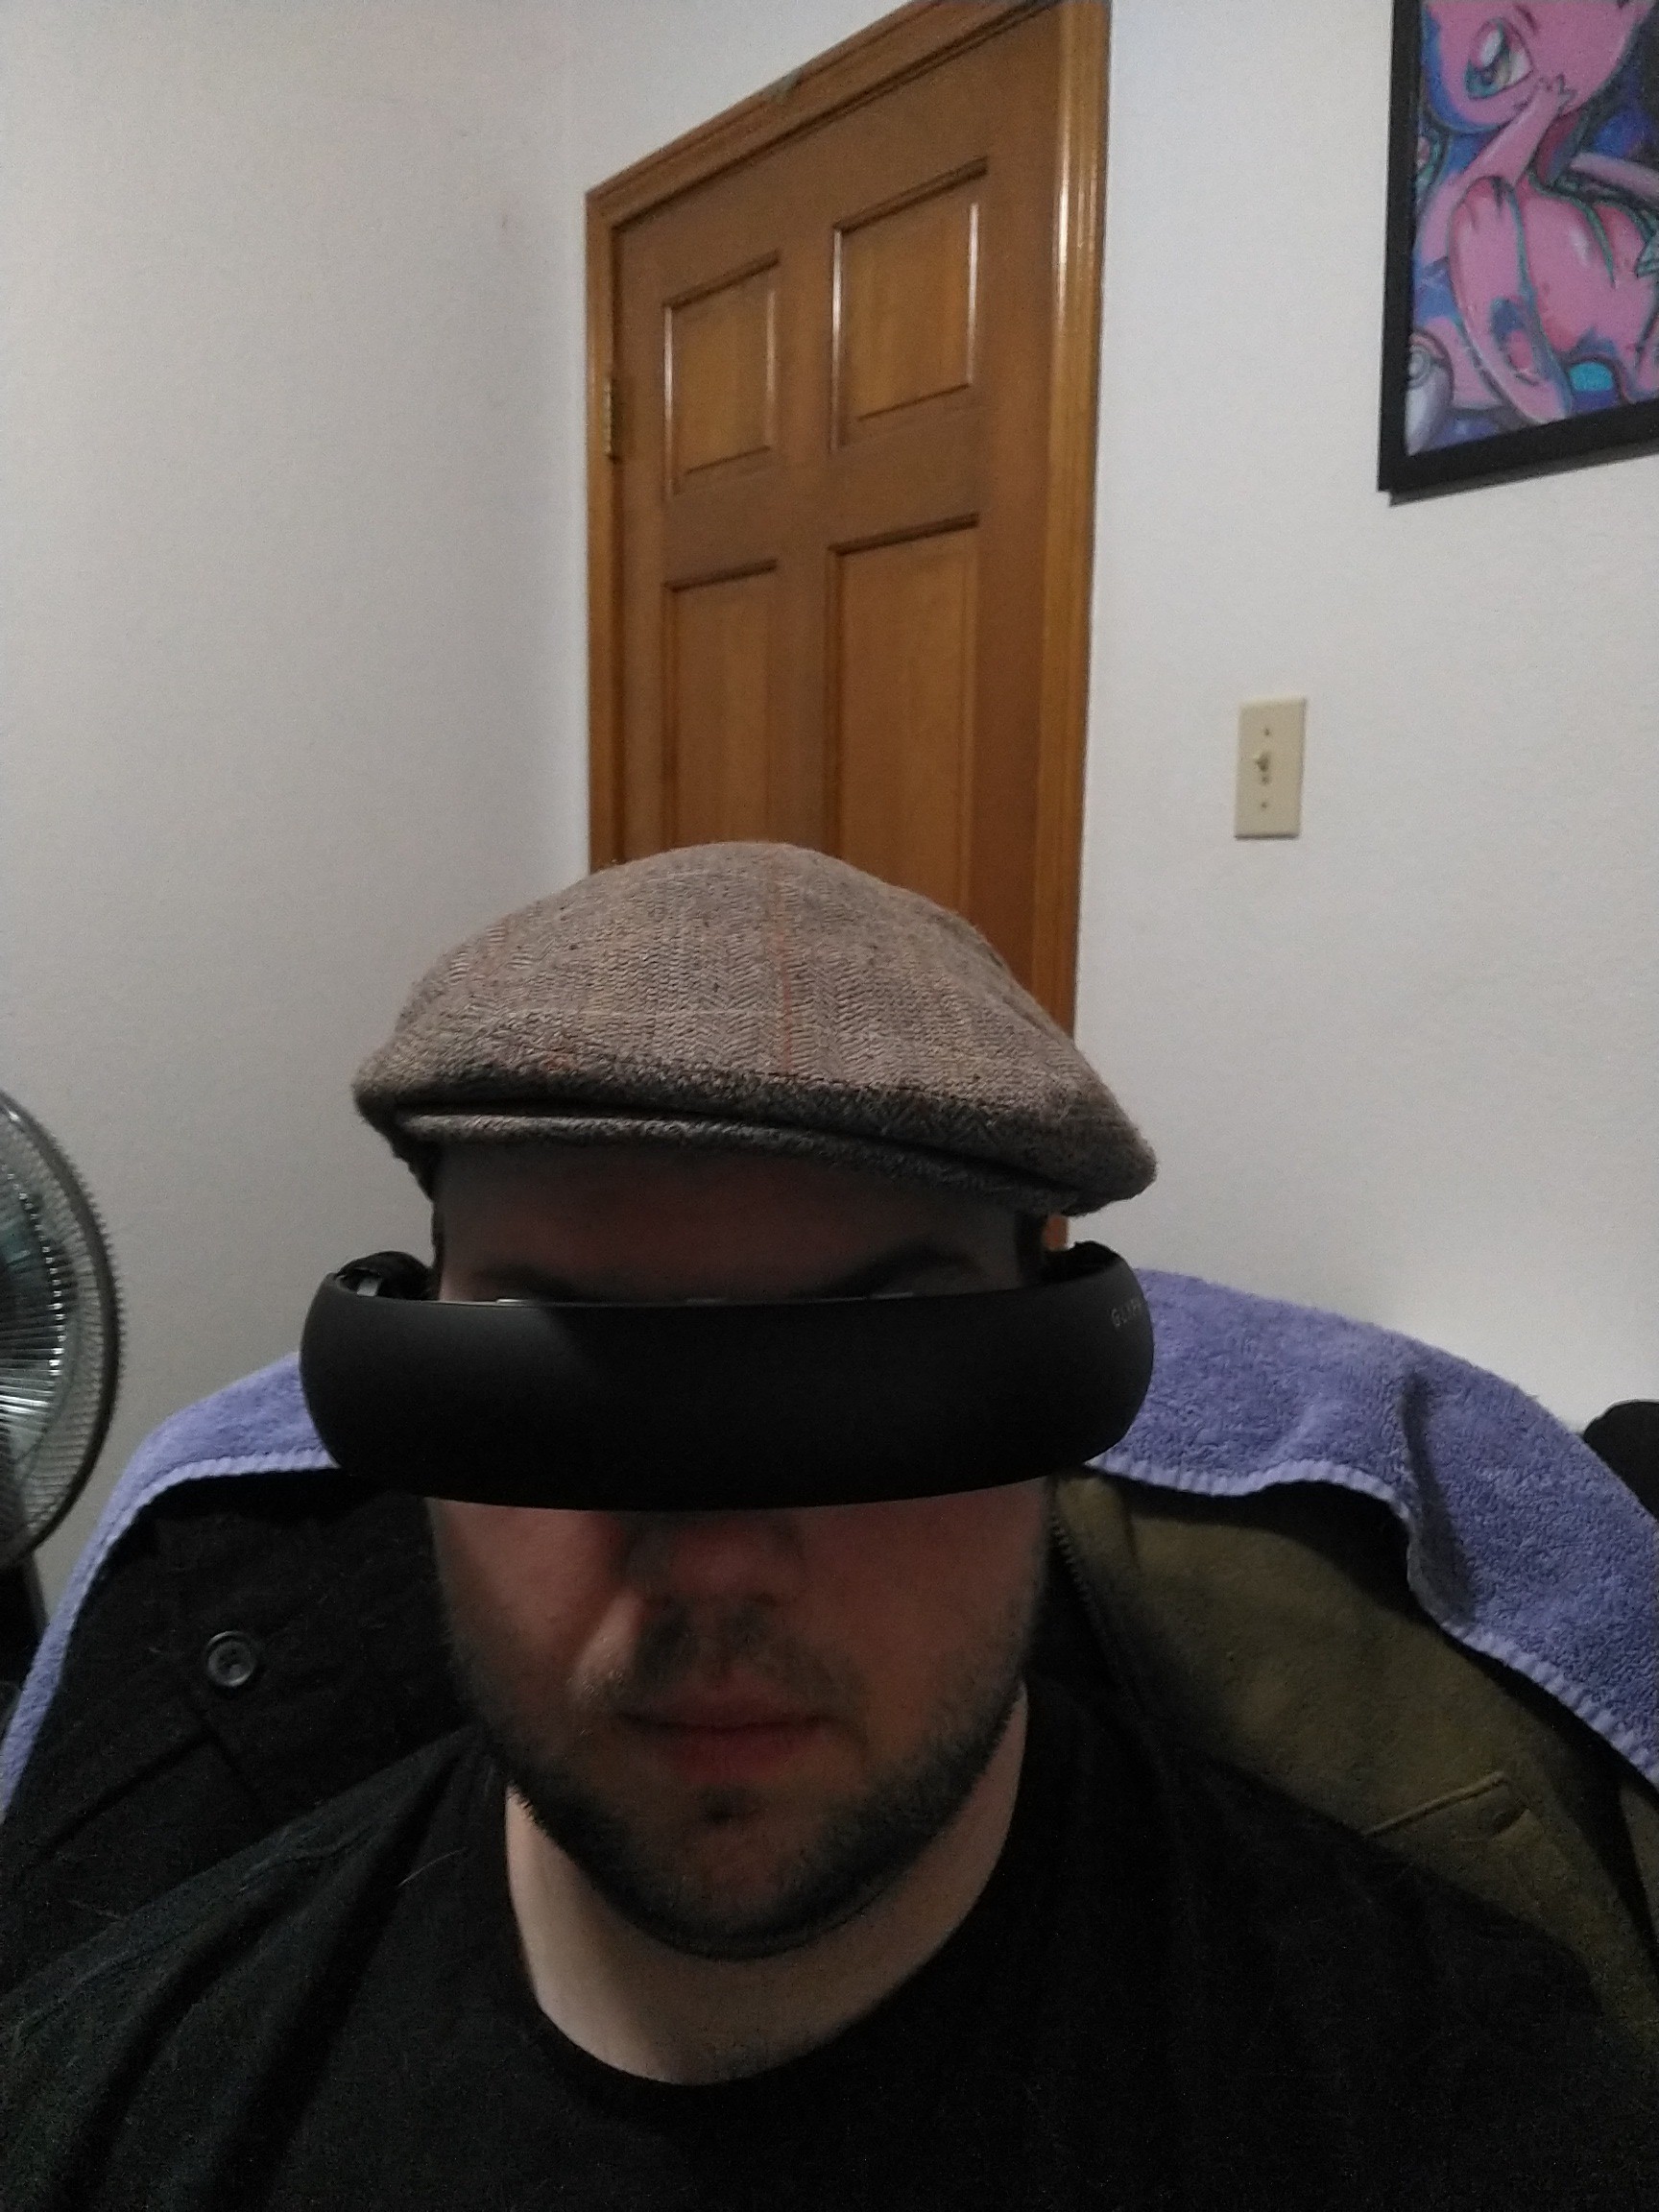
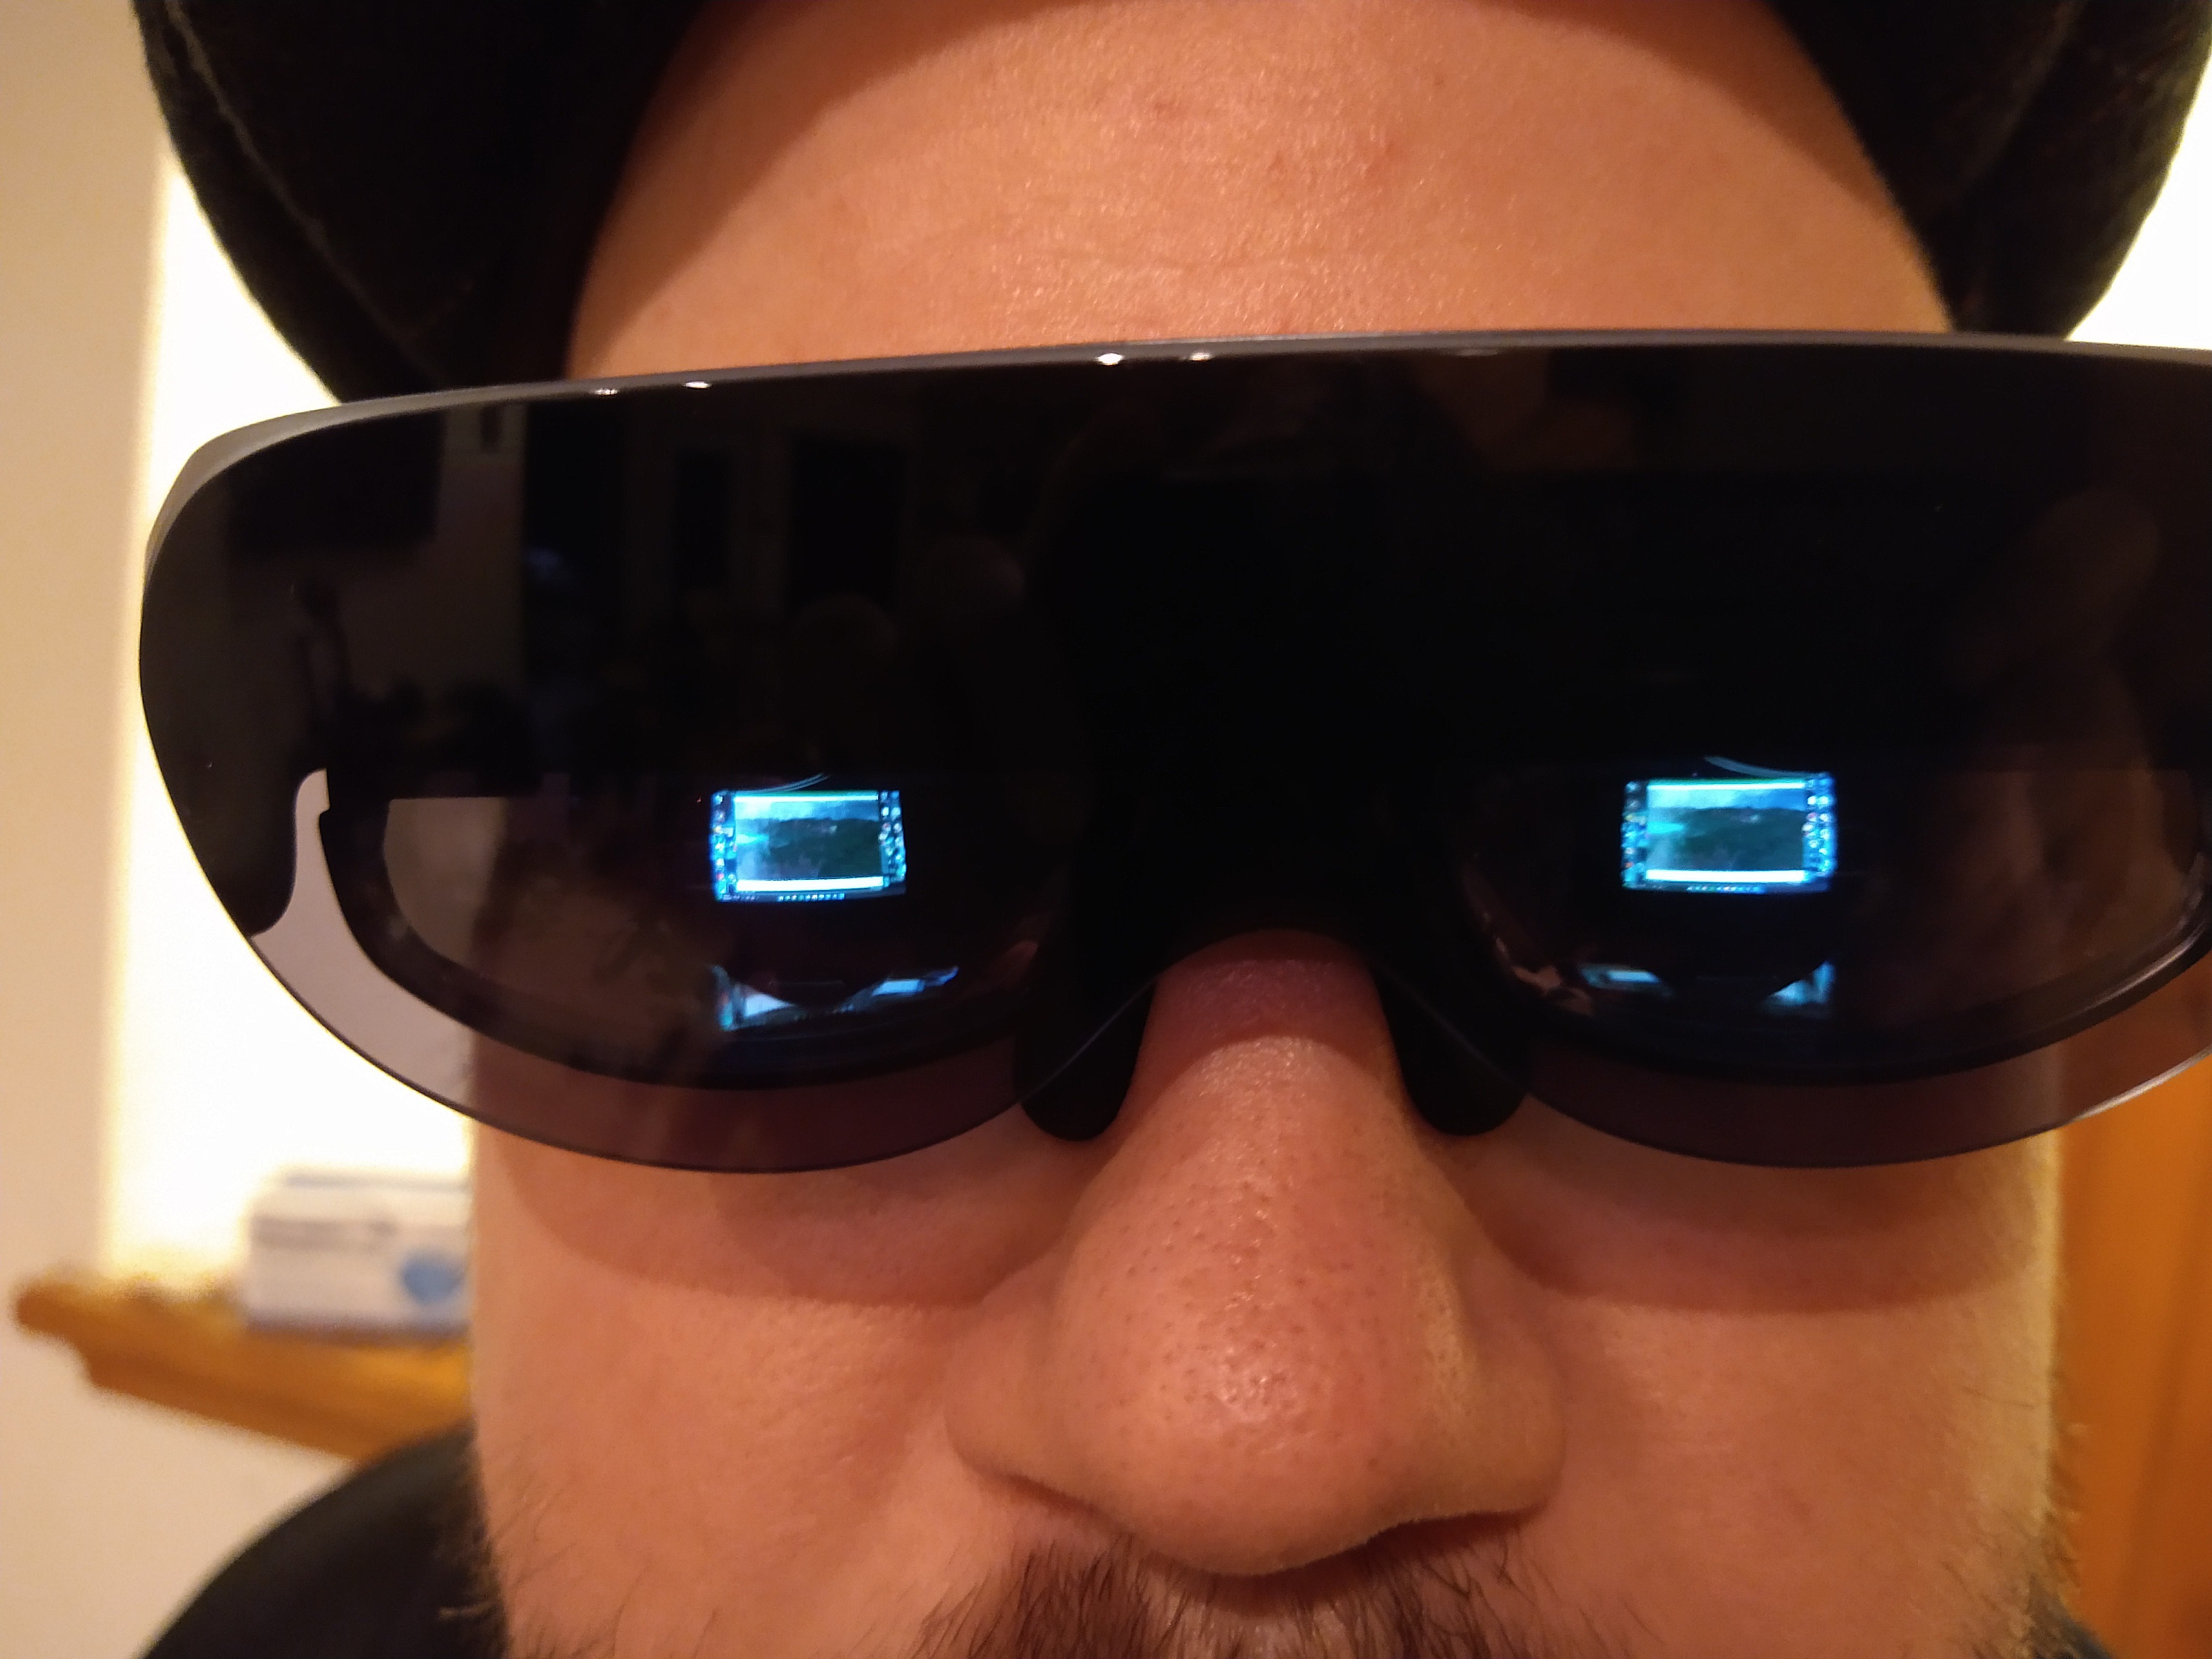
Rokid Air - Breathtaking
This is everything I could have asked for with a direct display wearable. Just a big screen taking up my vision, but also not taking up my entire vision like a VR headset. Even lets me see partially through it, like sunglasses! AND it's a native 1080p OLED display! It's lightweight, it has decent built in speakers that don't block my ears, it doesn't hurt my nose, and it just.. WORKS. It also has adjustable diopter lenses so I don't have to wear my contacts to see in it. It uses USB-C for the connection, and immediately works as a wearable 1080p display for the Steam Deck. Though my Mini PC doesn't have USB-C support for anything other than power, I got the Rokid with a HDMI adapter that takes in micro-USB for power. That also works perfectly with the mini PC, even through its split USB HUB I have inside. It just.. WORKS.
The AR features I can't even try since my phone doesn't support the display out protocol, so it's just a fixed-to-glasses display projection.
And this looks seriously cool. For some people though, that might be a problem. Unless you get up really close you can't actually see any specific details, and certainly can't read any text, from seeing it from the outside. But it does appear to other people, it can look awesome (or creepy) but it definitely doesn't look natural. I can kind of see through it as well, though details get blurry without my contacts. Unfortunately the main downside is that it doesn't come with a front cover to block out the real world like NReal glasses do, but the diopter lenses are worth it, and I could look into 3D printing a custom cover and use a cloth in the mean time if I want. Easily best display I could have asked for at this time.
5. The Bag
So what kind of secrets am I hiding in this bag anyways, eh? If the PC is on the outside, what's going on inside? Let's take a look! First off, I'm going to show an older picture that was the baseline for my internal wiring while highlighting problems at the time of the photo.

Let's start from the bottom. I have a cable cover around the RGB fans, HDMI, USB-C power, and USB hub cable fed from the outside to the inside. I got a grommet tool to create that hole for a clean cable management entryway, and at the time I had a lot of extra cabling in this pouch. The power cable, in red, routes upward to an interior grommet hole I created to pass through from the outside to the main cabling pouch all the way to the back/bottom pouch which I focus on Power only. In blood orange I have labeled 'Wasted Cabling', which is no longer a problem, but at the time I had the RGB fans (attached to the Mini PC exterior) with their long cables fed inside of here, and have them instead buried in outer pouches which I won't dig into here.
I also had excess HDMI cable, but over time I obtained more cables and adapters in different lengths to mitigate this. The HDMI signal is routed to a toggle switch that has a fake HDMI display plugged in. The reason I have a fake display plugged in is because if I want to remote into this machine without an actual display plugged in by using a VR headset and Virtual Desktop, or by using remote access from another PC, I may have problems getting a high resolution for whatever I'm trying to do. Otherwise I can toggle between a real display and the fake one (which I set to 720p for performance and battery reasons by default).
For USB I'm running the RGB fans (yes, they're USB! meant for rpi builds) to a per-port toggleable hub in case I want to turn off the fans individually, or control power for other devices plugged in. This is for discretion and for power efficiency. Usually they're just all on but it's nice having more control without having to actually unplug anything.

And this is its latest form with the innards pulled out a bit with a new grommet hole to feed in the new display's USB-C cable. This is updated and mirrored a bit to show that I have the USB-C to HDMI adapter plugged in for the Rokid Air wearable display, plugged in for power to the USB hub, and also have a dongle plugged in to the hub with a right angle adapter (since the dongle is so thicc). The dongle is for the wireless connection to a Mod Mic, which I use as a high quality microphone that will still allow me to use high quality, low-latency wireless earphones. The reason for doing that separation is 1. quality 2. bluetooth support is kind of awful to support quality audio streaming + any microphone support at all on the same device. I'm not sure if this is specifically a Windows issue, but digging around the internet led me to understand that the drivers and/or bluetooth protocol make this prohibitive. Why do I need high quality mic support? Well, for voice recognition using Voice Attack to control various things with macros I have set up. It's not robust yet, and I will probably focus more on that and hand tracking in EPI's v2 updated build.
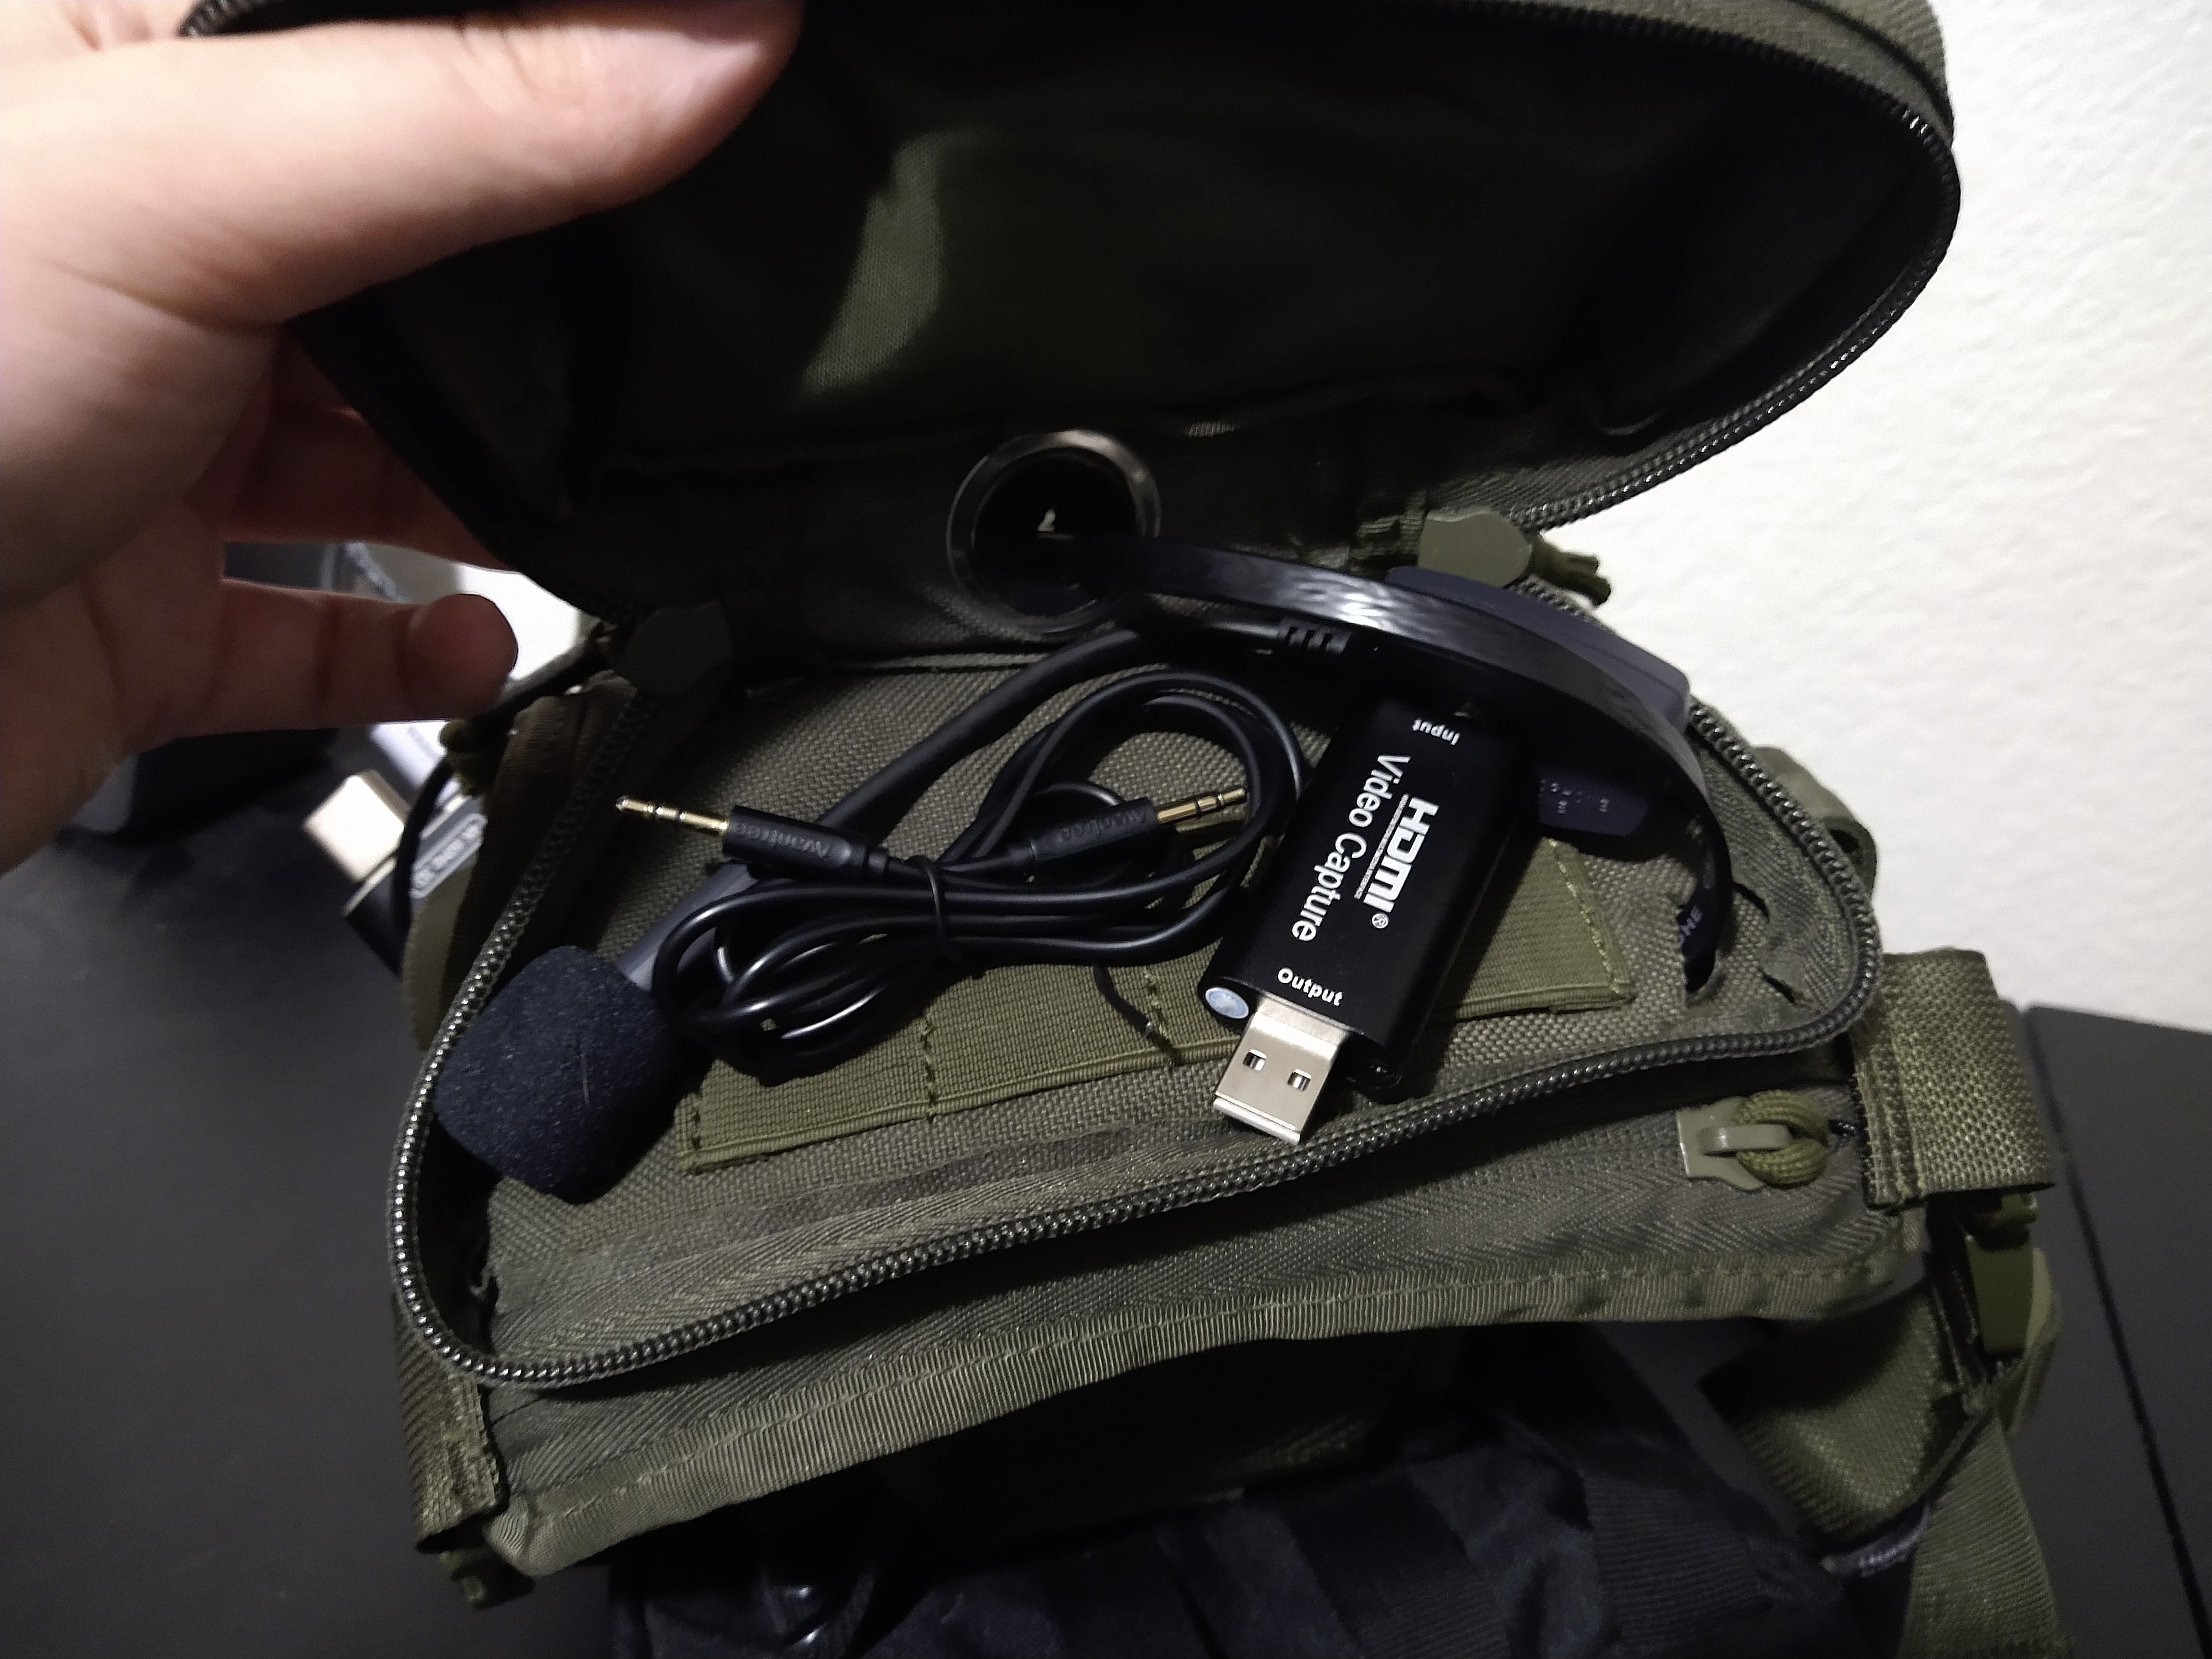
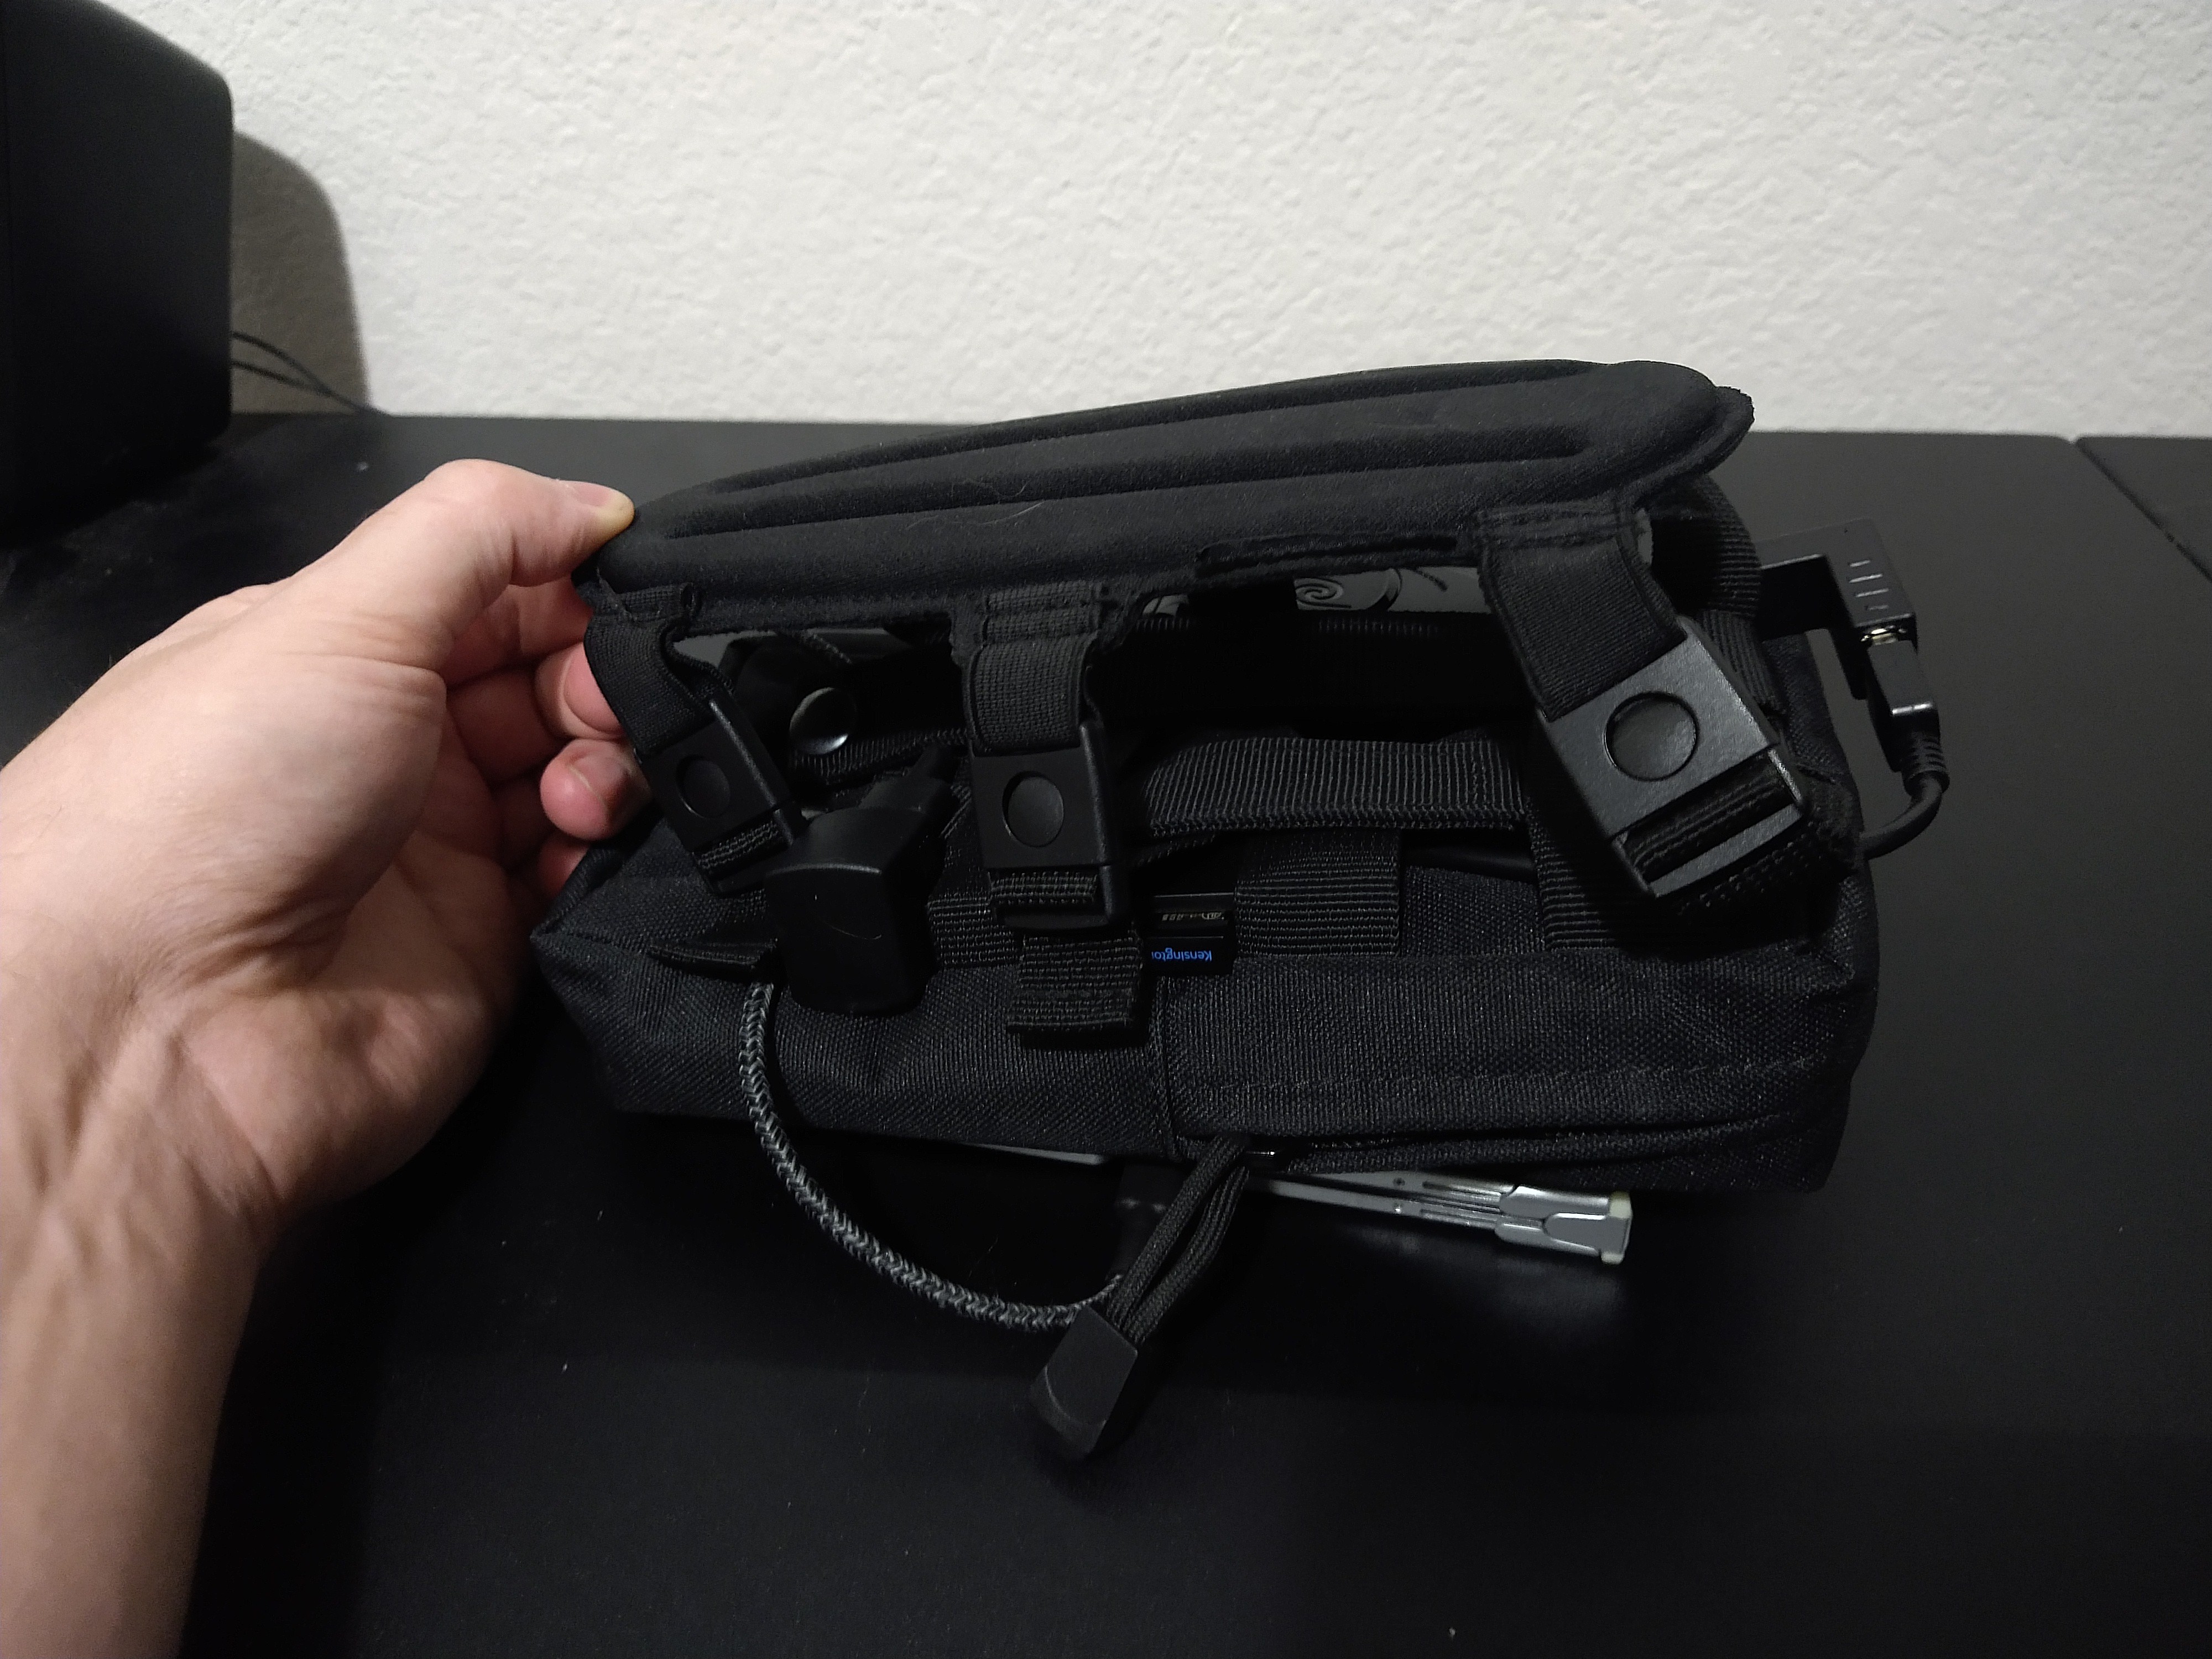
Extra Bits
Now, tucked under the Mini PC itself are the Mod Mic when I'm not using it, a USB capture stick if I need it, and an audio cable. Oh, and strung on the topright of all of that is a thin ethernet cable that is running into a very narrow pocket space for a hidden ethernet port extended from the mini PC itself.
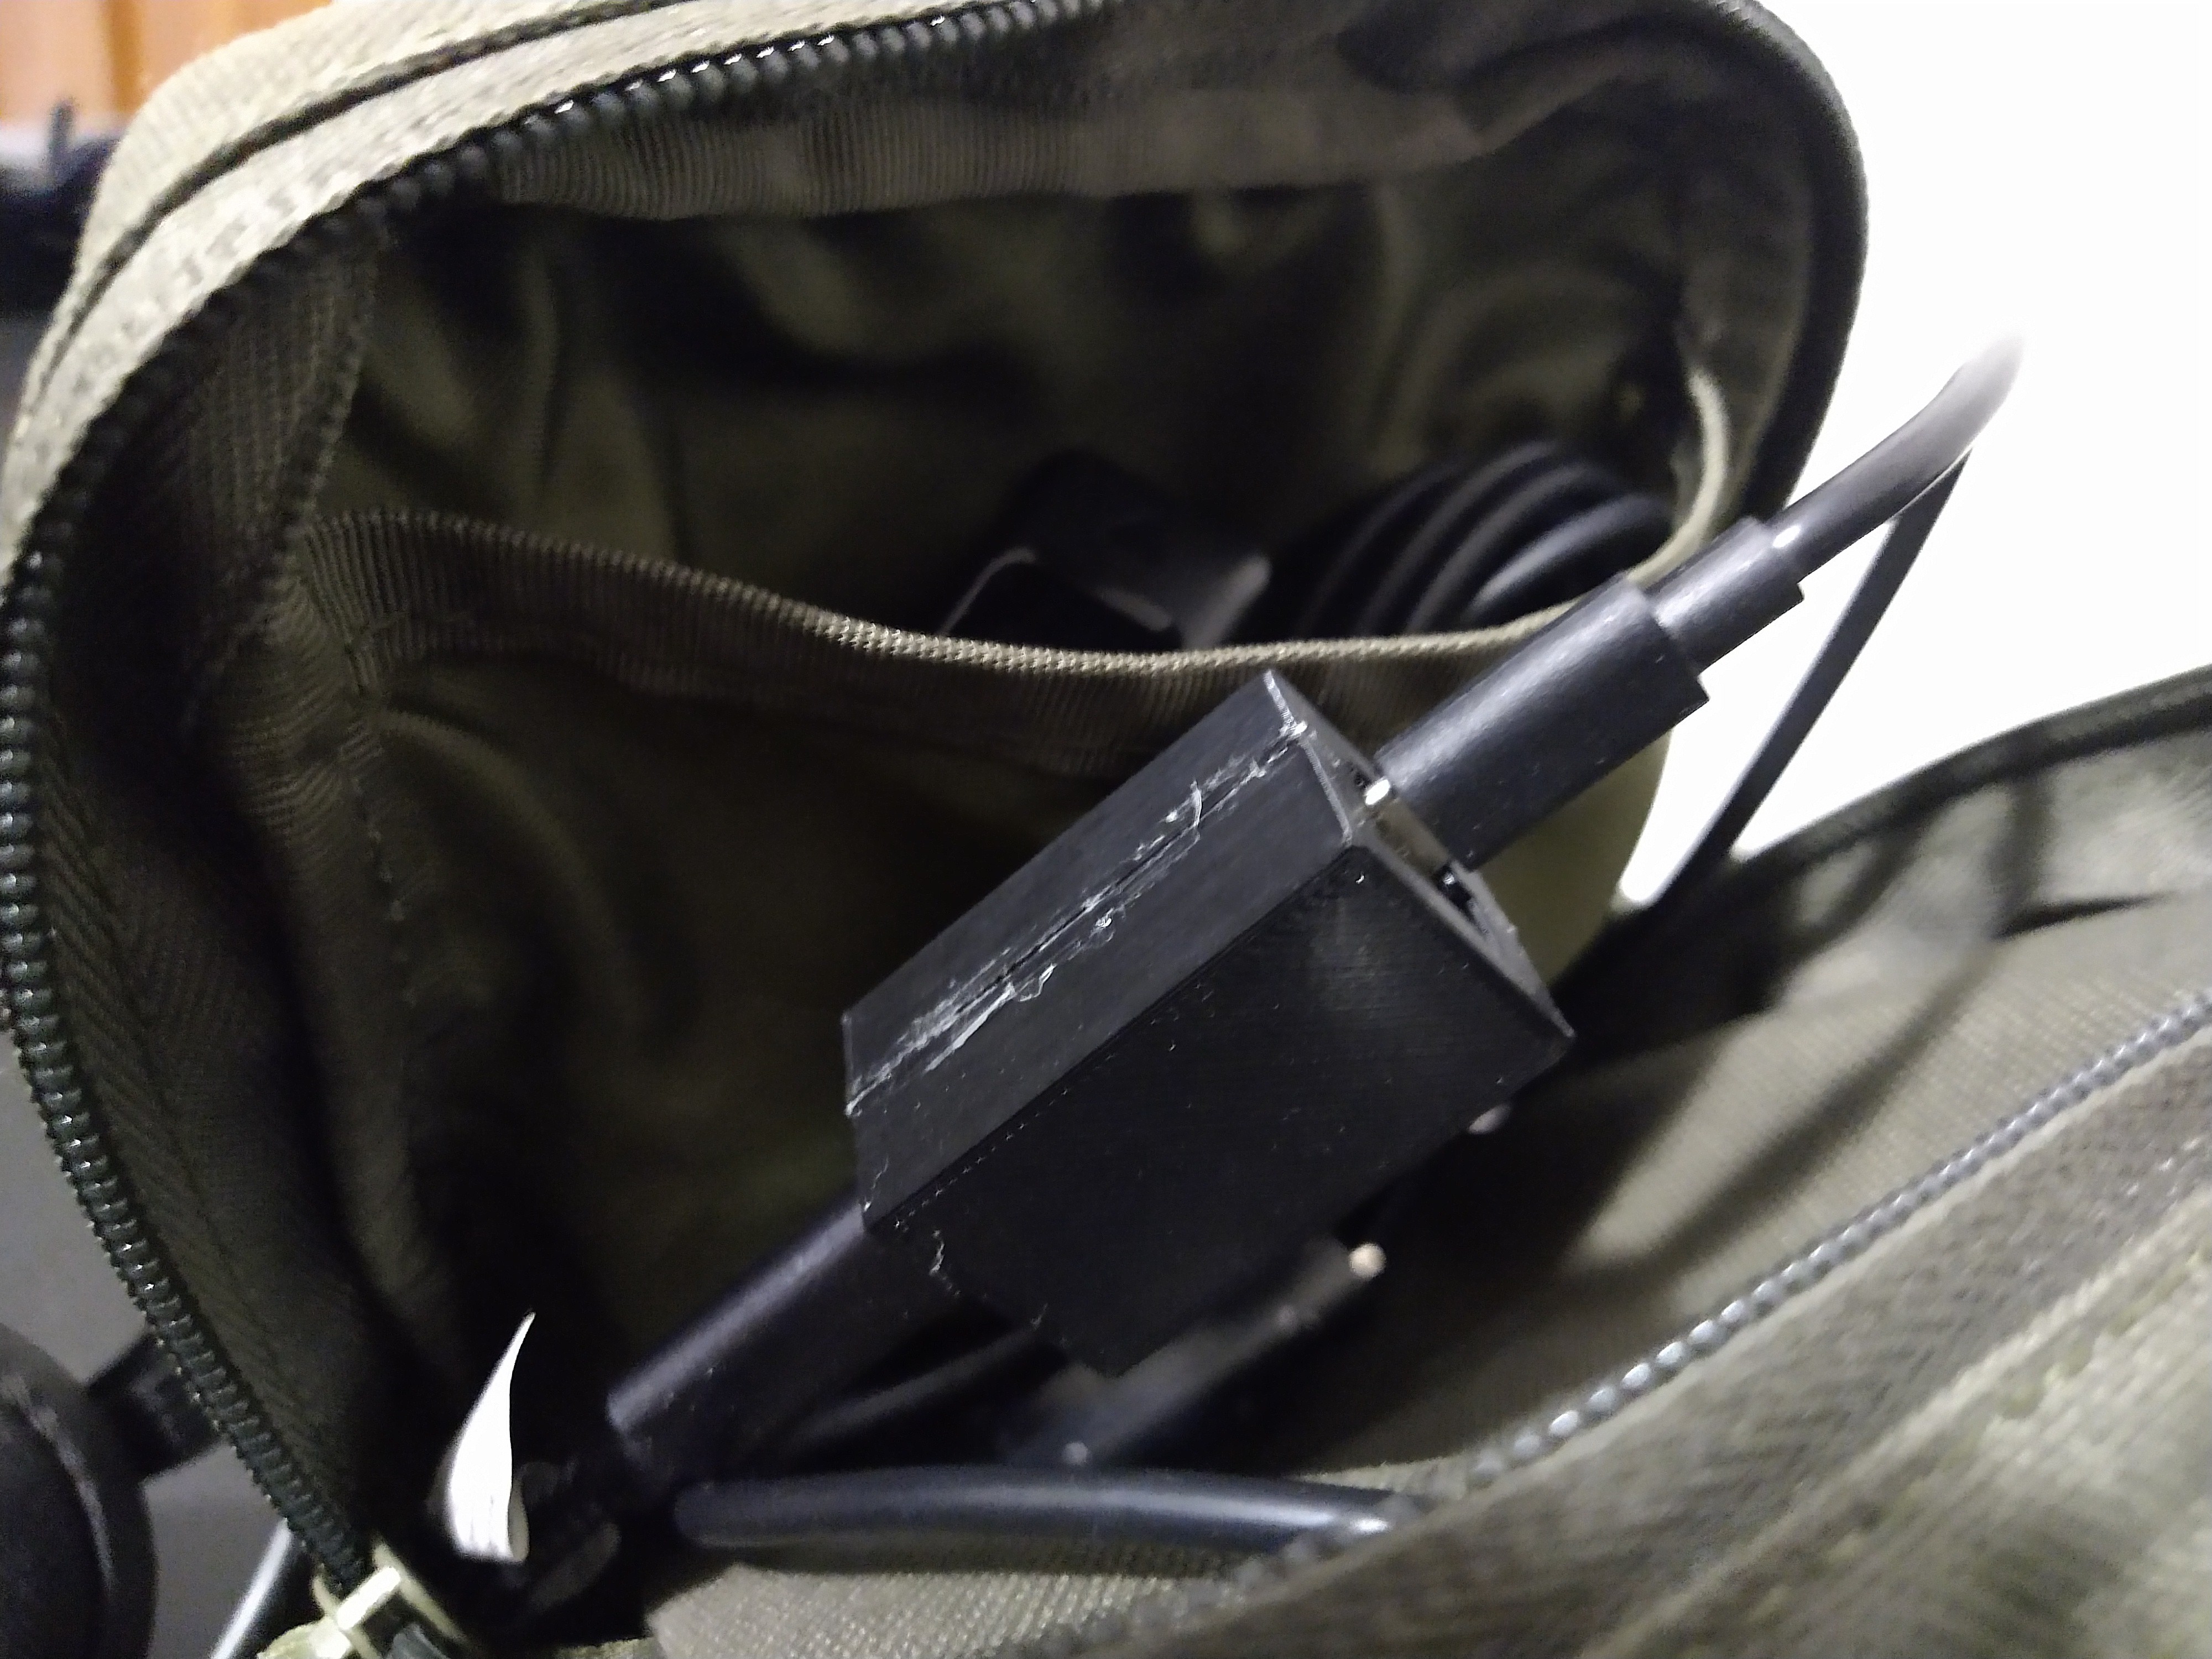
Ethernet
Originally I had a grommet hole here to try and feed ethernet cables through, but I wanted a dedicated external-access port that I didn't have to fish cabling through to plug into something, so I removed the metal grommet piece and super glued the right angle adapter to the fabric so it guarantees being a port on the outside. It's probably the most tacky part of this entire build, but given that it can't be seen when worn or folded into its desktop mode, I think this is an okay compromise especially given I did it the night before this competition entry was due.. oh boy.
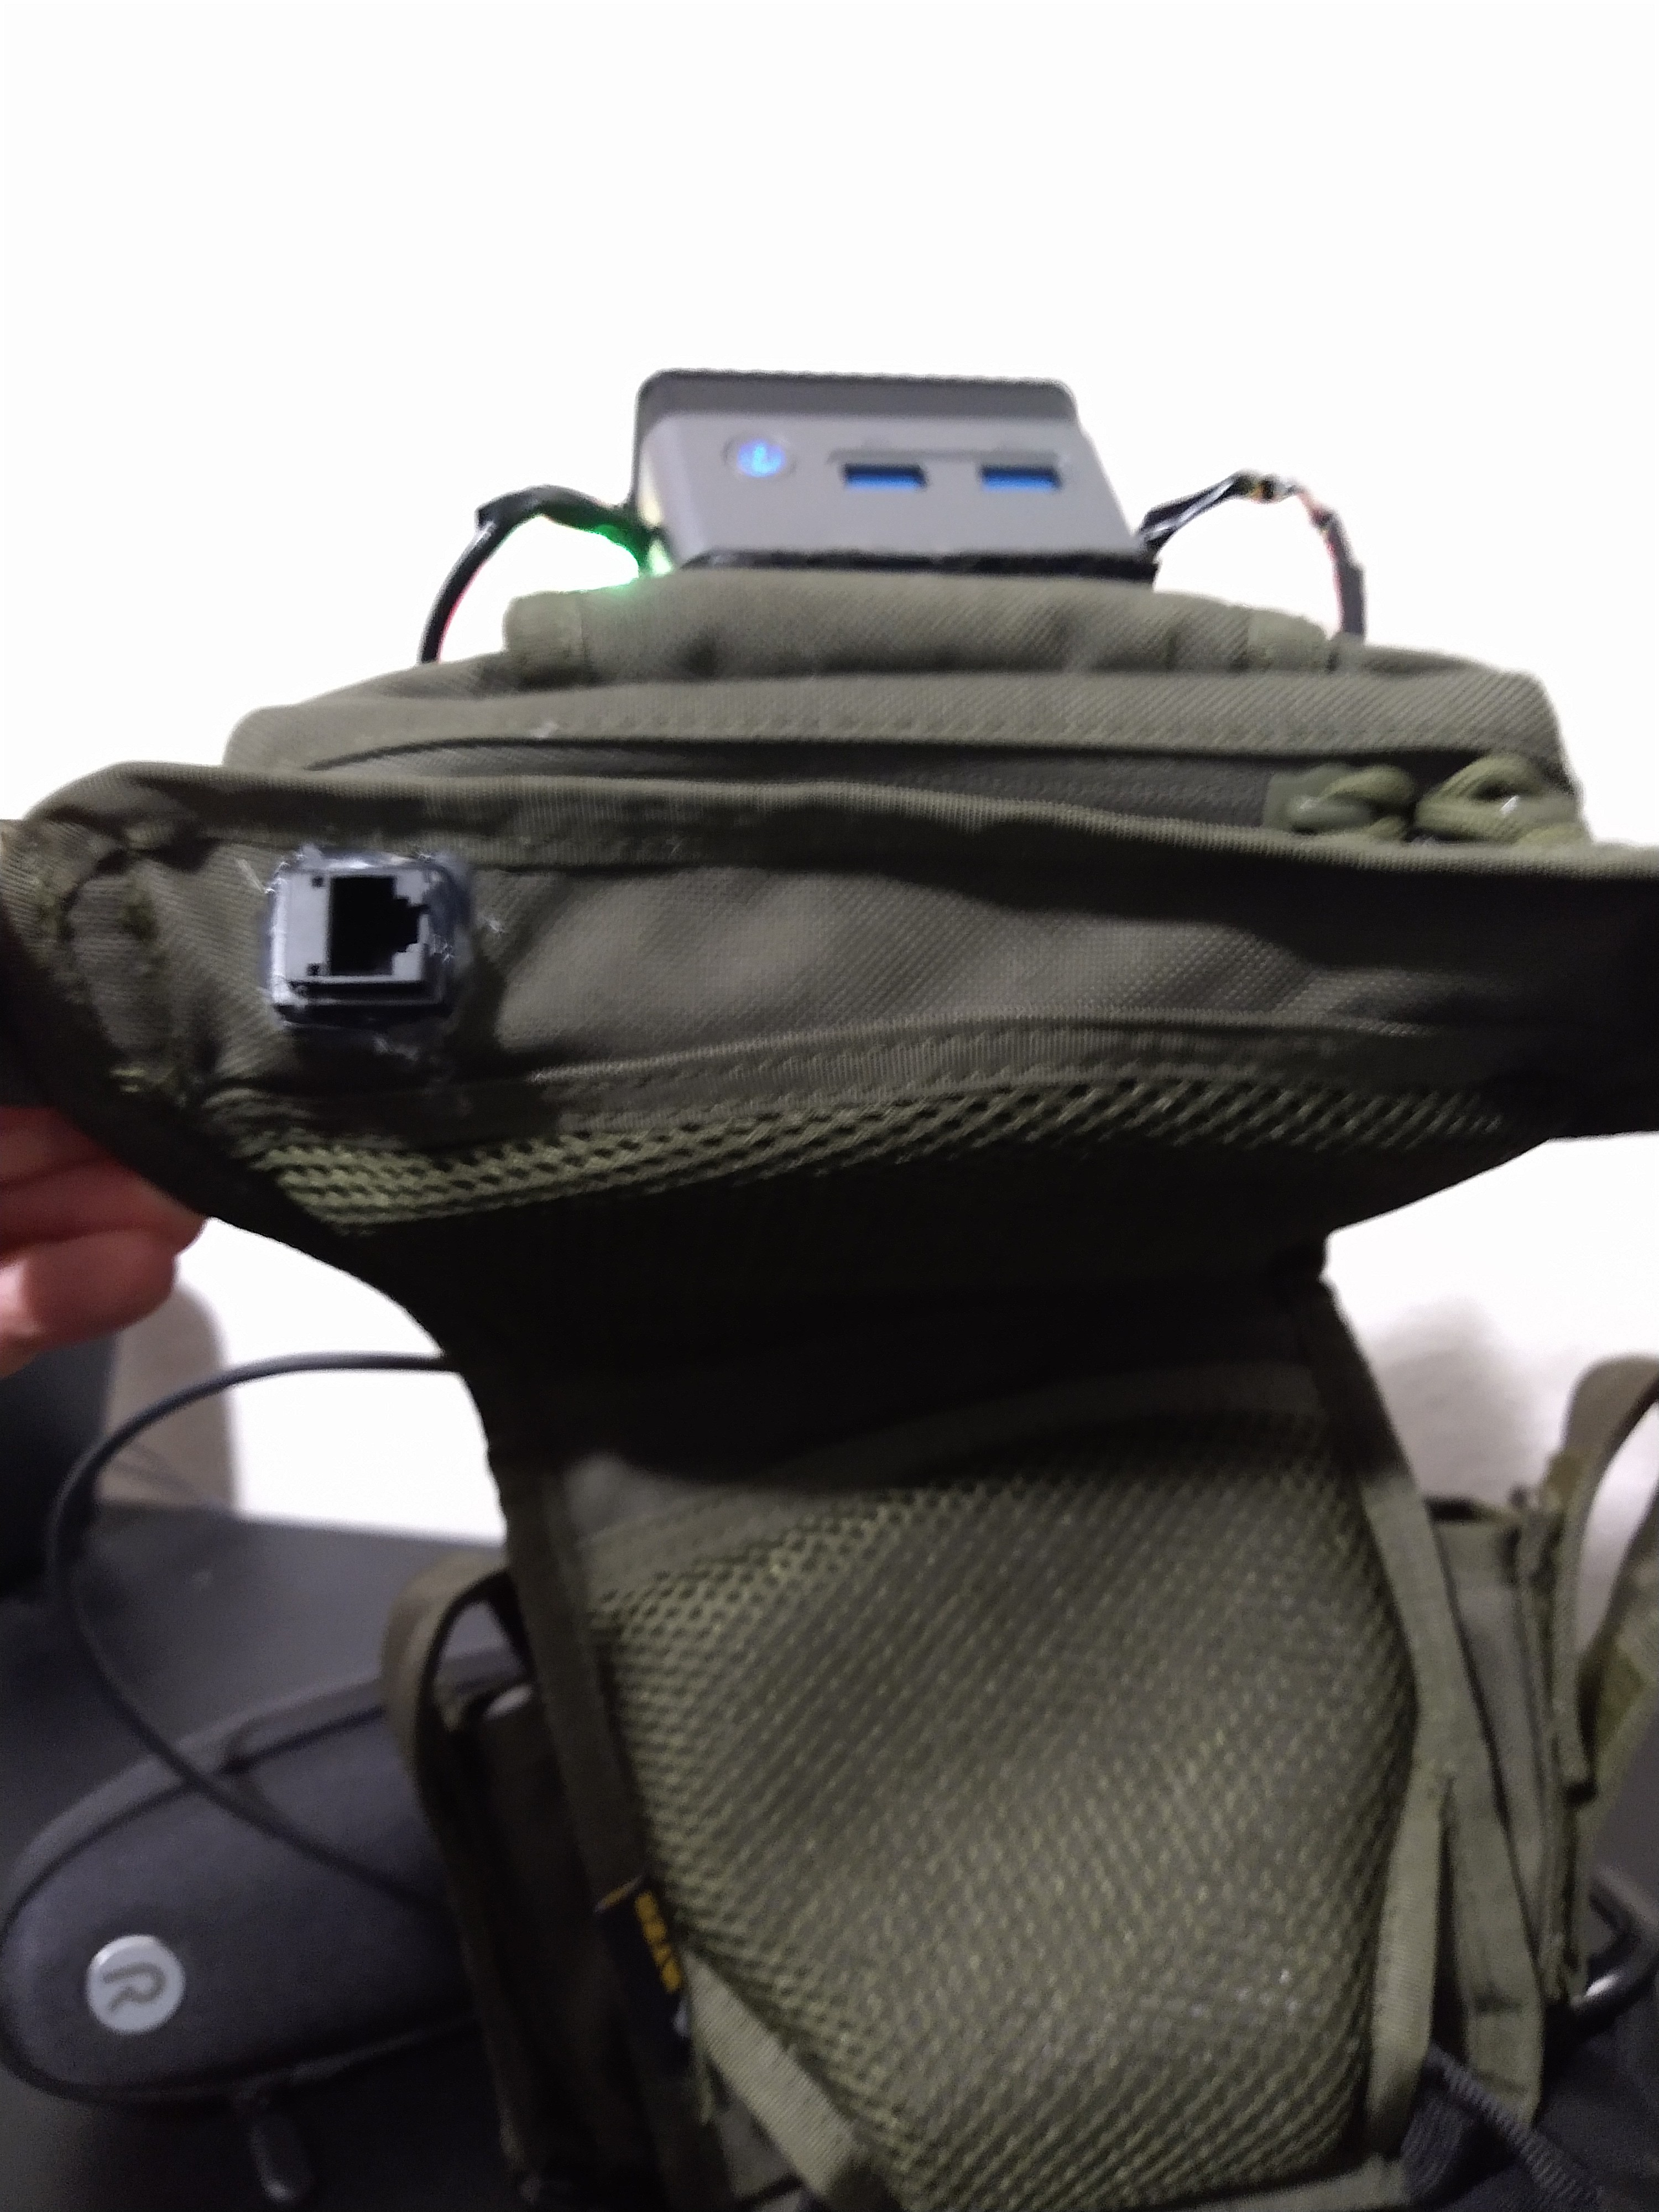
Power
The last compartment contains power-related items. Specifically, and notably, the Power Delivery Decoy Trigger. It's a neat little USB-C device that force-negotiates power delivery for whatever setting you set it at. You can't see the buttons for it, because I made a 3d print specifically to prevent the buttons from being pressed. The buttons change it between 5V, 12V, 15V, and 20V. The Mini PC uses 12V, but what happens when a wearable moves and accidentally presses one of the buttons as I power it on? I don't like to take chances, so I made a custom casing to prevent the buttons from ever being pressed. Since I have no idea how to model a snapping function into the case design, I just superglued it together.
Tucked behind that really import part are USB voltage testing adapters, extra micro-USB and USB-C cables, and a wall plug for up to 4 amps if I need it. This is as much a computer as it as a computer peripheral tech supplies bag, so I'm making the most out of it.
Not pictured due to time is the VHS tape-sized Anker battery I have running this whole thing which I happened to get for free, and probably would not have obtained otherwise. Depending on what I'm doing and at what power saving or performance mode I'm running the machine at, I get between 8 and 15 hours of battery life off one battery charge. The goal was to have an 'all day' computing capability and I think I landed at quite a reasonable result. The battery itself weighs 2 whole pounds, whereas the rest of the entire machine is about 1.5LB, totaling at 3.5LB for this machine. But wait, there's more!
6. Input
One common thing I think we all fantasize about when you hear the word Cyberdeck is having a really cool keyboard. For a wearable PC this becomes a bit tricky because you either shape an existing full keyboard into something wearable but bulky, or you use something that doesn't work like normal input and requires re-learning.
I did both.
In several images you may notice I have a Twiddler3 attached to my hand, or seated in one of the side pockets the Bag has. It's a chord-based keyboard with a nub mouse and I'm still getting used to it, but for my wearable PC it works just fine as a mouse to click on various things. For typing... well, it'll take a while. But before I managed to get one - as they are often out of stock - I went with the idea of putting a keyboard on my arm to fully realize the concept that often comes up for futuristic computers. In fact, since I want it more compact and I would prefer it to be wireless, I went hunting for a good wireless bluetooth keyboard. What I managed to find has been brilliant and more exciting than I could have imagined.
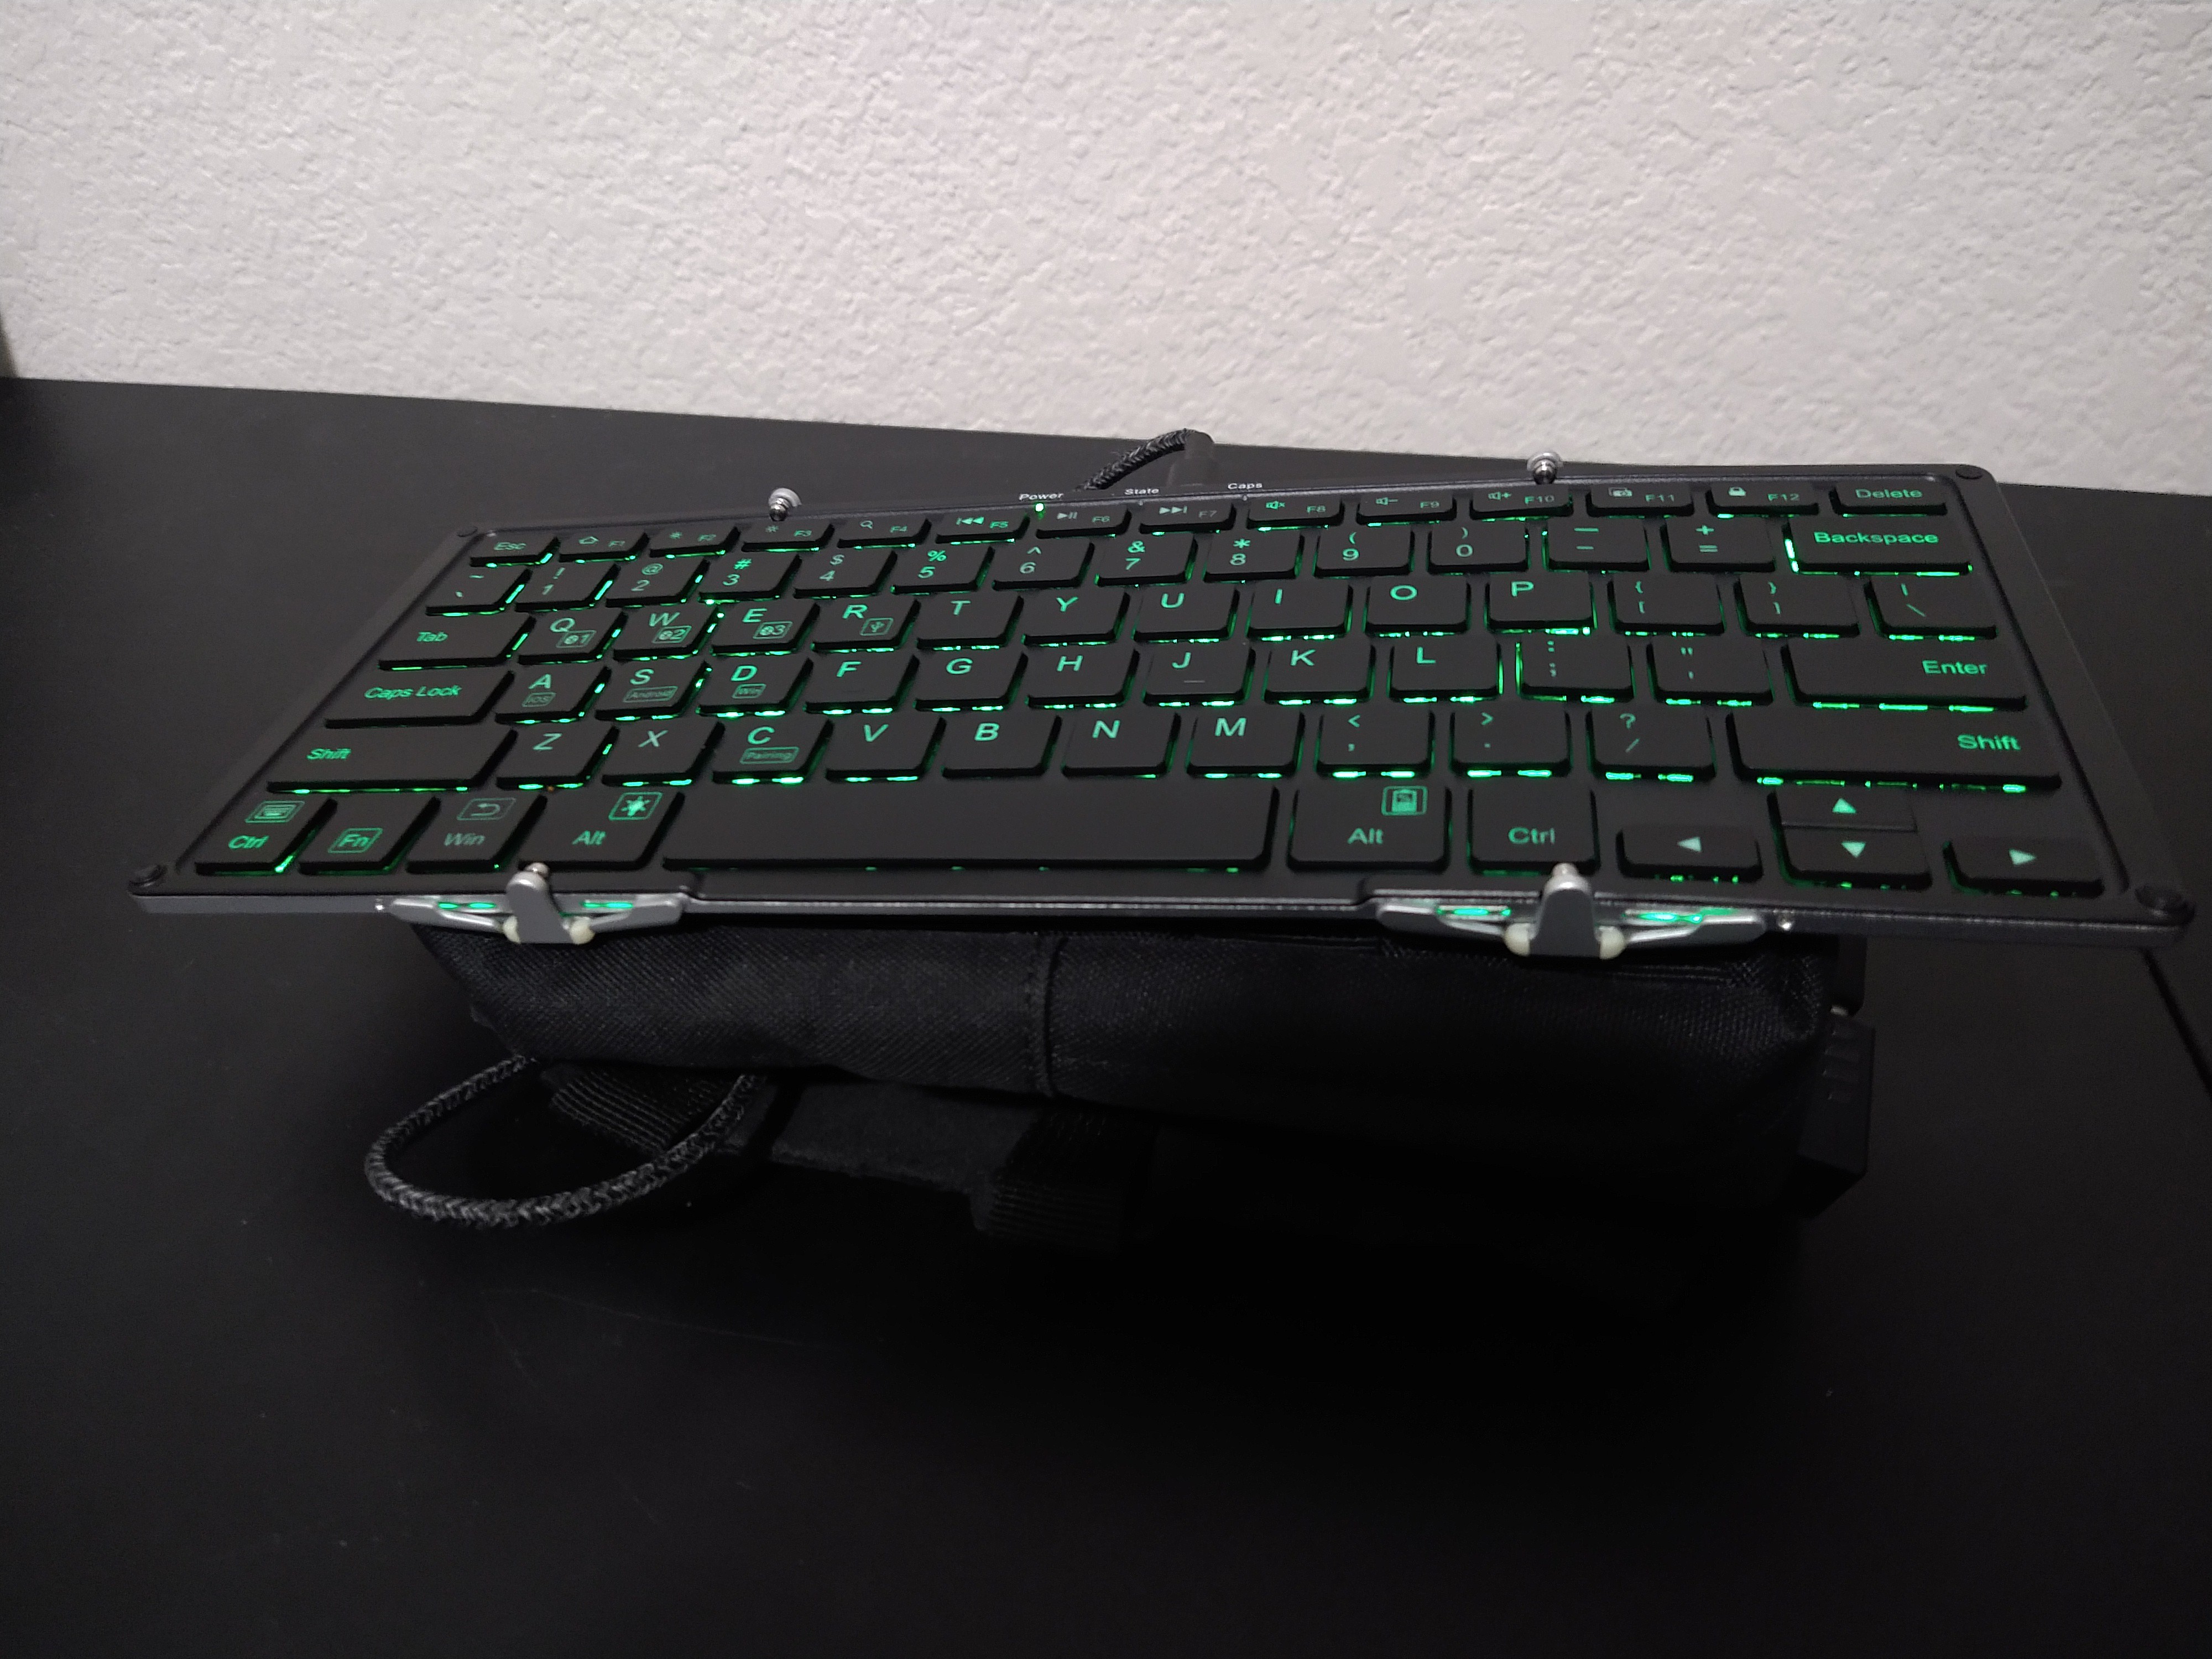
It has RGB lighting, great for dark areas. It folds open and closed, and powers off while closed. It's also reasonably lightweight given it's a 60% keyboard as well, and it's not exactly cheap feeling either. Not super strong, but stronger than other thin wireless keyboards I've used. This is an iClever foldable keyboard, and I had a very important lesson about learning that it uses magnetism to know that it's closed. I wanted to attach and remove it using magnets, but that caused it to no longer turn on because it thought it was closed with a magnet near. Bummer! But still, this works well with velcro to attach it to an archery armguard, which solves the wearable strap design and lightweight design with a hard surface problem immediately. No sewing or crafting required on my part, just velcro! At least, that's what I did at first.
There's now, as pictured (it's upside down, by the way), a pouch inbetween the keyboard and the arm strap, and that's to hold a few extra things. Ports for the USB hub are exposed inbetween the bag's woven fabric for quick and easy access, built in and immovable. Simple yet effective. The arm guard is also woven into the bag without any stitching, glue, or velcro required. Only the keyboard is attached via velcro.
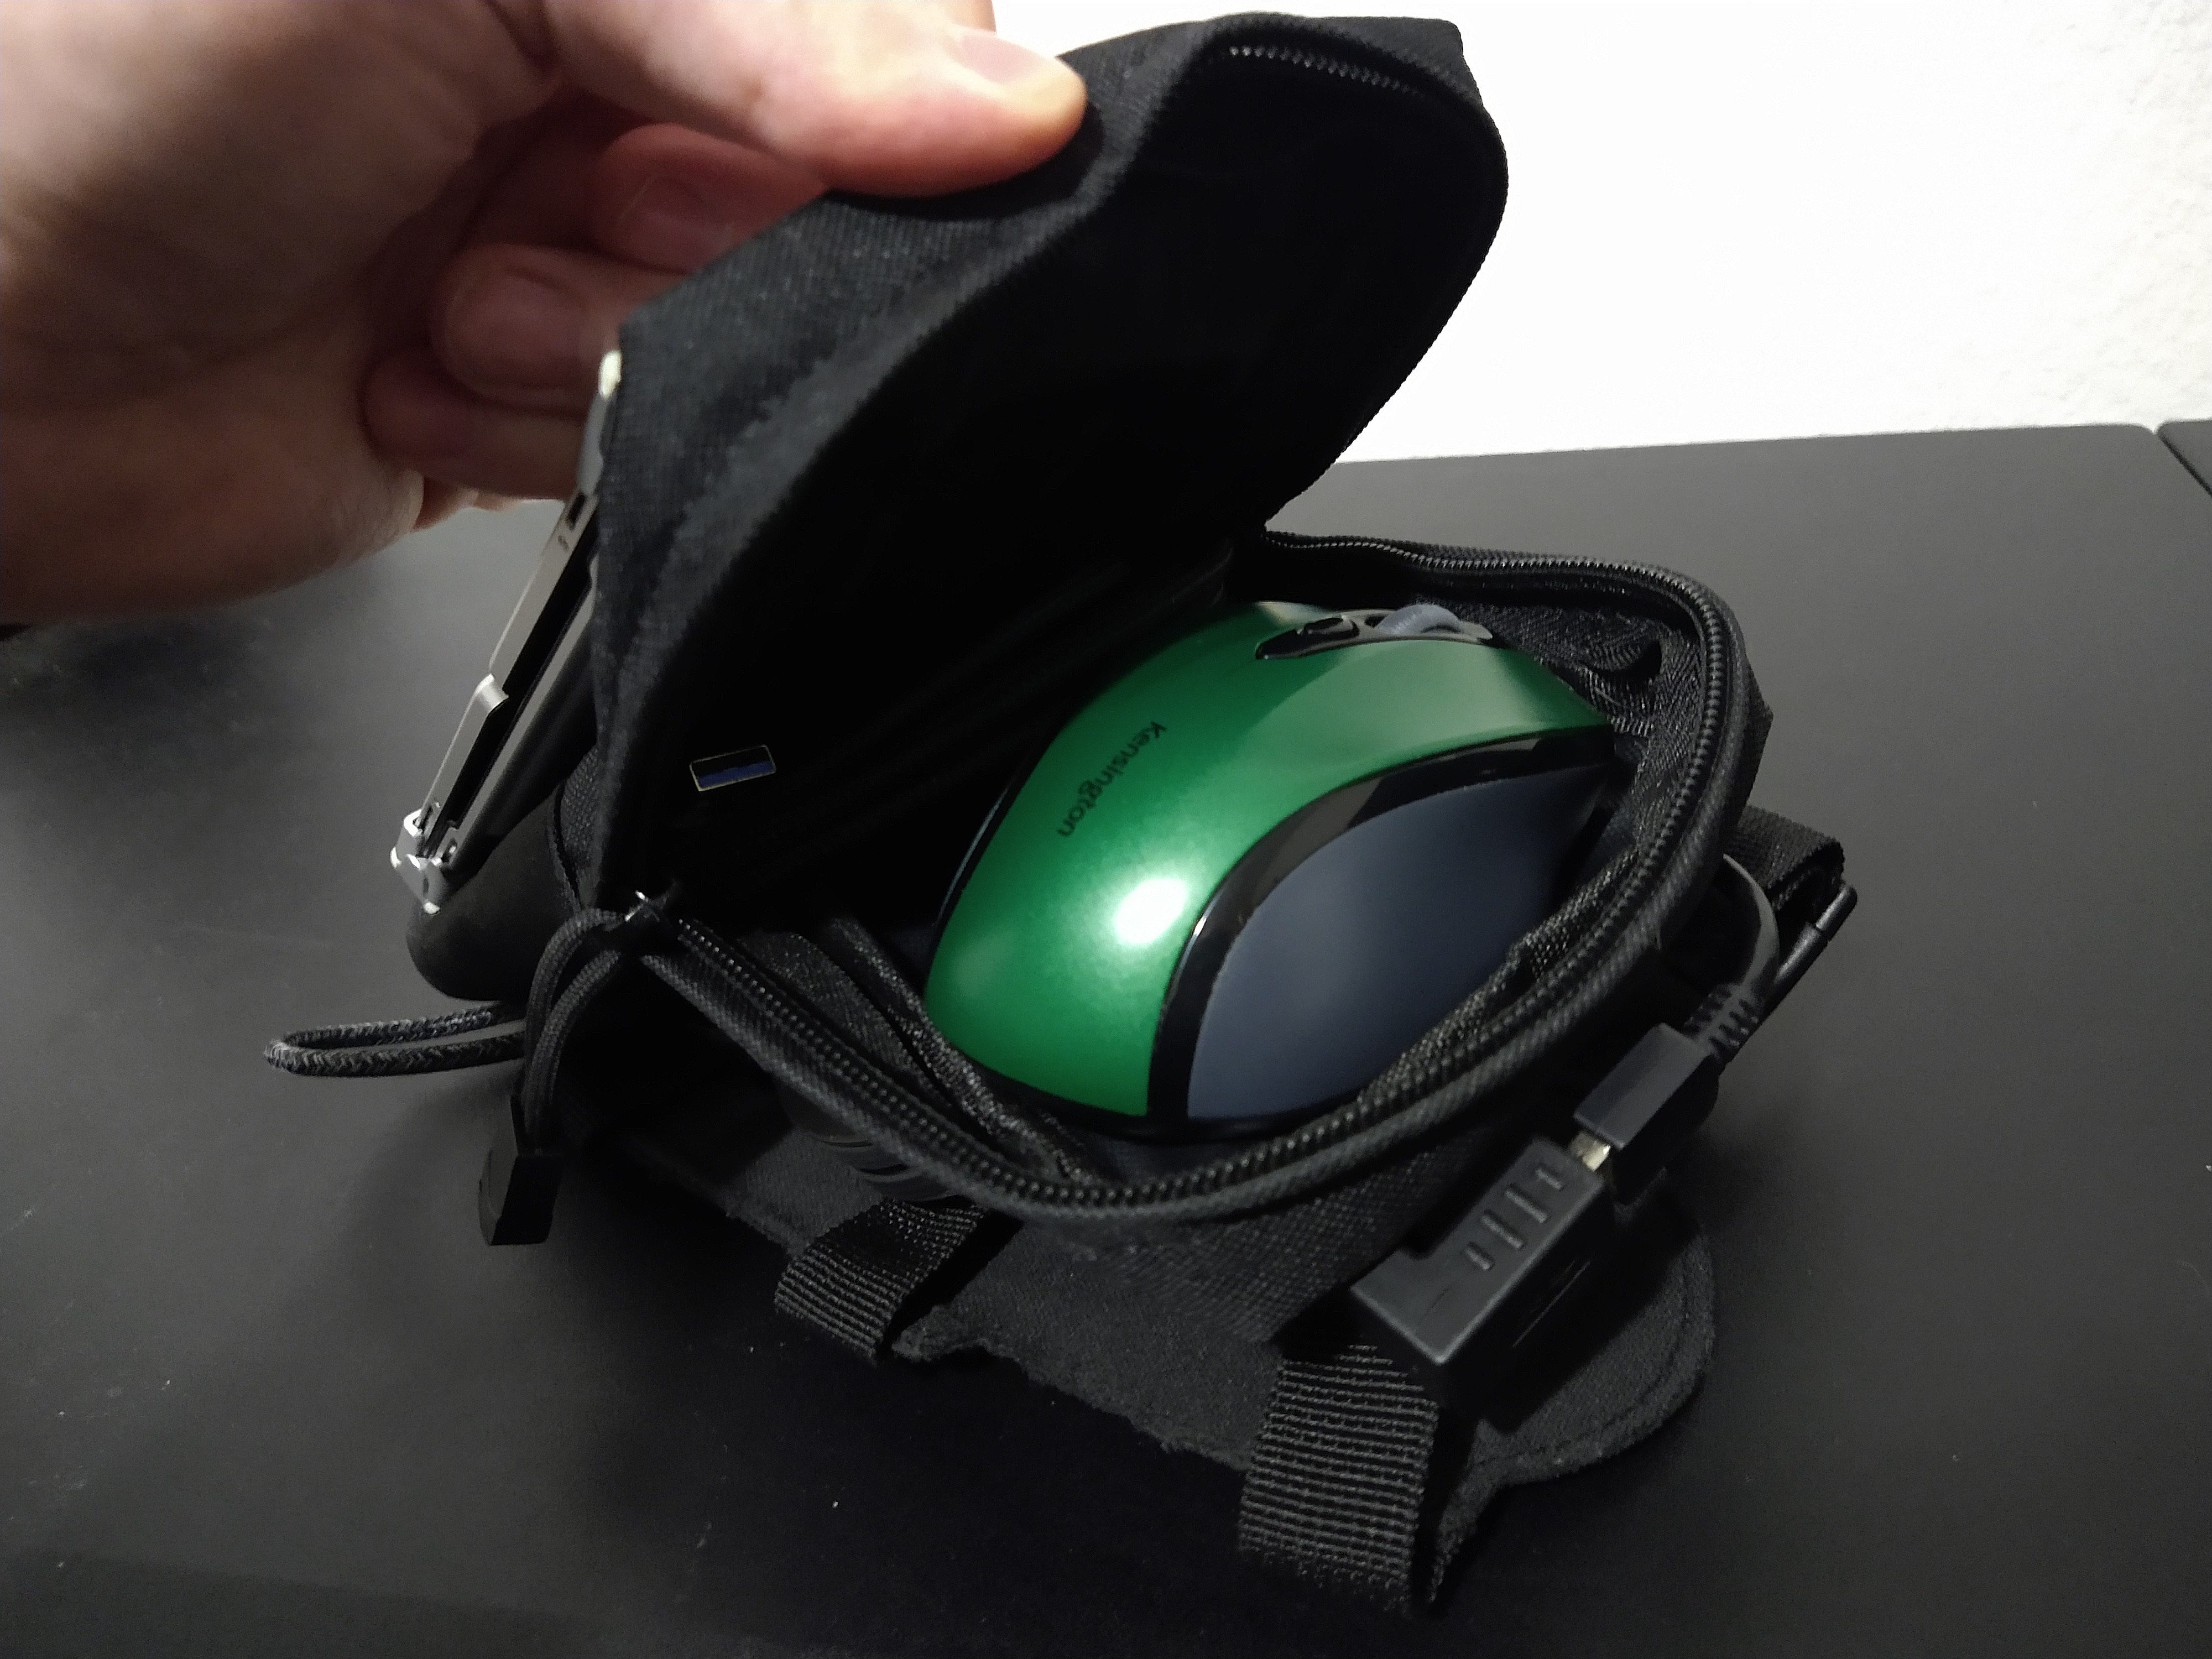
Inside the arm bag are a small mouse, more cabling, and optionally flash drives if I fancied it. You see, the keyboard is wireless, which means it has a battery. A battery needs charging, so it needs to be plugged in eventually. But this keyboard isn't only wireless - it has a wired USB mode if you plug the other end into a computer or device that recognizes USB keyboards. What if I just plugged that into a USB hub, with a wireless mouse receiver and a mouse, and whatever else I might want to just... jack into any machine? But then I'd have to fiddle with an extension cable and such, right?
Well, I added a retractable USB cable for the arm input. Video of it in action: https://i.imgur.com/zI0ltf7.mp4
Now this has more uses than just being a cool arm keyboard and can work as an independent input hub for anything. It took a lot of fiddling to get the layout for this to work with the parts I had, but it works great! Only problem is the retractable extension cable doesn't away tuck away nicely, and could be solved with a magnet, but the magnet still messes with the keyboard. I'll figure out an improvement eventually.

7. Mobile Network
The original backpack
Wait, what? Like a phone? Well, no. A phone could be involved, but that's not what I'm talking about. I mean a mobile NETWORK. There's an optional module to this project that was actually part of the original design, but isn't required for EPI to run. I have a GL.inet portable router tucked into a tiny backpack powered by another USB power bank battery which has 3x gigabit ports and Wifi 6 capability. It has.. several things connected to it when I want to use the back display module.
Earlier I mentioned this project started off as a Beat Saber VR display project and evolved into something more. It roughly looked like this in a diagram
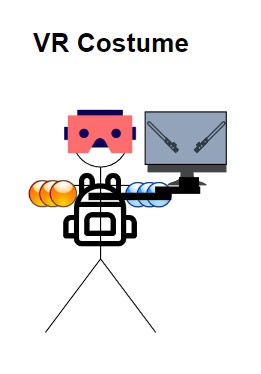
Looks really silly, but let me split that up into more parts.
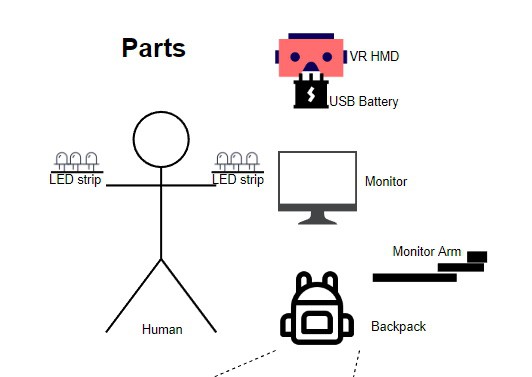
Here we have a Human, me, prepared to attach strips of LED lighting on my arms which are wired up to a backpack, and also has a monitor attached to a backpack frame that the backpack is attached to. Well that bit isn't pictured in the diagram, so let me give a photo or two to show the frame and monitor.
The Back-Screen
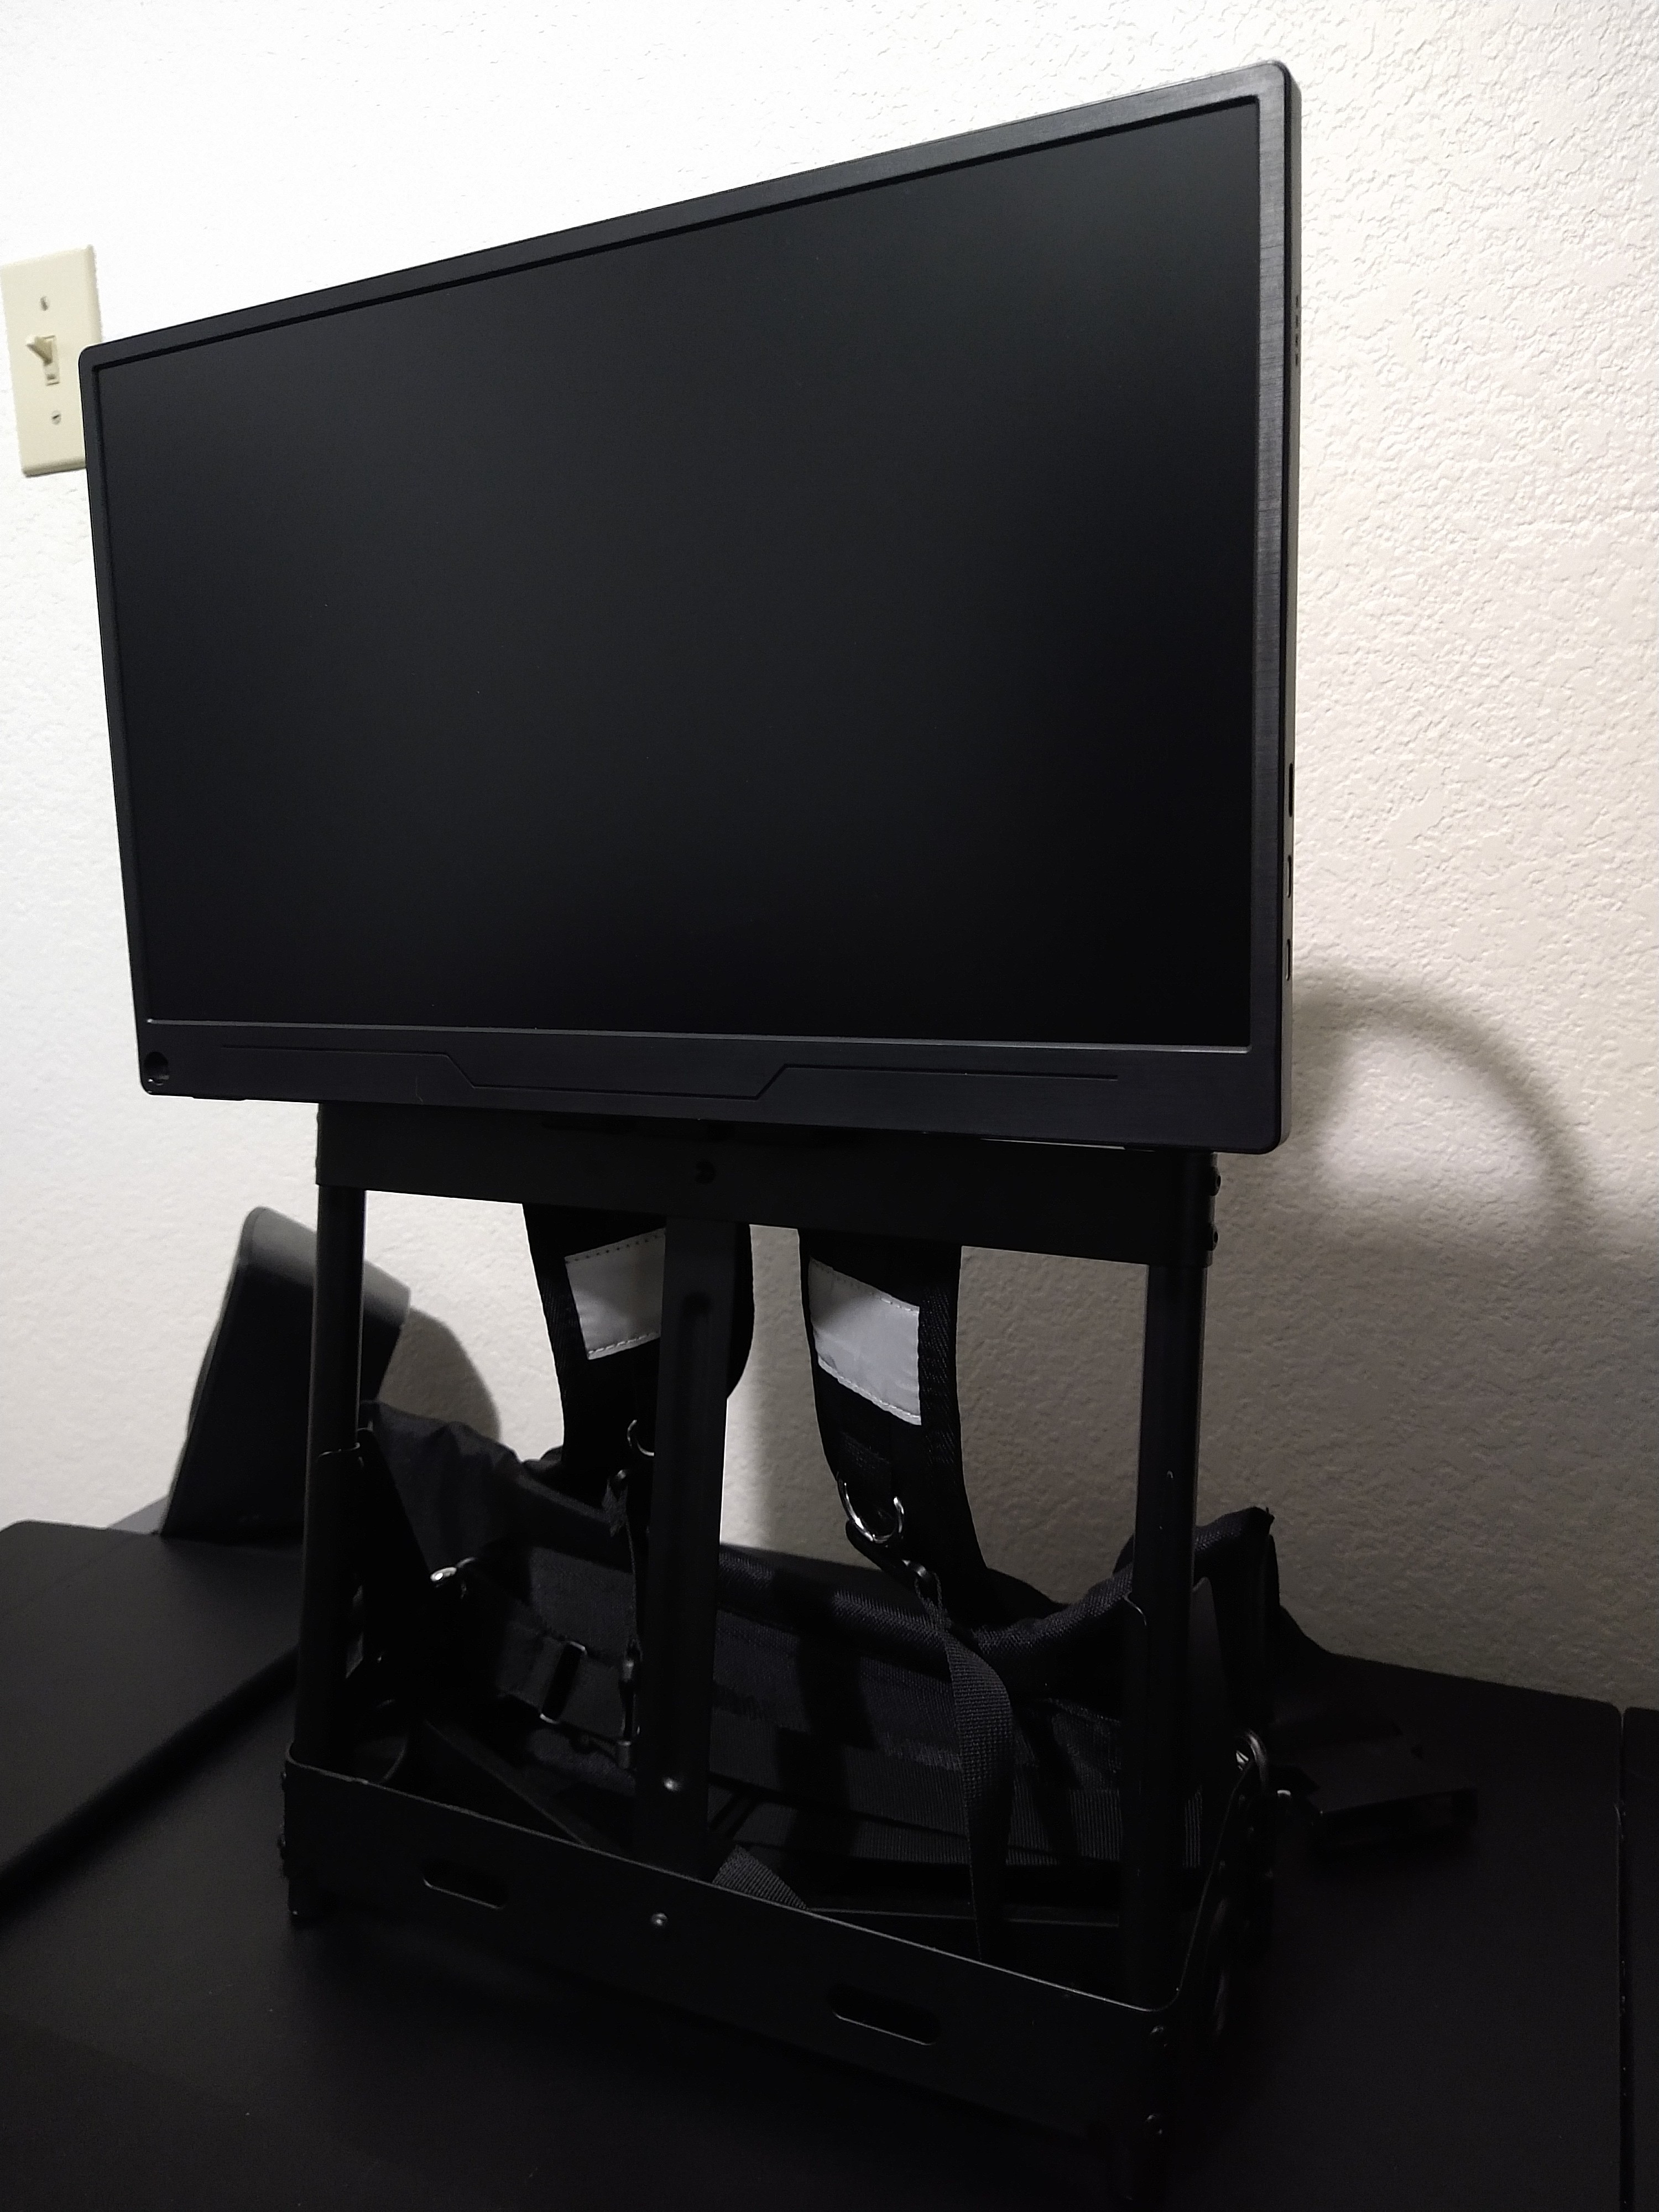
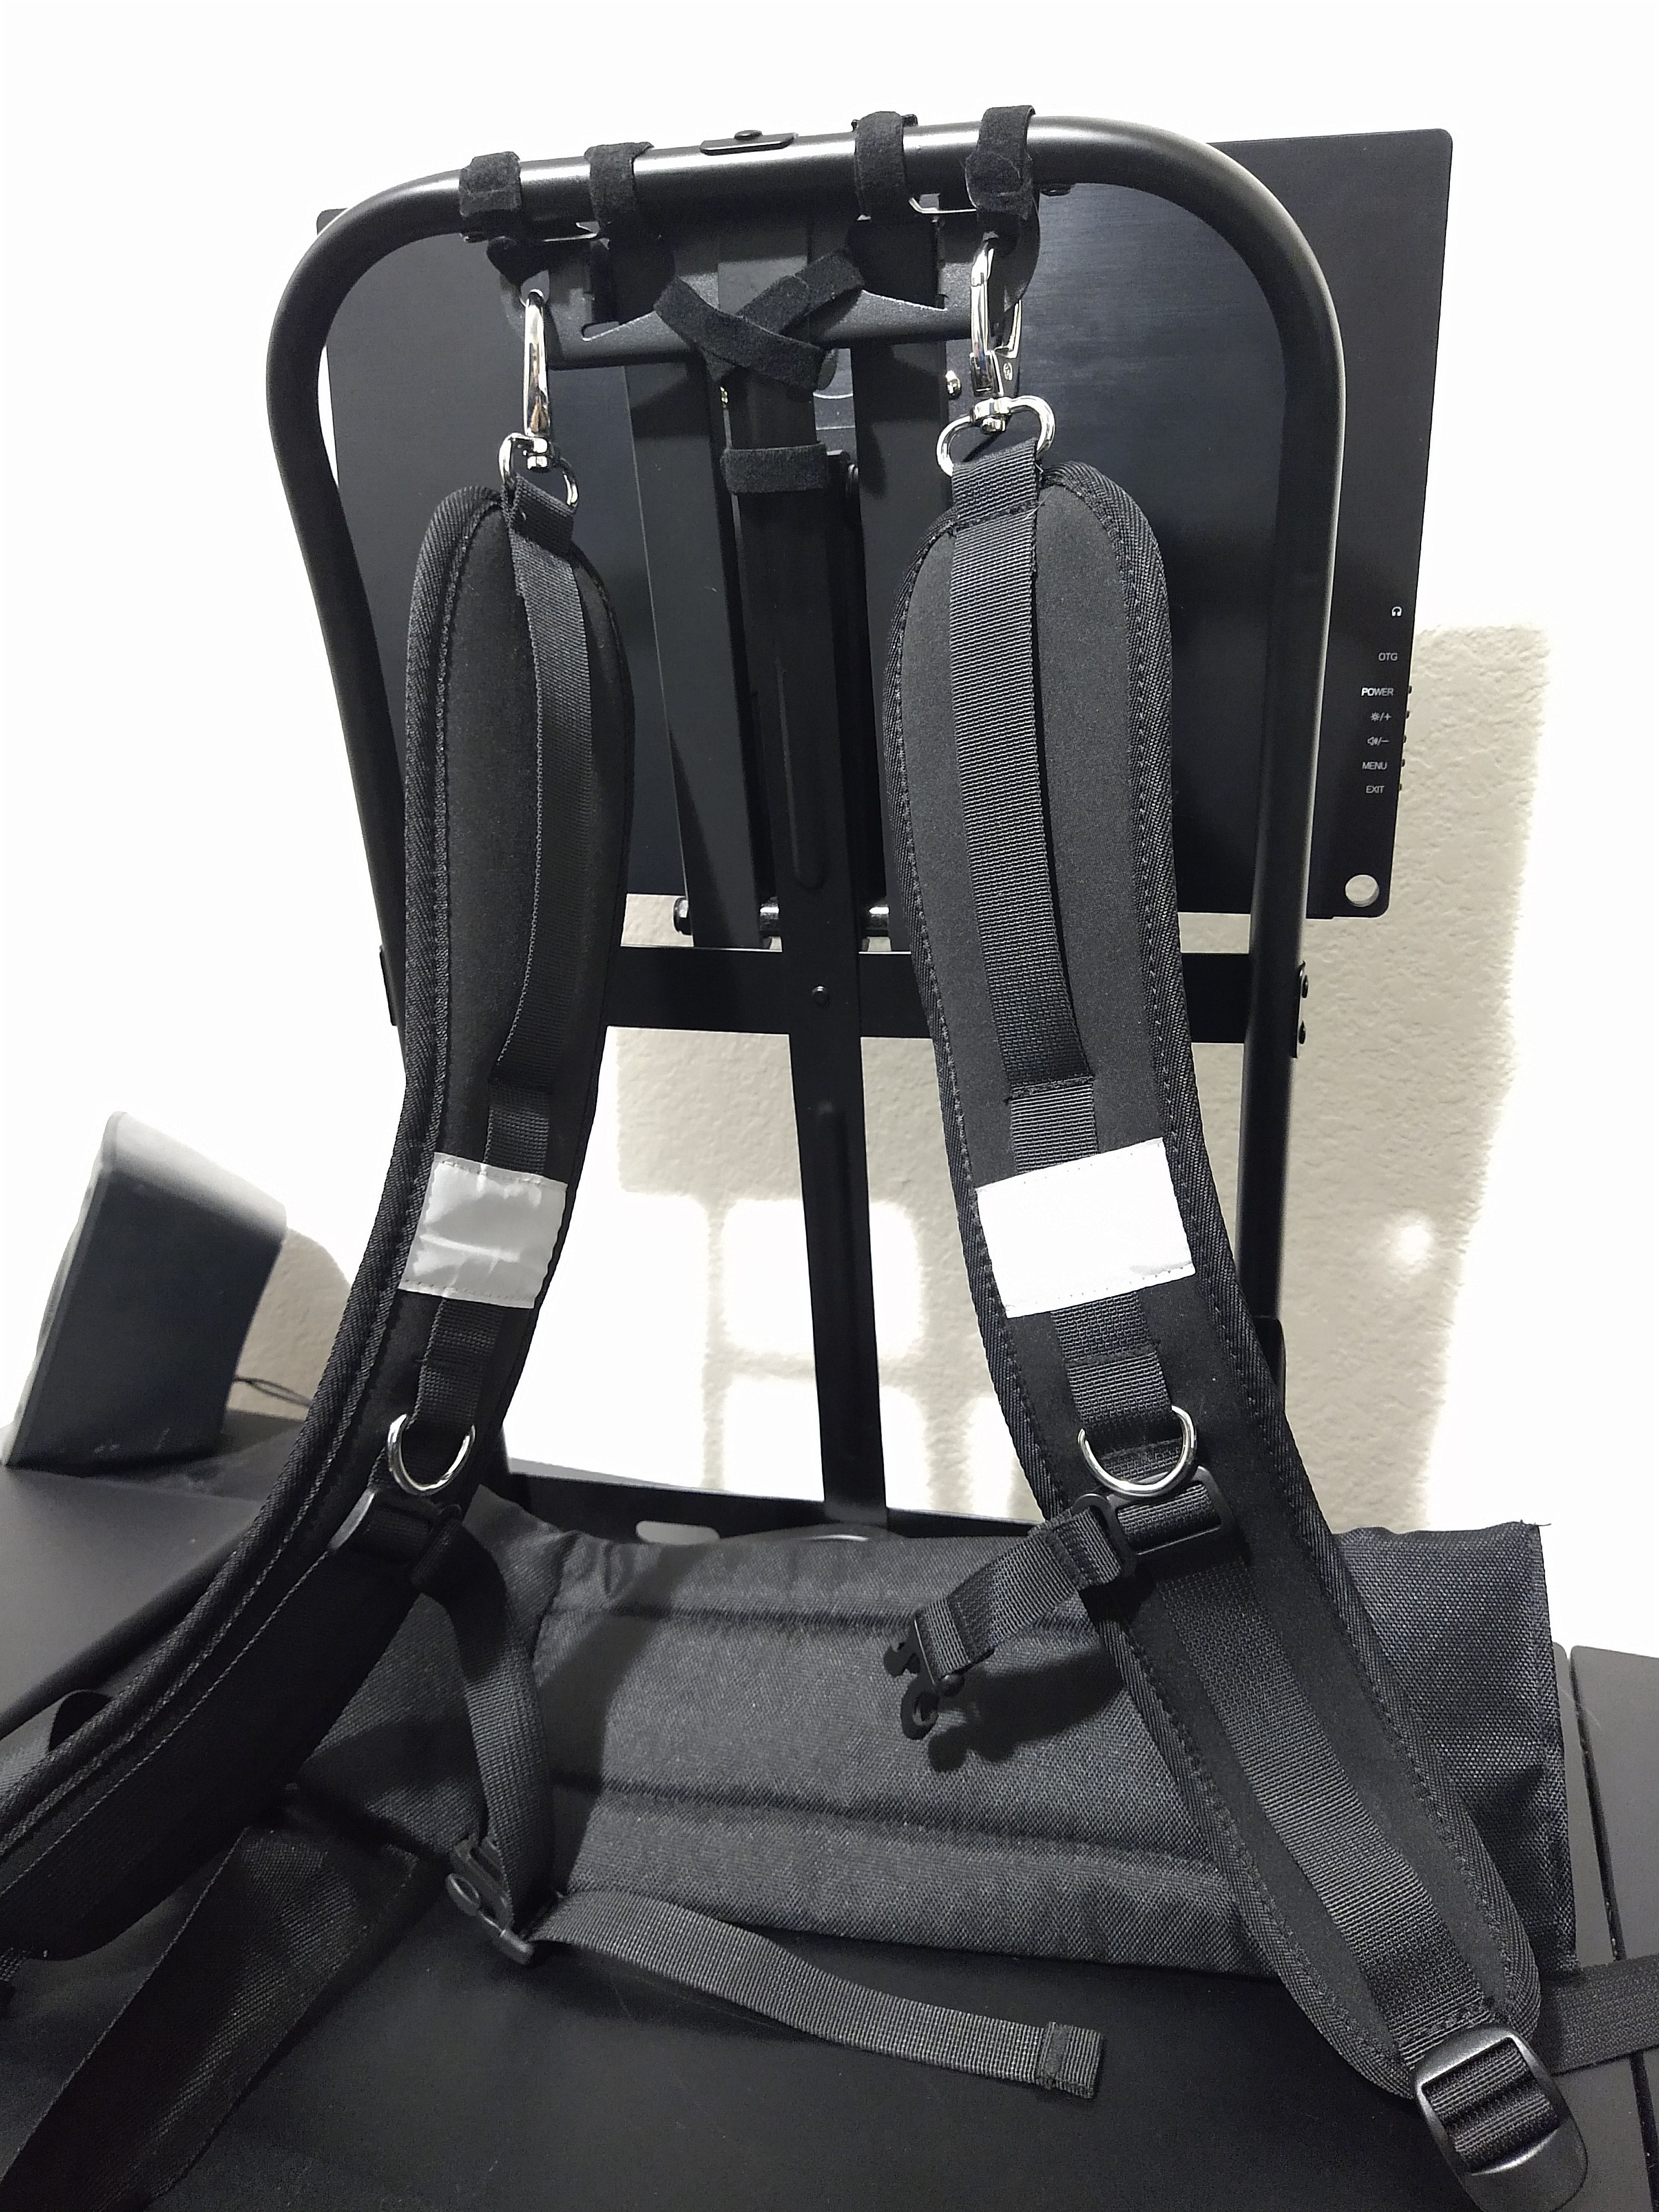
This does not include the bag, which is separate. Since I did not want to do any permanent damage (as is the case with basically this entire project, minus the grommet holes and super glue...) I used velcro straps to hold the monitor arm to this backpack frame. Yes, seriously. It works better than you'd expect. Doesn't even move. The main problem is this monitor arm, while thin and semi-light, was designed for horizontal movement, not vertical against gravity. With the weight of the monitor, it creeps down, so I can't have it lifted to neck/head height like I originally wanted. Still, having a screen on my back is a cool augment that has different uses.
But wait, there's more! See, I didn't explain what is IN this extra bag - and there really isn't much, so I didn't take a photo but I have the original planned diagram once more.
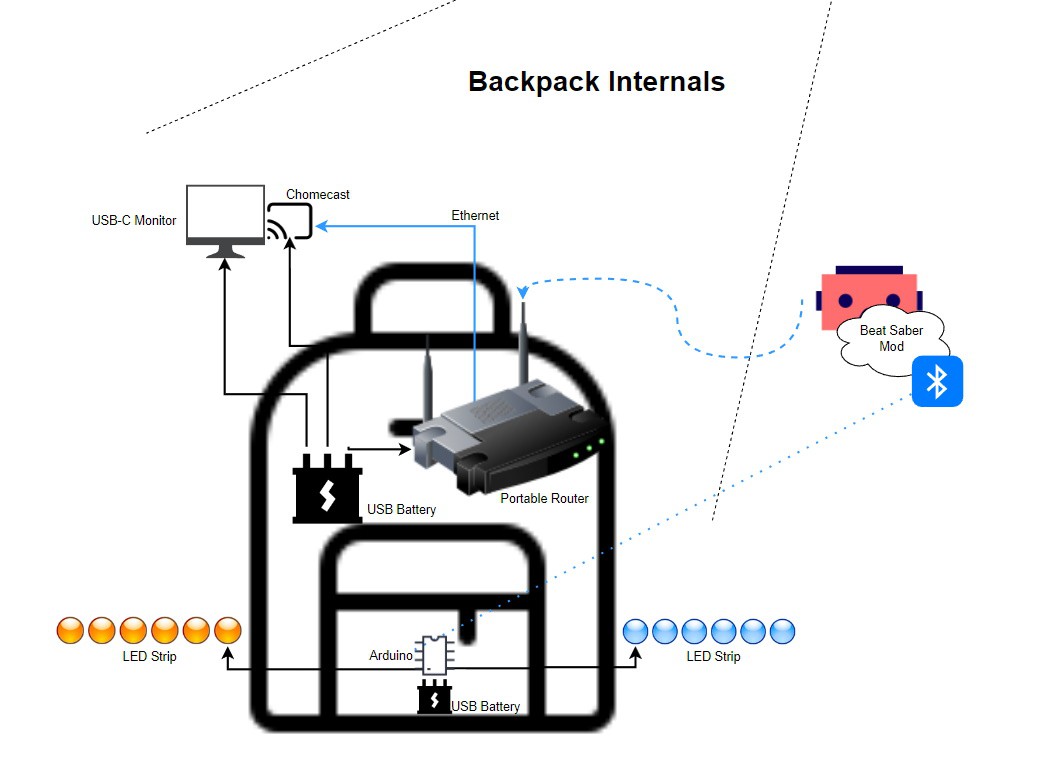
The Back-Bag
At the moment I don't have the optional Beat Saber mod created to do bluetooth signaling to change the colors to match what is in-game for Beat Saber, but I do have the LED strips and I do have the arduino coded to work with them at length. For now, that's set aside as my project grew to be more PC-focused instead of an overkill 'Beat Saber costume'.
The really interesting bit here is the Chromecast. Normally this is wireless, although if you got the Chromecast Ultra 4K it came with a wall adapter that had an ethernet port. While I can't plug that into the battery, I power it using standard micro-USB to the battery in the bag, but using an ethernet splitter adapter I found online. Given this setup with the router it gives me less wireless noise and less latency, which was a key goal of being able to stream as low-latency as possible from the Oculus Quest 2. You see, the Quest 2 cannot output any video with a cable at all. Not even over USB-C. It also cannot use USB ethernet after drivers were removed in a prior firmware update, of which they put out new ones regularly. My only option is to stream as low-latency as possible to get output to the monitor, and that's why I set up the Chromecast to be wired on ethernet to the router, so there's only 1 wireless signal flowing for the VR stream.
Alternatively I can have a direct HDMI cable run from the main EPI computer to the back display, but it becomes tricky to take one or the other off, which is why wireless casting to the Chromecast becomes intuitive and safer for the hardware. However, a Chromecast has to be fixated to one network only, and has to be reconfigured every time you change networks. That's why it's kind of bound to this isolated network. The portable router I use has a bridge/tethering option, so on the go I can hook into my phone's hotspot, or I can link into a local wireless (or wired!) network at will. EPI's core doesn't require the router by itself; only.when augmenting additional add-ons like the rear screen or chromecast. Both the Quest 2 and Chromecast won't work with casting unless there's a detected online connection, despite the casting process being done on a local network anyways! Absolutely annoying software limitations there, but I don't really have any options in that realm of reliable wireless casting on the cheap.
On the bright side I've tested running the USB-C display, the router, and the chromecast being actively used. The battery life in this bag is around 21 hours with all 3, so.. I won't really have to worry about power consumption there.
8. VR - Input Using Hands
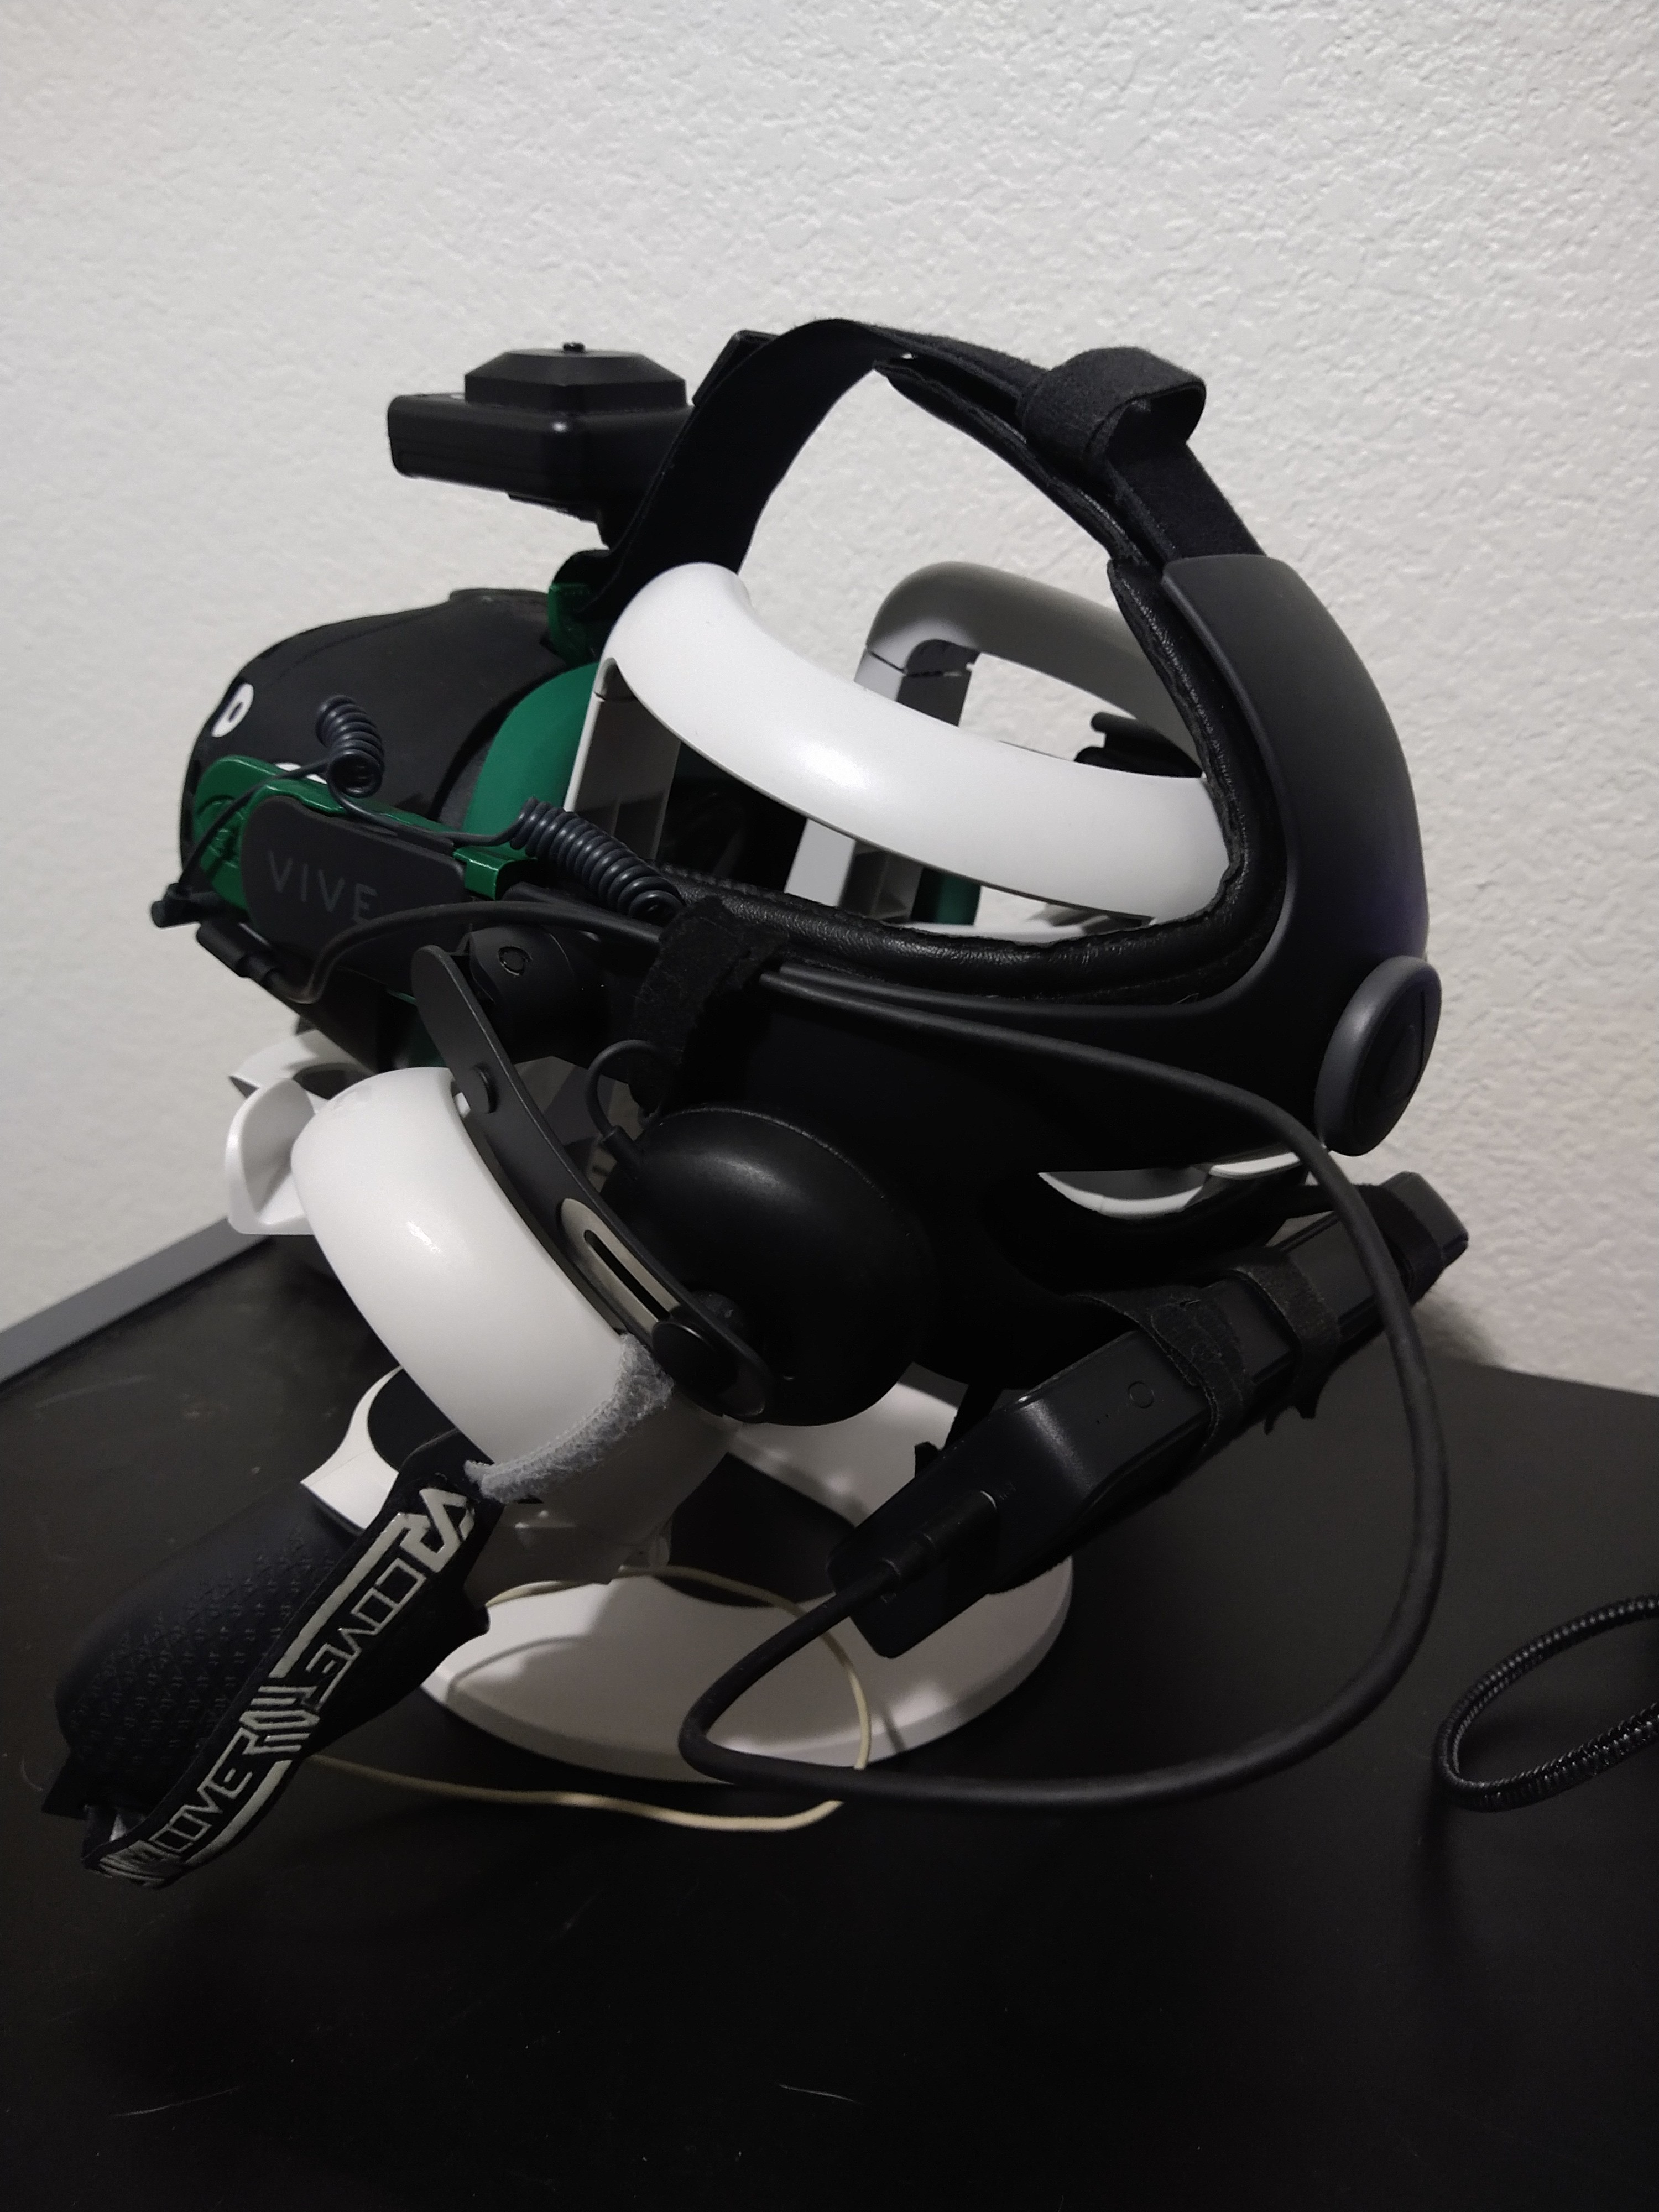
I use a Quest 2 VR headset quite often, and I've done a fair bit of modifications to it with the main one being the Frankenquest mod, where the Vive DAS is used as the main strap. The most unique thing about what I implemented is the IR light I attached at the front (pictured on the left). While there are other attachable lights now, when I did this mod there wasn't a 3rd party product to do this specifically for this headset. It has its own battery and power toggle, and I use it in low lighting conditions and to improve hand tracking quality as I need it. I also have a large battery in the back for weight distribution and extended battery life - around 8 hours of continuous use if I wanted it.
Using a Quest VR headset lets me easily use hand tracking for mouse input when I remote into a PC using Virtual Desktop, which is a software designed for VR headset -> PC usability for both local and remote uses, as well as wireless PCVR (though that's not in the scope of EPI at all, just one of its popular functions). This can have some practical uses if I want to do some basic clicks on the screen for my main PC with EPI for demonstrative purposes or if I just really don't want to hold anything in my hands, not even the twiddler, or even use my arm guard. This allows me to just relax and do natural motions as an optional input method.
Special thanks to my roommate for taking the main photos and helping recording this video to show what I mean. Unfortunately there's a bit more latency here due to the PC also being over wireless in this recording, and the view offset was a bit wrong for the VR view, but hopefully that gives the idea on how that works if you're not familiar with hand tracking.
9. Extras
BUT WAIT, THERE'S MORE!
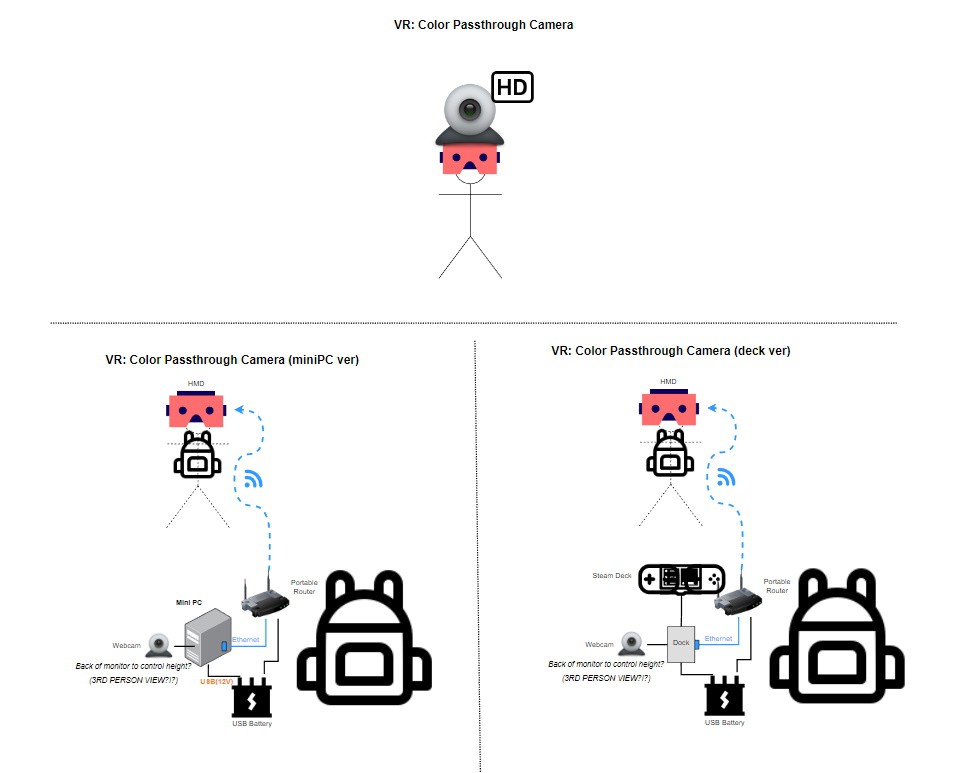
Kind of. I'm still working out how to mount an IP camera that I wanted to use for color passthrough, but with upcoming headsets and technology around the corner this might not be necessary. I drew up a diagram, got an IP camera, ripped it apart and got it super low latency so I could use it with my Quest to get color passthrough, but I needed a computer as a medium to get a fixed-to-head display because of their dumb limitations with 3rd party android apps and browser windows being fixed to a real-life location relative to your play area. Before I got the Mini PC I was using my Steam Deck as a testing bed for some of the features I was experimenting with on the local portable network I built, so that's part of this diagram here:
I also have a USB-rechargeable wearable neck fan to keep me cool when I'm doing VR workouts, and began looking into adding a shoulder bag that holds a water pouch so I can keep hydrated on the go without carrying a bottle around - just make it wearable!
And for fun, before I wrote up this article or even finish the ethernet mod to the Bag, I hauled out everything to do one last look over and configuration of the entire set of modules.
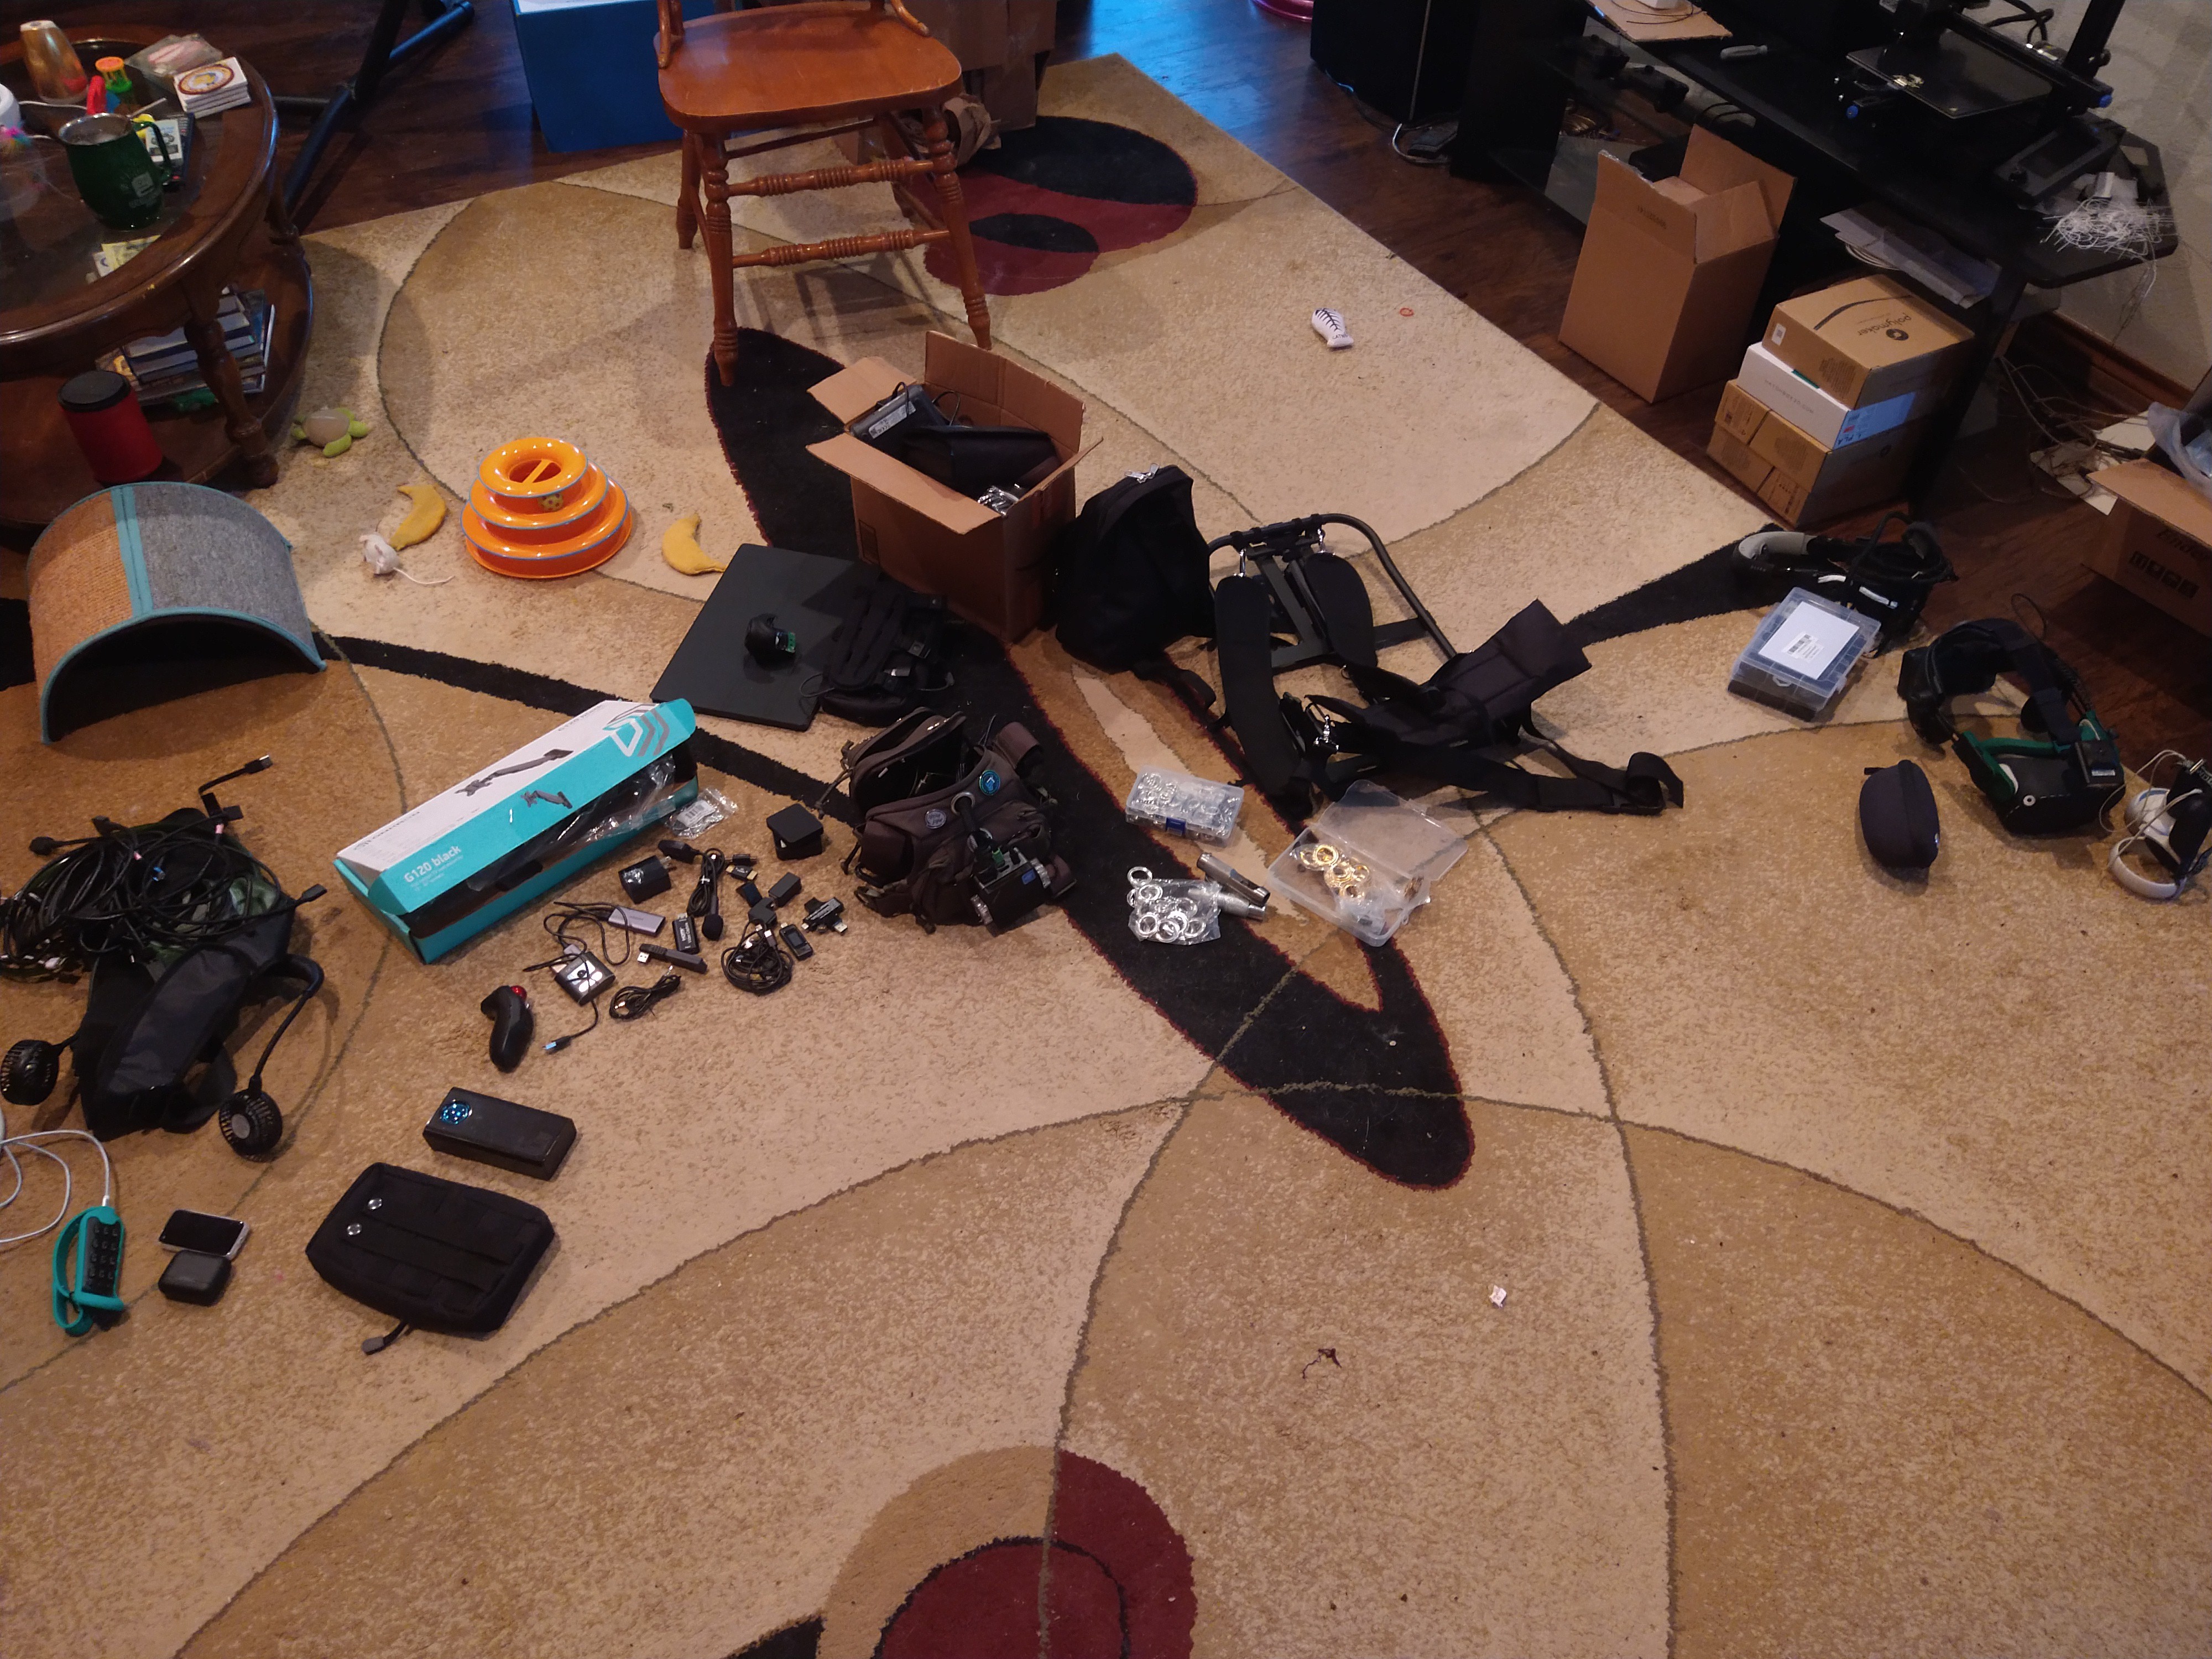
Sorry for the mess! There's a few other parts in there that I'm likely not using anymore, and don't consider part of the eventual v1 form of this project - including the handheld trackball mouse which has its own issues.
If you made it this far I hope I didn't bore you to death, and if anything I hope you learned something new or got a new idea out of all of this. I've really enjoyed working on this project and hope to continue evolving it further as the years go by. It's very fulfilling to create something unique of your own that you can continue working on and that adds more to your life that wouldn't otherwise be possible - I think that's the true purpose of the project for me.