 Manuel Alfonso
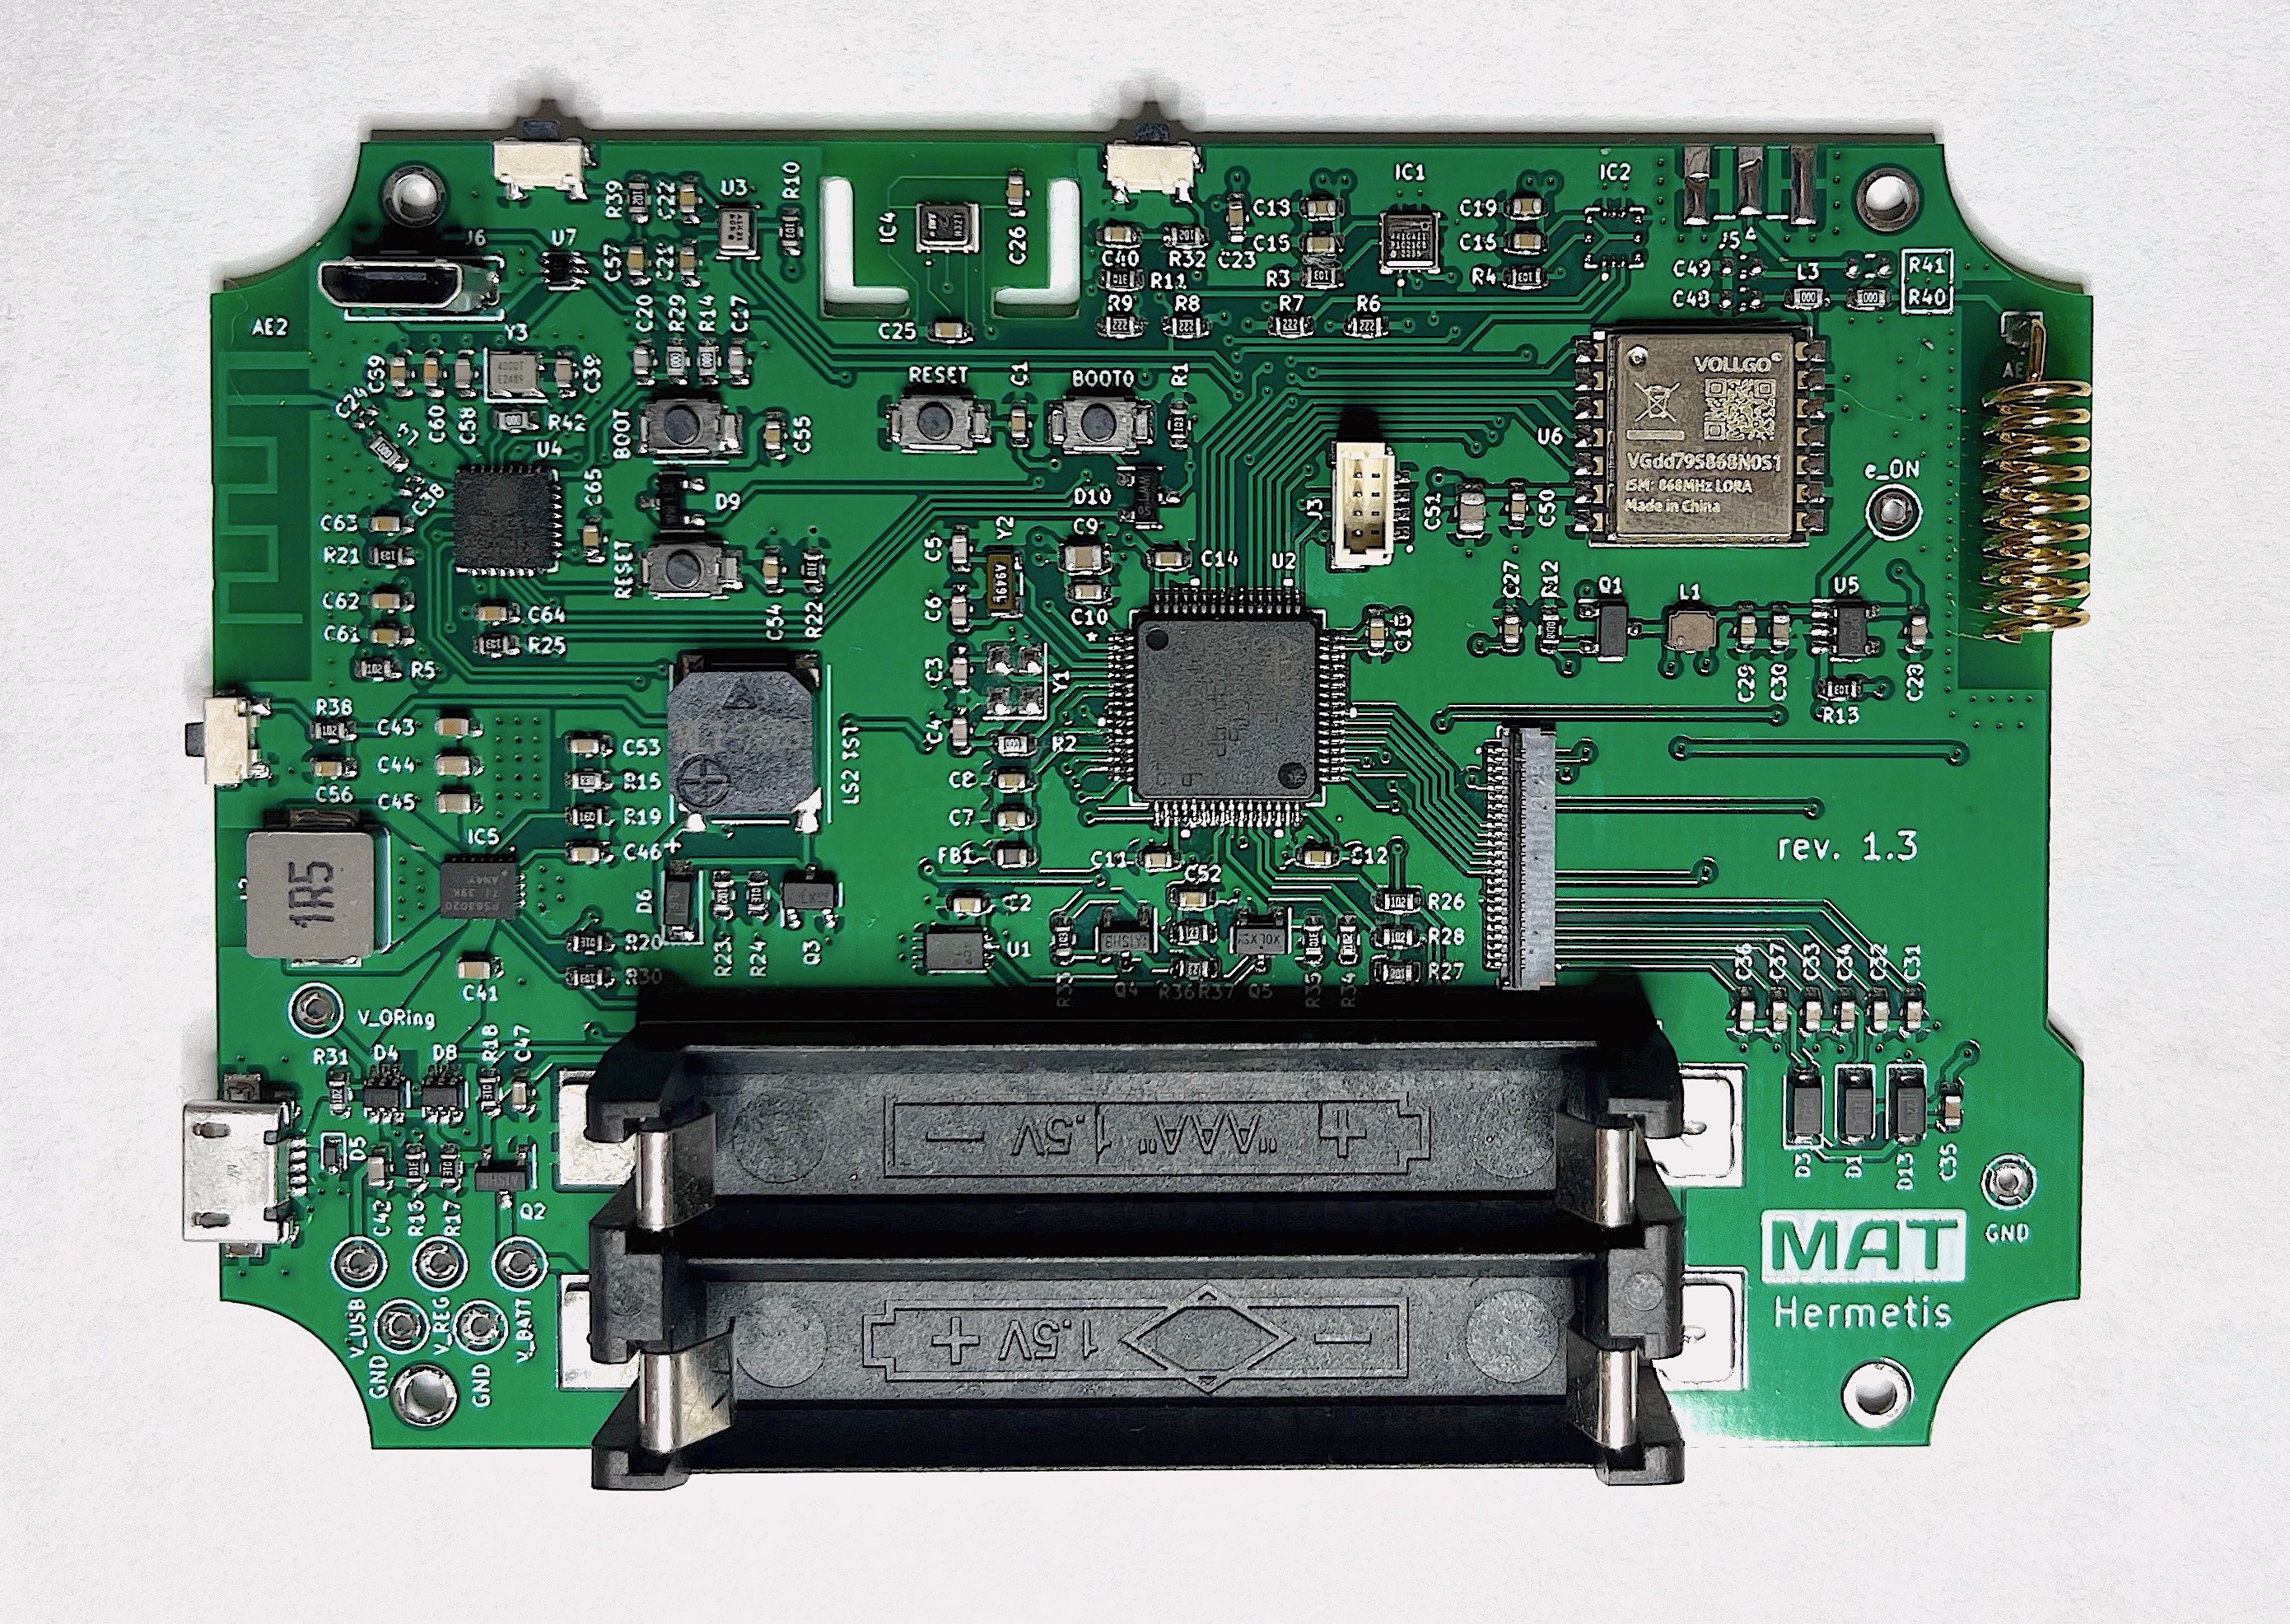
The device core is an ultra-low-power STM32L431 Cortex-M4 MCU with FPU, low power peripherals and seven different low-power modes that gives a lot of flexibility. As an example, it consumes 1.8uA in Stop2 mode with RTC enabled, SRAM and register contents preserved, I/O pins state preserved, and the wakeup capability of some peripherals like LPUART, I2C or LPTIM.
I started this project as a research of the possibilities offered by this family of MCUs (STM32L4) with low power modes. Once you know the architecture, the results are really amazing.
SENSORS
Gas Sensor
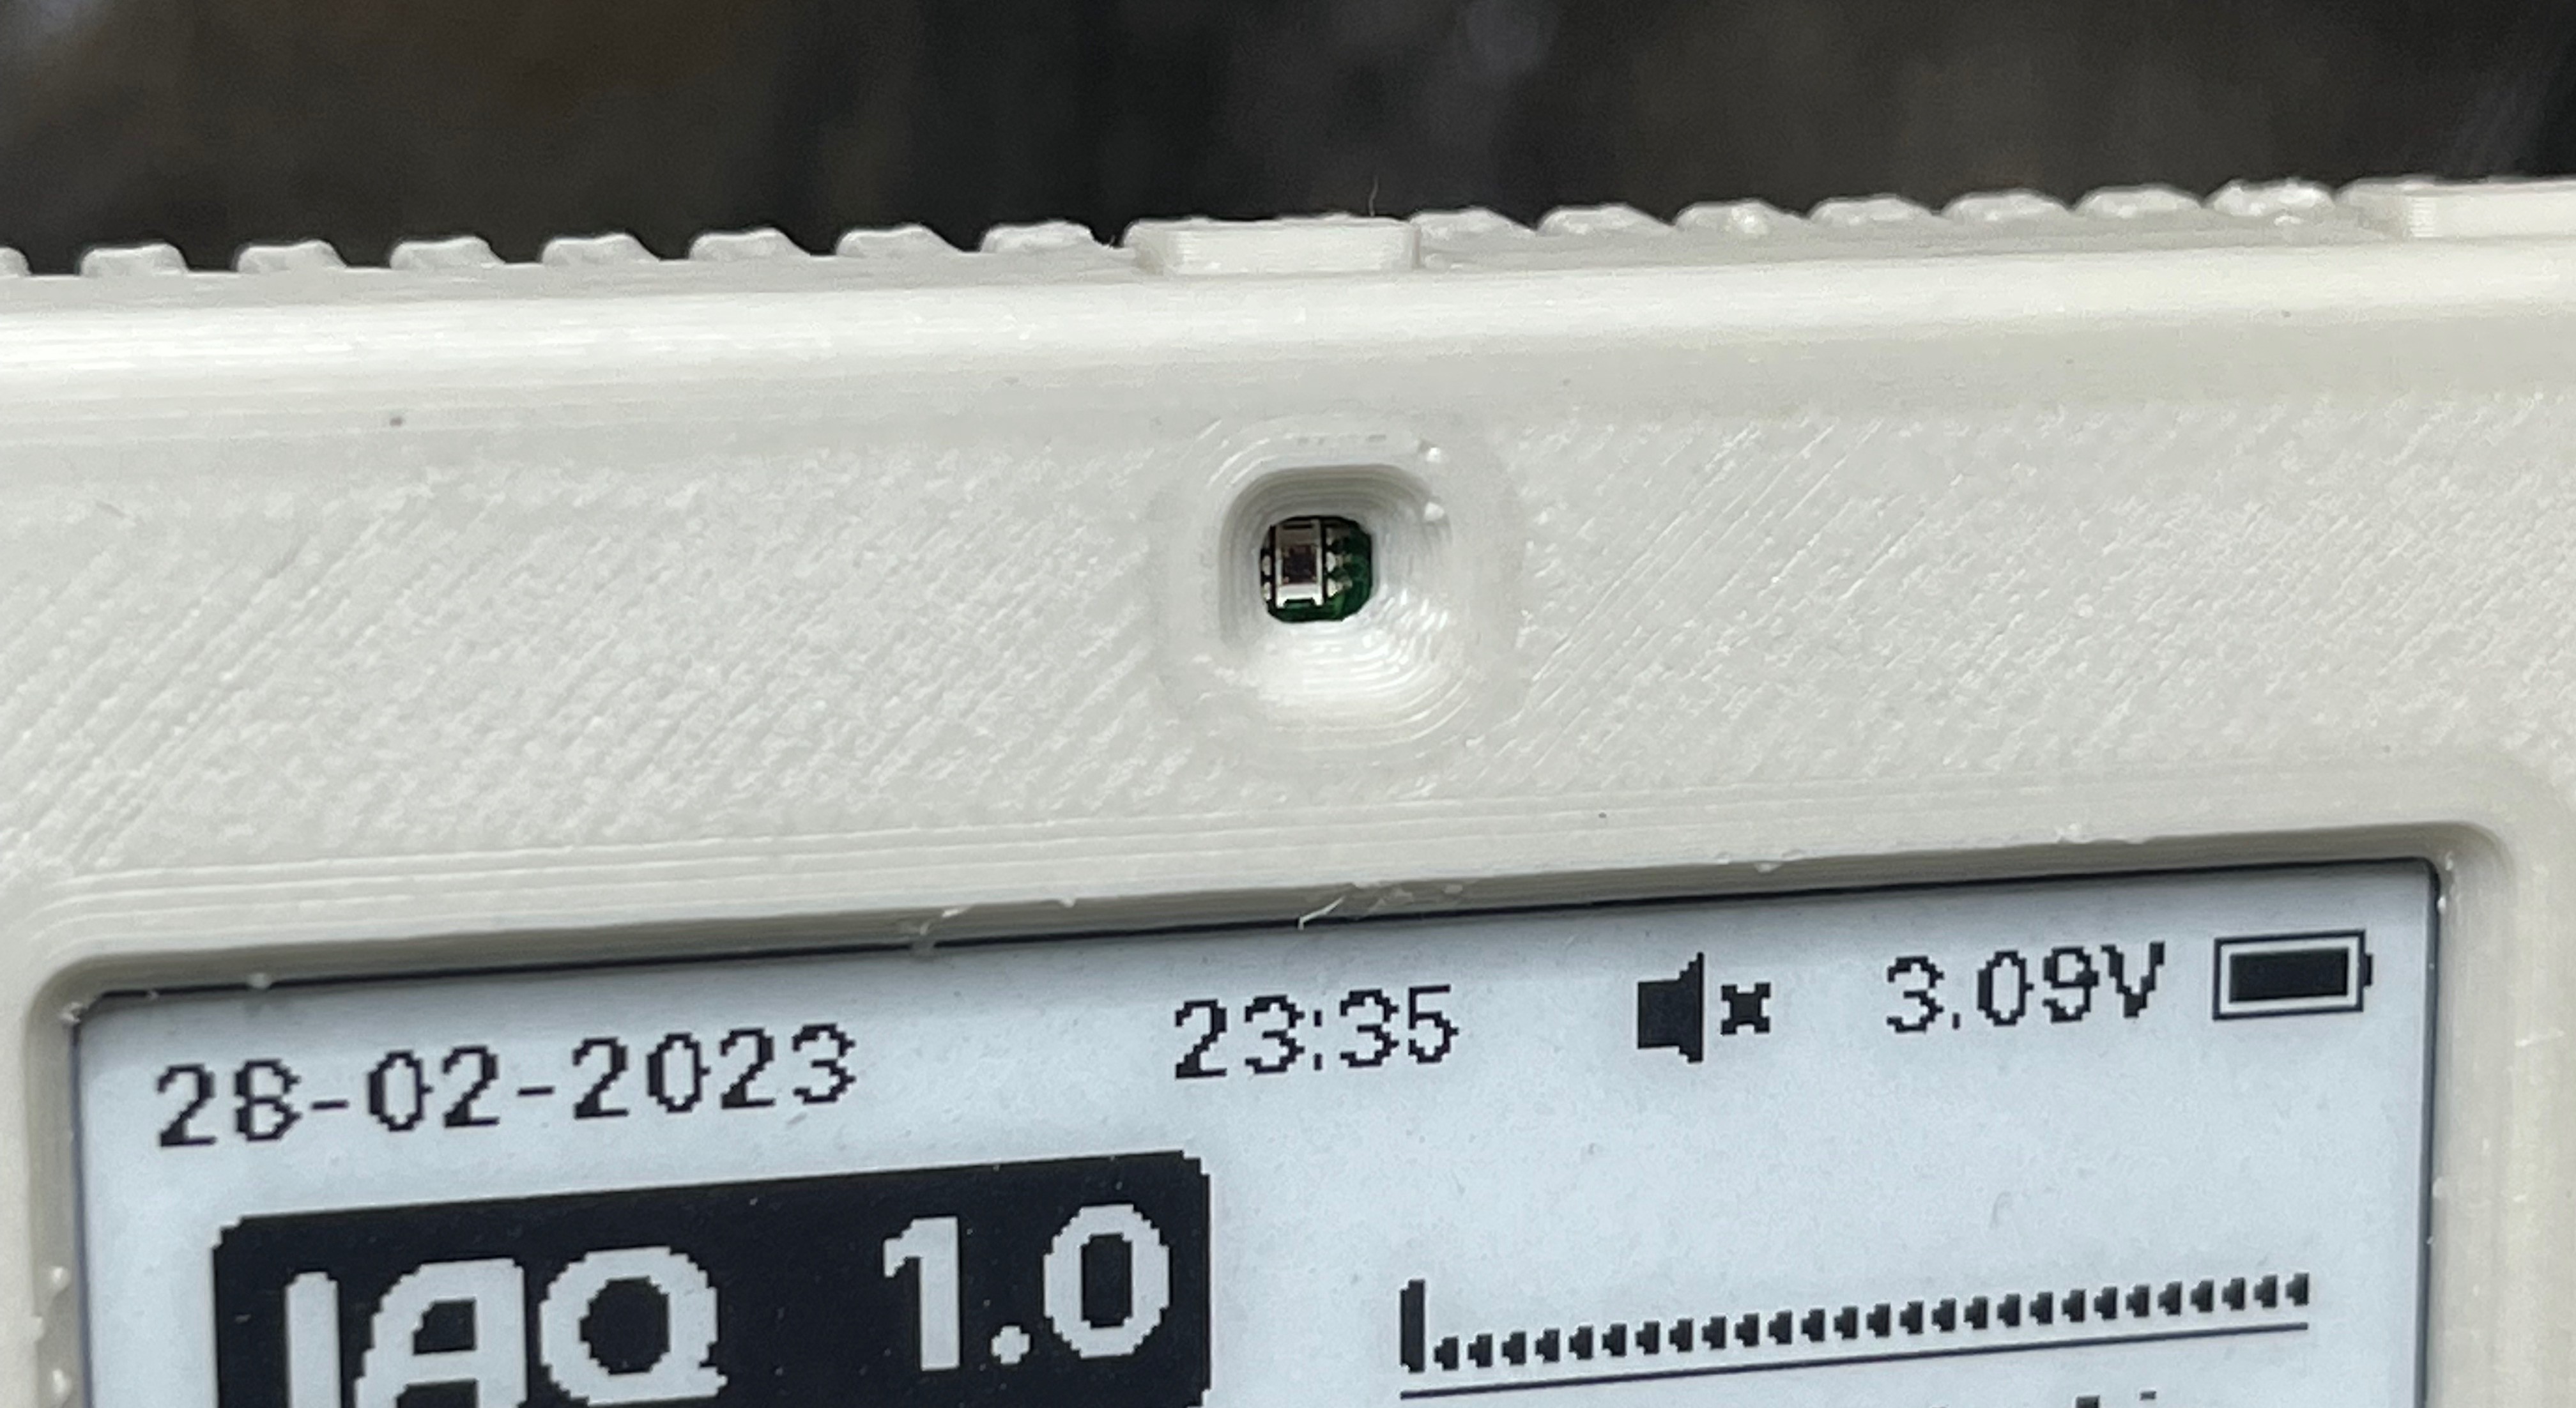
The indoor air quality is monitored with a ZMOD4410 sensor from Renesas. This sensor integrates several custom firmware libraries to perform AI machine learning algorithms to output total volatile organic compounds (TVOC), estimated carbon dioxide level (eCO2) and indoor air quality (IAQ) to meet UBA air quality standard.
eCO2 calculation is especially accurate with these algorithms, as detailed in this report.
For this project, the selected library is the IAQ 2nd Generation Ultra Low Power firmware. This firmware requires to perform a measurement with a sample rate of 90 seconds. This gives a lot of room to put the MCU in a low power mode between measurements.
Temperature and Humidity
Temperature and relative Humidity are obtained with a highly accurate, fully calibrated HS300x series sensor, also from Renesas. It integrates calibration and temperature-compensation logic with a very low power consumption (24.4 μA average with 14-bit resolution, 3.3 V supply, one RH and temperature measurement per second).
Initially I used the HS3002 variant, but finally opted for the HS3003 as it offers enough accuracy for home environments:
- +-2.5% of RH accuracy from 20 to 80% (3.5% max.)
- +-0.25 ºC for temperature accuracy from 0 to 70ºC (0.35 ºC max.)
Anyway, all variants have the same pinout and can be replaced for more accurate reads.
Barometric Pressure
For the barometric pressure it uses an SPL06-001 sensor from Goertek, with slightly better accuracy than the one offered by the BMP280 sensor from Bosch.
The device is not intended to be used for weather purposes, but I think that tracking barometric pressure is quite useful.
Ambient Light Sensor (ALS)
The device features an OPT3001 ambient light sensor from TI. It is used to increase energy savings, so no display update is performed if ambient light is below a configured value. If you can't see it, why update it? :-)
Once ambient light exceeds the threshold, display will be updated if previous refresh process have been skipped.
I've chosen this sensor because of its low power consumption: 3.7 uA on full active mode with interrupt enabled when input light is higher than or lower than a light level of interest.
E-PAPER DISPLAY
The use of an e-paper display for an ultra-low-power device is obvious. Requires very little power to update and needs no power to maintain an image.
The selected display is a 2.71" panel from Pervasive Displays, with a resolution of 264 x 176 pixels over an active area of 57 x 38 mm (that is 117dpi). I choose it for its squarer aspect ratio, since this kind of screens are usually more narrowed.
I have implemented four different views: two with general values (with more or less detail), and two more with graphs to check the evolution of the data. There is also an additional screen for remote data (see LoRa section).

DUAL POWER SUPPLY
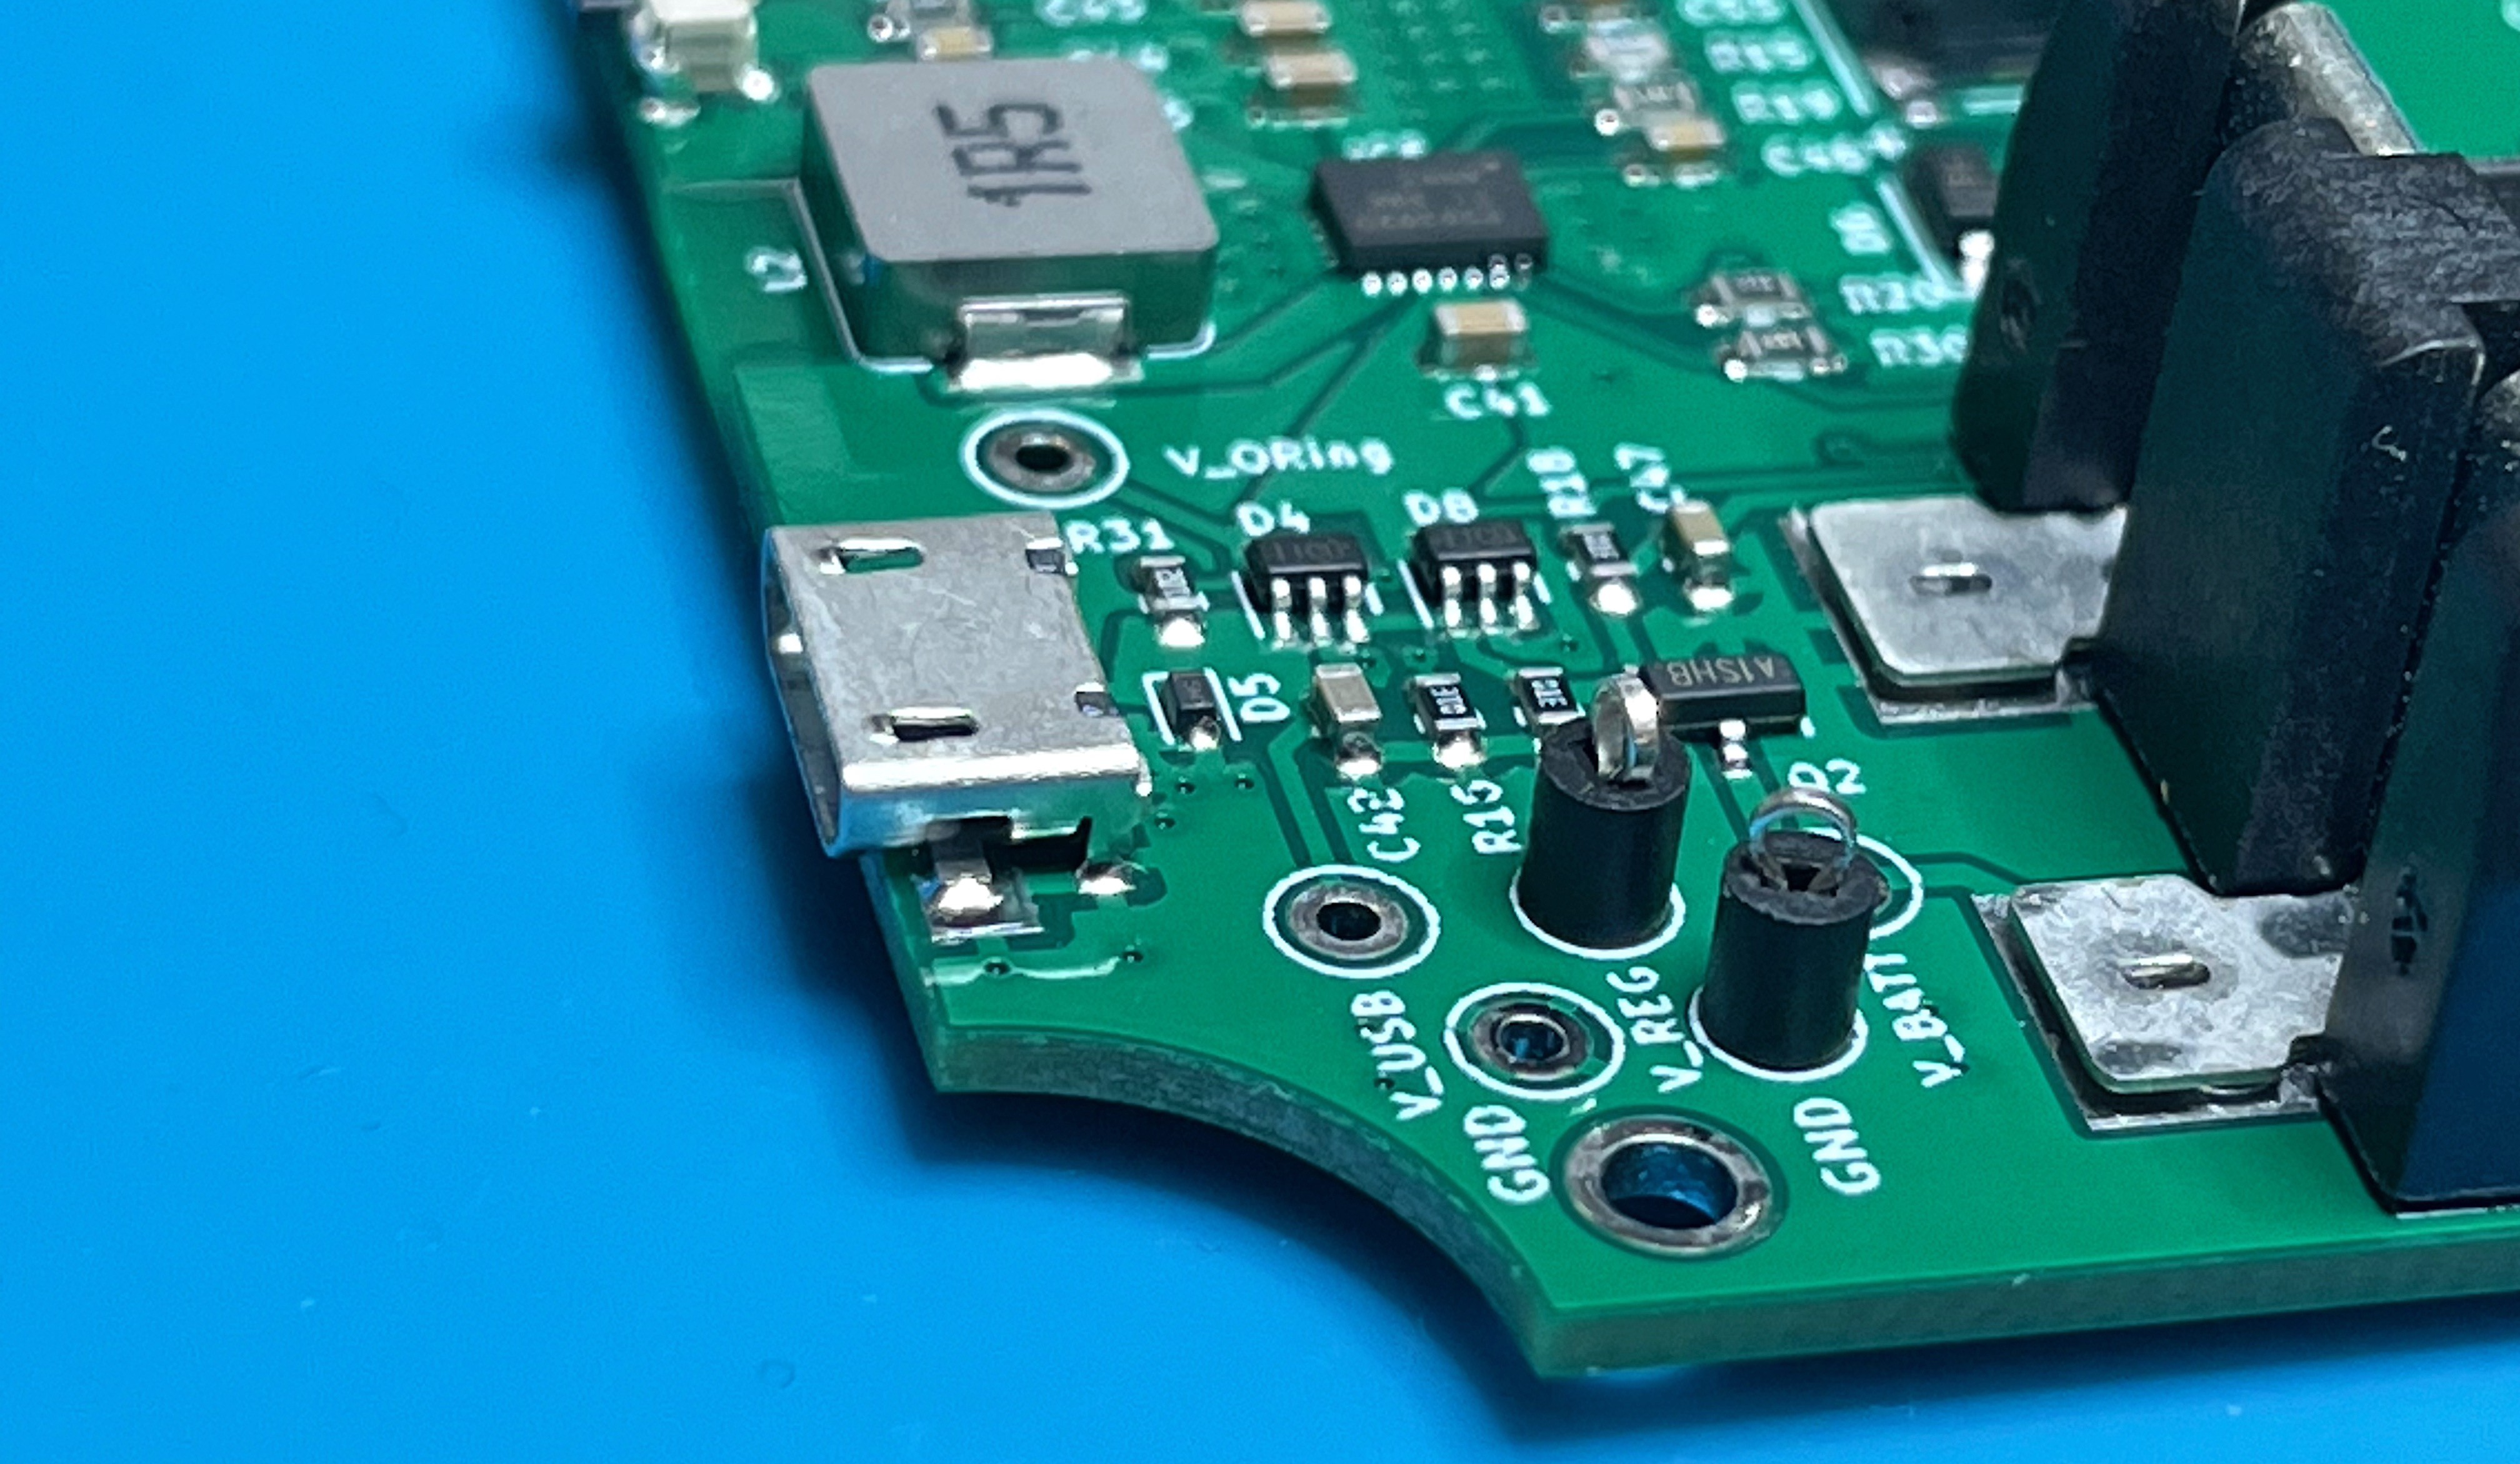
Hermetis features a dual power supply in ORing configuration, so you can use it plugged with an USB Micro-B connector or with a 2xAAA batteries. Or both. Two LM66100 Ideal Diodes are used to allow this ORing configuration, plus a P-Channel Mosfet to add reverse polarity protection with the batteries.
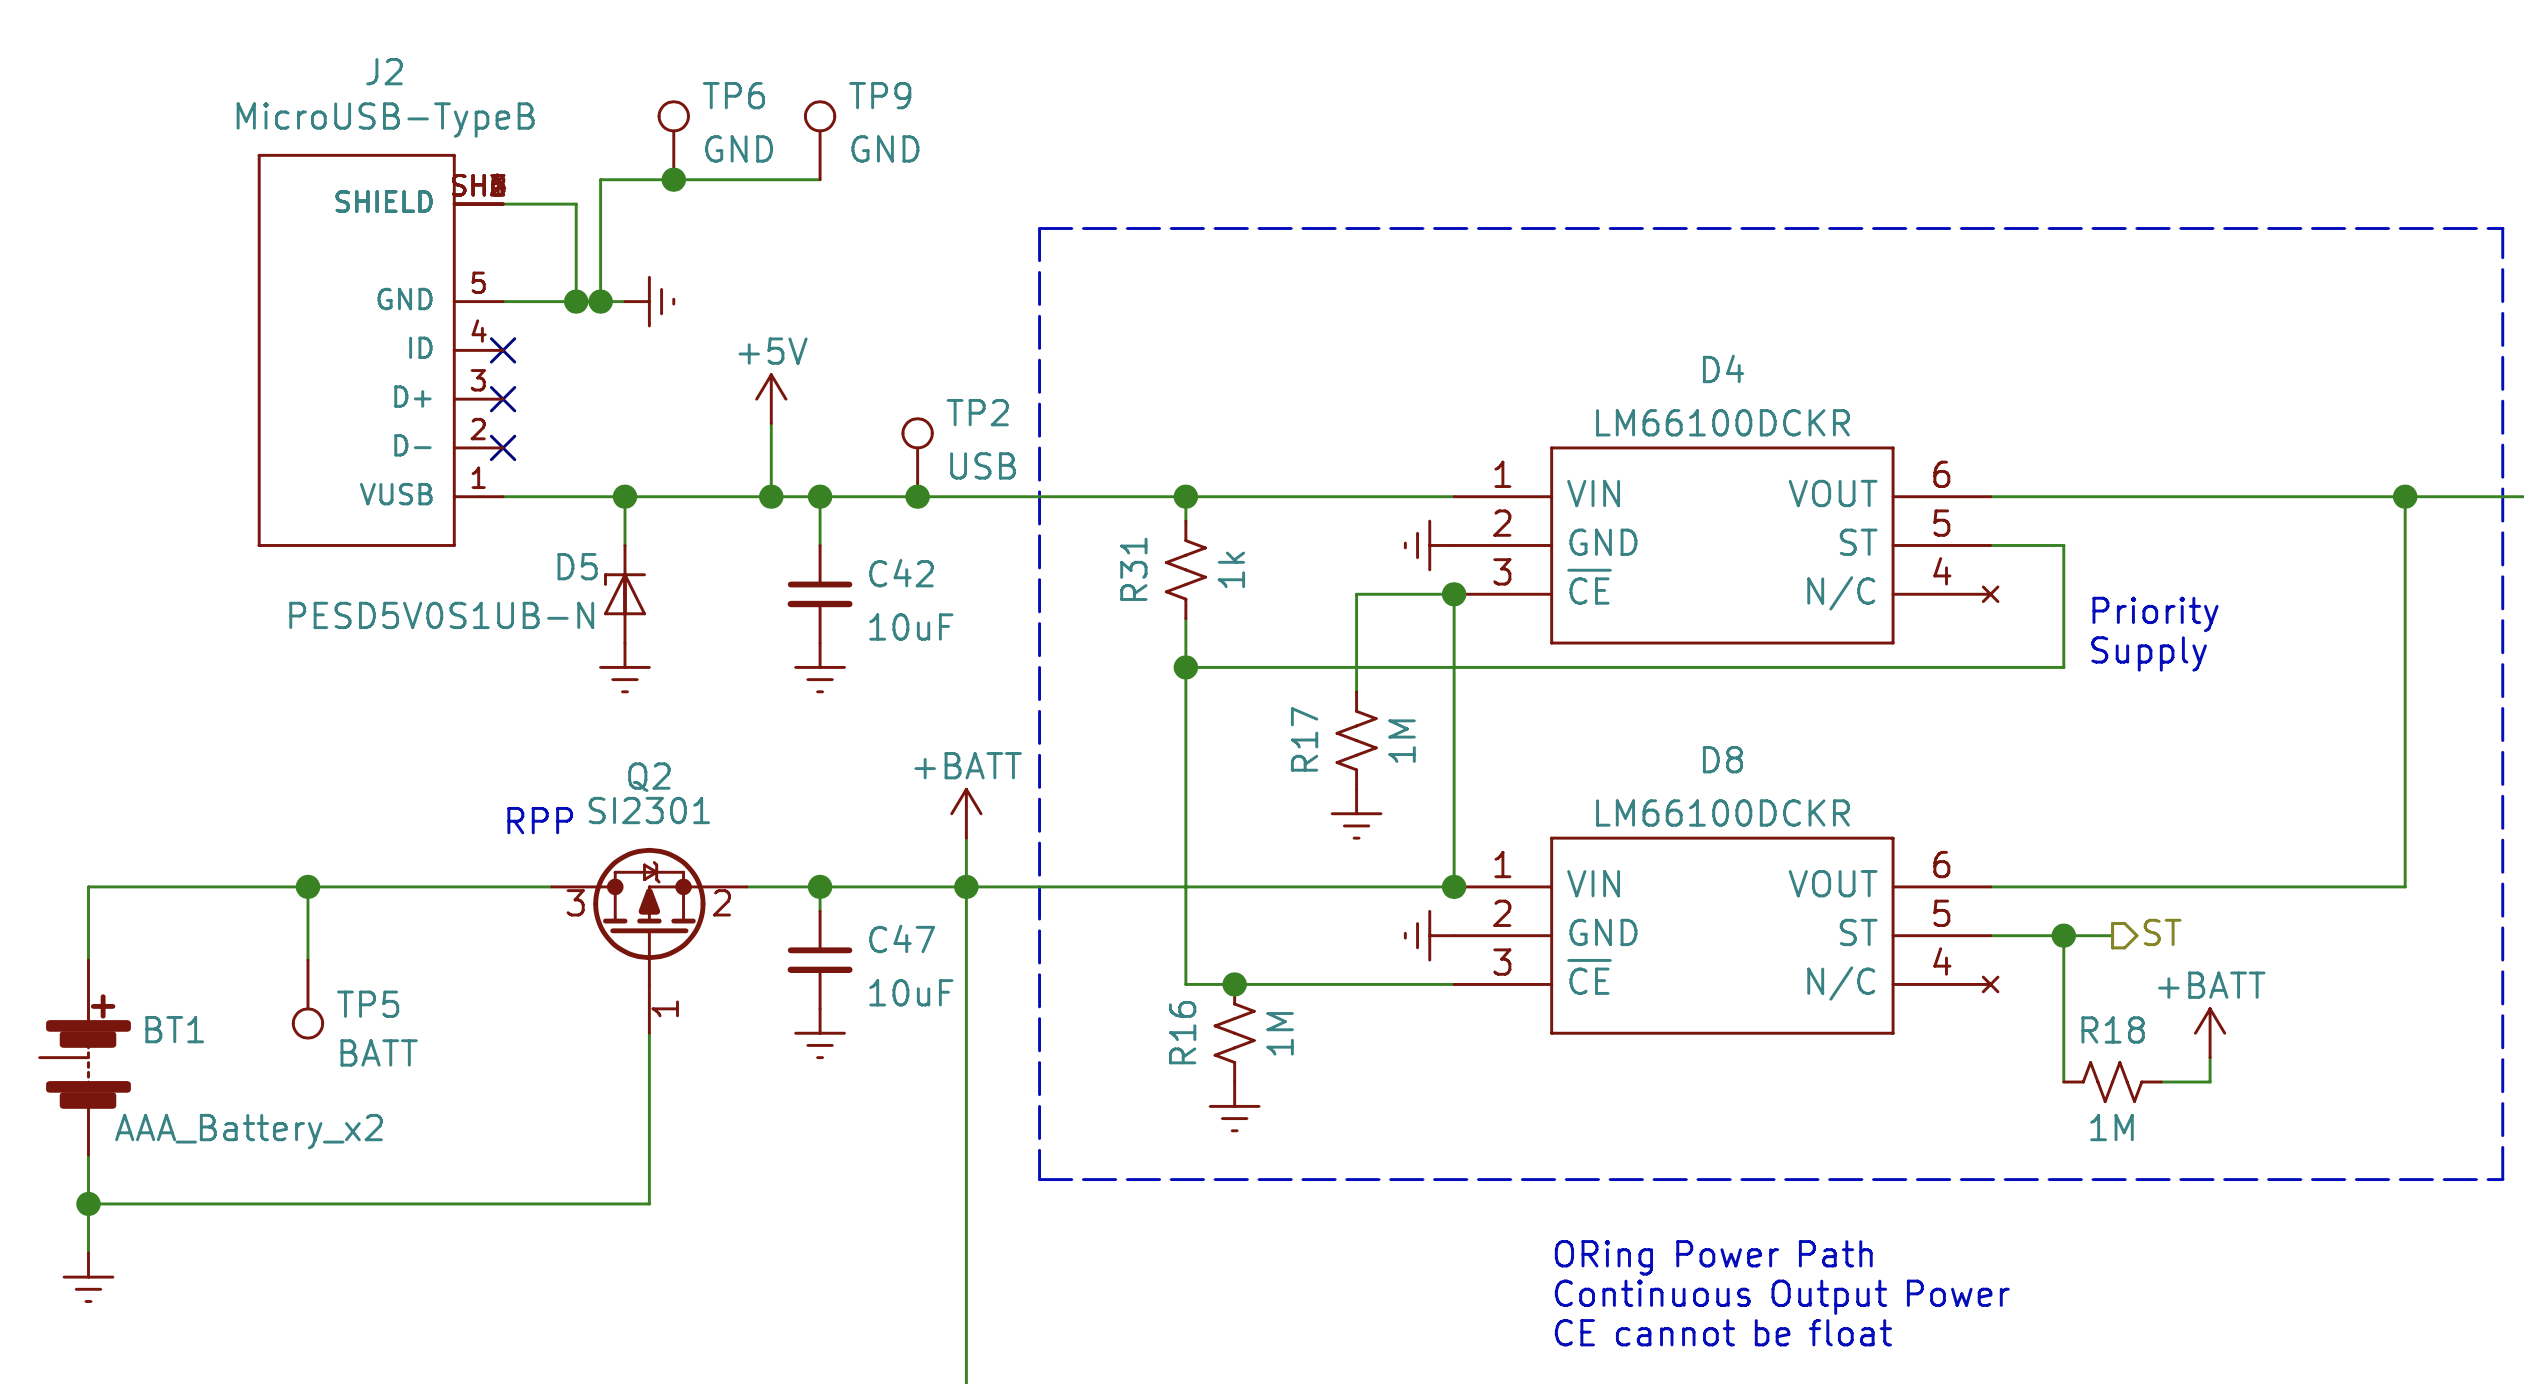
This ideal diodes features a status pin that is connected to the MCU, so we know all the time what power supply is in use and allows us to enable or disable some features depending on the power supply.
It also allows you to change batteries without rebooting the device, so you don't have to wait the 24-48h necessary for the stabilization of the gas sensor algorithm, and to keep the history data.
BUCK-BOOST CONVERTER
The output of the ORing links with a TPS63020 Buck-boost converter to set the main system voltage to 3V regardless of whether the input voltage is above or below.
This converter features a power save mode to improve efficiency at light load (<100 mA). At this point, the converter operates with reduced switching frequency and with a minimum quiescent current to maintain high efficiency. For higher loads the device automatically switches to pulse width modulation (PWM) mode.
The downside is the power consumption. It needs 25 uA at best, and increases to 50 or even 100 uA when battery is near the end (2V). This makes the consumption in standby mode increase from 13 uA in normal condition to 55 uA due to the boost process. Anyway I think it is a reasonable engineering compromise to allow a dual power supply.
LoRa COMMUNICATION MODULE
The device features a VGdd79s LoRa module from Vollgo, based on SEMTECH LLCC68 high-performance wireless transceiver chip. This chip is specifically designed for battery-powered applications, with an effective receiving current of 4.2mA and a transmission power from +14dBm up to +22dBm.
This feature can be used to share information with other Hermetis devices to create a mesh, so you can check the data of all devices from any of them.
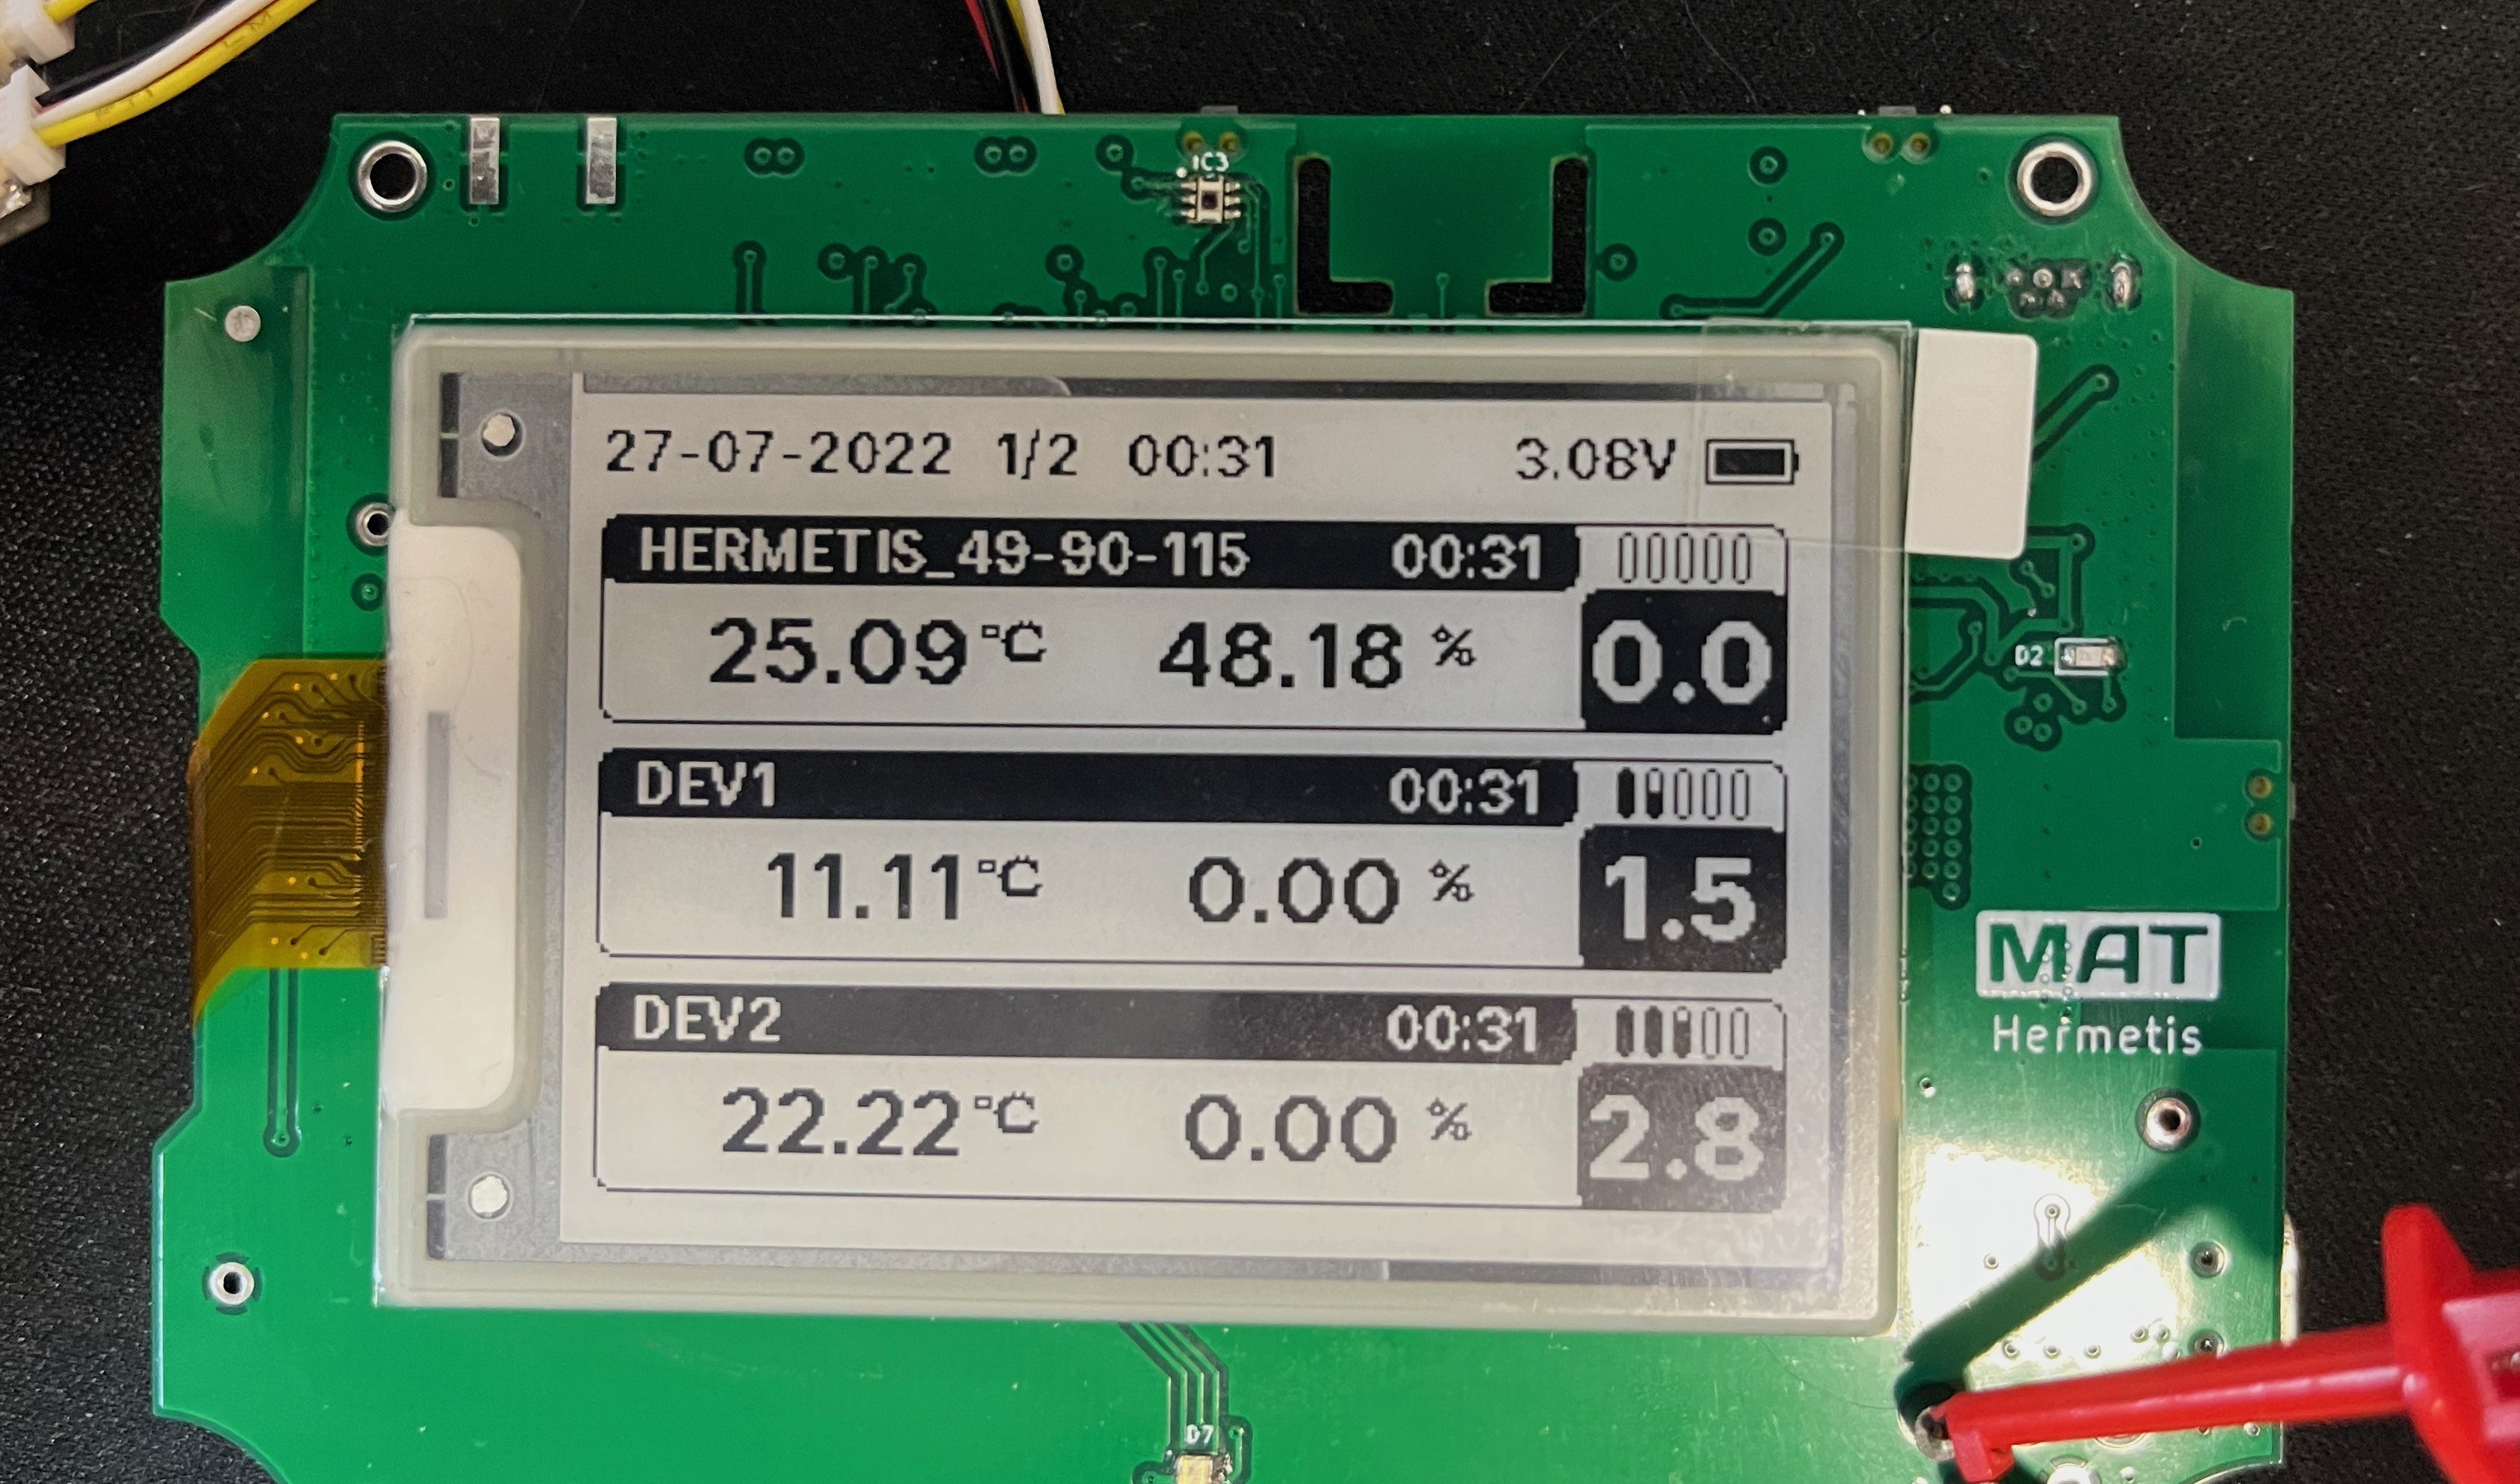
And of course, you can capture the data from any other LoRa device you have (i.e. LoRa HAT for Raspberry PI). To secure this communication, all the data is encrypted using AES-128 before sending it.
The module operation mode can be configured in Transmit (Tx), Receive (Rx), or both (Duplex). And of course, you can set different mode depending on the power supply currently in use.
USER FEEDBACK - RGB LED and BUZZER
The device also features an RGB LED and a buzzer to report indoor quality alerts. All the parameters, limits and functionality for this devices are fully configurable through the web configurator. And again, you can enable or disable it depending on the power supply currently in use.
WiFi ACCESS POINT CONFIGURATOR
Last but not least, Hermetis features an ESP32-C3 MCU with WiFi and BLE connectivity. Is configured to work as a WiFi Access Point and serves a front web page that consumes services from its own rest server. This way you can connect to the wifi network created by the device and access to the Device Configuration Web.
All configurations are managed by the main MCU and stored on an external EEPROM, so the ESP32 is connected with it via UART to send and receive all the data.

Updates
This module also allows to update the firmware of the main MCU, its own firmware and the front web.
Limitations
The ESP32-C3 module also supports BLE communication and other great functionalities via WiFi like Mesh Network, WiFi connection in station mode (for example to send info directly to an MQTT server), the adoption of new standard protocols like Matter, and so on.
However, the micro is used only as a configurator for the device, with the shortest possible active time. The reason is simple: this micro is a stove.... The device is intended for precise temperature and humidity measurements, and this precise values are required to obtain precise indoor air quality values. If we leave the C3 active, the PCB temperature increases about 2 - 3 ºC, so the device no longer makes sense.
I do my best trying to mitigate it: using the minimum trace width accepted by manufacturer, solid metal planes removed near the sensor, milled openings around the sensor, housing walls to shield from ambient temperature and to reduce dead volume... all with no luck.
I'm working on a separate device that acts as a bridge between LoRa and WiFi-BLE. This will allow Hermetis devices to be easily integrated in systems like Home Assistant, Apple HomeKit, Amazon Alexa and others.
LOW POWER MANAGEMENT
Firmware
To better understand the device consumption, let me explain how firmware is implemented.
As said before, I use the IAQ 2nd Generation Ultra Low Power firmware made by Renesas for the gas sensor. This firmware requires to perform a measure and call the algorithm with a sample rate of 90 seconds, with a maximum deviation of 5% to keep the algorithm accuracy.
So I opted to implement FreeRTOS, use the RTC to perform a wakeup event every 90 seconds and then call the task to read sensor ADC values and call the algorithm. This task uses the vPortEnterCritical() and vPortExitCritical() macros to disable interrupts and avoid preemptive context switches. The rest of the device's functionality follow the same principle, but using other kind of interrupts and thread flags.
The low power mode is managed enabling the tickless mode in FreeRTOS and modify the default policy to enter to a deeper low power mode.
So for the display update, user can specify how many intervals of 90 seconds to wait before performing a screen update. One interval performs refresh every 1.5 minutes, four intervals every 6 minutes and so on.
Here is where the ambient light power save mode comes in. Once enabled, no update were performed if light is below the specified threshold. The system stores this event, and once the value exceeds the threshold the screen updates to reflect all the data.
For the LoRa communication, the transmission mode interval works the same way. User can specify the same interval as the screen update or a different value.
Hardware to Monitor Power Measurements
I used two different devices to monitor the power consumption.

During the early stages of development I use the X-NUCLEO-LPM01A expansion board from ST. It can measure current from 100 nA up to 50 mA with a 100KHz bandwidth, and all with an incredible accuracy in the range of 2%.
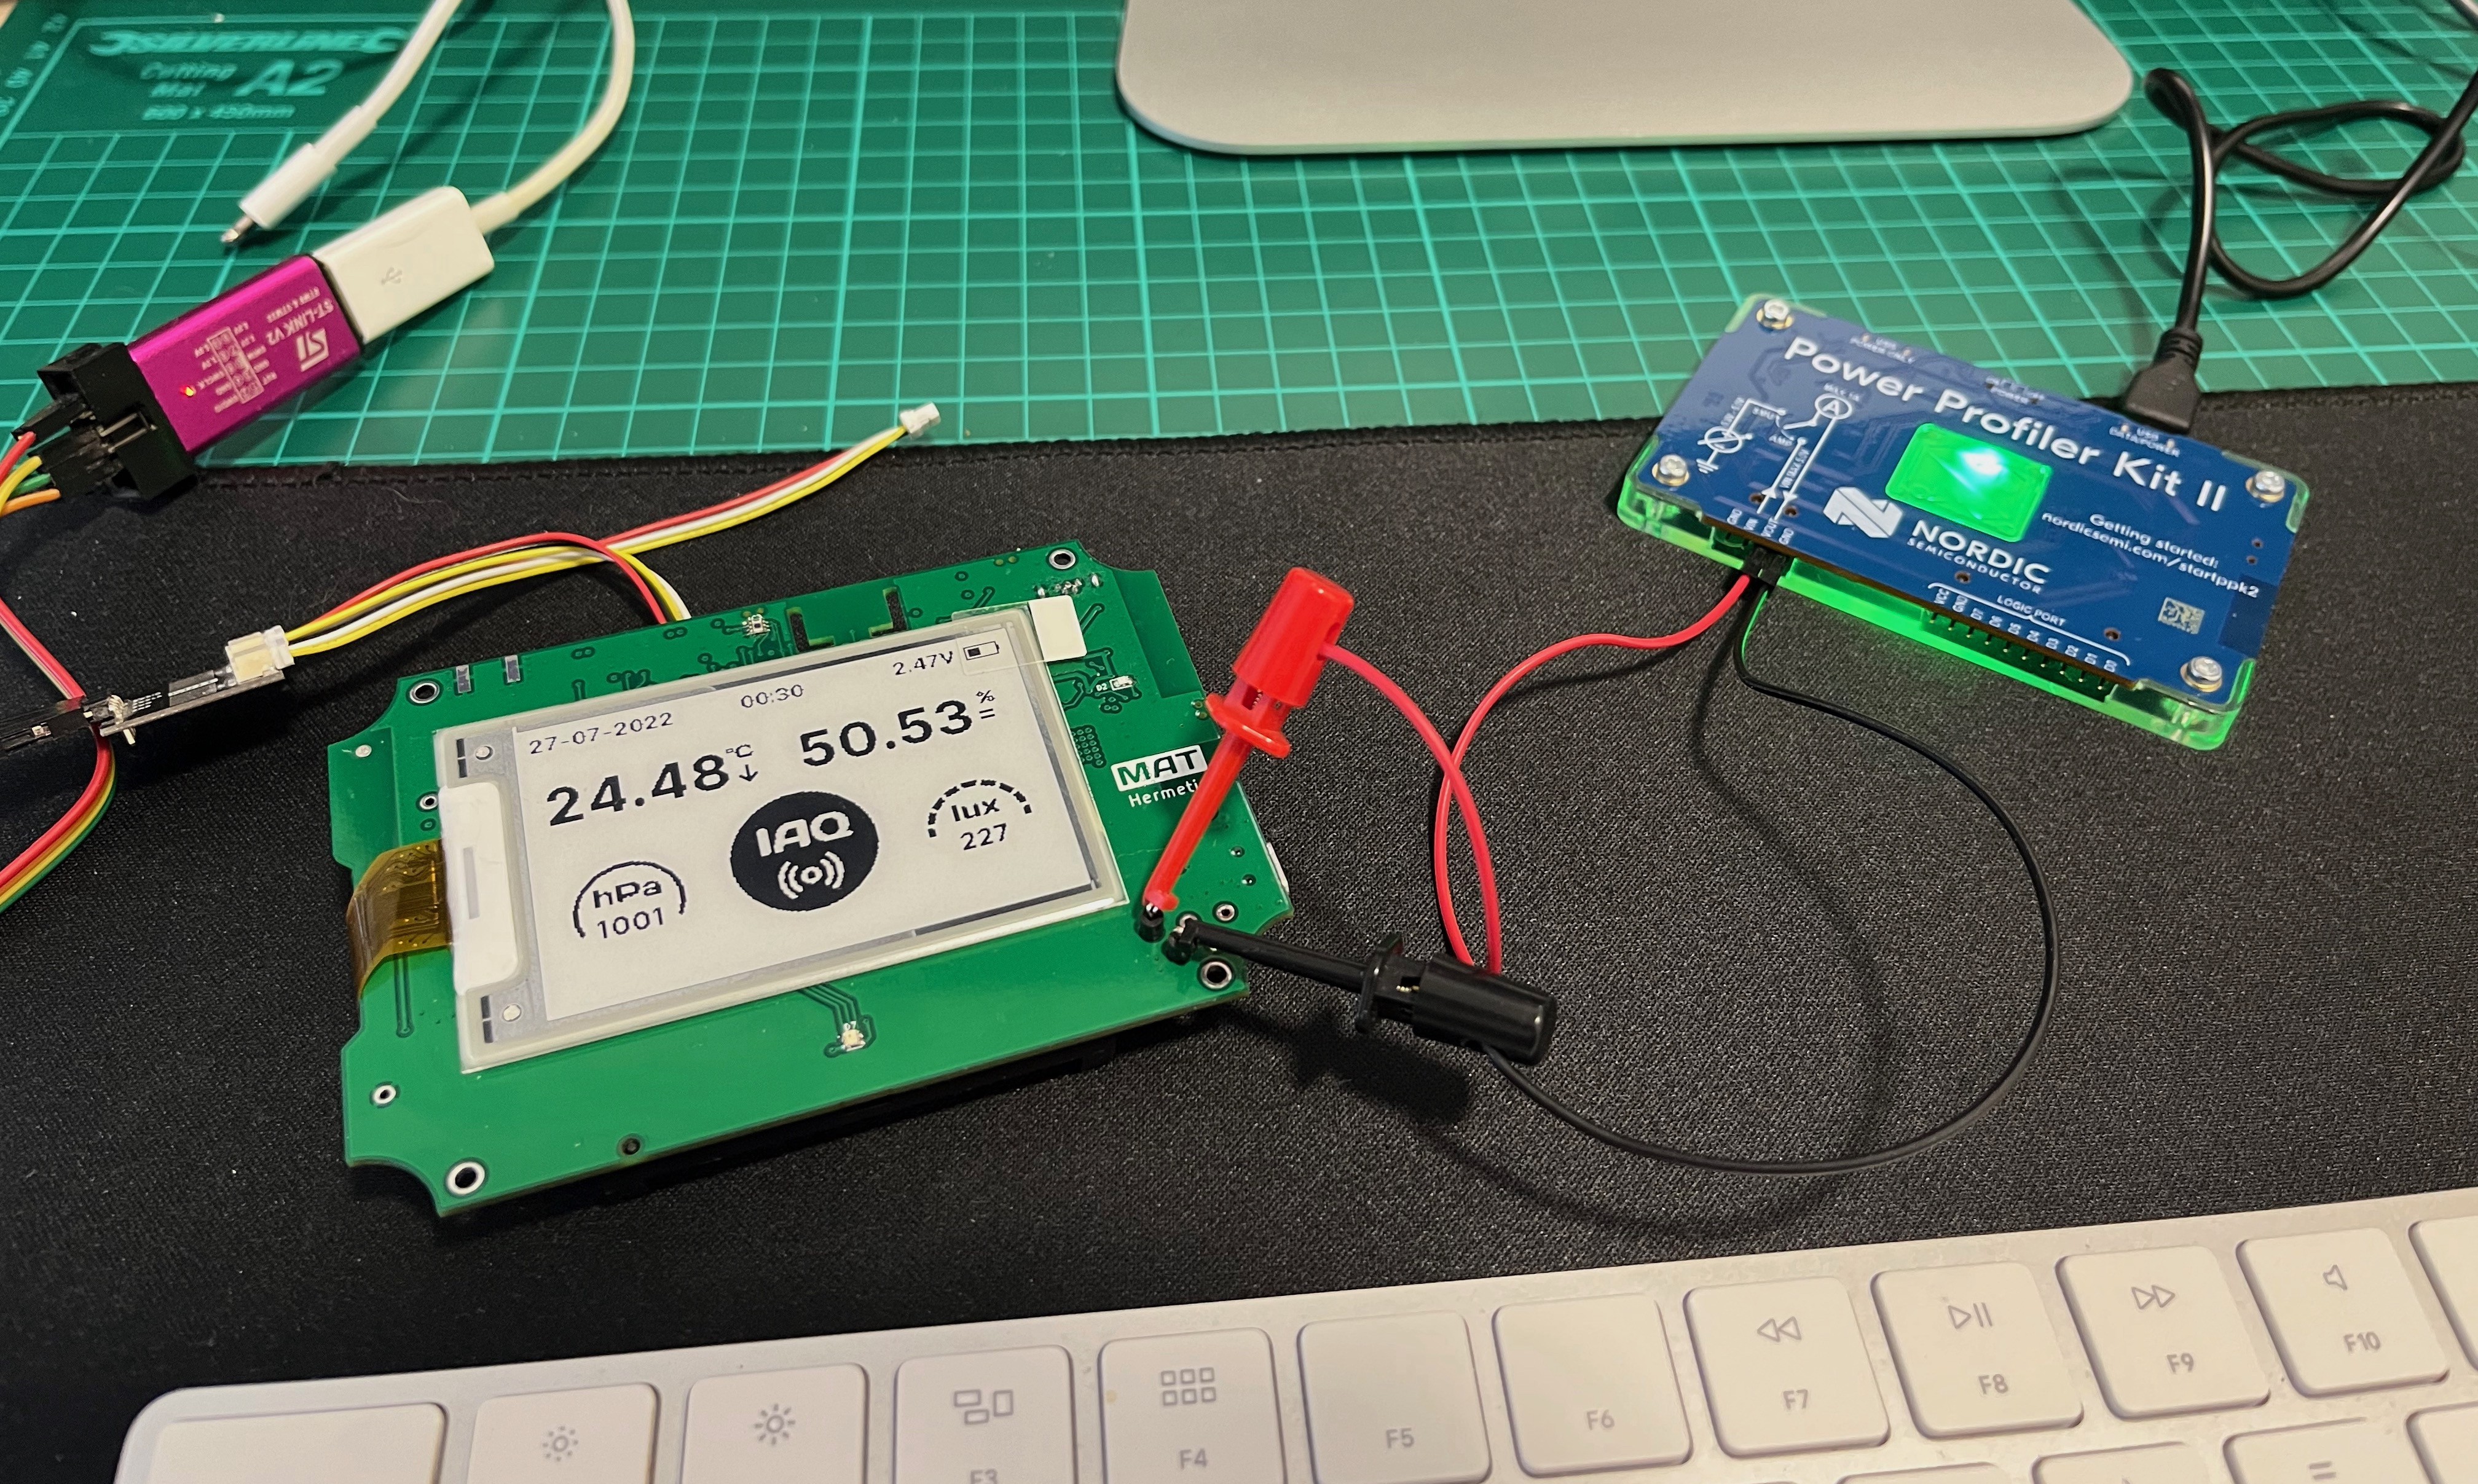
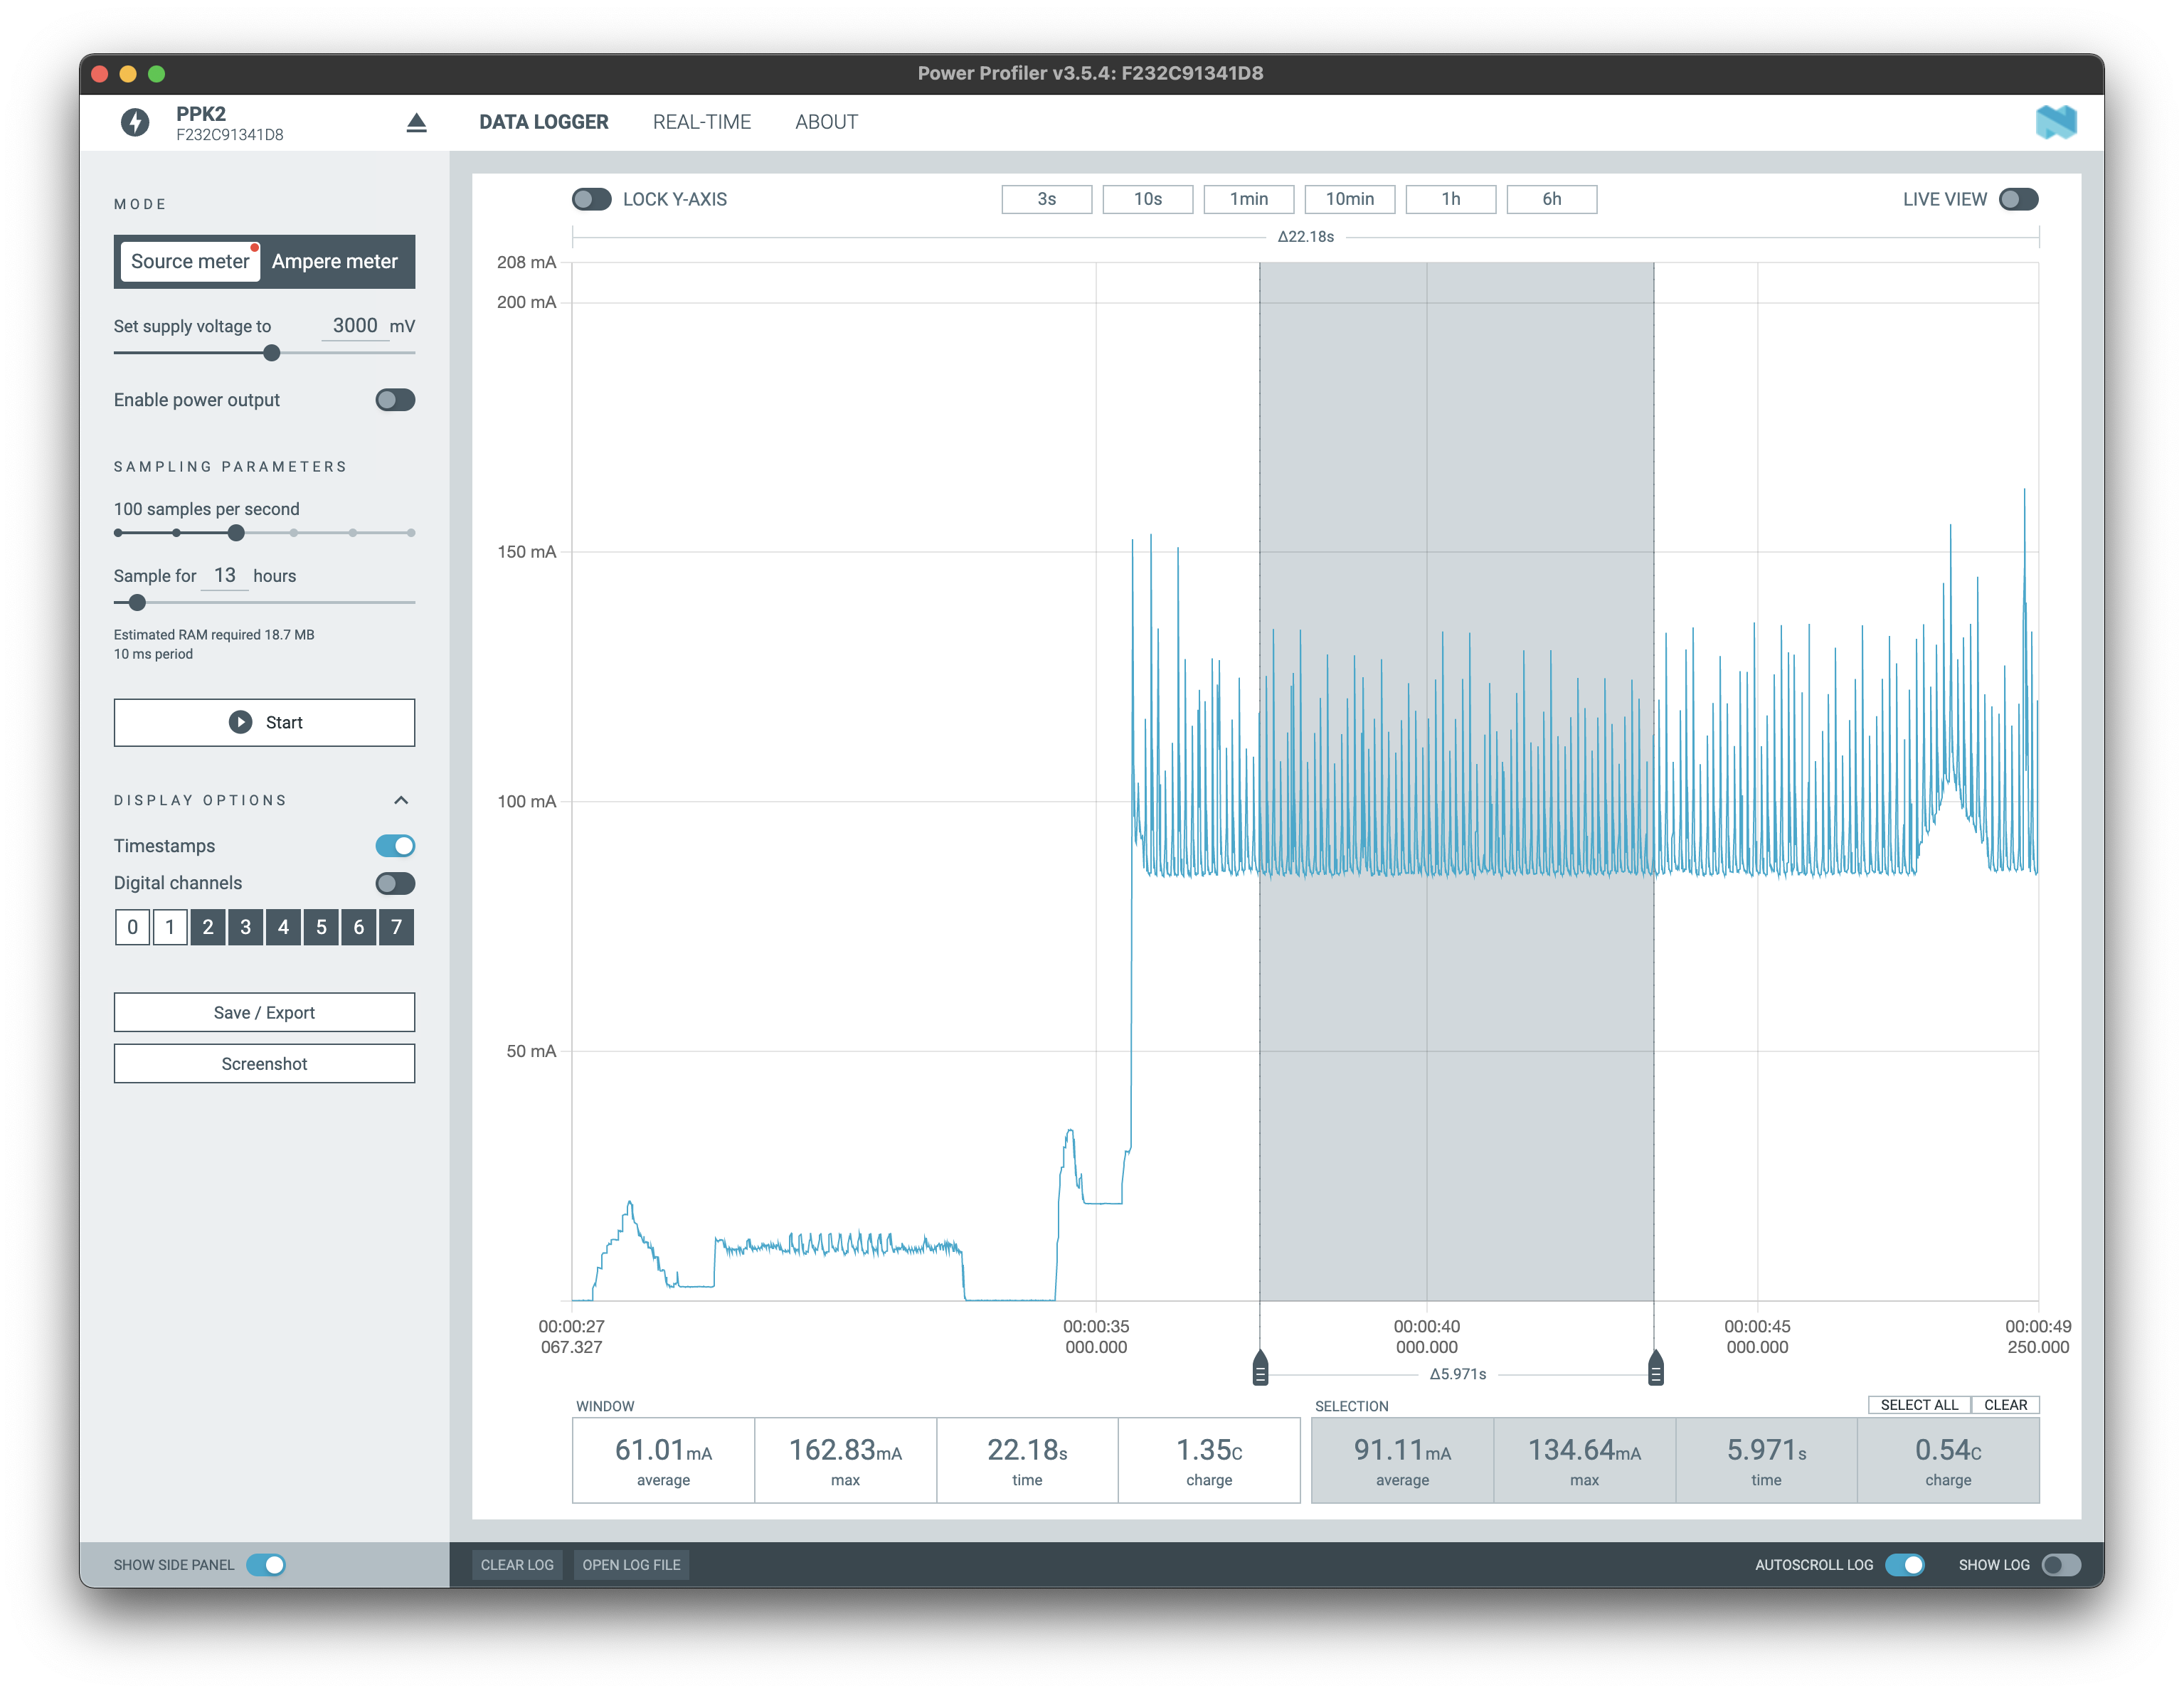
As the project progressed, the 50 mA started to fall short when increasing the LoRa transmission power, and even more when enabling the ESP32 WiFi. So I purchase a Power Profiler Kit II from Nordic Semiconductor. It can measure from 500 nA to 1 Ampere, but the accuracy drops to the +-20%.
With this, I use the Power Profiler as a main power meter and switch to the NUCLEO when I want to make more precise measurements, especially in the low power modes.
Measurement Process
During the development process I connect the monitor power supply directly on the 3V regulated rail, bypassing the buck-boost converter and ideal diodes. The converter needs 20 uA at best, so I need to bypass it to check real consumptions of low power modes and to avoid the "noise" in consumption introduced by the converter.
Anyway, for the estimations the consumption of all the components has been taken into account, and this calculation is more complex that it seems at first glance due to the variable voltage of the batteries. That is, 2x fresh batteries has about 3.25 volts and need to provide less current than the required by the 3V regulated supply (converter in buck mode). And the opposite happens when voltage drops below 3V (converter in boost mode).
The device stops working when batteries are at 2V, so for the battery life calculation I've made the measurements with 2.5V. I think it is a good strategy to obtain values close to reality.
I design the PCB with multiple through-hole testpoints to connect keystone 5001 connectors and make the measurements more convenient.
Measurements
Let me start at the end. The device consumes 383 uAh with a display update and LoRa transmission (+14dBm) every 6 minutes. It gives about 4,2 months of autonomy running with 2xAAA alkaline batteries (1.2 Ah).
With refresh and transmission every 15 minutes, and with 8 hours a day with twilight to avoid screen refresh, consumption goes to 221 uAh and an autonomy of 7.2 months (225 days).

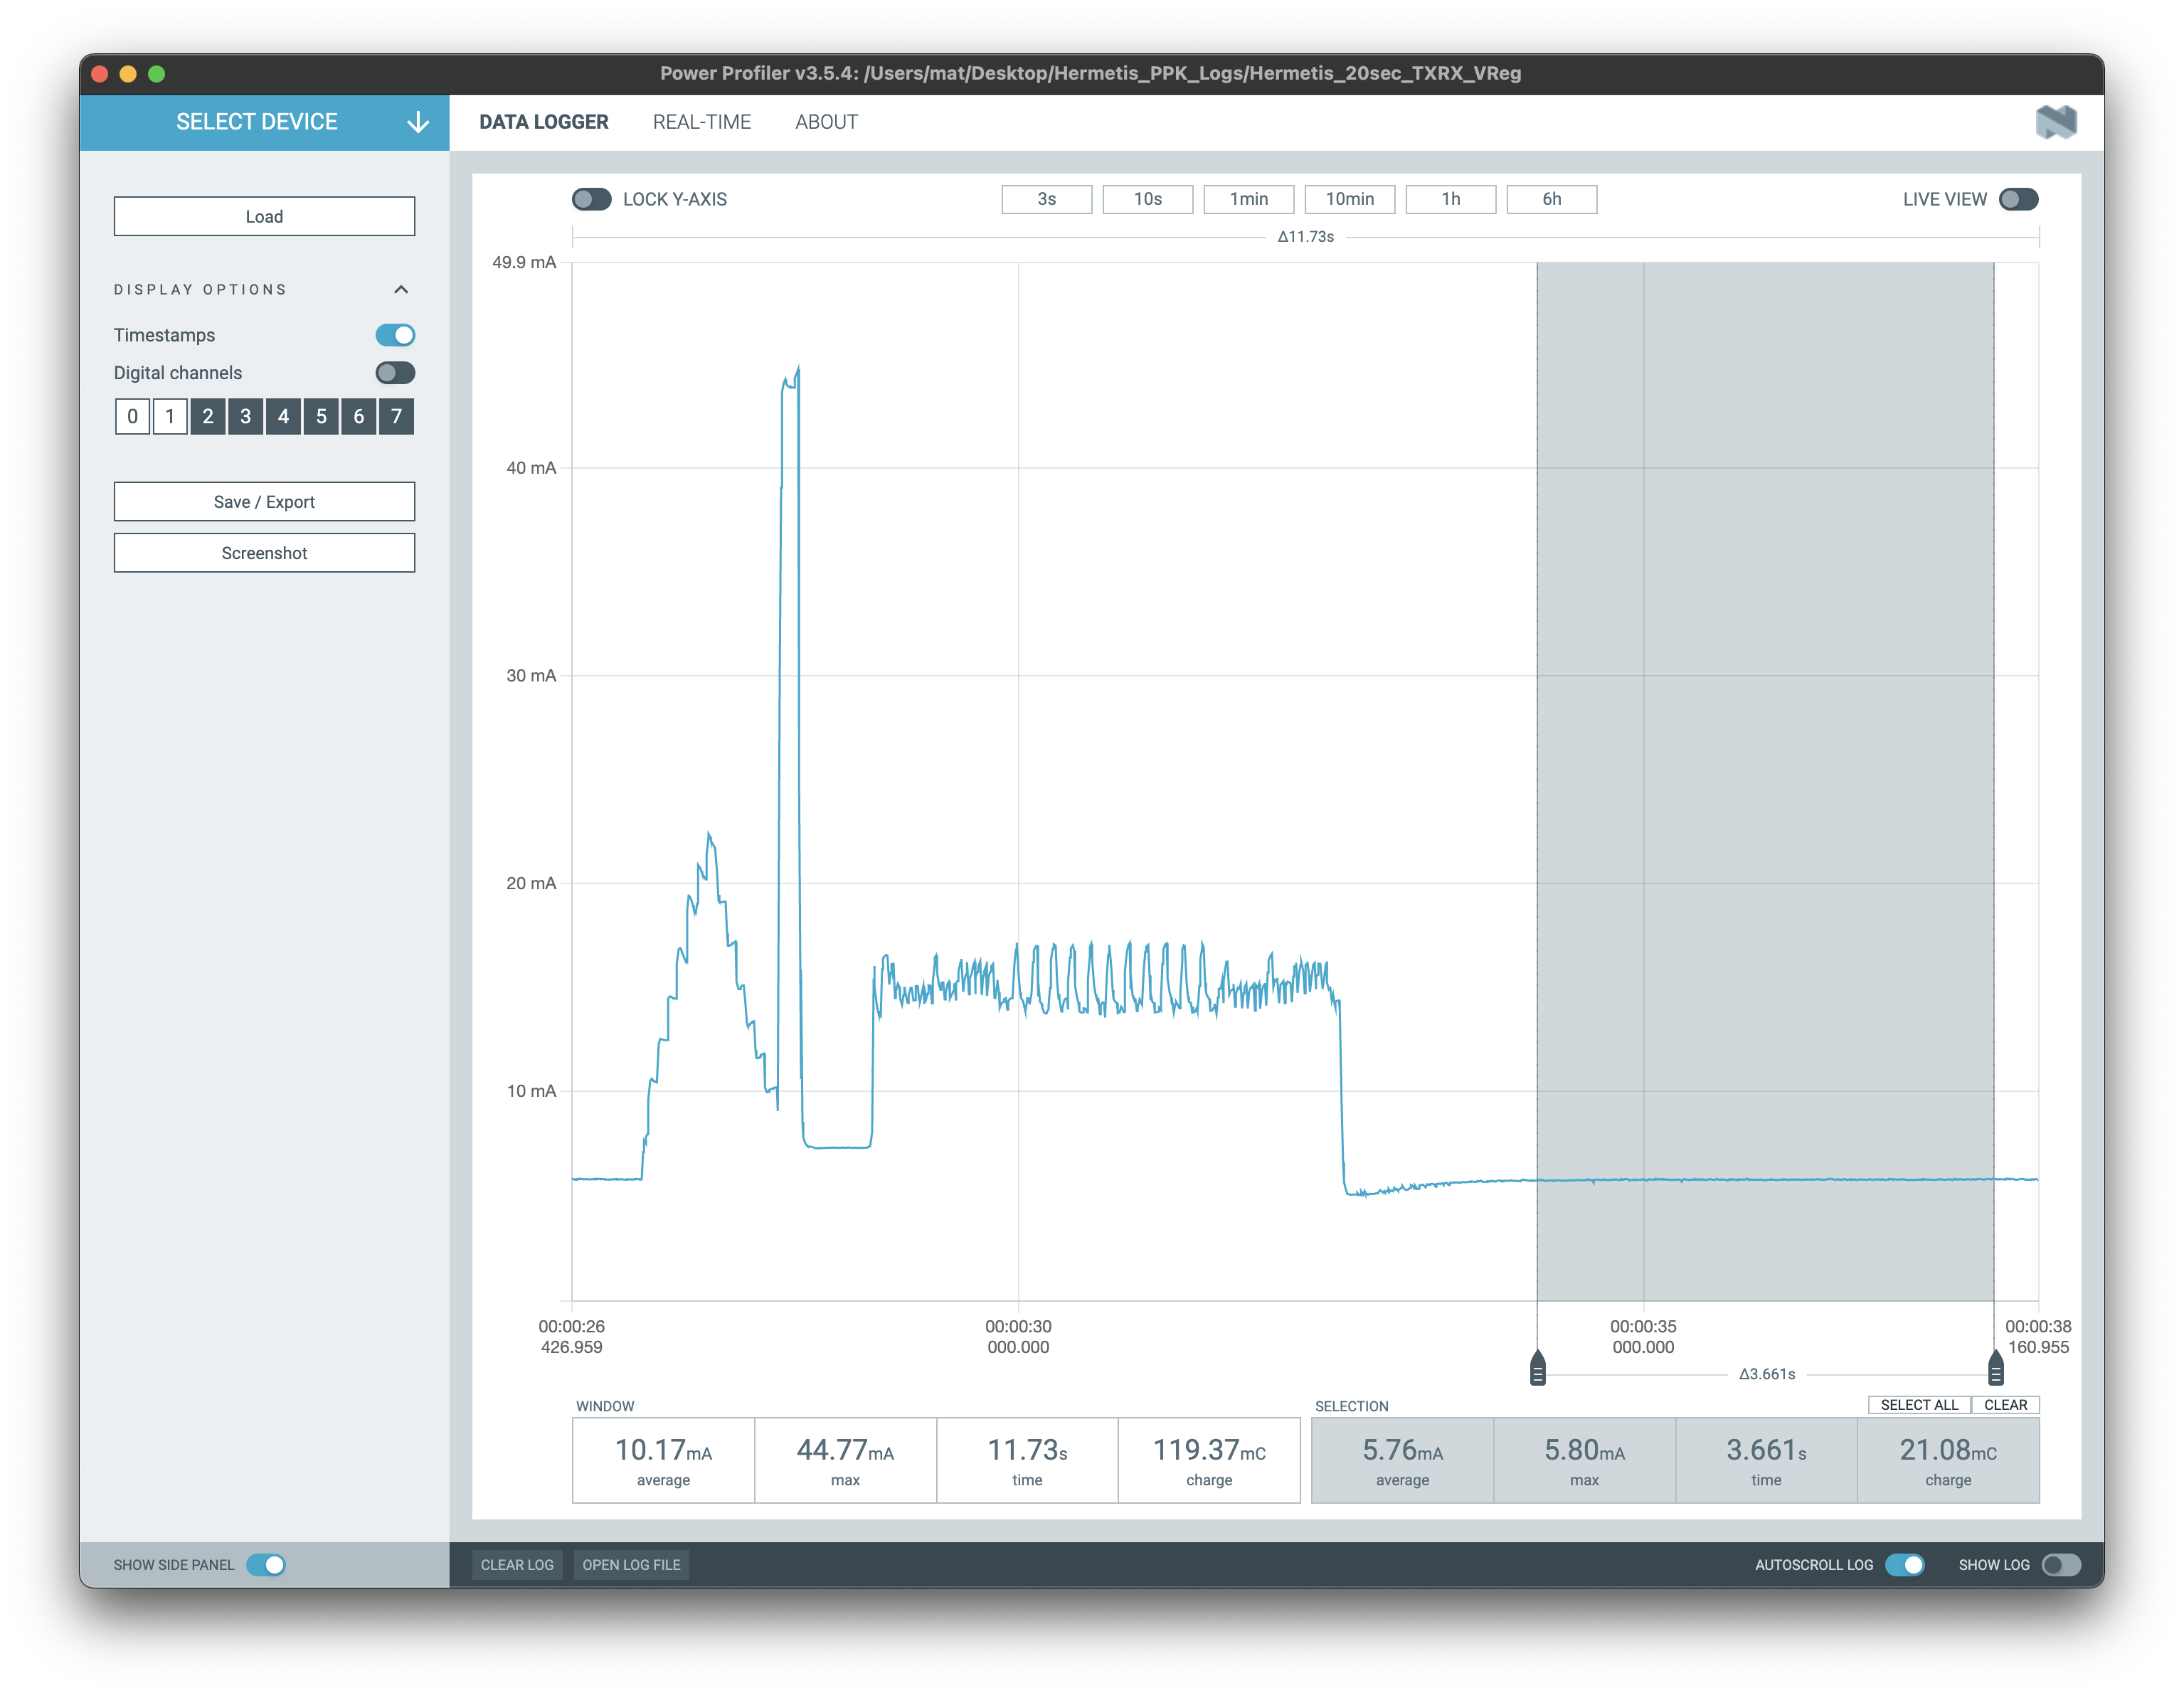
Let's look at each section separately. Every 90 seconds we calculate temperature and humidity, the gas sensor performs an ADC measurement, and call the algorithm with this data to obtain the air quality values. This process takes about a second with an average of 9.47 mA of power consumption, and an estimation of 12.57 mA real consumption.
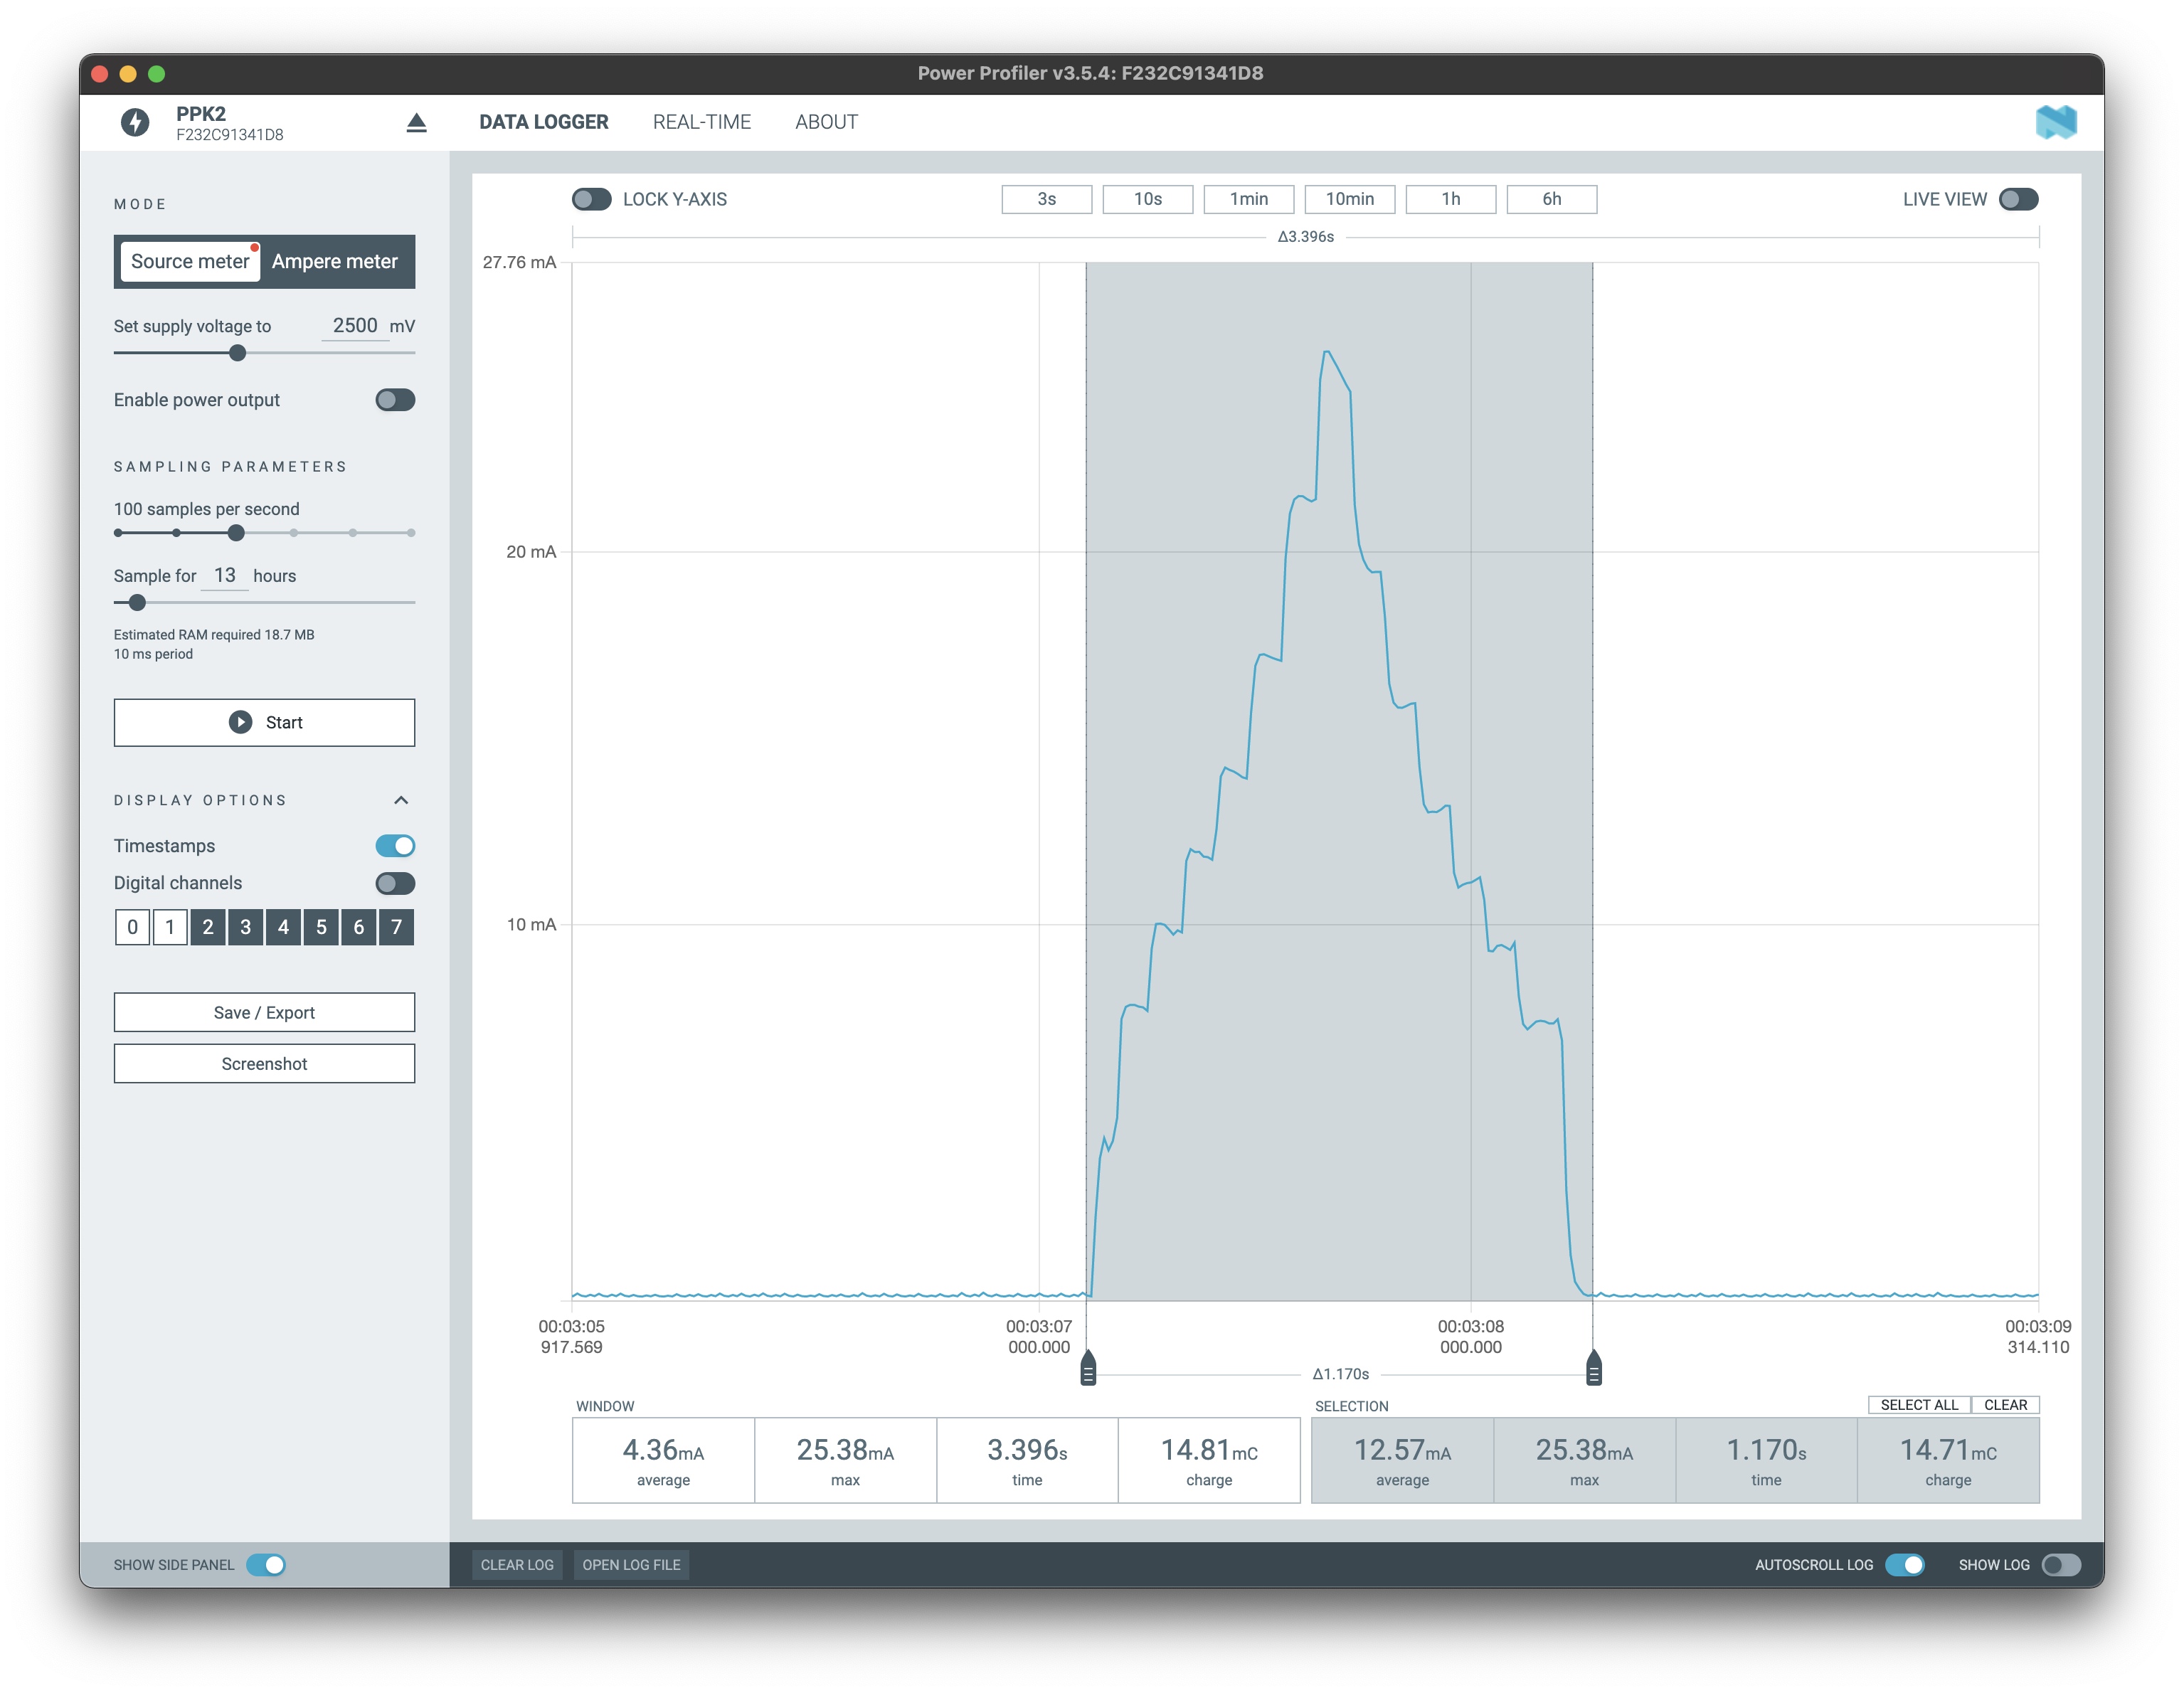
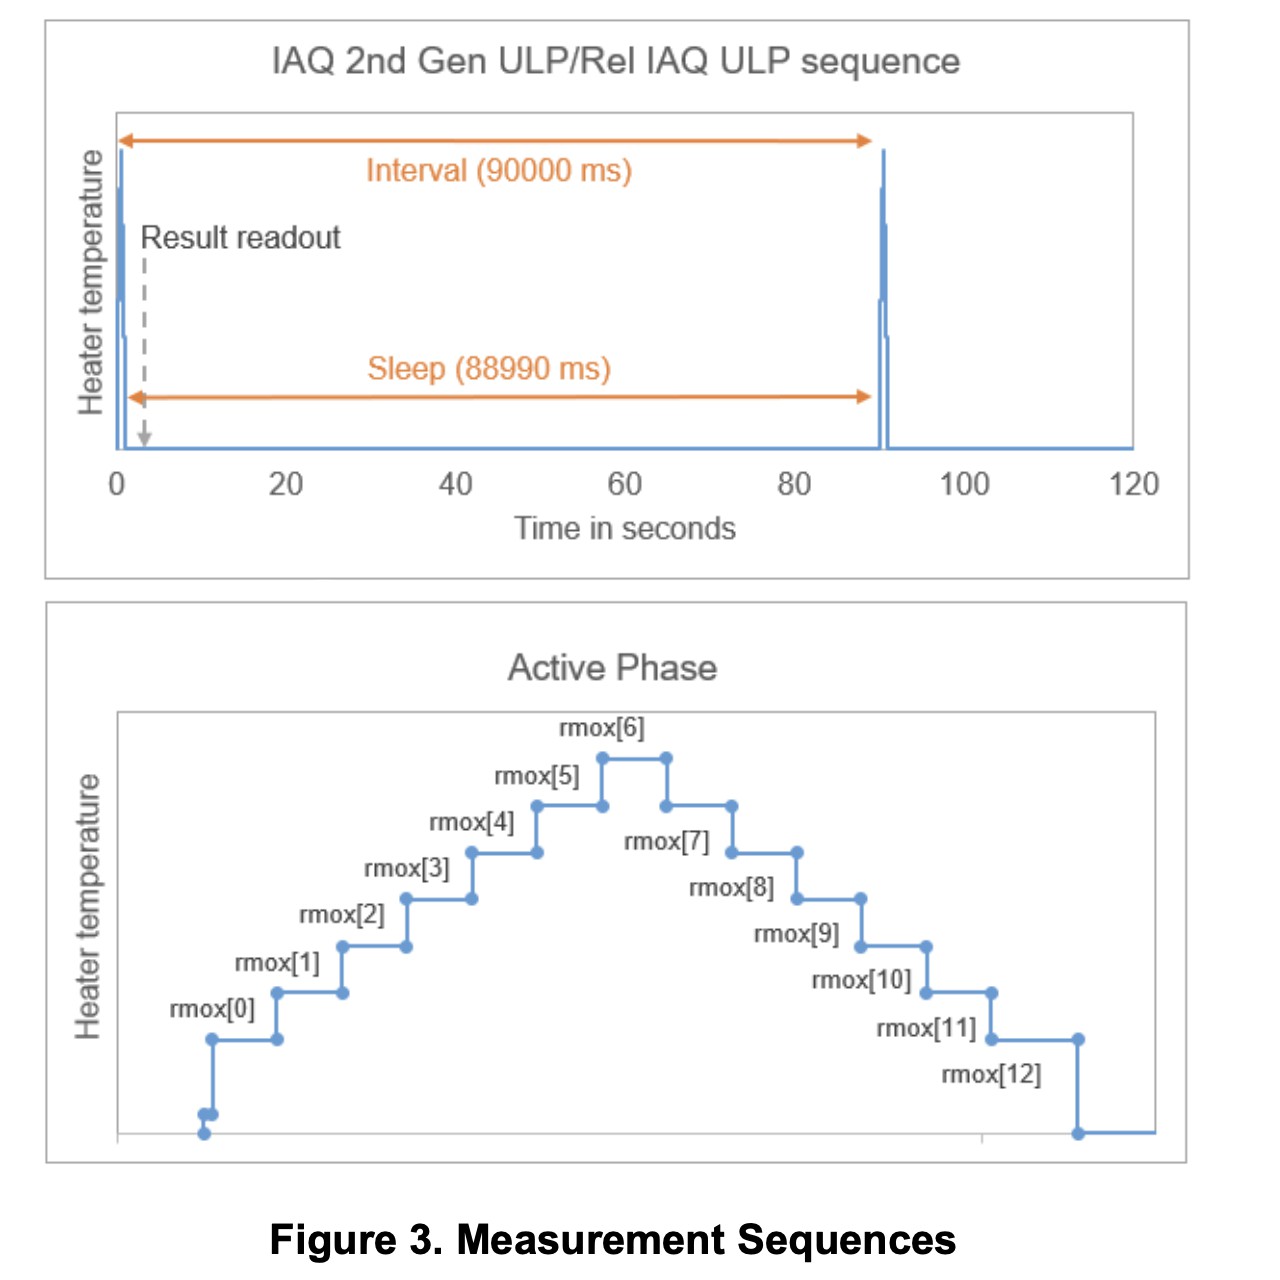
As you can see, the graph matches the one indicated by Renesas with the active phase measurement sequence of the sensor.
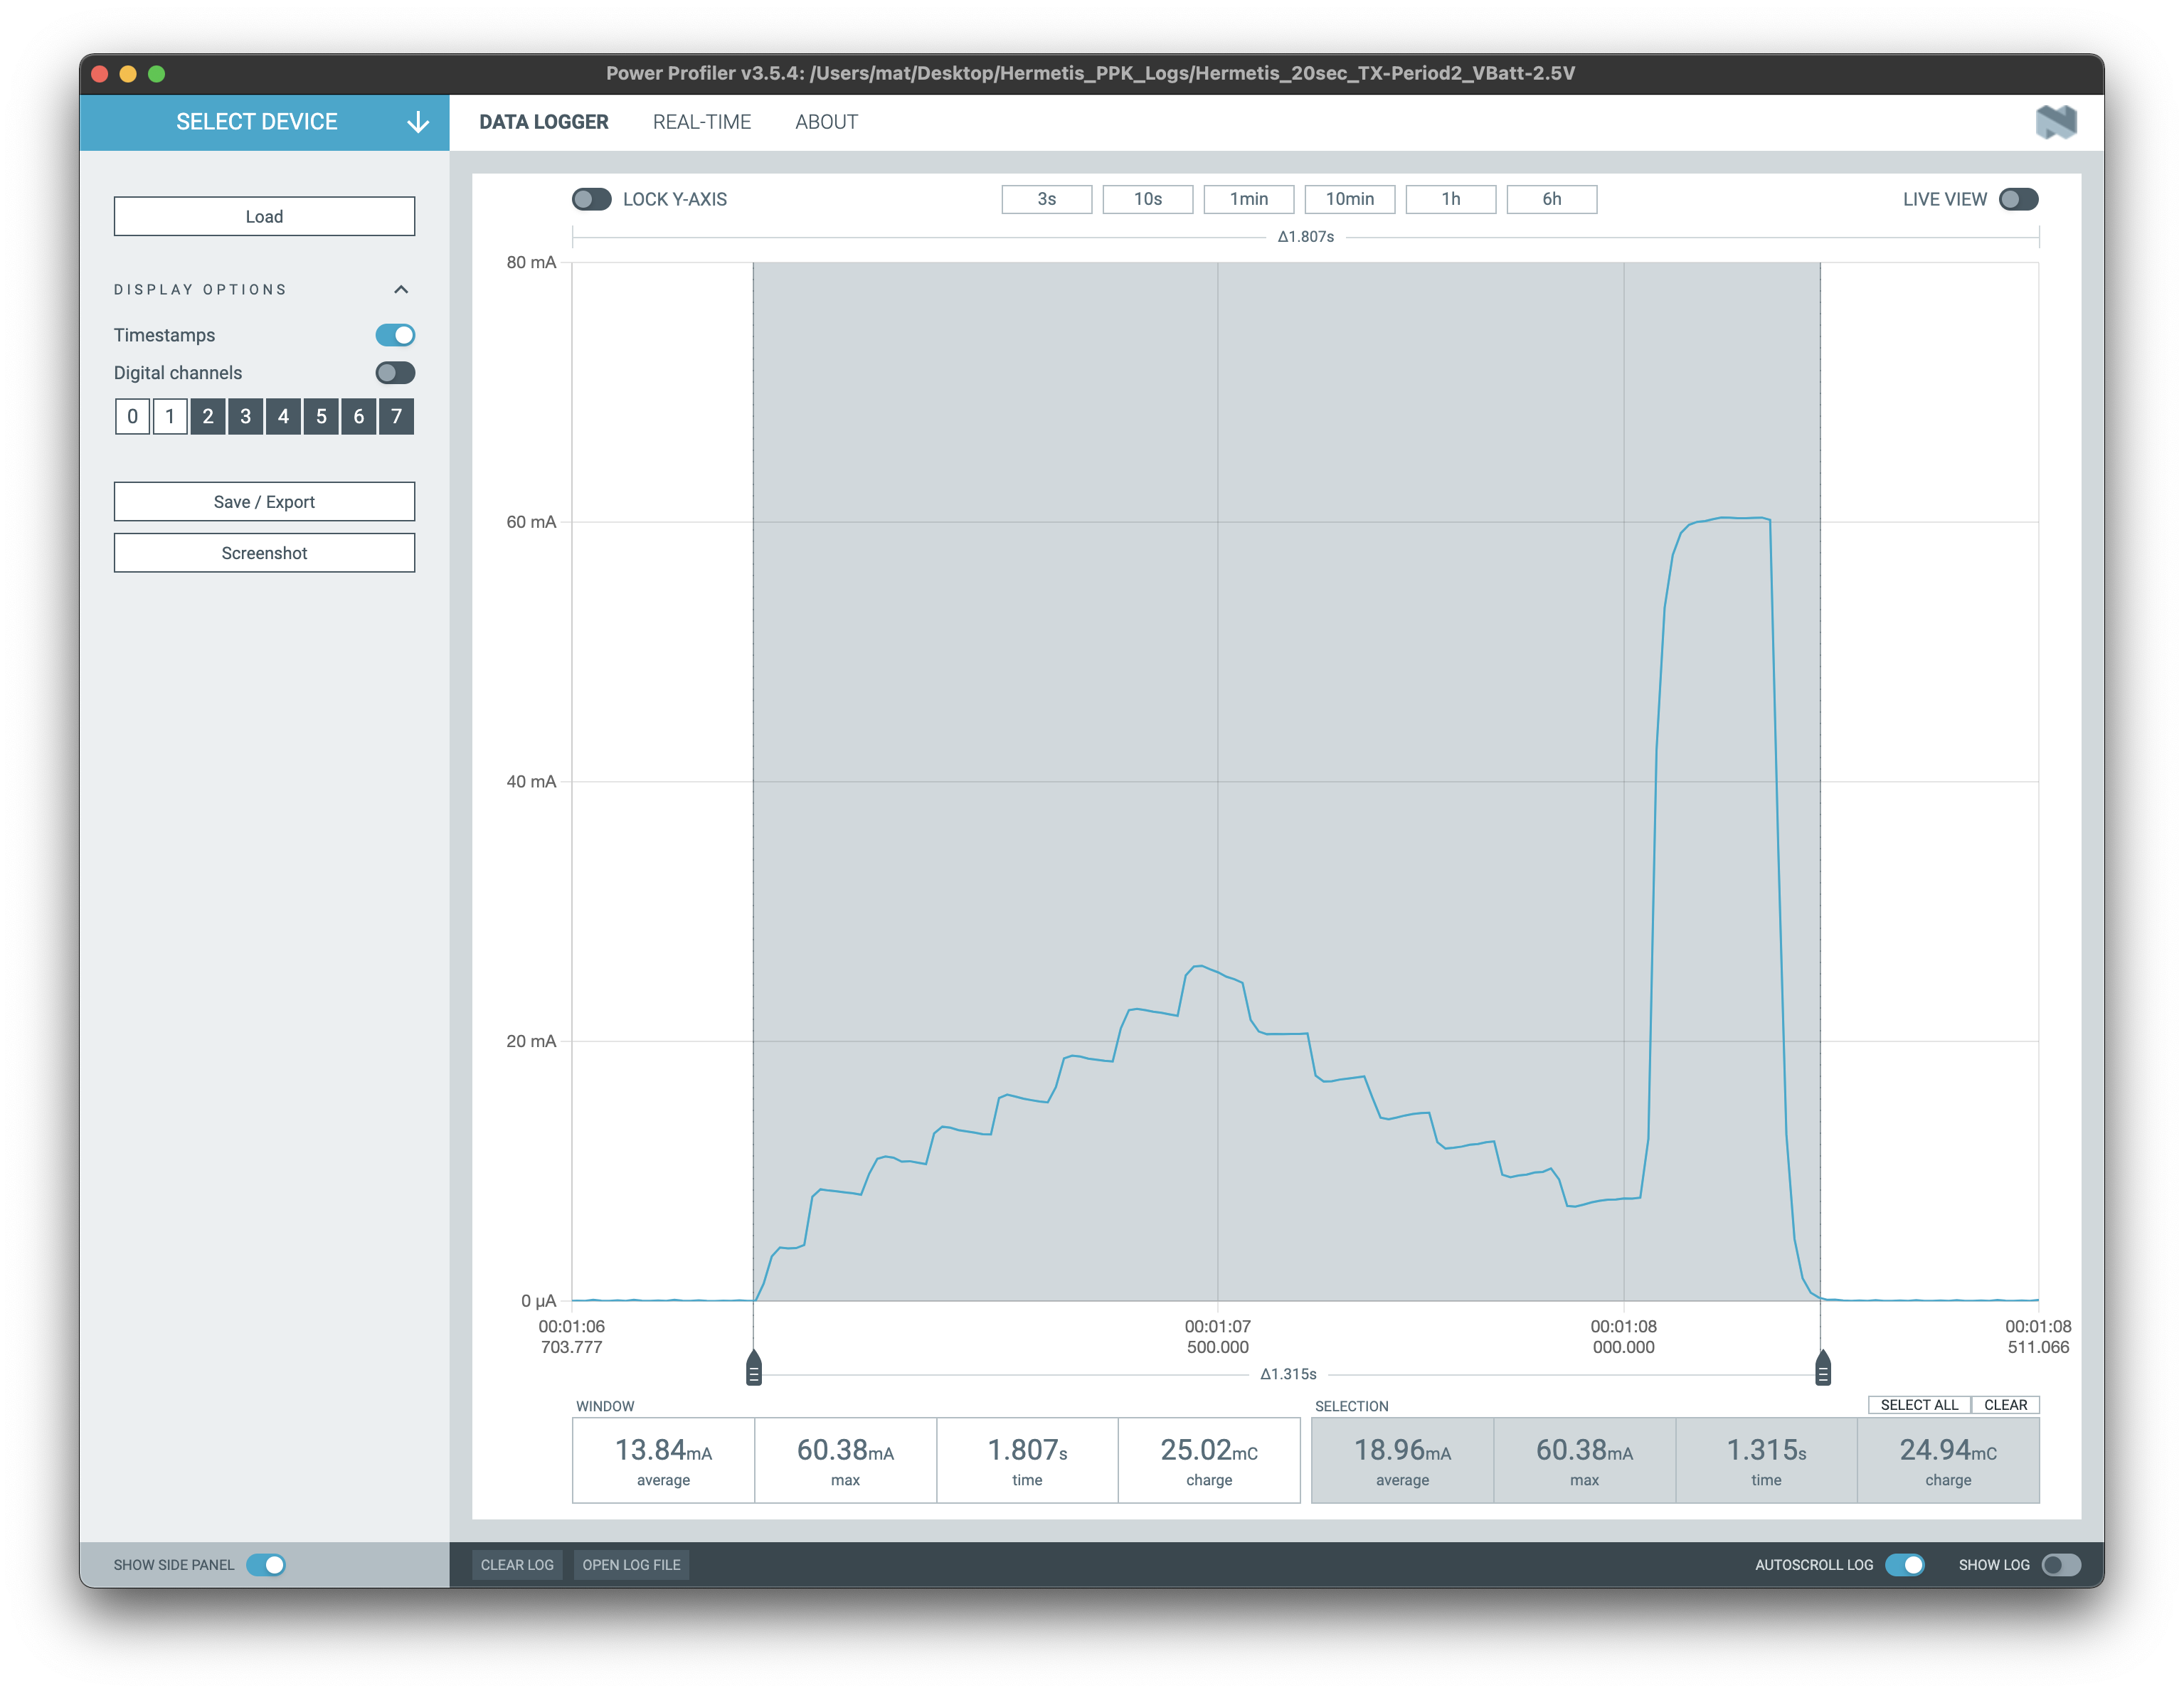
In case the LoRa transmission coincides with the sensor reading, the consumption would be 19mA for a total of 1.32 seconds.
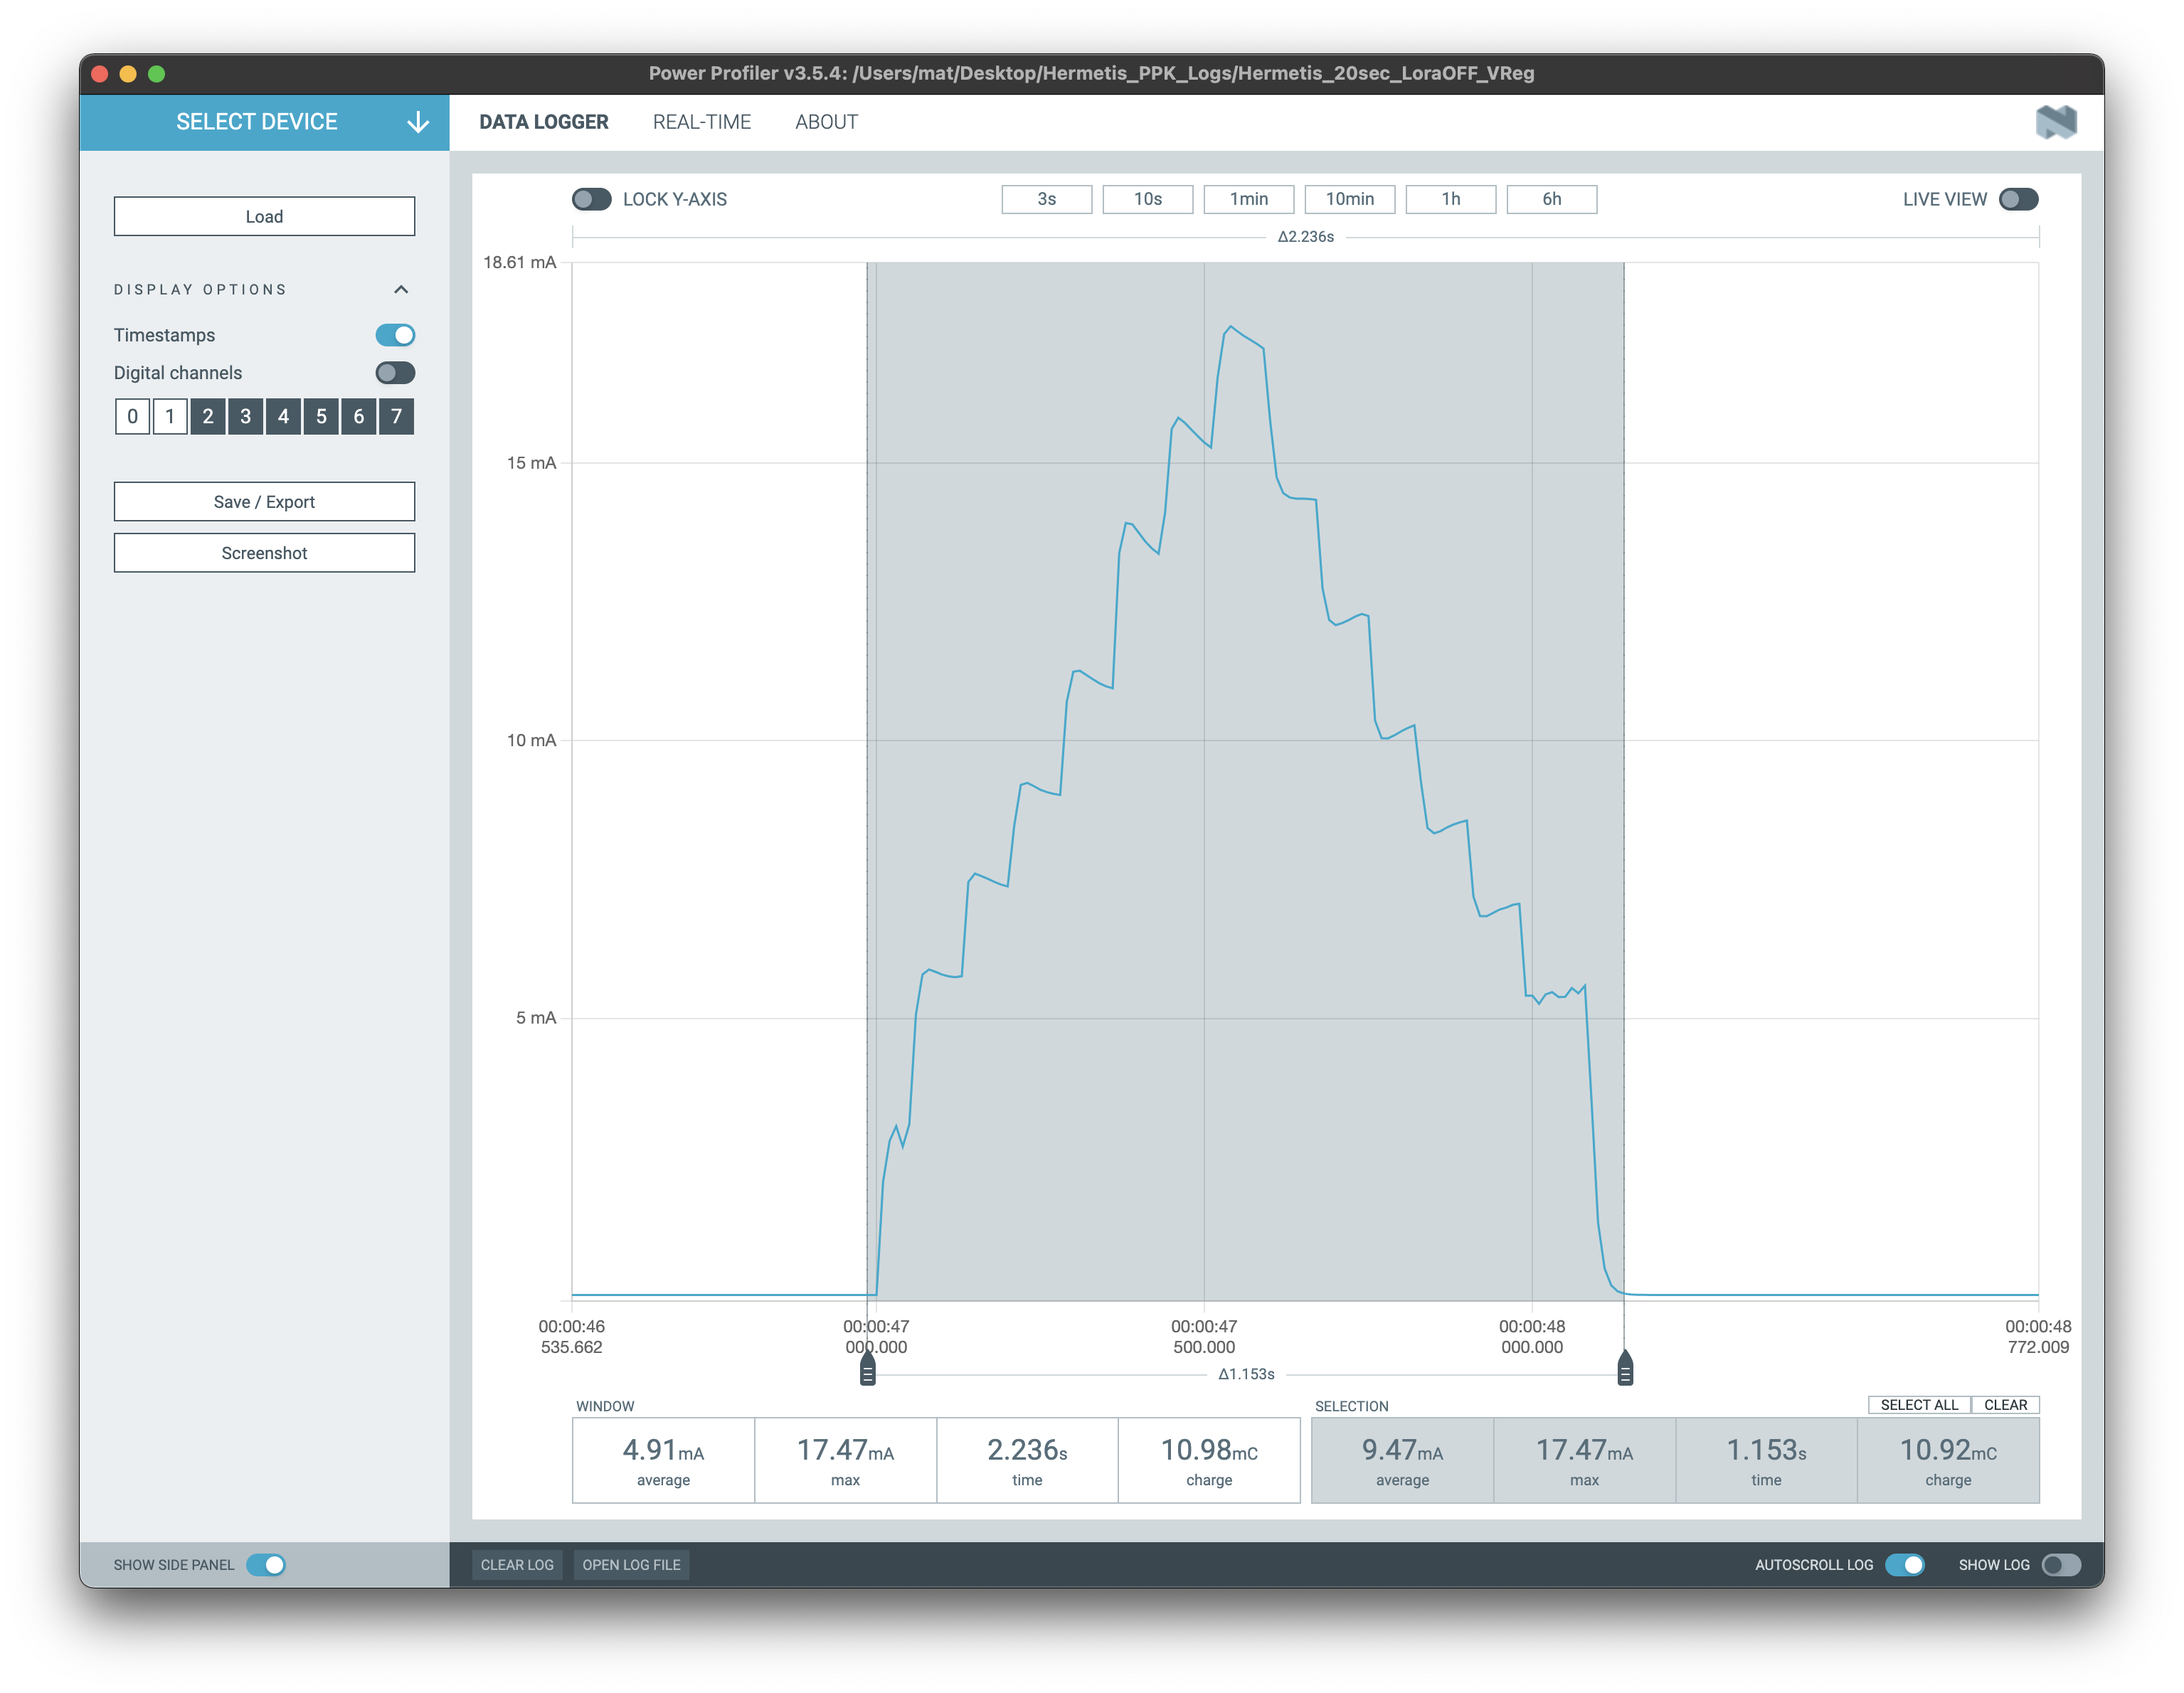
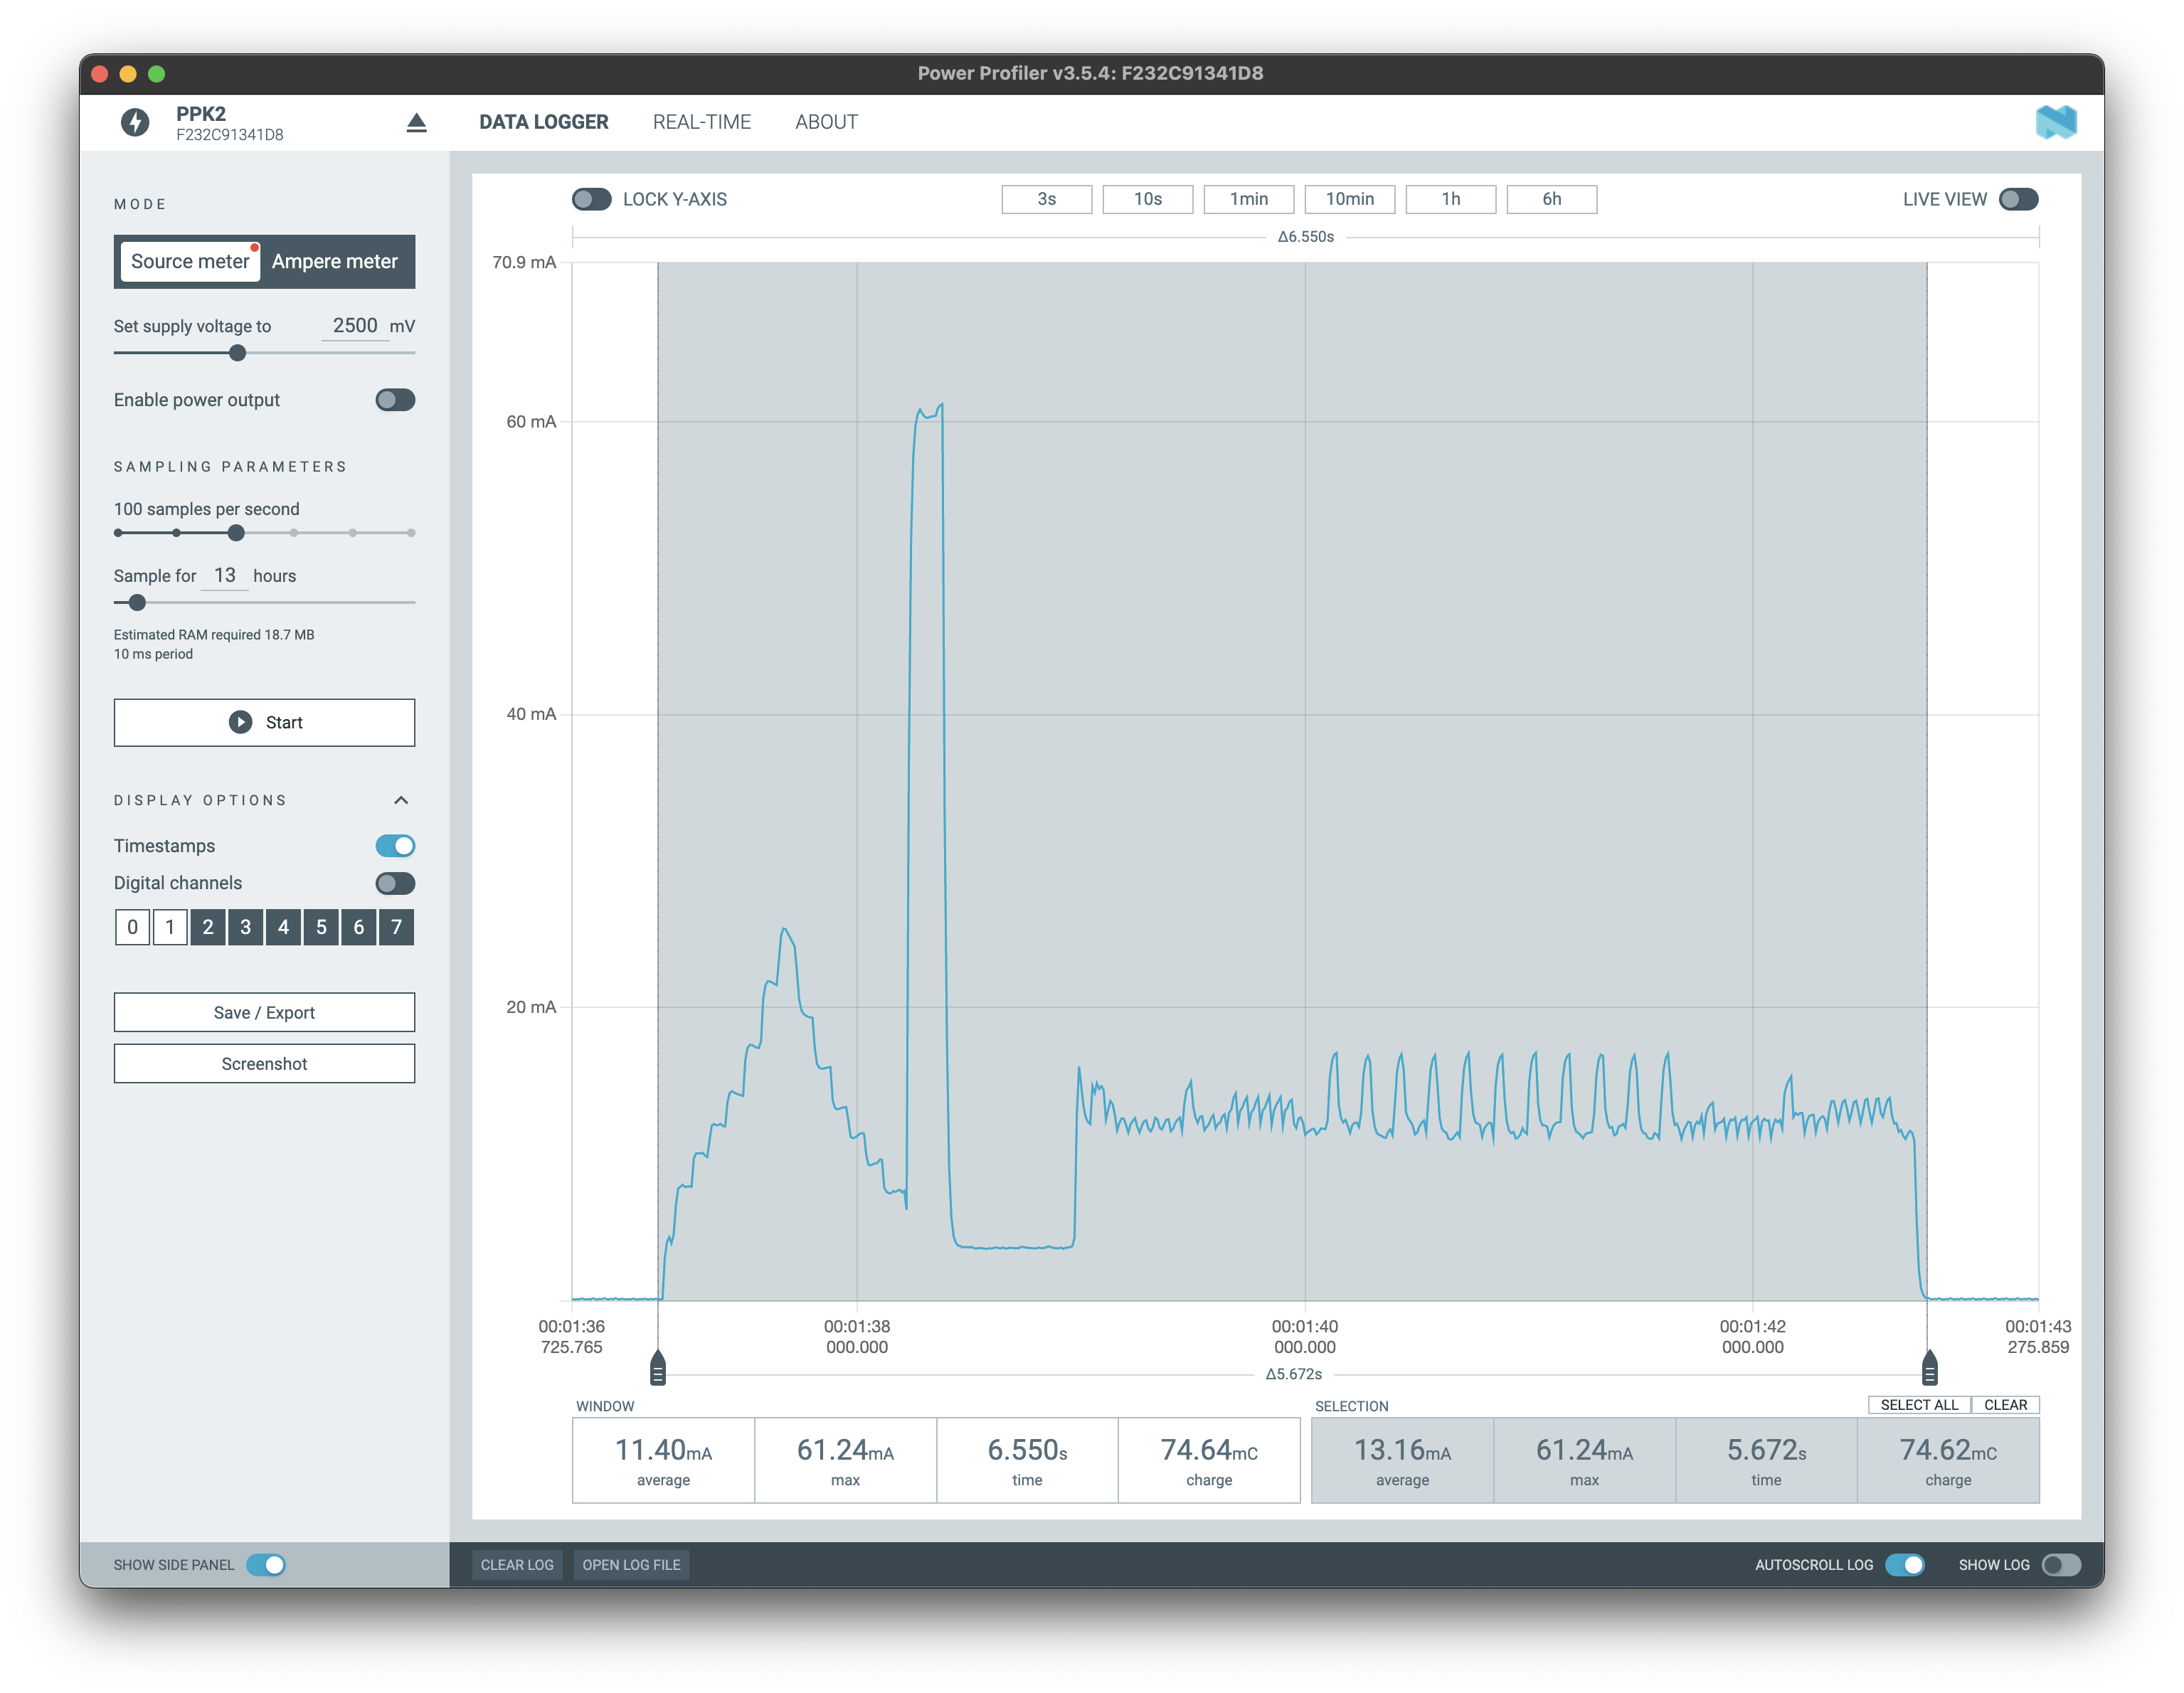
When performing a screen update, consumption goes to 11.56 mA for a duration of 5.7 seconds. If LoRa transmission is also performed, it consumes 13.16 mA for the same time. In the graph we can see the display update consumption for a duration of 3.8 seconds. This time can vary due to ambient temperature and display image.

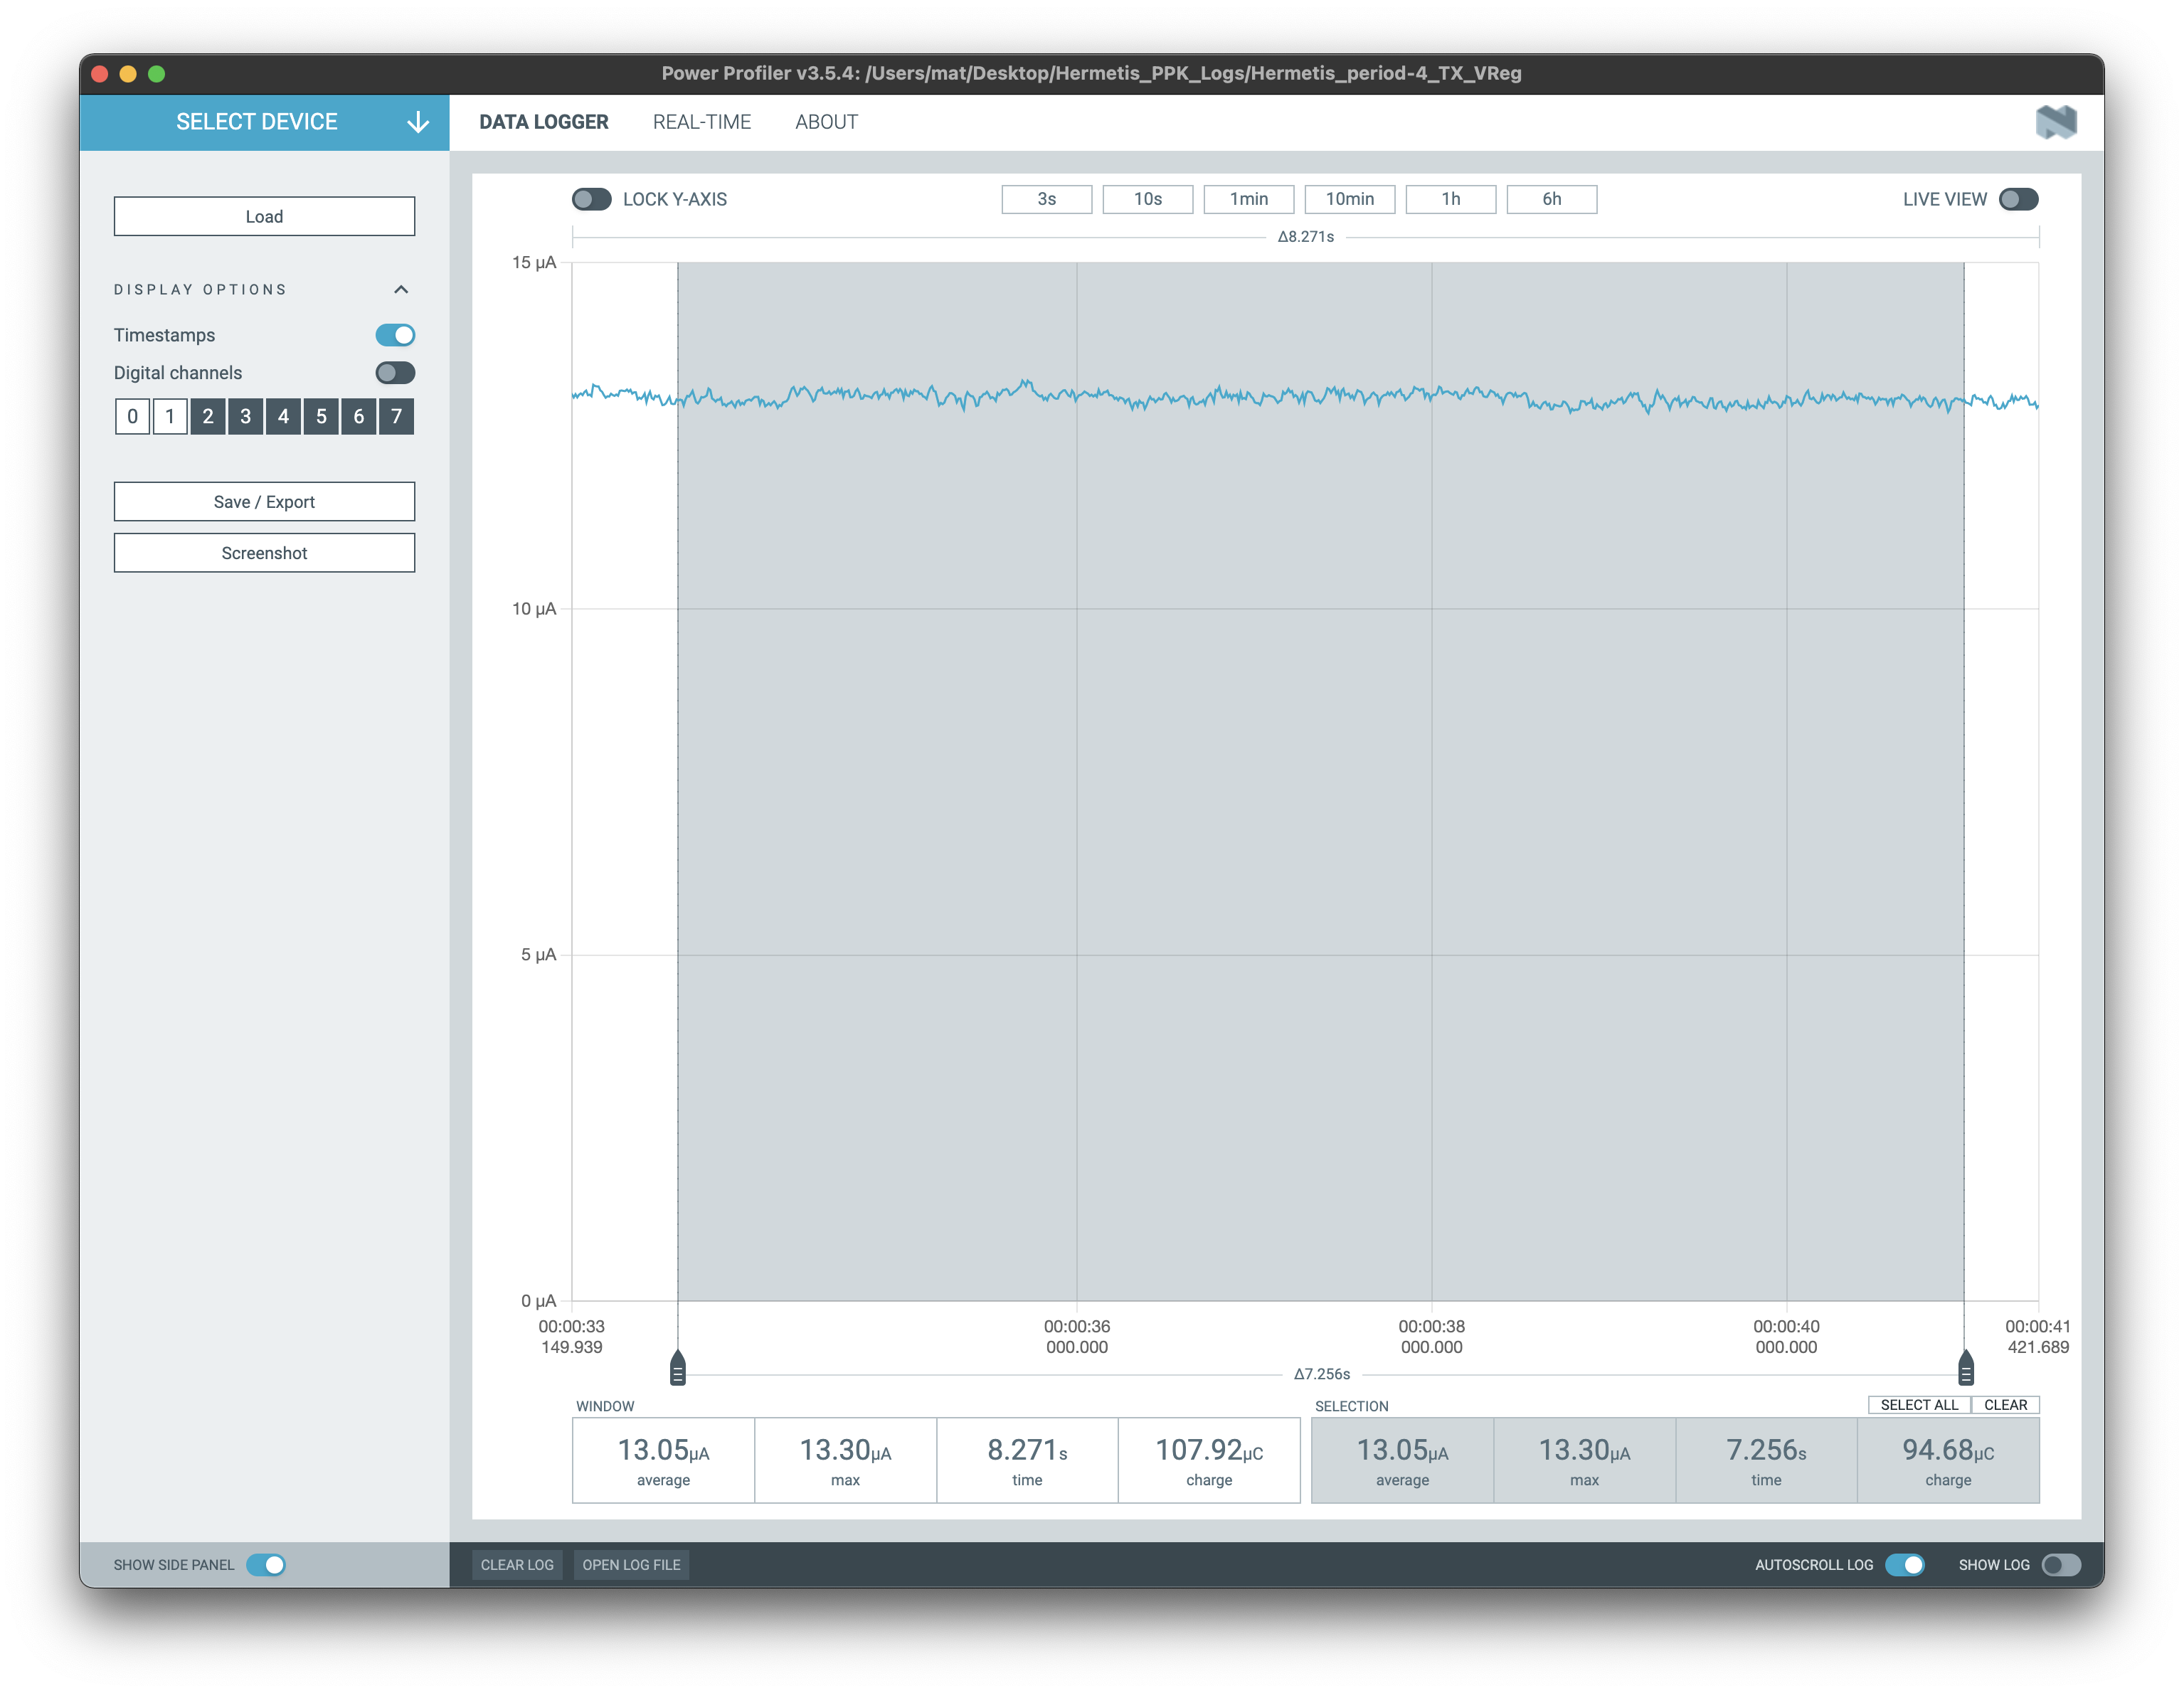
The rest of the time the device is in Stop2 low power mode. There are deeper low power modes, but the sensor algorithm functions work with variables saved in background and need memory retention between each call, so we need to retain the SRAM contents and Stop2 mode is the lowest we can use. The consumption in this mode is 13 uA with the ALS sensor active, so it's really low, but we really need 54.7 uA with the estimation of 2.5V on batteries due to the boost process.
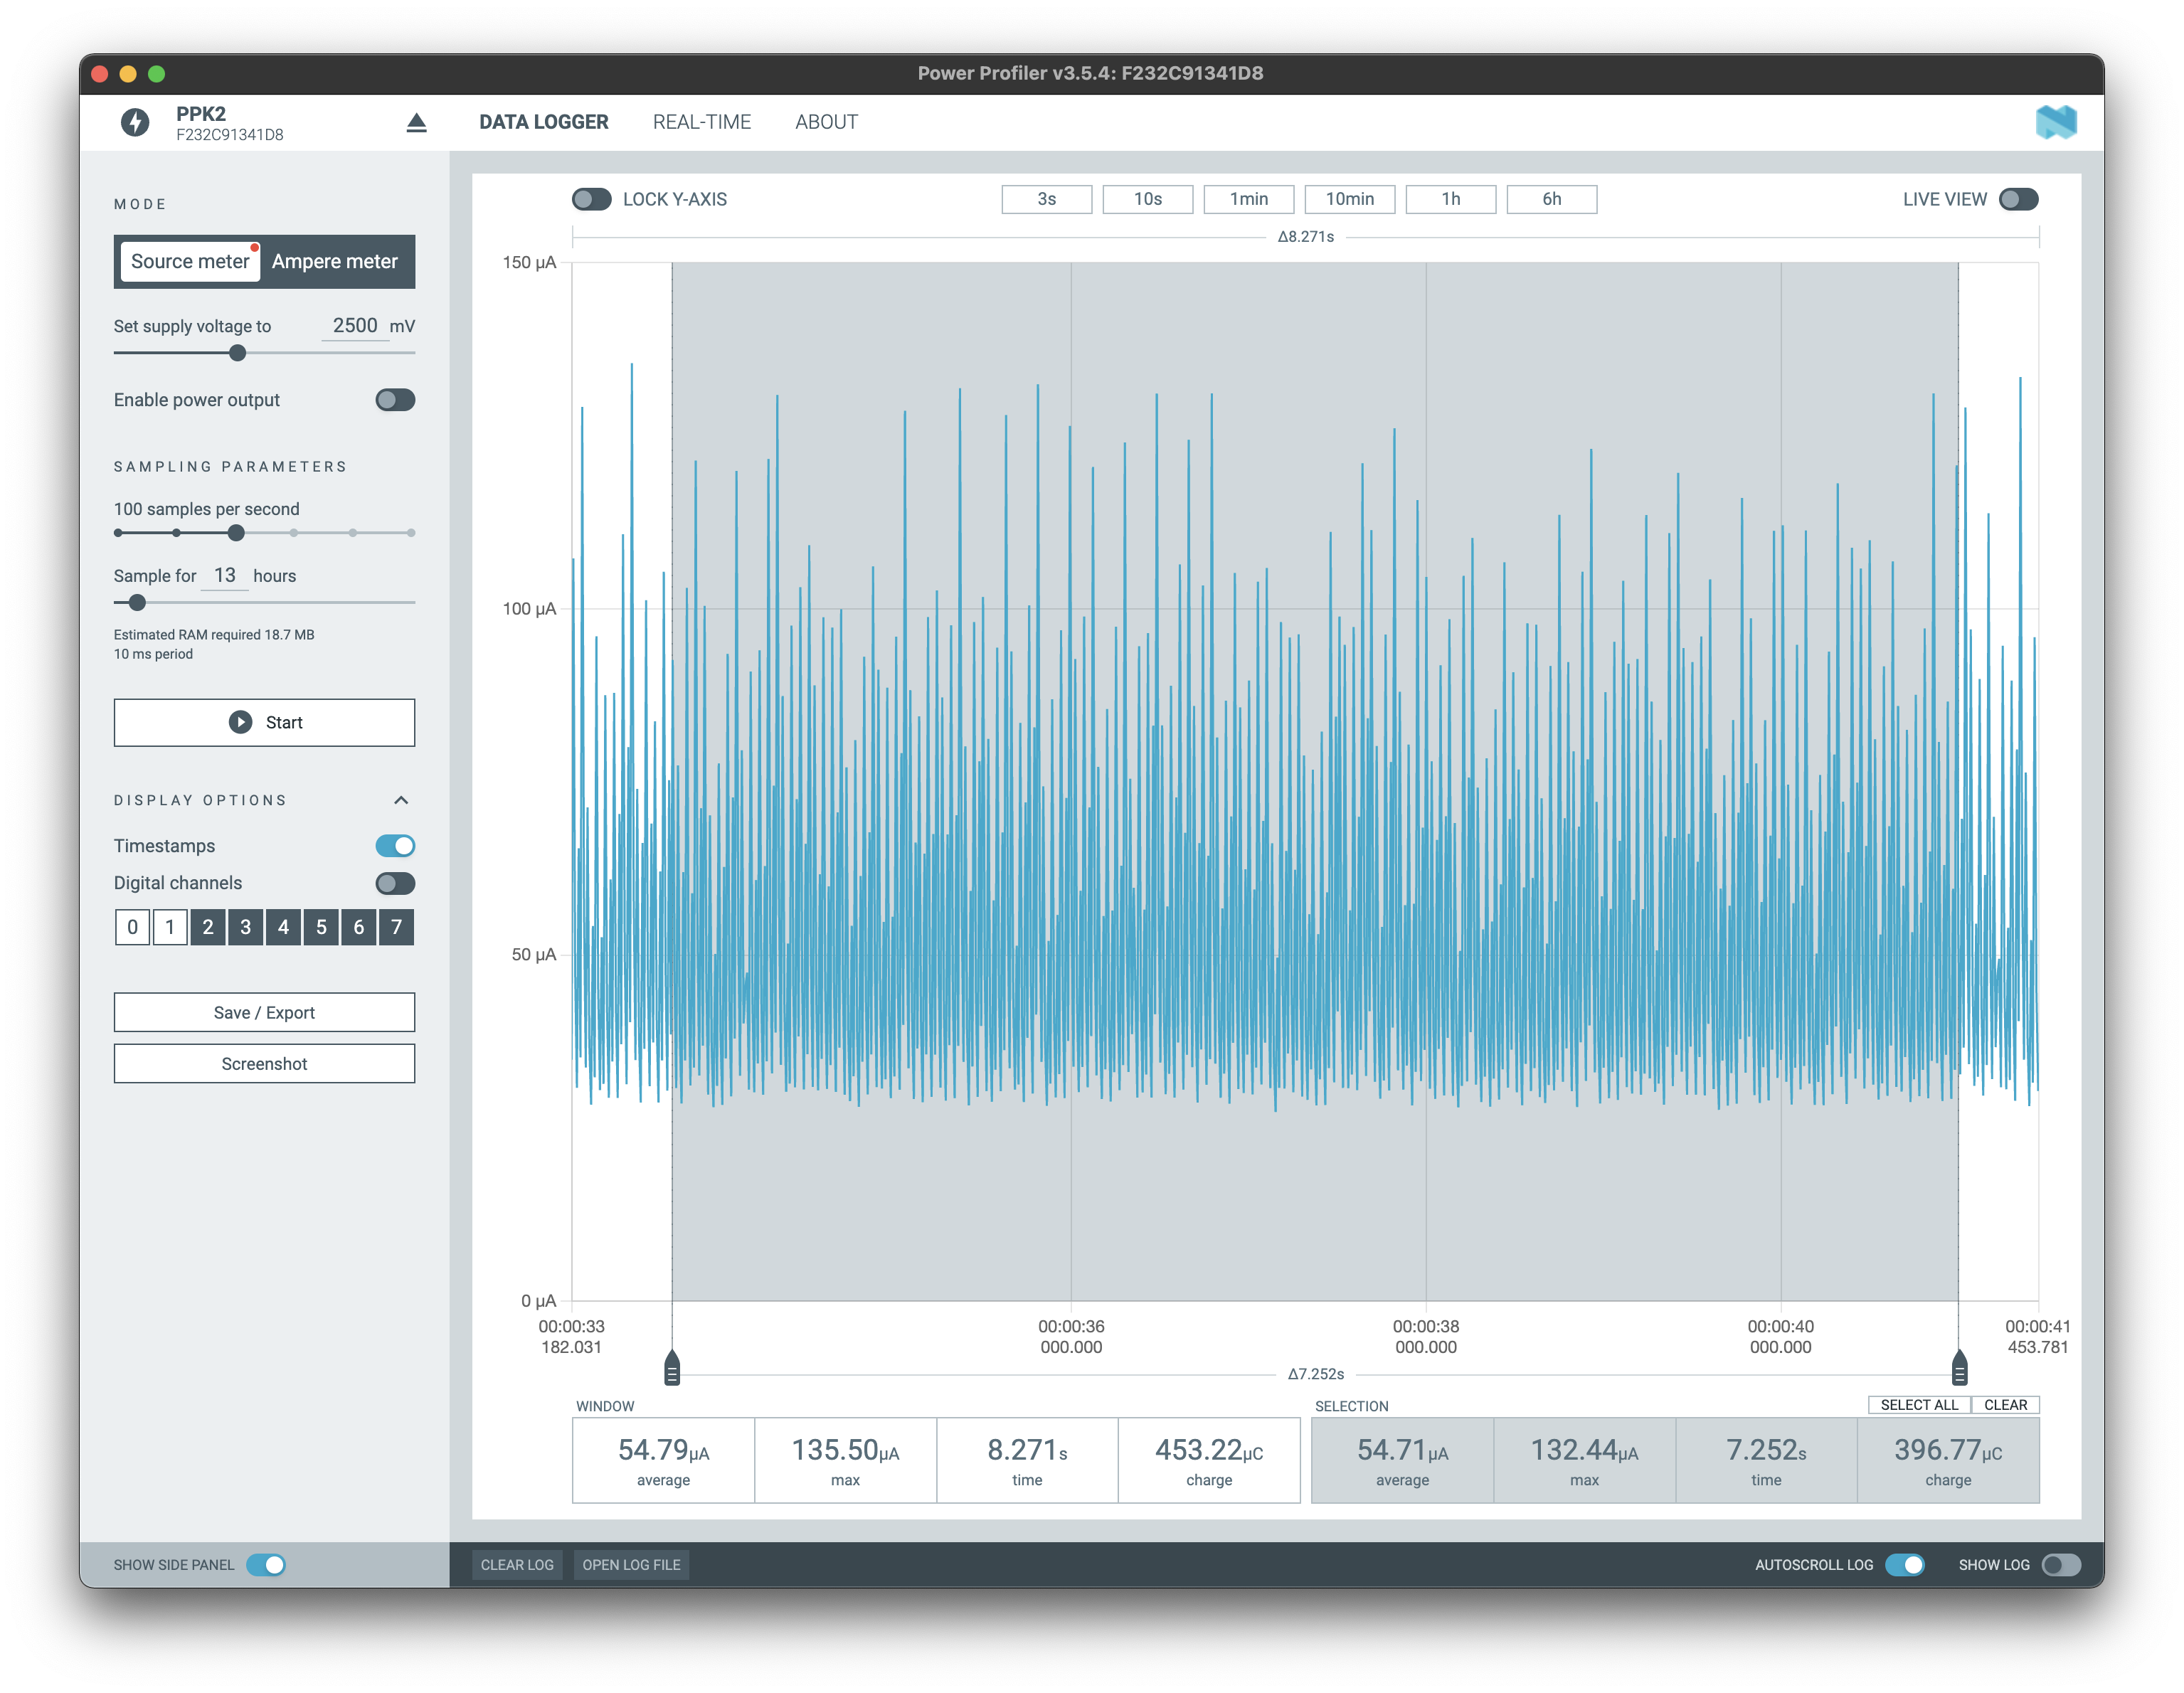
If we put LoRa module on Receive or Duplex mode, it needs about 5 mA to the listening process, so the MCU low power mode is not very helpful. This modes will be more useful when connected via USB. Below we can see the consumption after a screen update.
Below we can see power consumption when enabling WiFi. As you can see, the power consumption goes up near the 100 mAh.
Summary
There are many variables that establish the total consumption of the device, such as the number of intervals to update the screen, LoRa communication, update by switching screens, in addition to the use of wifi and the feedback through the RGB LED or the Buzzer that we have not taken into account in the previous measurements. In the table below I try to collect the consumption for some configurations:
| Configuration | Current | Battery life * |
|---|---|---|
| Screen update every 6 minutes. LoRa transmission at +14dBm every 6 minutes. ALS power save disabled | 383 uAh | 4.2 months 130 days |
| Screen update every 6 minutes. LoRa transmission at +14dBm every 6 minutes. ALS power save enabled: 8h of twilight a day | 270 uAh | 6 months 185 days |
| Screen update every 15 minutes. LoRa transmission at +14dBm every 15 minutes. ALS power save enabled: 8h of twilight a day | 221 uAh | 7.2 months 225 days |
| Screen update every 15 minutes. LoRa transmission at +22dBm every 15 minutes. ALS power save enabled: 8h of twilight a day | 227 uAh | 7 months 219 days |
| Screen update every 60 minutes. LoRa transmission at +14dBm every 30 minutes. ALS power save enabled: twilight half a day | 159 uAh | 10.1 months 315 days |
| Screen update every 60 minutes. LoRa transmission at +14dBm every 60 minutes. ALS power save off | 260 uAh | 6,2 months 192 days |
| Screen update every 60 minutes. LoRa transmission at +14dBm every 60 minutes. ALS power save enabled: twilight half a day | 157 uAh | 10.2 months 317 days |
| Screen update every 60 minutes. LoRa transmission at +14dBm every 60 minutes. ALS power save enabled: twilight half a day 24 user screen switches per day | 168 uAh | 9.6 months 297 days |
* Real estimation with measurements at VBat = 2.5V