 Arya
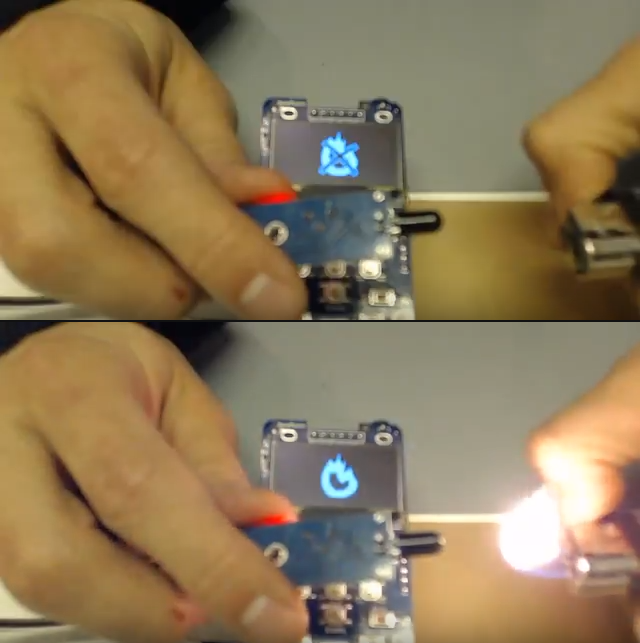
AryaFor Hackaday Prize video, I made some simple ZPUI apps (some of them were mockups, though). One of them was reading an external flame sensor and displaying pictures on the screen depending on whether the sensor detected flame or not. I had to do this in a rush, and I ended up adding some basic, but very useful, functions to ZPUI (though I did have to clean them up quite a bit before I could merge them into official ZPUI version =) ).
What's the algorithm of this app?
Set up the GPIO
In a loop, read from the GPIO pin
If pin has logic low on it:
    display picture of fire
Else:
    display picture of fire crossed out
The app is, therefore, very short. So, let's go through it thoroughly, explaining it in as much detail as possible!
Once again, ZPUI apps are a separate directory, with __init__.py and main.py . __init__.py is supposed to be empty, and main.py has to have following variables&functions:
- menu_name - app name for ZPUI menu (if omitted, app directory name will be used)
- init_app(i, o) - a small app initialization function, gets i and o, typically would just set them to module-global variables like this:
i = None; o = None
...
def init_app(input, output):
    global i, o
    i = input; o = output
Having globals named as i and o is not strictly necessary and is up to the app programmer, just a convention used by default - one that allows to easily pass i and o to UI elements, as well as allow for easy copy-pasting of examples that are provided with ZPUI. For now, init_app() return value doesn't matter. - callback() - function that gets called when app is activated, that is, selected from the menu. So, if you have an app named "My first app", you go to the app menu and press "My first app", the callback() function from main.py will be called. For now, callback() return value doesn't matter - what happens inside the callback() is what matters. Typically, you'd activate some UI element there, and you could also do some setup before&after.
Now, pretty much the only input for our app is reading from a GPIO. I've picked a GPIO from the 13-pin expansion header, connected it to the flame detector's digital output (active low), connected VCC and ground to it - all that's necessary from the hardware side. On the hardware side, I'll be using RPi.GPIO library. Something that we have to take into account is: 1) you need to set GPIO into the right state before being able to do something with it 2) once you've set it, other applications can still use it, as well as set it up differently 3) if something sets up GPIO the wrong way in the background, you either get an unexpected exception, or just silent failure - and you certainly don't get the result you wanted. The last thing might result in the app getting its rug pulled from under it, so we need to take that into account.
So, how do we set up the GPIO state the right way, to be exact, where do we put the setup statements? We could do that pretty much anywhere in the main.py - but there are caveats, as there are at least 3 different places to add the GPIO setup statements.
1 - Initialize GPIOs on import
We can add it on the first level, so that it's run right after the module import, something like this:
...
from RPi import GPIO
GPIO.setmode(GPIO.BCM)
GPIO.setup(18, GPIO.IN)
...
Or like this:
...
GPIO.setmode(GPIO.BCM)
GPIO.setup(18, GPIO.IN)
def init_app(i, o):
    ...
However, this positioning is problematic, since if other app sets up this GPIO to something else, this app won't ever set it back to what it needs to be. Say, we import all the apps, first the "flame detector" app, then the "GPIO playground" app (allowing to switch/read GPIOs from the UI). If both apps set up the GPIOs when they're imported, the "flame detector" app won't work properly, and likely won't even know about it =(
There are two more problems with "set things up when app is imported" approach that don't apply here, but might in a slightly more complicated case. First, if the GPIO number is to be determined at runtime, it won't work. If you need to do something time-consuming (like importing a big library, even), that means importing your app will take a long time, and it'll therefore make ZPUI load slower. If you depend on some external resources, they might not yet be available, and if you don't handle that gracefully and your app throws an exception, it won't get loaded. Lastly, you can't set up UI elements during import, since i and o (references to input and output device objects) aren't yet populated at this point.
2 - Initialize GPIOs in init_app():
The init_app() is run on ZPUI startup, when the app is loaded - right after importing it. The only difference between "set things up in init_app()" and "set things up on import" is that init_app gets i and o variables, so, init_app is where you'd set up UI elements, since you can't do that earlier. Other than that, the drawbacks are the same as with the previous way.
3 - Initialize GPIOs in callback():
The callback() function is only run when app is activated from the menu, to be exact, it's called each time you press the ENTER button when you're in the app menu and the app is selected. That seems to be the perfect place to put the GPIO initialization - as long as other apps don't interfere (from a background thread or even other process), the app will always have the GPIO set up the right way when it needs it. Possible drawbacks to putting initialization of your resources in callback(), that don't apply in the case of GPIO initialization:
- If initialization were to be a time-consuming process (for example, you'd be loading a database), it'd add a delay between the user pressing ENTER and app appearing on the screen. Most apps appear on the screen almost instantly, so you might be making the user feel like the UI just hung - especially if callback() would take 10 seconds. So, there's now a "background process" helper that allows you to launch the app initialization process in the background, and keep track of when it's done!
- If initialization only has to be done once, it's best if it's done as an oneshot process. This also applies if the initialization can be done more than once, but takes a lot of time - why would you be wasting user's time if it's not necessary? In that case, you can even use oneshot helper together with background process helper. Also, don't make the user lose the app's state if they would most likely need it preserved - for example, if your app allows the user to take some action but needs to be set up for this action first, it would most likely make the most sense to save user's settings from the last time user worked with the app and offer them the next time they use it.
Now that we got through the hardest part, let's see about the easiest part!
At the time when I was writing the app, displaying an image would need at least 4 lines of code. In contrast, displaying text would only take one:
PrettyPrinter(text, i, o, sleep=3)
So, I made it work all the same!
def GraphicsPrinter(image, i, o, sleep_time=1, invert=True):
    GraphicsPrinter.exit_flag = False
    def exit_printer():
        GraphicsPrinter.exit_flag = True
    if i is not None:
        i.stop_listen()
        i.clear_keymap()
        i.set_callback("KEY_LEFT", exit_printer)
        i.set_callback("KEY_ENTER", exit_printer)
        i.listen()
    if invert: image = do_invert(image)
    image = image.convert(o.device.mode)
    o.display_image(image)
    poll_period = 0.1
    if sleep_time < poll_period*2:
        sleep(sleep_time)
    else:
        sleep_periods = sleep_time/poll_period
        for period in range(int(sleep_periods)):
            if GraphicsPrinter.exit_flag == True:
                return #Exiting the function completely
            sleep(poll_period)
Invocation:
path = "fire.png"
image = PIL.Image.open(image_path).convert('L')
GraphicsPrinter(image, i, o, 0.1)
GraphicsPrinter needs an image, but we don't yet have it loaded. So, we can add a helper function that takes a path to an image, loads it and then calls GraphicsPrinter:
def show_image(image_path):
    if not os.path.isabs(image_path):
        image_path = os.path.join(app_path, image_path)
    image = PIL.Image.open(image_path).convert('L')
    GraphicsPrinter(image, i, o, 0.1)
Hmm... Now that I'm writing this, it could also accept a path, as a text string! Let me just add this feature real quick:
def GraphicsPrinter(image_or_path, i, o, sleep_time=1, invert=True):
    """Outputs image on the display, as soon as it's called.

    Args:

        * ``image_or_path``: Either a PIL image or path to an image to be displayed.
        * ``i``, ``o``: input&output device objects. If you don't need/want exit on KEY_LEFT, feel free to pass None as i.

    Kwargs:

        * ``sleep_time``: Time to display the image
        * ``invert``: Invert the image before displaying (True by default) """
    if isinstance(image_or_path, basestring):
        image = PIL.Image.open(image_or_path).convert('L')
    else:
        image = image_or_path
Much better, we got rid of one import and one function in the app - the app just became even shorter! I lost the "use relative path seamlessly" feature, but I can just make a small helper, and still call GraphicsPrinter directly.
local_path = lambda x: os.path.join( os.path.dirname(sys.modules[__name__].__file__), x )
...
GraphicalPrinter(local_path("fire.png"), i, o, 0.1)
Now, let's add a loop that'll be reading the GPIOs and showing the different images depending on its state:
while True:
    state = GPIO.input(18)
    if state:
        GraphicalPrinter(local_path("no_fire.png"), i, o, 0.1)
    else:
        GraphicalPrinter(local_path("fire.png"), i, o, 0.1)
The time for each iteration of the app is mostly defined by how long GraphicsPrinter runs. As we've set it to sleep for 0.1 second, that's approx. how long it will take. We can't make the loop run too quickly, since it'll unnecessarily load the CPU.
Now, the hardest part is - how do we exit the app? At any point, pressing LEFT (default for exiting the UI element you're in, or exiting the app) will only exit the GraphicsPrinter itself, which won't even be noticeable, given that it only runs for 0.1 second - the outer loop won't ever get a signal that it has to exit. So, the problem is that LEFT key callbacks are handled by the GraphicsPrinter UI element and the loop doesn't handle anything.
Let's fix that! We can set up a callback on the KEY_LEFT that'd be checked by the loop. In fact, we don't need to set any callbacks manually - I've added a helper that adds all the callbacks itself, and adds an easy way to check whether the button has been pressed!
eh = ExitHelper(i).start()
while eh.do_run():
     #the loop will run until "left" key on the keypad is pressed.
However, we also need to make sure the GraphicsPrinter doesn't add its own callback on the KEY_LEFT (overwriting our callback that the helper sets) - thankfully, we can just pass None instead of i:
GraphicsPrinter("fire.png", None, o, 0.1)
The resulting app:
menu_name = "Flame detector"

from RPi import GPIO
import sys
import os

from helpers import ExitHelper
from ui import GraphicsPrinter

local_path = lambda x: os.path.join( os.path.dirname(sys.modules[__name__].__file__), x )

i = None; o = None

def init_app(input, output):
    global i, o
    i = input; o = output

def callback():
    GPIO.setmode(GPIO.BCM)
    GPIO.setup(18, GPIO.IN)
    eh = ExitHelper(i).start()
    while eh.do_run():
        state = GPIO.input(18)
        if state:
            GraphicsPrinter(local_path("no_fire.png"), None, o, 0.1)
        else:
            GraphicsPrinter(local_path("fire.png"), None, o, 0.1)
As a result, we have an app that works for the purpose, uses external resources (GPIOs) but doesn't interfere with other apps, doesn't block the user from exiting it, and its code is short but concise. While writing this worklog, I've also added plenty of helpers and improvements to ZPUI!
App's purpose is fairly limited, though, so now I'm thinking of adding something like a BASIC interpreter to the UI, allowing to write short&simple apps while making use of ZeroPhone hardware. Would make for a fun weekend project! (I think that would even count as a project priority, eventually)
Discussions
Become a Hackaday.io Member
Create an account to leave a comment. Already have an account? Log In.