Creating & Deploying the Edge Impulse Model
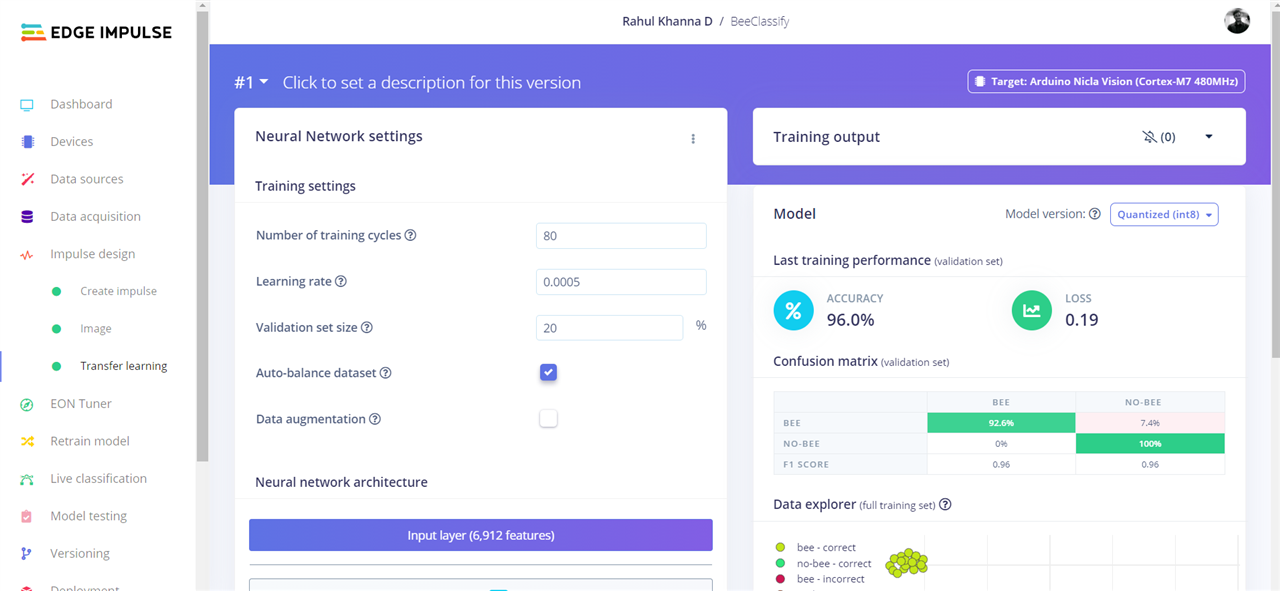
To create an impulse function, add an Image processing block with a 48x48 image size. Use transfer learning to fine-tune a pre-trained image classification model on your data and save the impulse. Set colour depth to RGB, and generate features to create feature maps. Set training cycles to 80 and use MobileNetV2 96x96 0.35 with 16 neurons as the NN model. Start training and wait a few minutes for the process to complete. After training, find the model's performance and confusion matrix. We achieved a 96% accuracy, with flash usage of 579.4K.
Build firmware from the deployment tab. From the folder and flash it to the board. Run the following Python script to run the classification.
import sensor, image, time, os, tf, uos, gc
sensor.reset()                         # Reset and initialize the sensor.
sensor.set_pixformat(sensor.RGB565)    # Set pixel format to RGB565 (or GRAYSCALE)
sensor.set_framesize(sensor.QVGA)      # Set frame size to QVGA (320x240)
sensor.set_windowing((240, 240))       # Set 240x240 window.
sensor.skip_frames(time=2000)          # Let the camera adjust.
sensor.set_vflip(True) # Flips the image vertically
sensor.set_hmirror(True) # Mirrors the image horizontally
net = None
labels = None
try:
    # Load built in model
    labels, net = tf.load_builtin_model('trained')
except Exception as e:
    raise Exception(e)

clock = time.clock()
while(True):
    clock.tick()

    img = sensor.snapshot()
    # default settings just do one detection... change them to search the image...
    for obj in net.classify(img, min_scale=1.0, scale_mul=0.8, x_overlap=0.5, y_overlap=0.5):
        #print("**********\nPredictions at [x=%d,y=%d,w=%d,h=%d]" % obj.rect())
        img.draw_rectangle(obj.rect())
        # This combines the labels and confidence values into a list of tuples
        predictions_list = list(zip(labels, obj.output()))
        for i in range(len(predictions_list)):
           confidence = predictions_list[i][1]
           label = predictions_list[i][0]
           #print(label)
          # print("%s = %f" % (label[2:], confidence))
           if confidence > 0.9 and label != "unknown":
               print("It's a ", label, "!")
               #print('.')
    print(clock.fps(), "fps")
Classification Output

Now the bees can be counted from a new image frame, run through the FOMO object recognition model, and log the bee count hourly. We will be integrating the bee count with the Arduino MKR in the next blog. Thanks for keeping up!
 Rahul Khanna
 Guillermo Perez Guillen
 kasik
kasik
 kutluhan_aktar