Close
0%
0%

Make Wall Art with an iDraw A3 Pen Plotter

My Journey to creating stunning wall art using a pen plotter.

Similar projects worth following
478 views
0 followers
As a novice enthusiast, I delve into the world of pen plotting, exploring the possibilities of creating stunning wall art with precision and ease. I share my journey from unboxing to assembly, software setup, and experimenting with various prints, showcasing the versatility of the iDraw machine.

Introduction:

Hey there! Today, I'm excited to share my experience with you as I delve into the world of pen plotting. I have always wanted to try one of these! I will tell you right now that I am a complete novice. I have only seen these in videos and as much as I was excited to try one, I have done very little research prior to choosing this one. Just know as you read along, this is coming from the standpoint of a complete noob to pen plotting. So, why did I pick this one you may be thinking. The iDraw 2.0 A3 caught my attention with its promise of precision, speed, and most importantly PRICE.

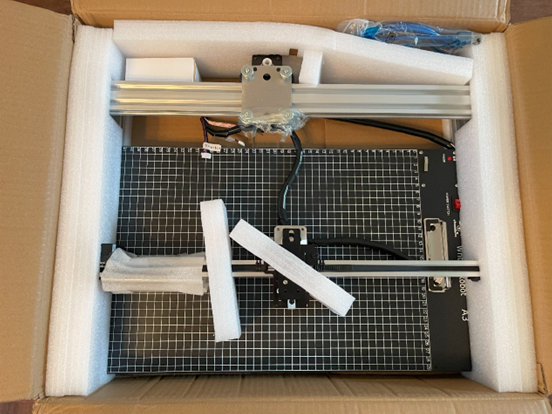
Here are some of the specs. This pen plotter boasts an ample drawing area of A3 size (11.7 x 16.5 inches), providing plenty of space for larger-scale designs and artwork. The iDraw 2.0 A3 is equipped with advanced stepper motors, ensuring precise movement and accuracy, which is essential for intricate and detailed projects. Uuna Tek also says that the iDraw 2.0 is 200% faster than the Axidraw. I have never tried the Axidraw, so I just have to take their word for it.

 Let’s jump right in!

  • 1 × Uuna Tek iDraw A3 Pen Plotter
  • 1 × uni-ball Vision Elite
  • 1 × Sharpie fine point
  • 1 × Card Stock

View all 4 project logs

  • 1
    Delivery and Installation:
    It arrived fast and was very well packaged. That was nice to see. It was also almost completely assembled which was great!
    The parts that I did have to put together were a breeze. There is a video on their website that shows the step-by-step process. It was incredibly easy to follow. The main components were already in place, and I only needed to attach the X-axis rail and plug in a few wires. It was a straightforward task that didn't require any special tools or technical knowledge. I took my time, carefully following the instructions, and surprisingly, I was able to complete the assembly in around 15 minutes.

    The parts of the pen plotter fit together seamlessly, and I didn't encounter any issues during the assembly process. Each piece had a precise fit, giving me confidence in the overall build quality of the machine. It was evident that the manufacturer had taken care to ensure that the assembly process would be hassle-free for the end user.


  • 2
    Software and User Interface:

    When it comes to controlling the iDraw 2.0, there are a few software options available. From what I can tell, the most popular choice is Inkscape, a vector drawing software. However, you can also use other g-code sender software if needed. As a complete beginner, I will be starting with Inkscape and the extensions provided. Even though a copy of Inkscape was provided, I went directly to inkscape.org and downloaded the latest version. It is open source, i.e., free. Installing the software and getting up and running was an incredibly easy process. Grateful for that.

    As a beginner, having the option to use Inkscape with the iDraw 2.0 is very convenient. You can create your designs, make adjustments, and control the pen plotter all within the same software. Since I have never used Inkscape before there is definitely a learning curve. There are, however, many videos out there and you can always Google keywords to try to figure out how to do what you want to do with it.

  • 3
    Performance:

    Regarding the sound when it is running, I have used some pretty loud 3D printers before so in comparison this plotter is relatively quiet. At the time of writing this, I have printed about 15 different things and have had zero performance issues with the plotter itself. Any issues I have had were either user errors or just not knowing how to set up the design properly in Inkscape.

    The only challenge I'm running into is knowing where on the print bed the drawing will be placed. I haven't really figured that part out yet. After playing with some of the document properties in Inkscape I am getting it figured out.

View all 6 instructions

Enjoy this project?

Share

Discussions

Similar Projects

Does this project spark your interest?

Become a member to follow this project and never miss any updates