 kutluhan_aktar
Even though there are some pioneering methods to combine physical store shopping with AI-based e-commerce features, such as Amazon Go cashierless convenience stores, these self-checkout stations are expensive investments for local stores since they require renovating (remodeling) store layouts or paying monthly fees to cloud services. Furthermore, local businesses may need to construct data sets for niche market products since AI algorithms require broad data sets for methods based on computer vision, sensor fusion, and deep learning.
After scrutinizing the recent research papers and the granted patents on e-commerce methods, I noticed there are nearly no appliances focusing on merging physical store shopping with AI-based solutions without altering existing conditions for local businesses. Therefore, I decided to build a budget-friendly and accessible AIoT shopping assistant utilizing the most common and recognizable product identification method — barcodes — to bring AI-based e-commerce features to physical store shopping.
Since I wanted to build a shopping assistant providing a wholesome physical shopping experience with the most prominent e-commerce features, I decided to develop a full-fledged e-commerce web application from scratch in PHP, HTML, JavaScript, CSS, and MySQL. Since I developed this complementing web application to bridge the gap between physical store shopping and e-commerce, it is capable of communicating with the shopping assistant (device), obtaining product information from barcodes, and generating AI-based recommendations consecutively.
The complementing e-commerce web application allows the customer to:
- Create a user account identified with the unique 12-digit token
- Obtain the generated account verification QR code via an HTML email, including the unique user token
- Add or remove product information via barcodes scanned by the shopping assistant
- Display the current product list in the cart and the total cart price
- Inspect ChatGPT-powered recommendations for each product in the cart
- Place an order by making a payment via credit/debit card
- Get the payment confirmation QR code via an HTML email
- Check purchased items from previous orders
As suitable for local businesses, I decided to install an Apache HTTP Server (XAMPP) on LattePanda 3 Delta, which also has a MariaDB database, to host my web application. Since I focused on creating a low-budget but state-of-the-art AIoT shopping assistant, I decided to employ the OpenAI API to generate ChatGPT-powered recommendations related to the obtained product information by barcodes via the Open Food Facts JSON API. I also employed Brevo's Email API to send HTML emails directly from localhost to inform the customer of the generated unique verification QR codes.
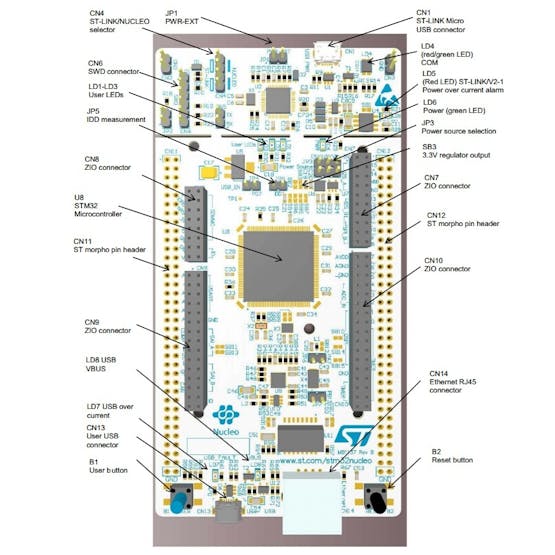
After developing my e-commerce web application successfully, I started to work on building the shopping assistant (device). Since Wi-Fi and Bluetooth transmissions may not be suitable options for a shopping assistant requiring as minimal latency as possible to communicate with the e-commerce application, I decided to utilize WIZnet's W5300 TOE SHIELD providing high-speed bus communication and reliable Ethernet transmission speeds. Since W5300 TOE SHIELD cannot perform without an STM32 Nucleo-144 board, I decided to utilize the NUCLEO-F439ZI development board and program it in MicroPython.
Since I needed the shopping assistant to scan barcodes and QR codes simultaneously to recognize customers, activate/deactivate carts, and send the scanned product barcode with the selected command (add/remove) to the e-commerce web application, I connected a GM77 barcode and QR code scanner to NUCLEO-F439ZI. Also, I connected an SSD1309 transparent display and an RGB LED so as to inform the customer of the device status. Furthermore, I added a tiny (embedded) thermal printer to directly notify the customer when the customer requests a device status report or scans the payment confirmation QR code. In that regard, I wanted to enrich the correlation between physical store shopping and e-commerce.
Lastly, to make the shopping assistant as robust and sturdy as possible while being employed as a self-checkout station, I designed a checkout counter-themed case, a removable top cover with snap-fit joints, and handles for moving the shopping assistant if necessary.
So, this is my project in a nutshell 😃
In the following steps, you can find more detailed information on coding, utilizing QR codes as an authentication method, obtaining product information via barcodes, generating ChatGPT-powered product recommendations, developing a full-fledged e-commerce web application, and communicating with the web application via W5300.
🎁🎨 Huge thanks to WIZnet for providing me with a W5300 TOE SHIELD.
🎁🎨 Huge thanks to DFRobot for sponsoring these products:
⭐ GM77 Barcode and QR Code Scanning Module | Inspect
⭐ Fermion: 1.51” OLED Transparent Display | Inspect
⭐ Tiny (Embedded) Thermal Printer | Inspect
⭐ LattePanda 3 Delta 864 | Inspect
⭐ DFRobot 8.9" 1920x1200 IPS Touch Display | Inspect
🎁🎨 Also, huge thanks to Anycubic for sponsoring a brand-new Anycubic Kobra 2.


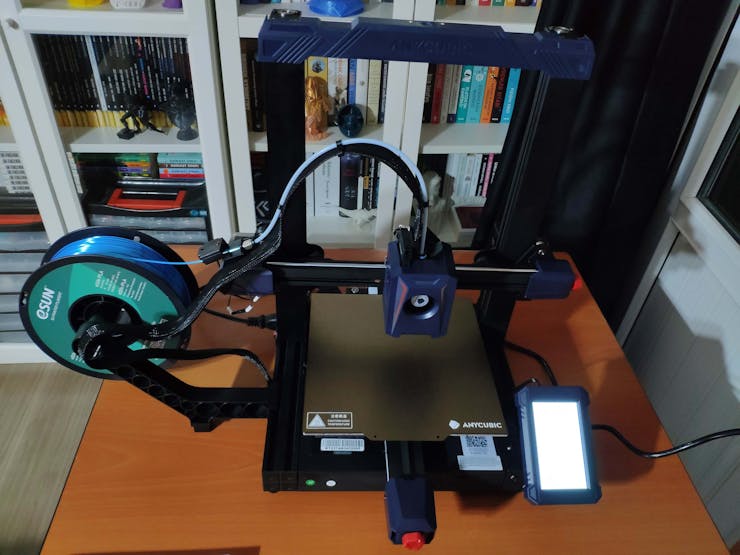
Step 1: Designing and printing a checkout counter-themed case
Since I focused on building a budget-friendly and accessible shopping assistant that scans product barcodes, communicates the e-commerce web application, and activates/deactivates the user's cart on the web app via QR codes, I decided to design a stylish and compact case allowing the customer to inspect the device status, scan product barcodes effortlessly, and receive the printed notifications by the embedded thermal printer. To avoid overexposure to dust and prevent loose wire connections, I added a removable top cover with snap-fit joints. Then, I added a slot to integrate the tiny thermal printer and two handles to position the removable top cover easily while performing maintenance. Also, I decided to emboss the WIZnet logo, the ChatGPT logo, and the shopping cart symbol on the removable top cover to highlight the capabilities of the shopping assistant.
Since I needed to fix the position of the scanner module to get better results, I added a two-sided protrusion on the front of the main case. Also, I thought providing a small gift for a new customer trying this shopping assistant would be cool, so I decided to print a Togepi figure to demonstrate my idea, which is a Fairy-type Pokémon and is considered to be a symbol of good luck and fortune :)
I designed the main case and the removable top cover in Autodesk Fusion 360. You can download their STL files below.


For the Togepi figure added as a gift for a first-time customer trying the shopping assistant, I utilized this model from Thingiverse:
Then, I sliced all 3D models (STL files) in Ultimaker Cura.


Since I wanted to create an attractive counter structure for the main case and apply a modern retail store theme representing a flourishing business, I utilized these PLA filaments:
- ePLA-Matte Dark Grey
- Bone White (Togepi)
Finally, I printed all parts (models) with my brand-new Anycubic Kobra 2 3D Printer.

Since Anycubic Kobra 2 is budget-friendly and specifically designed for high-speed printing, I highly recommend Anycubic Kobra 2 if you are a maker or hobbyist needing to print multiple prototypes before finalizing a complex project.
Thanks to its upgraded direct extruder, Anycubic Kobra 2 provides 150mm/s recommended print speed (up to 250mm/s) and dual-gear filament feeding. Also, it provides a cooling fan with an optimized dissipation design to support rapid cooling complementing the fast printing experience. Since the Z-axis has a double-threaded rod structure, it flattens the building platform and reduces the printing layers, even at a higher speed.
Furthermore, Anycubic Kobra 2 provides a magnetic suction platform on the heated bed for the scratch-resistant spring steel build plate allowing the user to remove prints without any struggle. Most importantly, you can level the bed automatically via its user-friendly LeviQ 2.0 automatic bed leveling system. Also, it has a smart filament runout sensor and the resume printing function for power failures.
#️⃣ First of all, install the gantry and the spring steel build plate.


#️⃣ Install the print head, the touch screen, and the filament runout sensor.


#️⃣ Connect the stepper, switch, screen, and print head cables. Then, attach the filament tube.

#️⃣ If the print head is shaking, adjust the hexagonal isolation column under the print head.

#️⃣ Go to Prepare➡ Leveling ➡ Auto-leveling to initiate the LeviQ 2.0 automatic bed leveling system.
#️⃣ After preheating and wiping the nozzle, Anycubic Kobra 2 probes the predefined points to level the bed.


#️⃣ Finally, fix the filament tube with the cable clips, install the filament holder, and insert the filament into the extruder.
#️⃣ Since Anycubic Kobra 2 is not officially supported by Cura yet, download the latest PrusaSlicer version and import the printer profile (configuration) file provided by Anycubic.
#️⃣ Then, create a custom printer profile on Cura for Anycubic Kobra 2 and change Start G-code and End G-code.
#️⃣ Based on the provided Start G-code and End G-code in the configuration file, I modified new Start G-code and End G-code compatible with Cura.
Start G-code:G90 ; use absolute coordinates
M83 ; extruder relative mode
G28 ; move X/Y/Z to min endstops
G1 Z2.0 F3000 ; lift nozzle a bit
G92 E0 ; Reset Extruder
G1 X10.1 Y20 Z0.28 F5000.0 ; Move to start position
G1 X10.1 Y200.0 Z0.28 F1500.0 E15 ; Draw the first line
G1 X10.4 Y200.0 Z0.28 F5000.0 ; Move to side a little
G1 X10.4 Y20 Z0.28 F1500.0 E30 ; Draw the second line
G92 E0 ; zero the extruded length again
G1 E-2 F500 ; Retract a little
M117G21 ; set units to millimeters
G90 ; use absolute coordinates
M82 ; use absolute distances for extrusion
G92
E0M107

End G-code:
M104 S0 ; Extruder off
M140 S0 ; Heatbed off
M107    ; Fan off
G91     ; relative positioning
G1 E-5 F3000
G1 Z+0.3 F3000 ; lift print head
G28 X0
F3000M84            ; disable stepper motors
#️⃣ Finally, adjust the official printer settings depending on the filament type while copying them from PrusaSlicer to Cura.


Step 1.1: Assembling the case and making connections & adjustments
// Connections
// W5300 TOE SHIELD :
//                                GM77 Barcode and QR Code Scanner
// PA3  --------------------------- TX
// PA2  --------------------------- RX
//                                Tiny (Embedded) Thermal Printer
// PG9  --------------------------- TX
// PG14 --------------------------- RX
//                                SSD1309 OLED Transparent Display
// PA7  --------------------------- MOSI
// PA5  --------------------------- SCLK
// PA4  --------------------------- DC
// PC7  --------------------------- RES
// PC6  --------------------------- CS
//                                Control Button (A)
// PC0  --------------------------- +
//                                Control Button (B)
// PC3  --------------------------- +
//                                Control Button (C)
// PC2  --------------------------- +
//                                Keyes 10mm RGB LED Module (140C05)
// PA1  --------------------------- R
// PF9  --------------------------- G
// PA0  --------------------------- B
Since W5300 TOE SHIELD cannot perform without an STM32 Nucleo-144 board, I needed to attach W5300 TOE SHIELD to an STM32 development board supporting W5300 MicroPython software. As of now, W5300 TOE SHIELD is compatible with these Nucleo-144 development boards for programming in MicroPython:
- NUCLEO-F429ZI
- NUCLEO-F439ZI
- NUCLEO-F722ZE
- NUCLEO-F756ZG
- NUCLEO-F767ZI
Since NUCLEO-F429ZI is not available in my country, I decided to utilize NUCLEO-F439ZI, which shares the same pin assignments and structure with NUCLEO-F429ZI.
To utilize the ST-LINK features, WIZnet states that the ST-LINK pin connections of the STM32 Nucleo-144 board must be manually altered due to the fact that the FMC (Flexible Memory Controller) data pin to control the W5300 chip overlaps with the default ST-LINK pin.
#️⃣ First of all, remove the SB5 and SB6 resistors, which are the solder bridges for the ST-LINK-USART, from the top of the STM32 Nucleo-144 board with a soldering iron. Also, solder double-row female pin headers to the top of the STM32 board in order to attach W5300 TOE SHIELD.


#️⃣ Then, after attaching W5300 TOE SHIELD to the STM32 Nucleo-144 board, connect the PC10 and PC11 pins of W5300 TOE SHIELD to the RX and TX pins of the CN5 connector on the STM32 board via jumper wires.
- PC10 ➡ RX (CN5)
- PC11 ➡ TX (CN5)
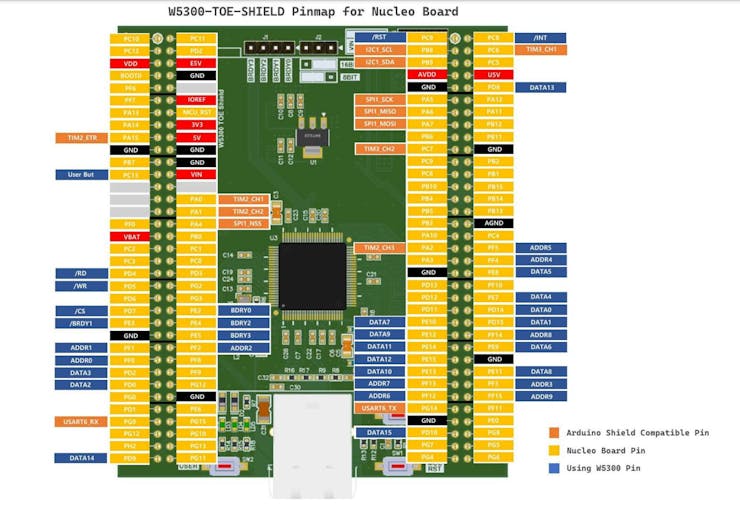
After attaching W5300 TOE SHIELD to NUCLEO-F439ZI successfully by making manual adjustments on the board, I proceeded to connect the remaining components to W5300 TOE SHIELD via its Arduino-compatible pin layout on the top of the shield.
To scan product barcodes and the QR codes generated by the e-commerce web application, I connected a GM77 barcode and QR code scanner to W5300 TOE SHIELD. Since W5300 TOE SHIELD cannot directly supply the GM77 barcode and QR code scanner due to its demanding current loads, I connected a USB buck-boost converter board to my Xiaomi power bank to obtain stable 5V to power the scanner module.
As mentioned in the user manual of the GM77 scanner module, it does not transfer data with the built-in UART (serial) communication channel out of the box. Therefore, I needed to scan a configuration QR code provided by the manual to activate the built-in TTL 232 interface.

After activating the built-in UART (serial) interface of the scanner module, it starts to transfer data packets via serial communication immediately:
- Baud rate ➡ 9600
- Data bit ➡ 8
- Stop bit ➡ 1
Then, I connected a tiny (embedded) thermal printer to directly inform the customer when the customer requests a device status report or scans the payment confirmation QR code. Since W5300 TOE SHIELD cannot power the tiny (embedded) thermal printer due to its operating voltage, I connected a USB buck-boost converter board to my Xiaomi power bank to obtain stable 12V to supply the thermal printer. The higher input voltage (voltage range is 5~9V) means faster printing speed and more clear printed records. I utilized 12V above the recommended 9V threshold due to my power bank's current limitation.
To inform the customer of the device status, I added an SSD1309 OLED transparent screen and a 10mm common anode RGB LED module (Keyes). Since the SSD1309 screen provides a connector for the GDI display interface, I was able to connect it effortlessly.
Finally, I added three control buttons to let the customer send commands to the e-commerce web application and request a device status report printed by the thermal printer.
After completing breadboard connections and adjustments successfully, I made the breadboard connection points rigid by utilizing a hot glue gun.


After printing all parts (models), I fastened the components to their corresponding slots on the main case.
I placed the W5300 TOE SHIELD attached to NUCLEO-F439ZI and connected an Ethernet cable to the shield via the built-in RJ-45 connector. Then, I affixed the tiny thermal printer to the top of the removable cover.
Finally, I attached the removable top cover to the main case via the snap-fit joints.


As mentioned earlier, I also printed a Togepi figure, representing good luck and fortune, as a small gift for the first-time customers trying the shopping assistant :)

Step 2: Creating a Brevo account to send HTML emails from localhost
Step 3: Creating an OpenAI account to generate credentials for ChatGPT
Step 4: Developing a full-fledged e-commerce web application in PHP, JavaScript, CSS, and MySQL
Step 4.0: Using the Open Food Facts JSON API to get product information by barcode
Step 4.1: Designing the home page and the sign-in page
Step 4.2: Designing the user interface (dashboard) showing the account QR code
Step 4.3: Displaying the previous orders when requested
Step 4.4: Designing the checkout (payment) page
Step 4.5: Integrating ChatGPT into the web application via the OpenAI API
Step 4.6: Setting and running the e-commerce web application on LattePanda 3 Delta
Step 5: Configuring NUCLEO-F439ZI with the modified W5300 TOE SHIELD firmware
Step 6: Installing and modifying MicroPython libraries on NUCLEO-F439ZI
Step 7: Programming NUCLEO-F439ZI to scan data and communicate with the e-commerce application
Step 8: Providing a wholesome e-commerce customer experience with AI-based suggestions
After programming W5300 TOE SHIELD attached to NUCLEO-F439ZI in MicroPython and hosting the e-commerce web application on LattePanda 3 Delta, the AIoT shopping assistant is ready to help customers while physical store shopping.
🛍️📩📲 When the customer provides the required information on the sign-up form on the home page, the e-commerce web application generates a unique account (user) token, creates a unique database table for the new user, and adds the provided information to the MariaDB database.


🛍️📩📲 After saving new user information to the MariaDB database, the e-commerce application generates an account verification QR code and sends an HTML email to the customer's registered email address via Brevo's Email API, including the account verification QR code.


🛍️📩📲 Then, the e-commerce application redirects the customer to the user dashboard.

🛍️📩📲 If there is no product in the cart, the e-commerce application informs the customer on the user dashboard and the ChatGPT recommendations page.


🛍️📩📲 The shopping assistant (device) waits for the customer to scan the unique account verification QR code to activate the cart. Also, it turns the RGB LED to blue to inform the user the fact that the cart is not activated yet.


🛍️📩📲 After scanning the account verification QR code, the shopping assistant registers the obtained user token and turns the RGB LED to green.


🛍️📩📲 After activating the cart, the shopping assistant waits for the customer to scan a product barcode and turns the RGB LED to cyan.


🛍️📩📲 When the customer scans a product barcode, the shopping assistant initiates the product menu (interface) to allow the customer to select a command before sending the scanned product barcode to the e-commerce application. Also, it turns the RGB LED to yellow until the customer chooses a command.