 Arielle
Requirements
Hardware
To build your version of this project, you need the following hardware.
- A Raspberry Pi with a microSD card set up following the Raspberry Pi Setup Guide.
- Halloween Animatronic Pumpkin Bowl
- Motor driver
- USB Webcam
- Jumper wires
- 12V power supply for the motor driver
- 5V power supply for the Raspberry Pi
Software
To control your pumpkin bowl programmatically, you need the following software prerequisites:
- An account on app.viam.com
viam-server- Python 3
- pip
- Viam Python SDK
Dissecting the pumpkin
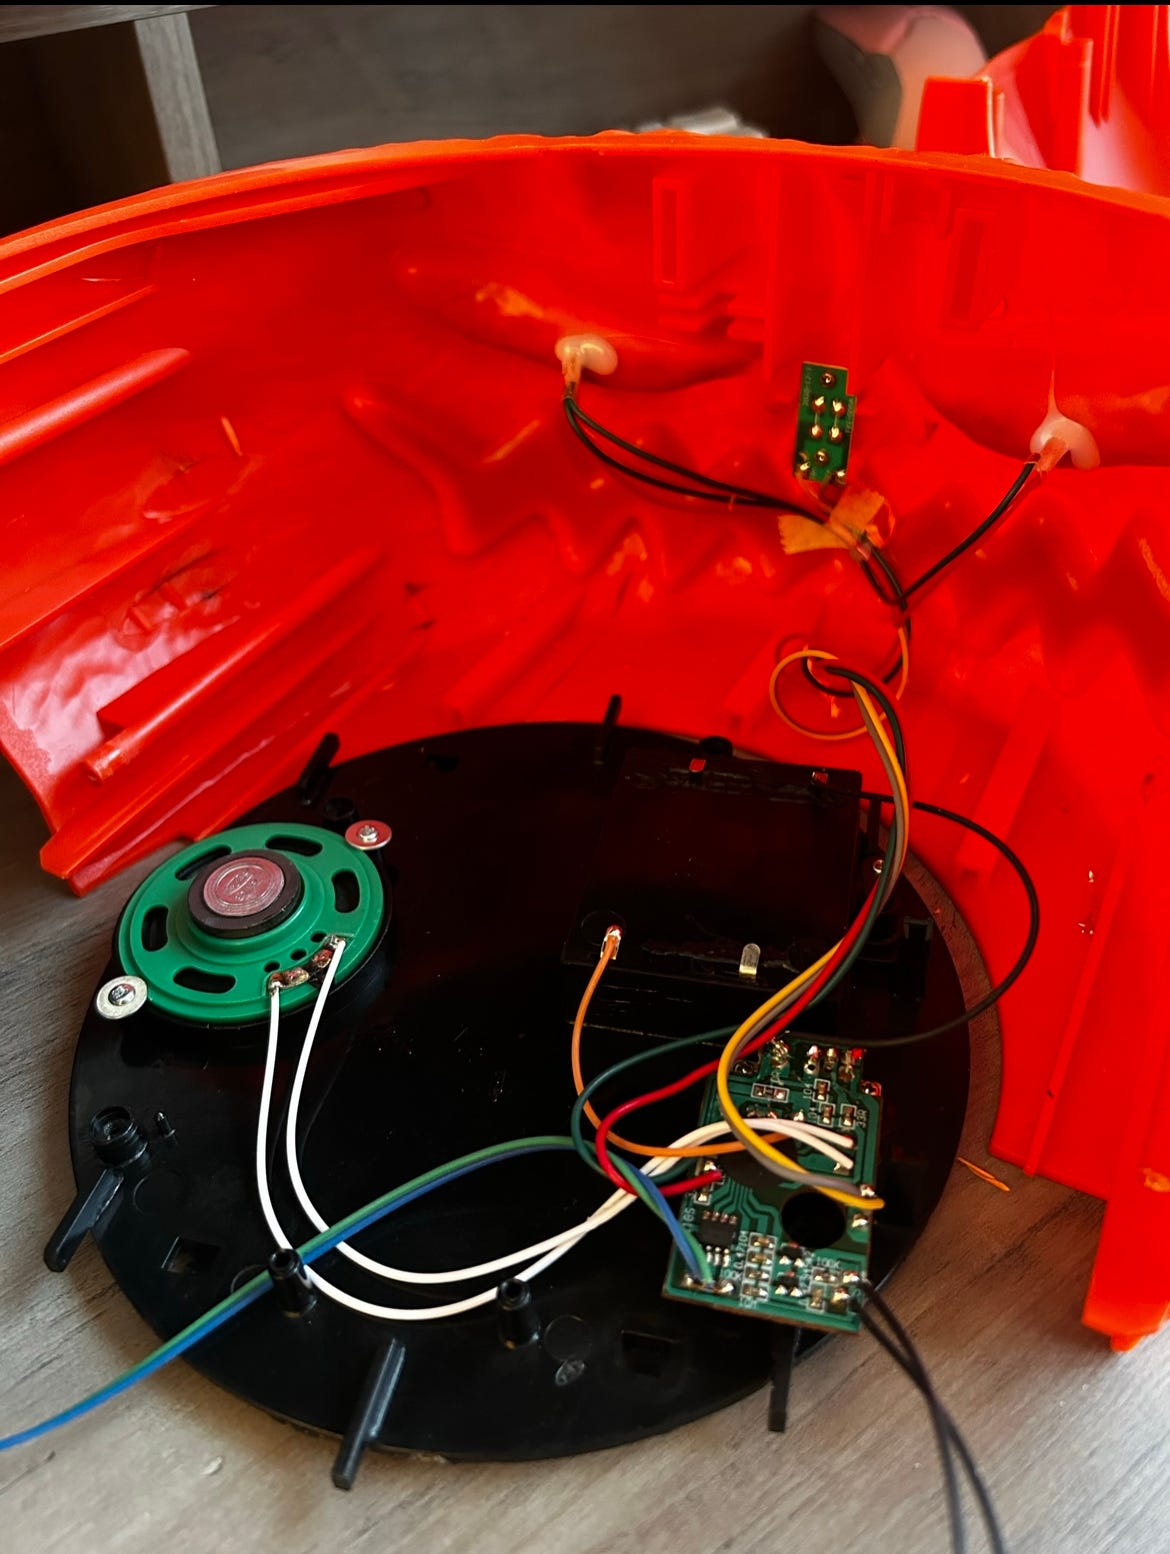
Just like pumpkin carving, don’t be afraid to split your pumpkin (bowl) open and rip out its guts. We want to see what hardware we already have and what we can ultimately upgrade to get it running on an SBC (single-board computer) such as a Raspberry Pi.
After opening the electronic pumpkin bowl, I can identify some pretty standard components: A dc motor, a photoresistor (serving as a motion sensor for its original functionality), a small speaker, a 5V battery pack, LEDs for eyes, and a custom control board which I assume has the programmed functionality driving the motor and sound effects.
Because Viam is compatible with nearly any off-the-shelf hardware you can think of (you can read more about this here), I know I can use this hardware and simply add a Raspberry Pi and a motor driver to fine-tune the hand movements to upgrade this pumpkin. I also know I can rip out these LED eyes and replace them with a camera to enable the bowl to see its surroundings.
Upgrading the hardware
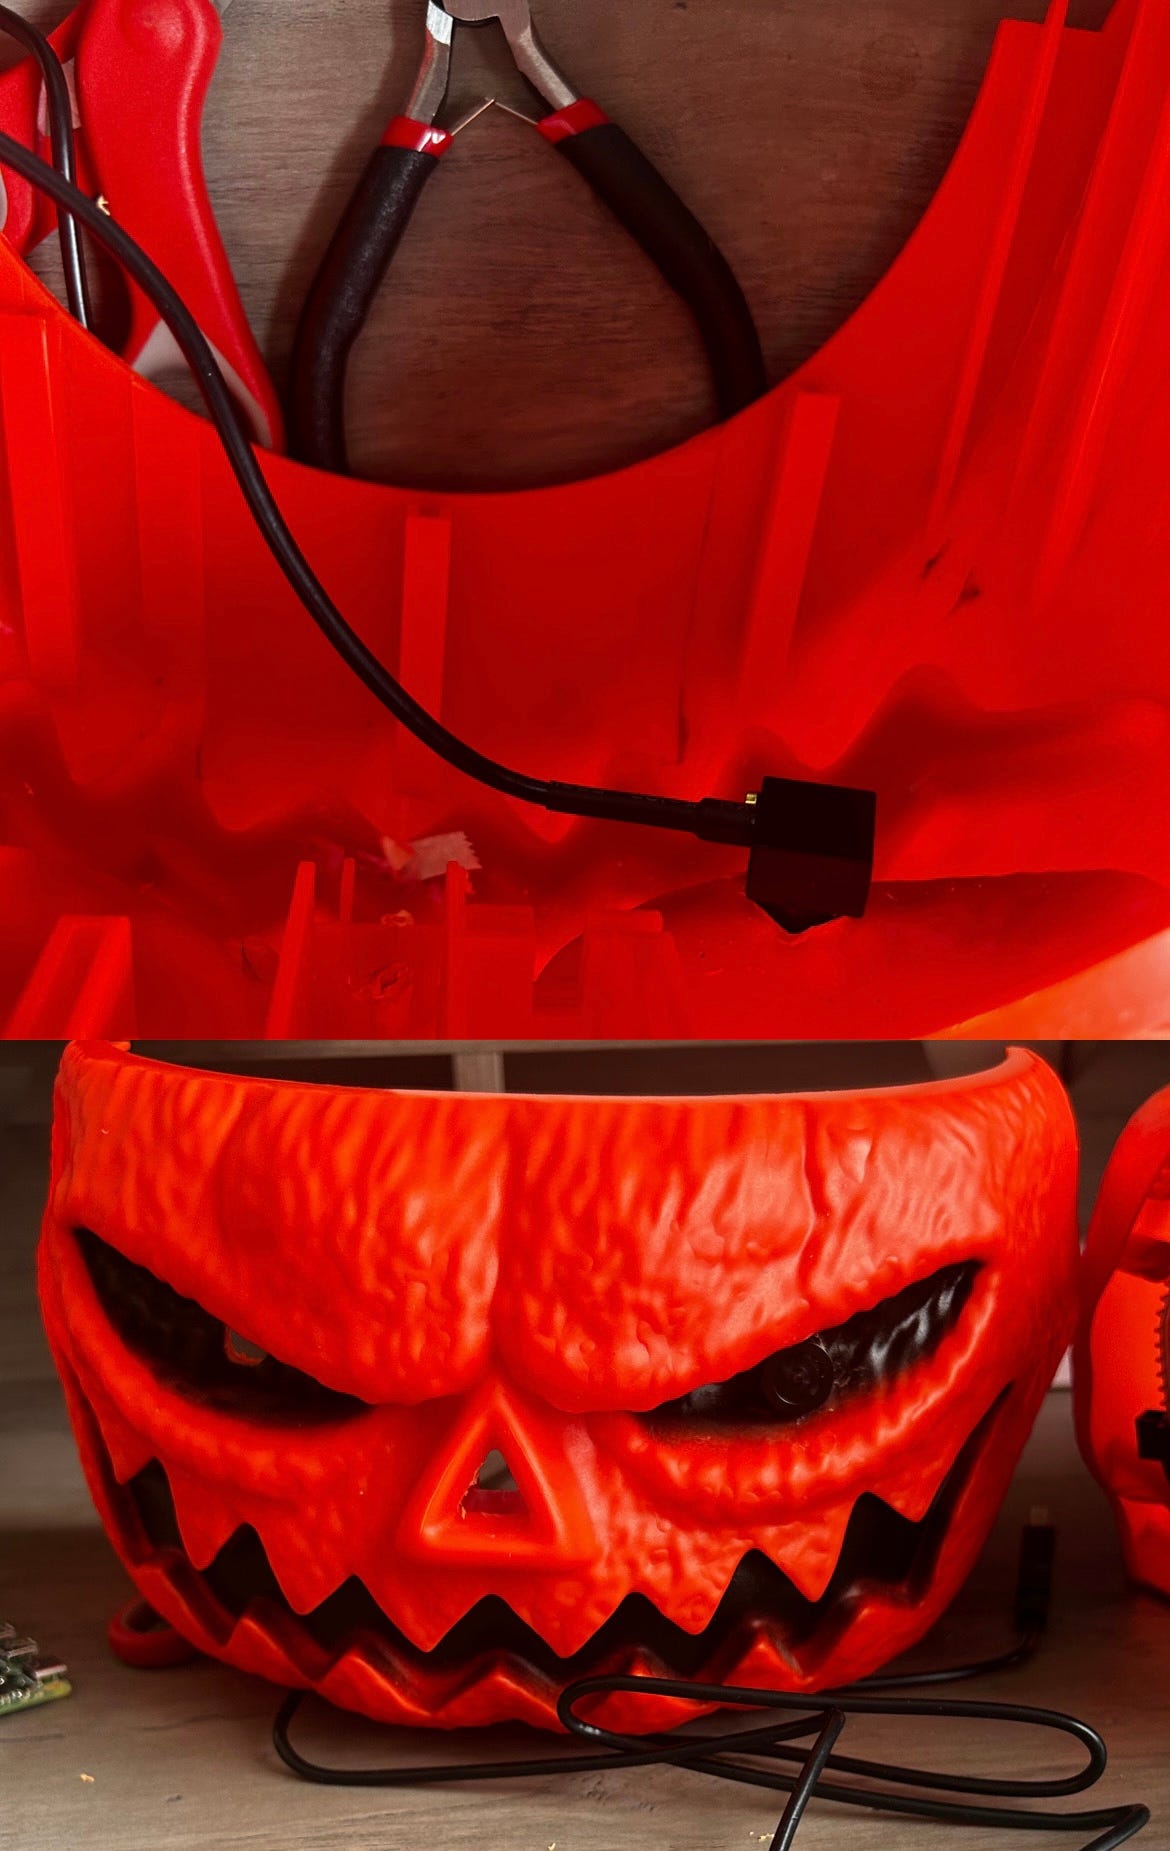
Begin by drilling a larger hole into one of the eye sockets to fit in the webcam lens. If you drill the right size hole, it should fit nicely and snugly so you don’t have to do any additional mounting.
Then, disconnect the DC motor from the board included in the pumpkin leaving the 12V and GND exposed.
After that, I tore out the included board, photoresistor, LEDs, and speaker, and dumped the rest of the hardware in my ever-growing pile of random hardware bits. I recommend you do the same, as you won’t need any of that.

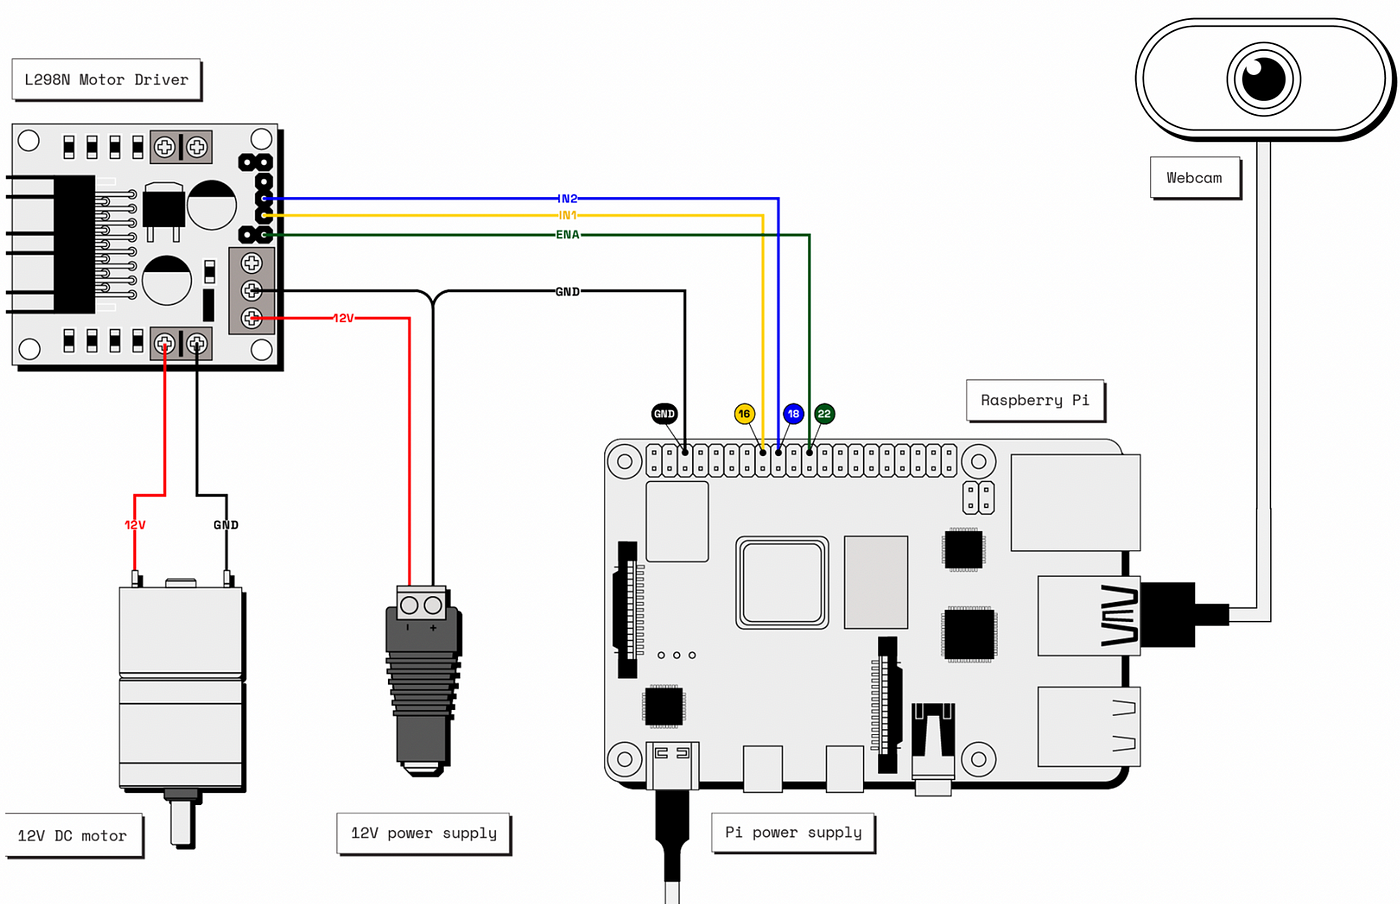
Connect your DC motor to the motor driver and pi according to this wiring diagram. Plug your webcam into one of the USB ports on the pi. Gently close up your pumpkin (without screwing everything shut) and proceed to test your hardware in the Viam app.
Setting up your robot bowl with Viam
Follow the Raspberry Pi Setup Guide to prepare your Pi to connect your robot to the Viam app. Once your Pi is ready, ssh into it from your computer. I named mine spooky@bowl.local as I felt it was fitting for the project.

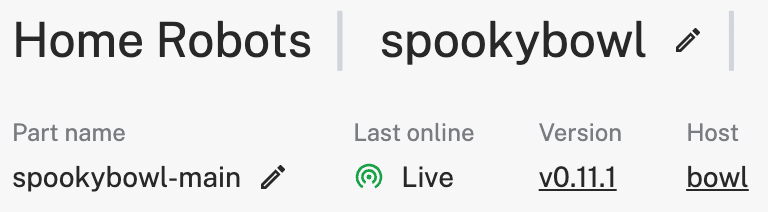
In your web browser, log in to the Viam app and create a new robot instance. Name your robot whatever you like and head to the Setup tab. I named mine spookybowl. On your Pi, follow the steps there to download the Viam app config and download and install viam-server. Wait a moment until your robot connects to the Viam app.
Configuring the hardware in the Viam App
Configure the board
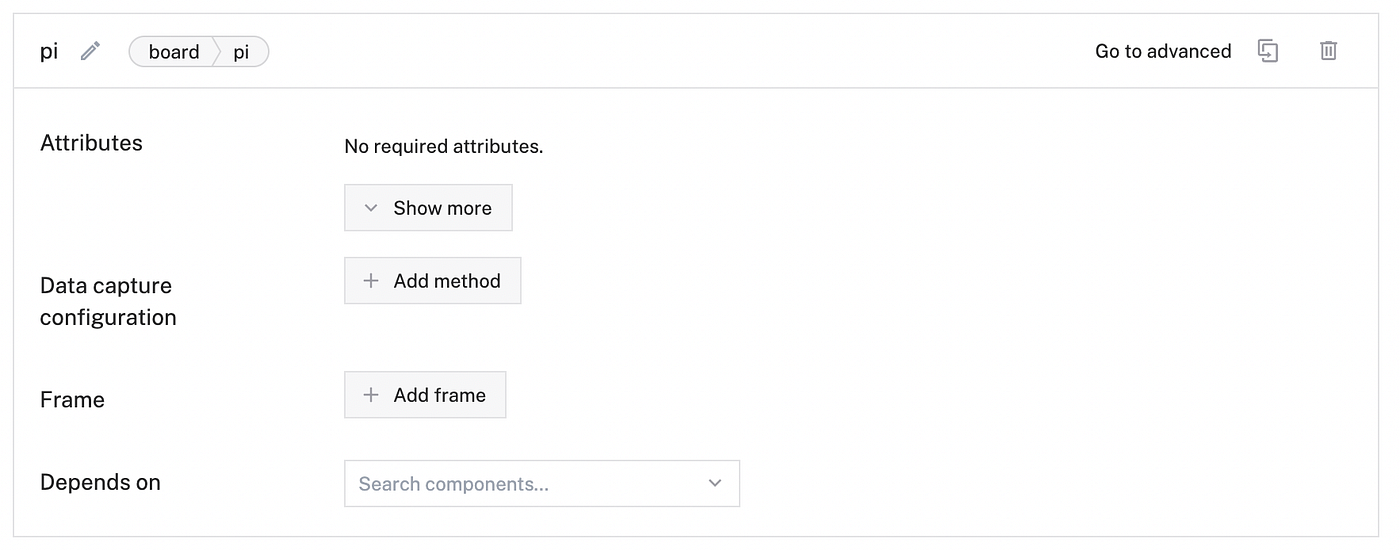
First, configure your board component:
- Navigate to the Config tab of your robot’s page in the Viam app. Click the Components sub tab, then click Create component in the lower-left corner.
- Select
boardfor type andpifor model. - Enter
localas the name for your board, then click Create.
Configure the motor
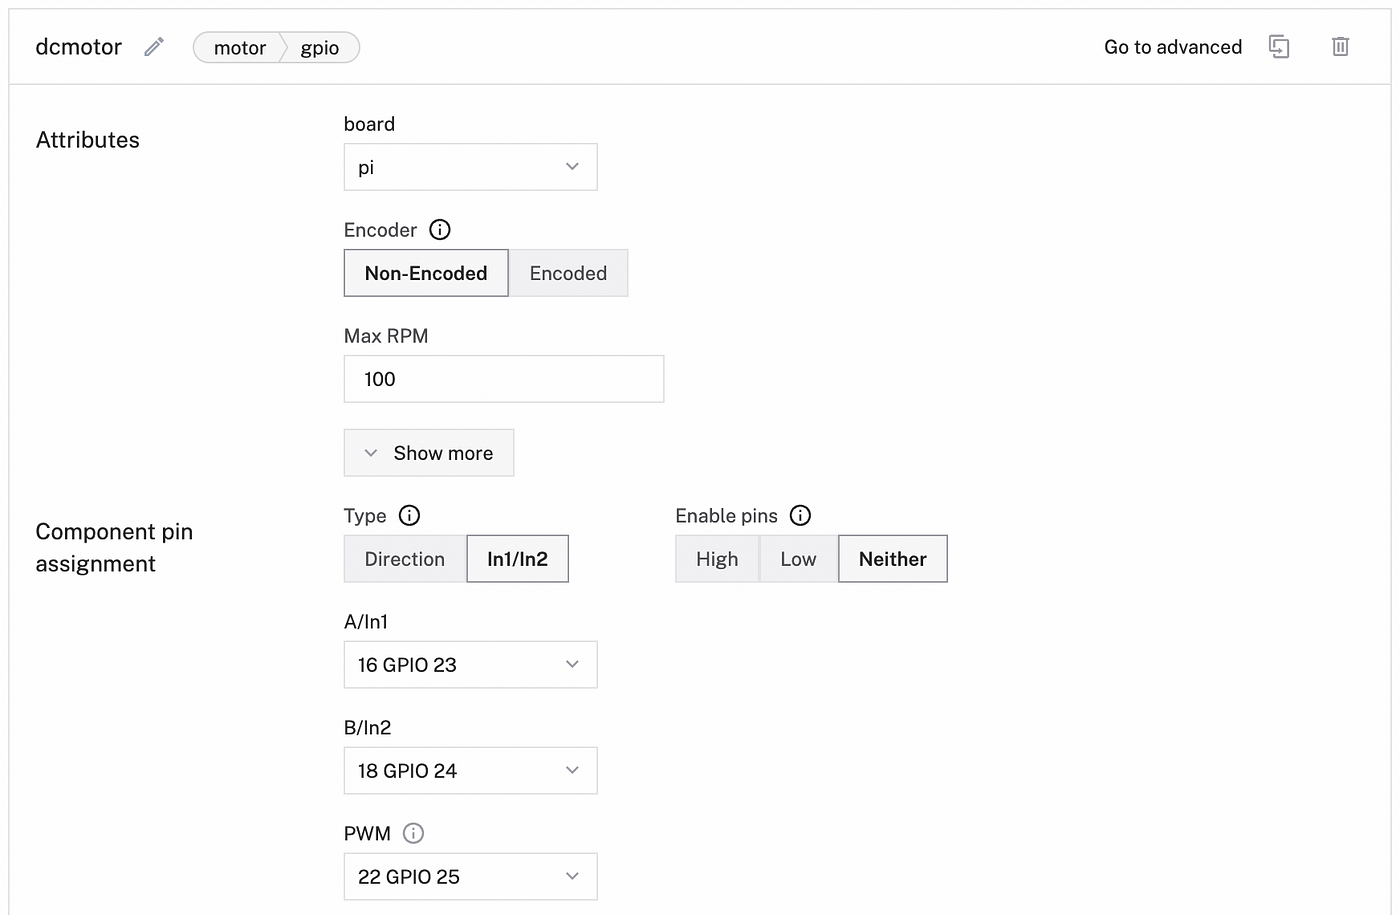
Next, add a motor component:
- Navigate to the Components sub-tab and click Create component in the lower-left corner.
- Select
motorfor type andgpiofor model. - Enter
dcmotoras the name for your motor, then click Create. - After creating your motor component, fill in the required attributes for a gpio motor:
- For the board, click the dropdown box and select local (or whatever you named your board!).
- For Max RPM, enter
100. RPM stands for revolutions per minute: it’s roughly a measure of how fast any machine operates at a given time. Enter100so the motor moves at a moderate speed. You can fine-tune this later in our custom code. - Toggle the slider to In1/In2 motor type. The specific driver you are using expects this pin configuration.
- A/In1: use 16 GPIO 23
- B/In2: use 18 GPIO 24
- PWM: use 22 GPIO 25 — this is the pin you attached to the PWM (pulse-width modulation) jumper wire. The motor driver we used is labeled as ENA.
- For Depends On select local. This ensures that the board is initialized before the motor.
Configure the camera
Next, add a camera component:
- Select Create component in the lower-left corner.
- Select
camerafor type andwebcamfor model. - Enter
pumpcamas the name for your motor, then click Create.
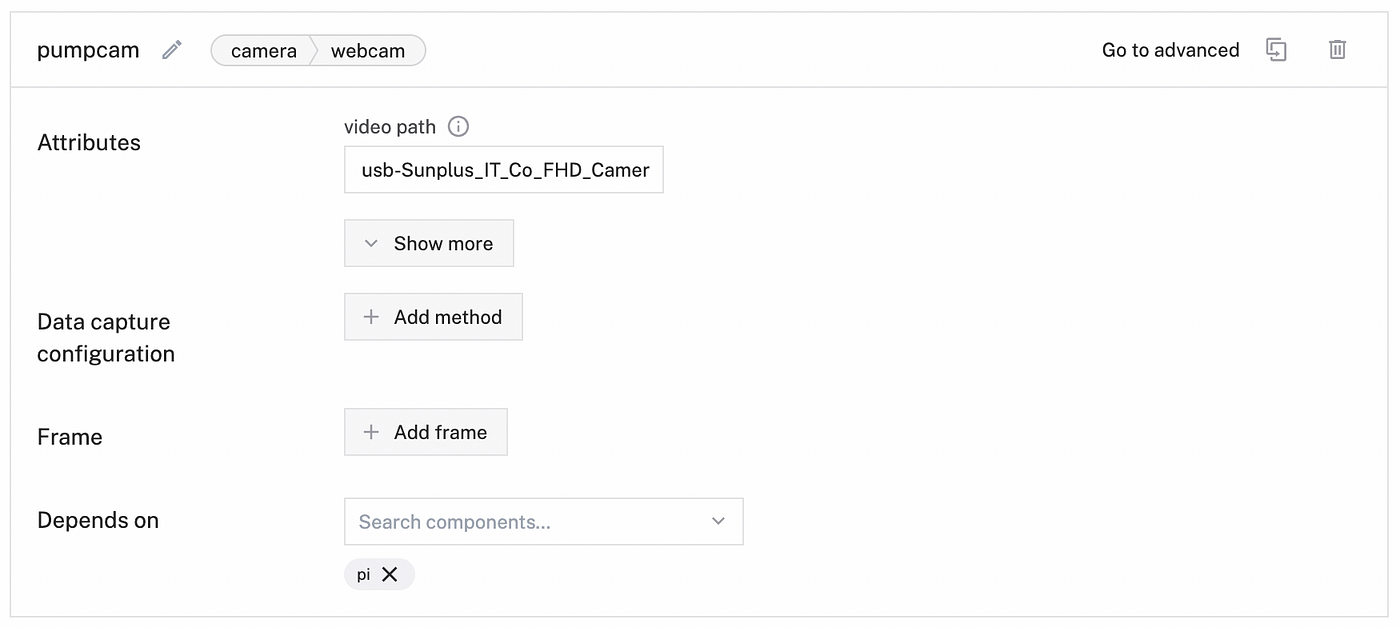
Note: The video path should auto populate thanks to Viam’s camera discovery process.
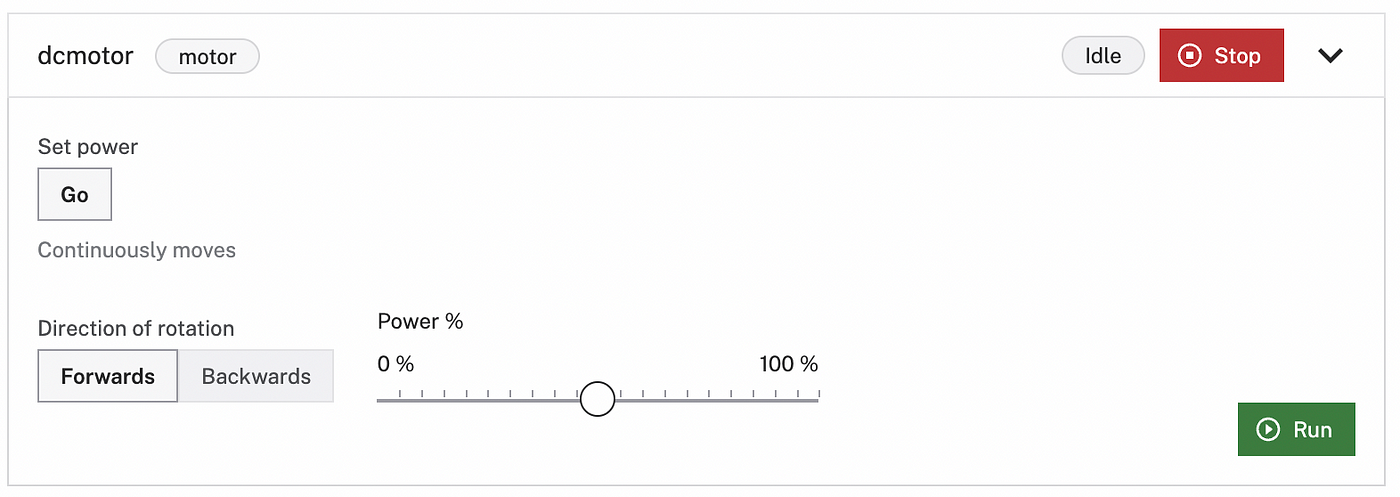
Test the components in the Control tab
Navigate to the Control tab and click on the top of the dcmotor card to open the motor controls. You can test to see if your hardware is configured and connected correctly by selecting a direction to turn your motor, setting the power to 100%, and hitting run. If your spooky hand pops out of the bowl, it means your hardware is configured correctly!
You can also test the pumpcam camera component by viewing the live feed in the stacked card in the control tab. Once you have checked those are working, go ahead and screw your pumpkin shut as you are now done upgrading your hardware and getting it running on Viam.
Adding machine learning capabilities
My goal for this candy bowl is two-fold: to detect people who are not in costume to scare them and to detect people who are in costume to not scare them so they can take candy.
The first challenge we want to tackle is teaching our spooky bowl to identify just people (no costumes yet) using Computer Vision and testing that this logic works.
Here I am using a tensorflow lite model that is pre-trained for detections with corresponding labels called ‘effdet’ (efficient detections). I’ve uploaded the models for you to download and use in my source code repository here.
First, navigate to the Data tab and select Models. Upload a New model and name your model. I’ve named mine effdettest and selected the Model type Object detection. Upload the saved .tflite and corresponding .txt files and select Upload model.

Next, navigate to the Config tab of your robot’s page in the Viam app. Click the Services sub-tab.
Add an ML model service.
The ML model service allows you to deploy the provided machine learning model to your robot. Click Create service in the lower-left corner of the page. Select type ML Model, then select model TFLite CPU. Enter ml_model_test as the name for your ML model service, then click Create.
In the new ML Model panel, select Deploy model on robot for the Deployment. Select effdettest and save.

Add a vision service.
Next, add a detector as a vision service to be able to make use of the ML model.
Click Create service and select type Vision, then select model ML Model. Enter detections_test as the name, then click Create.
In the new detector panel, select the ml_model_test you configured in the previous step.

Click Save config in the bottom left corner of the screen.
Add a transform camera.
Now we are going to add Computer Vision capabilities by adding a Vision Service to our robot with a transform camera.
Navigate to the Components sub-tab of the Config tab. Click Create component in the lower-left corner of the page.
Select camera for the type, then select transform for the model. Enter detections_cam as the name for your transform camera, then click Create.
Replace the attributes JSON object with the following object which specifies the camera source that the transform camera will be using and defines a pipeline that adds the defined detector:
{  "source": "pumpcam",  "pipeline": [    {      "type": "detections",      "attributes": {        "detector_name": "detections_test",        "confidence_threshold": 0.5      }    }  ]
}
Don’t forget to specify the Depends on attribute and add the source as your webcam, pumpcam.
Navigate back to the Control tab and your transform camera should show up. You can view your camera doing live detections of your surroundings- such as people and objects.
Controlling your smart pumpkin programmatically
With your pumpkin fully configured, you can now write code to control your spooky candy bowl through code. For this tutorial, I’ve decided to use Python.
Head to the Code Sample tab in the Viam app and follow the instructions to set up your development environment.
$ | pip3 install viam-sdk
Then copy and run the following in your code sample to connect to your robot. If it is your first time using Viam, you can copy all of the code provided in the code sample which provides boilerplate code to initialize all of your robot resources in your program. For the sake of this tutorial, I am simplifying the code and only taking what we need.
import asyncio
import os

from viam.robot.client import RobotClient
from viam.rpc.dial import Credentials, DialOptions
from viam.components.motor import Motor
from viam.services.vision import VisionClient


#Env Variables for Robot Connectivity robot_secret = os.getenv('ROBOT_SECRET') robot_address = os.getenv('ROBOT_ADDRESS')
Notice I am setting environment variables for the robot secret and robot address. Import this variable into your development environment as needed.
To show your robot’s location secret in the sample code, toggle Include secret on the Code sample tab. You can also see your location secret on the locations page. Think of your robot secret as the private key or password to your robot, so do not share it.
Then copy over the robot connectivity code. This is what allows you to connect to your robot. You can run this code on your machine with these credentials.
#Robot Connectivity
async def connect():
    creds = Credentials(
       type='robot-location-secret',
       payload=robot_secret)
    opts = RobotClient.Options(
       refresh_interval=0,
       dial_options=DialOptions(credentials=creds)
     )
return await RobotClient.at_address(robot_address, opts)
Now let’s write a function that describes the behavior of our skeleton hand in the bowl. In simplest terms, we just want to move the motor forwards and backward repeatedly to get that nice jump-scare motion out of the bowl. The motor is mounted on a rack and pinion under the bowl which allows for that kind of movement.
Using the Motor API in the Python SDK, I am using the following methods: set_power and go_for. I want my motor to be about 75% power (it’s a bit quieter this way) and I want it to jump out and retract quickly. I’m doing this in the function I’ve called jumpscare() with my motor as the only parameter.
async def jumpscare(dcmotor):
    #Hand jumps out, motor goes forward
    await dcmotor.set_power(power=.75)
    await dcmotor.go_for(rpm=70, revolutions=1)
    #Hand goes in, motor goes backwards
    await dcmotor.set_power(power=-.75)
    await dcmotor.go_for(rpm=-70, revolutions=1)
The next function we are writing is called trickOrTreater() where I am looking for people to scare. This function gets detections from the camera and looks for anything labeled “Person” (as per our tensorflow lite model and labels). If the camera detects a person, it will change the seen state to true and will trigger our jumpscare() function. For now, we will only pass in two parameters: our motor and the name of our Vision Service configured on the robot.
async def trickOrTreater(dcmotor, detections_test):
    #Searching for trick or treaters to scare!
    while True:
        people_detections = await detections_test.get_detections_from_camera("pumpcam")
        seen = False
        print ("no one is around to take some candy")
        for d in people_detections:
            if d.confidence > 0.6:
                if d.class_name == "Person":
                    print("gotcha!")
                    seen = True
        if seen:
             await jumpscare(dcmotor)
Finally, we want to create our main loop that initializes our robot connectivity, declares our components and services, and calls the function trickOrTreater().
async def main():
    robot = await connect()

    #Components and Services
     dcmotor = Motor.from_robot(robot, "dcmotor")
    detections_test = VisionClient.from_robot(robot, "detections_test")
    costume_det = VisionClient.from_robot(robot, "costume_det")
    await trickOrTreater(dcmotor, detections_test)
    await robot.close()

if __name__ == '__main__':    asyncio.run(main())
Now we can run this code and your bowl should now autonomously scare people approaching the bowl for candy.
Training a new model for costume detections
Now this part is really up to you in terms of how robust you want your data set to be. I went ahead and scoured Google for images of popular costume types in a variety of different lightings, skin tones, and gender presentations just to make sure our data set is diverse. This helps detections be more accurate. I took approximately 20 images of the following costume types: zombie, witch, vampire, cowboy, and mummy. This is not all-encompassing for all costume types but for the sake of this tutorial, a very simple model will suffice.
Saving images onto your robot (pi)
Download and save all of your images into a folder on your computer. Import those images onto your robot via the command line using the SCP command. The SCP command or secure copy allows the secure transfer of files between the local host and the remote host.
Open your terminal on your computer and use the following SCP command with your image folder directory followed by your remote_username@ host:/whatever/directory. This is where your images will be saved.
$ | scp <YOUR IMAGES PATH> spooky@bowl.local:/home/spooky
Now ssh into your pi and check to see if your files have transferred.

Pushing collected images into Viam
Head back to the Viam app and create a new Data Management service. Name it costume-images. Add the directory on your robot (in this case, where the images are saved) and enable cloud sync. This will vacuum up the images saved on your robot and store them in the Data Manager in the cloud.

Don’t forget to save your config. Head to the Data page to see all of your uploaded images.
Labeling
You can now start labeling your images with the desired labels and corresponding bounding boxes to train your model. Click on the image for expanded view, select Bounding box, and start drawing those boxes!
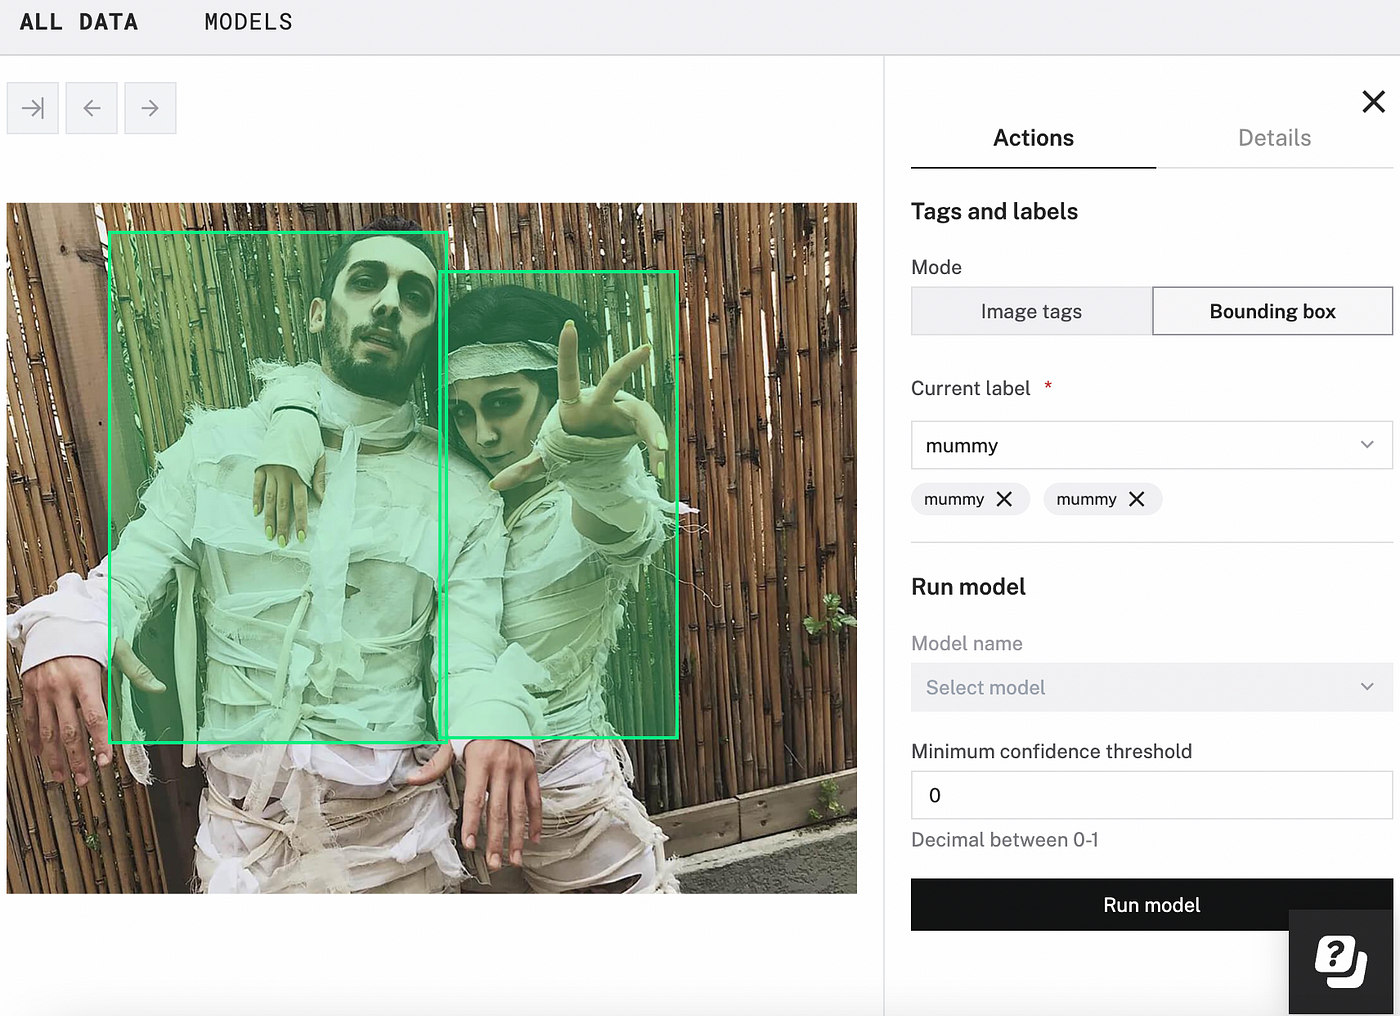
Continue labeling as many images as you want. Remember, the bigger your data set is, the more accurate your detections will be. You need a minimum of 10 images per label to successfully train a .tflite model in the Viam app.

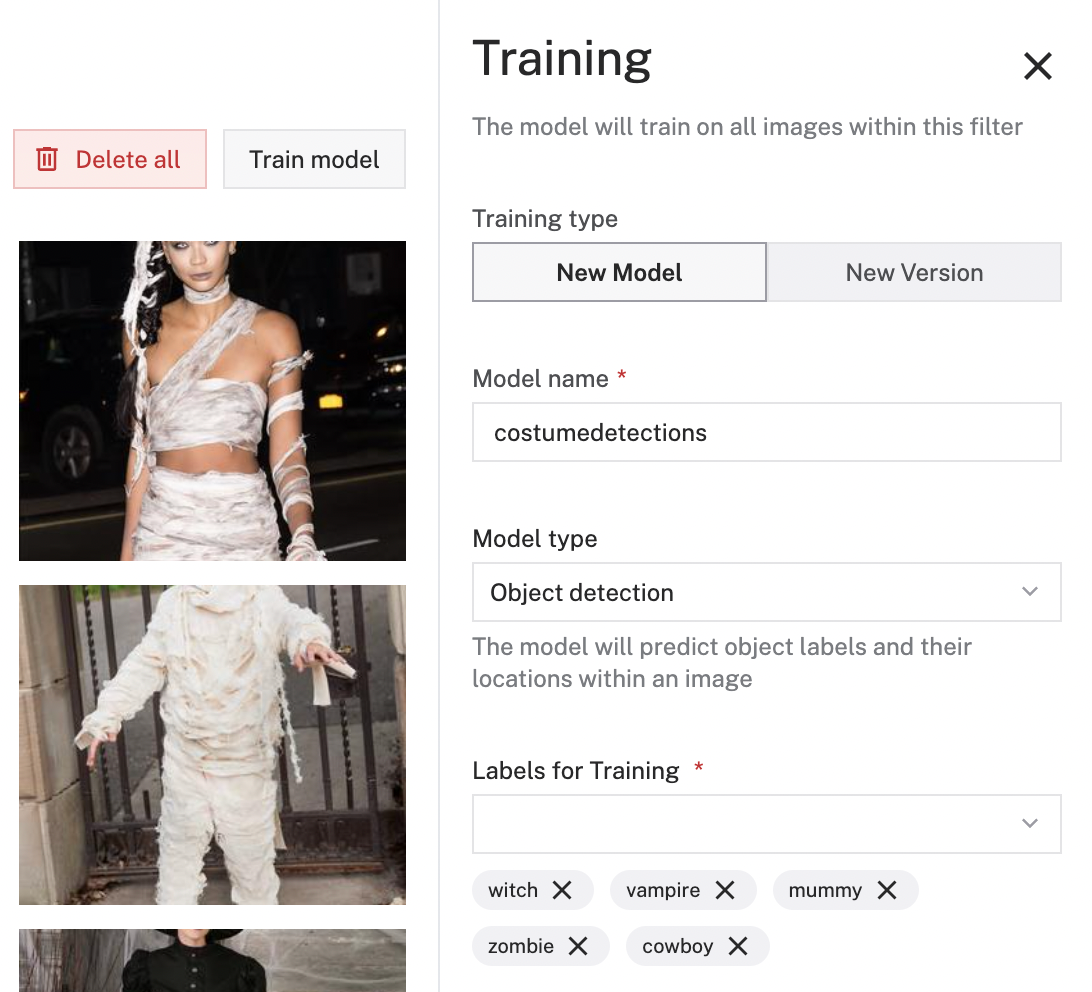
Training
Once you are finished labeling all of your images, select Train model, name it costumedetections and select Object detection as the model type. Make sure to select all of the labels you want for training.
Deploying this new model on your robot
Once your model is done training, you can now repeat the steps from earlier and deploy this model onto your robot. Select type ML Model, then select model TFLite CPU. Enter ml_model_costumes. Select the model we just trained. Now create a Vision Service with type ML Modeland name it costumes_det.

Adding costume detection code
Now you can write a few more lines of code that looks for the costume detections in the model you trained.
Declare a global array of labels you want to look for based on the model you trained. I put this near my environment variables at the start of my code.
COSTUMES = ["witch", "mummy", "vampire", "cowboy", "zombie"]
Update your trickOrTreater() function to include detections for people dressed up in costume. We want the candy bowl to do nothing if people are wearing costumes, as they are in the Halloween spirit and deserve a treat over a trick! To make sure this works, we are simply just sending a message in the console.
async def trickOrTreater(dcmotor, detections_test, costume_det):
    #Searching for trick or treaters to scare!
     while True:
         people_detections = await detections_test.get_detections_from_camera("pumpcam")
       costume_detections = await costume_det.get_detections_from_camera("pumpcam")
        seen = False
        print ("no one is around to take some candy")
        for d in people_detections:
            if d.confidence > 0.6:
                if d.class_name == "Person":
                    print("gotcha!")
                    seen = True
        if seen:
             await jumpscare(dcmotor)
        else:
            for d in costume_detections:
                if d.confidence > 0.6:
                   if d.class_name in COSTUMES:
                       print("happy Halloween! take a treat!")
                       seen = True
Finally, we want to initialize a new resource in the main() function of our costume detector Vision service, and we want to add that parameter to the function trickOrTreater().
async def main():
      robot = await connect()

     #Components and Services
     dcmotor = Motor.from_robot(robot, "dcmotor")
     detections_test = VisionClient.from_robot(robot, "detections_test")
     costume_det = VisionClient.from_robot(robot, "costume_det")
    await trickOrTreater(dcmotor, detections_test, costume_det)
    await robot.close()
Running your code on power-up
Want to avoid running the code manually every time you plug in your bowl? You can have your code run automatically when your robot boots by adding a Process. Navigate to the Config tab of your robot’s page in the Viam app. Click on the Processes sub-tab and navigate to the Create process menu.
Enter run-forever as the process name and click Create process.
In the new process panel, enter python3 as the executable, main.py as the argument, and the working directory of your board Pi as /home/spooky/.
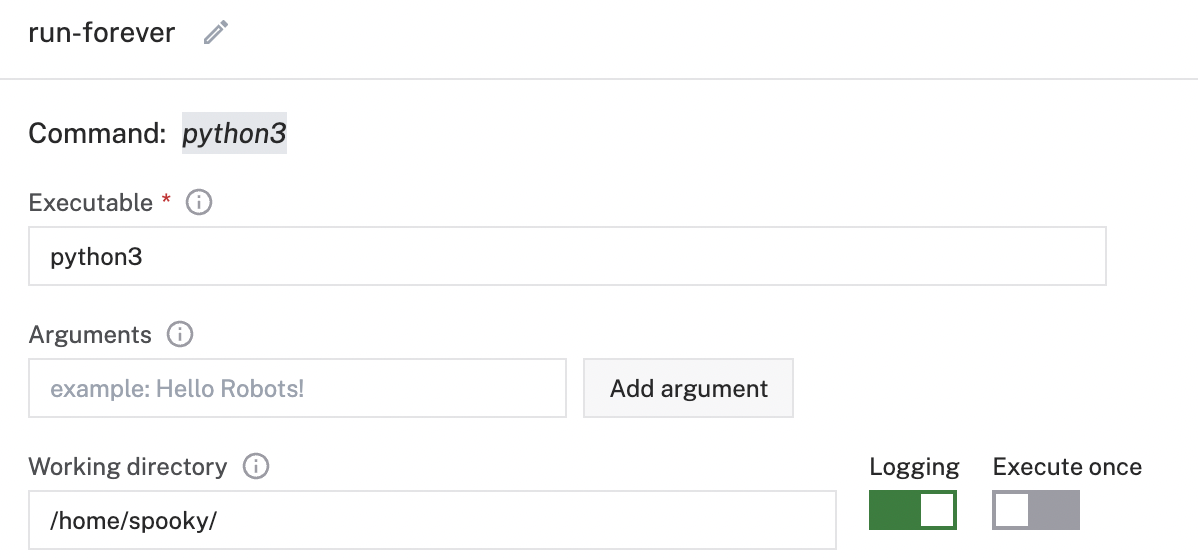
Click Save config in the bottom left corner of the screen.
Now your robot will start its code automatically once booted. That means you can simply plug your bowl in anywhere in your home or porch and it will always look for people to scare and costumed individuals to not scare!
Now go have some candy.
I hope you liked this fun tutorial- it was really fun upgrading something I bought off of Amazon and completely customizing it to utilize Computer Vision and Machine Learning. I encourage you to try this at home with this candy bowl, or any holiday-themed animatronic you like.
Full Code
You can find the whole project on GitHub. Give it a star if you liked this tutorial!
import asyncio
import os

from viam.robot.client import RobotClient
from viam.rpc.dial import Credentials, DialOptions
from viam.components.motor import Motor
from viam.services.vision import VisionClient


#Env Variables for Robot Connectivity
robot_secret = os.getenv('ROBOT_SECRET')
robot_address = os.getenv('ROBOT_ADDRESS')

COSTUMES = ["witch", "mummy", "vampire", "cowboy", "zombie"]

#Robot Connectivity
async def connect():
    creds = Credentials(
        type='robot-location-secret',
        payload=robot_secret)
    opts = RobotClient.Options(
        refresh_interval=0,
        dial_options=DialOptions(credentials=creds)
    )
    return await RobotClient.at_address(robot_address, opts)

async def jumpscare(dcmotor):
    #Hand jumps out, motor goes forward
    await dcmotor.set_power(power=.75)
    await dcmotor.go_for(rpm=70, revolutions=1)

    #Hand goes in, motor goes backwards
    await dcmotor.set_power(power=-.75)
    await dcmotor.go_for(rpm=-70, revolutions=1)


async def trickOrTreater(dcmotor, detections_test, costume_det):
    #Searching for trick or treaters to scare!
    while True:
        people_detections = await detections_test.get_detections_from_camera("pumpcam")
        costume_detections = await costume_det.get_detections_from_camera("pumpcam")
        seen = False

        print ("no one is around to take some candy")

        for d in people_detections:
            if d.confidence > 0.6:
                if d.class_name == "Person":
                    print("gotcha!")
                    seen = True
        if seen:
            await jumpscare(dcmotor)
        else:
           for d in costume_detections:
            if d.confidence > 0.6:
                if d.class_name in COSTUMES:
                    print("happy Halloween! take a treat!")
                    seen = True


async def main():
    robot = await connect()

    #Components and Services
    dcmotor = Motor.from_robot(robot, "dcmotor")
    detections_test = VisionClient.from_robot(robot, "detections_test")
    costume_det = VisionClient.from_robot(robot, "costume_det")

    await trickOrTreater(dcmotor, detections_test, costume_det)

    await robot.close()

if __name__ == '__main__':
    asyncio.run(main())