1.0 - INTRODUCTION
When I decided to build Tricorduino 4.0, I felt more or less like Mr. Spock in the classic series episode called, “The City on the Edge of Forever”, when he was trying to make modifications to his broken Tricorder. I don't mean the feeling of building the first mnemonic circuit in history, but rather of working with little more than soft clay and chipped stone. As I explained before, Tricorduino is far from being a Tricorder because the idea of a real Tricorder involves a miniaturization of systems that are currently very large. In the episode in question, Spock used thermionic valves to recover the damaged Tricorder. Of course, this is just fiction, but the plastic of the film wants to show precisely the fact that technology evolves both, concept and in miniaturization. Even for Spock's brilliant Vulcan mind, it was quite complicated to carry out repairs on the Tricorder in New York during the Great Depression of the 1930s. Perhaps it would be much easier if it were today in 2023, in Silicon Valley. To summarize the situation, it is not impossible to build a real Tricorder with current technology, but it is still impossible for it to be the size conceived in the Star Trek series. We cannot contain a precision spectrograph or a database of the complete history of the earth in detail inside a multimeter box. Let's say that between 1930 and 2023, we evolved from galena diodes and thermionic valves to something like polymers and processed silicon. However, a lot still has to happen between 2019 and 2260, the year in which the classic Star Trek series takes place.
As was very evident, for those who read the posts regarding tests with Tricorduino 3.0, the degree of miniaturization is essential to have an instrument that can be used anywhere and at all times. It is also essential to have a screen that can be viewed during the day in intense sunlight. Solving all these problems and still having energy for at least 4 or 5 hours of continuous operation is quite challenging. A practical Tricroder should have the dimensions of a cell phone. With this in mind, I decided to completely reformulate this project and set out to create Tricorduino 4.0.
2.0 - DESCRIPTION
2.1 - Processor
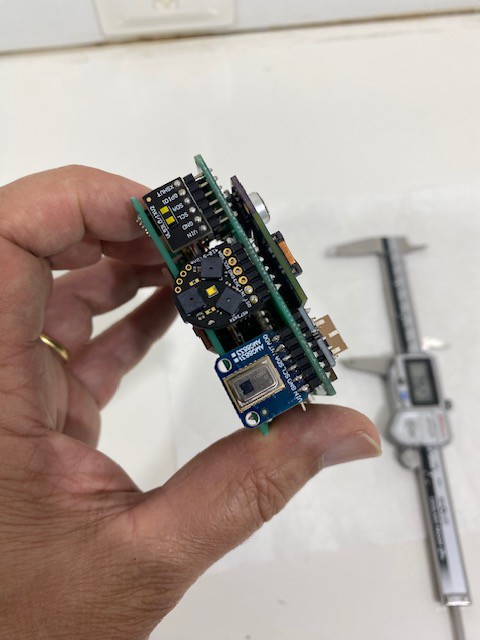
Tricorduino 4.0 uses the TTGO T-Display which is an excellent development board, incorporating an ESP32 processor (with support for WiFi and Bluetooth) and a small OLED display. Okay, the first thing you might be thinking is that it's really small. Yes, it's very small, but it's surprisingly efficient. The screen is bright enough to view during the day, even in sunlight. Because it is very small, the degree of miniaturization allows us to build something that can be carried in your pocket without any problems. Furthermore, since the OLED display is inserted into the processor block, we have enough free pins to connect all possible and imaginable types of sensors and switches. By switching the Feather-MO processor for a TTGO Esp32, I lost the advantage of using a micro SD card to record observational data, which is sometimes of utmost importance. However, I can still solve this problem by transmitting information via ESPNow from the TTGO processor to a mobile unit with an Esp32 attached to a micro SD card reader. In fact, the possibility of using the ESPNow protocol opens up a series of prospects for readings from probes that can be scattered in the environment to be researched.
2.2 - Hardware
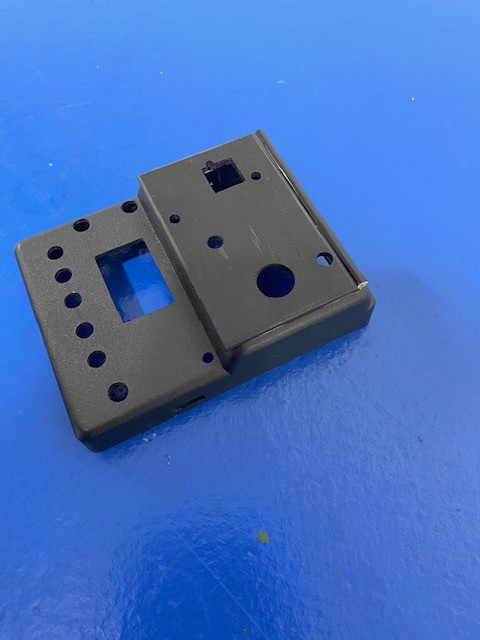
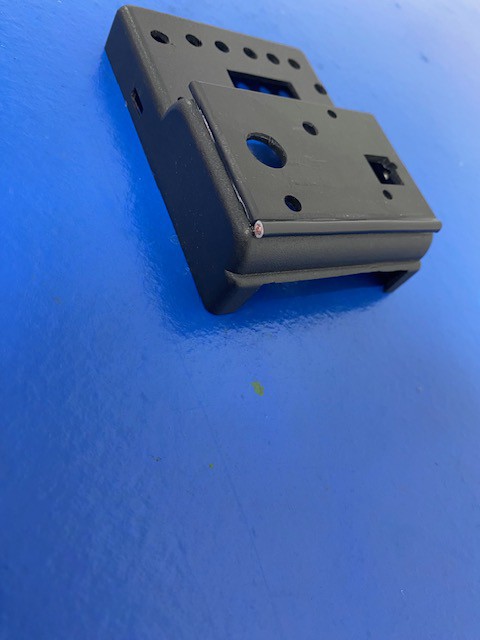
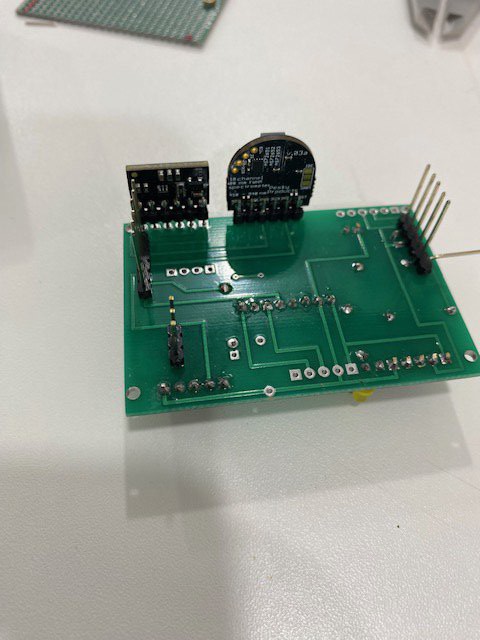
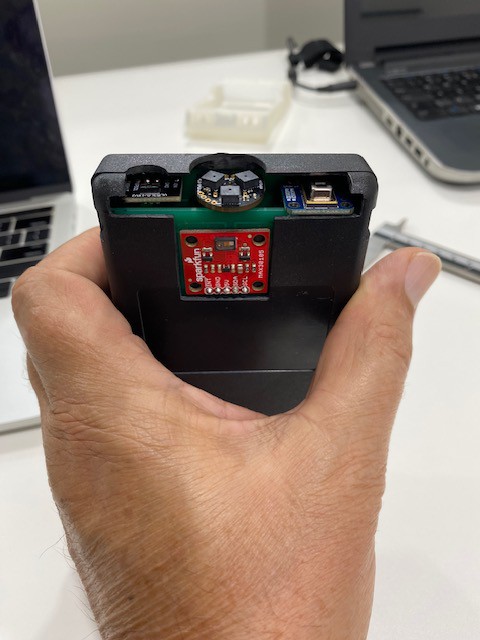
A very important thing I learned while building Tricorder prototypes is that it is essential to use printed circuit boards. If you assemble a prototype using wires, sockets, breadboards, and the like, your device is destined to fail at the most critical moments. So, after conducting all the basic tests on breadboards, I decided to purchase professional printed circuit board fabrication services. The investment is not too expensive, and the return is very good. Contact failures during field operations completely disappear. I also mentally worked on the issue of the circuit containment case. There is a natural tendency for Star Trek fans to want to reproduce the icons exactly as seen in the series. This seems to be the case with the tricorder. Many people would like to insert a bunch of circuits and sensors into a toy tricorder produced by the franchise. It is important to differentiate between two situations: the first being the avid collector who is solely interested in the series' icon, and for that, there are countless toys available on the market. The second is someone who truly wants to have a functional instrument with the concept of a tricorder. If you are in the first case, you have no problem at all because you can buy items for your collection at will. But if you find yourself in the second case, like me, you certainly won't find a functional tricorder to buy. The option is to build your own tricorder. Thinking in this way, I completely disregarded the idea of building a tricorder and inserting it into a toy tricorder box. This attitude led me to a more professional level. Still, I tried to maintain the design with some similarity. The final result is something that can be acquired and built by anyone interested. Not everyone has the convenience of a 3D printer. For this reason, I opted for the choice of a standard case that can be easily found on Amazon under the designation Patola Pb087. The case should be worked on with some care to accept the board assembly correctly. It's hard to say what came first, the choice of the case, the number of sensors, or the type of processor. To be honest, I had to think about all three variables simultaneously.


2.3 - Sensors
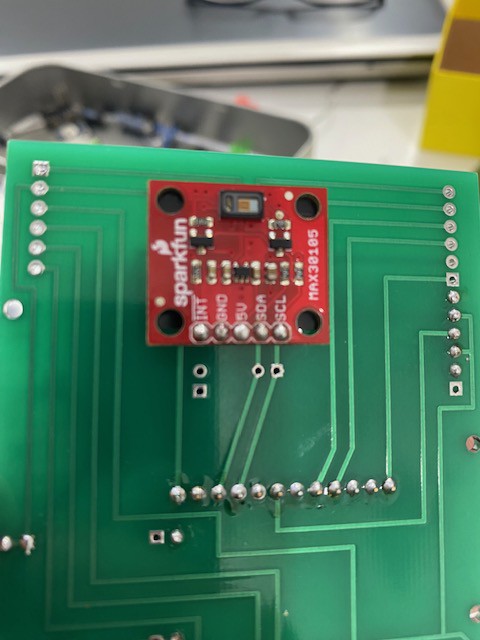
The choice of sensors was carefully made based on my experience gained from tests conducted with Tricorduino 3.0. Obviously, the more sensors you have, the larger the size of the instrument will be, even if you make a concerted effort to condition them all compactly. With that in mind, I was very discerning in choosing what should be included in Tricorduino 4.0. For example, I noticed that the multiple gas sensor was completely useless, mainly because my interest was always in detecting volatile gases without needing to know exactly which gas was being detected. So, I kept only the CO2 and volatile gas sensor. To enhance the CCS811 sensor, I introduced a micro fan to pull air from outside into the case. This ensures a constant airflow under the sensor for faster operation. The fan is activated only when the air quality sensor is turned on to save battery power. The lightning sensor AS3935 was removed because it never worked very well. It seems to only work well for SPI-type connections, making it impractical for inclusion in a system where all sensors operate on I2C connections. I also removed the color sensor TCS34725 as it somewhat competed with the spectrographic sensor AS7265X. I preferred to keep the latter and use additional processor pins to ensure its calibration. To further reduce the volume of the assembly, I replaced the BNO055 and BME280 sensors with a single Ladybug MPU9250 plus BME280 sensor. This replacement offers a huge space gain in the assembly. Since I found no utility for terrain declination analysis, I simply removed the software part. However, this can be added again if necessary because the Ladybug sensor also provides data for it. The electrostatic sensor remains the same for now, but I am working on developing a more efficient sensor that can even detect lightning.
I thought it would be very beneficial to include a sound sensor with a Max9814 type microphone. So, I used the sketch developed by FabriceA6 at the following link: https://www.instructables.com/Portable-Sound-Analyzer-on-ESP32/ Initially, it was just interesting to observe the spectrogram of nature sounds, but after some time, I began to realize that it was also sensitive to inaudible sounds. I still can't explain why, but it picks up some types of ultrasonic sounds, including those from bats. I will conduct some tests in the near future.
It's important to note that I used a different GPS sensor than the one used in Tricorduino 3.0. This time, I used the PA10100 sensor, which allows for I2C connection. This was necessary because the TTGO Esp32 does not have RX and Tx type connections. Finally, I want to talk a bit about the light sensor. During tests with Tricorduino 3.0, I realized that using three sensors was completely unnecessary for my situation. I don't need to measure the exact power of light radiation in Watts. I only need to assess the sunlight conditions during the day. Therefore, I chose to keep only the SI1145 sensor, which provides approximate sunlight data. For me, that's sufficient.

2.3 - Power Source
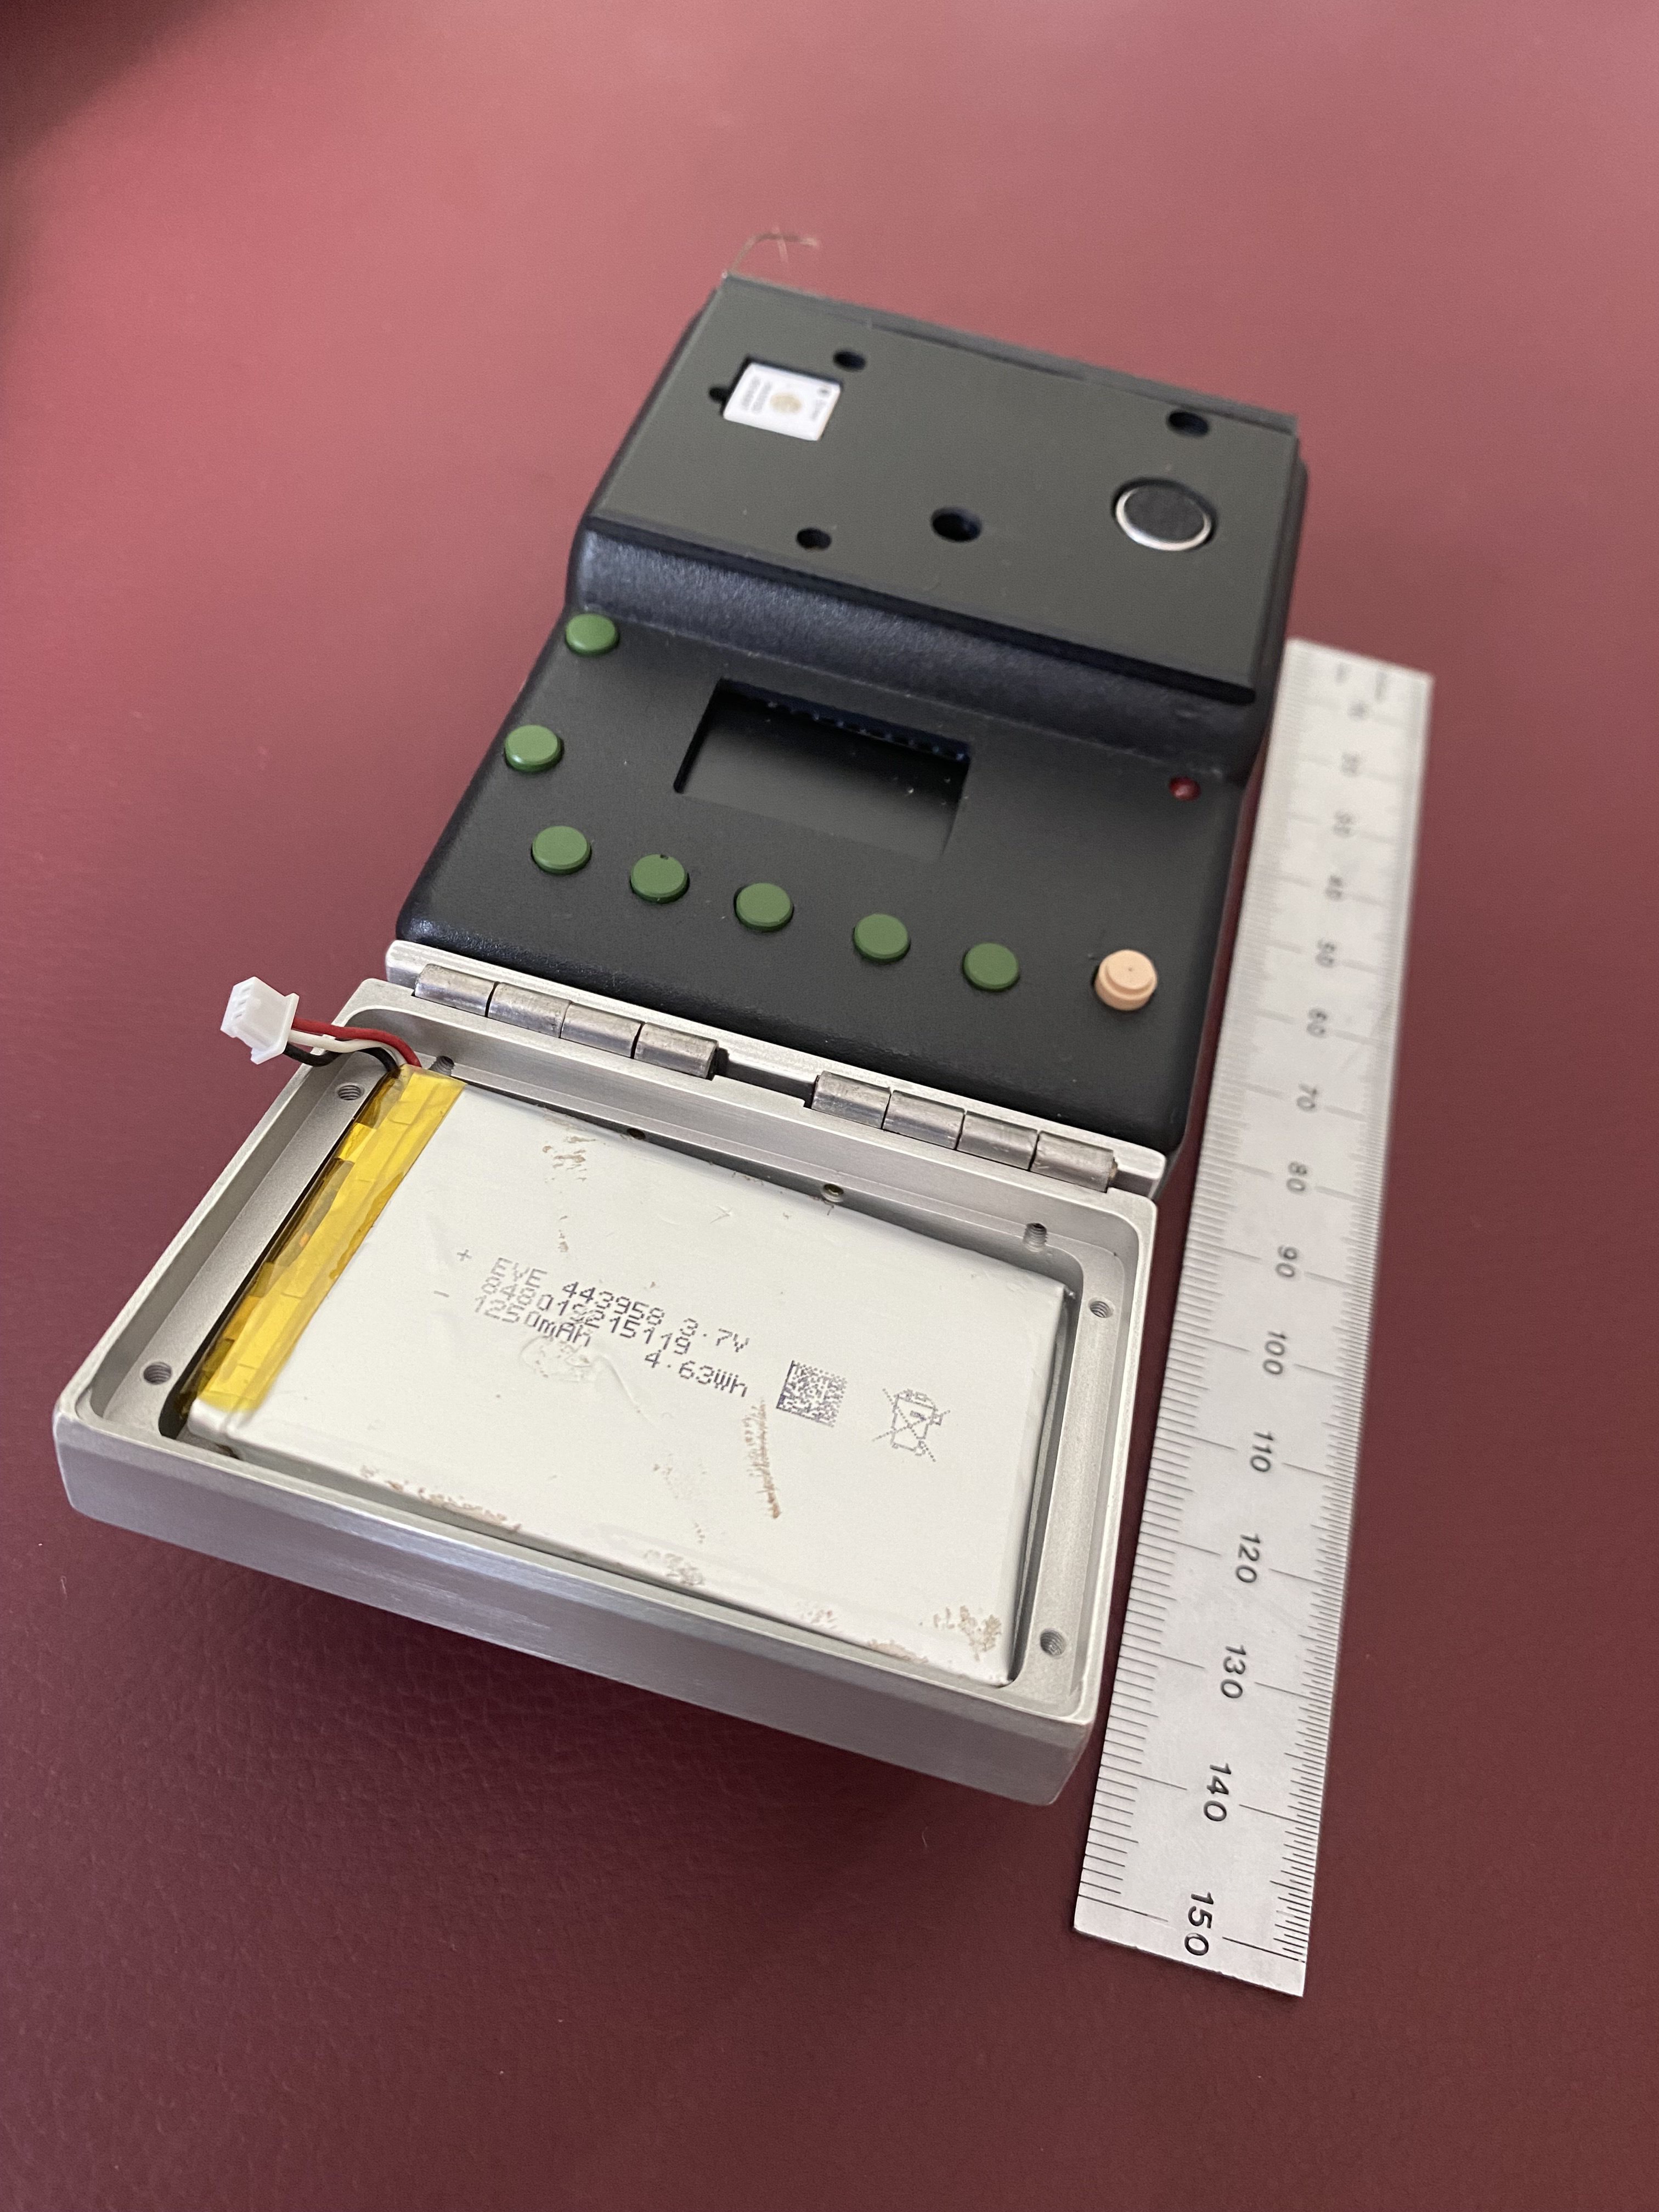
The power source will always be a complex issue to resolve in the case of a tricorder. Note that the ideal scenario would be to have power for days or weeks. However, to achieve this, we would need to use very large batteries, or even small ones, they could possibly be expensive. This brings us back to the problem of miniaturization. If we use long-lasting batteries it will certainly increase the size of the tricorder, and this is not desirable. Initially I used a 600 mAh LiPo battery with dimensions of 40 x 20 x 4 mm. This battery is small enough to be mounted under the TTGO socket, as seen in the photo below. Naturally, this battery allows continuous operation for only approximately two hours, depending on which sensor is in operation. If it's the GPS sensor, it may only last about an hour. So, I thought it would be interesting to combine the useful with the necessary by introducing a new battery into the set. To do this without increasing the volume of the instrument, I built a chassis with a flip-out system similar to the tricorder featured in the series Star Trek: The Next Generation. The new battery will be fitted into the cavity shown in the photo and then sealed with an aluminum plate. A small HH switch will be able to switch between the internal 600 mAh battery or the external 1250 mAh battery with dimensions of 53 x 38 x 4 mm. I confess that in this way I managed to establish a real use for the flip-out system. Furthermore, the aluminum chassis provides extra rigidity to the set, maintaining handling comfort. The new battery will offer approximately 6 more hours of continuous use.