Smalls
Making the Fox Head
I'd never made a puppet head before but I'm pretty crafty and during my cosplay days I'd discovered the material Worbla, which is a thermoplastic that can be easily shaped when heated and has adhesive on one side that is also heat activated. When it cools it retains its shape and can be reheated over and over again. I've previously used it to make some pretty cool armor and uniquely shaped props so I thought it would be just what I needed.
That said, I always do better when I have a shape to place the Worbla over, so I headed over to thingiverse.com to see if there were any fox skulls 3D print designs that looked promising.
I found a Fennec Fox Puppet head base created by Tioh:

I scaled it down using my 3D printer slicer software Flash Print to be about 3-4 inches wide and sent it off to print. After a successful print, I began to cut out small pieces of Worbla and began applying it to the outside of the print with the shiny side facing out as this is the adhesive side that we'll need later to stick the fur to:

IMPORTANT: Heat the Worbla pieces away from the 3D print, as the PLA will start to warp when too much heat is applied.
After the 3D skull was completely covered with Worbla I cut out a section of faux fur and shaved it down using a beard trimmer. Don't go as short as you want the finished project as you'll do some more trimming once everything is assembled, but getting some of the bulk of the fur removed early on is helpful for attaching it to the 3D printed skull. This was SUPER messy, do this outside if you can.


I then traced lines on the back radiating out from areas I knew it would have to curve around the shape of the skill, generally radiating from the bridge of the nose. Using a utility knife, I carefully cut the lines.
Make sure to only cut through until the base of the fabric separates, do not chop any of the fur on the other side.

I then heated the Worbla on the 3D printed skull and began sticking the fur to the activated adhesive. This part is tricky because your PLA will also get warm enough to start to warp so as it cools make sure you're helping the plastics reform to the right positions. You may need to cut a few extra lines, trim off excess or otherwise manipulate the fabric to be where you need it.
I also had to cut a few extra few extra pieces that I did not trim the fur on that would go behind the ears so it was a smooth transition when I eventually create a body for the fox.
This wasn't an exact science, do what you have to do to make it look right.


I then trimmed out the eye shape with sharp pair of embroidery scissors.

The ears were created using trimmed down fur of the same color as the head and also some trimmed down white fabric. I didn't capture photos of the process but here are the step I followed:
1. Cut out a triangle shape out of cardboard and cut a slightly curved line along the bottom that follows the general slop of your fox head where the ears will be places.
2. Use this as a template to cut out the Worbla, make sure to flip the template over for the second one, as you need ears sloping in opposite directions.
3. Cut out fur slightly bigger than your template.
4. Cut a wooden dowel about 2 inches long, The dowel should be around 1/4 inch thick or less but don't go too thin.
5. Heat your Worbla to the point where it feels stick on both sides and put your dowel so it's 1/2 inch from the bottom of the ear in the center of your ear. Place your normal fur color to one side, and the white fur to dowel side, press firmly until cooled.
6. Re-heat and gently shape the ear so it has a small rounded fold around the edges and gently curve over all.
7. Repeat for the other ear.
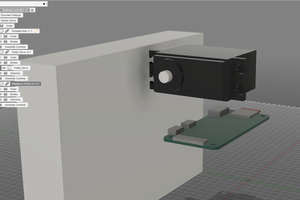
8. IMPORTANT: WAIT TO DO THIS STEP UNTIL YOU'RE READY TO MOUNT YOUR SEVOS. See further down in the instructions. Drill holes in the head the size of your dowel where the ears should be placed and insert ears....
Read more »
 mechanicalsquid
 Will Donaldson