 tom Meyers
Parameterized - IoT Confrigurator
The following is intended to illustrate the capabilities of my parameterized IoT configurator with an actual use. I recently wanted to measure the temperature and humidity in my house. I live in the Dominican Republic and like many houses mine is not air-conditioned except for the bedrooms as-needed.
I am interested in the temperature/humidity patterns inside so I can adapt myself and my rooms to maximize comfort and minimize electricity costs.
I used my confirator and library of IoT components to prepare my sensors software and then collect and analyze my data and ultimately act on that data. The following steps illustrate the capabilities of my components:
Step 1:
I chose an ESP32 with WiFi and a bunch of memory for my hardware platform, a DHT22 sensor for measuring temperature and humidity and an OLED 64x128 display. The hardware was cheap. I used a small project box and a 3D printed enclosure for the display.
I then used my parameterized configurator to combine an ESP32 software platform with 3 services: DHT22, OLED display and MQTT. I had previously written those components but this is the first time I combined them. Here is the surprise: I did not write any new code for this project!
Step2:
I used my configurator to choose software components from my library and it wrote the code. My library components are each 2 files file1 is primarily the prompts for name value pairs. Each prompt includes the name, default value, regex to validate and descriptive text. That file also contains rules for consumption of resources like pins used that is later used to test for resource conflicts. File2 is the source code with references to name/values. Thus, the name values and code are used together to produce a working service. And each service participates with a pub/sub event driven platform.
Here is the first file for my dht22 sensor:
<namevalue> <DHTPIN> <23>
<\A[0123456789]\Z|\A[0123456789][0123456789]\Z>
<pin number for data from 0 to 99>
<namevalue> <DHTTYPE> <DHT22>
<\A[0-9A-Za-z]+\Z>
<Type of DHT; Types defined in DHT library>
<namevalue> <INSTANCENAMEOUTQUOTED> <"mqtt">
<\A"[0-9A-Za-z]+"\Z> <Where to send the write event>
<description> <This DHT22 is a one-wire device for measuring temperature and
humidity; the sensor or driver is finicy so there is some
error recovery included.>
<resource> <DHTPIN> <\A[0123456789]\Z|\A[0123456789][0123456789]\Z> <PIN$0> <exclusive>
Here is the DHT22 sensor code:
//===== DHT22 Sensor Implements:
// constructor
// event listener
// (vdd)=(data)=(NC)=(Gnd)
#include "DHTesp.h"
DHTesp dht;
class CLASSNAME {
public:
CLASSNAME() {
dht.setup(DHTPIN,DHTesp::DHTTYPE);
registerListener("*",
INSTANCENAMEQUOTED,"read",INSTANCENAMEQUOTED,listener);
queueEvent(2, INSTANCENAMEQUOTED,0, INSTANCENAMEQUOTED, "read", "");
}
//=========================================================================
static void listener (Event event) {
if(event.eventCode == "read") {
int i;
Serial.print("Read DHT22:");
for(i = 0;i < 5; i++) {
ComfortState cf;
float humidity;
float tempF;
float tempC;
TempAndHumidity newValues = dht.getTempAndHumidity();
Serial.print(".("); Serial.print( dht.getStatus()); Serial.print(")");
if (dht.getStatus() == 0) {
tempC = newValues.temperature;
tempF = (9.0f * tempC / 5.0f) + 32.0f;
humidity = newValues.humidity;
float heatIndex
= dht.computeHeatIndex(newValues.temperature, newValues.humidity);
float dewPoint
= dht.computeDewPoint(newValues.temperature, newValues.humidity);
float cr = dht.getComfortRatio(cf, newValues.temperature, newValues.humidity);
String comfortStatus;
switch(cf) {
case Comfort_OK:
comfortStatus = "Comfort_OK";
break;
case Comfort_TooHot:
comfortStatus = "Comfort_TooHot";
break;
case Comfort_TooCold:
comfortStatus = "Comfort_TooCold";
break;
case Comfort_TooDry:
comfortStatus = "Comfort_TooDry";
break;
case Comfort_TooHumid:
comfortStatus = "Comfort_TooHumid";
break;
case Comfort_HotAndHumid:
comfortStatus = "Comfort_HotAndHumid";
break;
case Comfort_HotAndDry:
comfortStatus = "Comfort_HotAndDry";
break;
case Comfort_ColdAndHumid:
comfortStatus = "Comfort_ColdAndHumid";
break;
case Comfort_ColdAndDry:
comfortStatus = "Comfort_ColdAndDry";
break;
default:
comfortStatus = "Unknown:";
}
if (tempC > 15.0) { // Reasonability check
Serial.println(">>>>> DHT22 Status: " + String(dht.getStatusString()));
queueEvent(1,INSTANCENAMEQUOTED,0,
INSTANCENAMEOUTQUOTED,"write","raw,,,,,,,DHT22CFH"
+ (String) "," + (String) tempC
+ (String) "," + (String) tempF
+ (String) "," + (String) humidity
+ (String) "," + (String) heatIndex
+ (String) "," + (String) dewPoint
+ (String) "," + (String) comfortStatus
+ (String) "," + (String) cf
);
break;
}
dht.setup(DHTPIN,DHTesp::DHT22); // Try to reset
Serial.println(">>>>> Reset DHT");
}
delay(2250);
};
Serial.print("\n");
if(i >= 5) {
ESP.restart();
}
queueEvent(2, INSTANCENAMEQUOTED,0, INSTANCENAMEQUOTED, "read", "");
return;
}
}
}
};
CLASSNAME INSTANCENAME;
Here is a screen shot of the configurator:
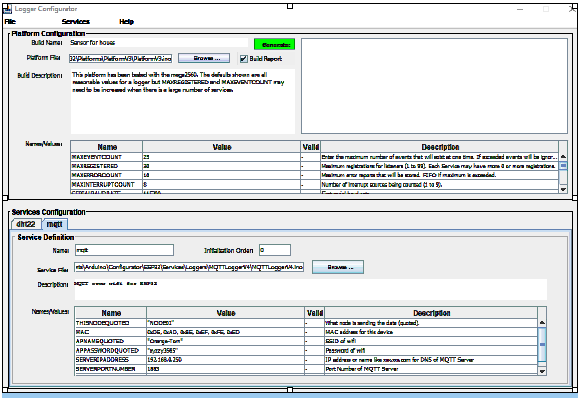
Again, I wrote no code for this project. The data (NV's) and the code are combined to create a class and instantiate it. Easy!
Step3:
I configured my database to receive data from my new sensor. I added its name to the list of valid sensors and added a list of valid measure types (TempF, TempC, . ..)
I have an MQTT instance running and a db writer that subscribes to data coming from sensors. It uses a configuration file to direct what it subscribes to. I added my sensor to that file.
Step4:
At this point my sensor is running, sending MQTT messages to the MQTT broker, the Broker is forwarding messages to the db writer and data is accumulating in my db (SQL Server).
To examine my data graphically I use a web page to query my database:
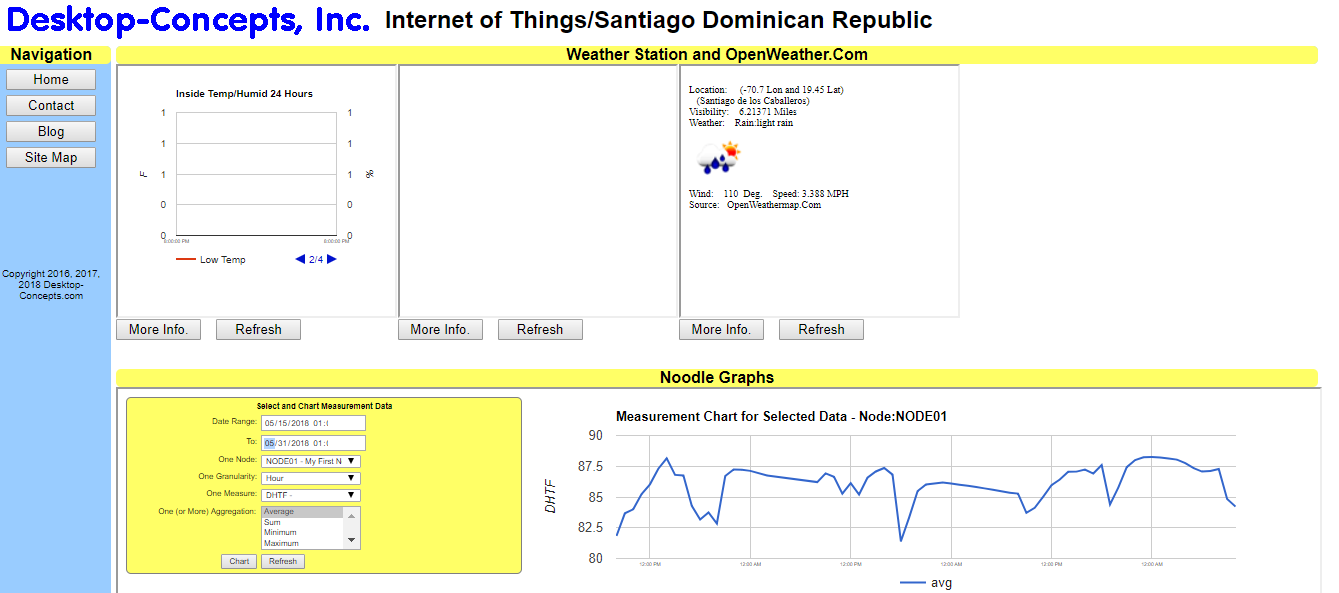
This is my general interface to my db data. I am collecting data from my weather station and from a weather service. I use my "data noodle" to query and graph my data. The web pages use websockets to send a uniform/generalized query to a node-red JS service for my IoT database and I display the graph using GoogleCharts.
Still I have not written any code.
Next Steps:
I will build 3-4 more of these sensors (HW/Software) that will be deployed in other rooms of my house. I hope to reduce my energy costs and increase my comfort.
I have started building a solar powered sensor that for now only measures the Solar Panel but later will be used for wireless connections.
Take Aways:
I designed and implemented my IoT framework for generality so that my future uses would extend what I built and not require changes. Using the parameterized configurator made that possible.
The event driven OS, written in straight-up arduino C, has been used on three different Arduino hardware types. Putting inter service messaging and task displatch in one place simplifies sequencing and uses a tested/proven framework. I
My code implements a singular interface for components: an event with from,to,type,values and a publication/subscription protocol. That standardization makes adding more sensor types easy. Uniformity makes extensions easy. Uniformity and division of responsibility made this system easy to develop, debug, explain and extend.
The configurator is the way to go for situations where different clients have different needs for the same software. In my case it was different combinations of sensors, logging, hardware platform. The solution was not to write one program that includes the code for all variations because of the resource constraints of the hardware platform. By adapting.configuring/parameterizing your code you can reduce memory, storage and cpu bloat.
My code is available if you are interested.