 Neil K. Sheridan
[ u n d e r c o n s t r u c t i on ]
This causes a lot of problems, evidenced if you search for issues related to it on the web! And it caused me a lot of problems certainly! So I'm writing this guide to illustrate approaches and things that can go wrong + fixing them.
Please check you have Raspian "Jessie" as the OS on the Pi first! And that you don't have a small or nearly full SD card.
I'm going to add screen-recordings of the installations to help!
USING MAKEFILE TO BUILD TENSORFLOW
This is from the install guide here: https://github.com/tensorflow/tensorflow/tree/master/tensorflow/contrib/makefile
This is an alternative to using bazel to build TensorFlow. You compile the TensorFlow and Protobuf libraries. Here's what protobuf is if you hadn't heard of it: https://github.com/google/protobuf
1. Clone the TensorFlow repository to the Pi. git clone https://github.com/tensorflow/tensorflow.git
2. Run the download_dependencies.sh script that TensorFlow team have written. You can see it here https://github.com/tensorflow/tensorflow/blob/master/tensorflow/contrib/makefile/download_dependencies.sh and you'll have it on your Pi at tensorflow/contrib/makefile/download_dependencies.sh . This will download all the required dependencies. This is one of the ways I got in a mess because I tried to get them all individually, and got in a muddle.
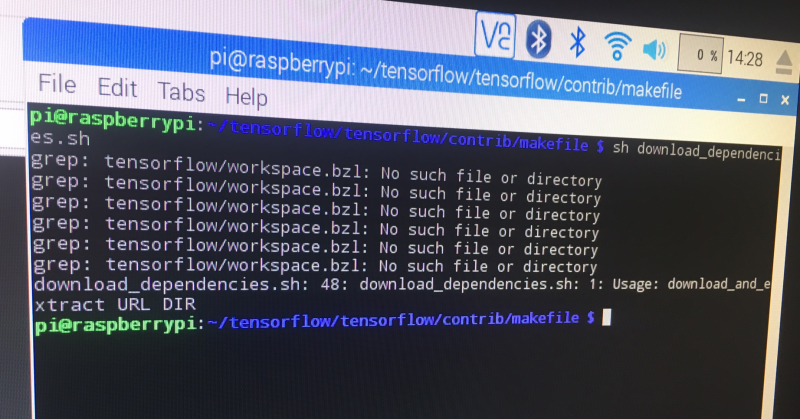
(e r r o r) So this was the point of the first error! Here is it below! tensorflow/workspace.bzl didn't exist! And if you look at the download_dependencies.sh script, you'll see it wants to use that directory! Ah well this was because the TensorFlow repository has been written to tensorflow/tensorflow instead
of just tensorflow!
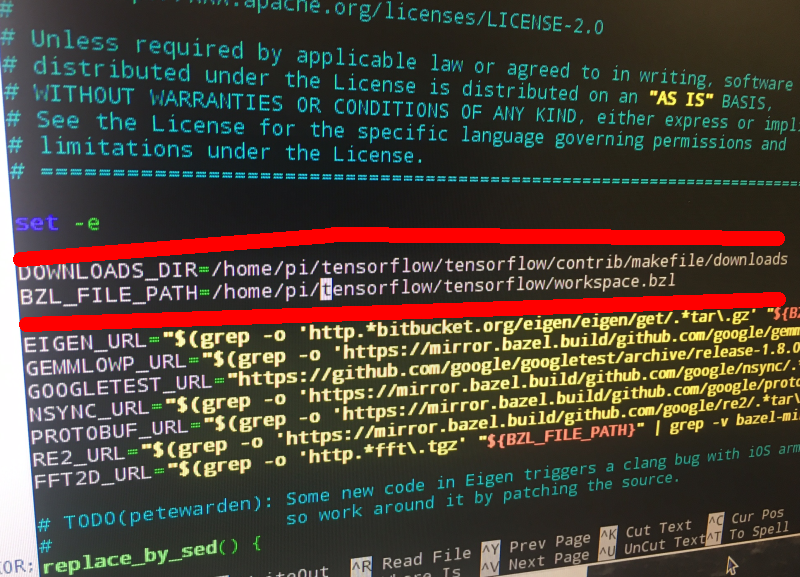
So to fix this error, we have to edit download_dependenices.sh! Let's go and do it with the sudo nano command. It's in the directory tensorflow/tensorflow/contrib/makefile/ . So we change the lines
DONWLOAD_DIR= and BZL_FILES_PATH= to the correct directories. See below image, I have changed them to
/home/pi/tensorflow/tensorflow/ . Now we can run the download dependencies script without an error!
Here's what you should see when you run the script!

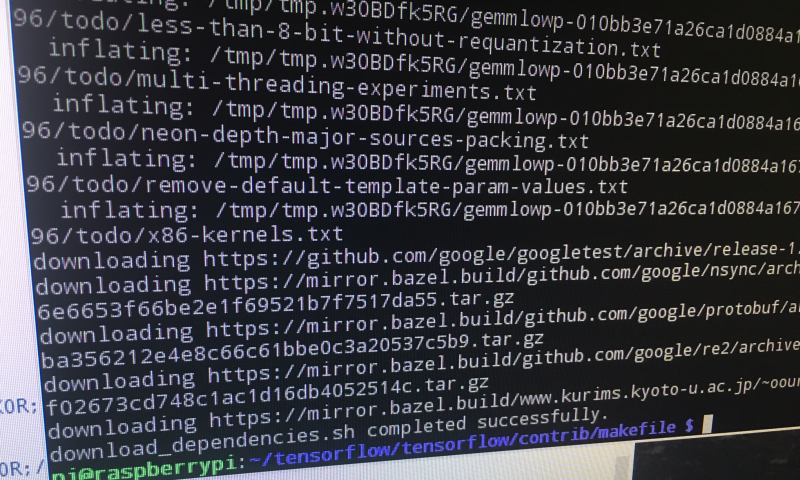
Great! So that bit is done!
3. Download the example graph for testing . Here it is: https://storage.googleapis.com/download.tensorflow.org/models/inception5h.zip
4. Now with
sudo apt-get install -y autoconf automake libtool gcc-4.8 g++-4.8
we will get our packages for installation. So the packages are:
autoconf https://www.gnu.org/software/autoconf/autoconf.html for auto configuration
automake https://www.gnu.org/software/automake/ to auto generate makefile.in
libtool https://www.gnu.org/software/libtool/ support for working with shared libraries
gcc-4.8 gcc 4.8 compiler https://gcc.gnu.org/onlinedocs/4.8.1/ this is used instead
** note that gcc 4.8 is used instead of gcc 4.9 which is installed on the Pi OS, because 4.9 is known to encounter an error involving __atomic_compare_exchange.
g++ 4.8 compiler
I didn't have any problems with that bit! But it did take quite a while i.e. 30 mins+
5. Building protobuf:
cd tensorflow/contrib/makefile/downloads/protobuf/
./autogen.sh
./configure
make
sudo make install
sudo ldconfig  # refresh shared library cache
cd ../../../../.. (so back to tensorflow directory)
export HOST_NSYNC_LIB=`tensorflow/contrib/makefile/compile_nsync.sh`
export TARGET_NSYNC_LIB="$HOST_NSYNC_LIB"
(e r r o r) Now we encountered the second error! This occurs when you attempt the first export command! Permission was denied to mkdir! Specifically "cannot create directory tensorflow/contrib/makefile/downloads/nsync/builds/default.linux.c++11 Permission Denied"
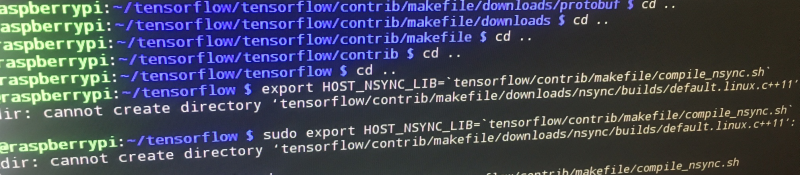
So that's because of the permissions. I went ahead and used chmod so change them!

You can see above I used sudo chmod -R 777 tensorflow to set permission for all subdirectories and files to 777. So that's as loose as it gets for permissions! You can calculate the permission numbers with this tool: https://chmod-calculator.com/ Anyway, as you can see, that worked out fine. You can change them back to something more secure afterwards.
6. Now compile the TensorFlow library using Makefile:
make -f tensorflow/contrib/makefile/Makefile HOST_OS=PI TARGET=PI \
 OPTFLAGS="-Os -mfpu=neon-vfpv4 -funsafe-math-optimizations -ftree-vectorize" CXX=g++-4.8
Ok, so this takes a long time! The first time I did it, it actually crashed the Raspberry Pi. Maybe because I'd allocated extra memory to the GPU for a camera project?
Here's a Tensorflow GitHub issue regarding the crashing when compiling training_ops:
https://github.com/tensorflow/tensorflow/issues/13176
You can see what MakeFile does here: https://github.com/tensorflow/tensorflow/blob/master/tensorflow/contrib/makefile/Makefile
7. Testing your build!
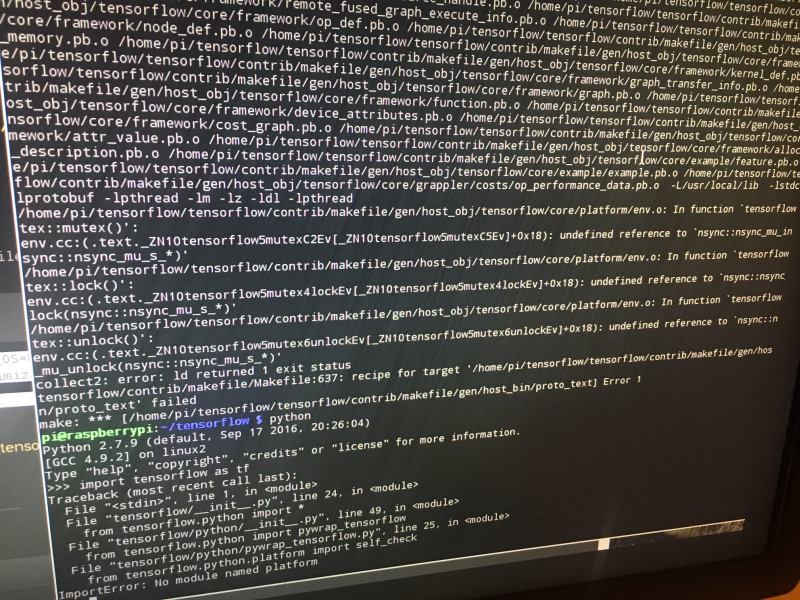
You can go ahead and run python then try importing TensorFlow with "import tensorflow as tf" or as anything you'd like to be a bit different!
Here's a screengrab of me trying this after a failed build. This failed because of the error with "export HOST_NSYNC_LIB=`tensorflow/contrib/makefile/compile_nsync.sh`" mentioned above.
Testing according to TensorFlow GitHub guide
Ok, so on the makefile section of the TensorFlow GitHub they have this testing method for Raspberry Pi:
curl https://storage.googleapis.com/download.tensorflow.org/models/inception_dec_2015_stripped.zip \
-o /tmp/inception_dec_2015_stripped.zip
So that's use curl to download the Inception model, and write it to local file -o /tmp/inception_dec_2015_stripped.zip
Then it is:
unzip /tmp/inception_dec_2015_stripped.zip \
to unzip the file, and then it is:
-d tensorflow/contrib/pi_examples/label_image/data/
to post the extracted data from that zip to the above directory (tensorflow/contrib/pi_examples/label_image/data
Then they have:
make -f tensorflow/contrib/pi_examples/label_image/Makefile
And afterward, you can use tensorflow/contrib/pi_examples/label_image/gen/bin/label_image with the grace hopper image you got in that zip. The reason you use Makefile is because the https://github.com/tensorflow/tensorflow/blob/master/tensorflow/contrib/pi_examples/label_image/label_image.cc is written in C++ so it needs compiling with gcc! Since we are using Makefile we use that to compile it. Usually it is done using bazel e.g. https://github.com/tensorflow/tensorflow/tree/master/tensorflow/examples/label_image
It's all detailed in their guide here: https://github.com/tensorflow/tensorflow/tree/master/tensorflow/contrib/pi_examples
Testing with Python
Ok, so there is a label_image.py too! Here it is: https://github.com/tensorflow/tensorflow/blob/master/tensorflow/examples/label_image/label_image.py with argparse
You will need to pass it the following arguments
1. --image to label
2. --graph (e.g. tensorflow/examples/label_image/data/inception_v3_2016_08_28_frozen.pb)
3. --labels (e.g. tensorflow/examples/label_image/data/imagenet_slim_labels.txt)
===========
Additional instructions to prevent screen blanking:
https://www.raspberrypi.org/forums/viewtopic.php?f=91&t=57552
You can free resources by disabling the GUI on Raspberry Pi:
Use sudo raspi-config and select boot options. Set boot option to console text console
You can also run the Pi headless to free resources:
Find you Pi's IP. Then use SSH from another computer with
ssh pi@<IP>Pi is the username, and you'll need to enter your password. The default is raspberry. But it would be best to change this if you are exposed to internet!
Discussions
Become a Hackaday.io Member
Create an account to leave a comment. Already have an account? Log In.