Why RISC-V? Our goals in defining RISC-V include:
A completely open ISA that is freely available to academia and industry.
A real ISA suitable for direct native hardware implementation, not just simulation or binary translation.
An ISA that avoids "over-architecting" for a particular microarchitecture style (e.g., microcoded, in-order, decoupled, out-of-order) or implementation technology (e.g., full-custom, ASIC, FPGA), but which allows efficient implementation in any of these.
An ISA separated into a small base integer ISA, usable by itself as a base for customized accelerators or for educational purposes, and optional standard extensions, to support general-purpose software development.
Support for the revised 2008 IEEE-754 floating-point standard.
An ISA supporting extensive user-level ISA extensions and specialized variants.
32-bit, 64-bit, and 128-bit address space variants for applications, operating system kernels, and hardware implementations.
An ISA with support for highly-parallel multicore or manycore implementations, including heterogeneous multiprocessors.
Optional variable-length instructions to both expand available instruction encoding space and to support an optional dense instruction encoding for improved performance, static code size, and energy efficiency.
A fully virtualizable ISA to ease hypervisor development.
An ISA that simplifies experiments with new supervisor-level and hypervisor-level ISA designs.
What's Available?
Right now, you can download the final user-level ISA specification, and RISC-V software tools including aGNU/GCC software tool chain, GNU/GDB debugger, an LLVM compiler, an ISA simulator, QEMU, and averification suite.
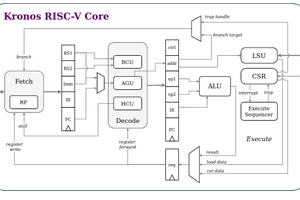
The Sodor repository of educational RISC-V cores, written in Chisel is also available. The cores include a microcoded processor, an unpipelined processor, and 2, 3, and 5-stage pipelines. We plan to open-source our Rocket core (a 64-bit RISC-V single-issue in-order core) generator.
The zynq-fpga repository contains infrastructure for implementing Rocket cores on Zynq FPGAs, like the Zybo and ZedBoard.
To sample the architecture without installing anything, try out ANGEL, a JavaScript ISA simulator that boots an interactive session of riscv-linux on a simulated RISC-V machine in your browser.
Our intent is to provide a long-lived open ISA with significant infrastructure support, including documentation, compiler tool chains, operating system ports, reference software simulators, cycle-accurate FPGA emulators, high-performance FPGA computers, efficient ASIC implementations of various target platform designs, configurable processor generators, architecture test suites, and teaching materials. Initial versions of all of these have been developed or are under active development. This material is to be made available under open-source licenses.
 Sonal Pinto
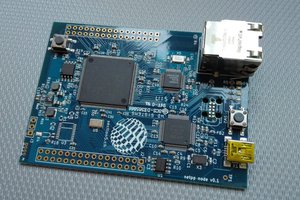
 Martin
 Ted Fried
 Vicharak