 Fábio Gil
Now the ALU is done! So, the system have a Arithmetic Unit and a Logic Unit, that works in the same place. We can make some operations like ADD (addiction)/SUB (subtraction) Arithmetic operations (in binary), and AND, OR and XOR/NOT Logic operations (in binary). A circuit of selection has been constructed using Multiplexers, because the result is shown with only one operation at a time in ALU. To select an operation, the ALU have a set of control bits like (/XOR|NOT, /ADD|SUB, ALU_1 and ALU_0). We can follow the table content into figure bellow to understand:
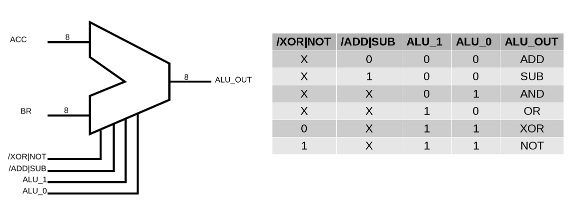
Note: "X" means "don't care"
The result of operation can be transferred to BUS to be processed/stored by another modules, using the ALU_OUT control bit. The ALU use ACC and B registers (see the first videos about this registers) for input parameters, except in NOT operation that only ACC register is used. For while, all operations can be performed manually. Some problems start appear on the system in this moment, mainly the power distribution, that is normal because of system growing up. The total current of system can reach over than 500mA now. Because of this my power supply has been replaced.
The video bellow show all the process of ALU step by step.
Note: This video have English subtitle, that you can activate on You-tube Player.
Discussions
Become a Hackaday.io Member
Create an account to leave a comment. Already have an account? Log In.