 Anthony
Seeing as this is my first project working with a variant of the RasPi, I will admit I do have some gripes with it. This is especially the case if one has worked with, for example, the Beagle Bone Black before. While I didn't expect the Pi to be anywhere as capable of a board, I was rather surprised that even some standard features found on seemingly much more 'simple' boards (like the Arduino Uno) that either are not present on the Broadcom chip, or simply haven't been fully broken out to the GPIO.
Sound on the RasPi is a strong example of this. While I knew going in that only output and not recording capabilities were present, I thought going in that there might instead simply be the possibility of using the on-board ADC to create in software a basic recording program suitable for voice commands.... Only, unlike almost every other board out there, the RasPi has no on board ADC. So, okay, it is only a few bucks to add an additional one.
Yet the disparities tend to go further as one realizes the Pi, even for a chip of its size only has two PWM pins available (where the original model had almost an unbelievable single pin only). My original plan was to use the two PWM pins to provide the proper DTMF signalling combinations with a low-pass filter to facilitate dialing.
Only yet another issue crops up here, which is of particular sensitivity in this case. There are, in fact, other PWM pins on the Broadcom chip itself, but in this case they are being used to provide the sound output, and seeing as this is essentially a sound only application here, stories of issues cropping up with playing sound while working with PWM started to make this sound like a further 'no-go'.
Yes, one could always go out and pick up a DTMF Tone Generator IC.... But then we are really starting to add a good deal of cost, which was part of the reason why the PI was the development platform in the first place (it is cheap).
Thus, seeing as one can pick up a USB sound card at places like Microcenter for a mere $10, cheaper than any of the above two options, in this particular case I ultimately decided in this case 'simpler is best'. I would have liked to do all this work simply on the board, but at the same time I think in the end it represents something of that 'engineering trap', of wanting to add certain portions of additional hardware, and thus have a more 'advanced' design, when really in the end, a cheaper (not to mention simpler) option already exists.
In any case, having tested I can say the Sabrent (or some other variant of C-Media chipset) is rather quite easy to set up. Adafruit has already complied a rather excellent guide on ID'ing the chipset and initial configuration posted here, so rather than restating things, I would go through that guide first.
One thing they do leave out though is the recording features of this card. I have, in the past, heard stories of people having difficulty getting audio recording to work. However, with the build of Raspian (2015-05-05) it seems to work for me basically 'out of the box'.
Once audio out as per the Adafruit guide is tested and running properly, one can test the recording capability by running the following from the terminal:
arecord -vv -fdat test.wavWhere Ctrl-C will cease recording.Then try playing the sound back via:
aplay test.wavThe one issue some people have run into is first one needs to ensure their mic/device is not muted in ALSA. The easiest way is via the mixer:alsamixer
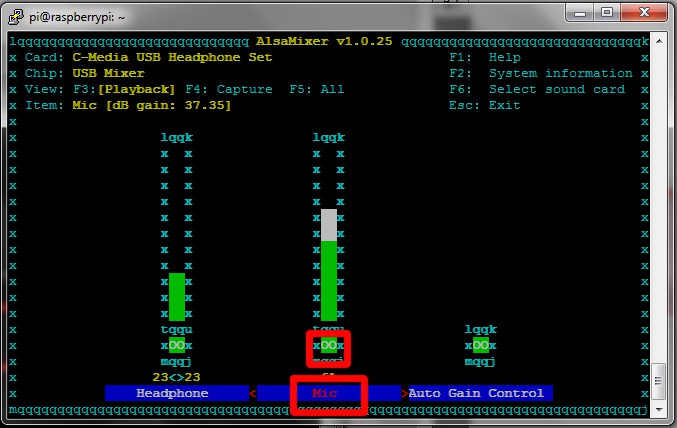
The important things to check here are then that 'Mic' is selected (and that it is the C-Media card you are using as in the upper left hand corner)-- Use the left and right arrow keys to navigate-- And that the second box in red reads 'OO', not 'MM' (which stands for 'mute'). A device can be 'unmuted' by pressing the 'M' key, and the volume level for each device is adjusted via the up/down arrow keys.
If you are having problem with recording, check these settings and try again.
Discussions
Become a Hackaday.io Member
Create an account to leave a comment. Already have an account? Log In.