 Michael Ratcliffe
Before you start, make sure you have a working Processing environment on your Pi. [See Tutorial-1]
This Tutorial Gave me a bit of a headache, I can not find much reliable information online using the GPIO pins from inside the Processing environment. Which is a shame because it is such a useful environment for those guys coming over from Arduino based electronics.
The only project I could find was this little snippet on git hub:
http://xseignard.github.io/2013/04/24/processing-and-gpios-on-raspberry-pi/
This tutorial implements the following steps to get GPIO’s working within Processing:
>Check System is up to date
>Download the Latest Pi4J library
>Unzip the library and rearrange its files into something Processing will accept
>Show us how to Run Processing as Root [Pi4j needs to be ran as root]
you are used to the Linux GUI and the use of Commands, then skip the Video and just read the tutorial. If this is your first time with a Raspberry Pi and are finding yourself a little lost making your way around the environment then use both the video and tutorial together.
Check System is up to date
Enter the following into the Command Terminal:
Sudo apt-get updateSudo apt-get upgradeDownloading the Latest Pi4j
Pi4j Has moved to: www.pi4j.com
Do not install it as recommended on the website, to make it work with processing you will have to follow the rest of the steps.
Download the : pi4j-1.0.zip [http://pi4j.com/download.html]
Re-structuring Pi4j
Once the Download has finished Copy the zip file into your:
Home/pi directory
The Run the Following command in the Terminal:
unzip pi4j-1.0.zipSince Processing is not happy when a lib have something else than letters and numbers in the lib name, you need to rename the unzipped folder:
(see http://wiki.processing.org/w/How_to_Install_a_Contributed_Library).
mv pi4j-1.0 pi4jThen you need to re-arrange files to stick with the Processing convention:
mv pi4j/lib pi4j/librarymv pi4j/library/pi4j-core.jar pi4j/library/pi4j.jarNow you can put the lib in the Processing library folder (defaults to ~/sketchbook/libraries).
mv pi4j sketchbook/librariesRunning as Root
cd ~/processing-2.2.1/sudo su ./processing
Now that you are logged in to Processing, click on file>preferences

Make Sure the Sketchbook Location is /Home/PI/Sketchbook
Testing
Processing should start up, it is a good idea to check that the "clock" example will still compile and run before moving onto testing GPIO's.
Gpio Testing:
Connect a button as shown, or use some jumper wires to make the following circuit:
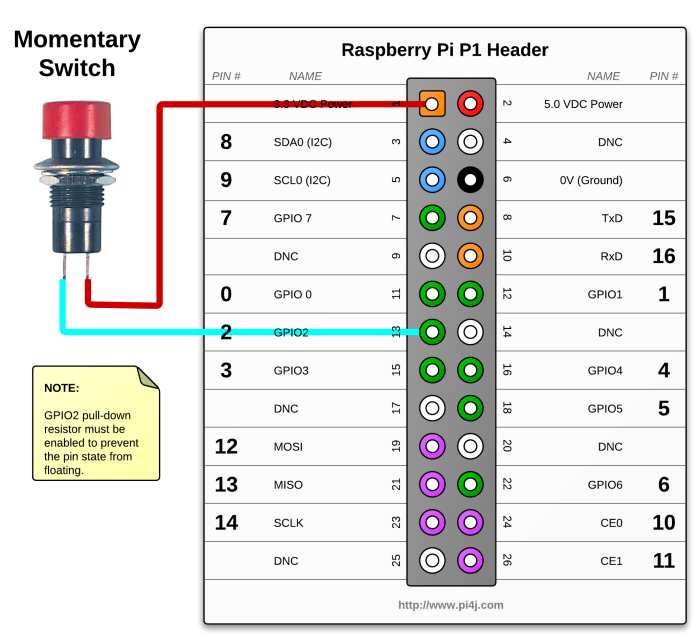
For an explanation of Pin-outs see: www.pi4j.com
Here is the Sketch that comes along the Image from above (borrowed from http://pi4j.com/).
Copy and Past This Code into a processing window and run it:
import com.pi4j.io.gpio.GpioController;
import com.pi4j.io.gpio.GpioFactory;
import com.pi4j.io.gpio.GpioPinDigitalInput;
import com.pi4j.io.gpio.PinPullResistance;
import com.pi4j.io.gpio.RaspiPin;

int WIDTH = 1280;
int HEIGHT = 1024;
GpioController gpio;
GpioPinDigitalInput button;

void setup() {
    size(WIDTH, HEIGHT);
    gpio = GpioFactory.getInstance();
    button = gpio.provisionDigitalInputPin(RaspiPin.GPIO_02, PinPullResistance.PULL_DOWN);
}

void draw() {
    if (button.isHigh()) {
        println("pressed");
        fill(int(random(255)), int(random(255)), int(random(255)));
        float x = random(WIDTH);
        float y = random(HEIGHT);
        ellipse(x, y, 80, 80);
    };
}
When You press the button [or bridge the correct pins with a jumper] A sphere should appear on the new screen, If it doesn't then check you have the correct sketch folder defined under file>preferences.
Dont Forget To like, Share and Get involved with the "Hackers Solution to World Hunger" Project. The next Tutorials:
>Raspberry Pi, Camera and Processing, Bringing Vision Based Control To Your Projects
>How To make an Image Useful To a Computer Program
Discussions
Become a Hackaday.io Member
Create an account to leave a comment. Already have an account? Log In.