 zakqwy
... and I'd love your feedback. Seriously! This is design iteration number 8, and I'm ready to lock it down and put in a major CFRP order. I'm planning on sleeping on this and maybe tinkering a bit more tomorrow or Tuesday, but I don't want to make many more changes. Time to build a prototype.
A few quick (and rough) specifications for v08:
- Weight: 1850g
- Thrust:Weight Ratio: 1.5:1
- Estimated Battery Life: 6-8 minutes
Okay, so what's new? Be brief, Zach!
No more reaction wheel. I've gone in to depth on this decision previously, so I won't belabor the point here; needless to say, this choice makes a lot of things simpler and lighter:
- No more slip ring
- No more power converter
- No more large hollow shafted brushless motor
- No more additional brushless motor controller
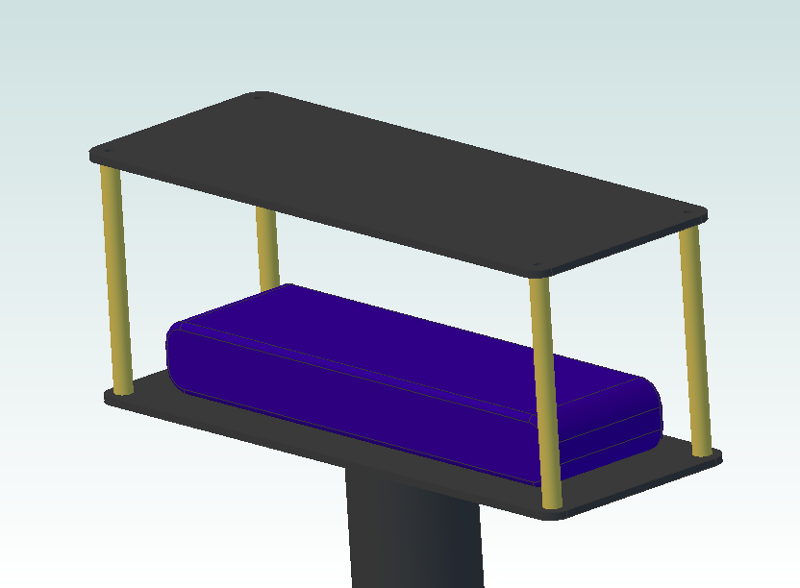
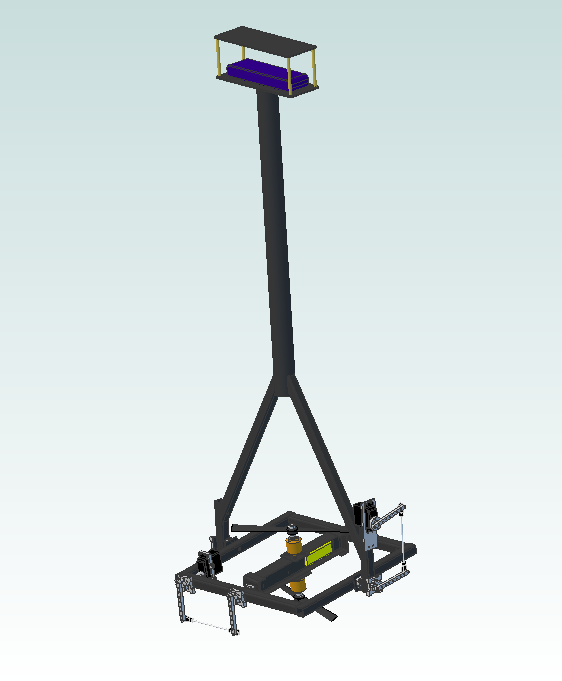
See? Isn't that a simpler battery compartment? Also notice the largeness of the battery; I'm using a 3S 6000mA unit. The Arduino and various other bits will mount to the underside of the top plate.
Back to the original X/Y thrust vectoring design. It's somewhat proven and should dramatically improve reaction time (again, see the previous post; I'm talking 50 Hz vs 6 Hz, so nearly an order of magnitude improvement. At least on paper...).
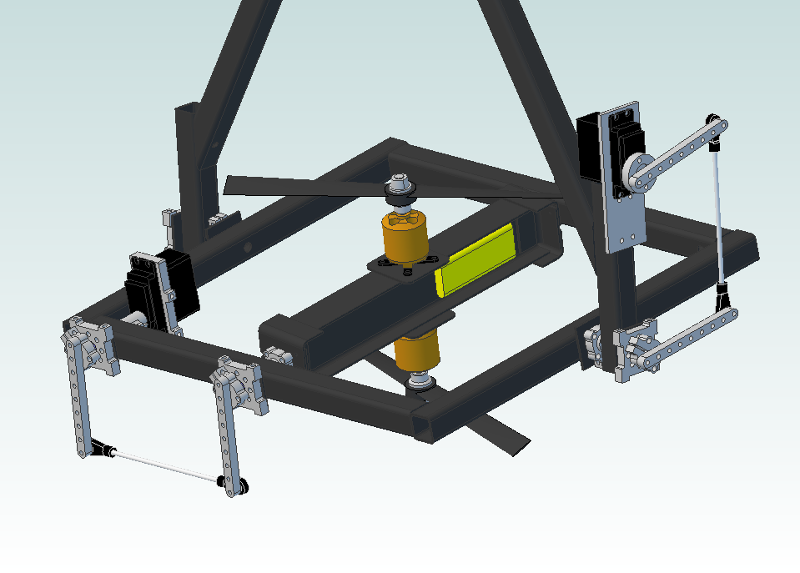
Yeah, I know the linkages aren't quite parallel... I got a bit lazy with my measuring. Stuff to note here:
- All of the aluminum bits are Actobatics parts that I can get easily. The models should be fairly accurate assuming the drawings are good on their site; the parts are likely a bit lighter than estimated since I didn't include all of the holes. K.I.S.S. is in full effect here; I could shave some weight off by custom machining stuff, but I don't have a machine shop. These parts are all in stock.
- Linkage arms are long for a reason; I can't find a reliable spec on servo resolution (most stuff I read online for the digital units seems to be in the 0.25-0.5 degree range). If resolution and chatter prove to be an issue, I can adjust the linkage ratios down a bit; conversely, I can also speed things up a bit if the servos are beefy and accurate enough. Either way, I'll probably hand-trim the linkages after figuring out which holes are best.
More power!! You noticed that thrust:weight ratio, right?? Yeah, I'm hoping to see maximum thrust in the 2.8kg range. How?
- 9" CFRP props (already on hand, and in the model)
- 1350kV/400W motors (not in the model, but similar in size and weight)
- 50amp+ ESCs (also not in the model)
Back-calculating from the prop thrust tester, I'll need ~10k rpm to hit 1.8kg thrust at about 170W/motor. Given 80% motor efficiency and a bit of extra power draw from sensors, controllers, servos, etc, I'm estimating average power consumption at 500W or so. 6000mA 3S battery-->66W-hr capacity-->8ish minutes of run time at a hover. I'll take it, even if it's half that figure in reality.
Stuff that isn't shown (but is included in the weight estimate)
- Arduino Due
- 9DOF sensor stick
- Motor tachs
- Wire and connectors
- RC stuff (this likely comes later)
- Gussets/plates for the CFRP square tube joints
- LANDING GEAR!
More to come early this week. Comments welcome!
- Zach
Discussions
Become a Hackaday.io Member
Create an account to leave a comment. Already have an account? Log In.
The only other thing that you should probably add to your shopping list is a good supply of spare props!
Are you sure? yes | no
- The motor controllers are fairly close to the motors themselves; ideally, this will keep most of the noise a solid meter away from the control circuitry. I should probably scope the speed controller power wires on the test rig to see how the controllers affect the power loop.
- Think the CFRP tube is conductive enough to use as a shield? If I can ground it, maybe I could run the power wires along the outside and stuff all the signal wires into the hollow portion of the frame.
- I'll keep the twisting recommendation in mind. Fortunately, silicone wire is super flexible.
- Think I should spring for shielded cable for the servo controls? I'll definitely use it for the tachs. How would I set up a differential pair for PWM servos, since they're single-ended? I would need some circuitry near the servos themselves, right?
- Props are, miraculously, quite cheap. I've got a few sets and will probably spring for a few more. The CFRP ones in particular are fairly brittle.
Thanks Curtis!
Are you sure? yes | no
Are you sure? yes | no
Are you sure? yes | no
How do you plan to test this thing? A test plan would be a good idea, since there might be some physical, electrical, and software hooks you want to add for debug, etc.
At some point you're probably going to want to untether it and let it fly free... and it will crash. You mentioned landing gear, but I would be more pessimistic and look at protecting everything. I'm most concerned about the unguarded rotors and linkages. It wouldn't take much of a hit to kill those servos.
A neat approach would be something like NASAs super ball bot, which uses a tensegrity based super structure to absorb impacts. Fun fact, one of the younger guys from Case is working on that robot.
Are you sure? yes | no
1. Fully constrained testing. I'll likely build an adapter for my thrust testing rig that clamps around GimbalBot's tube frame; this will allow me to verify static thrust, work the bugs out of the tachs, and test the servo actuation under load.
2. Laterally constrained testing. I'll support GimbalBot using a few rings around the tube frame, suspended by wires on a frame in my basement. This will allow a foot or so of free vertical movement while preventing forward/backward or side-to-side pitching. This testing routine will be used to start fiddling with the vertical stability loop and to quantify roll axis response rate.
3. Tethered testing. I'll modify the laterally constrained testing rig to give GimbalBot a bit more leeway in the pitching axes; this will allow me to start tuning the other stability loops and quantify the control response rate from the servo mechanisms. In particular, I want to figure out linkage ratios here. The tethers will mostly be in place to keep GimbalBot from crashing.
4. ??? That's about as far as I've gotten at this point. What's the next step before fully untethered outdoor flight?
Good call on the servos; I was focused on protecting the props and reinforcing CFRP joints, but I didn't think about linkage protection; even a moderate hit on any part of the pitch ring will send a severe shock through the servo linkage and probably strip out a gear or two. The units I'm planning to use have titanium gearboxes and are pretty stout, but they also aren't cheap by any stretch of the imagination.
Maybe a mechanical fuse of some kind? I wonder if I could modify the servo arm linkage assembly to deliberately break away if I exceed a certain torque value. Might be as simple as replacing the linkage mounting bolts with nylon rivets or something.
I had to look up 'tensegrity structure'; I've seen those setups before, totally fascinating. It seems like I could make a large, lightweight safety cage using pulltruded CFRP rods and Kevlar thread. As long as I can keep it under 50 grams or so, that would be waaaay better than landing gear.
Are you sure? yes | no
Are you sure? yes | no
Are you sure? yes | no