WJCarpenter
-
Shower tower
03/11/2024 at 00:11 • 0 commentsMy design for the tiles around the faucet, shower arm, and tub spout is a blend of aesthetics and pragmatism.
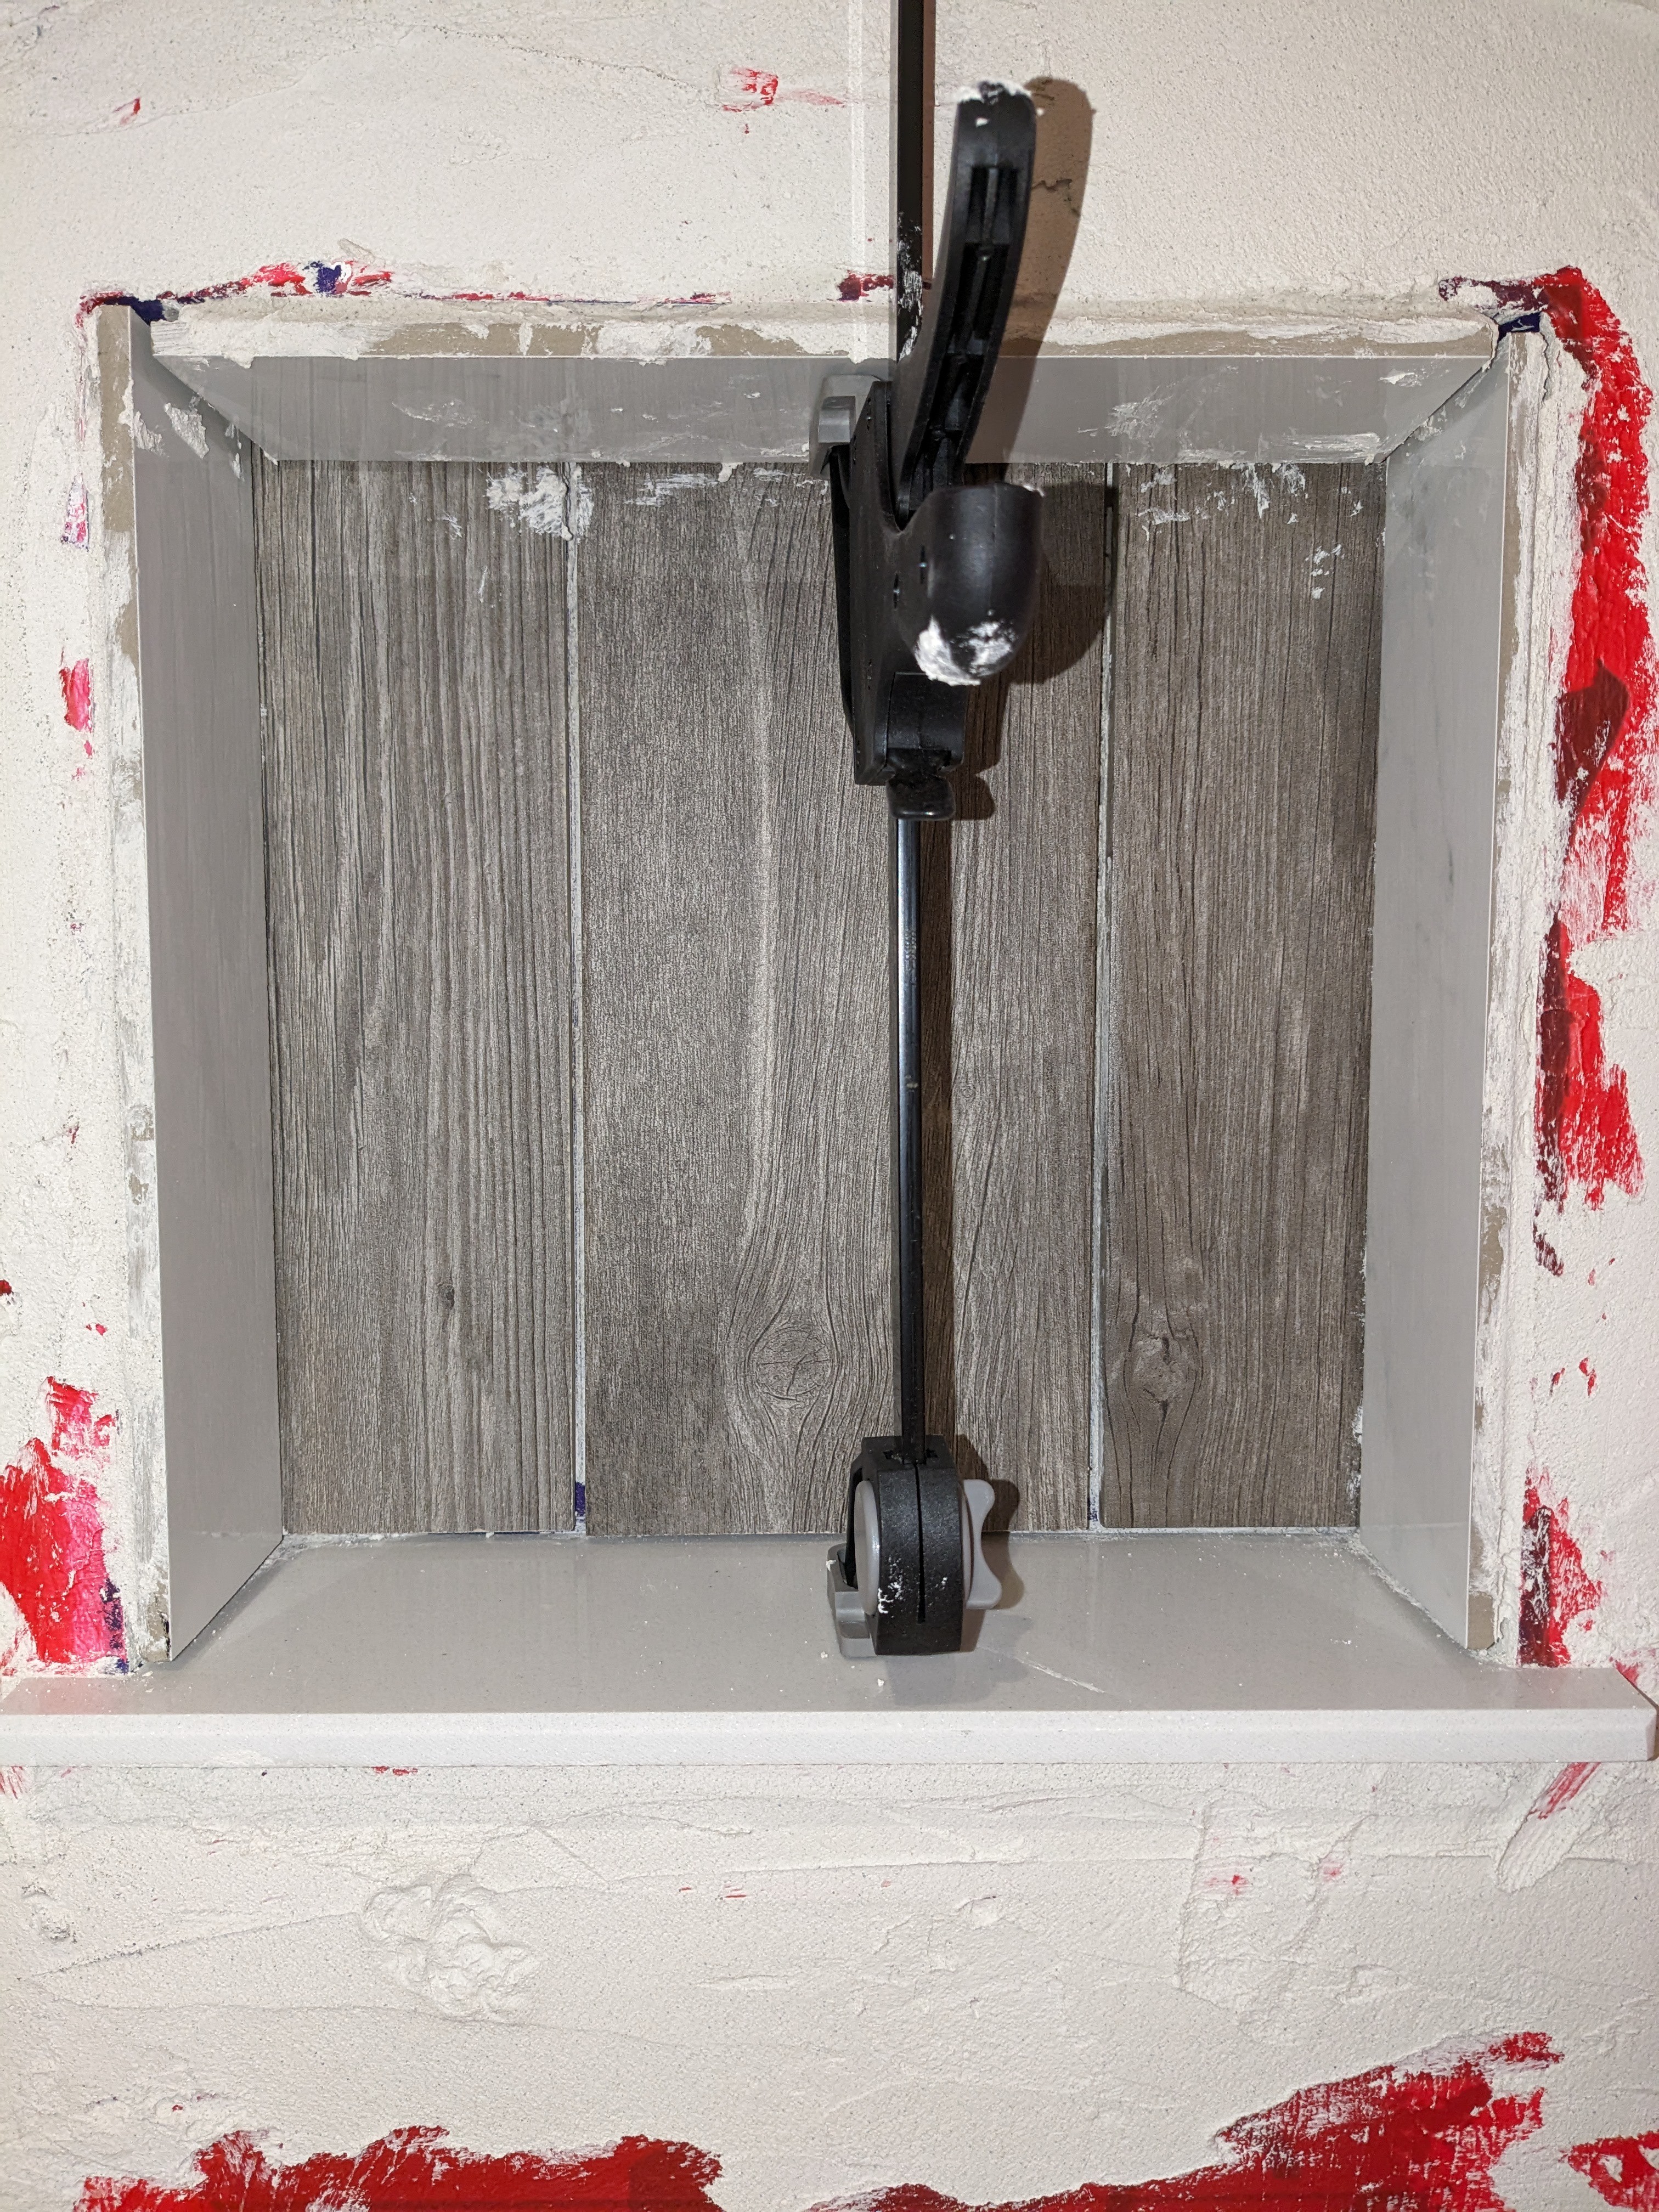
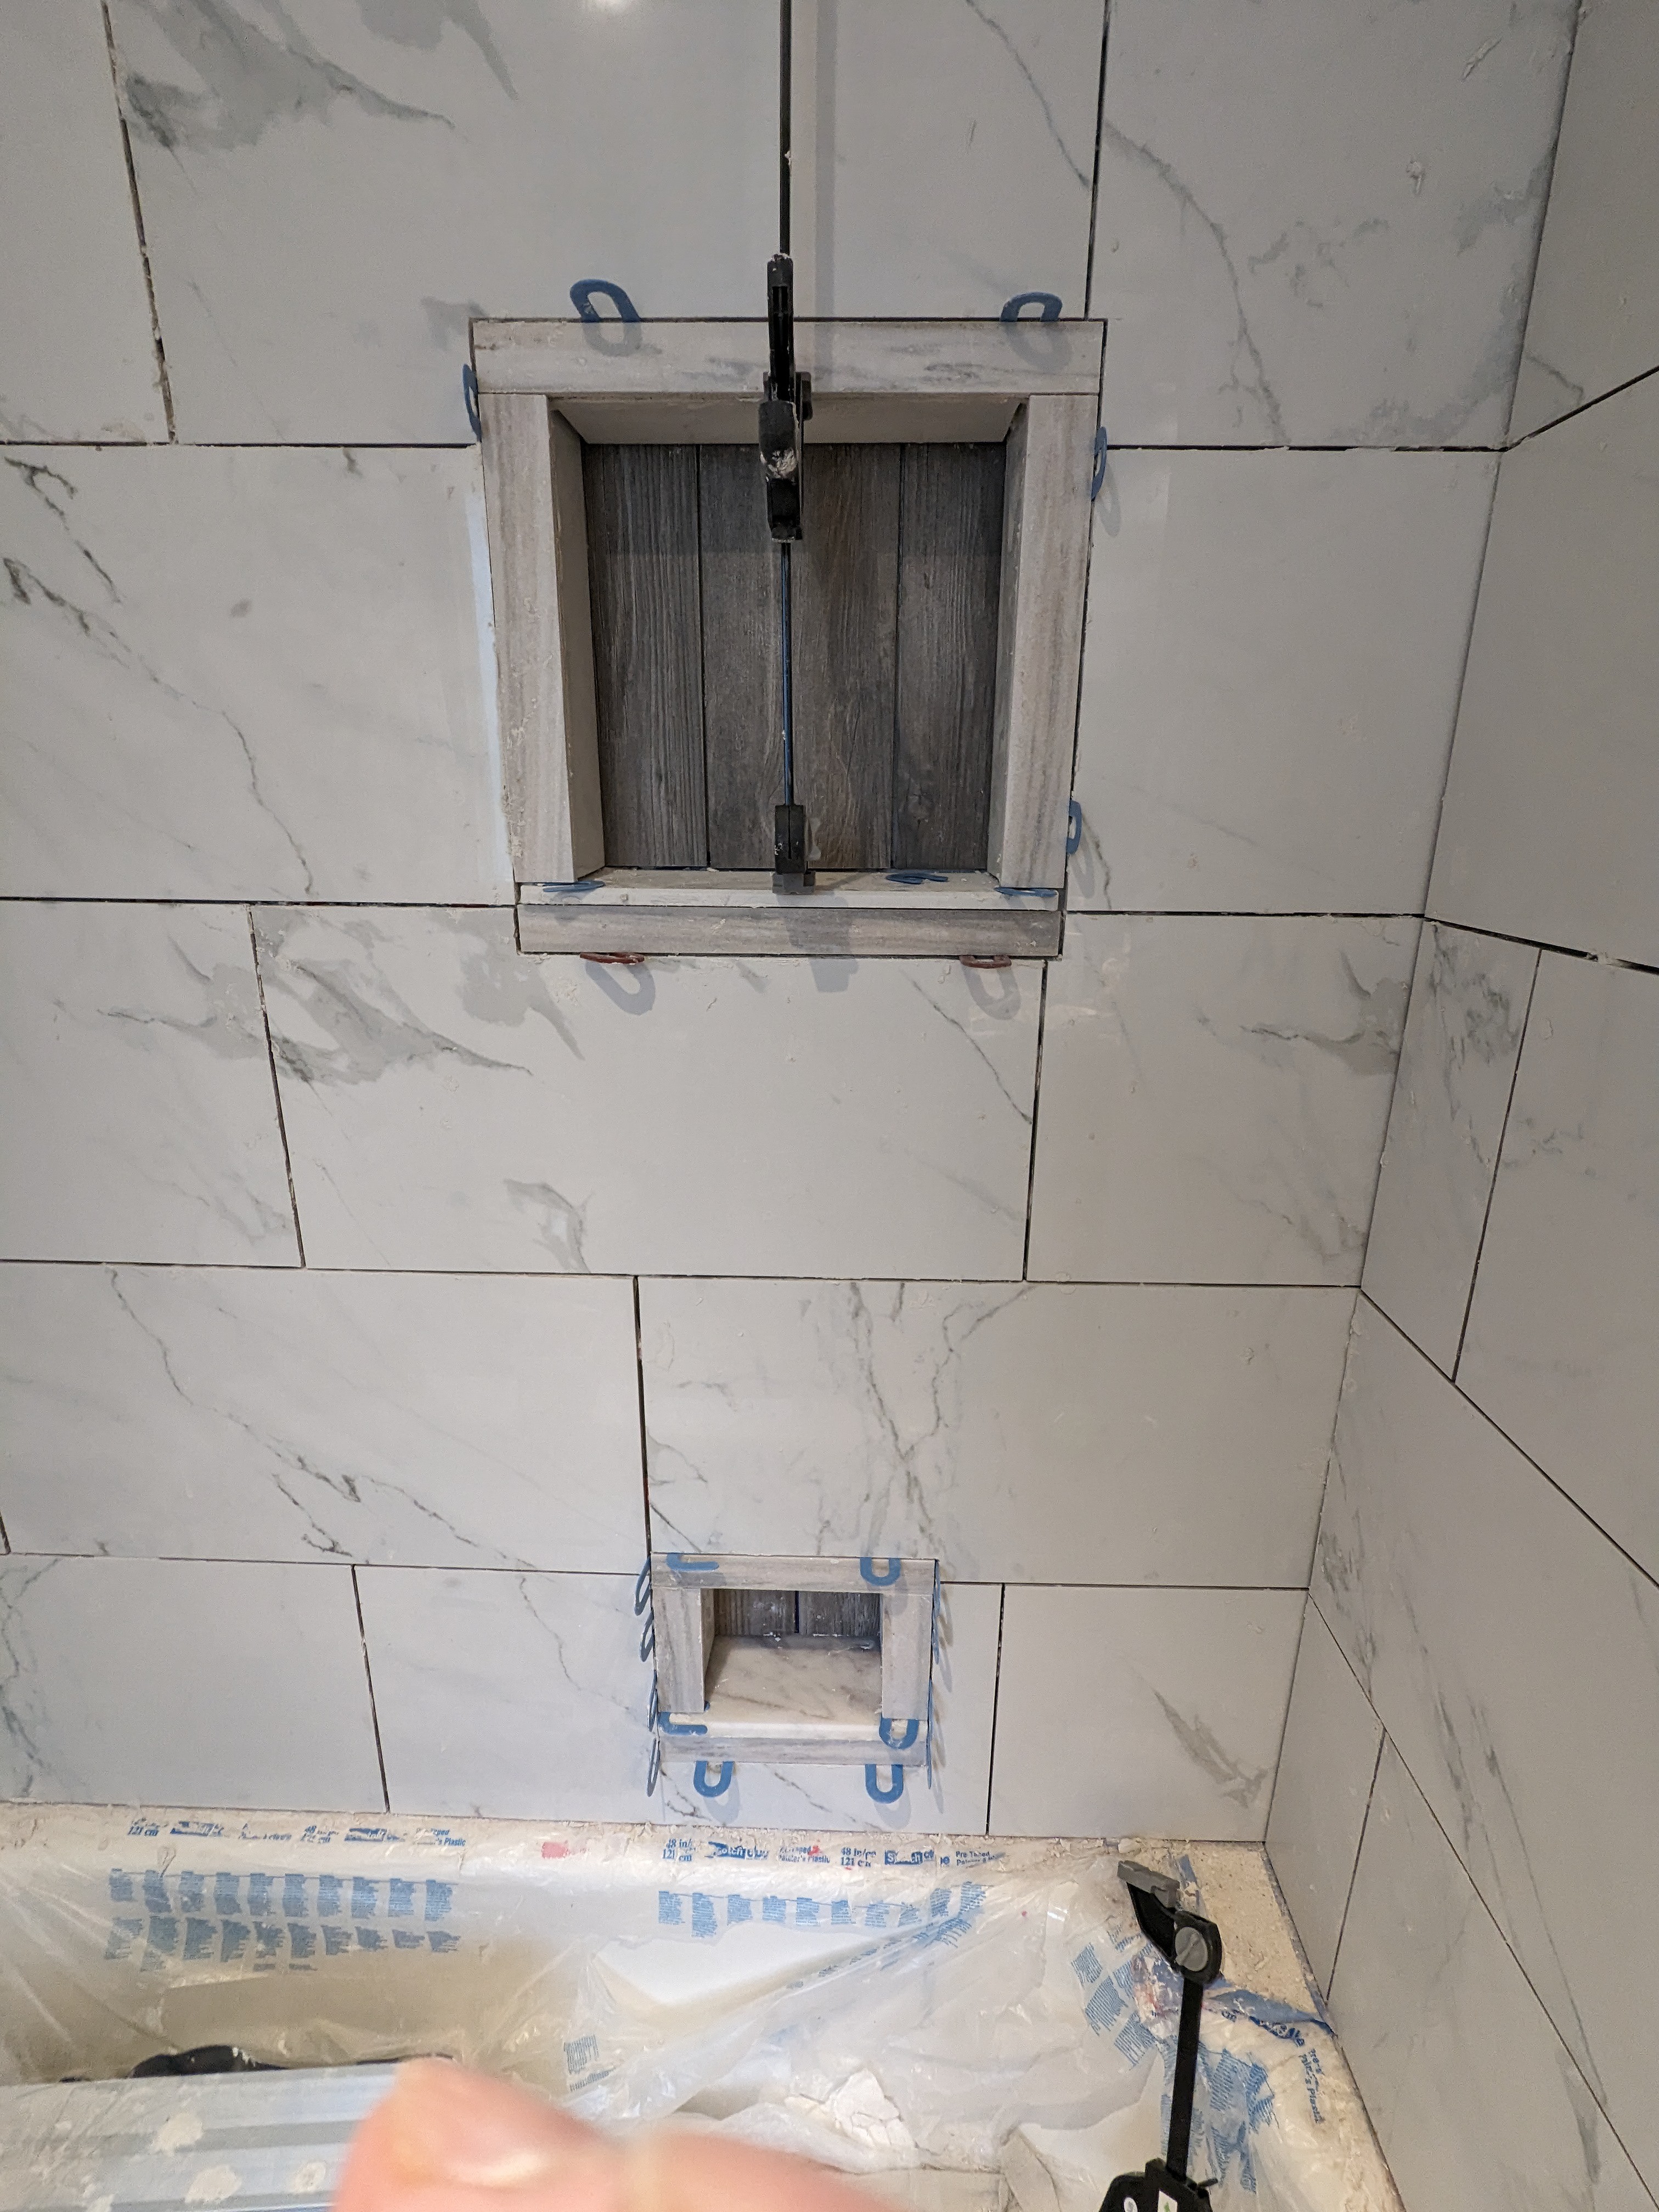
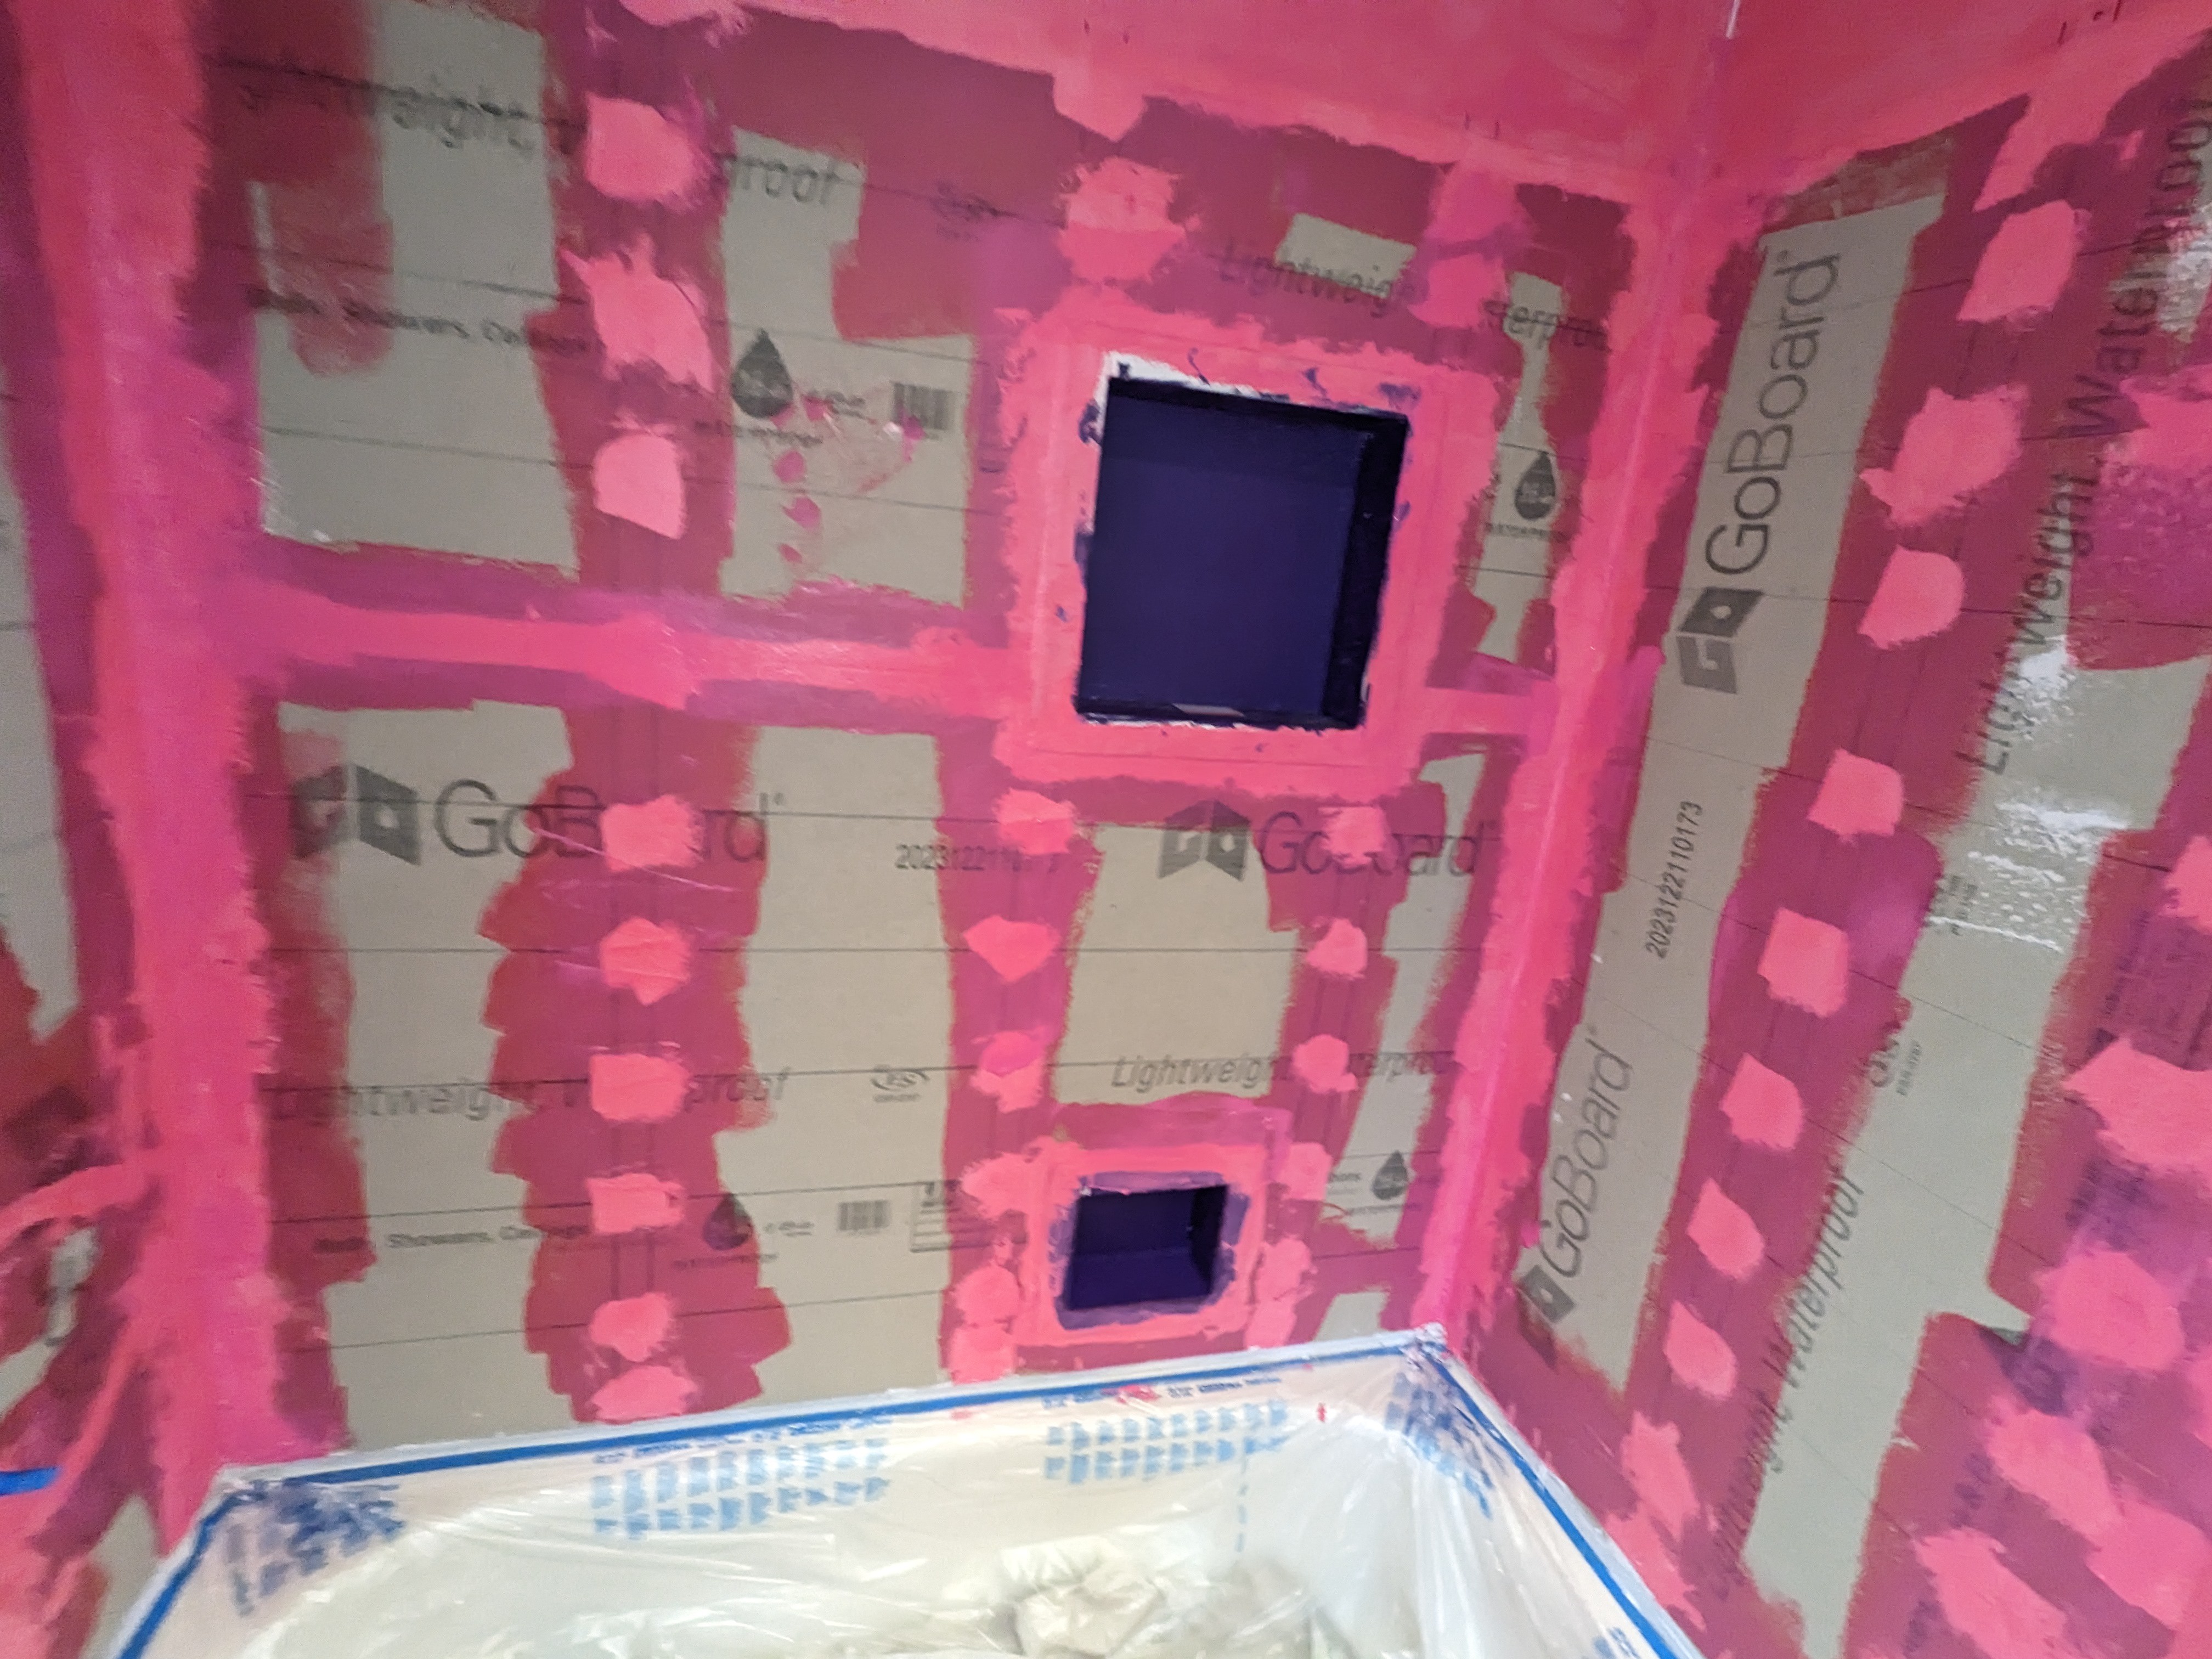
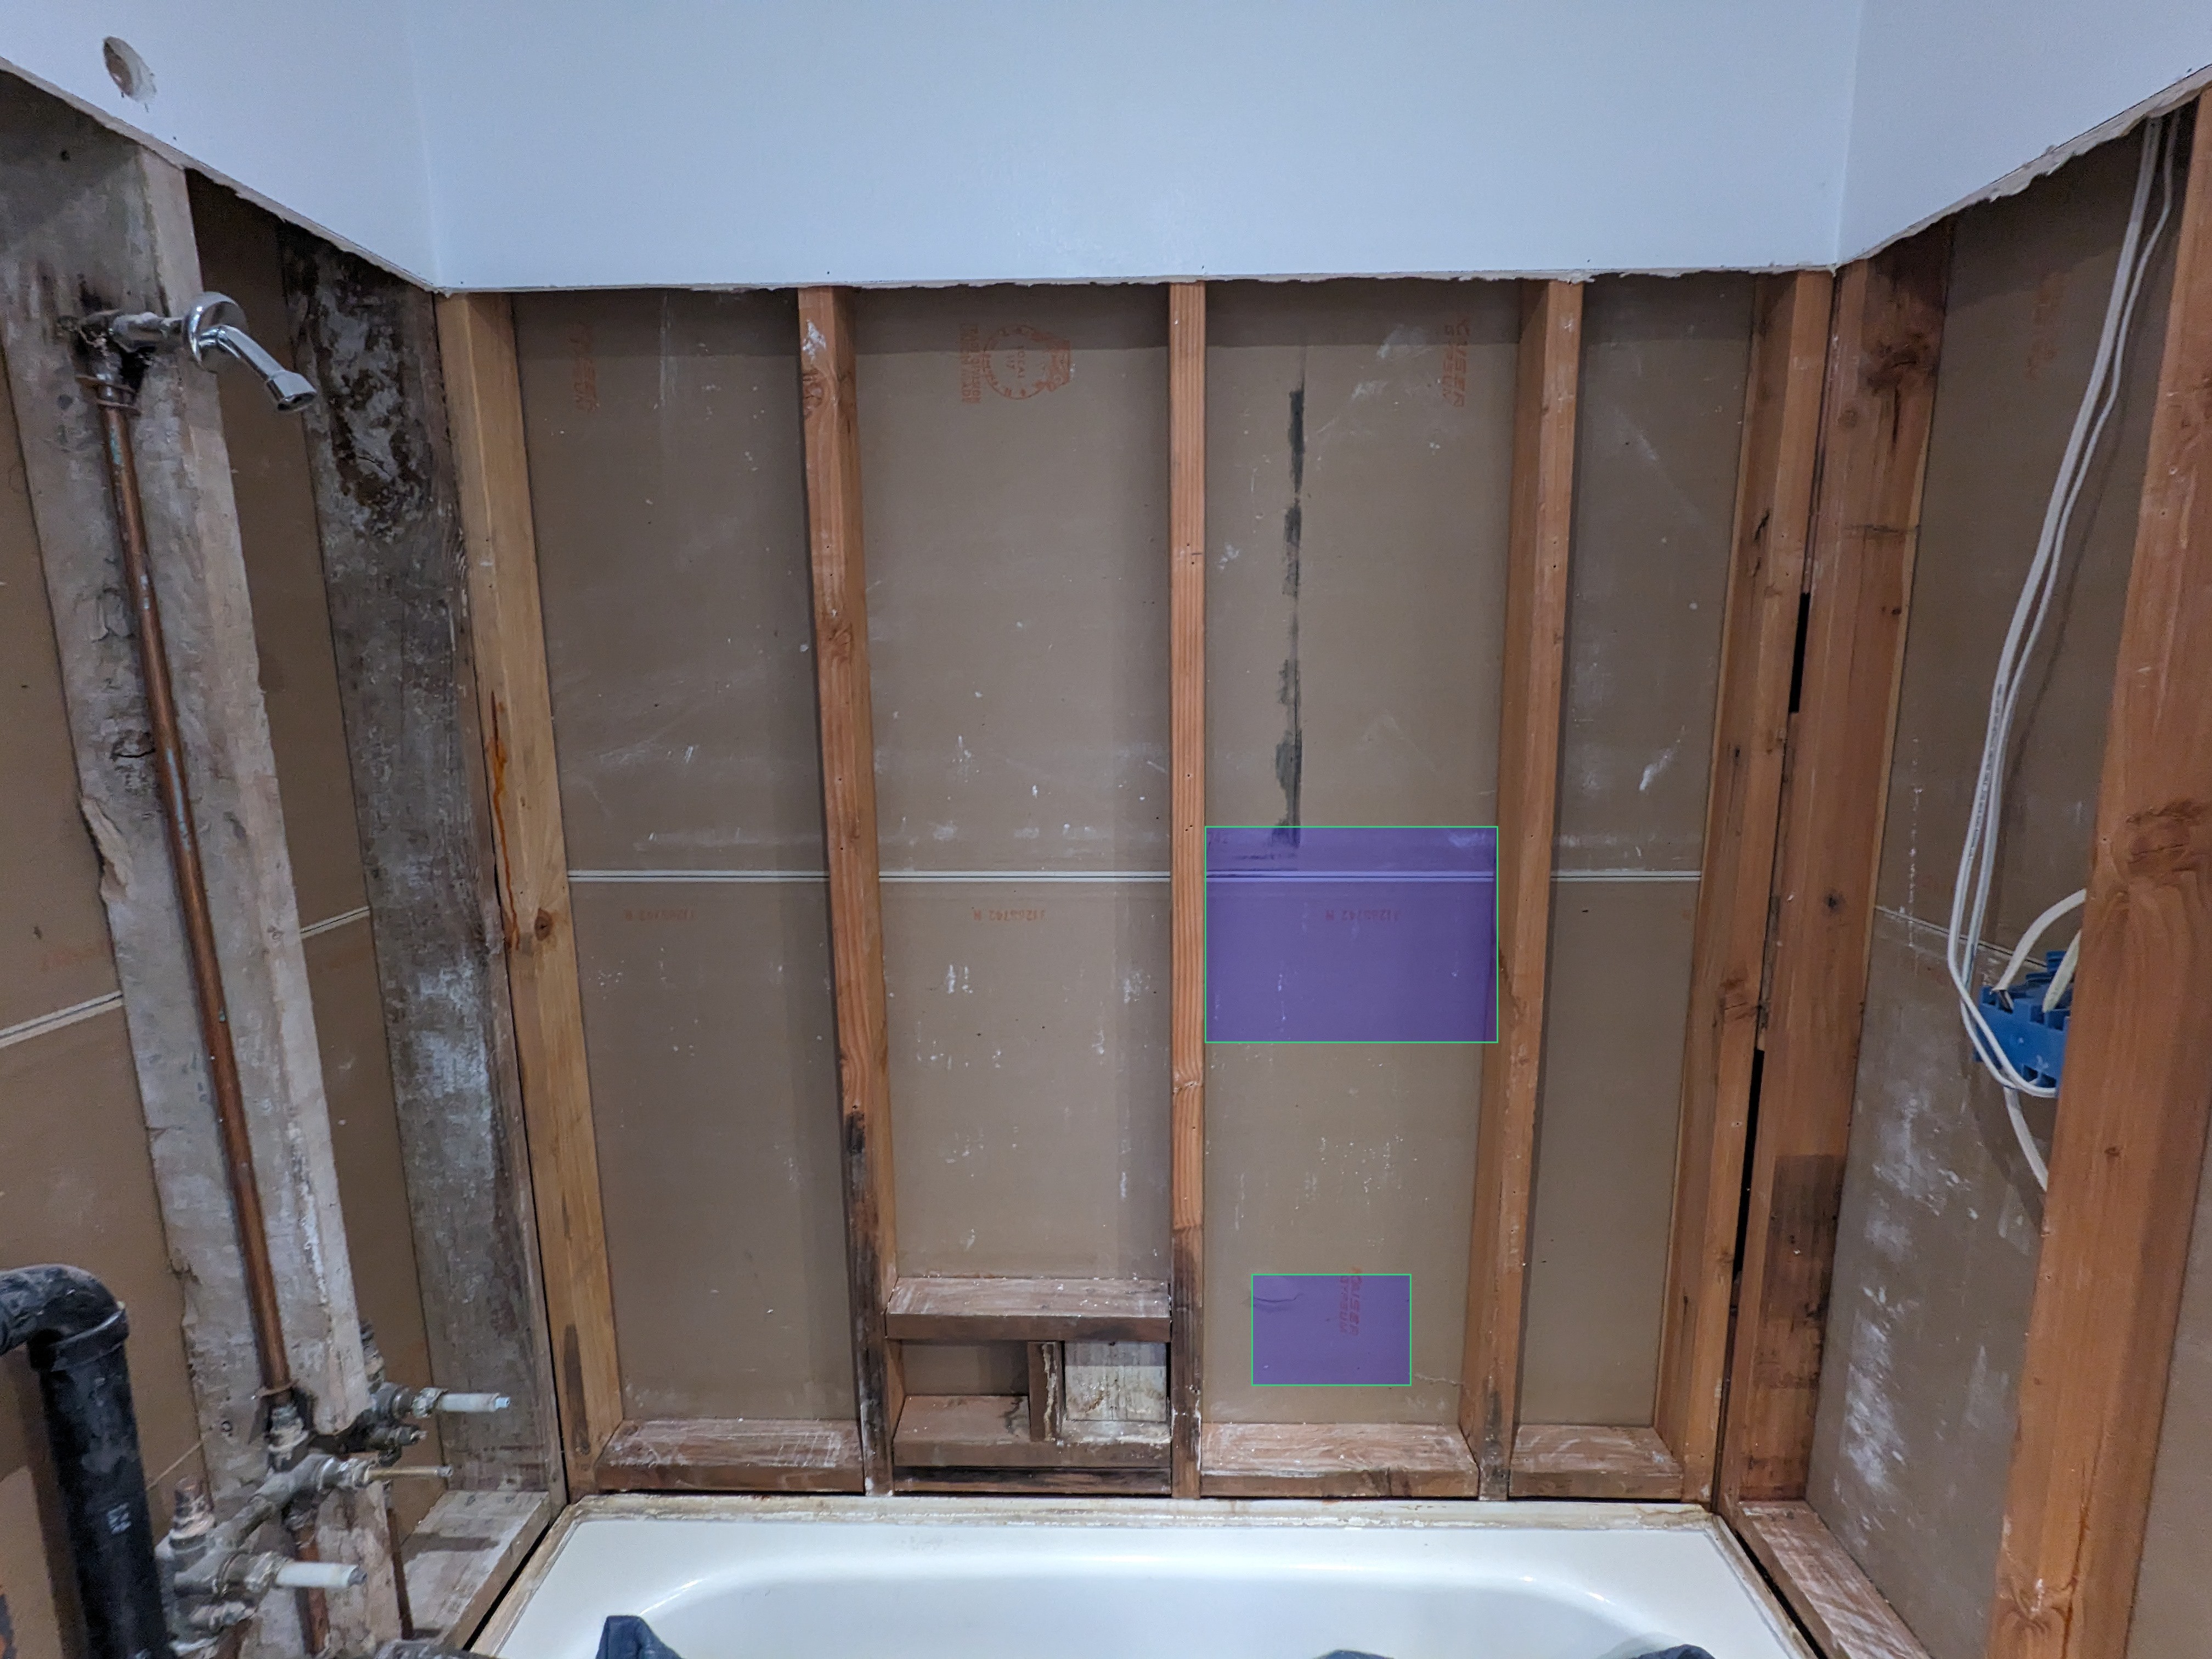
The openings for the shower arm and tub spout tube were simple enough. I made them with a 1 3/8 inch diamond-tipped hole saw. The installation instructions for the faucet called for an approximately six inch circular cut-out. I didn't know how well I could do that with the tools that I have (a wet tile saw and a grinder with a diamond blade). So, I chose contrasting 6x24 inch tiles mounted vertically. These are the same wood-look tiles that I used in the back face of the two niches, With a smaller opening for the faucet, I could use a rectangular opening in the tiles. With six inch wide tiles above and below that opening, I only had to cut the tiles to the right length. The cover plate for the faucet will cover the entire opening. On both sides of that six inch wide tile are three inch wide tiles made by cutting the six inch tiles length-wise. I staggered them so that none of the horizontal seams would line up. The rest of that wall will be the Carrara marble tiles used on the other walls.
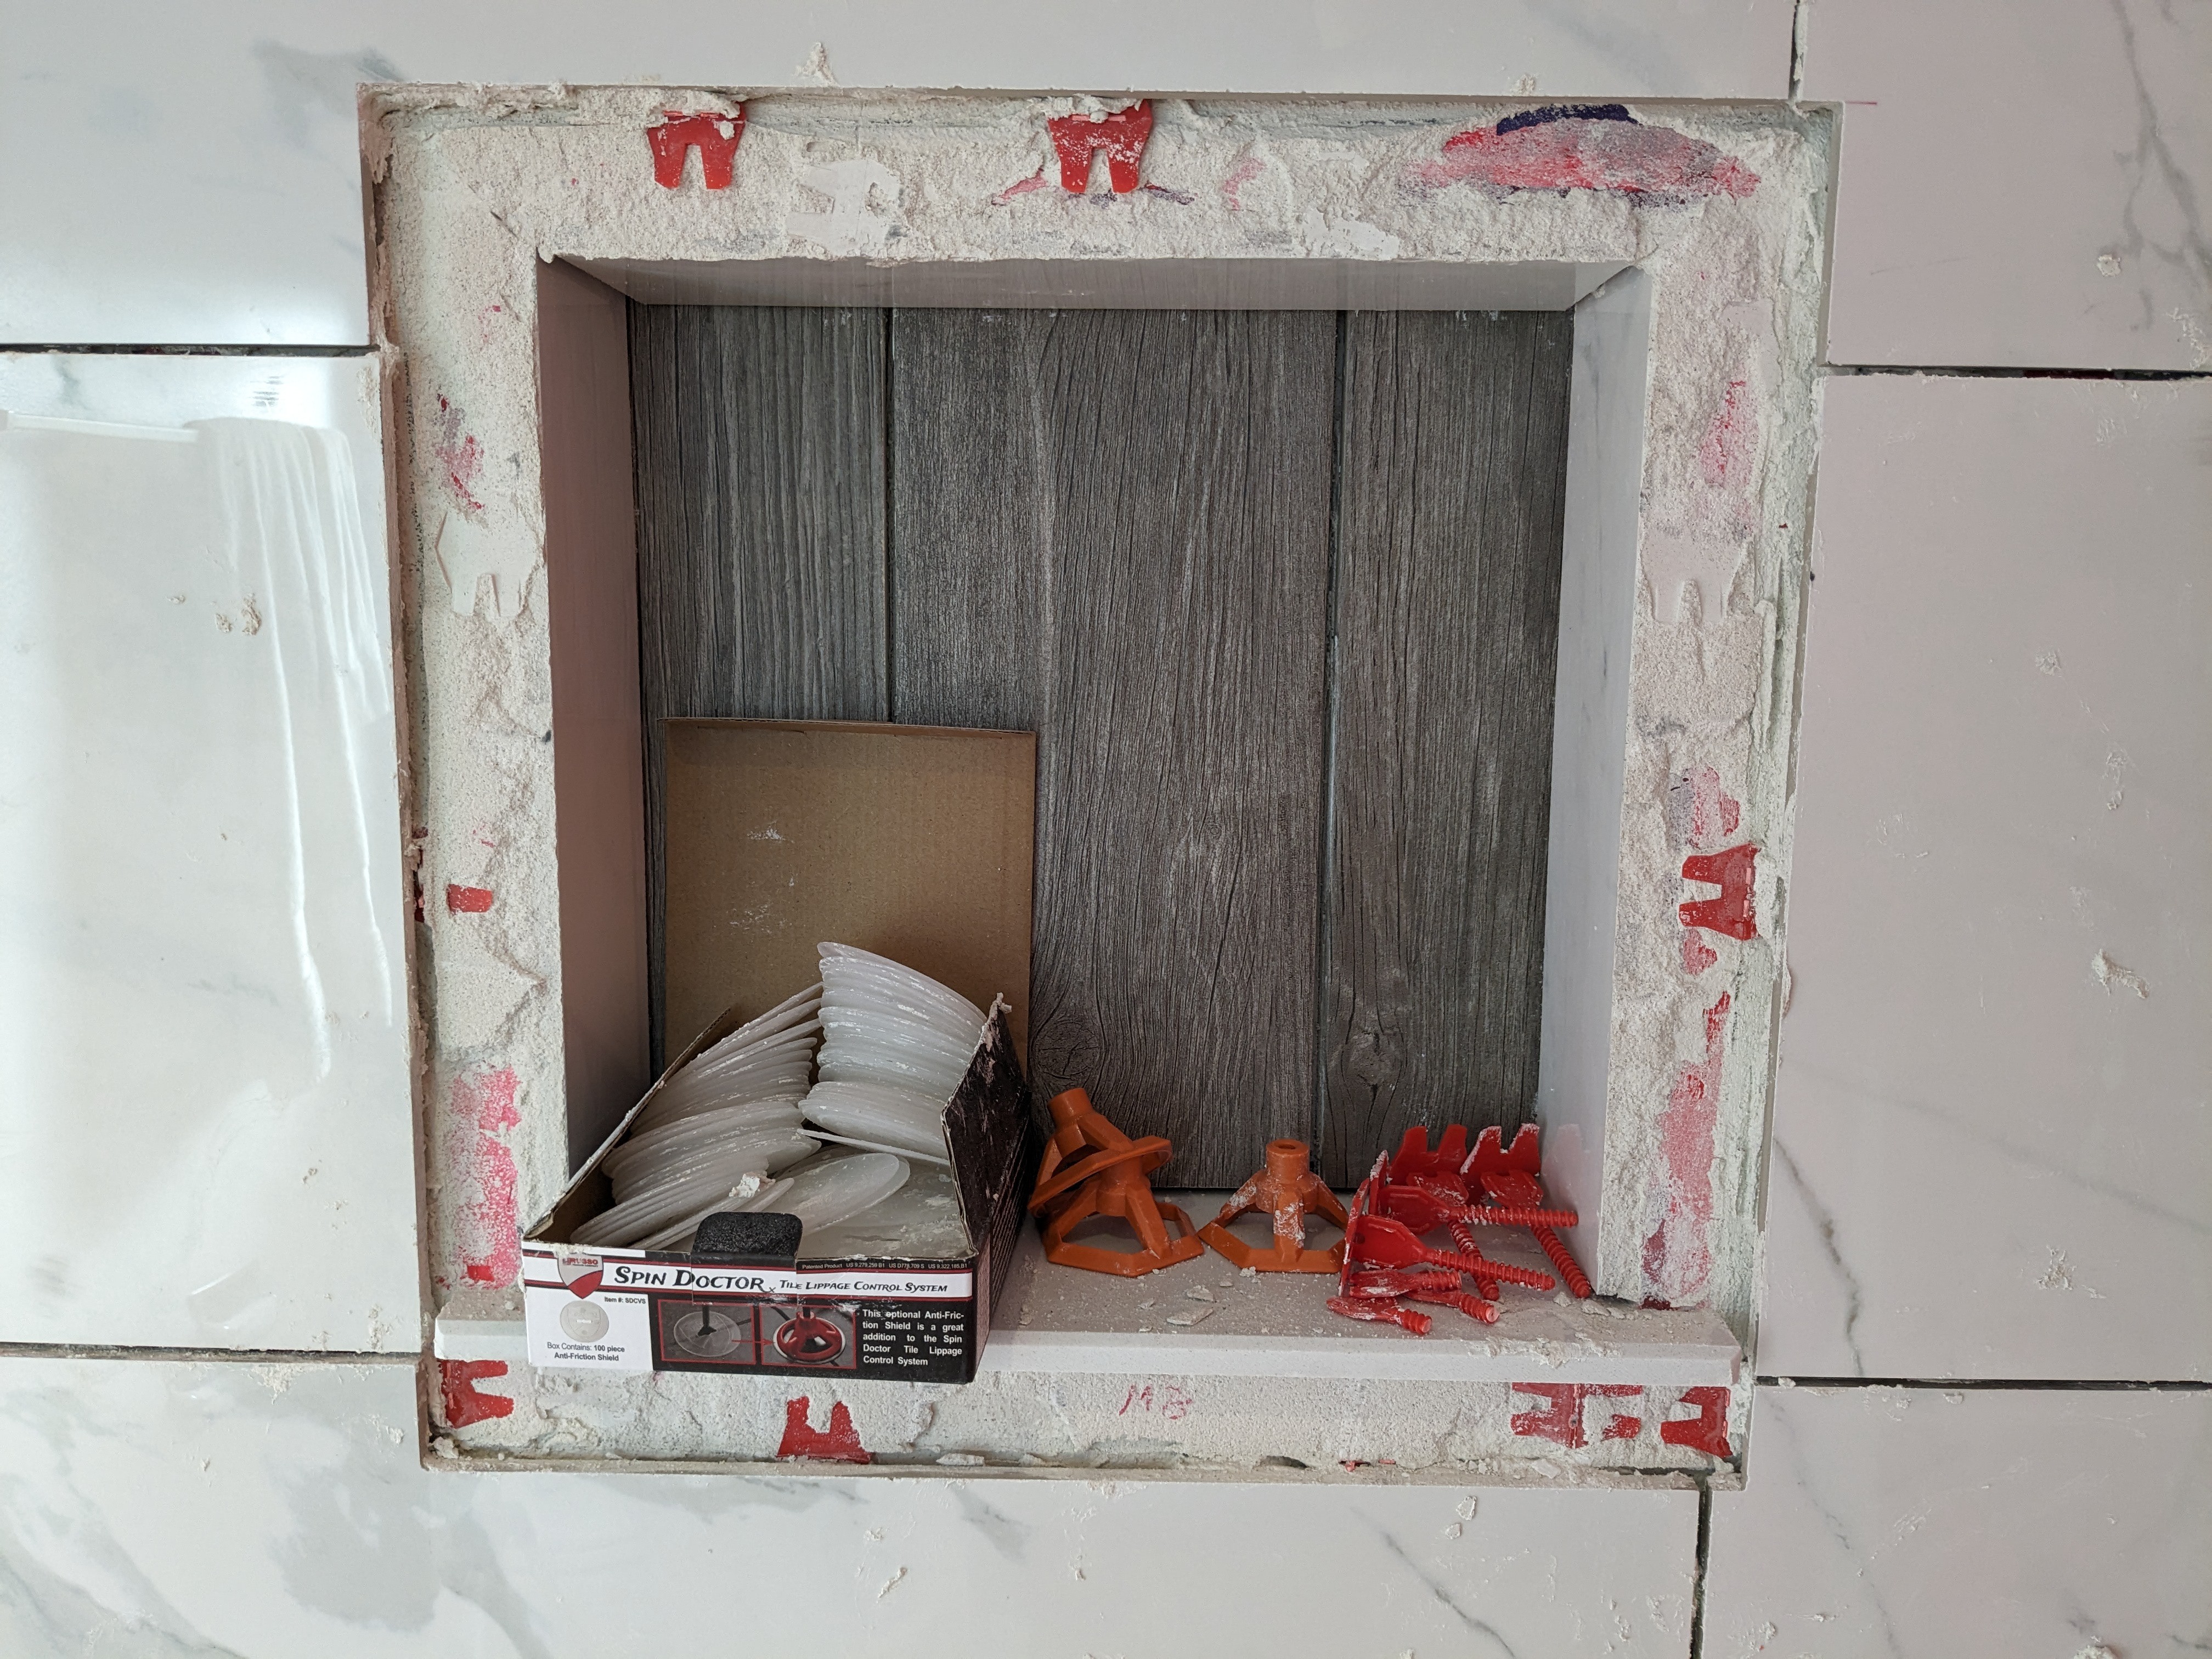
Here's a photo. Excuse the messy thinset fingerprints. I'm using the spinny type of spacers with the idea of minimizing lippage. The idea is that you put those red parts in as spacers between tiles. The red parts have a threaded spike coming out of them. The orange parts screw onto the threaded spikes and clamp down on the tiles to force them to be even with each other. They are a bit hard to see, but there are also transparent plastic circles between the orange parts and the tiles. That's to prevent the orange parts from scuffing the tiles as you tighten them down. I'm not sure they are necessary with the tiles I am using, but better safe than sorry. I'm still not perfect at this scheme, but I'm getting better.
![]()
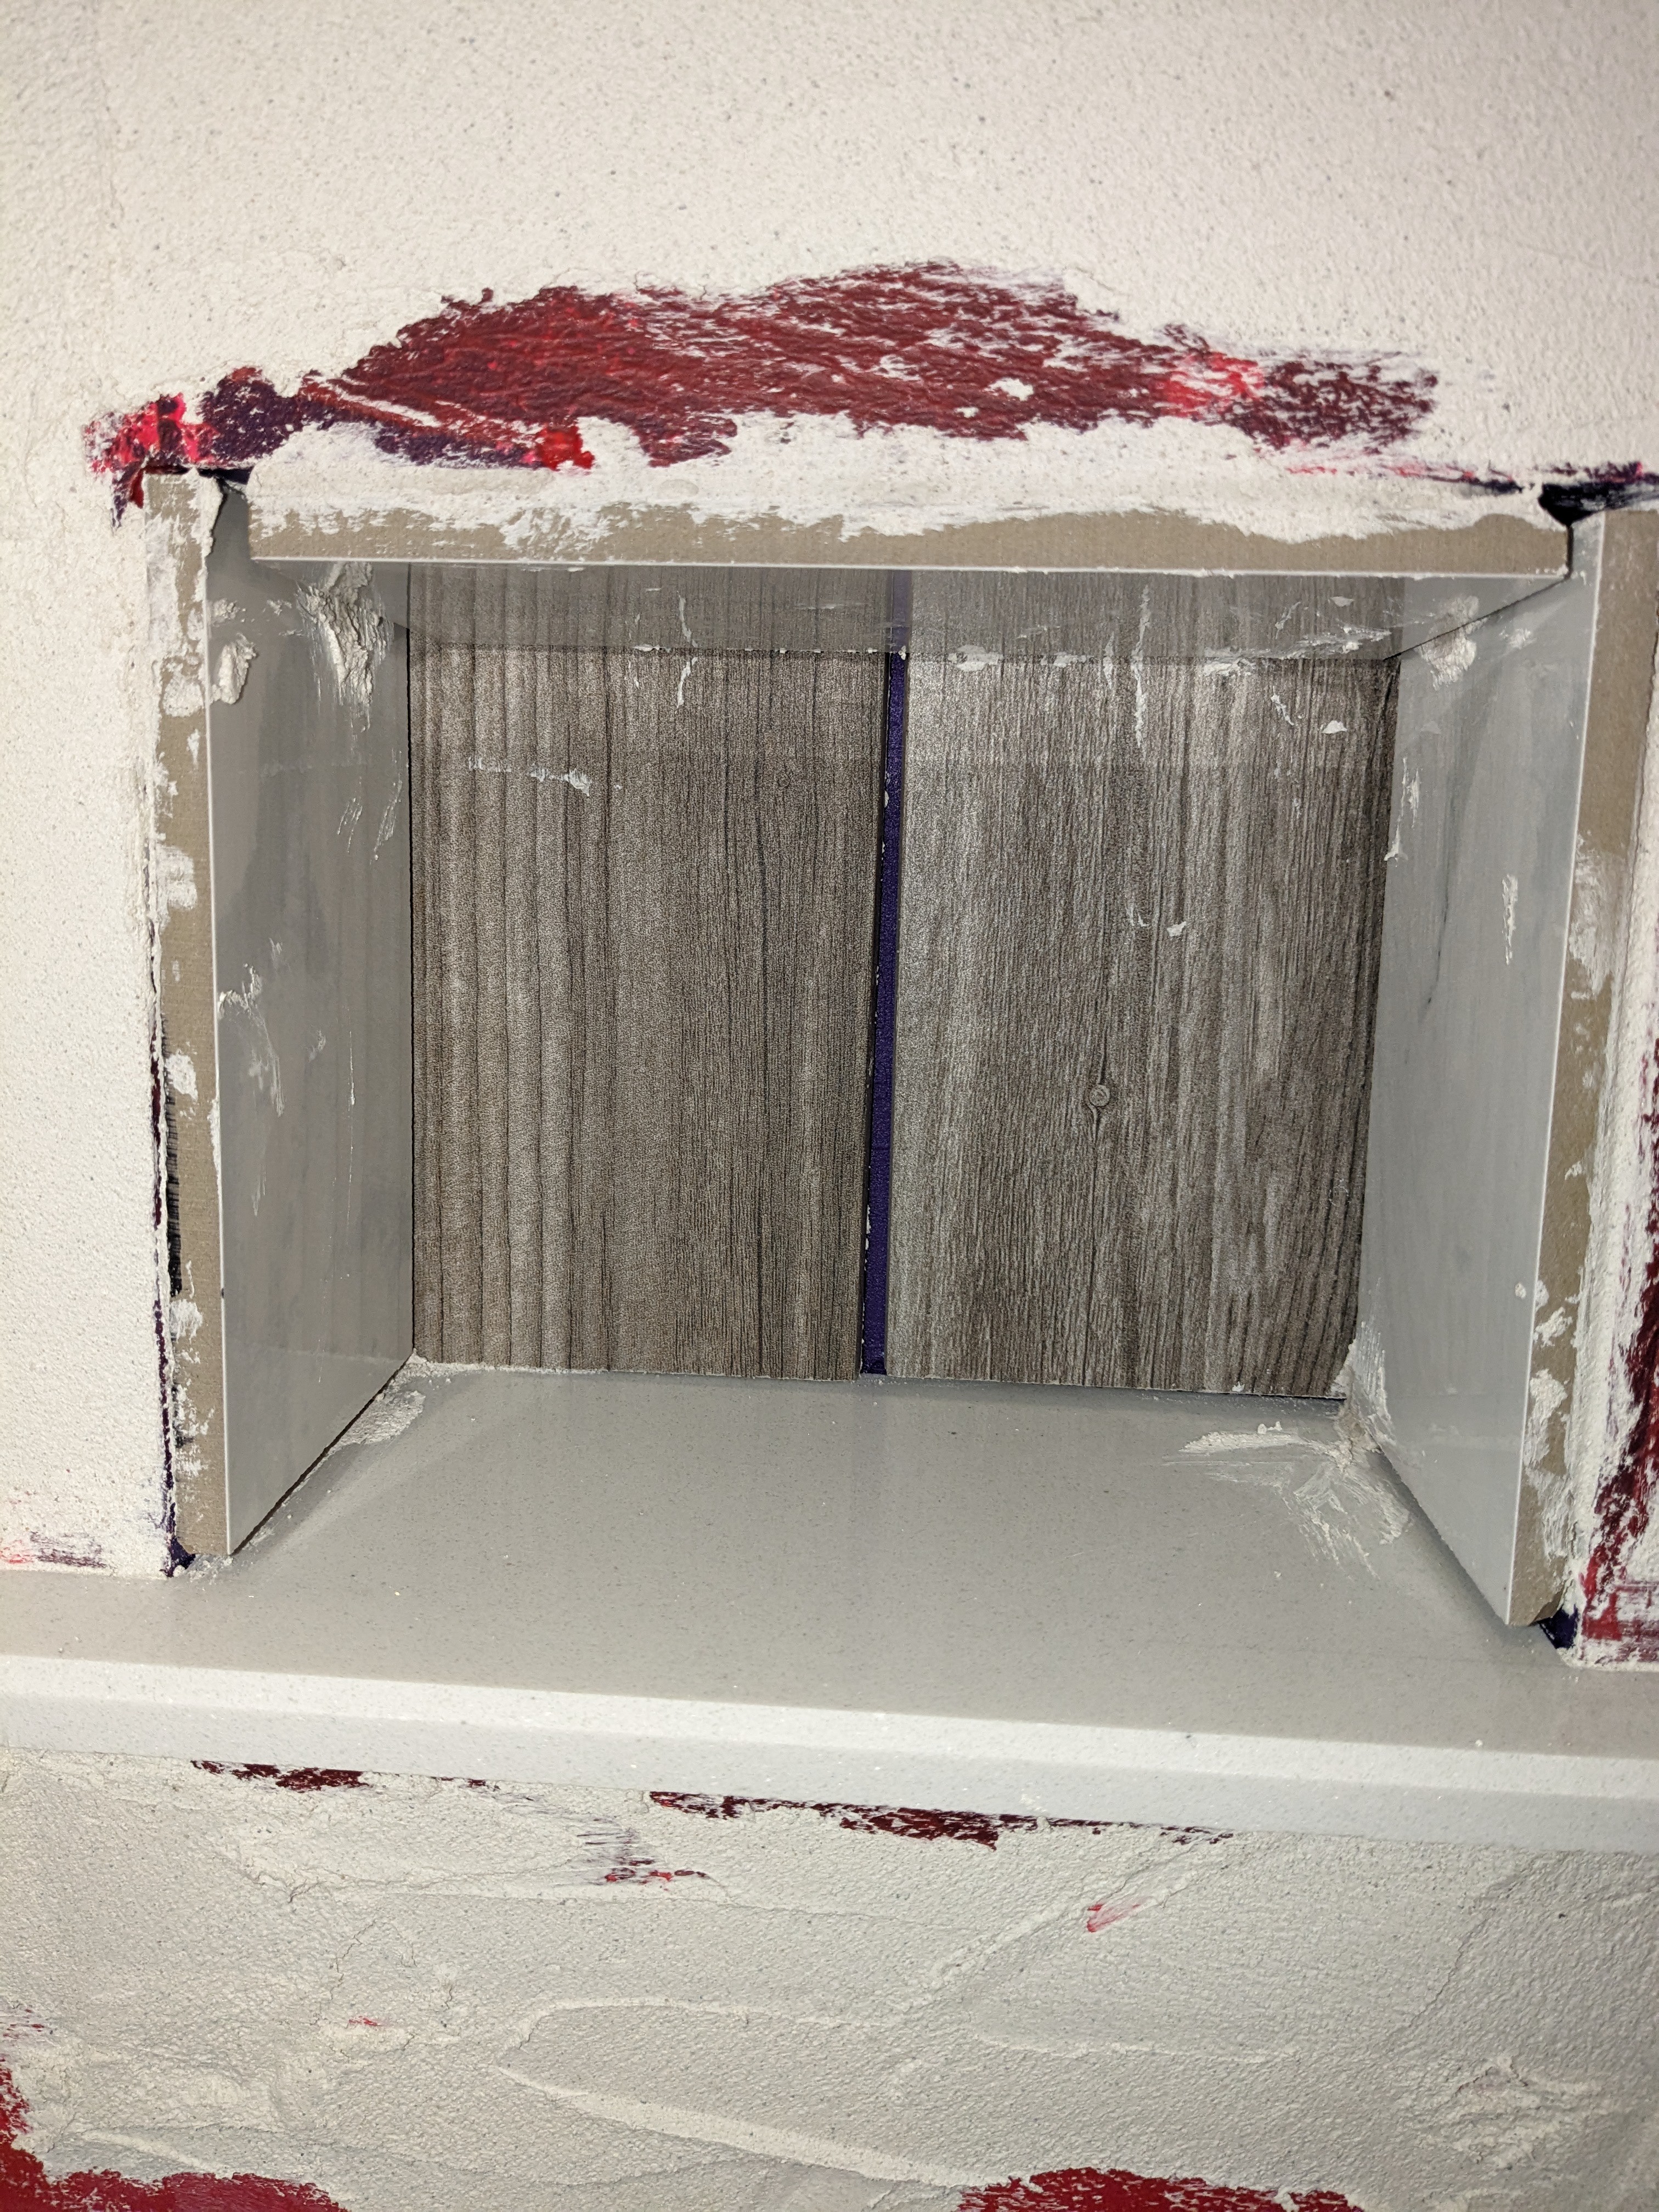
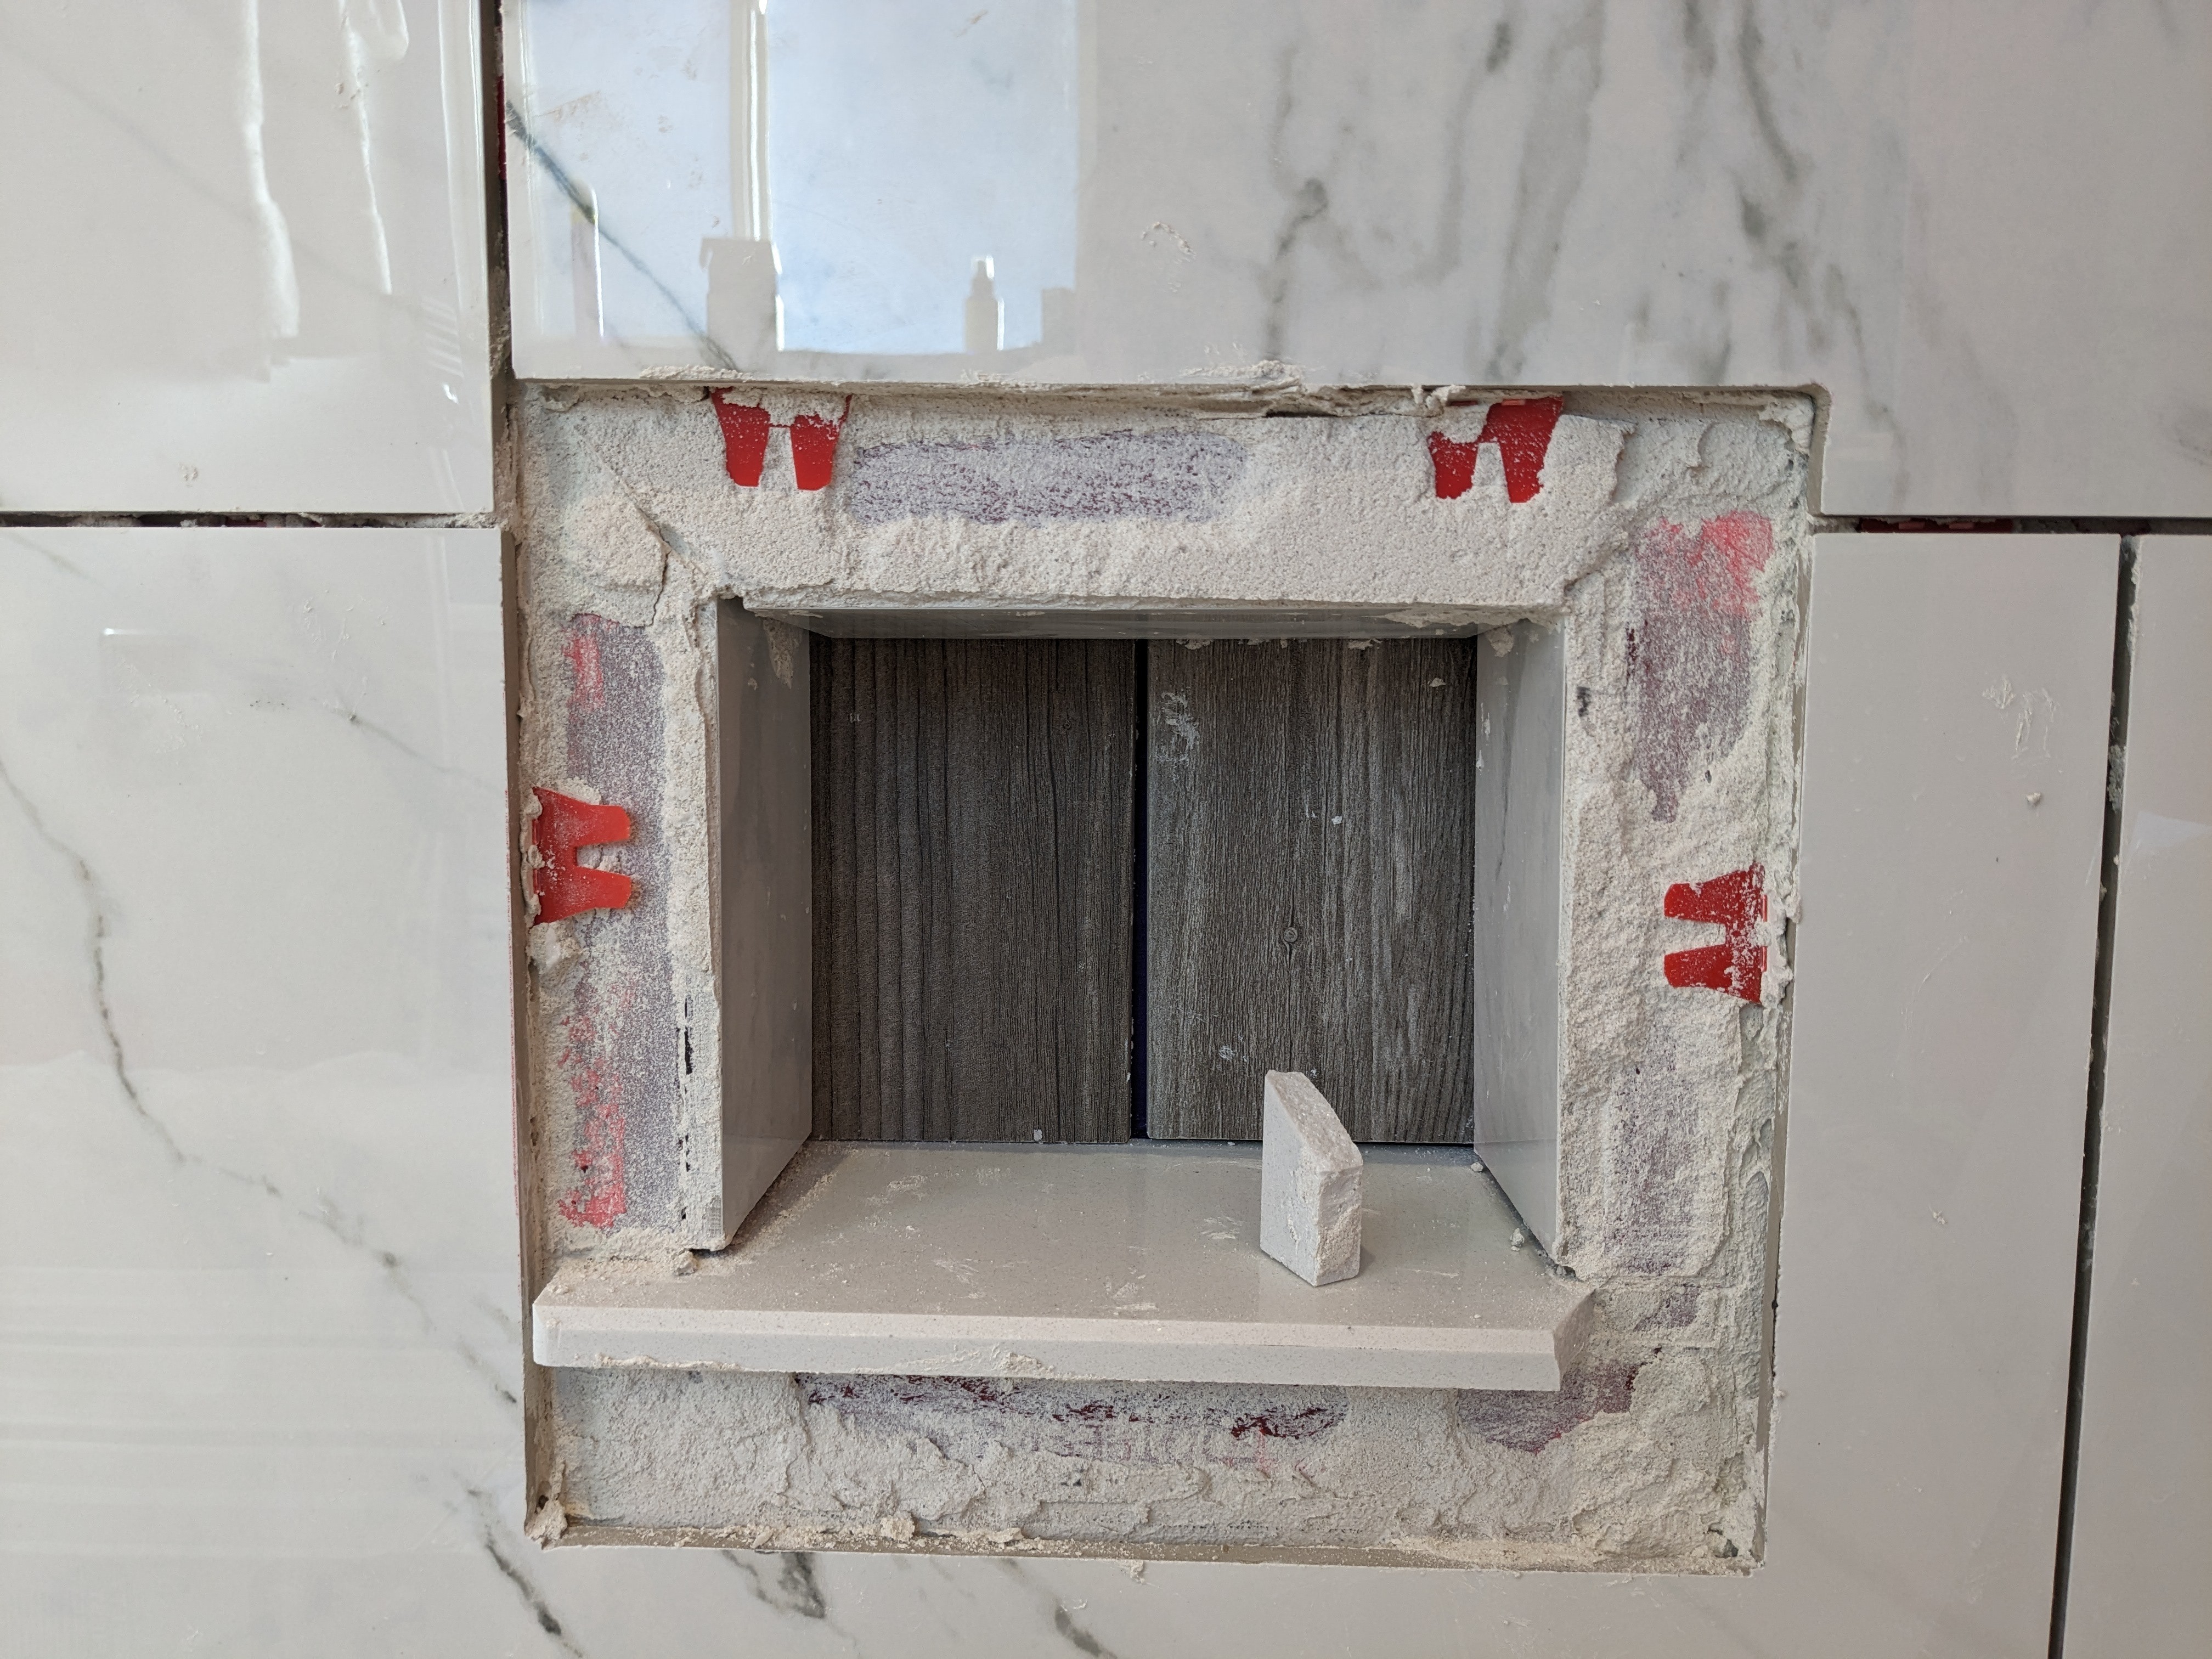
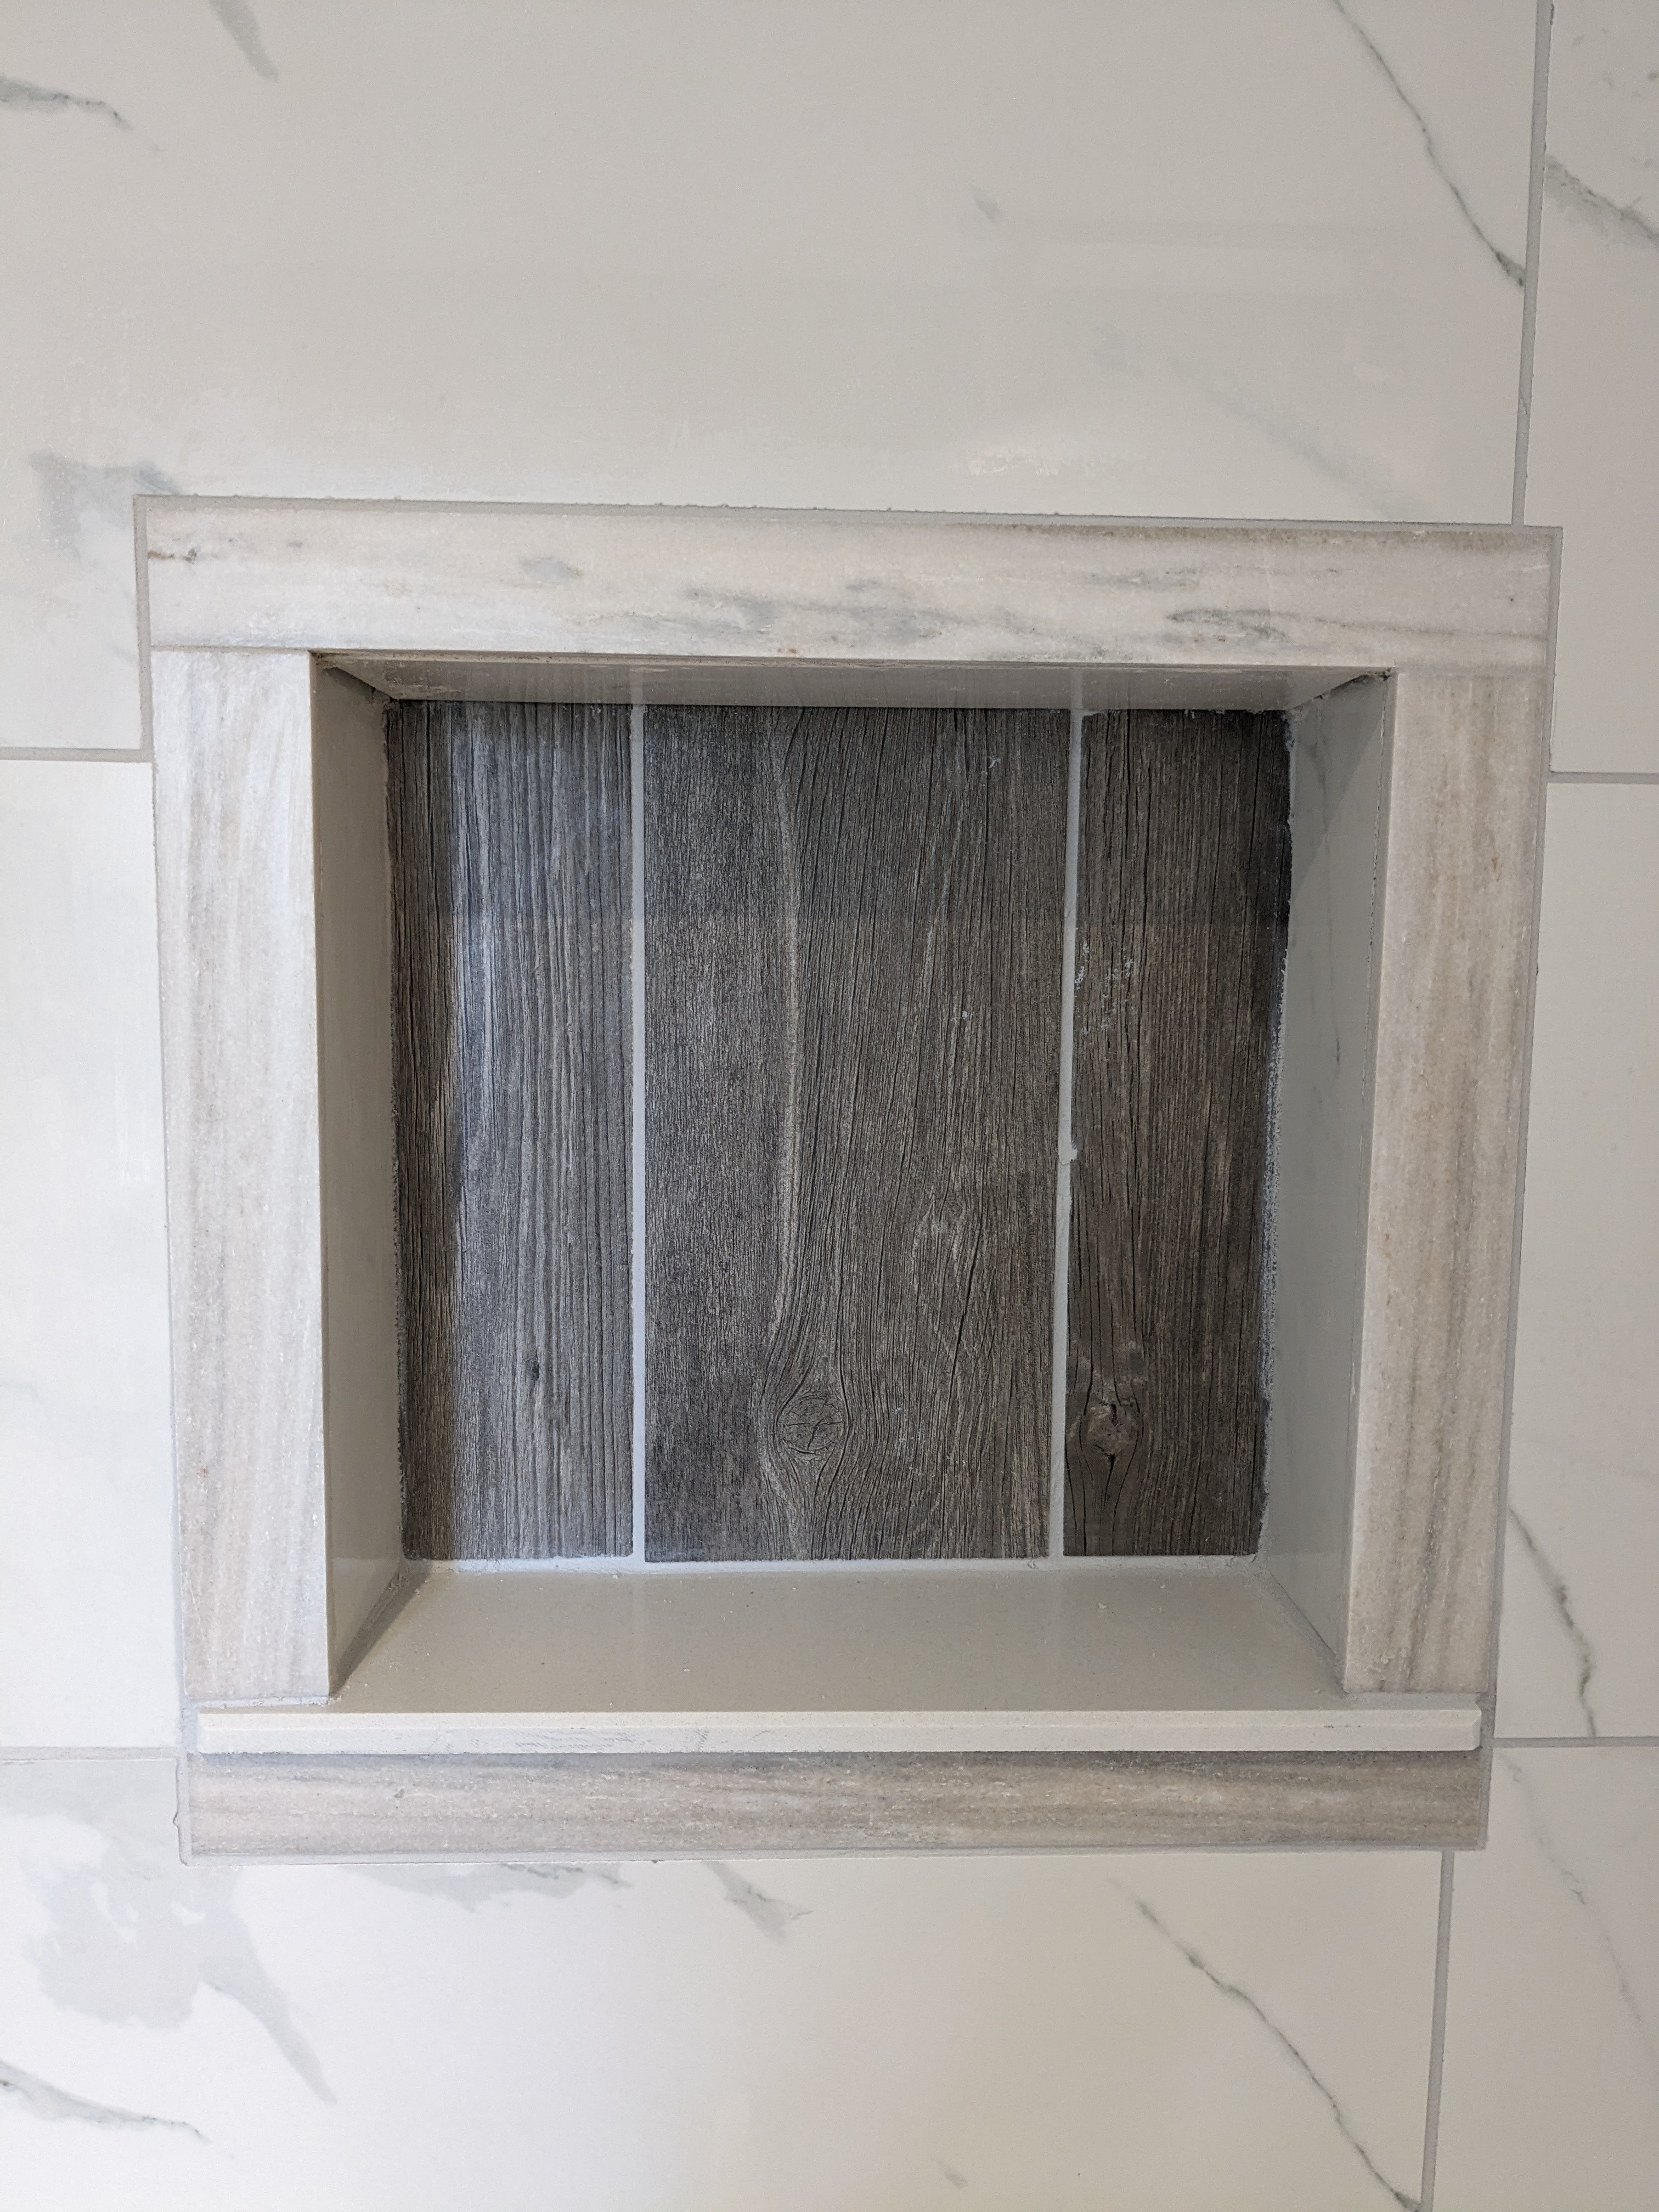
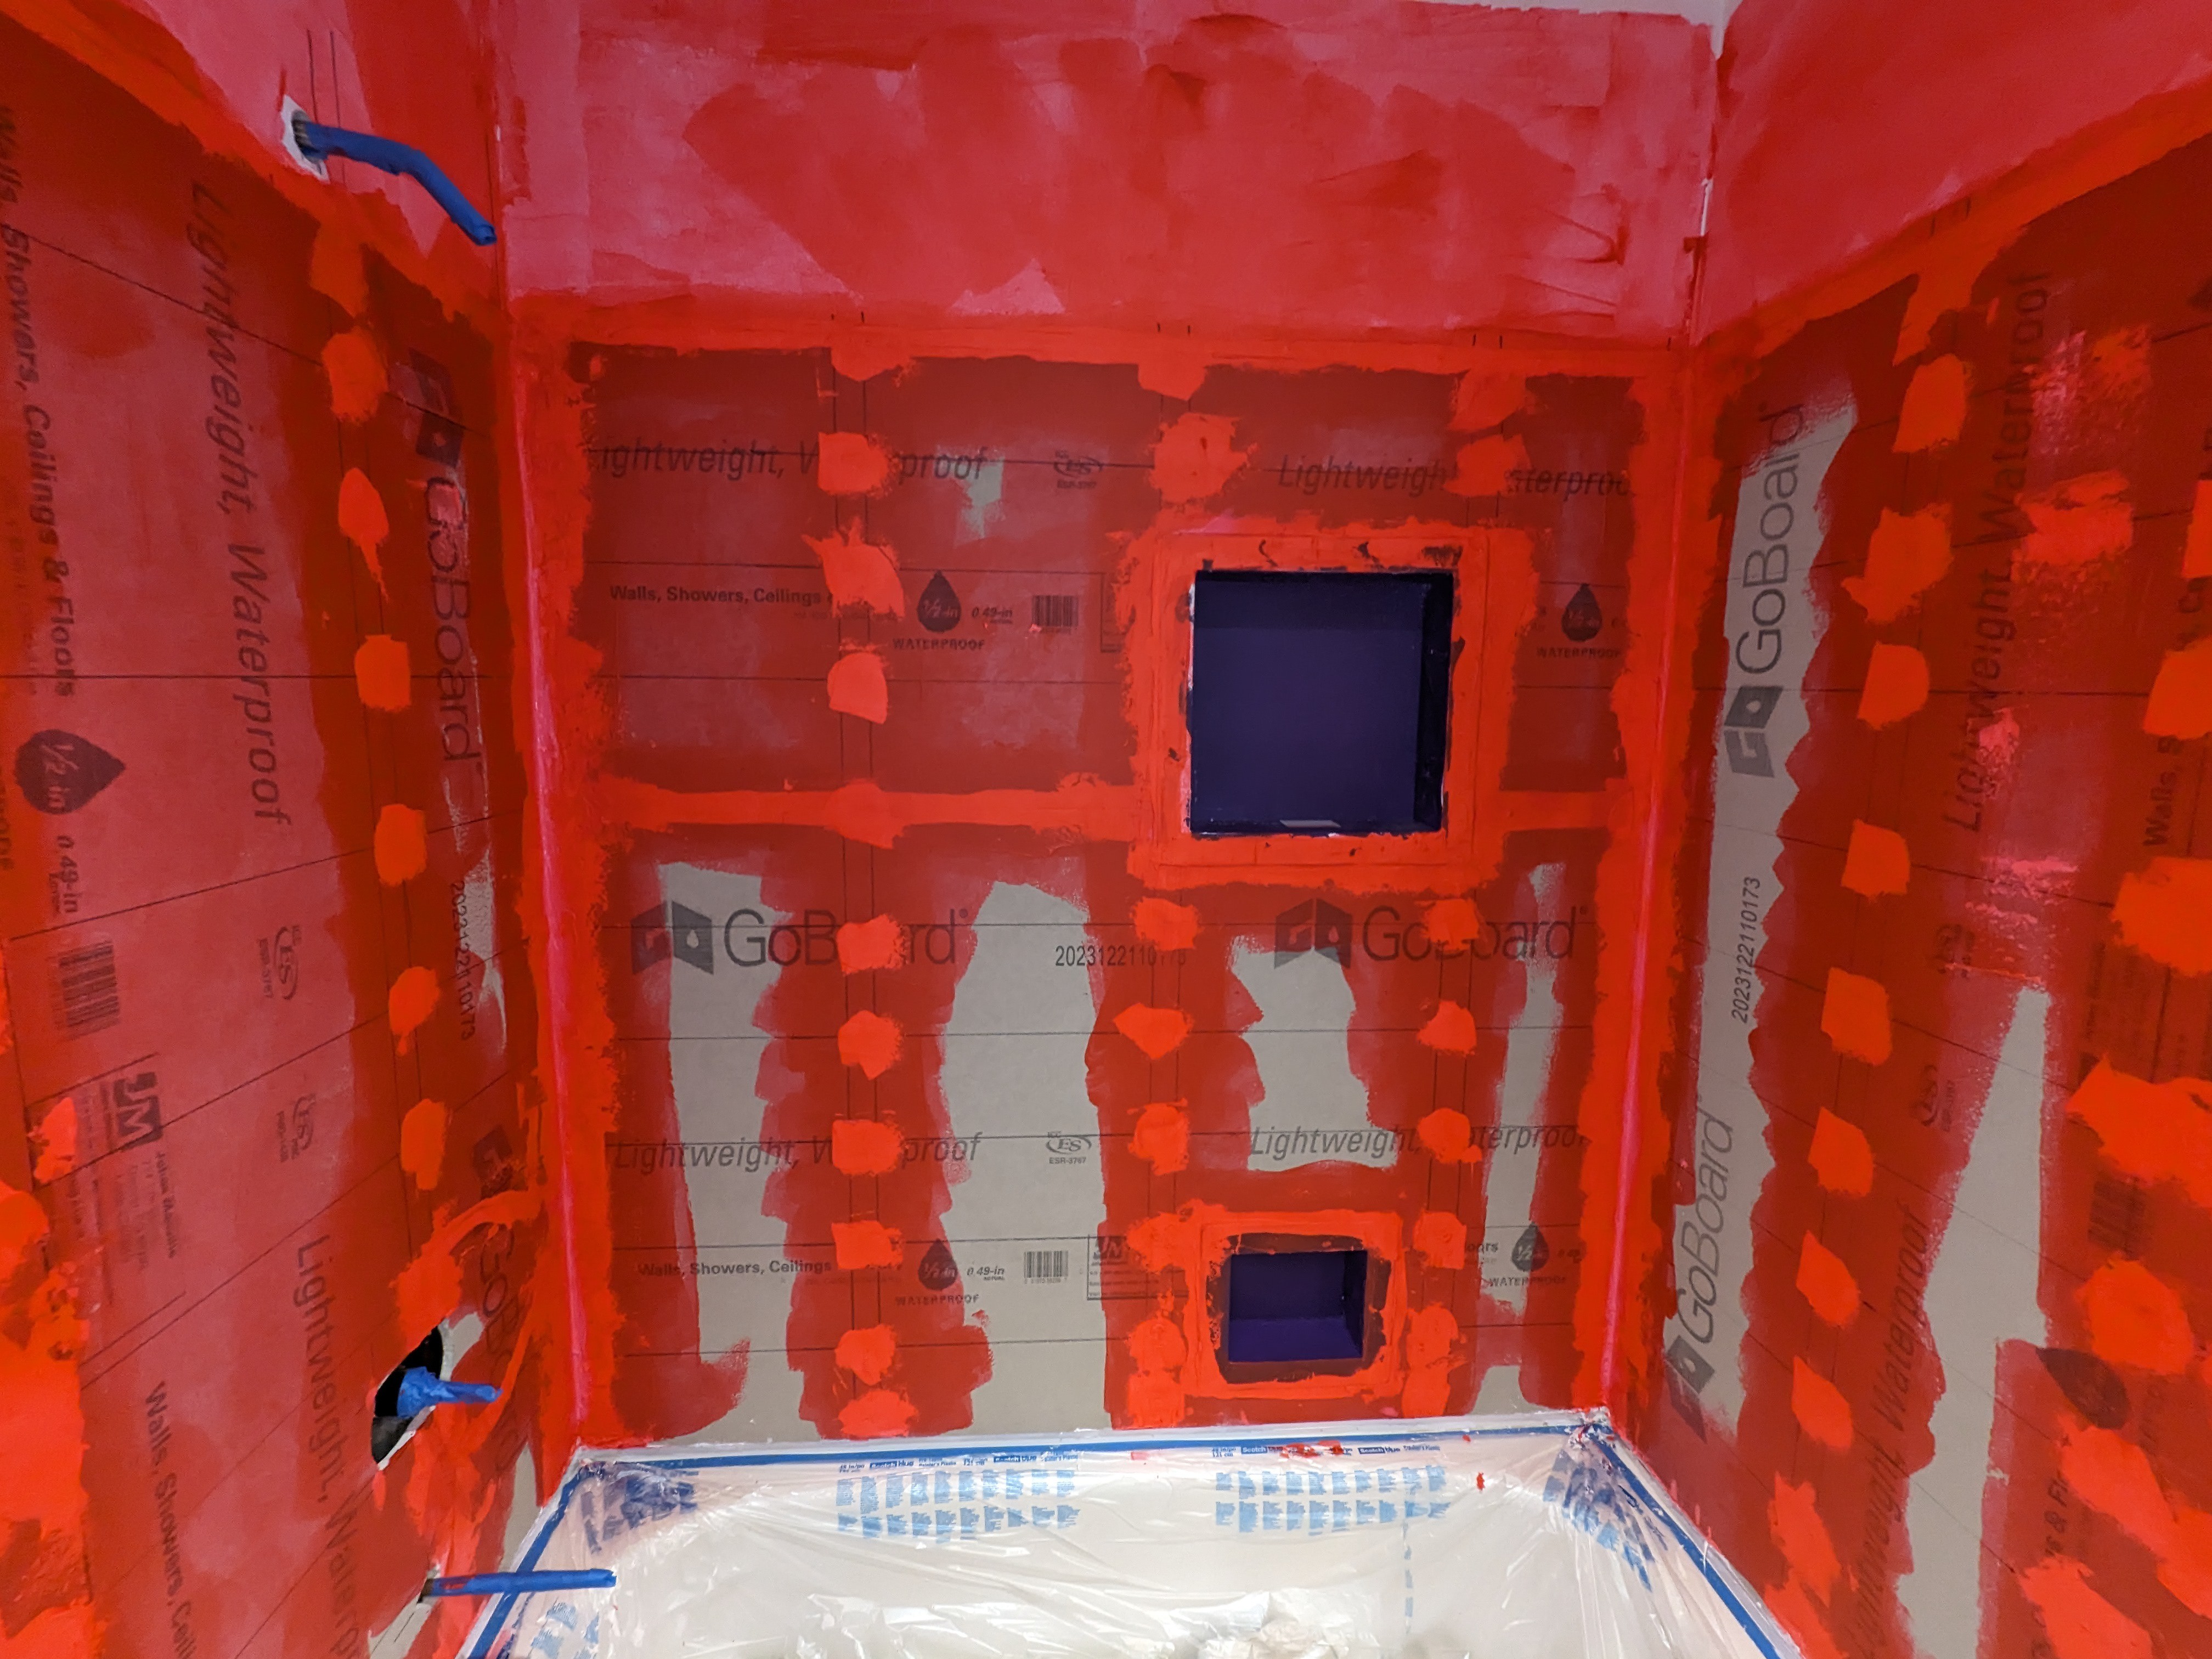
Here's a picture after a little clean-up (but still no grout). After unscrewing the orange part and removing the transparent washer, you break off the red parts by wacking them with a hammer. I used a rubber mallet just in case I missed and hit the tiles. For this area, I only had one of the red spacers break off in a way that needed digging out. I (genlty) used my oscillating multi-tool for that.
![]()
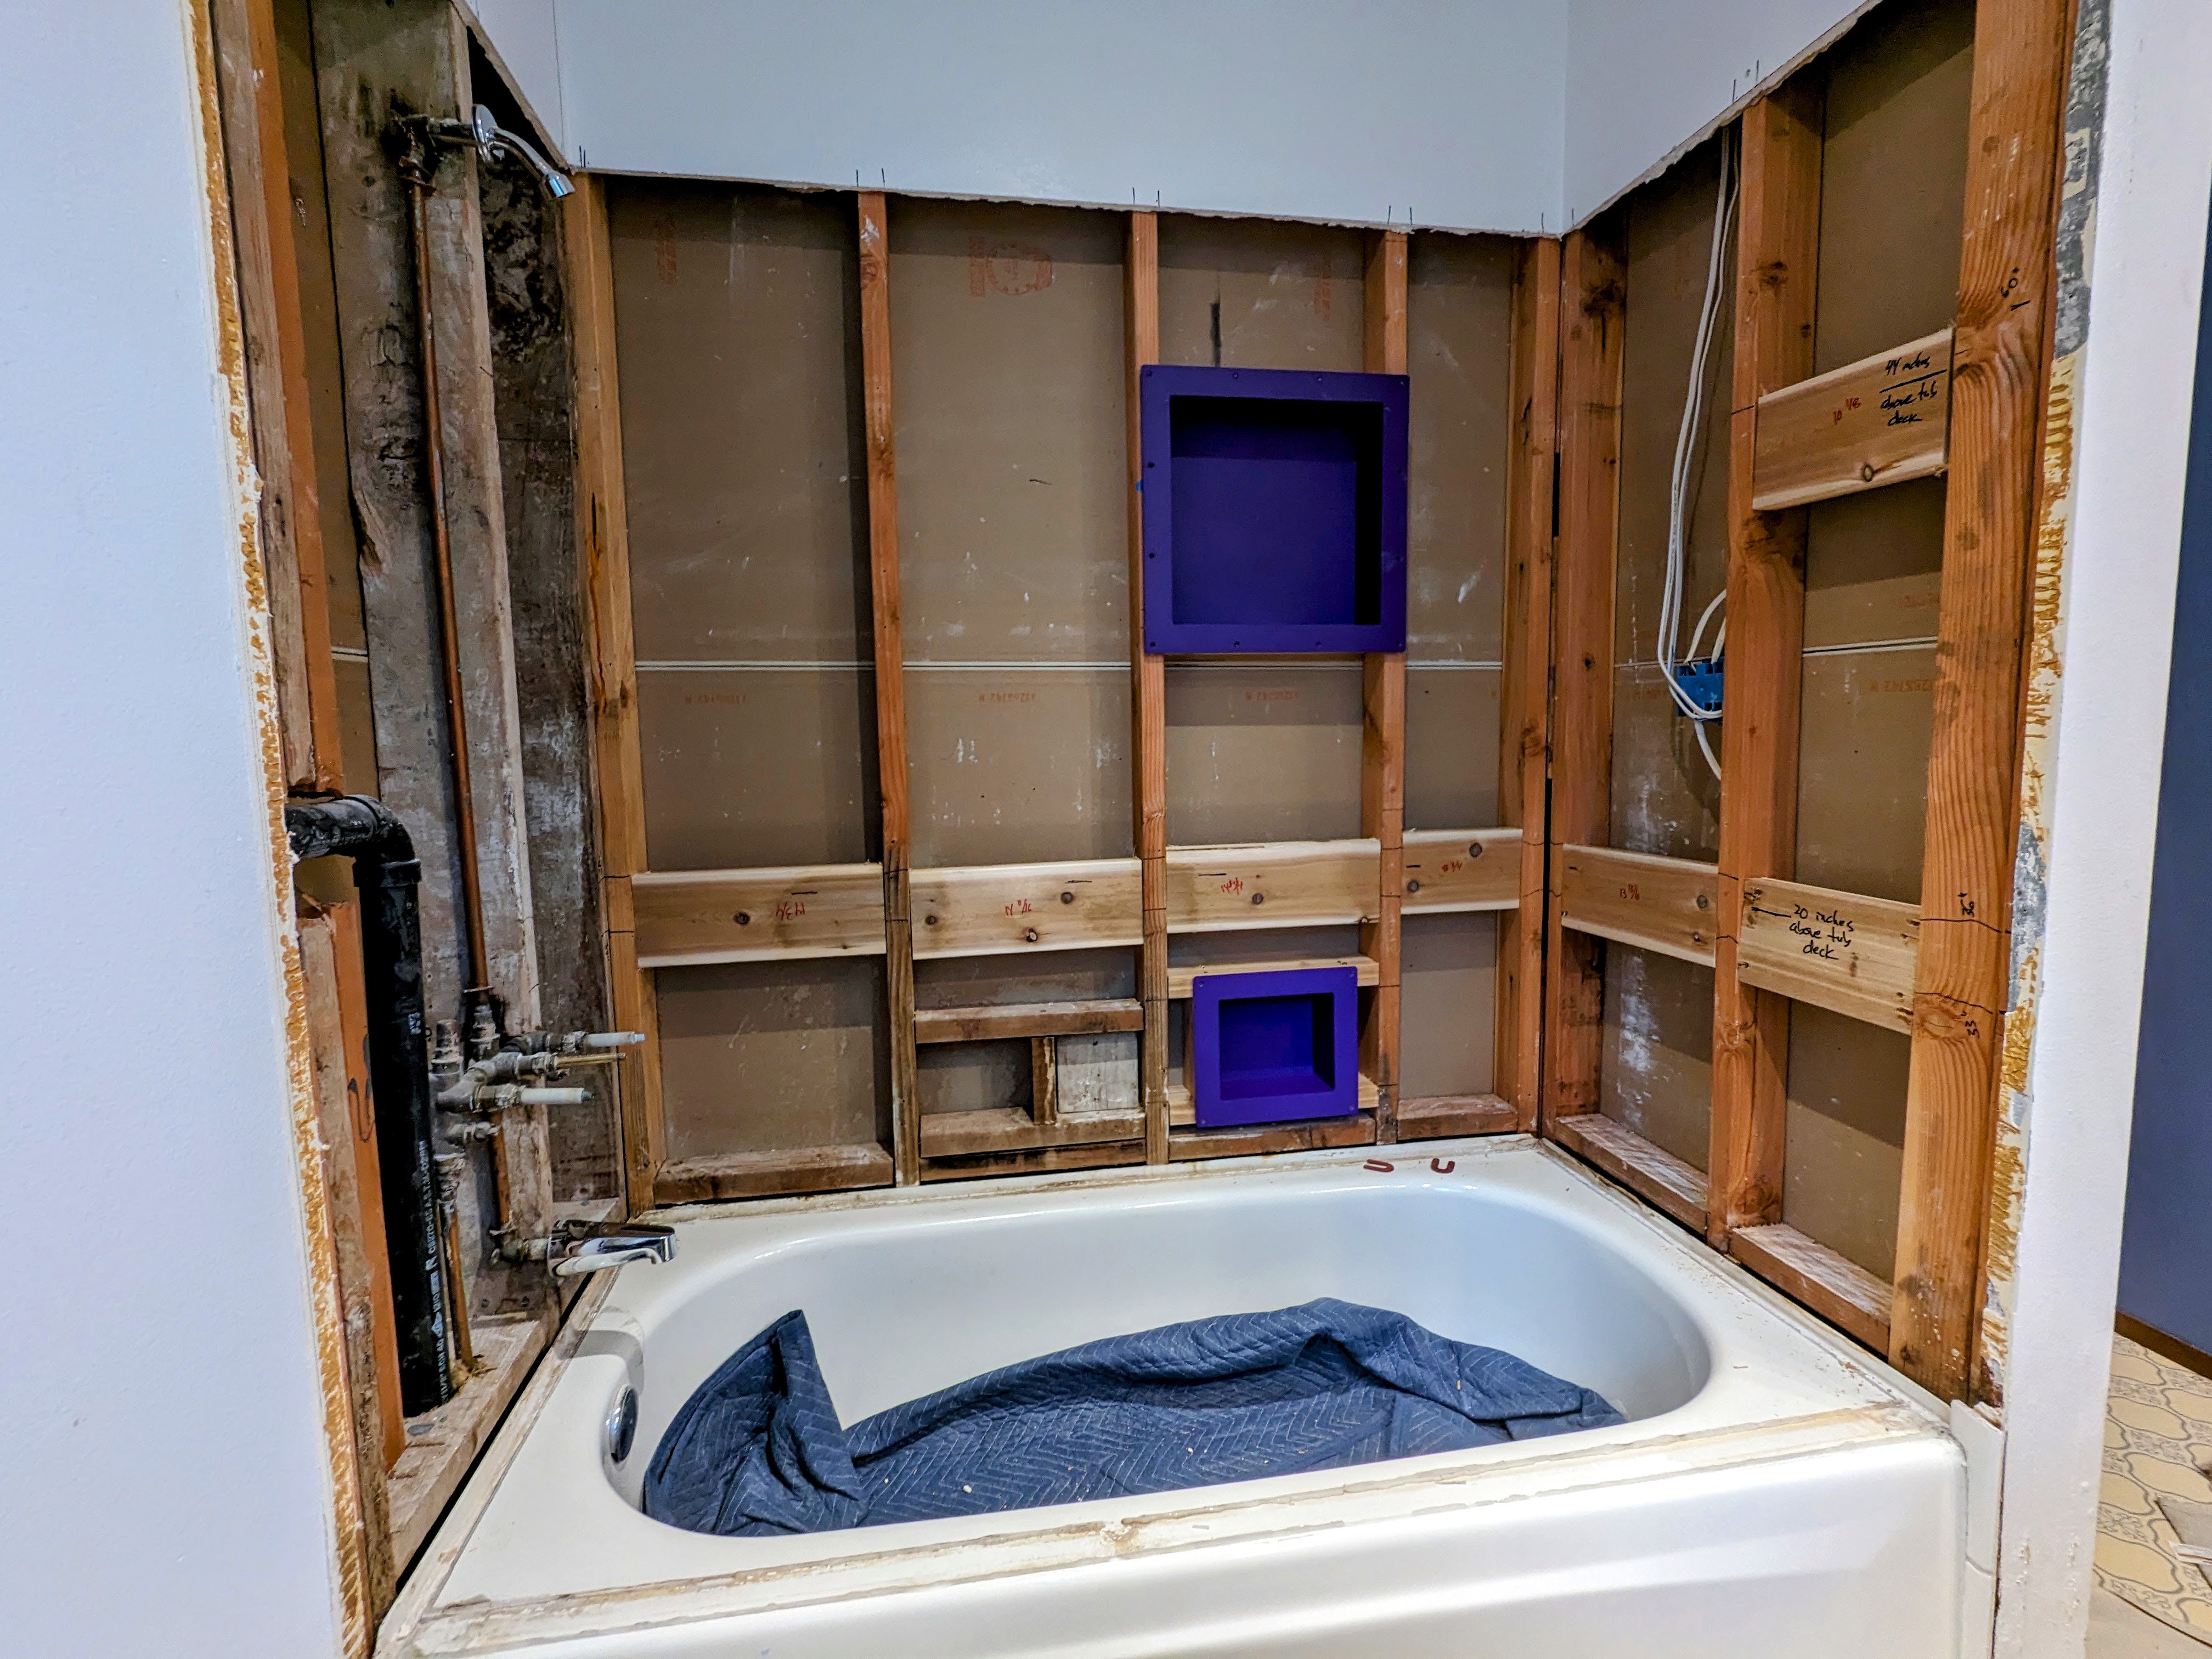
In the middle column, there is a short piece of tile a little more than half-way up. I don't like the look of it right now and wish I had put it at the top of the column, but we'll see how things look when the grout is put in place. If I still don't like it, maybe I'll cover it up with a framed set of instructions for how to take a shower.
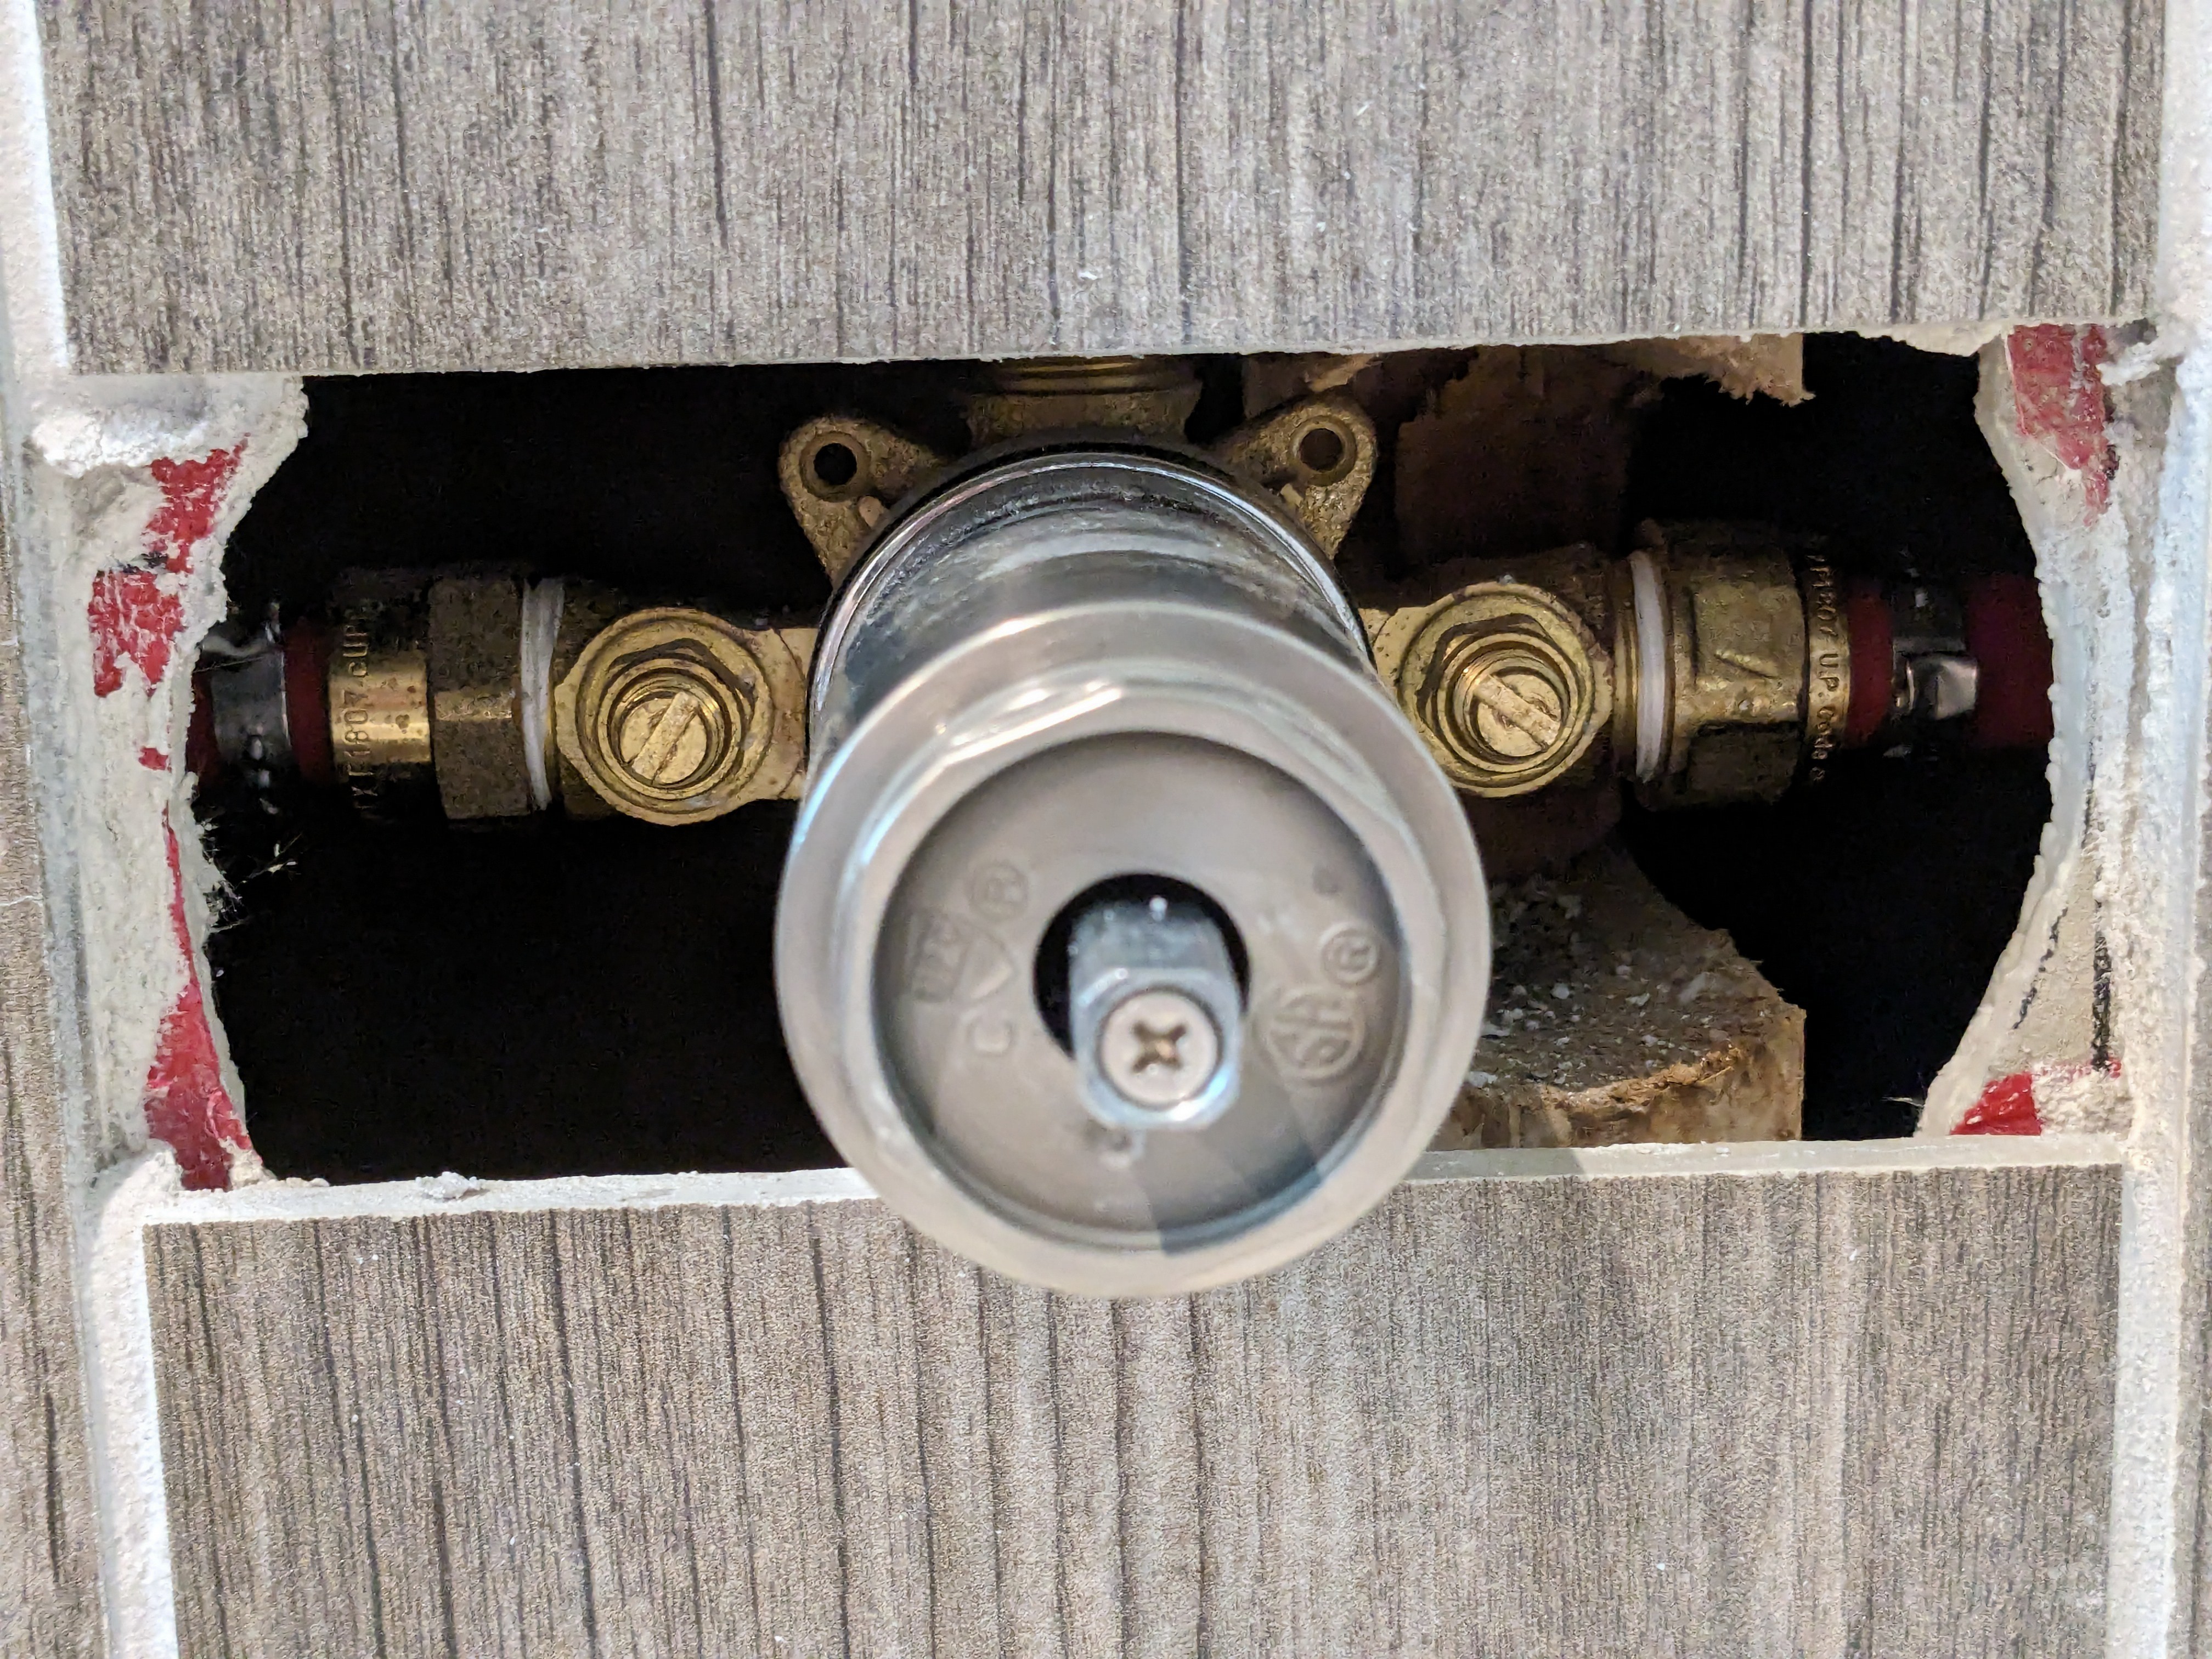
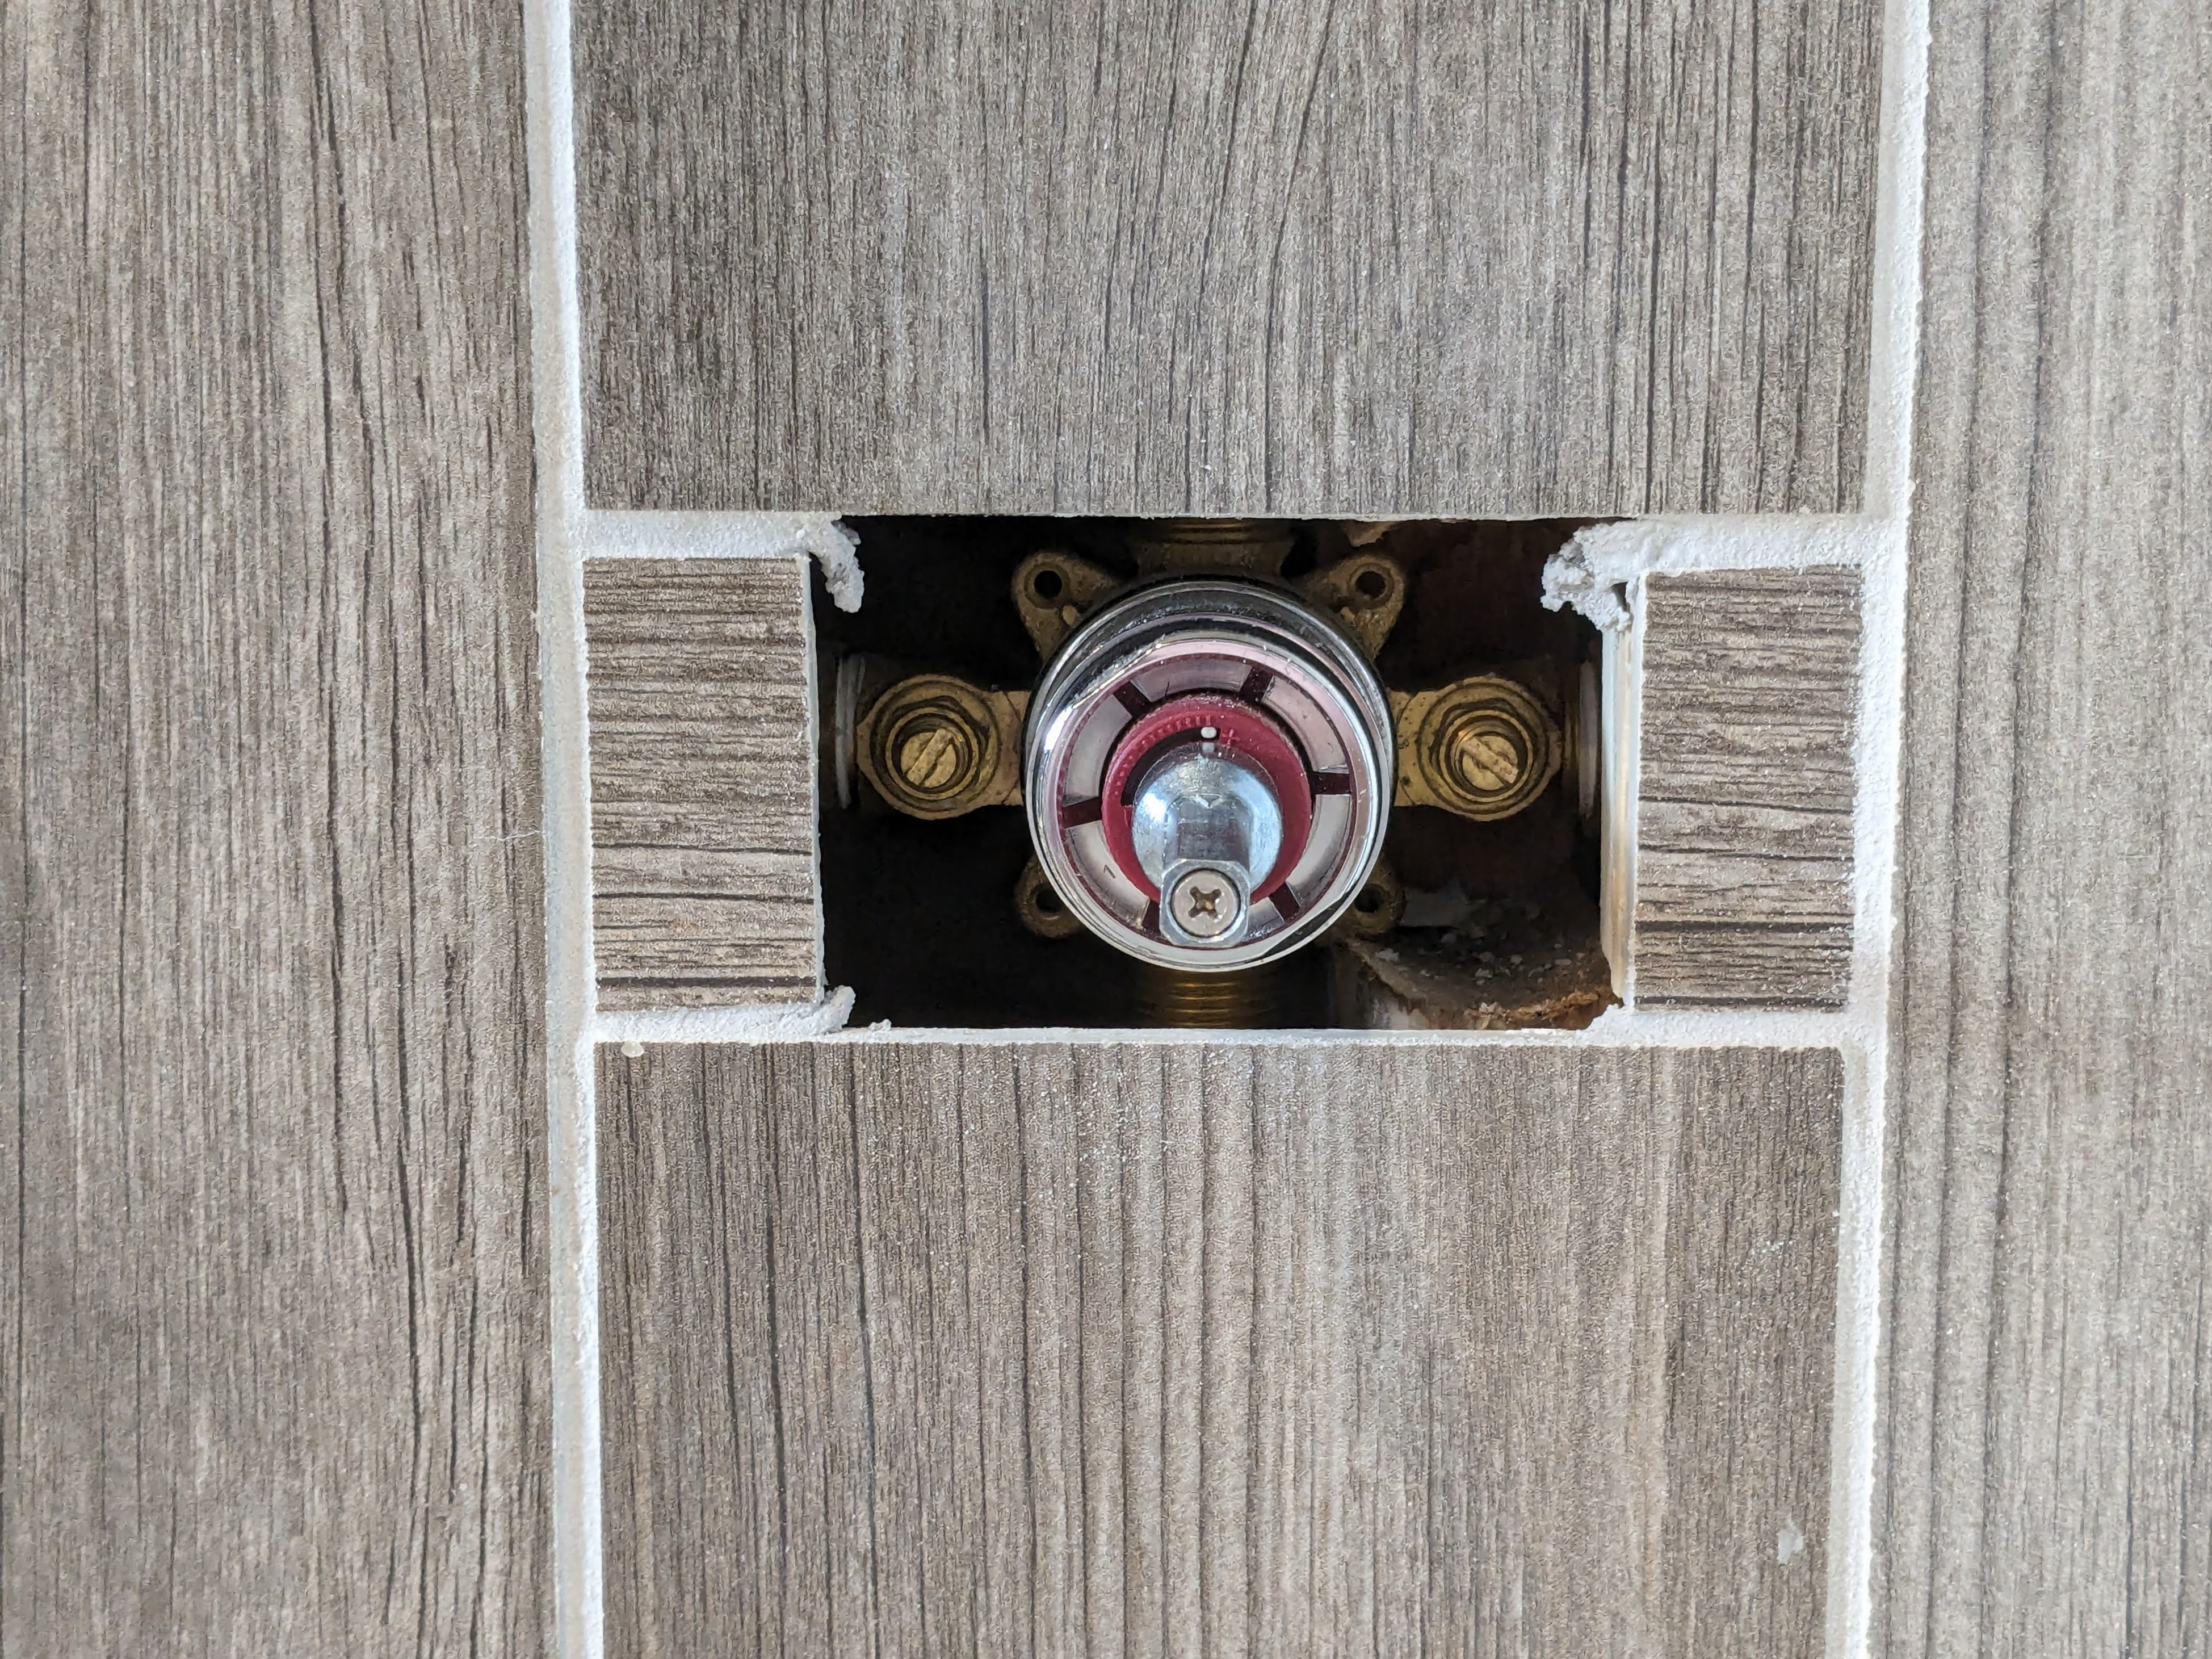
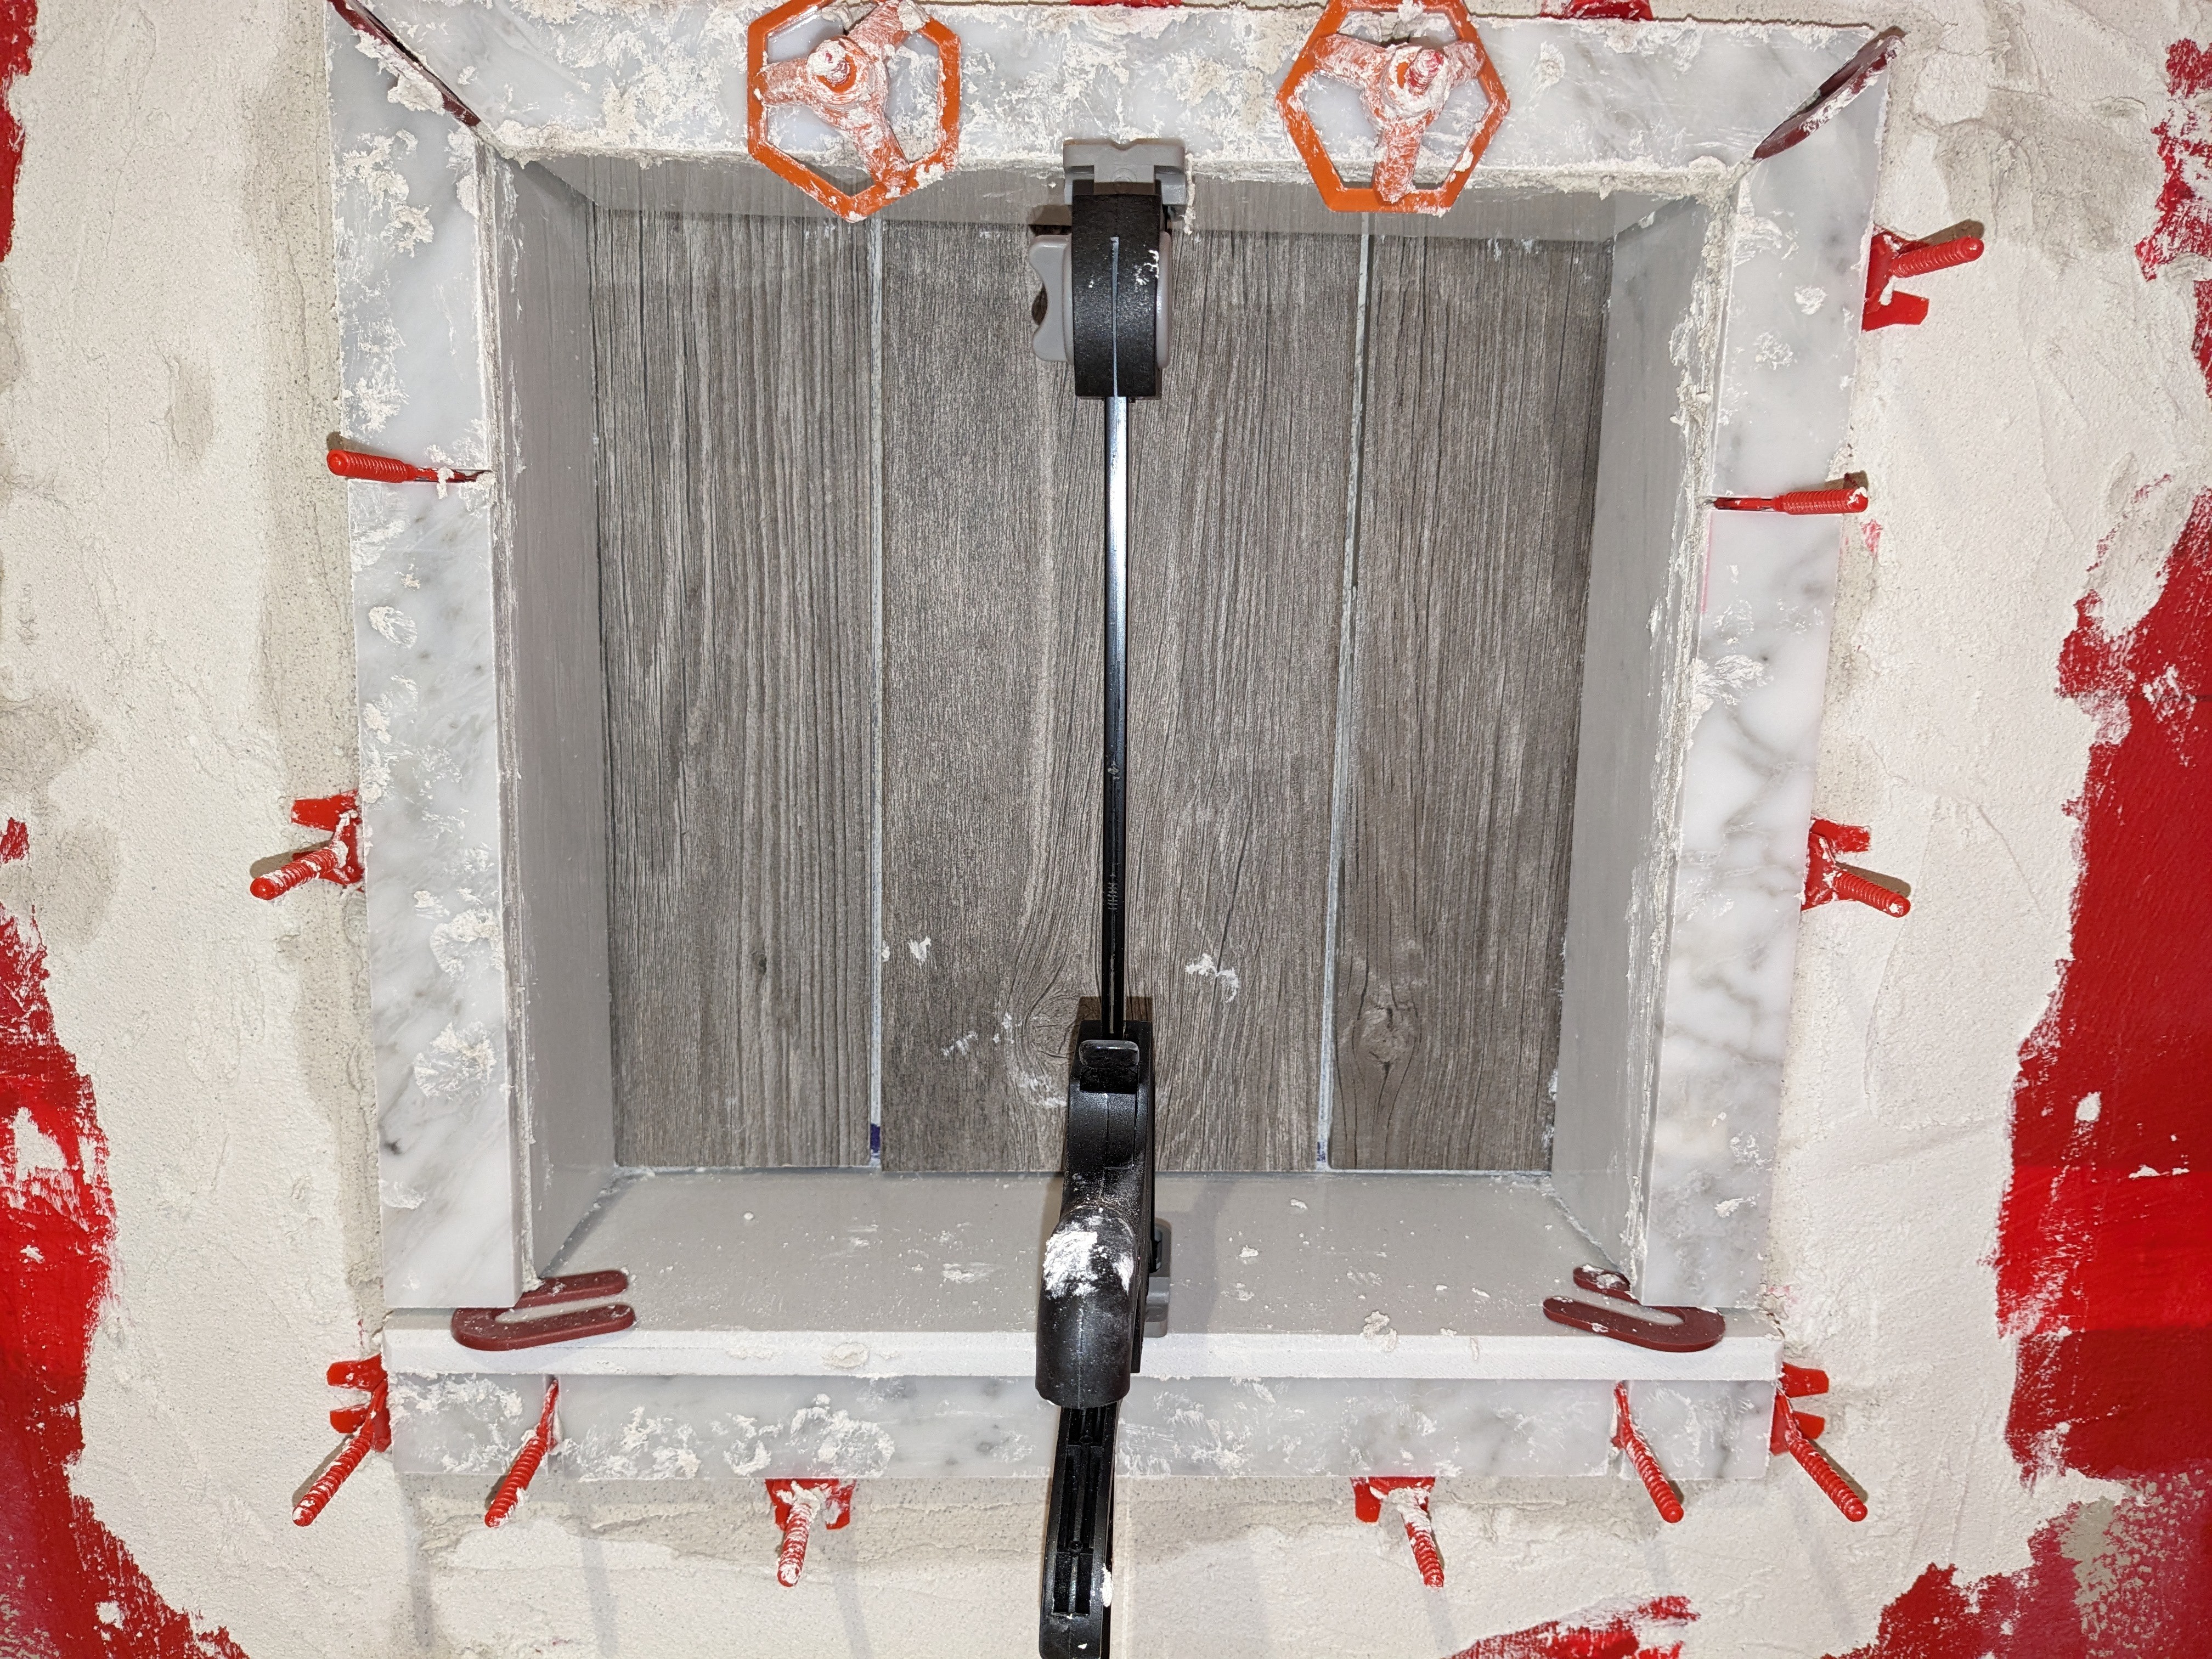
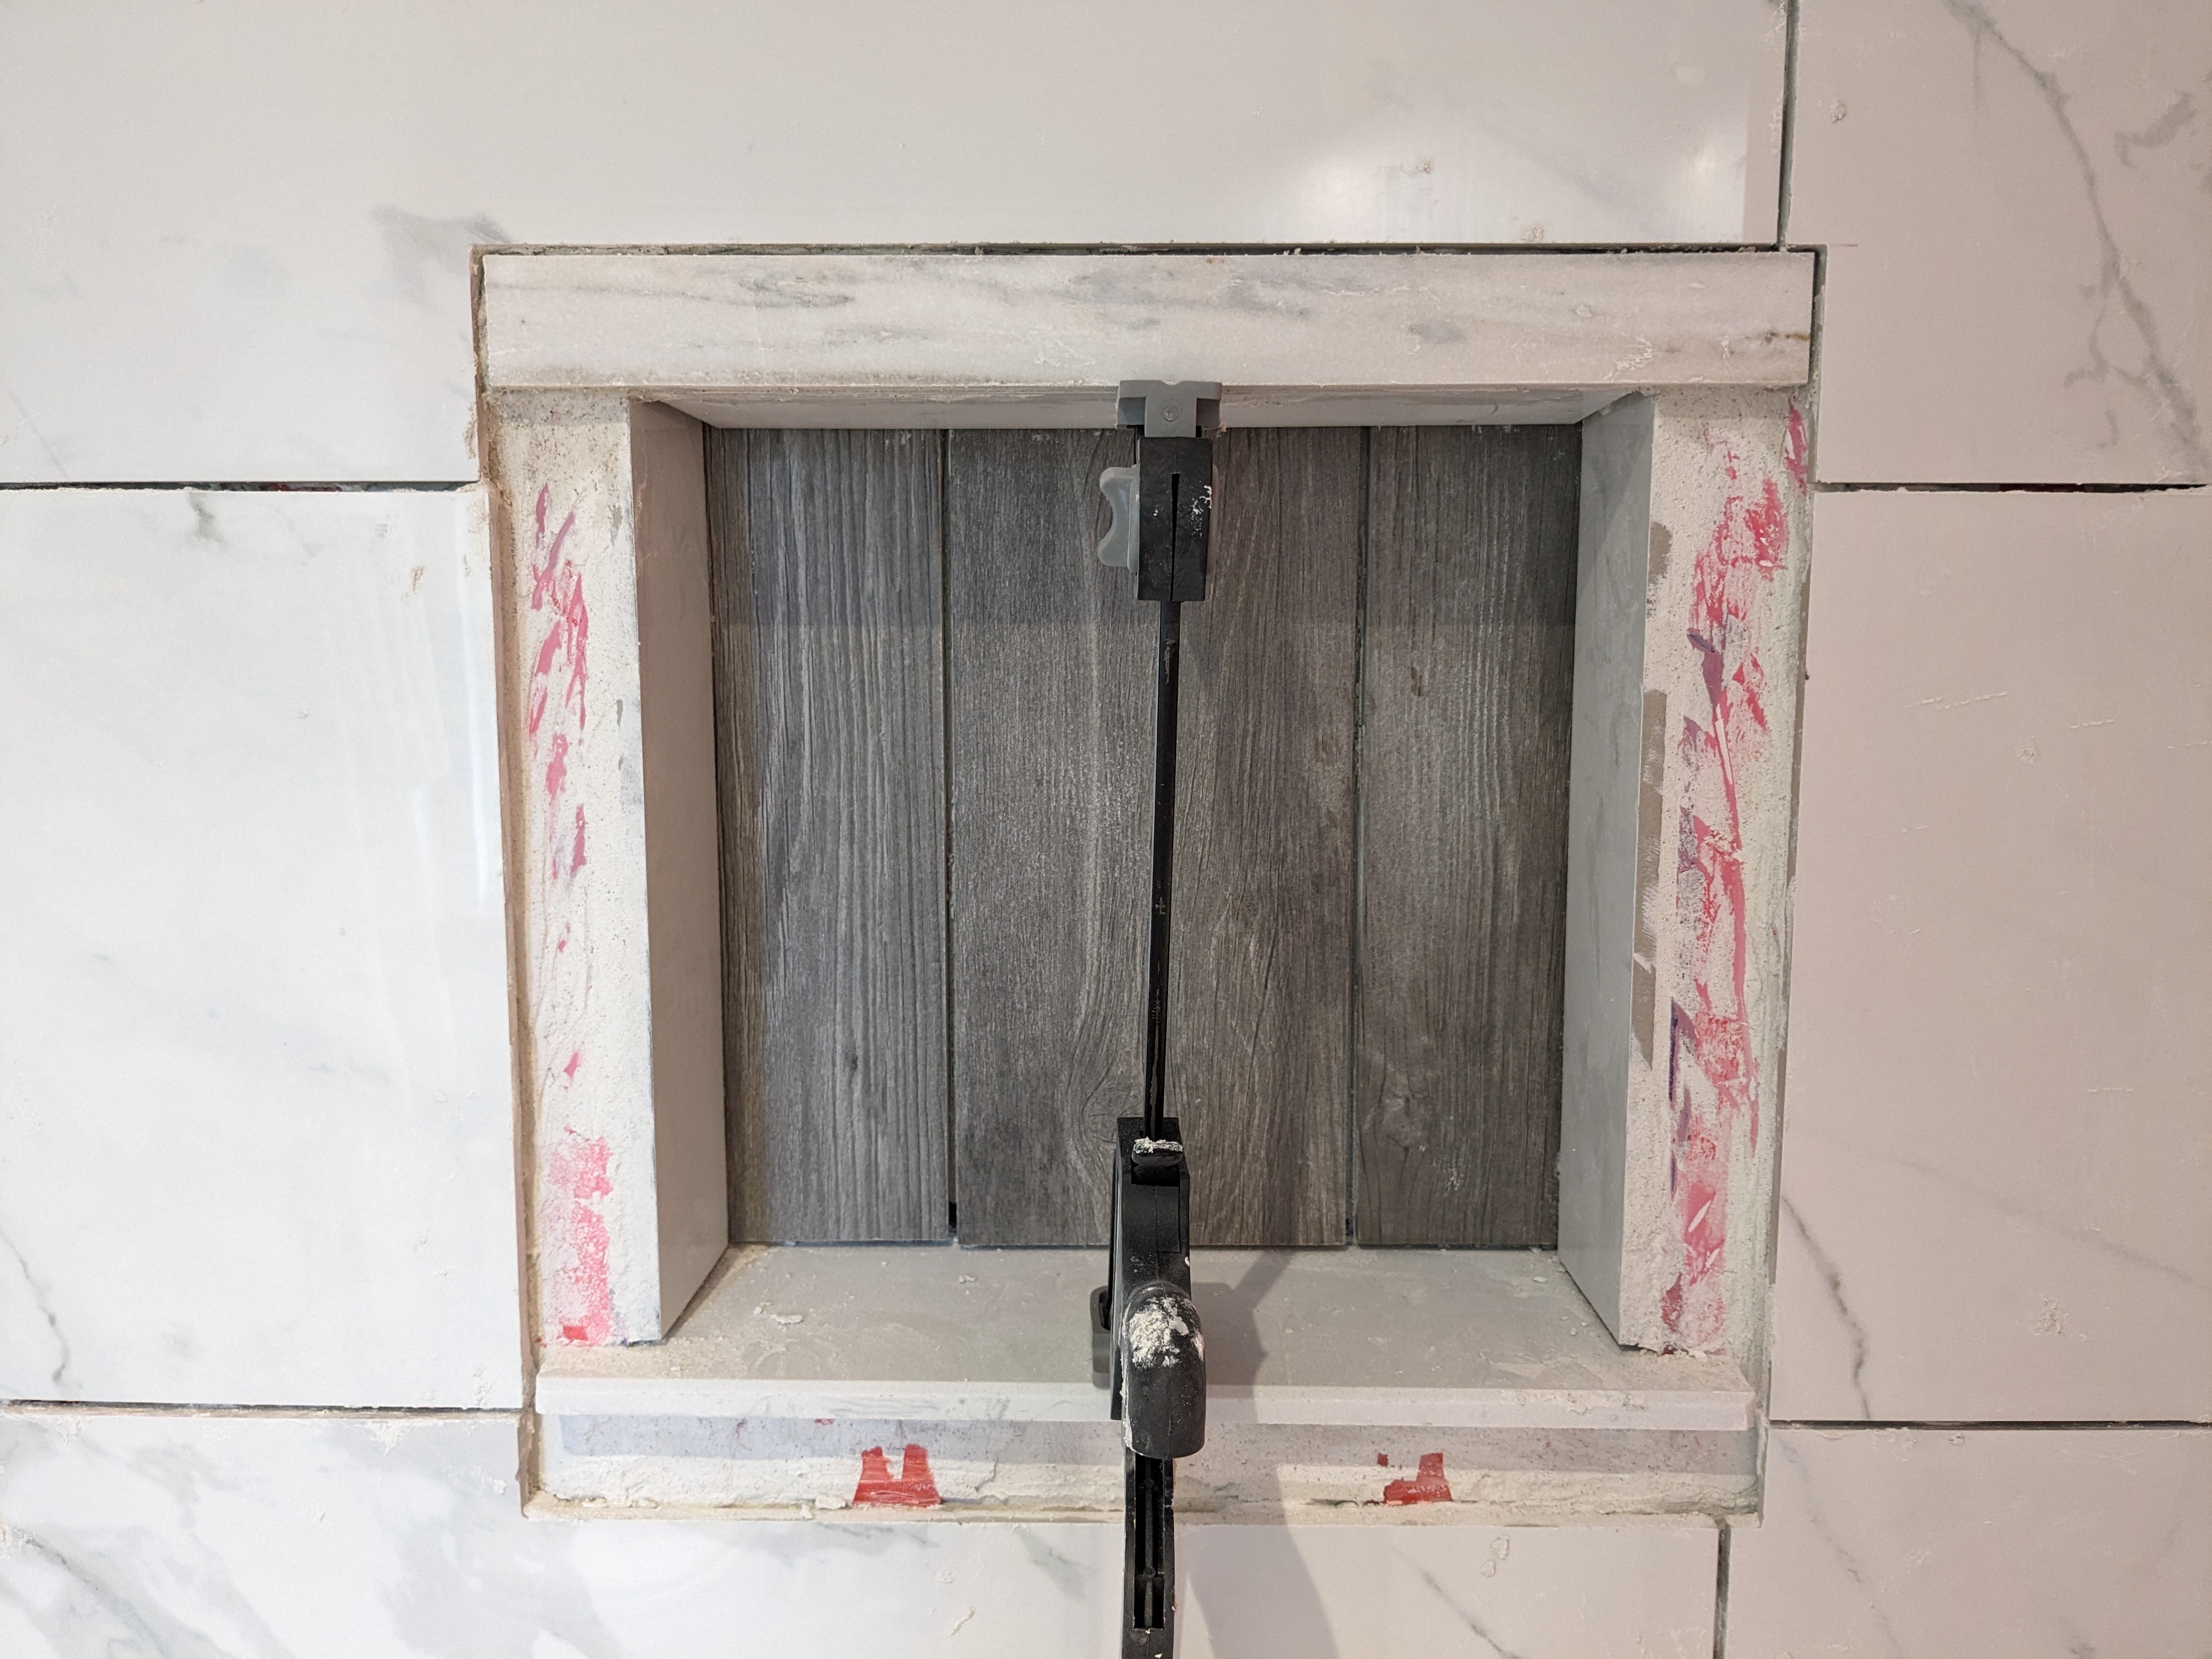
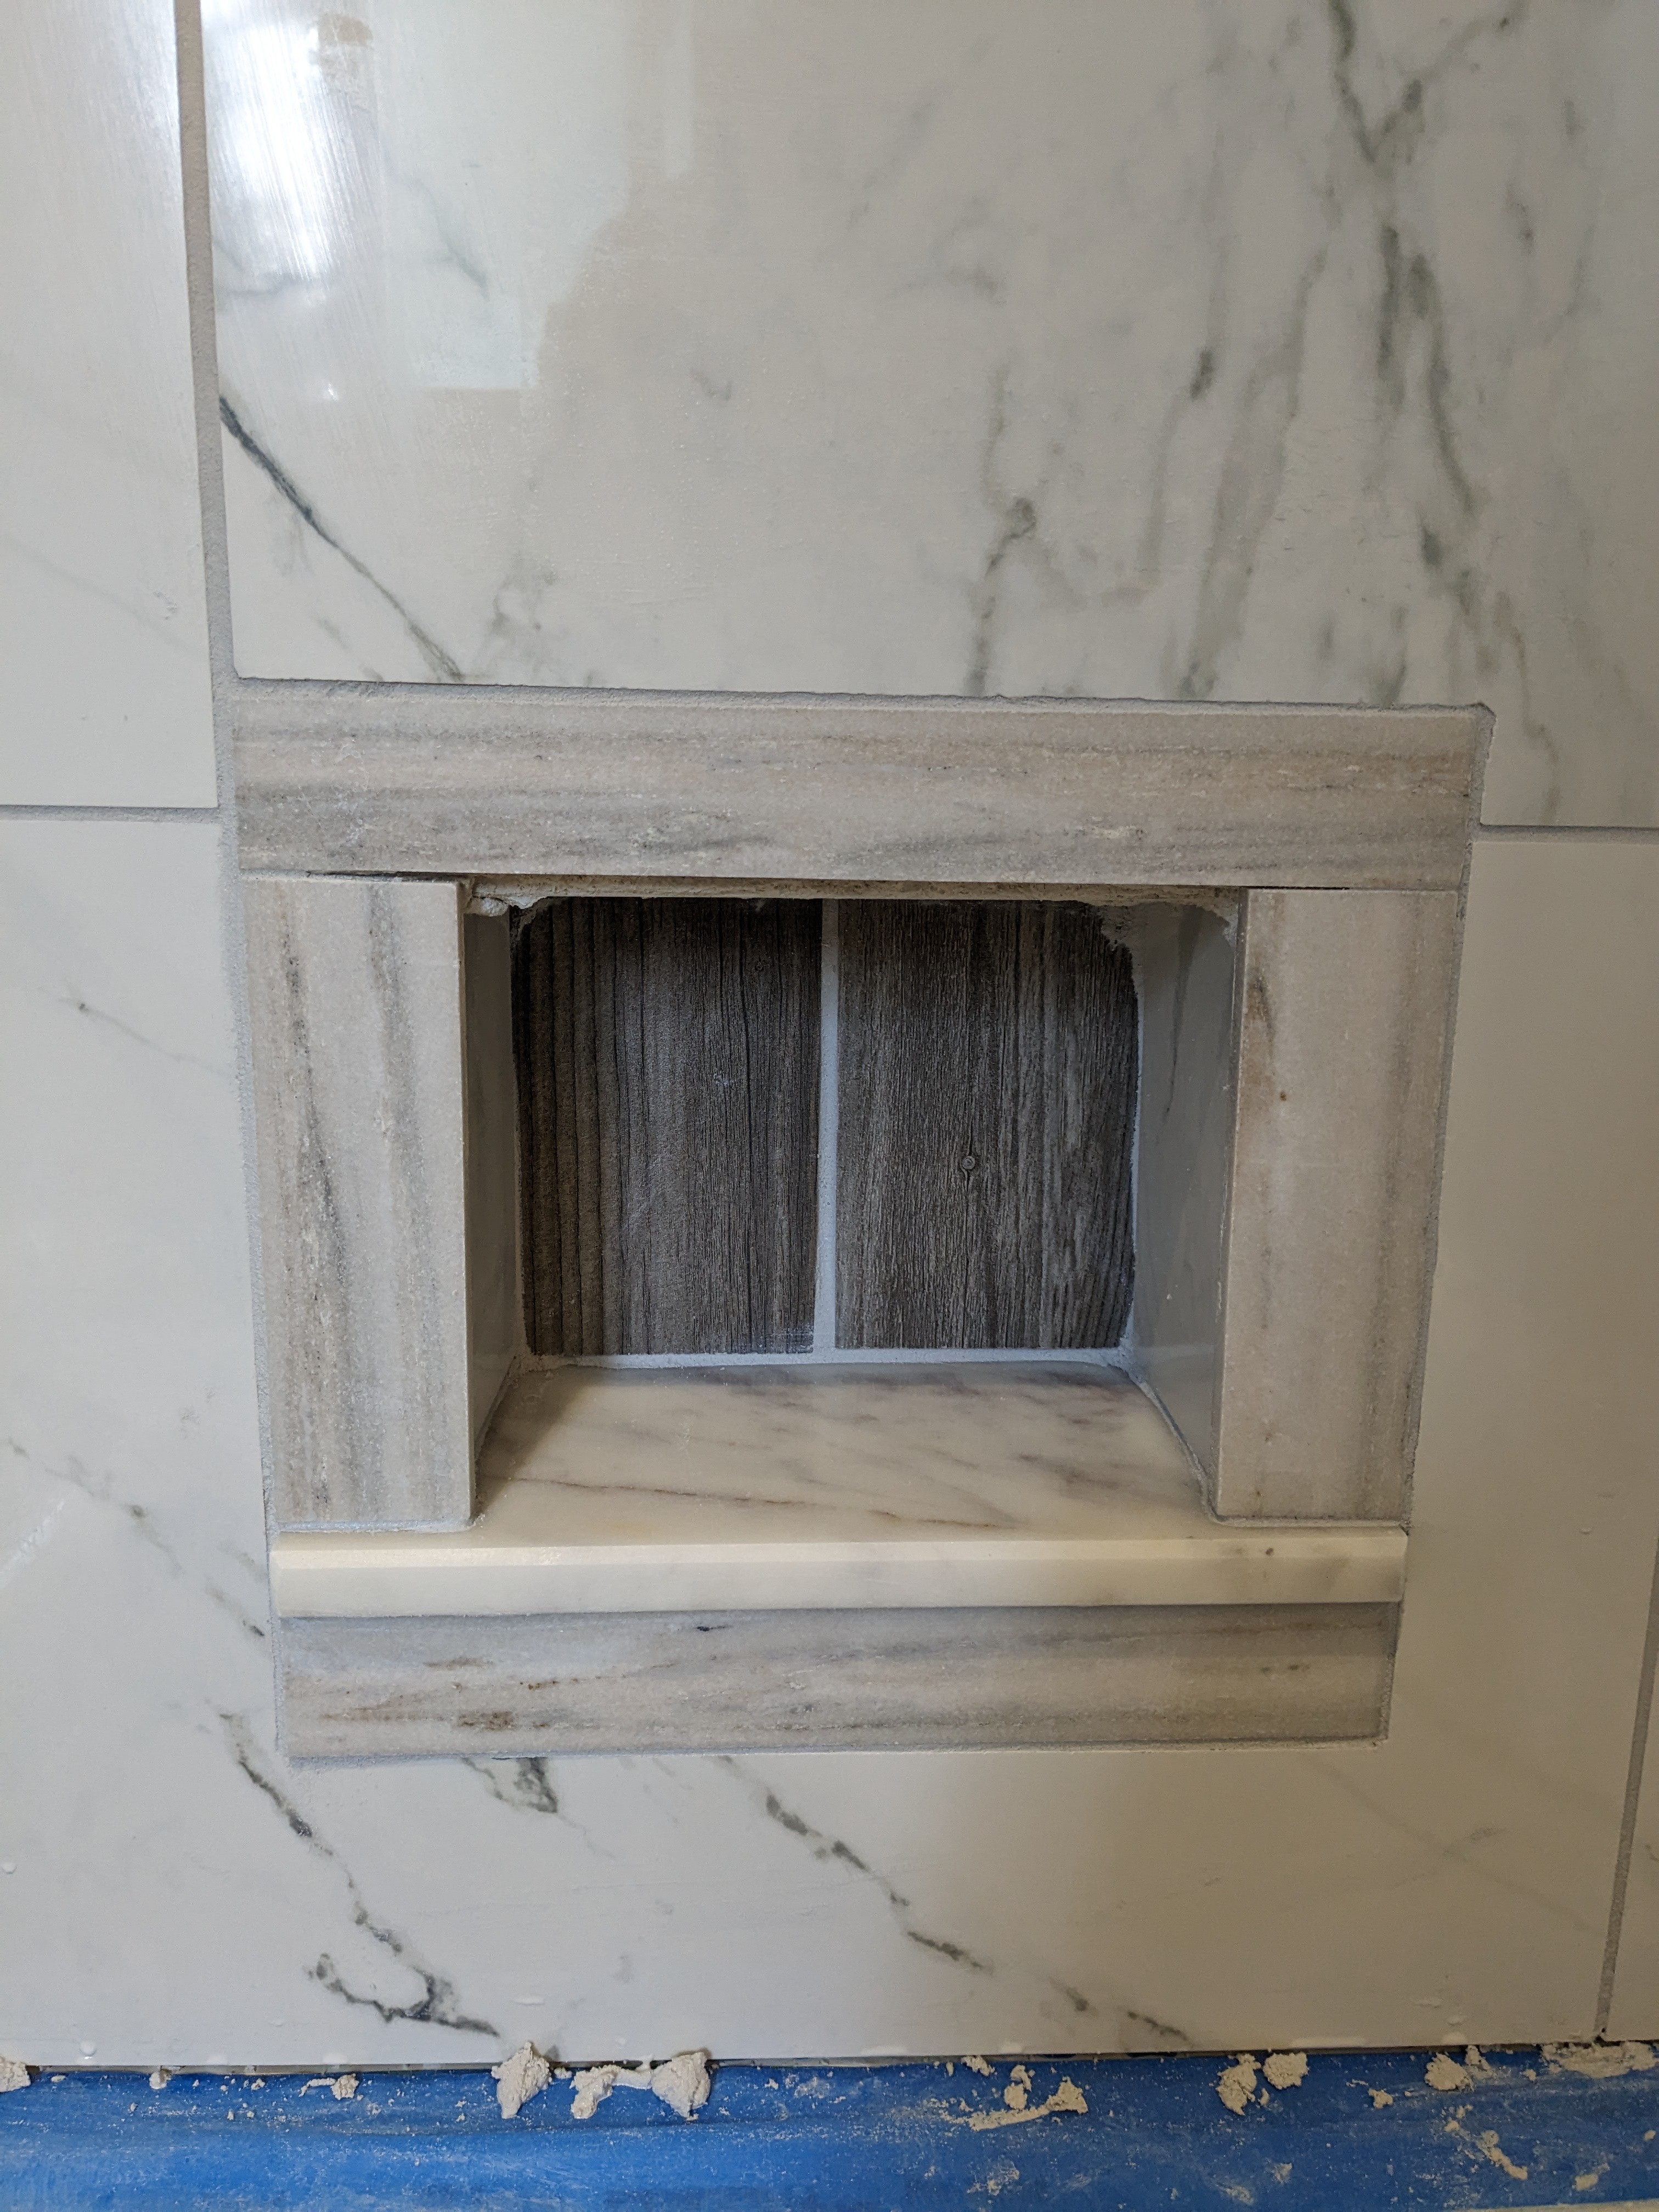
Update: Despite measuring, calculating, and ruminating, the shower valve plate does not quite cover the rectangular hole I left in the tiles. The upper left corner is slightly open, and the other corners are borderline close.
![]()
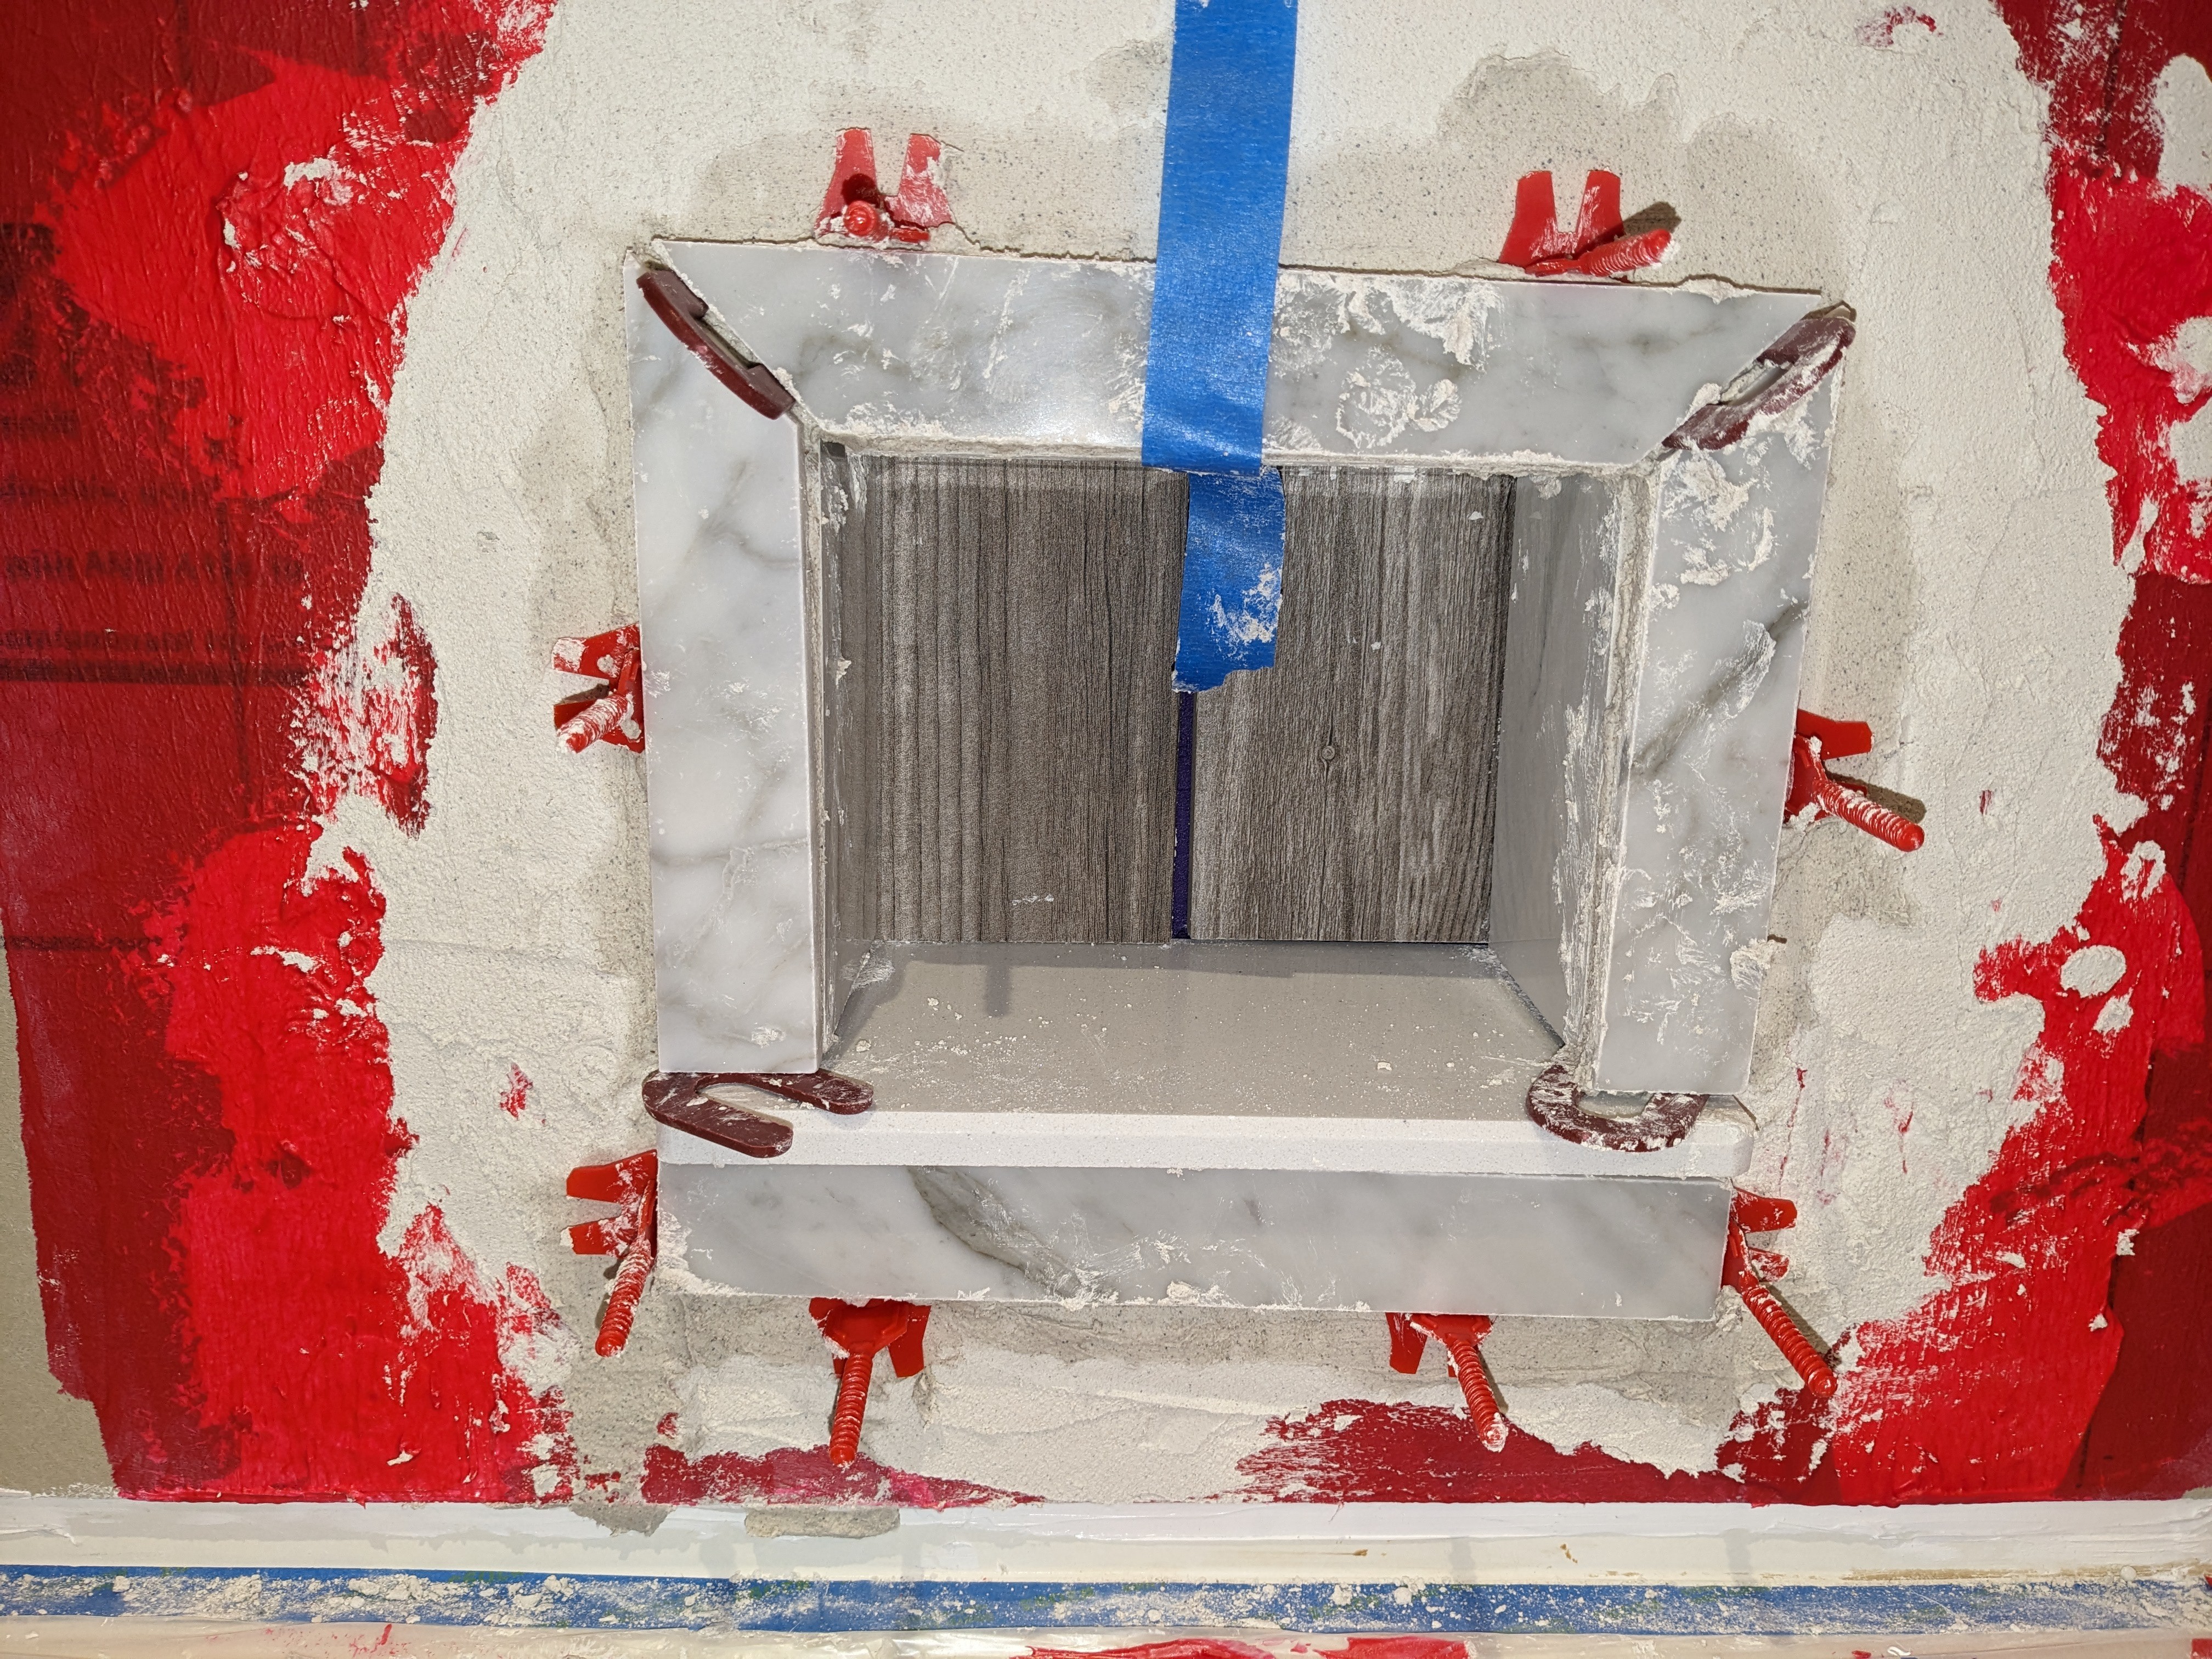
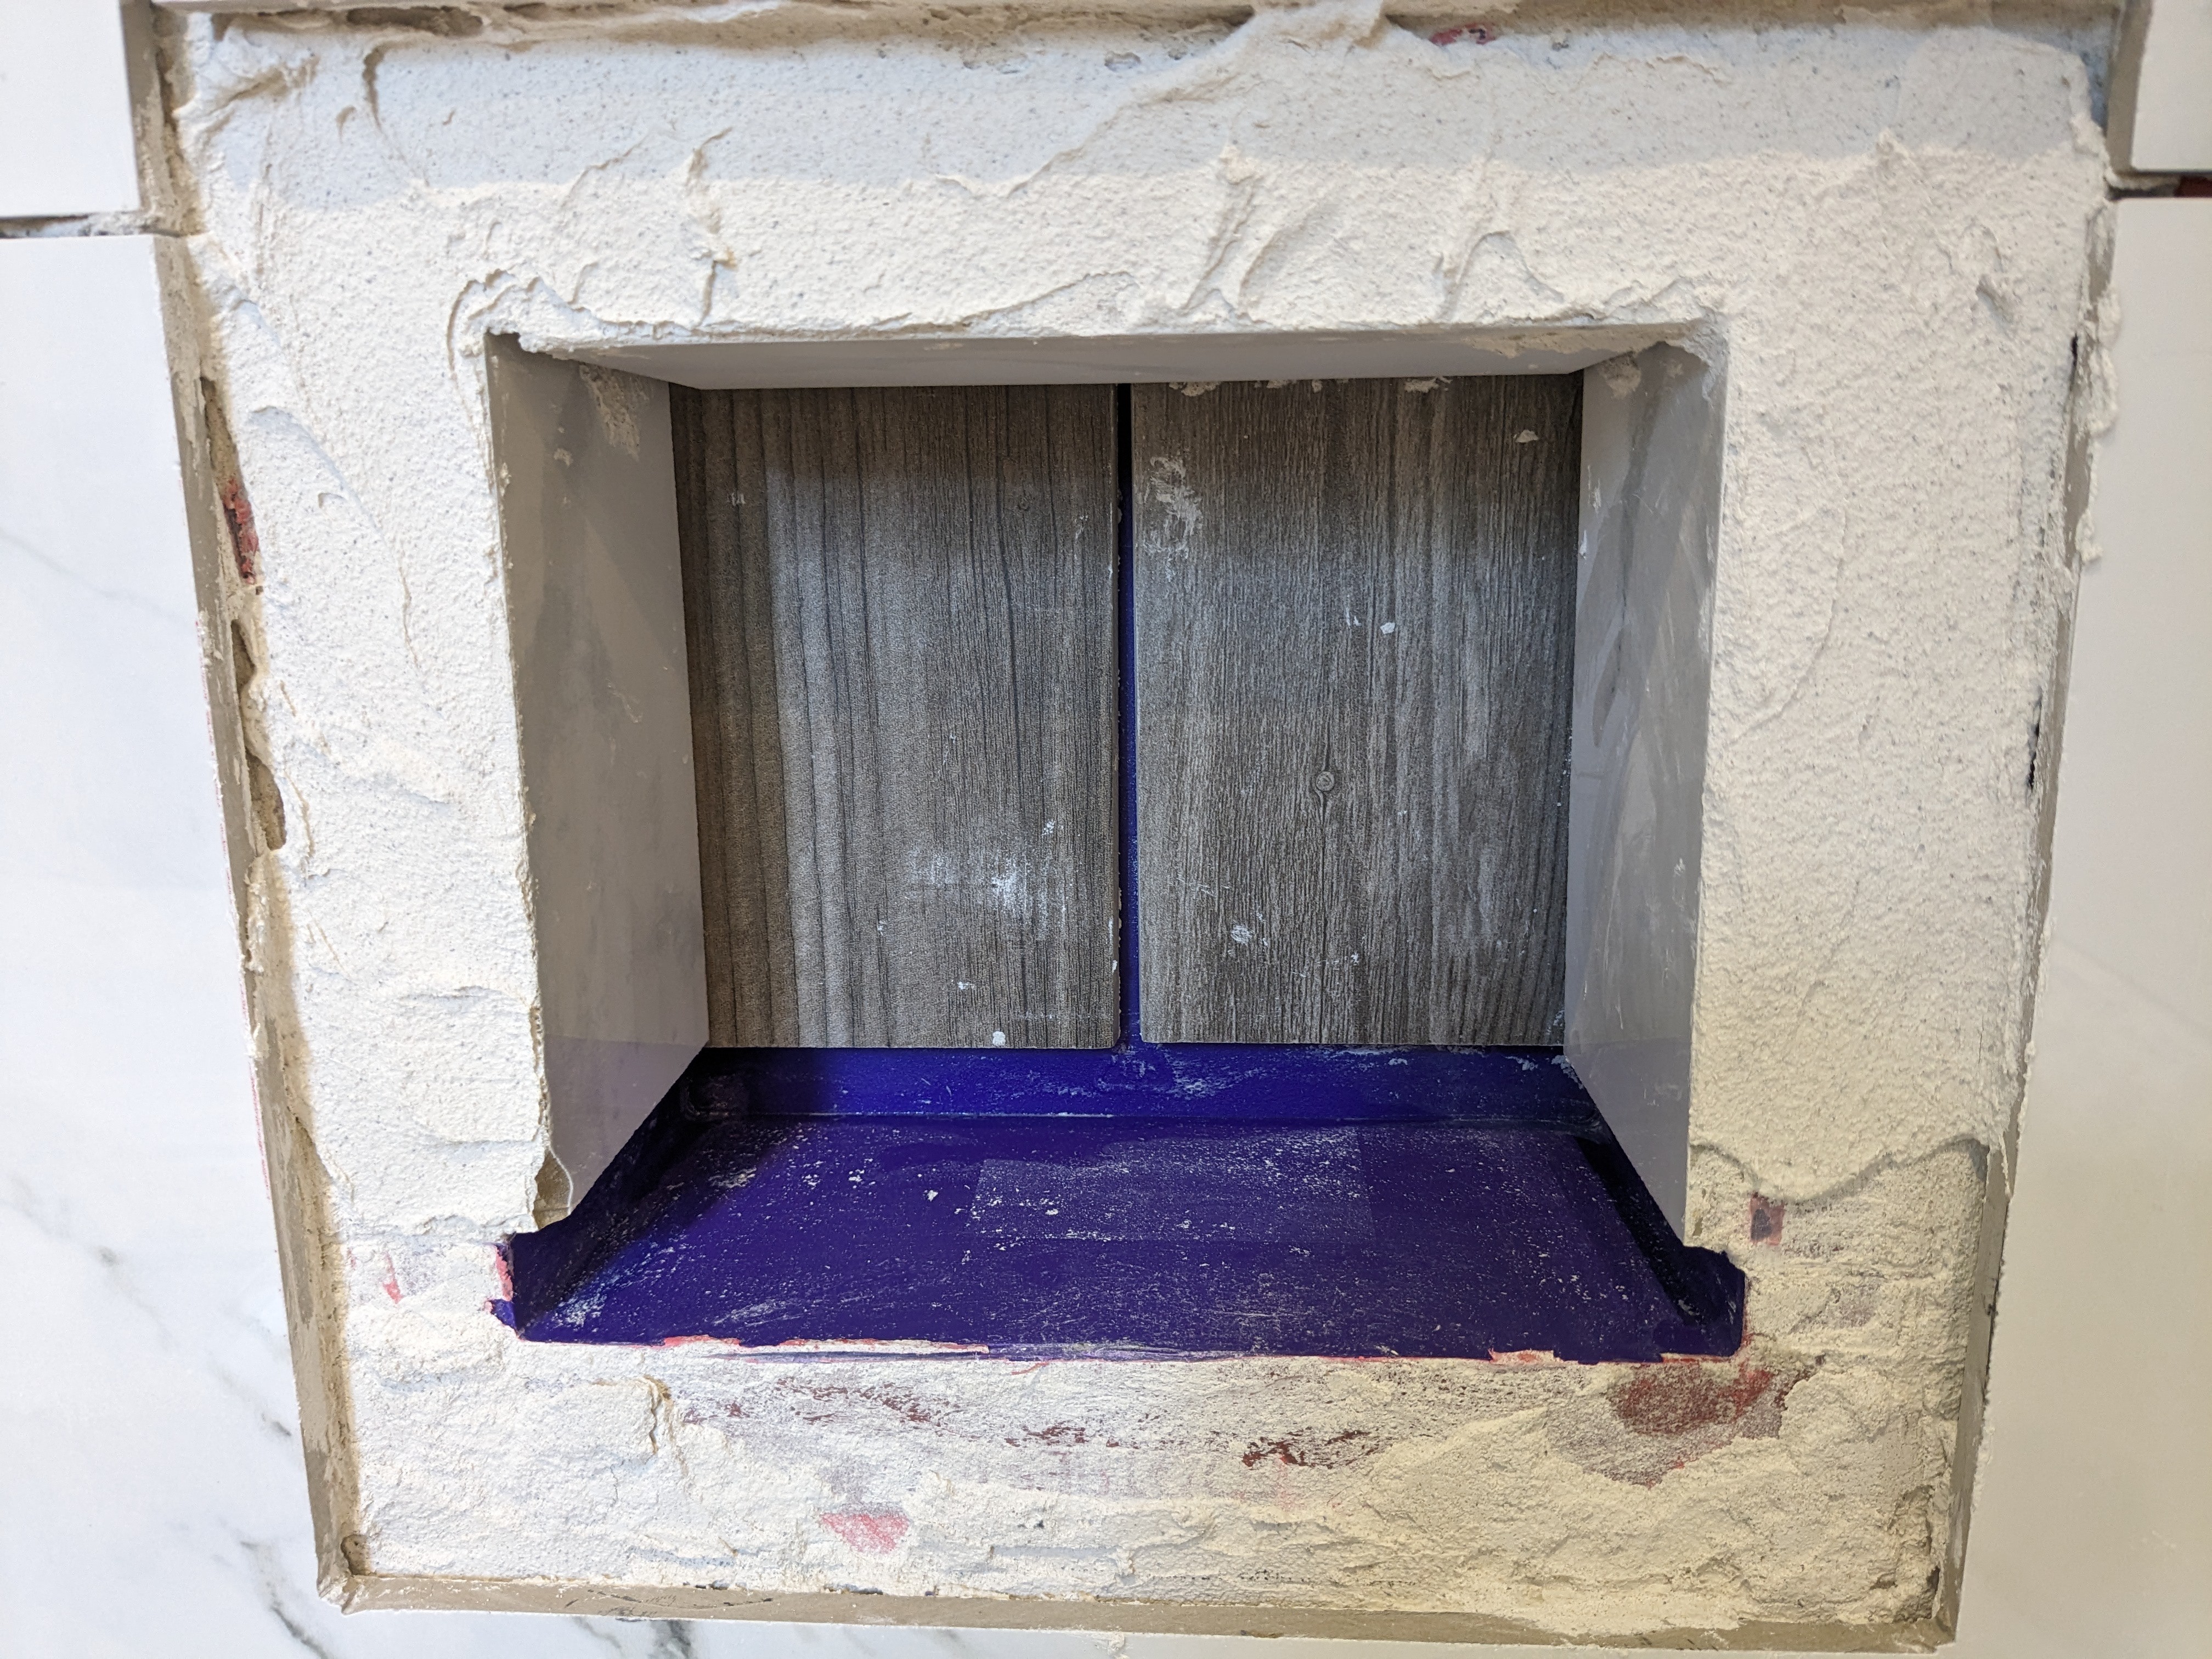
I considered several options for sealing things up. Since the gaps are so small, I thought I might use plumber's putty or caulk to just fill in. Here's what things look like behind that plate:
![]()
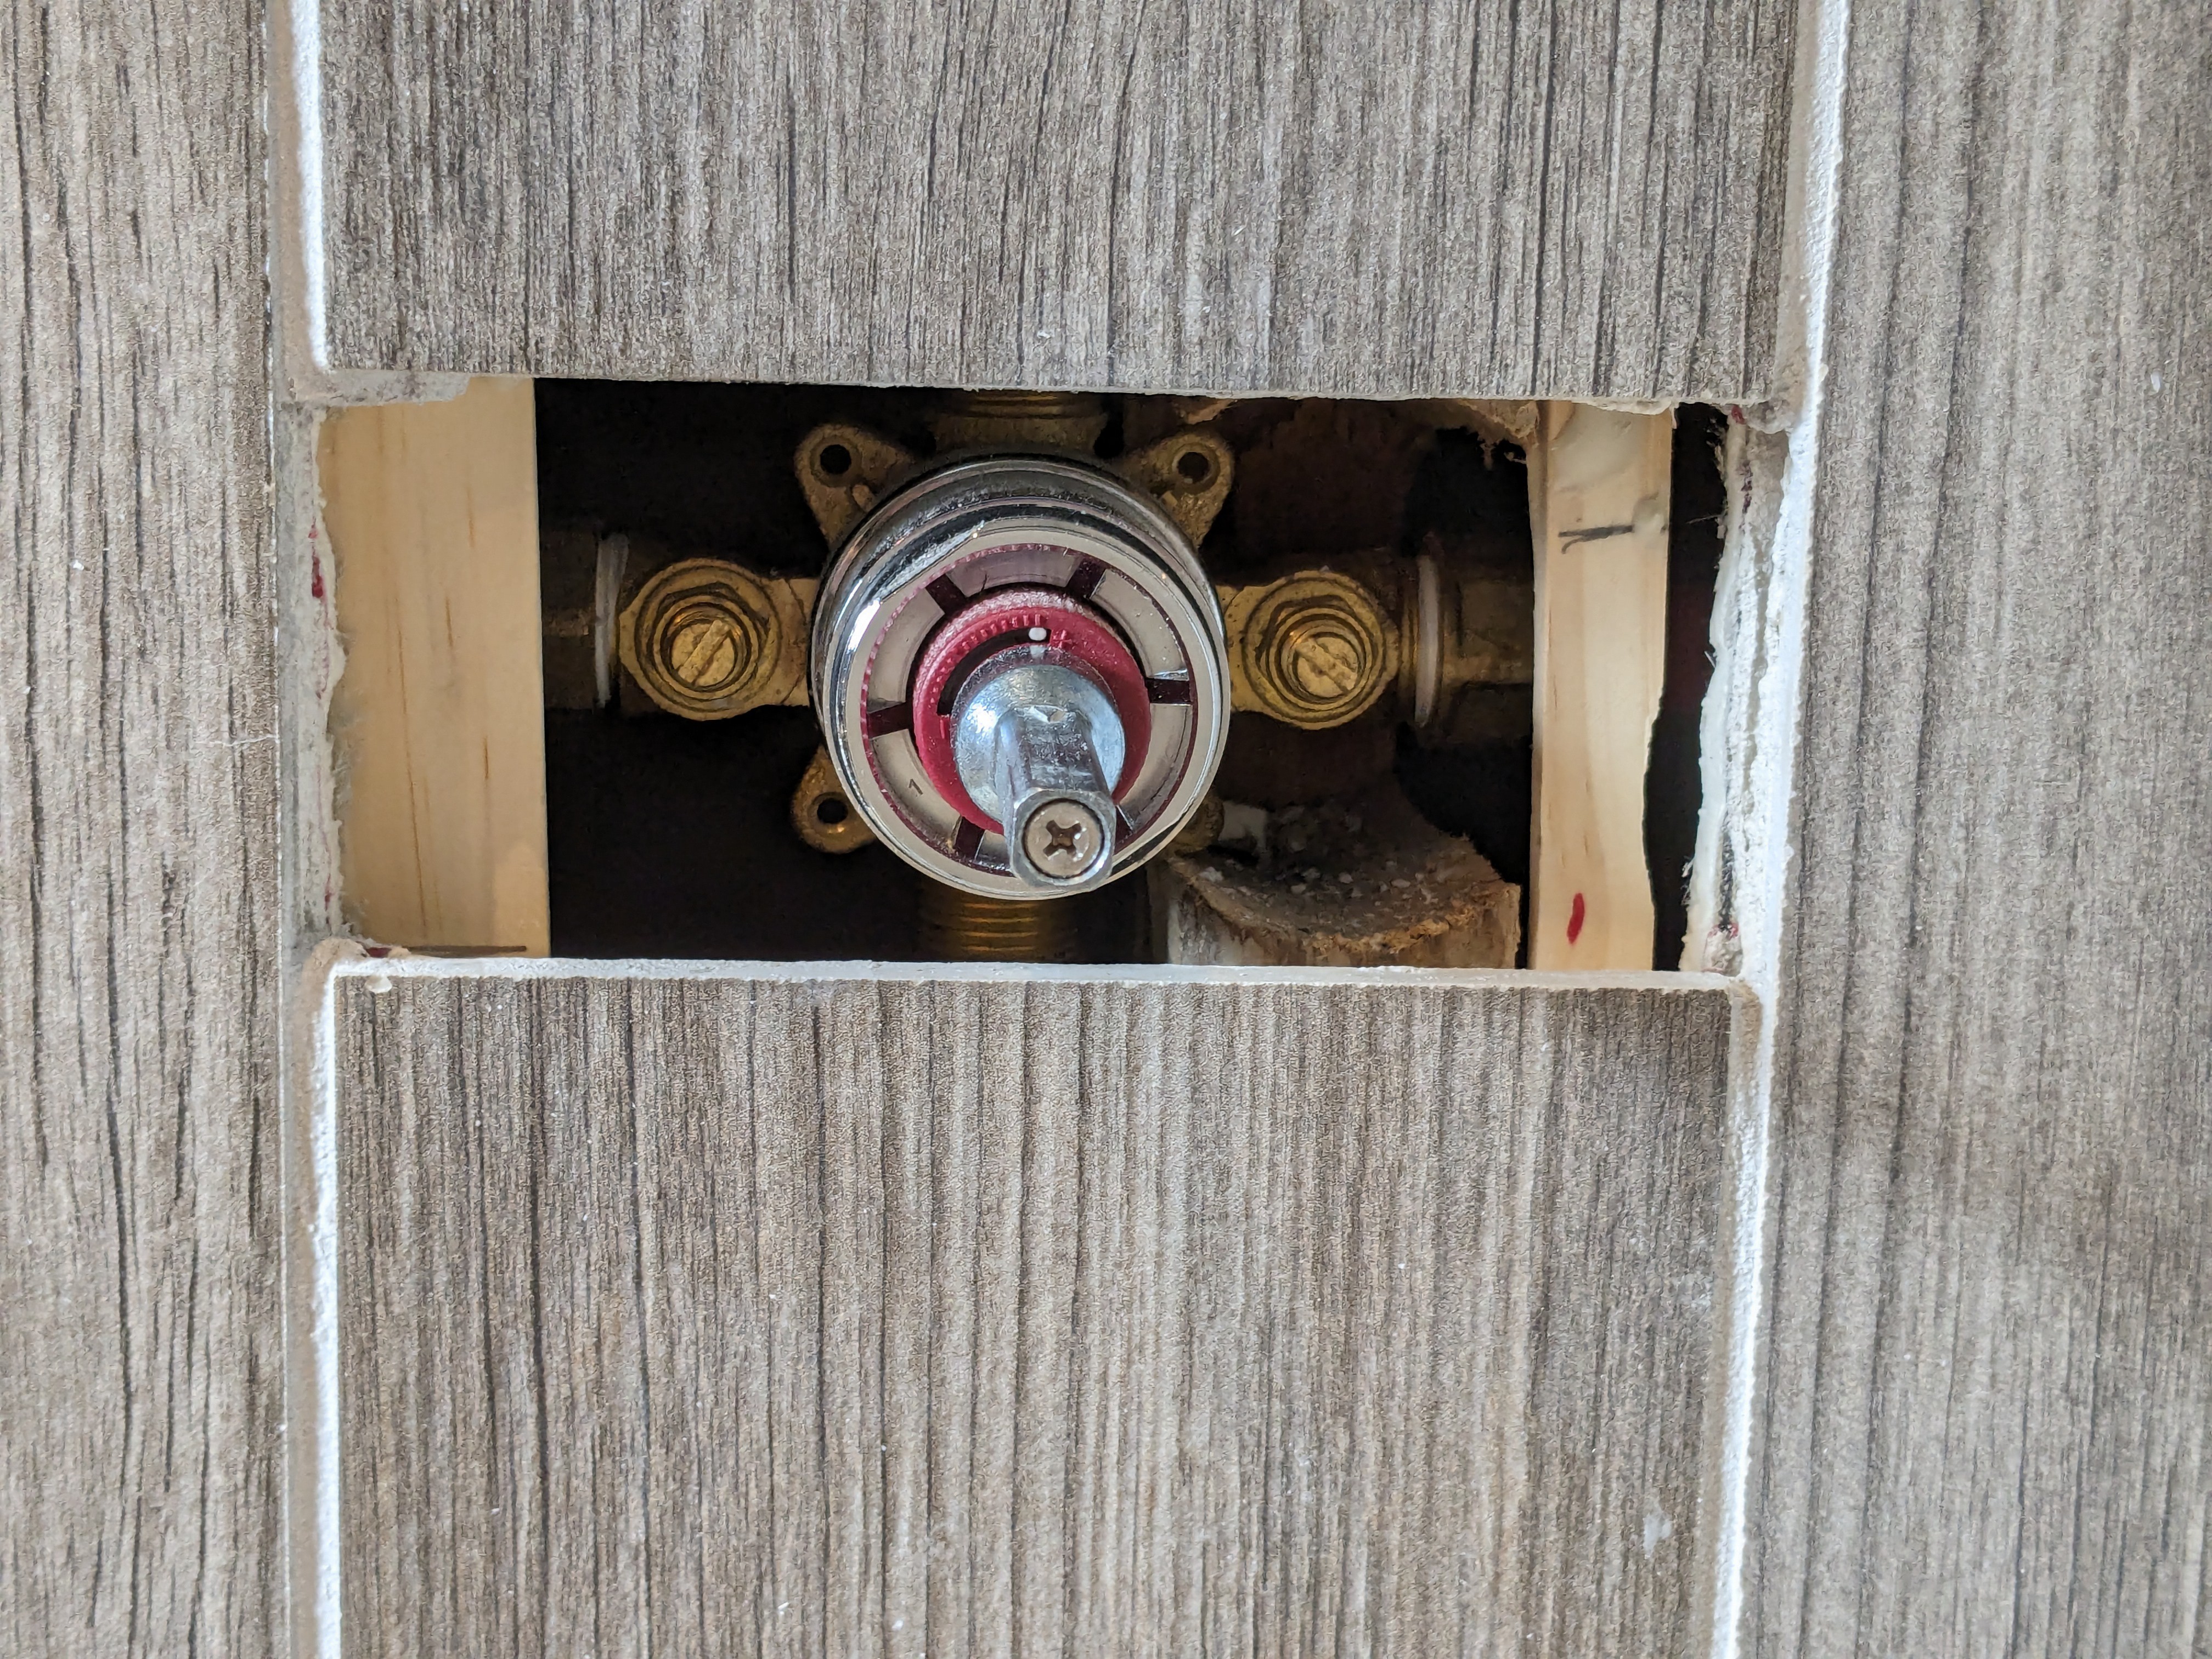
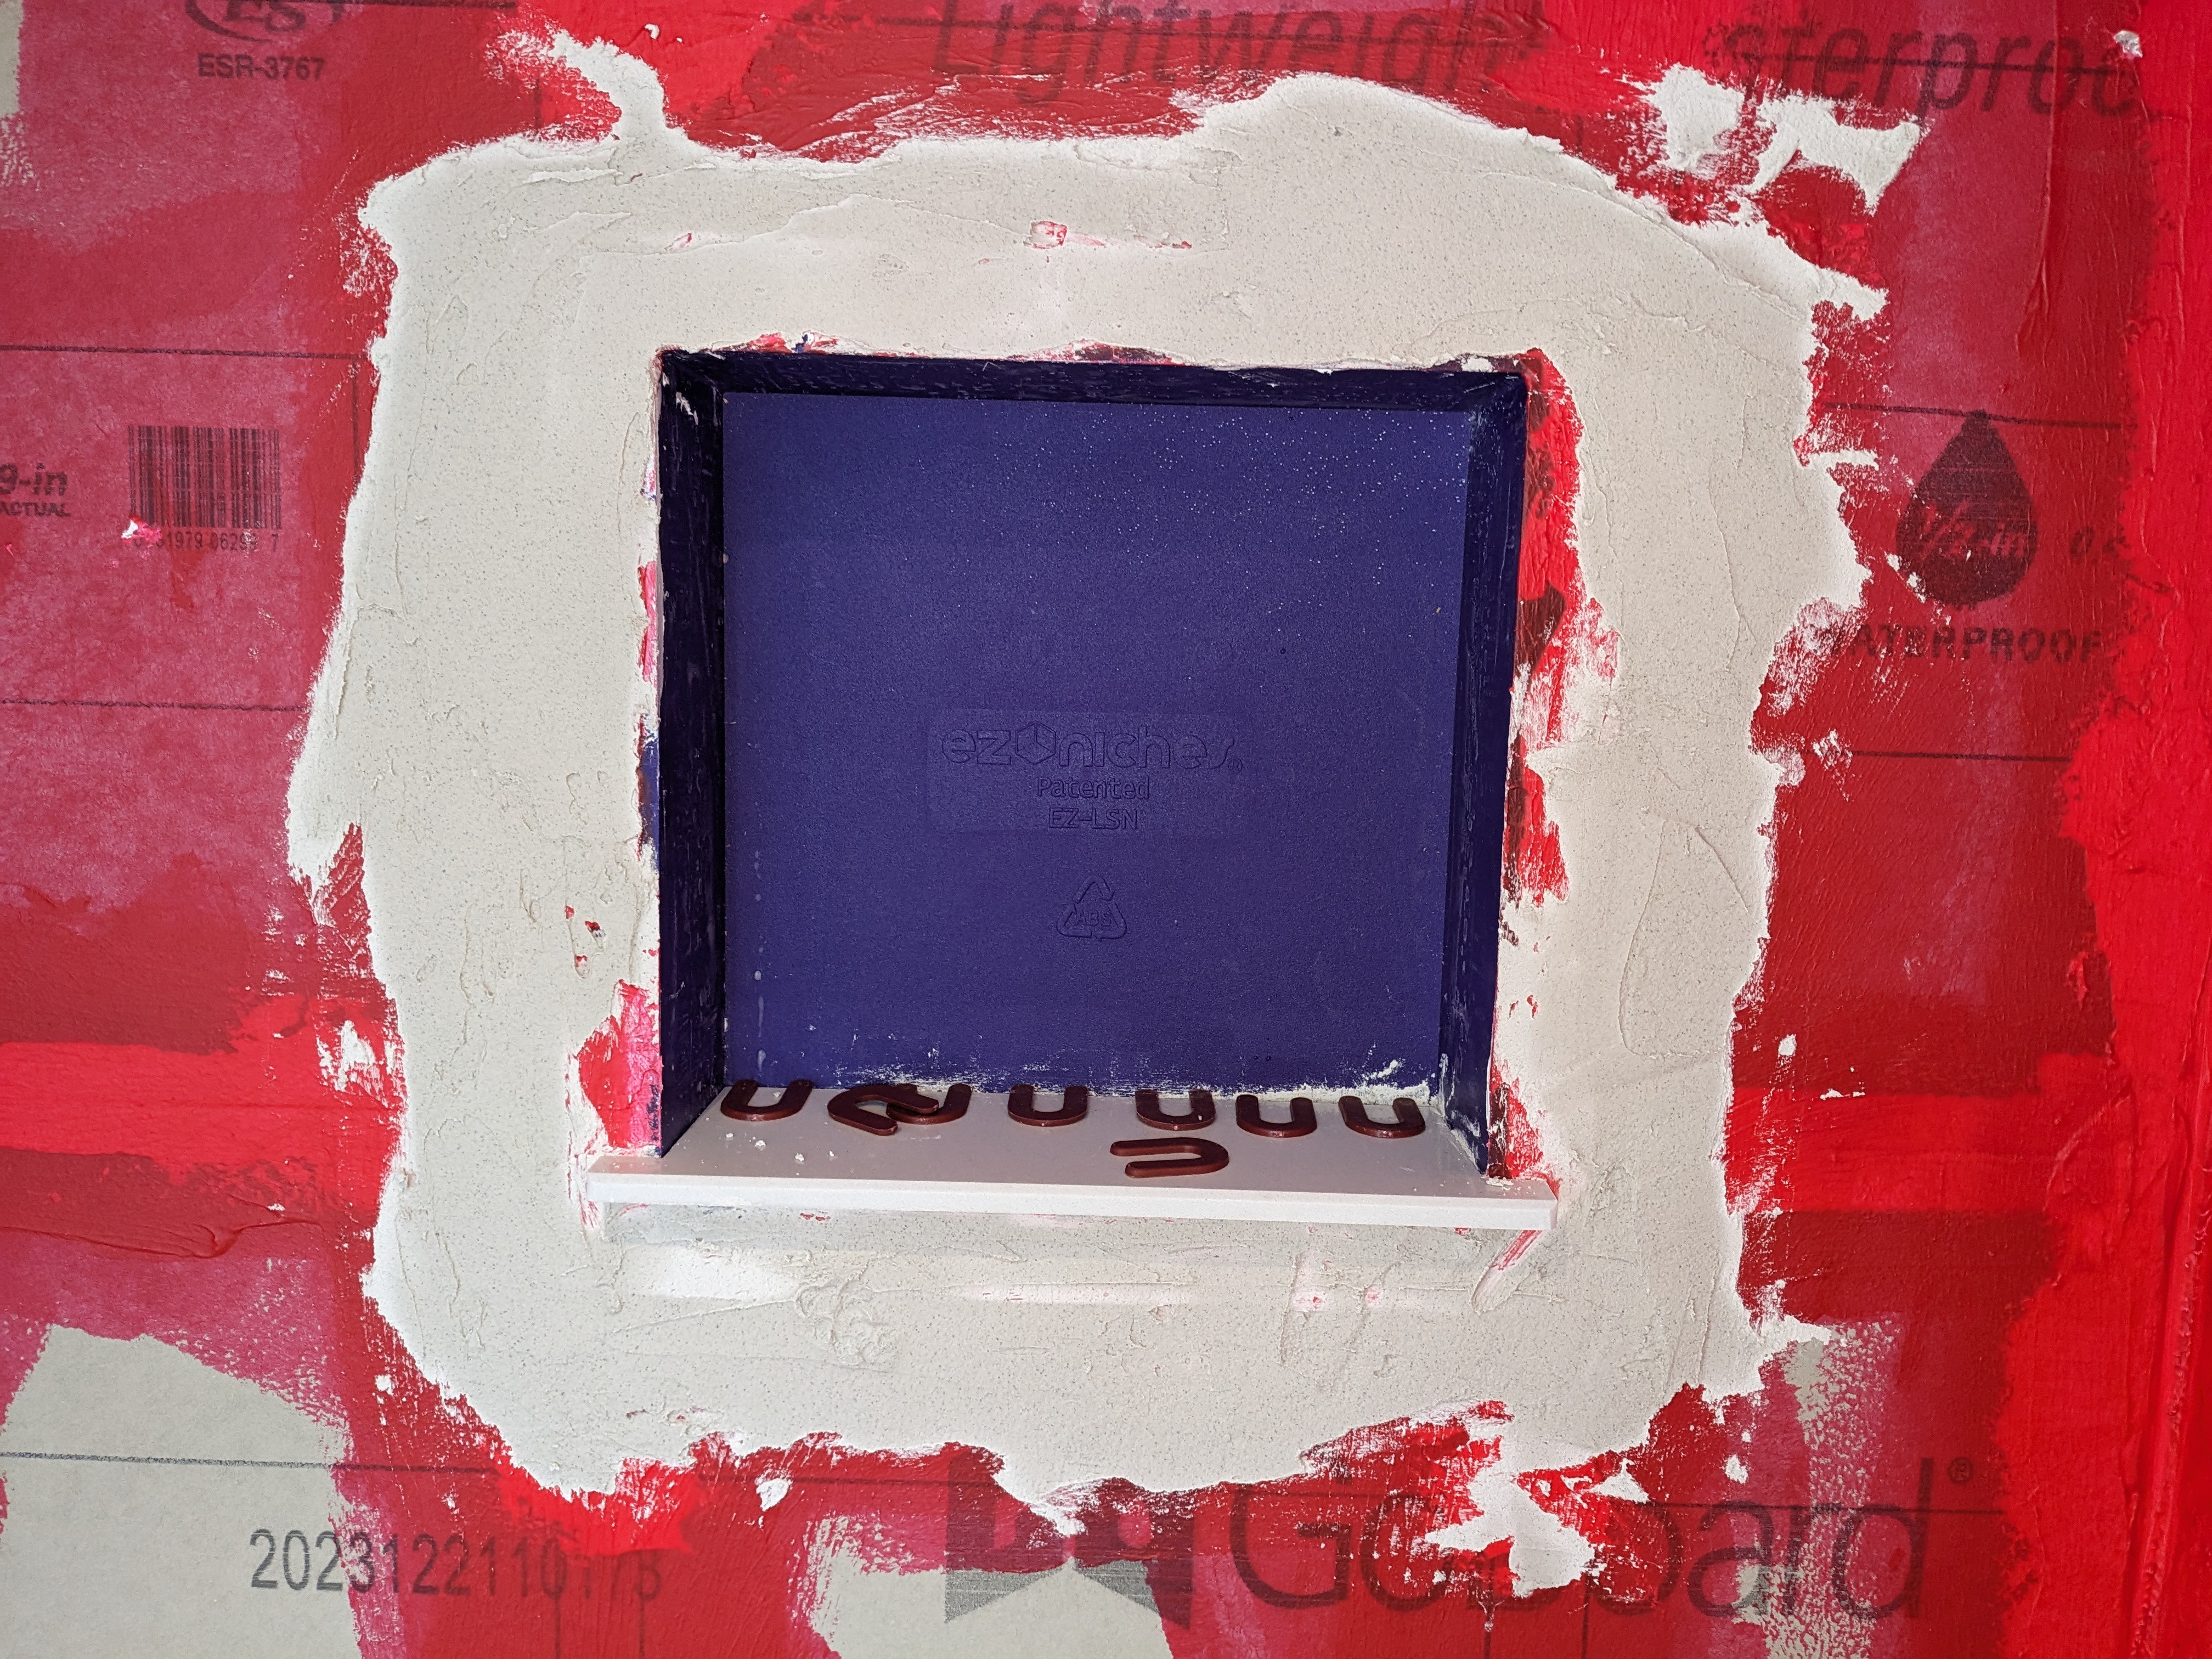
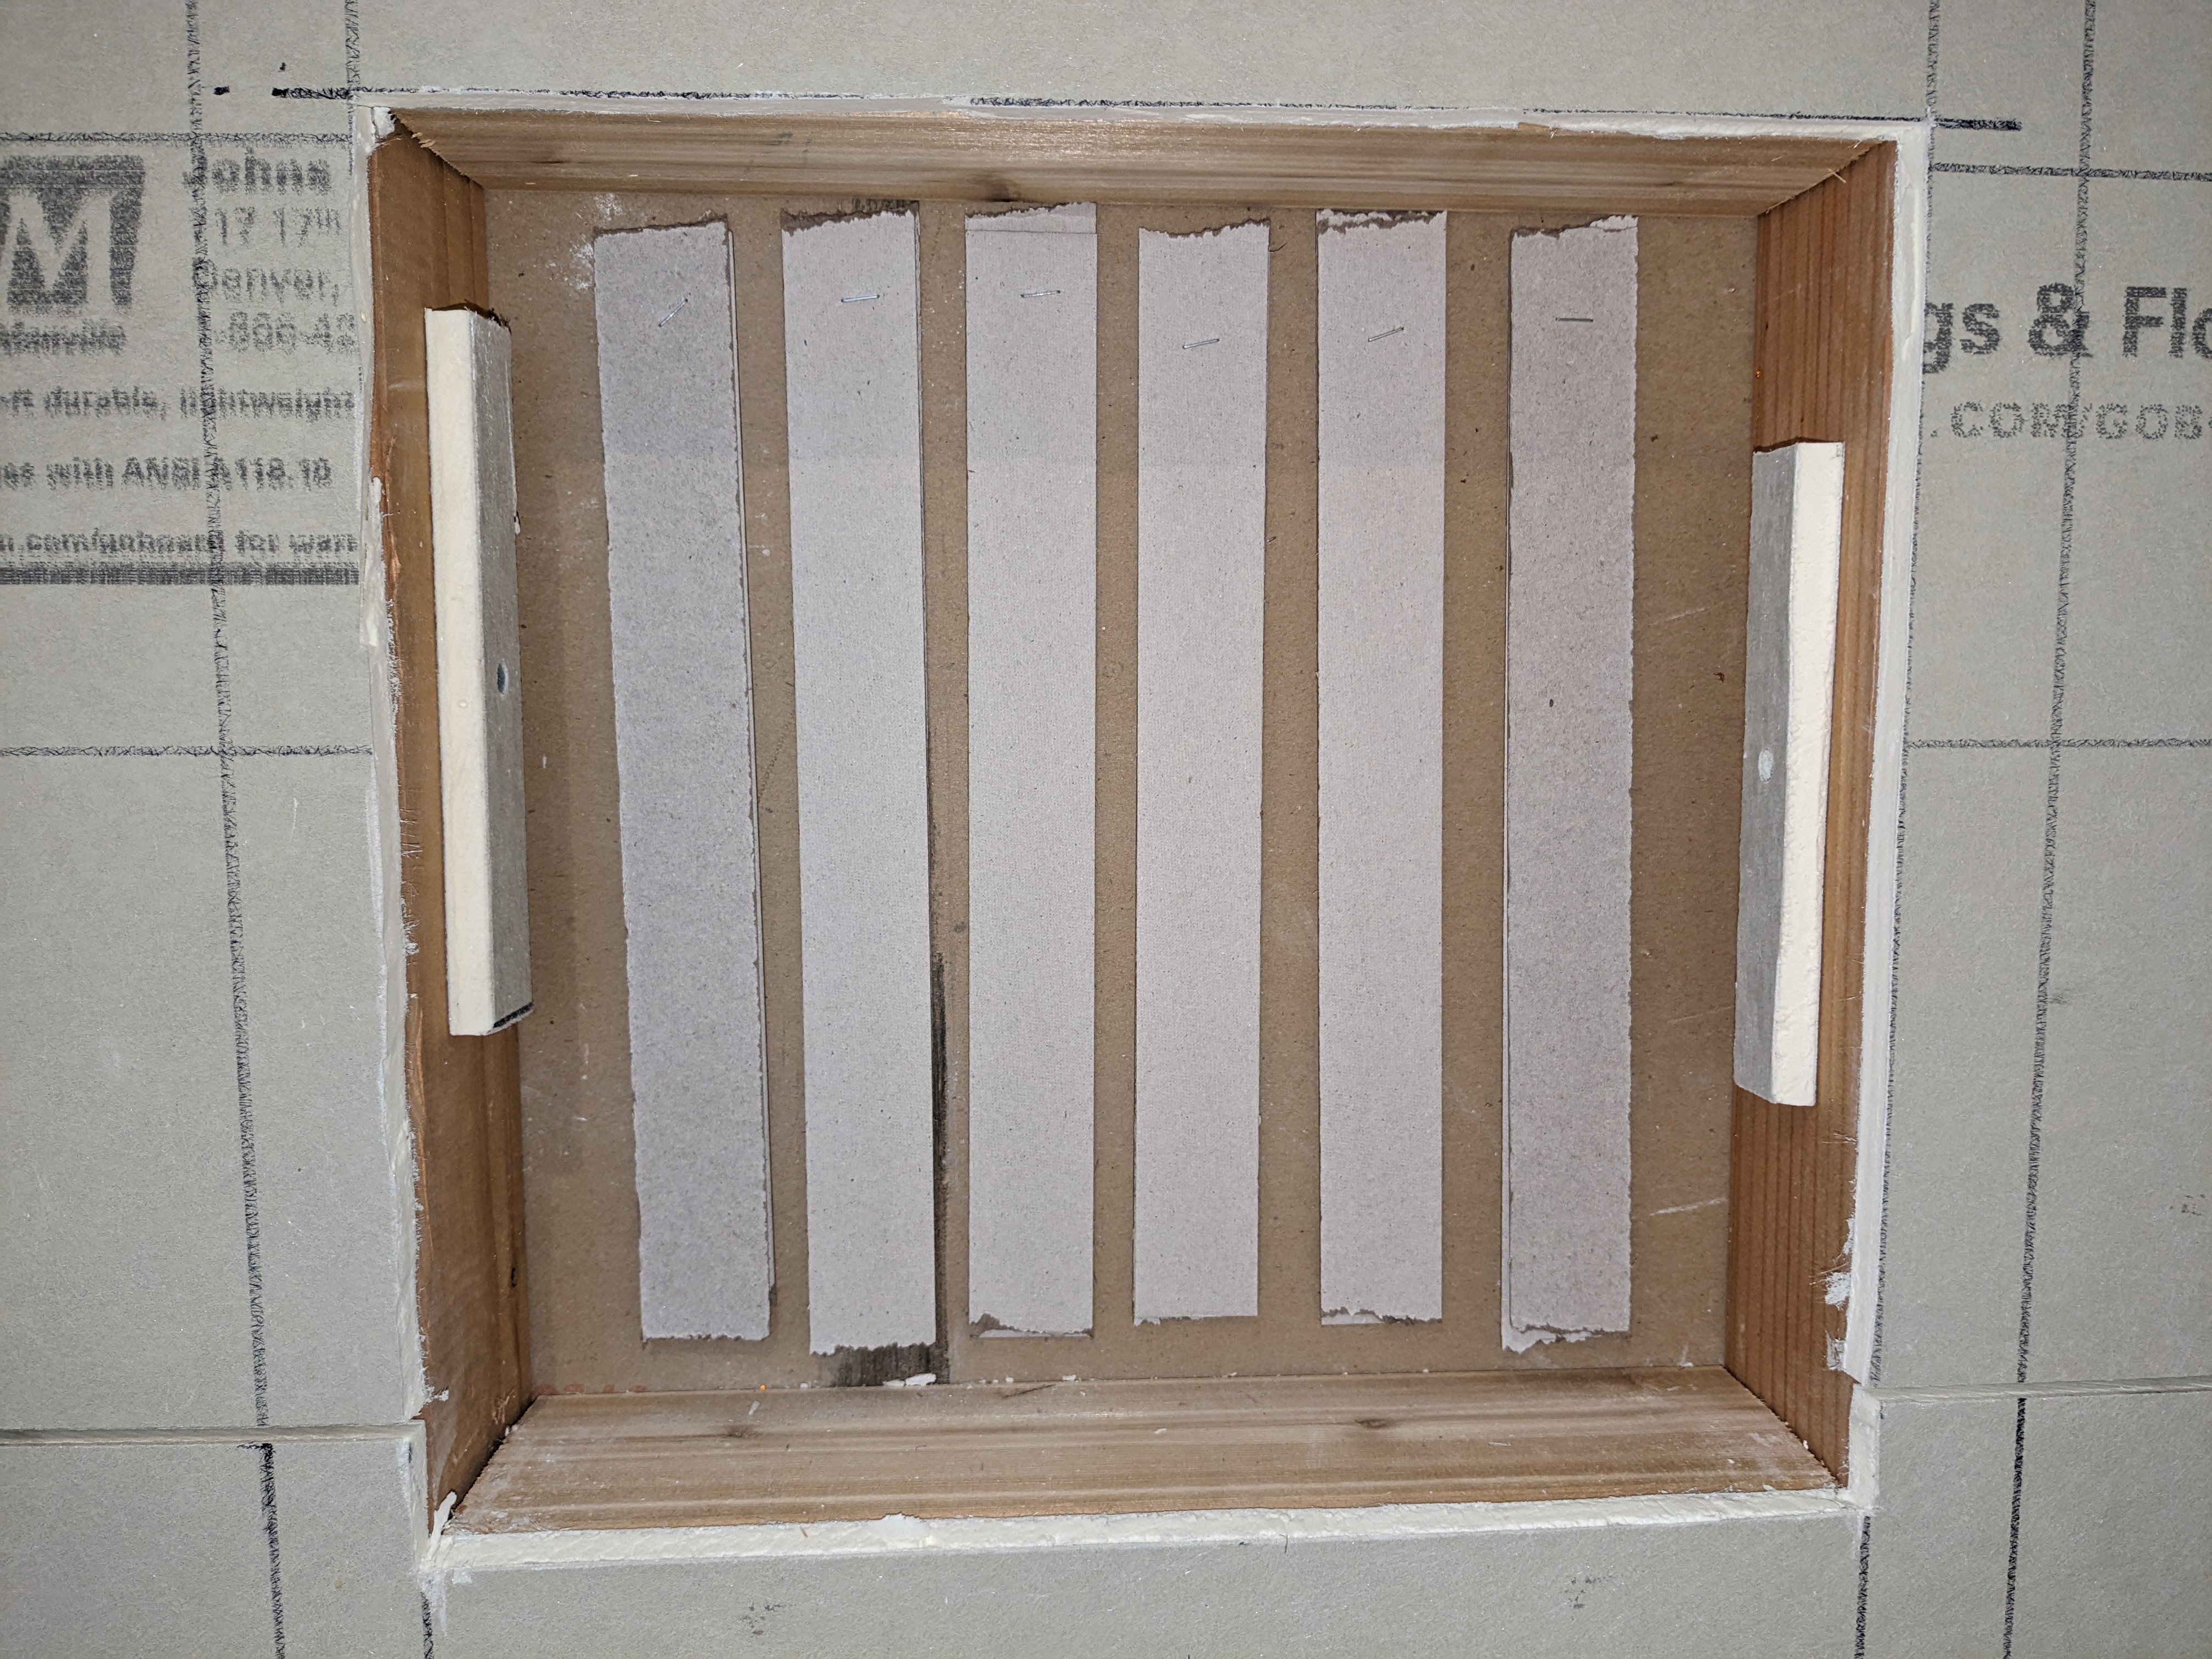
There is plenty of room to the left and right of the integrated stop valves, so I decided on a less funky approach. The things you see in red in the above photo are GoBoard with RedGard coating. I trimmed those away to match the rectangular opening in the tiles. I used Liquid Nails adhesive to attache some fragments of paint sticks as a base behind the main GoBoard. Because of the stud location, I had to use a narrower piece on the right side.
![]()
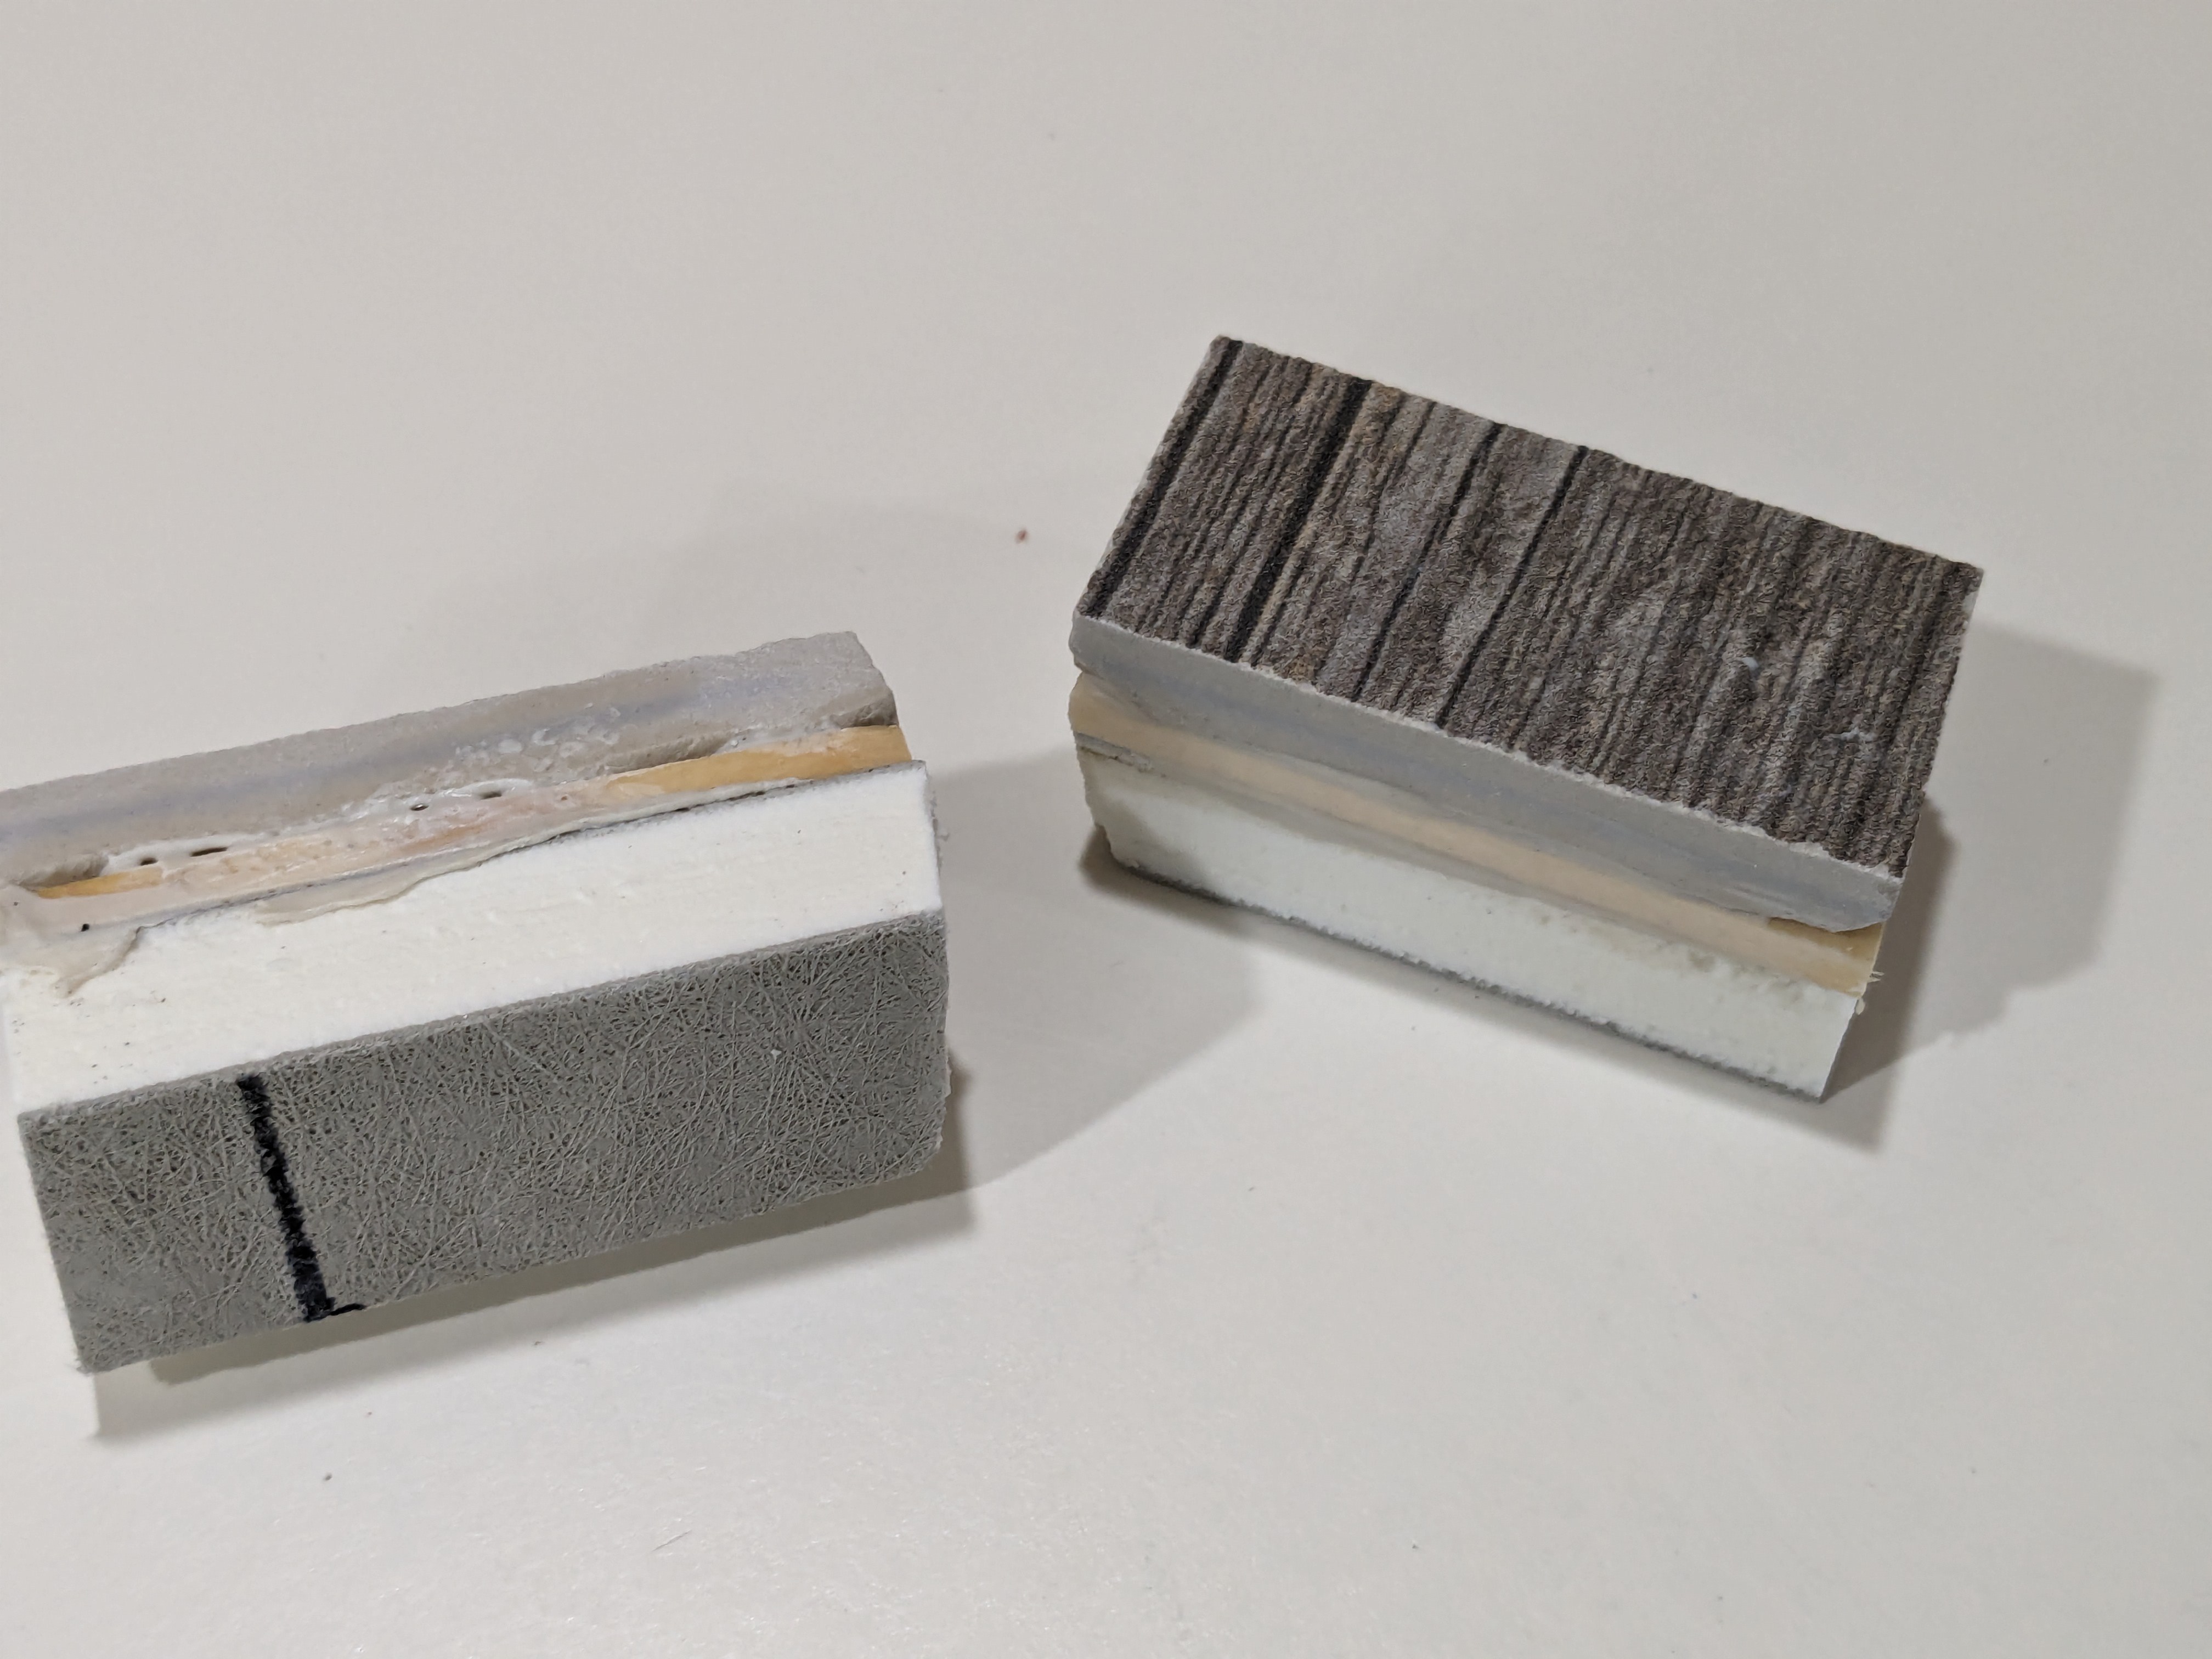
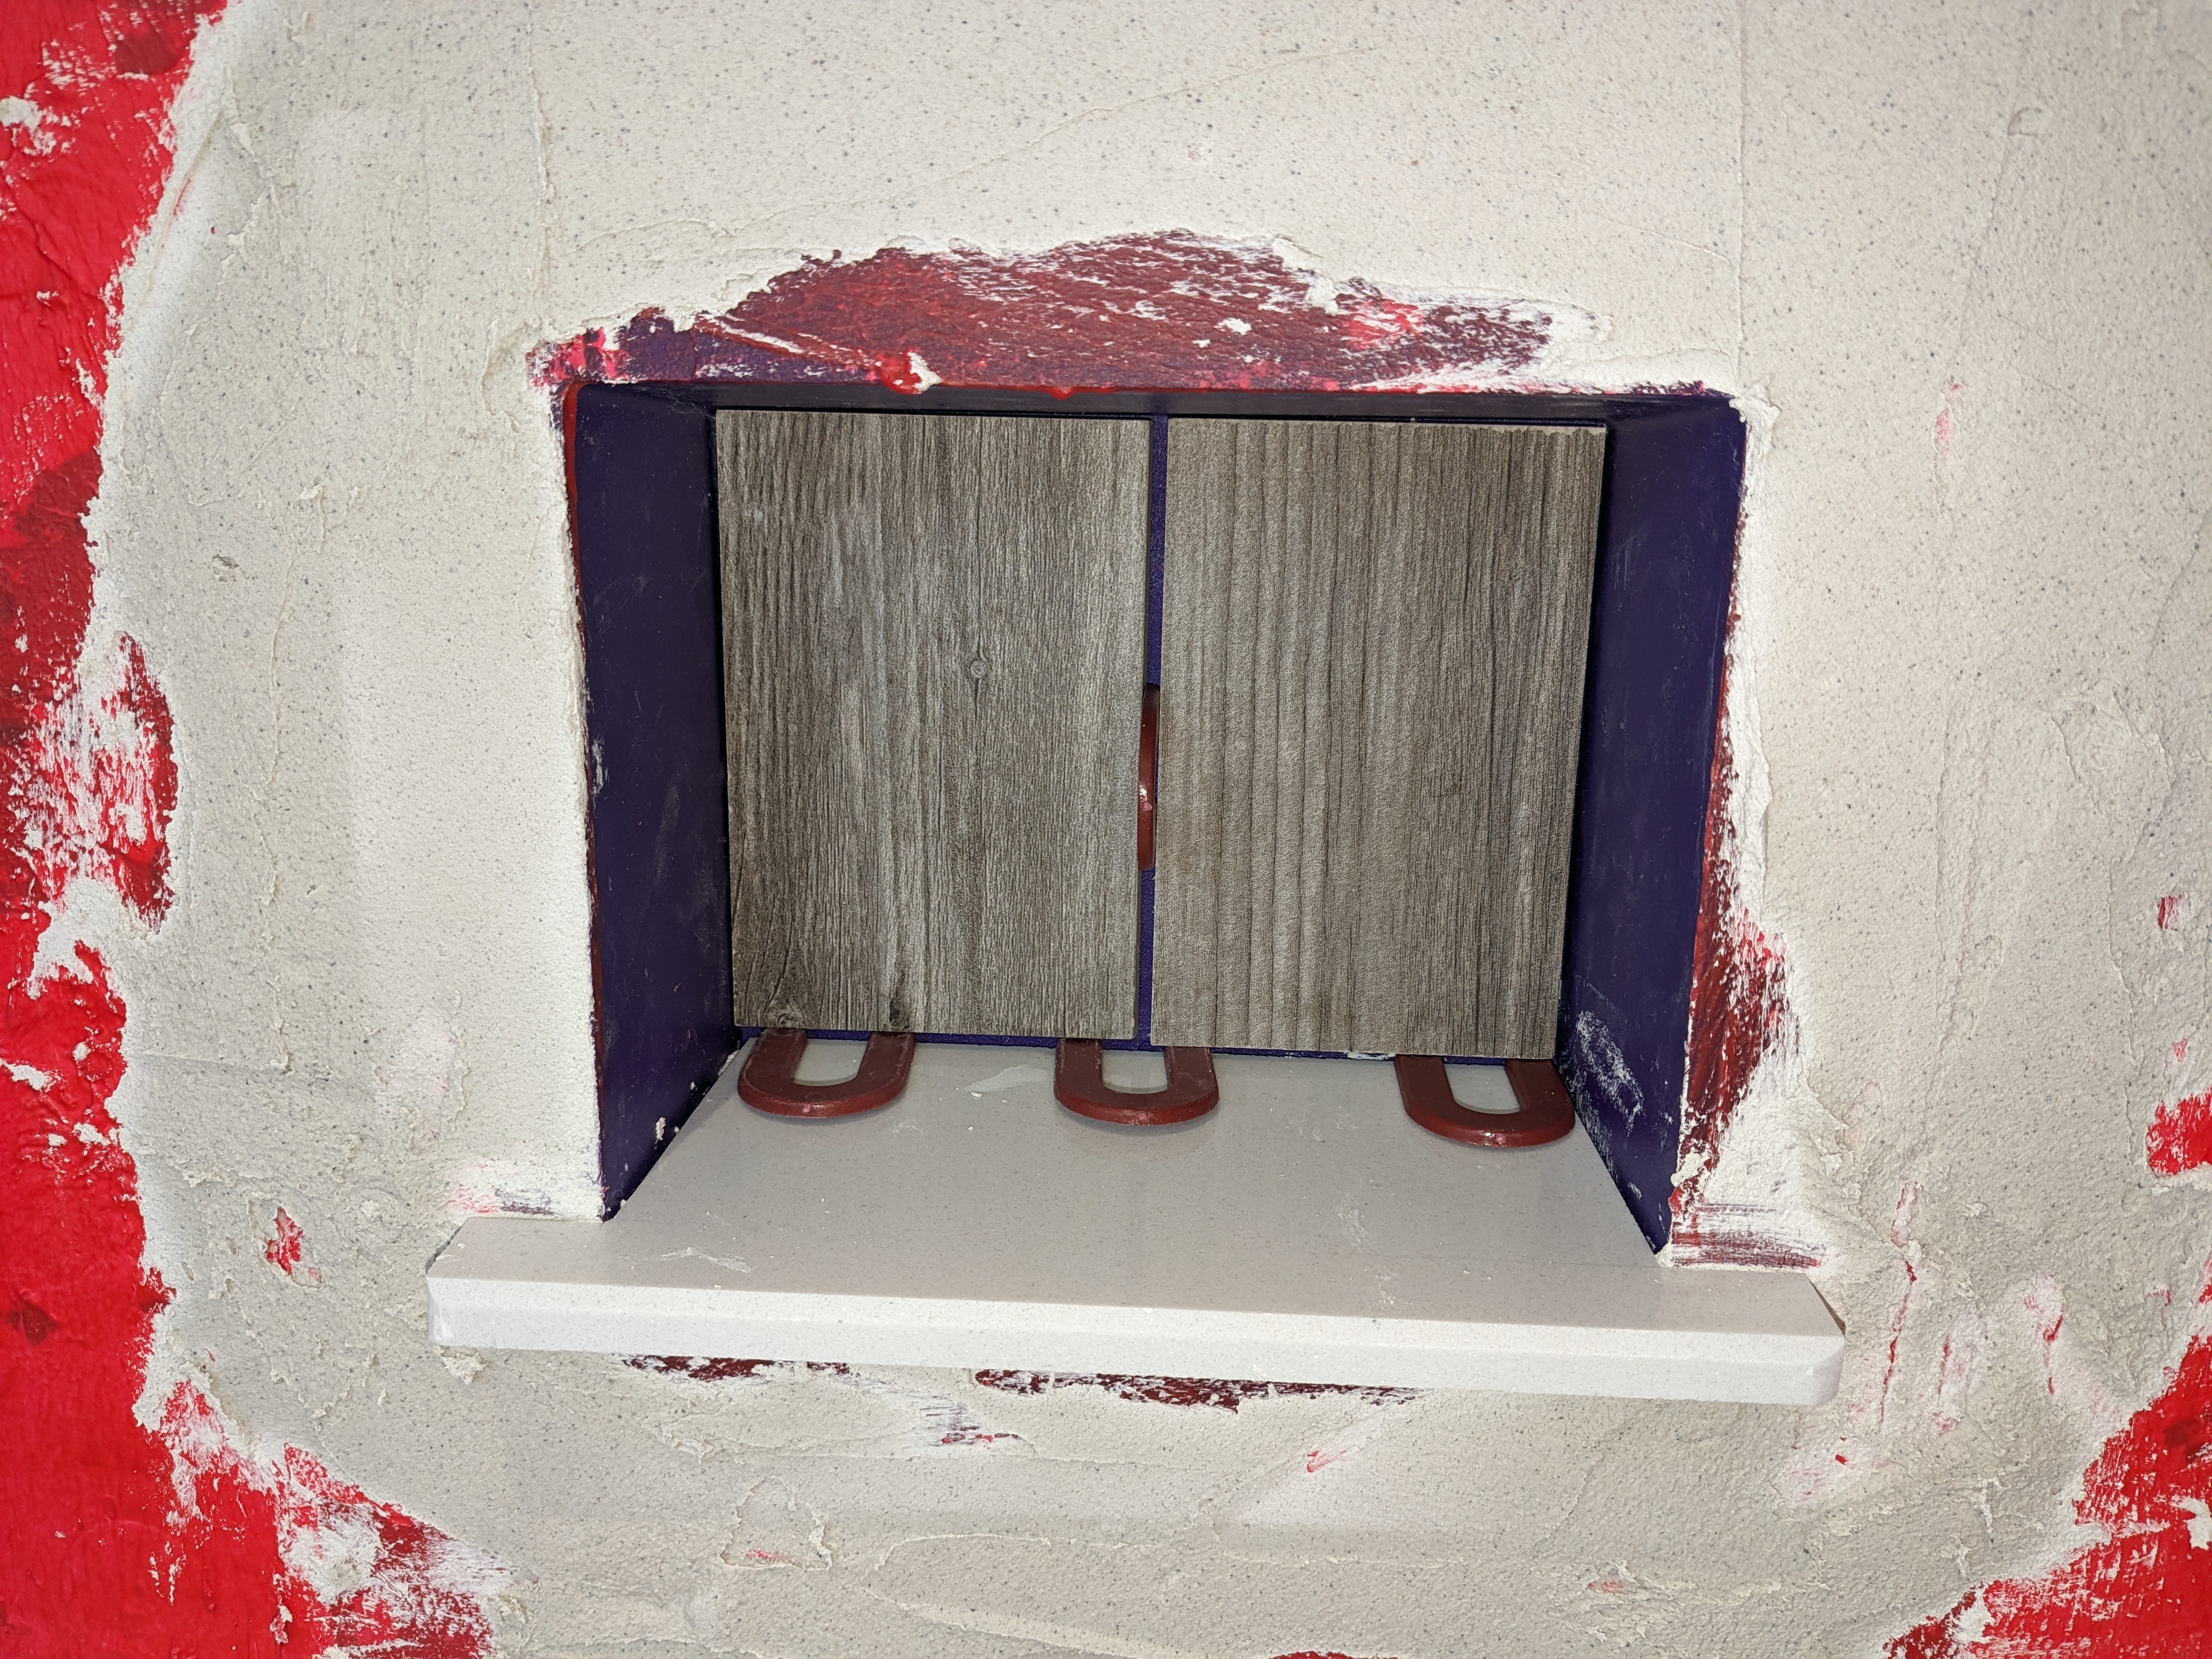
I made these delicious looking sandwich cookies. The layers are GoBoard, paint stick, and tile, and they are glued together with Liquid Nails. (I didn't notice until looking at this picture that I had cut the tile pieces with the grain pattern in the wrong orientation. Since one of them will be completely invisible and the other nearly so, I didn't re-cut them.) The paint stick layer stands in for the thinset layer of the existing tiles.
![]()
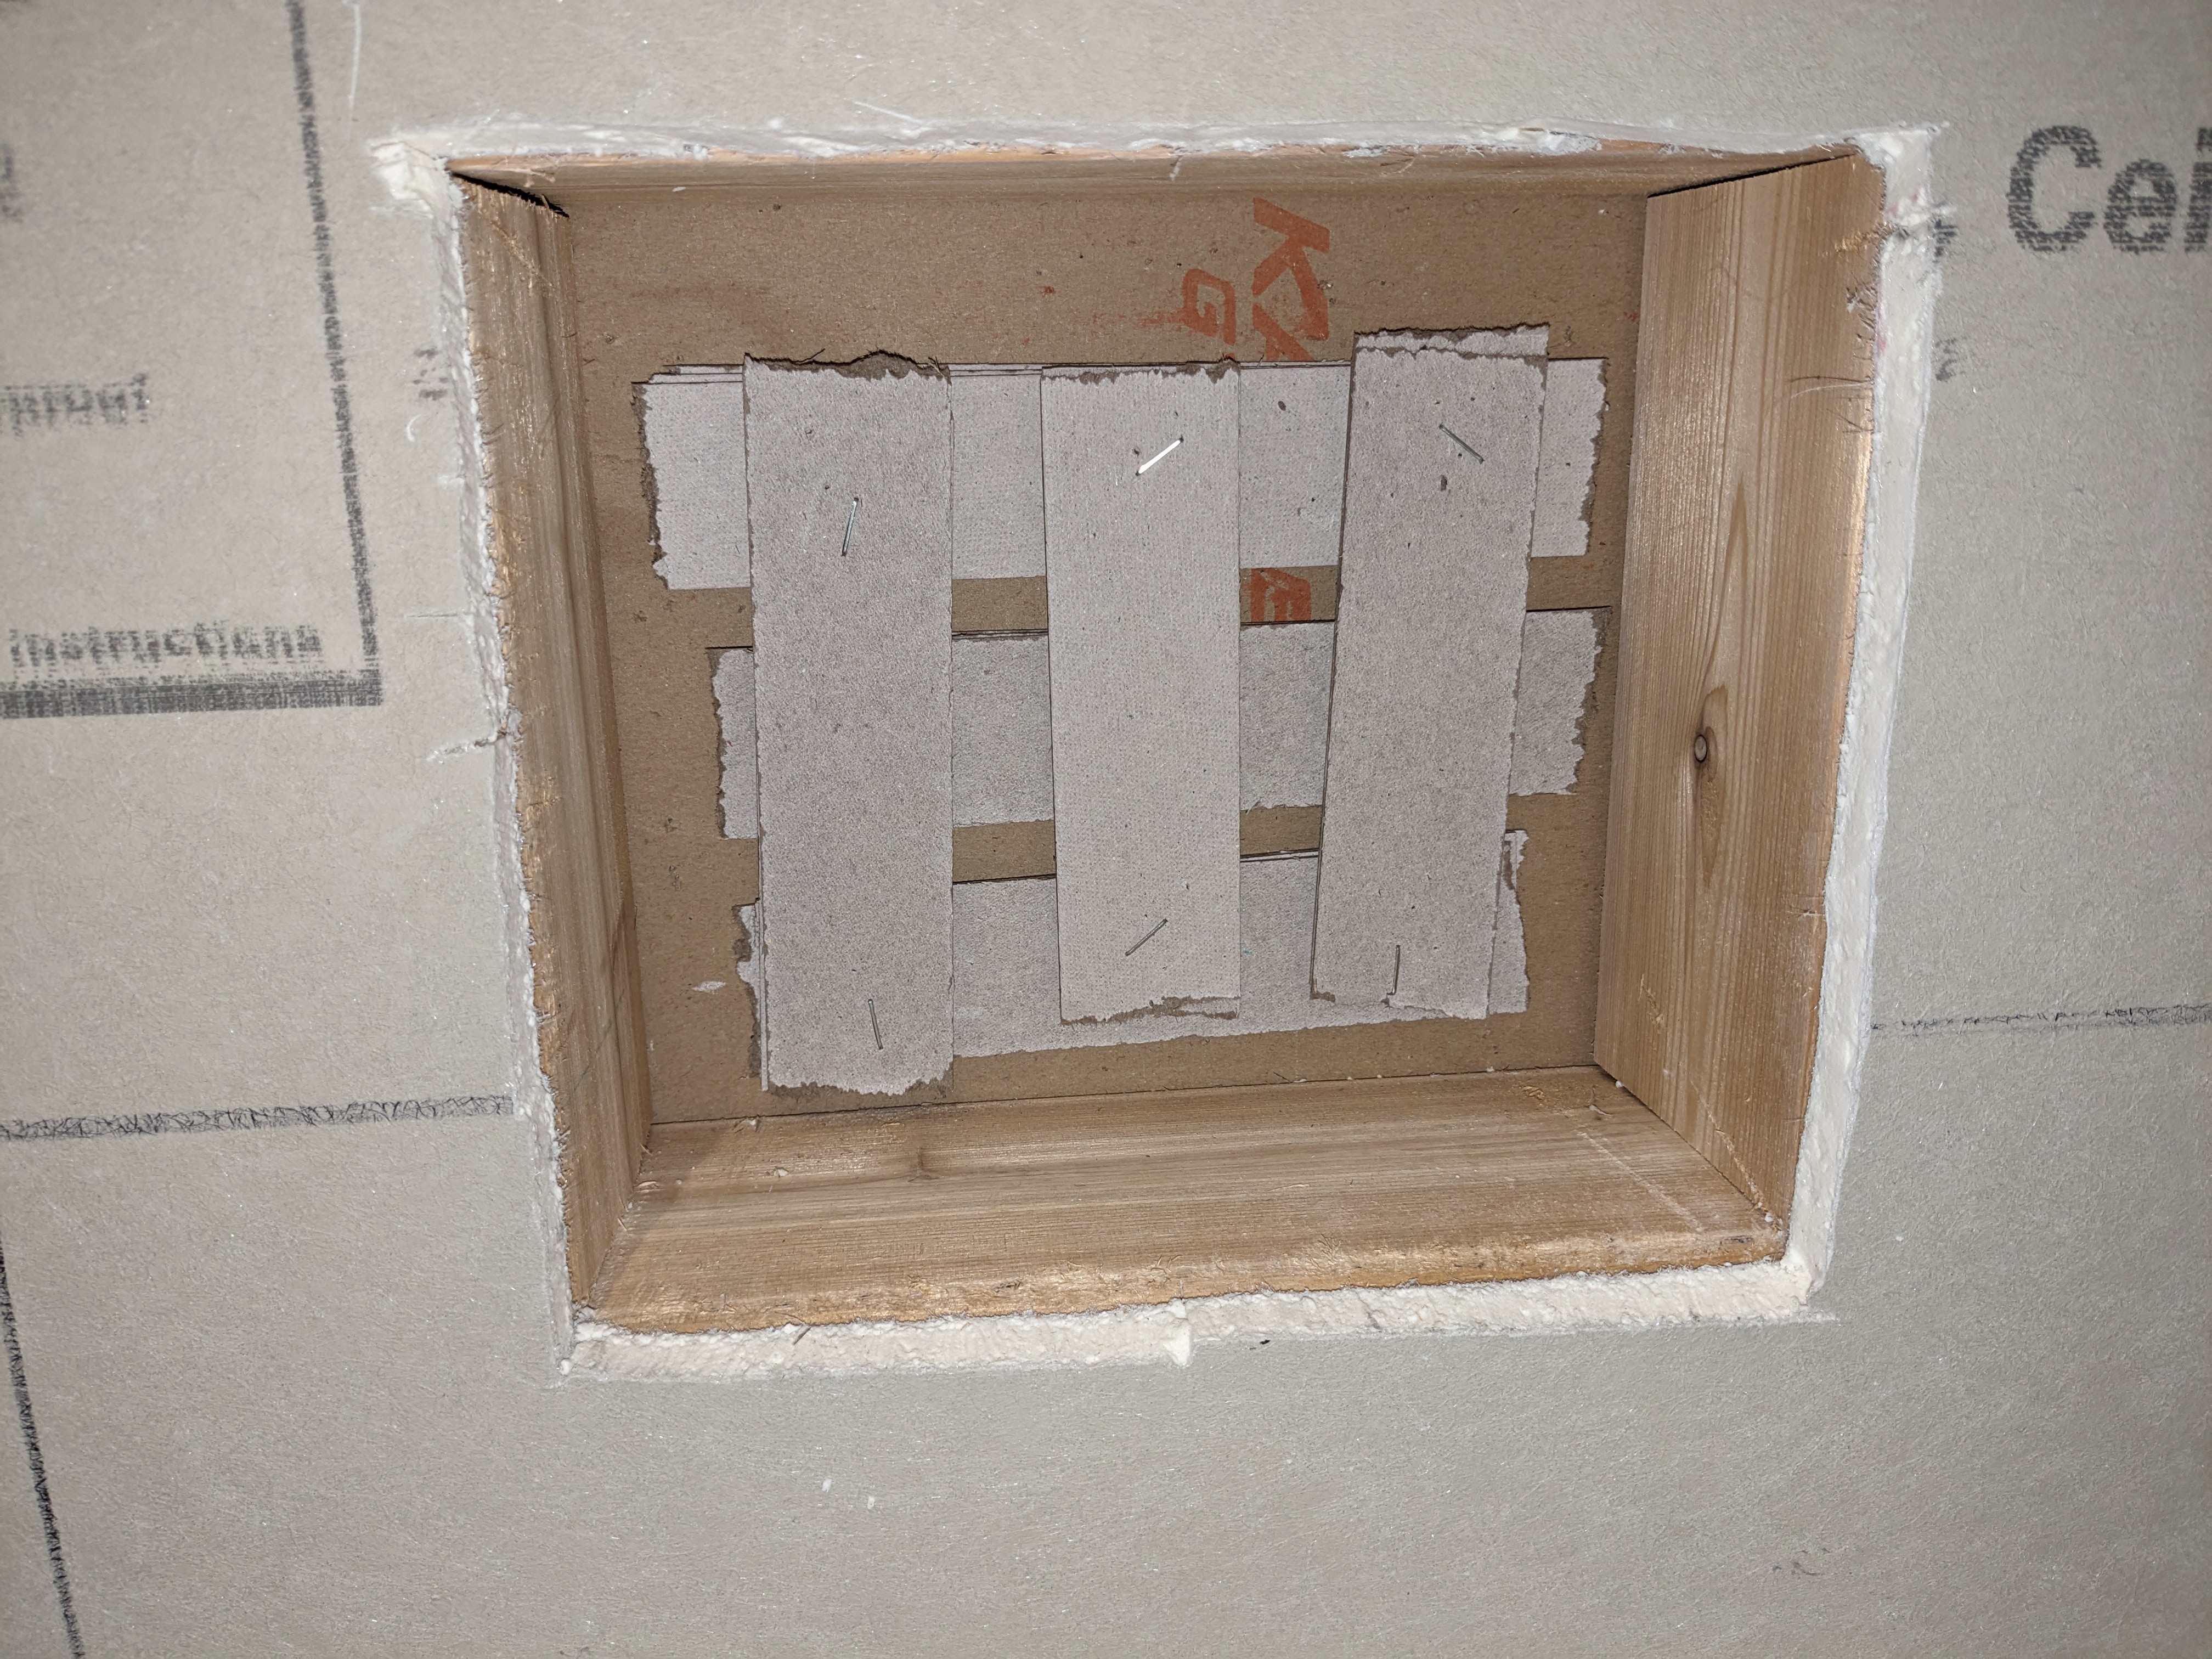
I used Liquid Nails to glue the GoBoard surface to the paint sticks previously affixed in the rectangle. After that, I applied grout to make it water-tight.
![]()
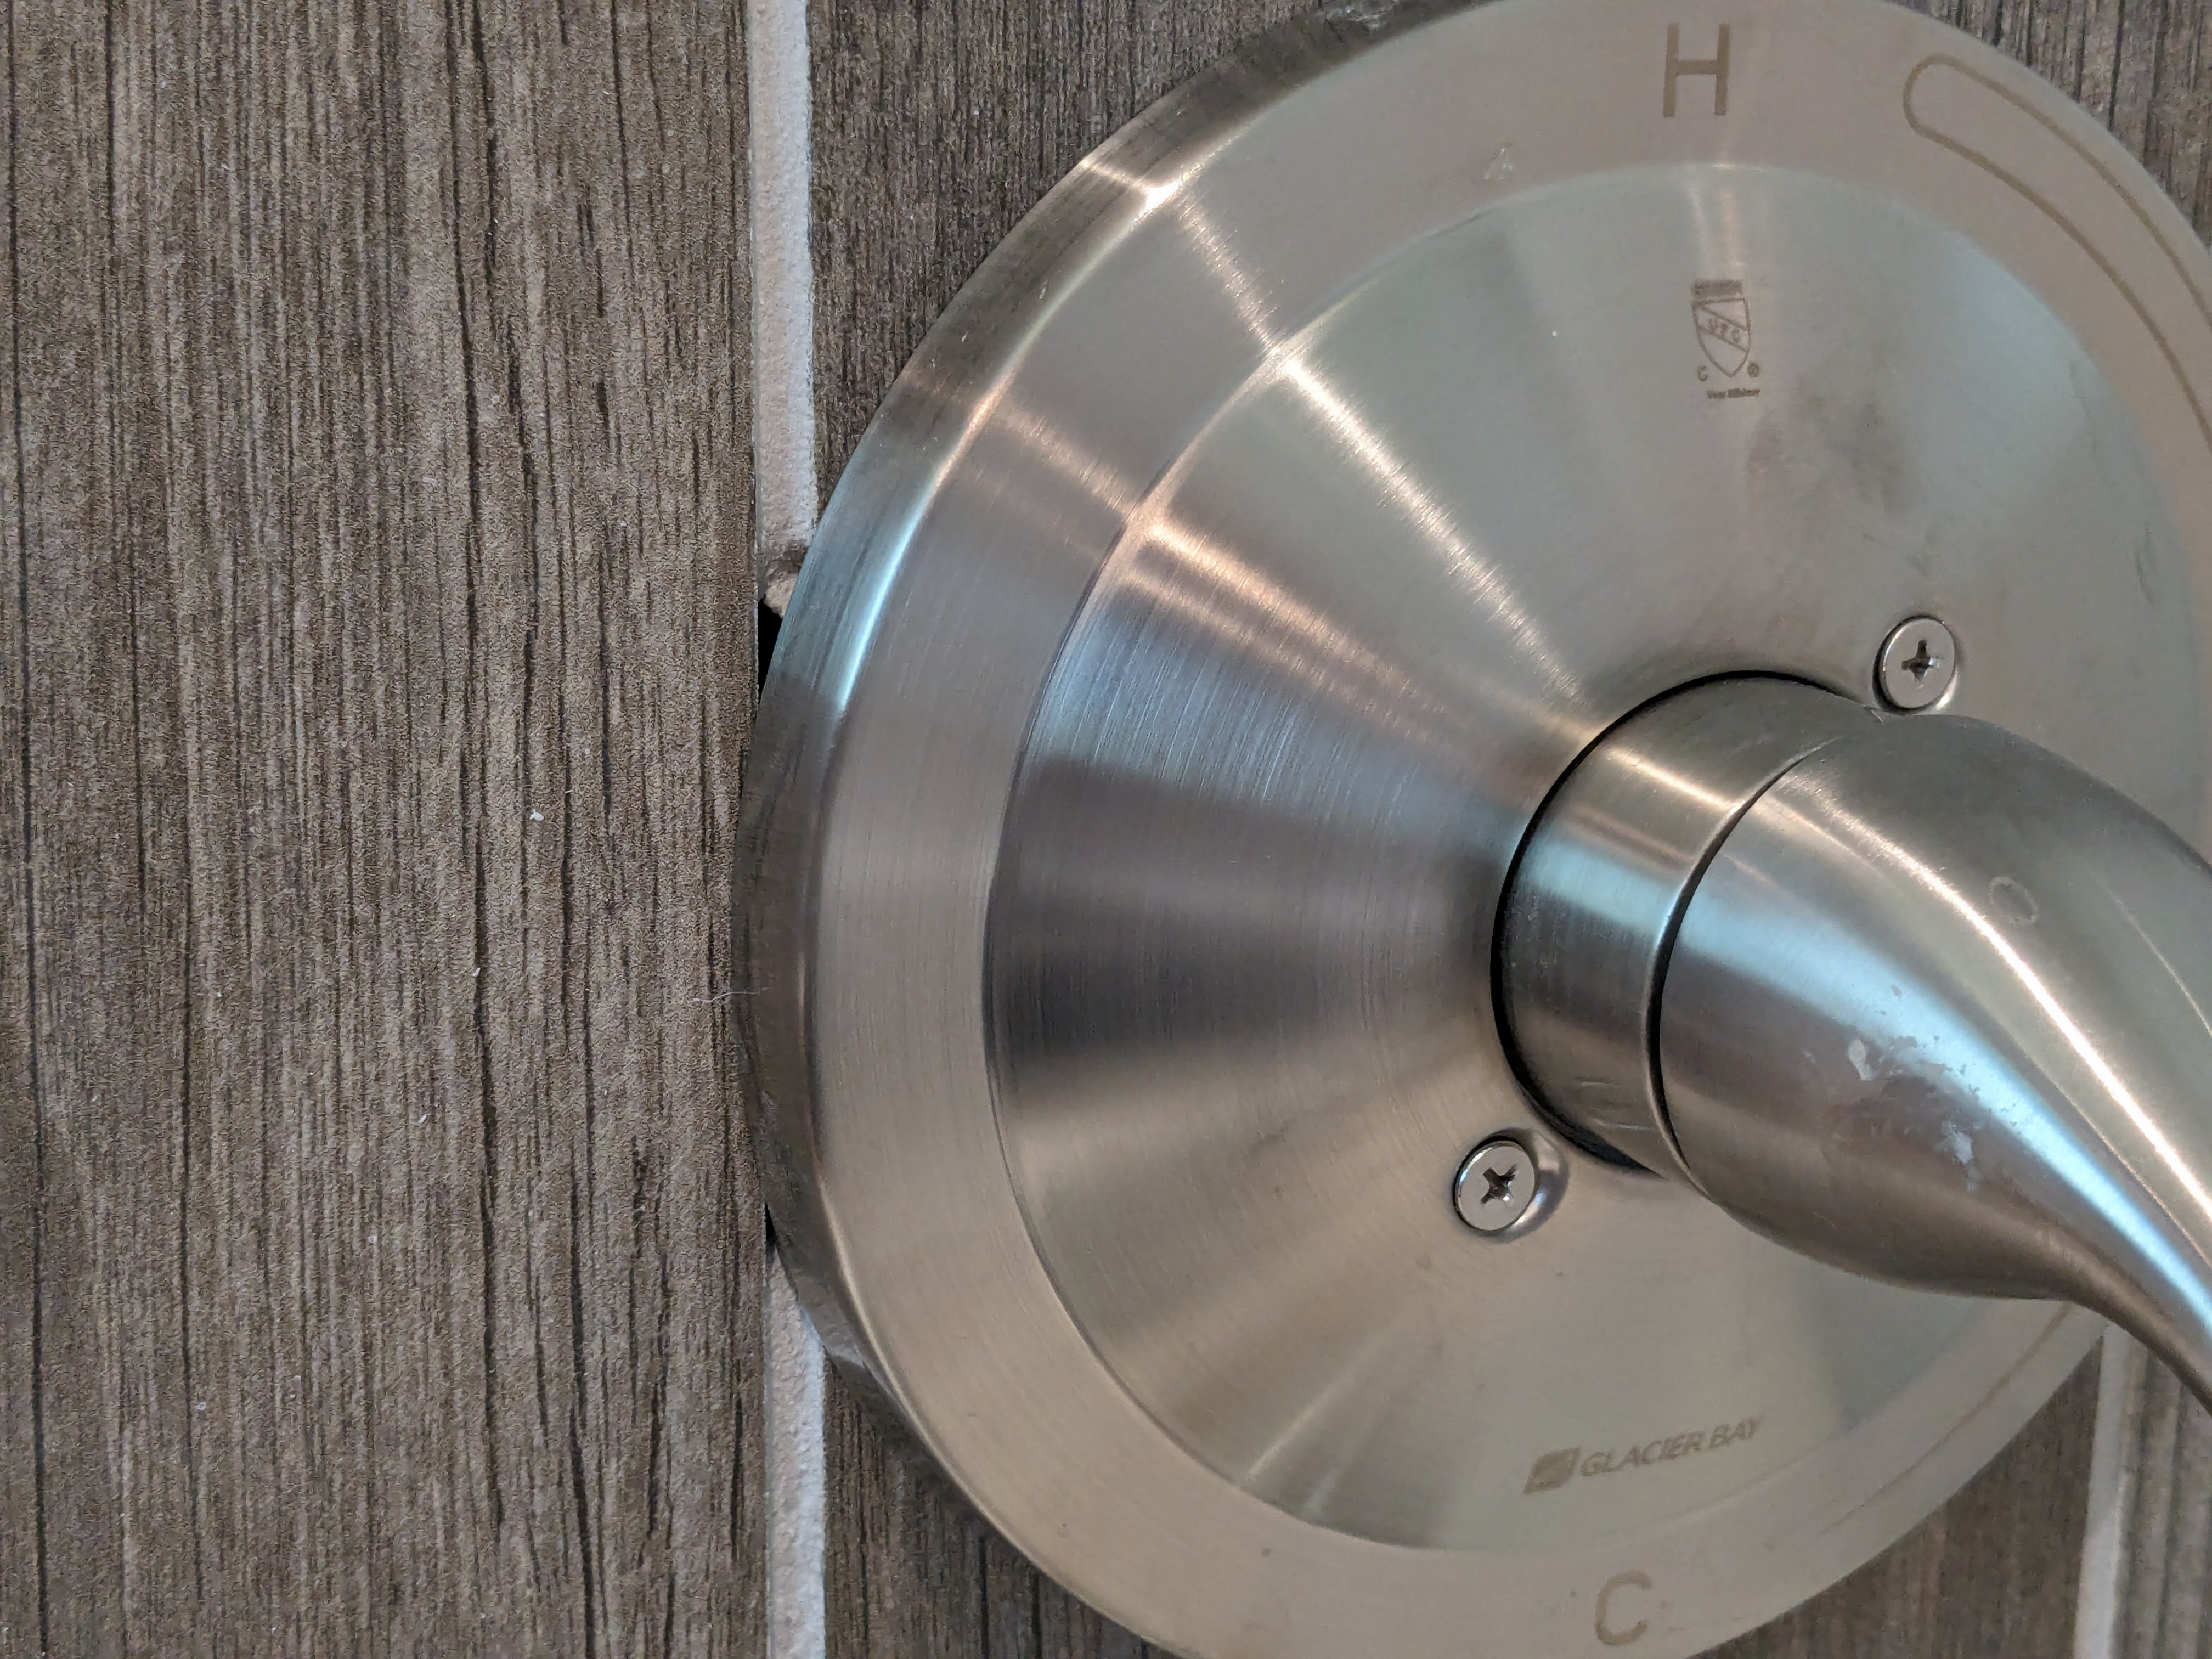
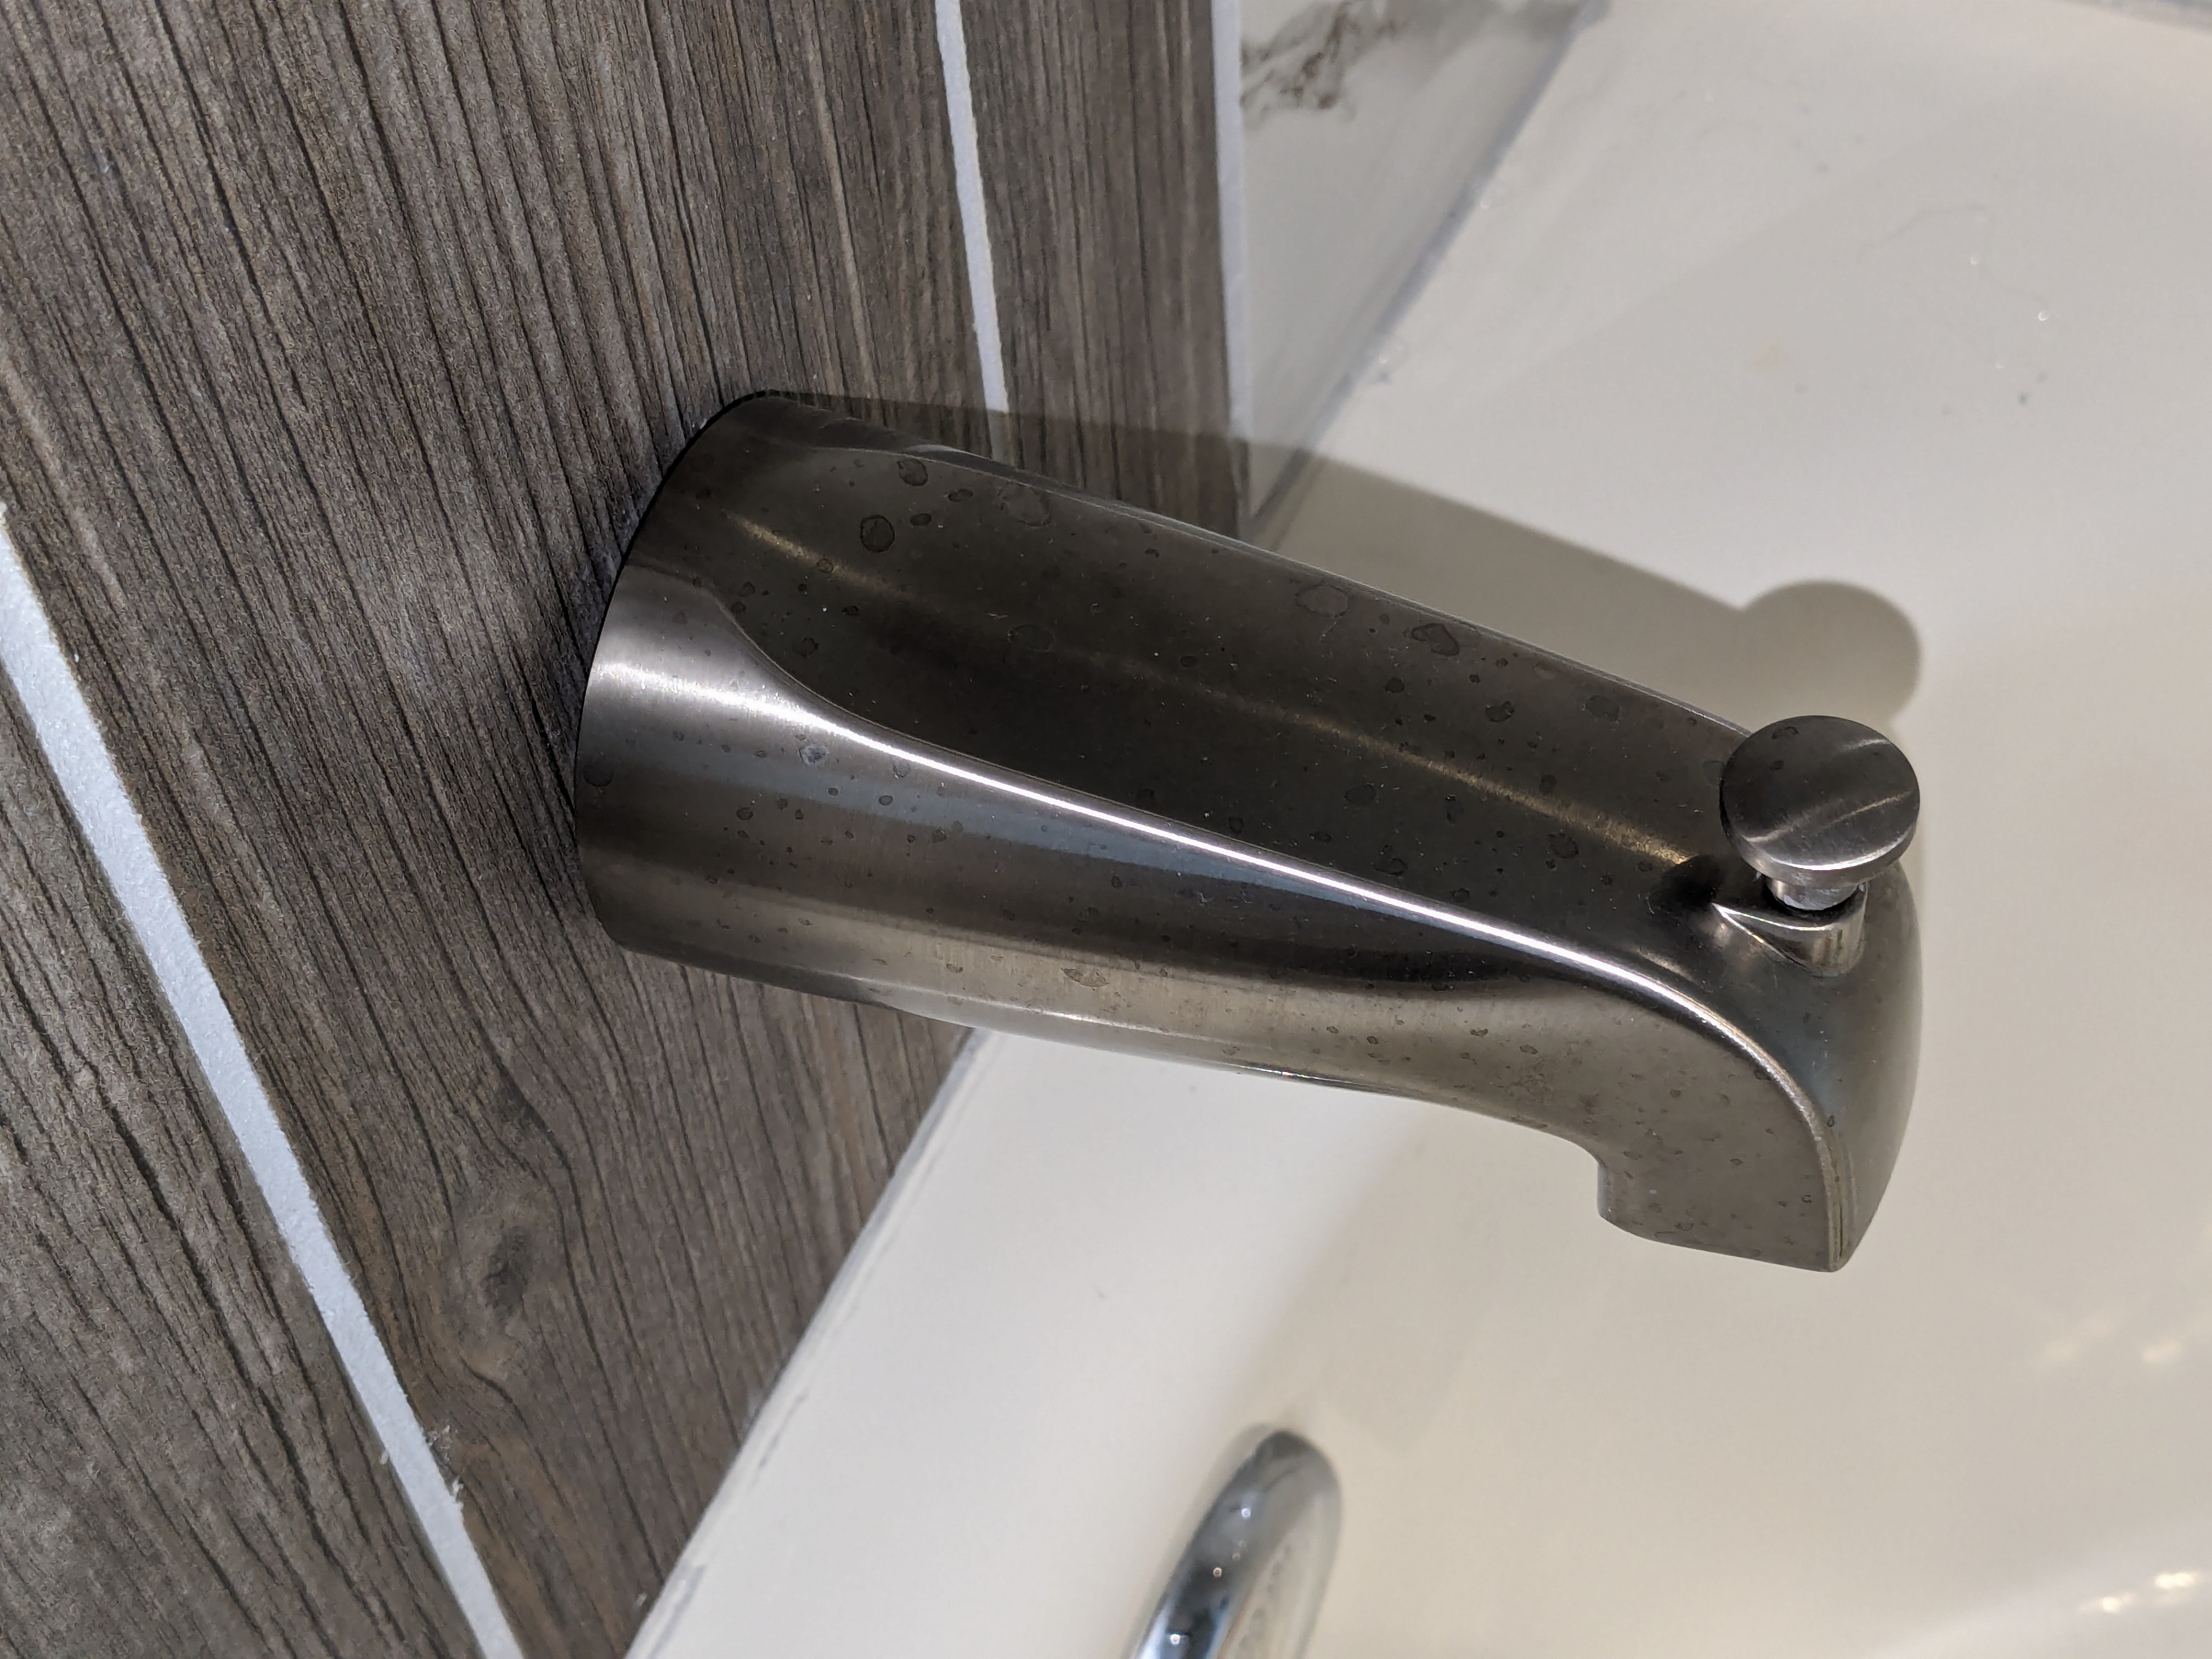
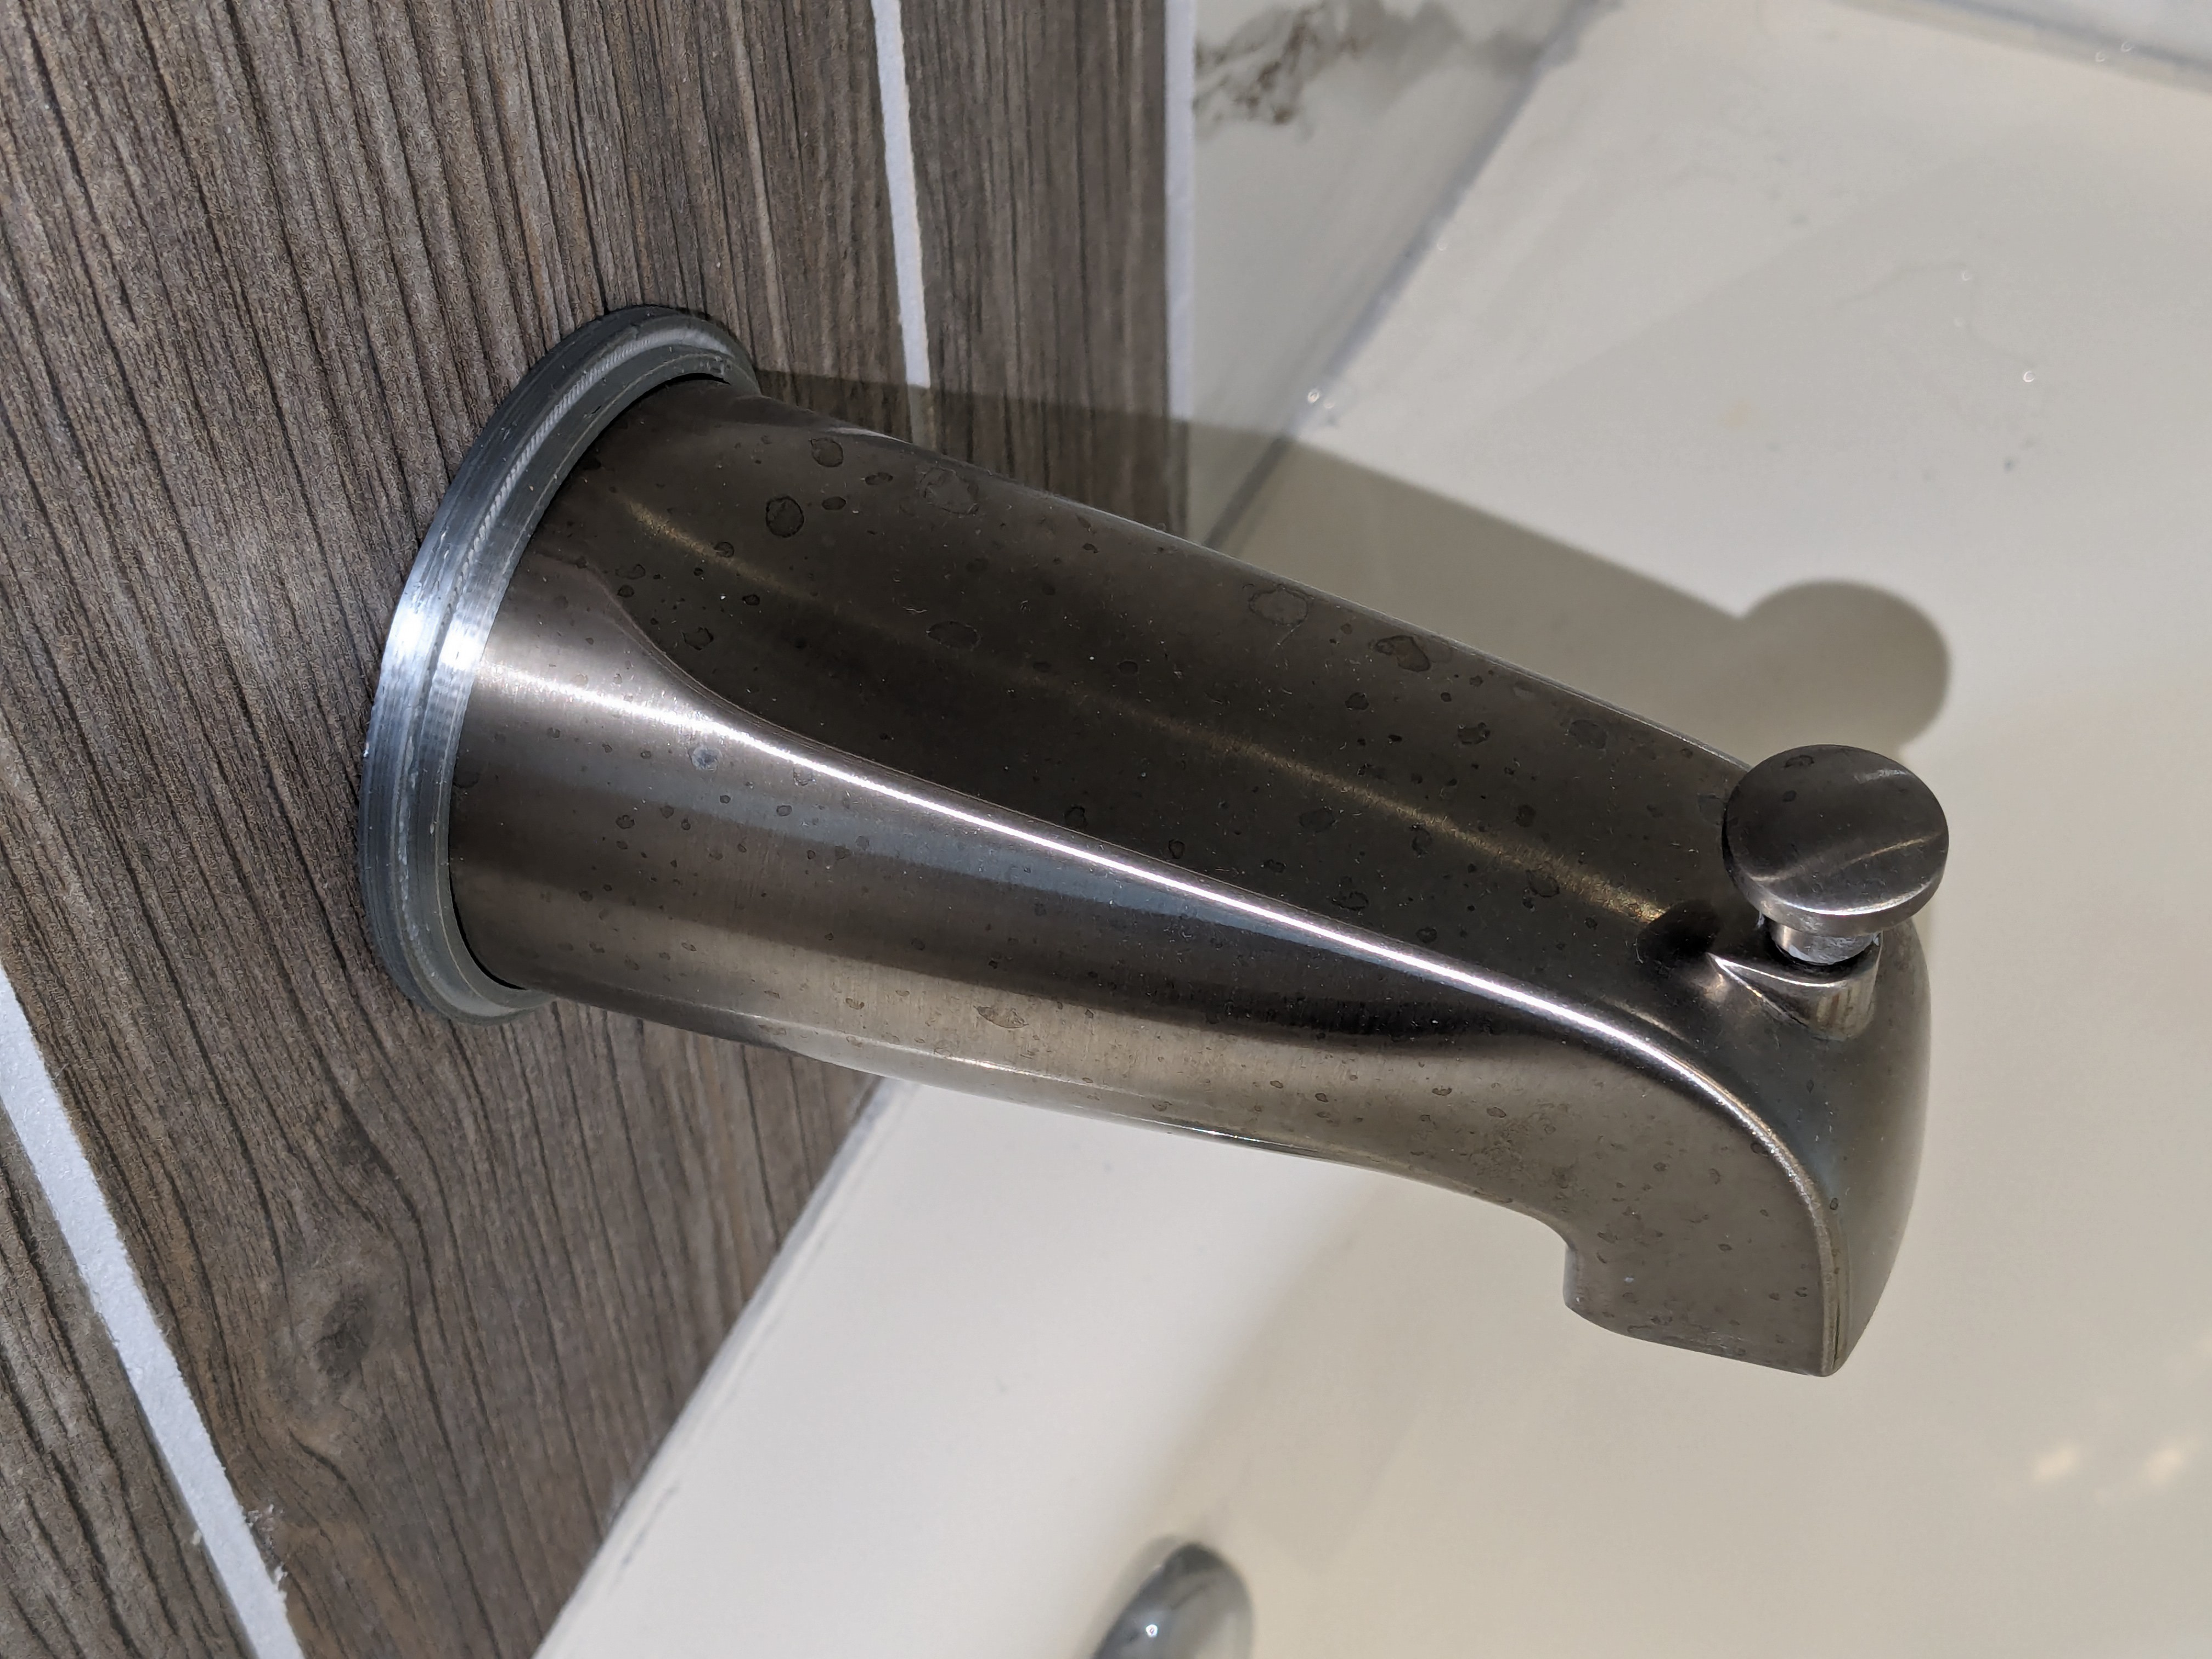
Update: I wasn't happy with the mounting of the tub spout. There are two types of spout attachments. One type threads onto a fitting at the end of the copper stub coming out of the wall. The other type slides onto the copper stub and is held in place with a set screw. With the fixtures I bought, it was the second type.
There's a little bit of flex in the mounting of the copper stub, so it's difficult to get the spout all the way against the tiles without having it spring back a little bit. If I had thought about that before I closed up the wall, I probably could have done something about it, but that's water under the, uh, spout. My copper stub is also a small number of degrees away from perpendicular to the tiles. I blame the person who did the copper plumbing (aka, me). Both of those things add up to there being a small gap between the back of the spout and the wall.
![]()
This is purely an aesthetic thing. I already sealed the opening around the copper stub with plumber's putty, so I'm not worried about water leaks getting behind the tiles. I just don't like the look of it.
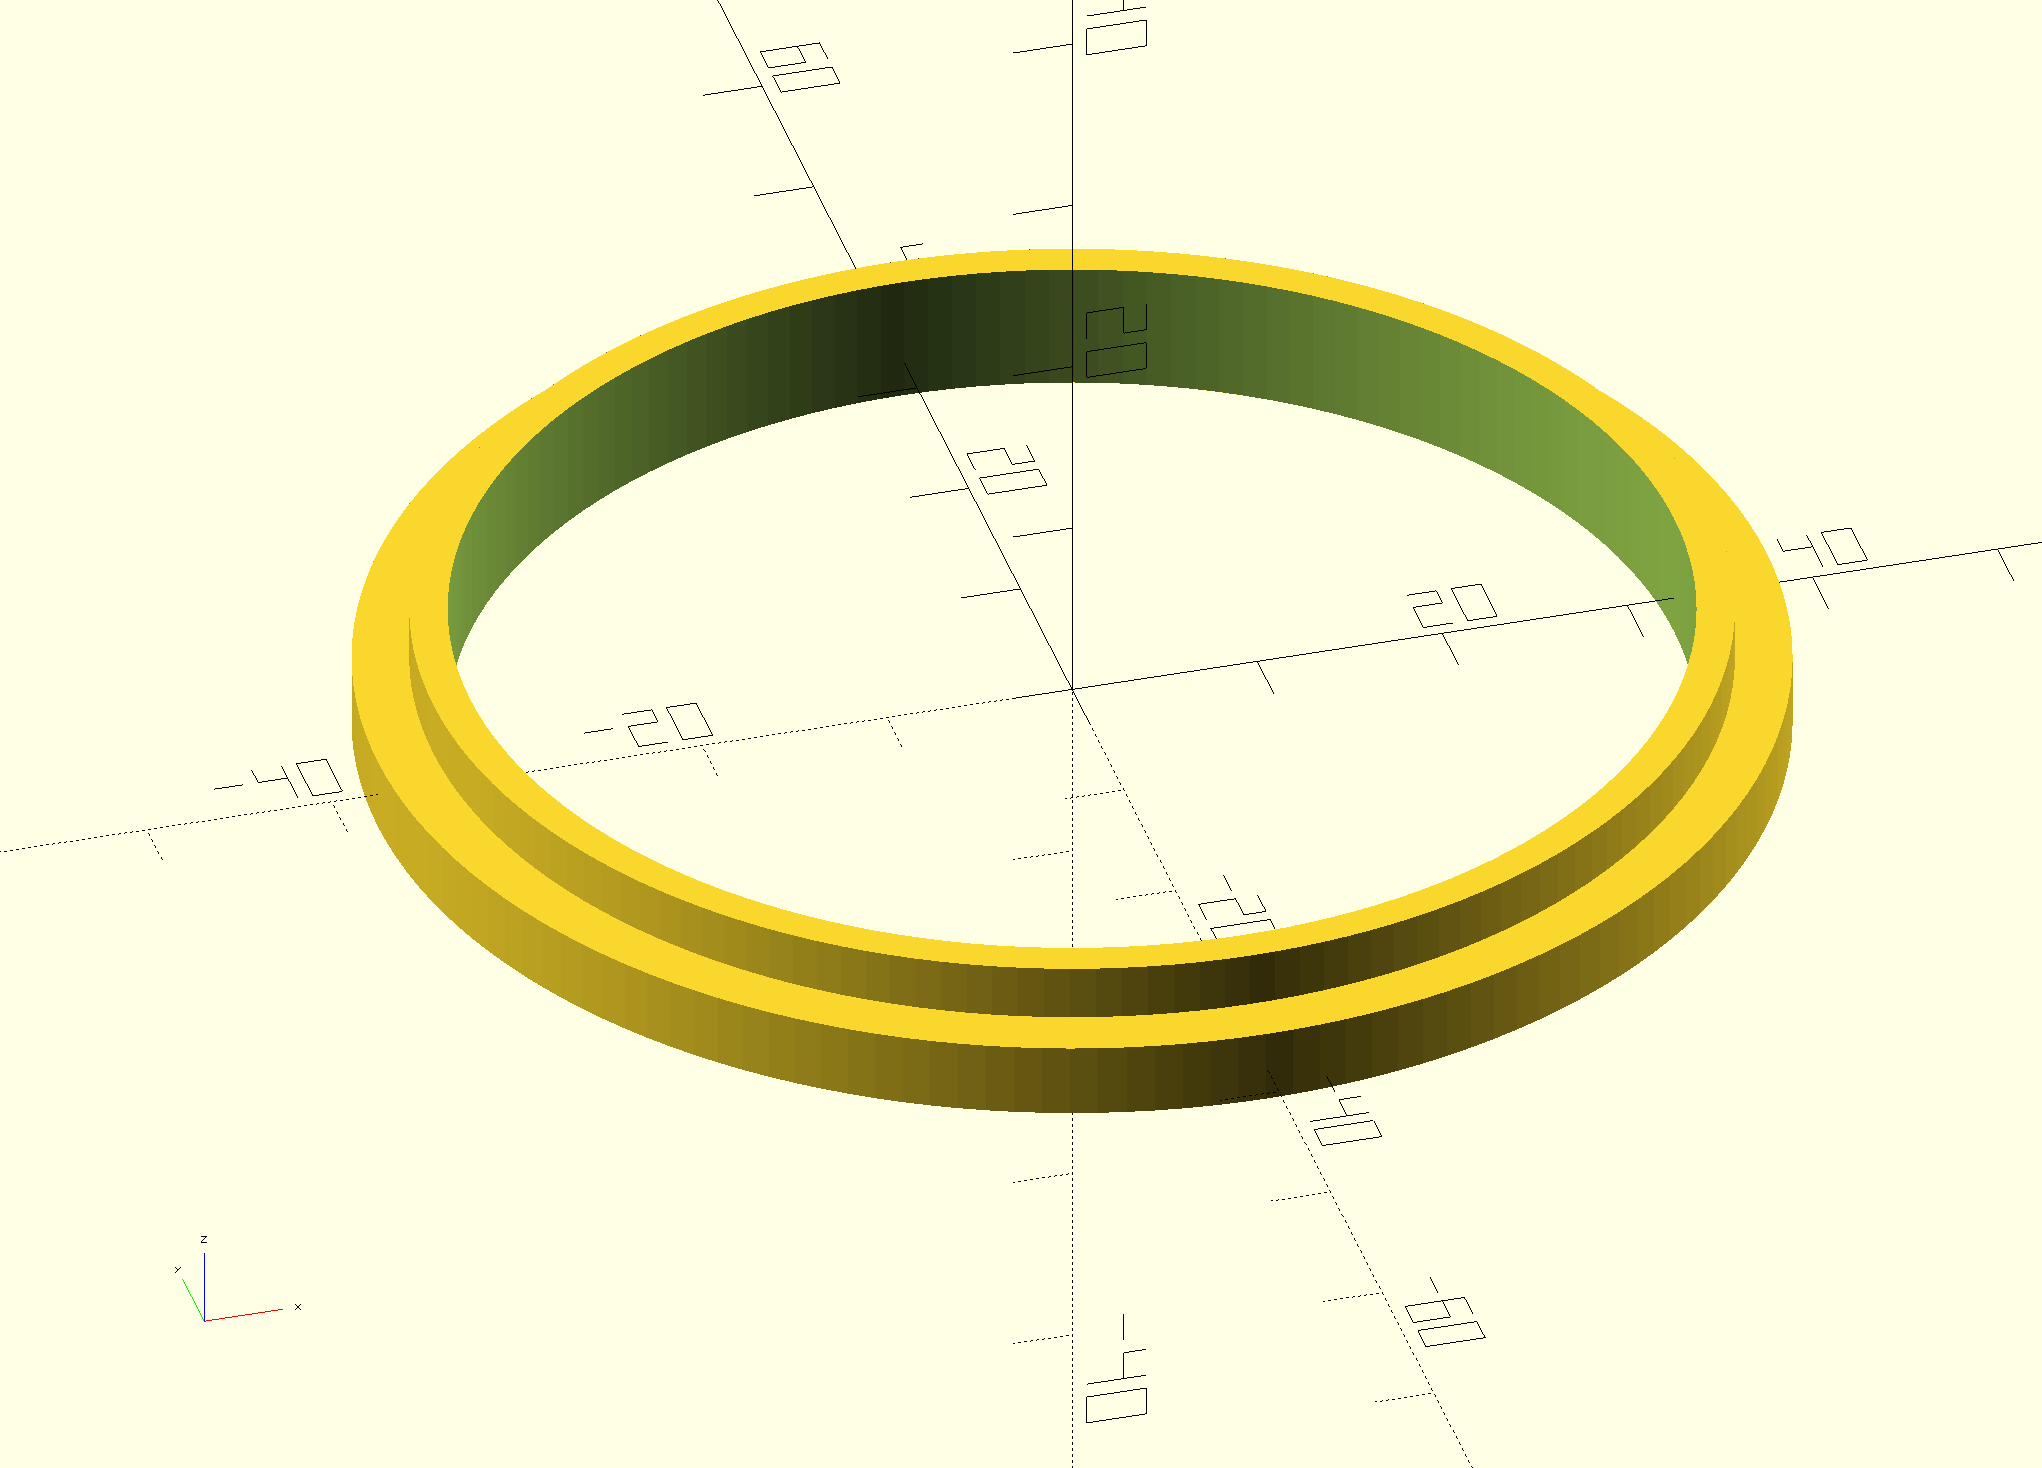
I've spent some time looking at commercially available flanges. They are mostly designed to cover up irregular holes in the wall that the spout doesn't cover. I don't have that problem. I decided to see if I could fabricate my own flange on my 3D printer. There are lots of free models for flanges and escutcheons of various flavors. I ultimately chose General Flange Designer! because it's a customizable OpenSCAD design. That allows me to vary things to get a precise fit for my needs. Besides customizing with my own sizes and so on, I made one tiny change to the design file. The design expects the base of the flange to be some kind of polygon, and it can be customized to have up to 60 sides. I changed that to allow up to 360 sides because I really wanted a true circle. With 60 sides, some of those vertex artifacts were still visible.
![]()
As far as I know, there is no such thing as brushed nickel 3D printer filament. Instead, I used silver metallic "silk" PLA. I used this one because it was cheap and quickly available. I never used that brand before, but I'm happy with the results.
![]()
In this close-up, it does not really look like an excellent color match. From a reasonable distance and with the normal room lighting, it's OK. The shape of the spout itself let me slip the ring on without unfastening the spout. PLA has some shrinkage factor that varies by manufacturer, so I did a few trials to dial in just the size to fit snugly on the base of the spout. For now, that mild pressure is what hold it in place. We'll see how that goes. If it comes loose over time, I'll probably caulk it.
The other things in the see-how-it-goes department are whether the PLA will degrade over time and whether any tub gunk will accumulate on it
-
Return to Niche Mountain
03/08/2024 at 01:24 • 0 commentsFinally, I've put a little mortar to work, so the tiling is truly underway. I started with the niches, but first I have to confess.
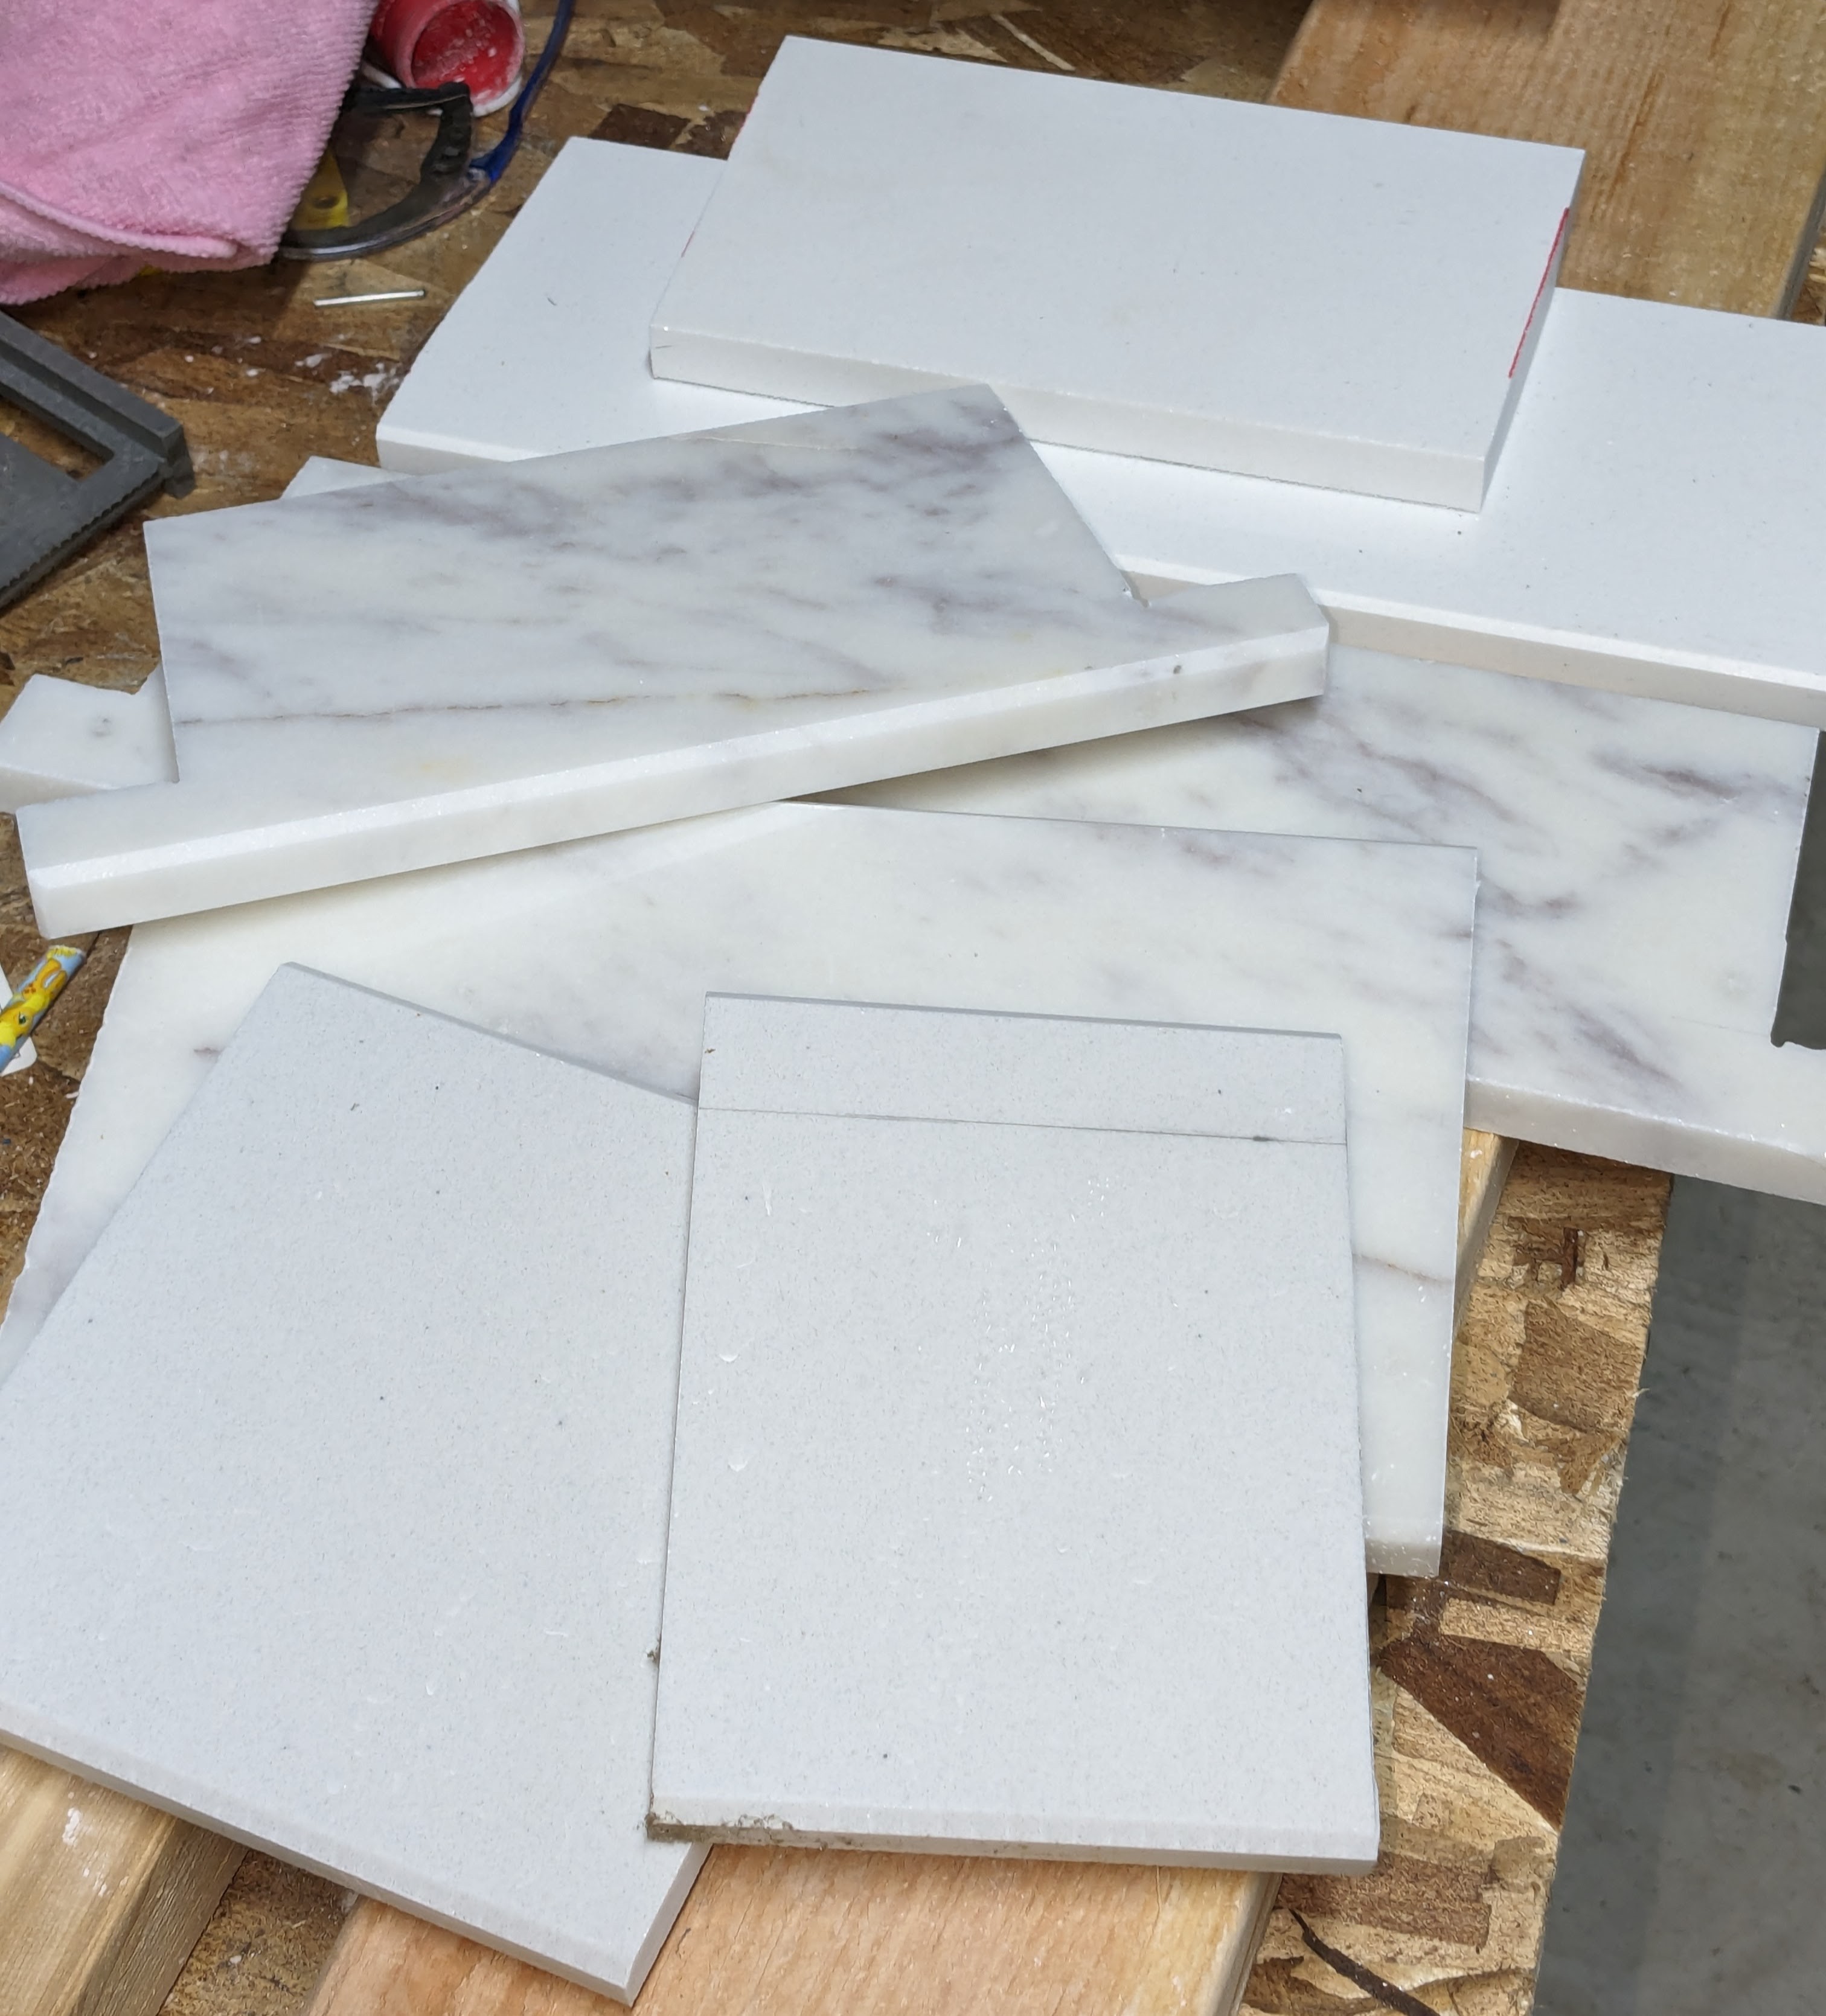
Two of my specialties in projects like this are changing my mind and making obvious blunders. My original plan for the sills of the niches was to use some leftover engineered stone (I think it's this one) donated by a friend of mine. It was a fairly bright white color, but it looked OK next to the tiles I was using. I cut out those sills and showed them in some photos in earlier project logs. When I finally got around to planning how I was going to tile the rest of the niches, I decided that my original "earless" look for the sills wasn't very appealing. I didn't have enough of that left over to cut new sills, so I went off to a tile store to buy a nice 6x36 inch chunk of marble. It wasn't a match for my Carrara marble tiles, but it was close enough to fit in nicely. It had two beveled edges. I didn't want a bevel at the back of the niche to collect water, but that wasn't a problem since I needed to trim off an inch or so from the piece to get the proper depth. I don't know the exact order of cuts I made, but I didn't notice until I was doing a test fitting that I had used the flat (trimmed) side of the piece as the front for the larger niche, leaving the bevel in the back. I was pondering if there was a way to deal with that when I noticed (aka, remembered) that the larger niche was slightly deeper by 1/8 inch or so compared to the smaller niche. I had used the smaller niche sill as a template for trimming the larger niche sill, so there there was an unacceptable gap at the back of the niche. If I had instead messed up the smaller sill, I might have had enough material to re-do it. Instead, I went to another store and bought yet another 6x36 inch slab. This one was again engineered stone. It was said to have a marble look, but it was that light gray with specks sort of marble. It looks fine with my other tiles. Before doing each cut, I measured several times and checked that I was doing it right. Things turned out OK, but my work area looks a bit like the slag heap at a quarry. Sheesh.
![]()
When doing a shower niche, you want the sill to slope gently downward so that water will naturally run out of it. EZ-Niches makes that easy since the slope is built into the pre-formed niche. All you have to do is lay the sill flat against the EZ-Niches surface, and you automatically get the desired slope. It's a blessing and a curse. The slope is built into all four size of the niche. That means that all of the surfaces except the back are trapezoids instead of rectangles, and the difference from right angles is small. I measured it at about 2.5 degrees using an angle finder tool. You can see the slant in the small marble sill in the photo above, though that one was cut slightly higher than 2.5 degrees. Through careful transfer of the angle from the angle finder tool, I was able to do a pretty decent job of cutting that slant with my wet tile saw during the re-do. I guess having some earlier practices counted for something.
I used the standard technique to cut the sills with my wet tile saw: cut the front side until the blade just reached the intersection of the measured lines, flipped the piece over and did the same thing from that side. Because of the curvature of the blade (my tile saw is a 7 inch blade), the waste piece is still attached to the main piece by a tiny fragment. It was easy enough to snap out the waste piece without damaging the main piece. I then used a grinder to gently remove the fragment to make a proper corner. I also used the grinder to gently round the corner of each ear. The material was soft enough that an ordinary, run-of-the-mill grinding wheel took care of things. I didn't need a diamond wheel.
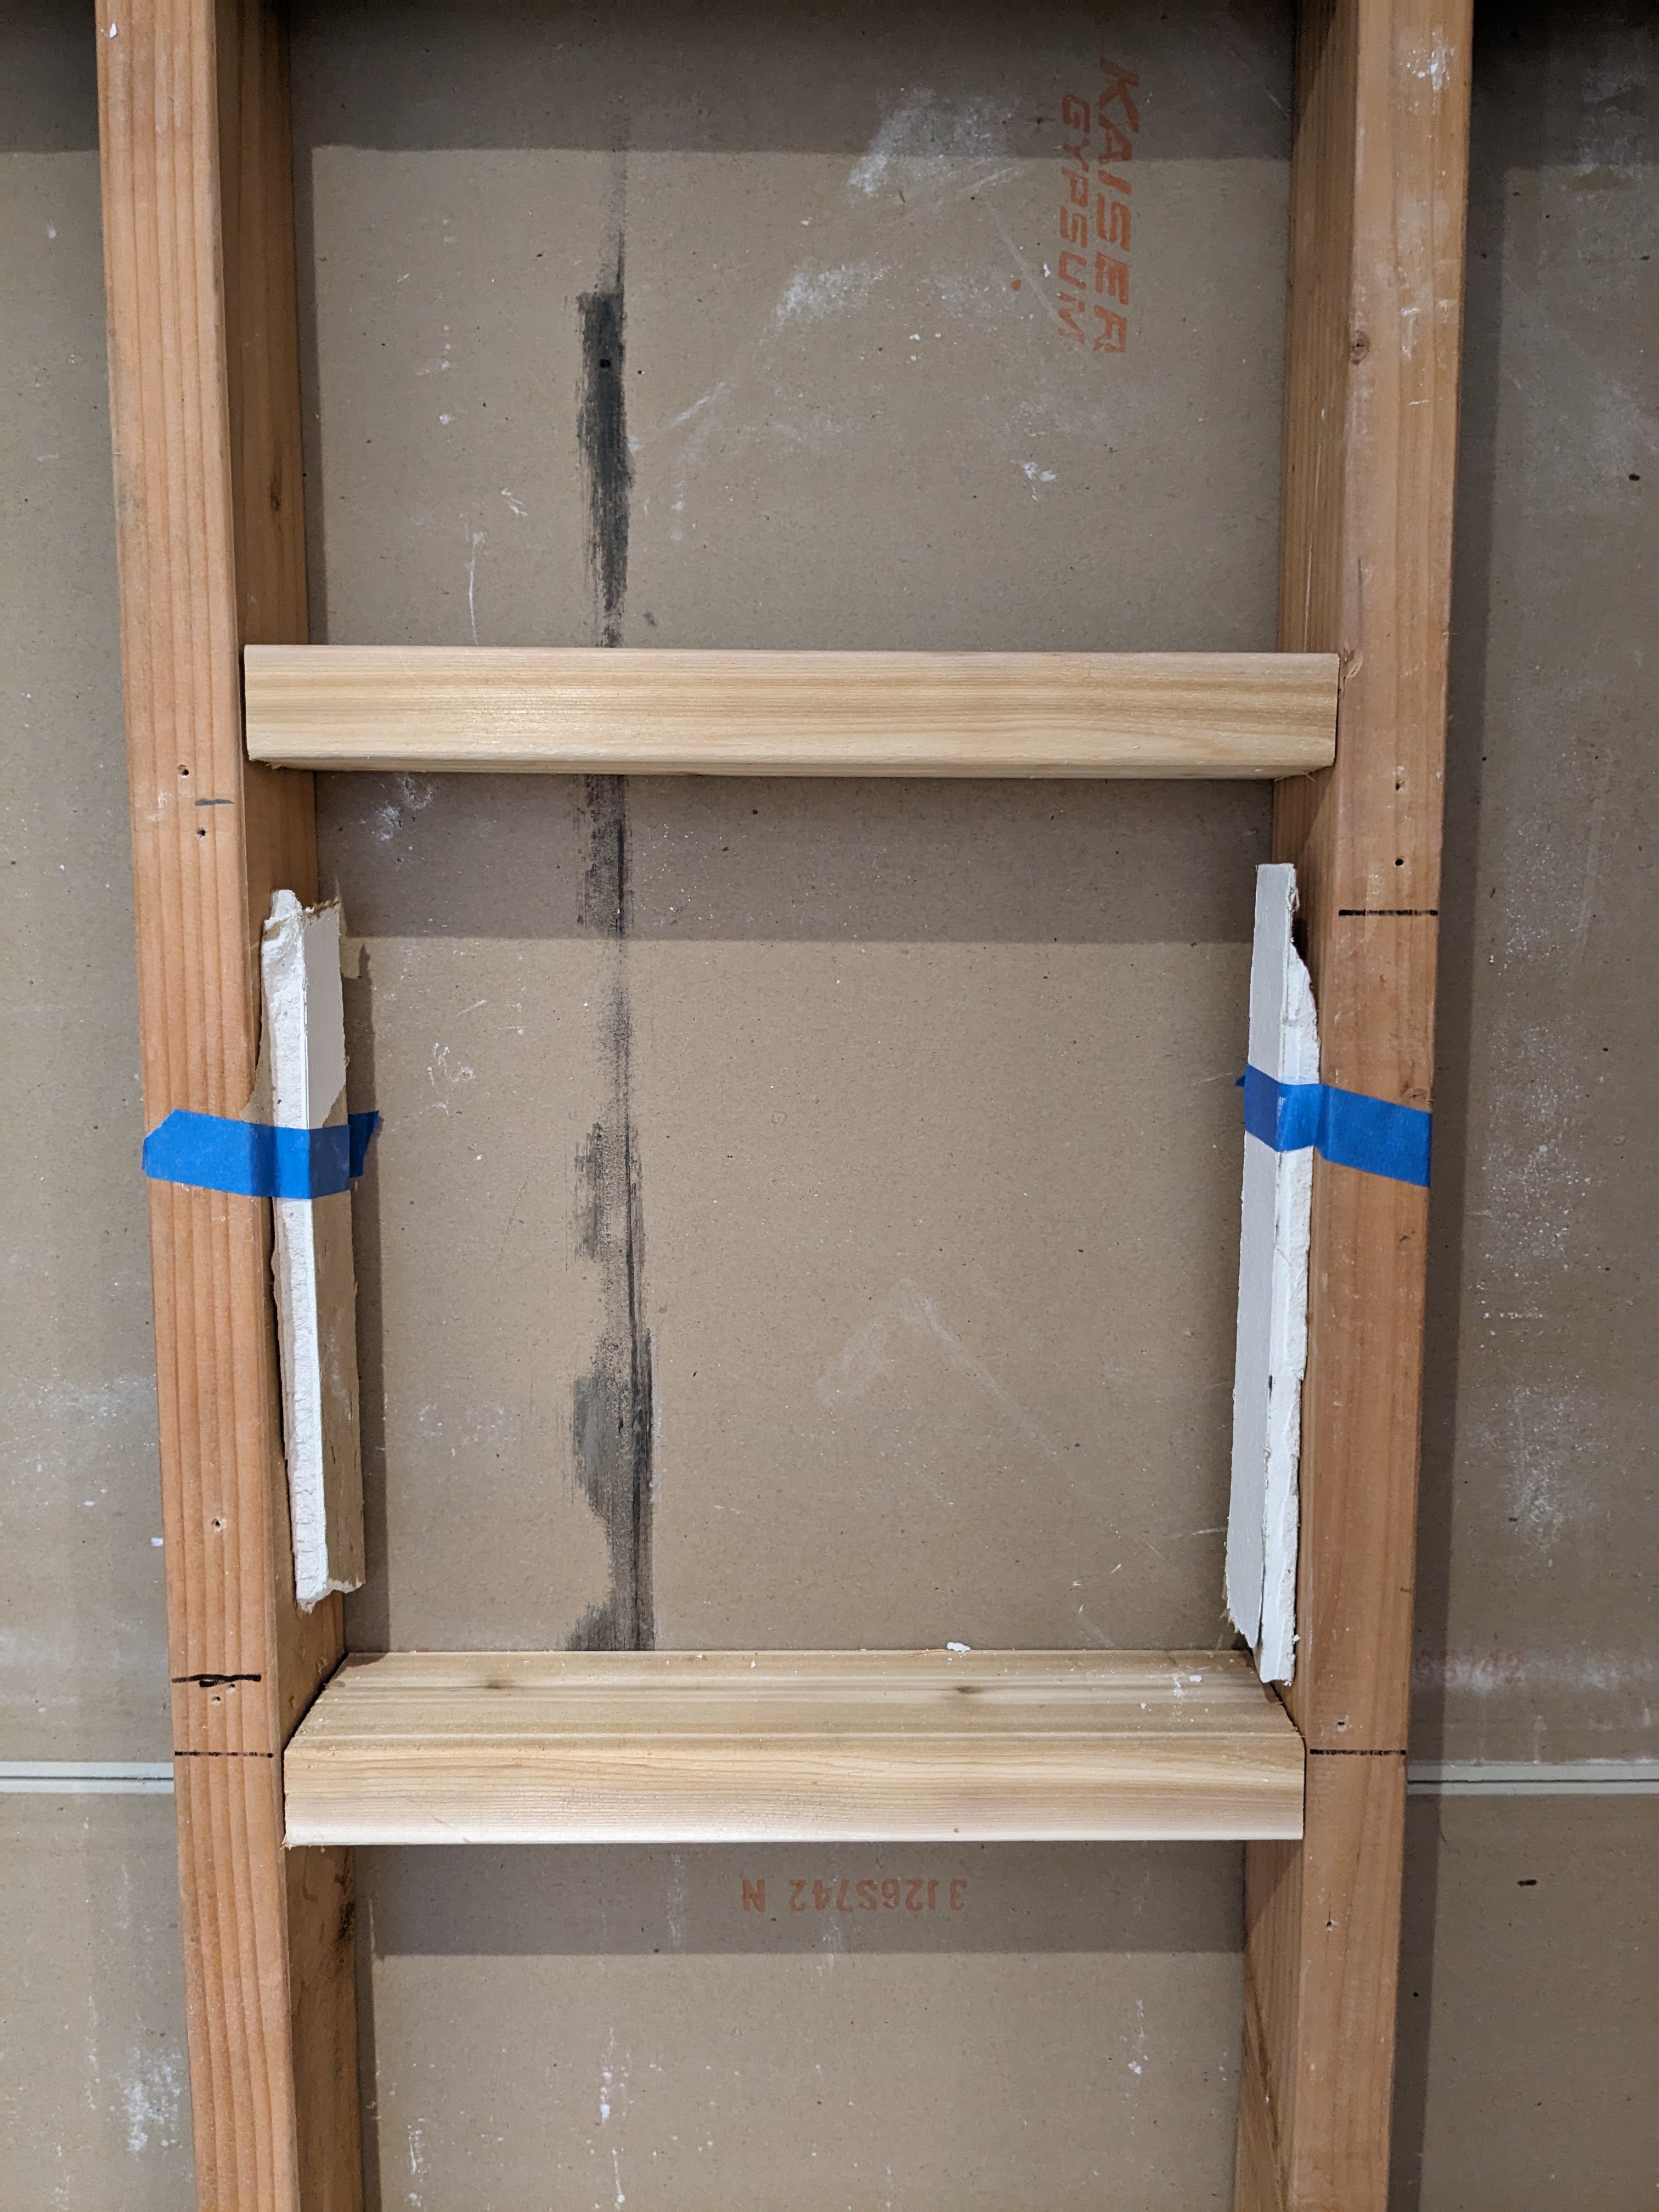
Here is the larger niche after placing the sill. I feathered the thinset around the edges of the niche, which has a flange about 1/16 inch thick. The sill is mortared into place with thinset.
![]()
Here is the smaller niche. It also has the tiles on the back, though they are merely placed to see how they will fit and look. I did the same with the pieces for the larger niche, but they were unwilling to stay standing long enough for me to take the pictures.
![]()
I'm doing the tiling of the niches one step at a time because my immature tiling skills don't let me predict in advance what the thickness of the thinset will be. So, I have to get adjoining pieces mortared in place before I take measurements for following pieces.
By the way, an objective is to tile the niches to make accumulation of water less likely, so the order of tiling is sill, back, sides, and then top. There will be some trim pieces covering up the outward-facing tile edges. I've watched several videos specifically about tiling a niche. In some cases, they fill the gaps with thinset, sometimes with grout, and sometimes with caulk. Under the theory that the niche is just a microcosm of the whole tub surround, it should be caulk for a change of plane and grout for gaps in a single plane. The caulk versus grout might not matter as much because there shouldn't be much expansion/contraction in something the sizes of these niches. Even if the grout cracks, the pre-made niches will prevent any leakage. I have some caulk that is color-matched to the grout by the manufacturer. I have a lot of flexibility for appearances, but I haven't decided which plan to use yet.
Here are a couple of photos after things progressed. The clamp is just holding the larger niche top in place until the thinset dries a bit.
![]()
![]()
Update: The edge trim around the niches.
![]()
![]()
Update: Now that the smaller niche is completely surrounded by tile, I really don't like the look of it. This picture was taken before I adjusted the vertical position of the tile resting on top, so the grout line between the trim piece and that tile is even more out of whack (on an angle). I will definitely remove and re-set that top trim piece. I may even redo the whole niche trim arrangement.
![]()
Update: I removed the trim from around the niches. My idea was that I could place individual pieces of the new trim whenever I had a little bit of thinset leftover from a batch. It all went smoothly until it didn't. I snapped one of the ears off the sill on the smaller niche. Since the sill was the first piece tiled inside the niche, I'm now pondering how much of that small niche's tiling I'll have to undo to replace that sill. The good news is that I have leftover material to make the new sill. If I break up the old sill and am lucky, I might be able to slide the new sill in place without removing other tiles. Do you feel lucky today, punk? Well, do you?
![]()
![]()
Update: After finishing the left end wall, I did the first piece of the new niche trim with some left-over thin-set.
![]()
I removed a lot of the previous thinset with an angle grinder tool (big dusty mess). The photo shows how well the colors go together. After I took this photo, I realized that I had forgotten to take into account the main reason for separate niche edge trim pieces. The edges of the surrounding porcelain tiles are partially exposed because the combination of thinset and the trim tile was not as thick as the surrounding tile. I removed that trim piece but left most of the thinset in place to dry as a built-up layer. I had already cleaned up my thinset bucket for the day or I would have laid down a thinset layer on the other three sides. In retrospect, I could have left most of the thinset in place instead of grinding it away. I just didn't think about it at the time.
Update: It took just about every tool in my arsenal (and a certain amount of swearing), but I was able to get the sill out of the small niche by grinding and breaking it. There's a small chip out of the bottom of the left side piece, but I'll just do some kind of cosmetic touch-up on that (not sure how). The best news, as far as I'm concerned, is that the purple EZ-Niches surface was not injured at all, so the water barrier is intact. Now I just have to cut the new sill and slide it in.
![]()
Update: I re-did the niche trim pieces today. It's not perfection, but I like it a lot more than my first attempt. It was pretty easy to slide the replacement sill into the small niche. Rather than cut a new sill, I decided to use the marble pattern sill for the small niche that I had left over after goofing up the marble patterned sill for the large niche. The two sills don't match now, but they are far enough apart that I don't think it matters much.
![]()
Update: Now with grout!
![]()
![]()
The little crumbs at the top inner corners of the small niche are actually dried mortar, which I will chip off later.
-
Finally, in the pink
03/05/2024 at 00:51 • 0 comments![]()
I can only make that lame joke in the title of this project log because RedGard goes on pink and dries a fairly dark red. RedGard is a paint-on liquid waterproof membrane. Technically, since I am using GoBoard and approved sealants for the seams and fasteners, I don't need to use something like RedGard. I'm doing it anyhow, for extra confidence. (And also because I bought a gallon of it for doing the test wall before I decided to use GoBoard.) This stuff is pretty expensive, and a gallon is the smallest amount that you can buy.
Even as an extra confidence factor, I only need to put RedGard on the seams and fastener locations. GoBoard surfaces that are intact are inherently waterproof. The drywall above the GoBoard doesn't need waterproofing at all since it's outside of the wet area. I put RedGard on it for a different reason. For setting tile, the convention is to use mastic on drywall, especially painted drywall, because thinset doesn't adhere to it very well. The coat of RedGard solves that so that I can use thinset all the way to the top of the wall. If you do web searches for using RedGard on drywall, you'll see lots of advice about not doing it. But that sort of advice is really telling people to not use drywall (or the drywall and RedGard combination) in a wet area. In my case, I'm tiling over the drywall for aesthetic reasons.
I did most of this with a 4 inch roller, which I was able to dip directly into the RedGard container to load it up. In the corner seams, I used a 3 inch paint brush (the cheapest model I could get).
![]()
I need to use at least two coats of RedGard. As I write this, I'm waiting for the first coat to dry. It looks like after the second coat I will still have more than a third of that gallon of RedGard left. I might put on an additional coat just because of that.
This photo is after the second and third coats and a couple hours drying/curing time. It turned out to be about half a gallon left in the bucket.
![]()
-
... pry it from my caulked, dead fingers
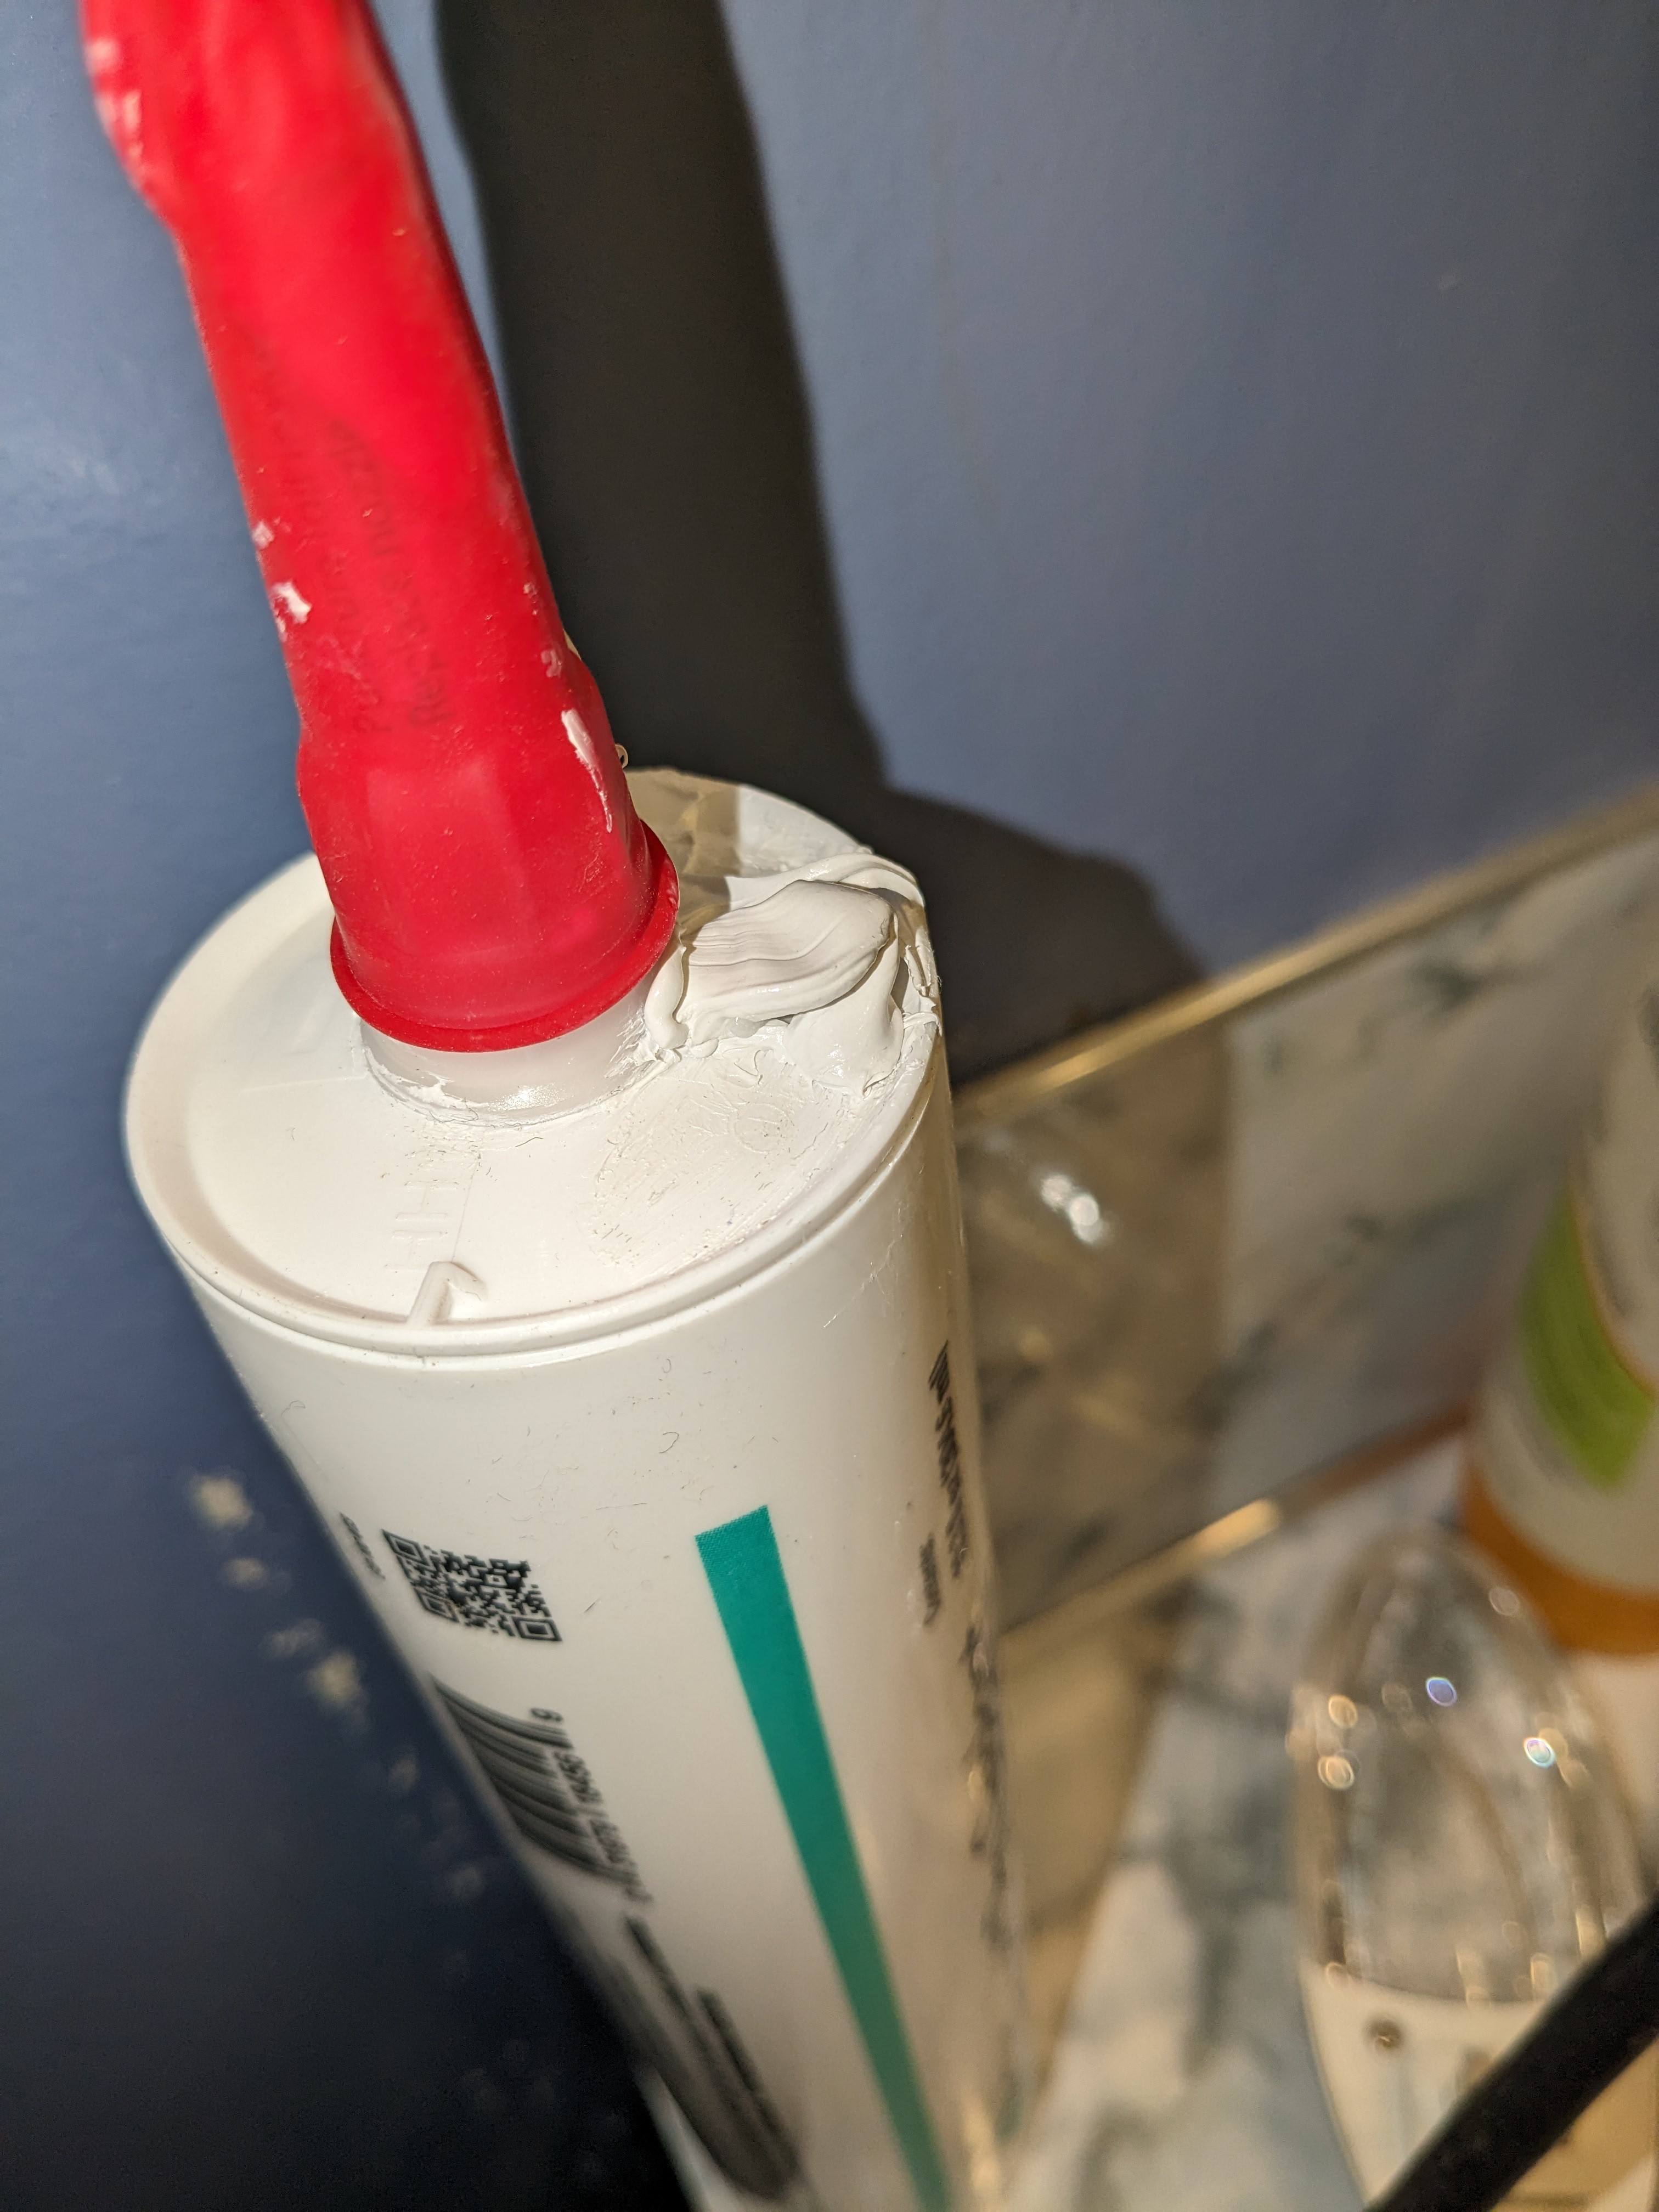
03/04/2024 at 02:06 • 0 commentsSince my backerboard is GoBoard, I decided to use GoBoard Pro Sealant for the caulking. I picked up a couple of tubes when I picked up my GoBoard sheets. I figured if I didn't need both tubes, I could return one of them. That was naive. In the end, I needed to use seven tubes of caulk to seal the GoBoards. Ha, ha, the joke's on me.
Over the years, I've used tubes of caulk on several occasions. The recipe for using them is well-known: snip the end off the nozzle, poke something sharp down into the nozzle to break a foil seal, load the tube into the caulk gun, and away you go. When I tried that with the GoBoard sealant, it was very difficult to break that inner seal. I finally had to resort to using a thin screwdriver and pounding it through with a hammer (like a barbarian). When I tried to use the tube with the caulk gun, it was very difficult to get it to come out through the nozzle. More squeezed out through a seam in the tube's top cap than through the nozzle. What a mess.
![]()
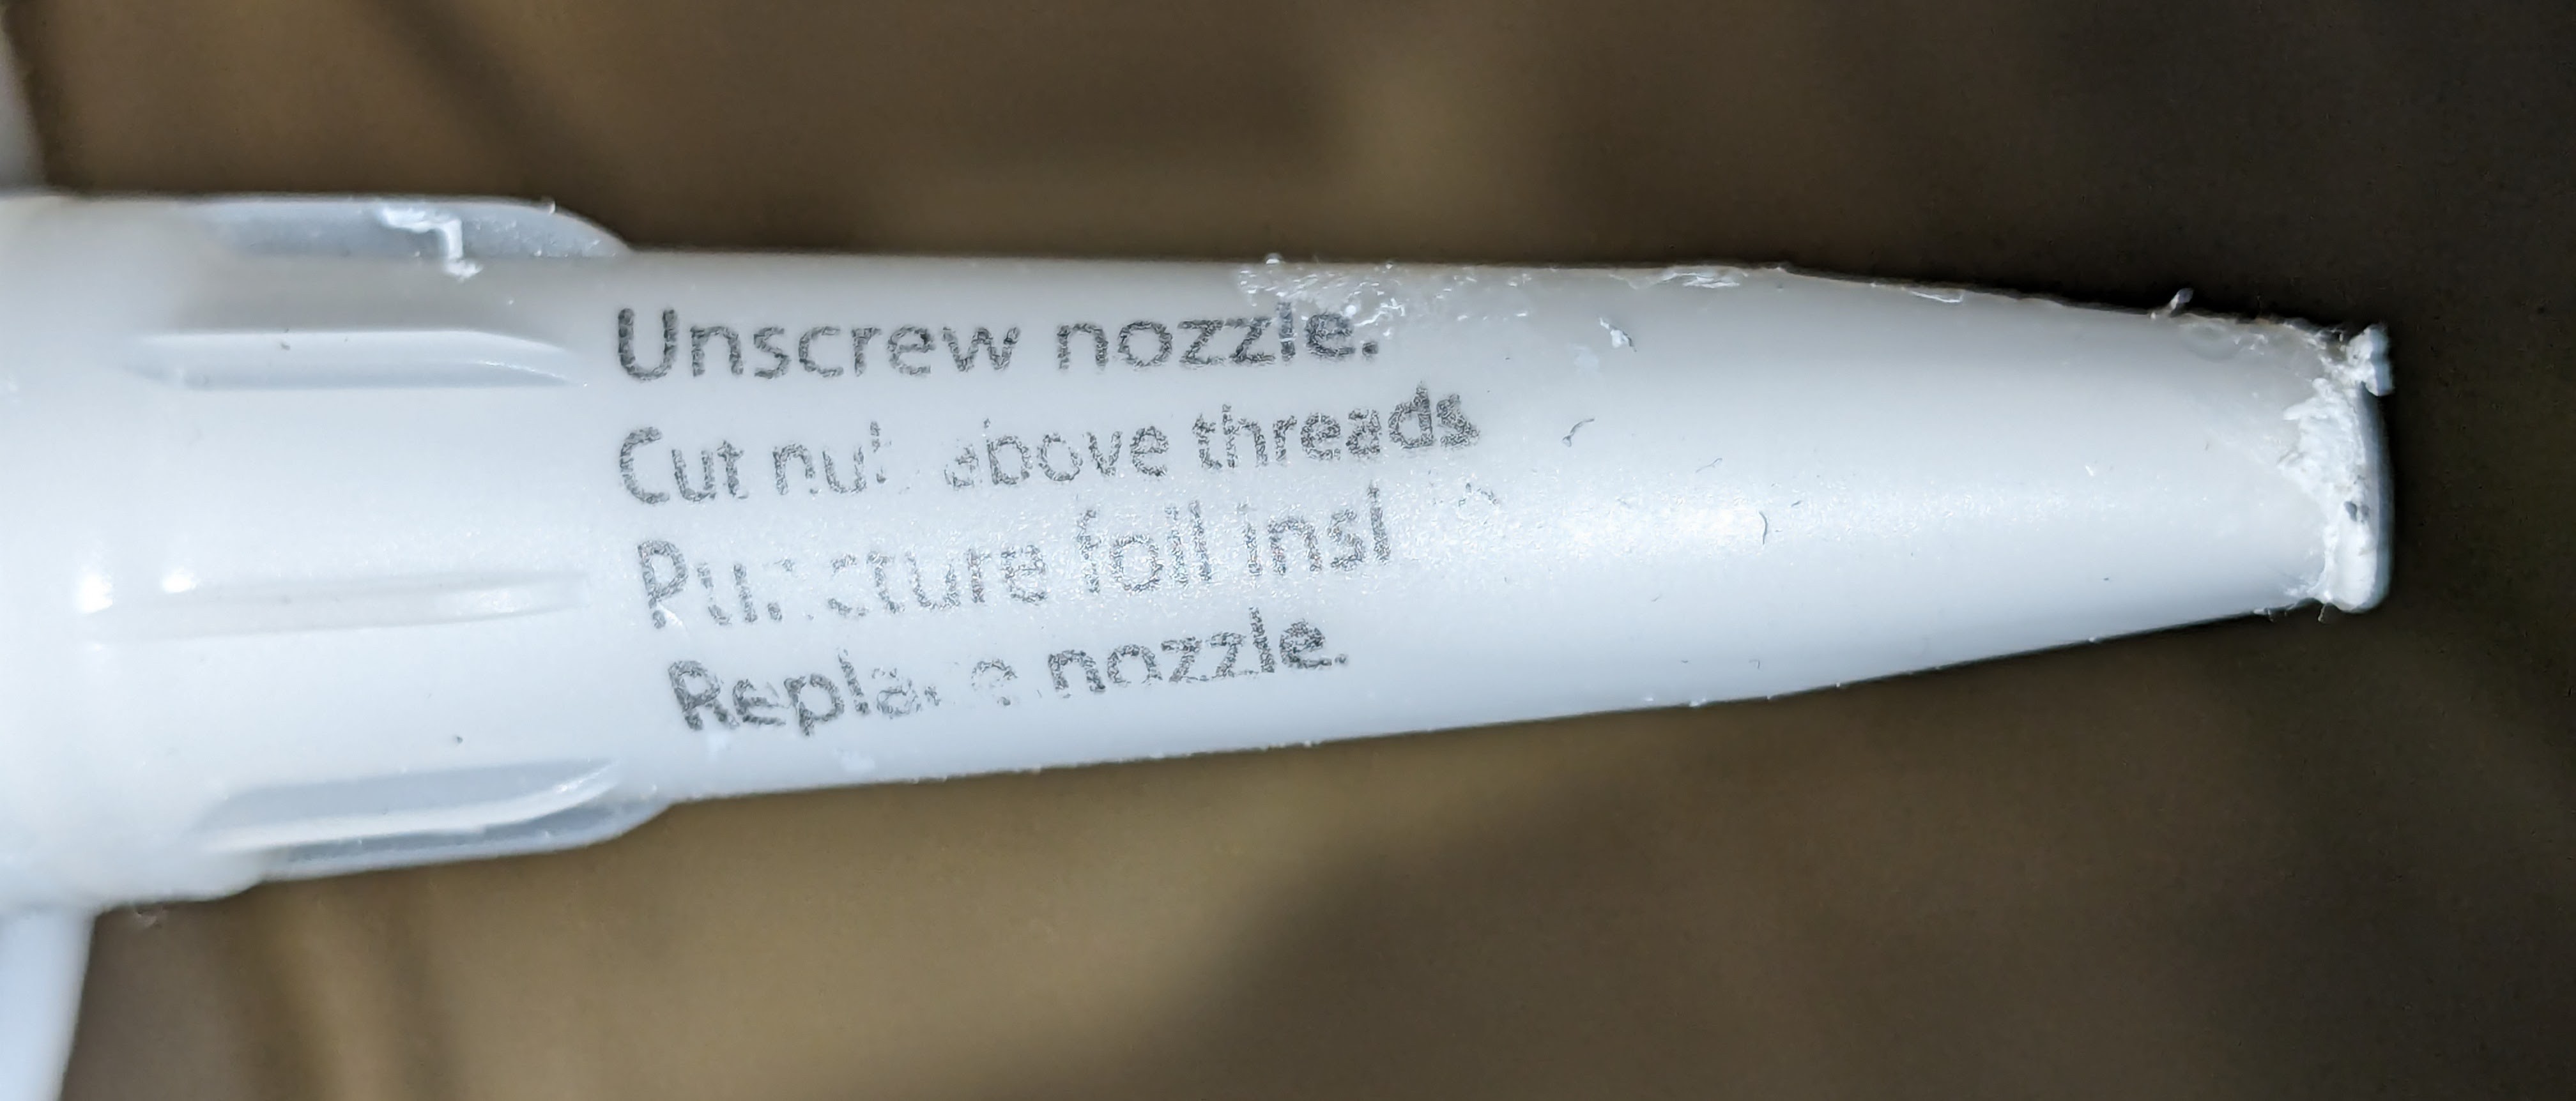
I figured this tube was somehow defective. Maybe some top layer of the sealant had cured and become hard. I gave up on that first tube and turned to the second tube. It was then that I finally noticed the instructions printed on the nozzle itself.
![]()
Huh. I hadn't encountered that type of tube before or, in fact, any type of caulk tube where the nozzle could be removed. Under the nozzle, as part of the threads themselves, is a complete plastic barrier. It's easy to remove with a utility knife. I followed the instructions for that second tube, and things worked as expected. As for the first tube (first photo above), I let it rest overnight. That firmed up the leaked sealant enough that I could use that tube for the less precise work of covering the fastener locations. (The little red sock you see in that photo is a handy device for closing up a tube of caulk so the stuff in the nozzle doesn't start curing. It's like a tiny balloon or, well, some unmentionable thing that I'm sure you'll figure out.)
I mentioned that I greatly underestimated how many tubes I would need. There was lots of it around in nearby Lowes locations when I got the first couple of tubes, but when I looked to get more, there were only two tubes available at a single distant Lowes location. The manufacturer provides a list of acceptable alternative sealants. I finished the job with OSI® Quad® Max (Model 1868684). The OSI Quad Max also had that plastic seal arrangement (but no inner foil), so maybe that's a common thing that I just hadn't encountered before. Judging from the reviews of GoBoard Pro Sealant, I think it's a surprise to many DIYers.
The next photo shows the mostly complete caulking step. The regularly-spaced white blotches are the fastener locations. The only real difficulty I had (besides the giant mess that working with caulk can make) is that some of my gaps were wider than 1/8 inch in some places. A lot of sealant would be needed to fill the buckets of space behind the boards. I had to sort of build up beads of sealant until I could cover the whole gap.
![]()
-
Niche space
03/02/2024 at 22:42 • 0 commentsThere is a small amount of open space behind the pre-made niches. It's not much, but you can feel a little flex if you push on the center of the niche back walls. Perhaps I am overly cautious, but I don't want that small amount of flex to lead to loosened grout or tiles over time in the niches.
Luckily, I have a huge surplus of cardboard drywall shims, and I was able to use a few of them to take care of this problem. The space is not in a wet area. I stacked up some of the shims by trial and error until I found the number that would start pushing the edges of the niches away from the GoBoard, and then I used one fewer layer. The larger niche wanted two layers of shims, and the smaller niche wanted five layers. I held things in place with simple staples since the niches will hold them permanently.
![]()
![]()
-
When I nod my head, you hit it with a hammer
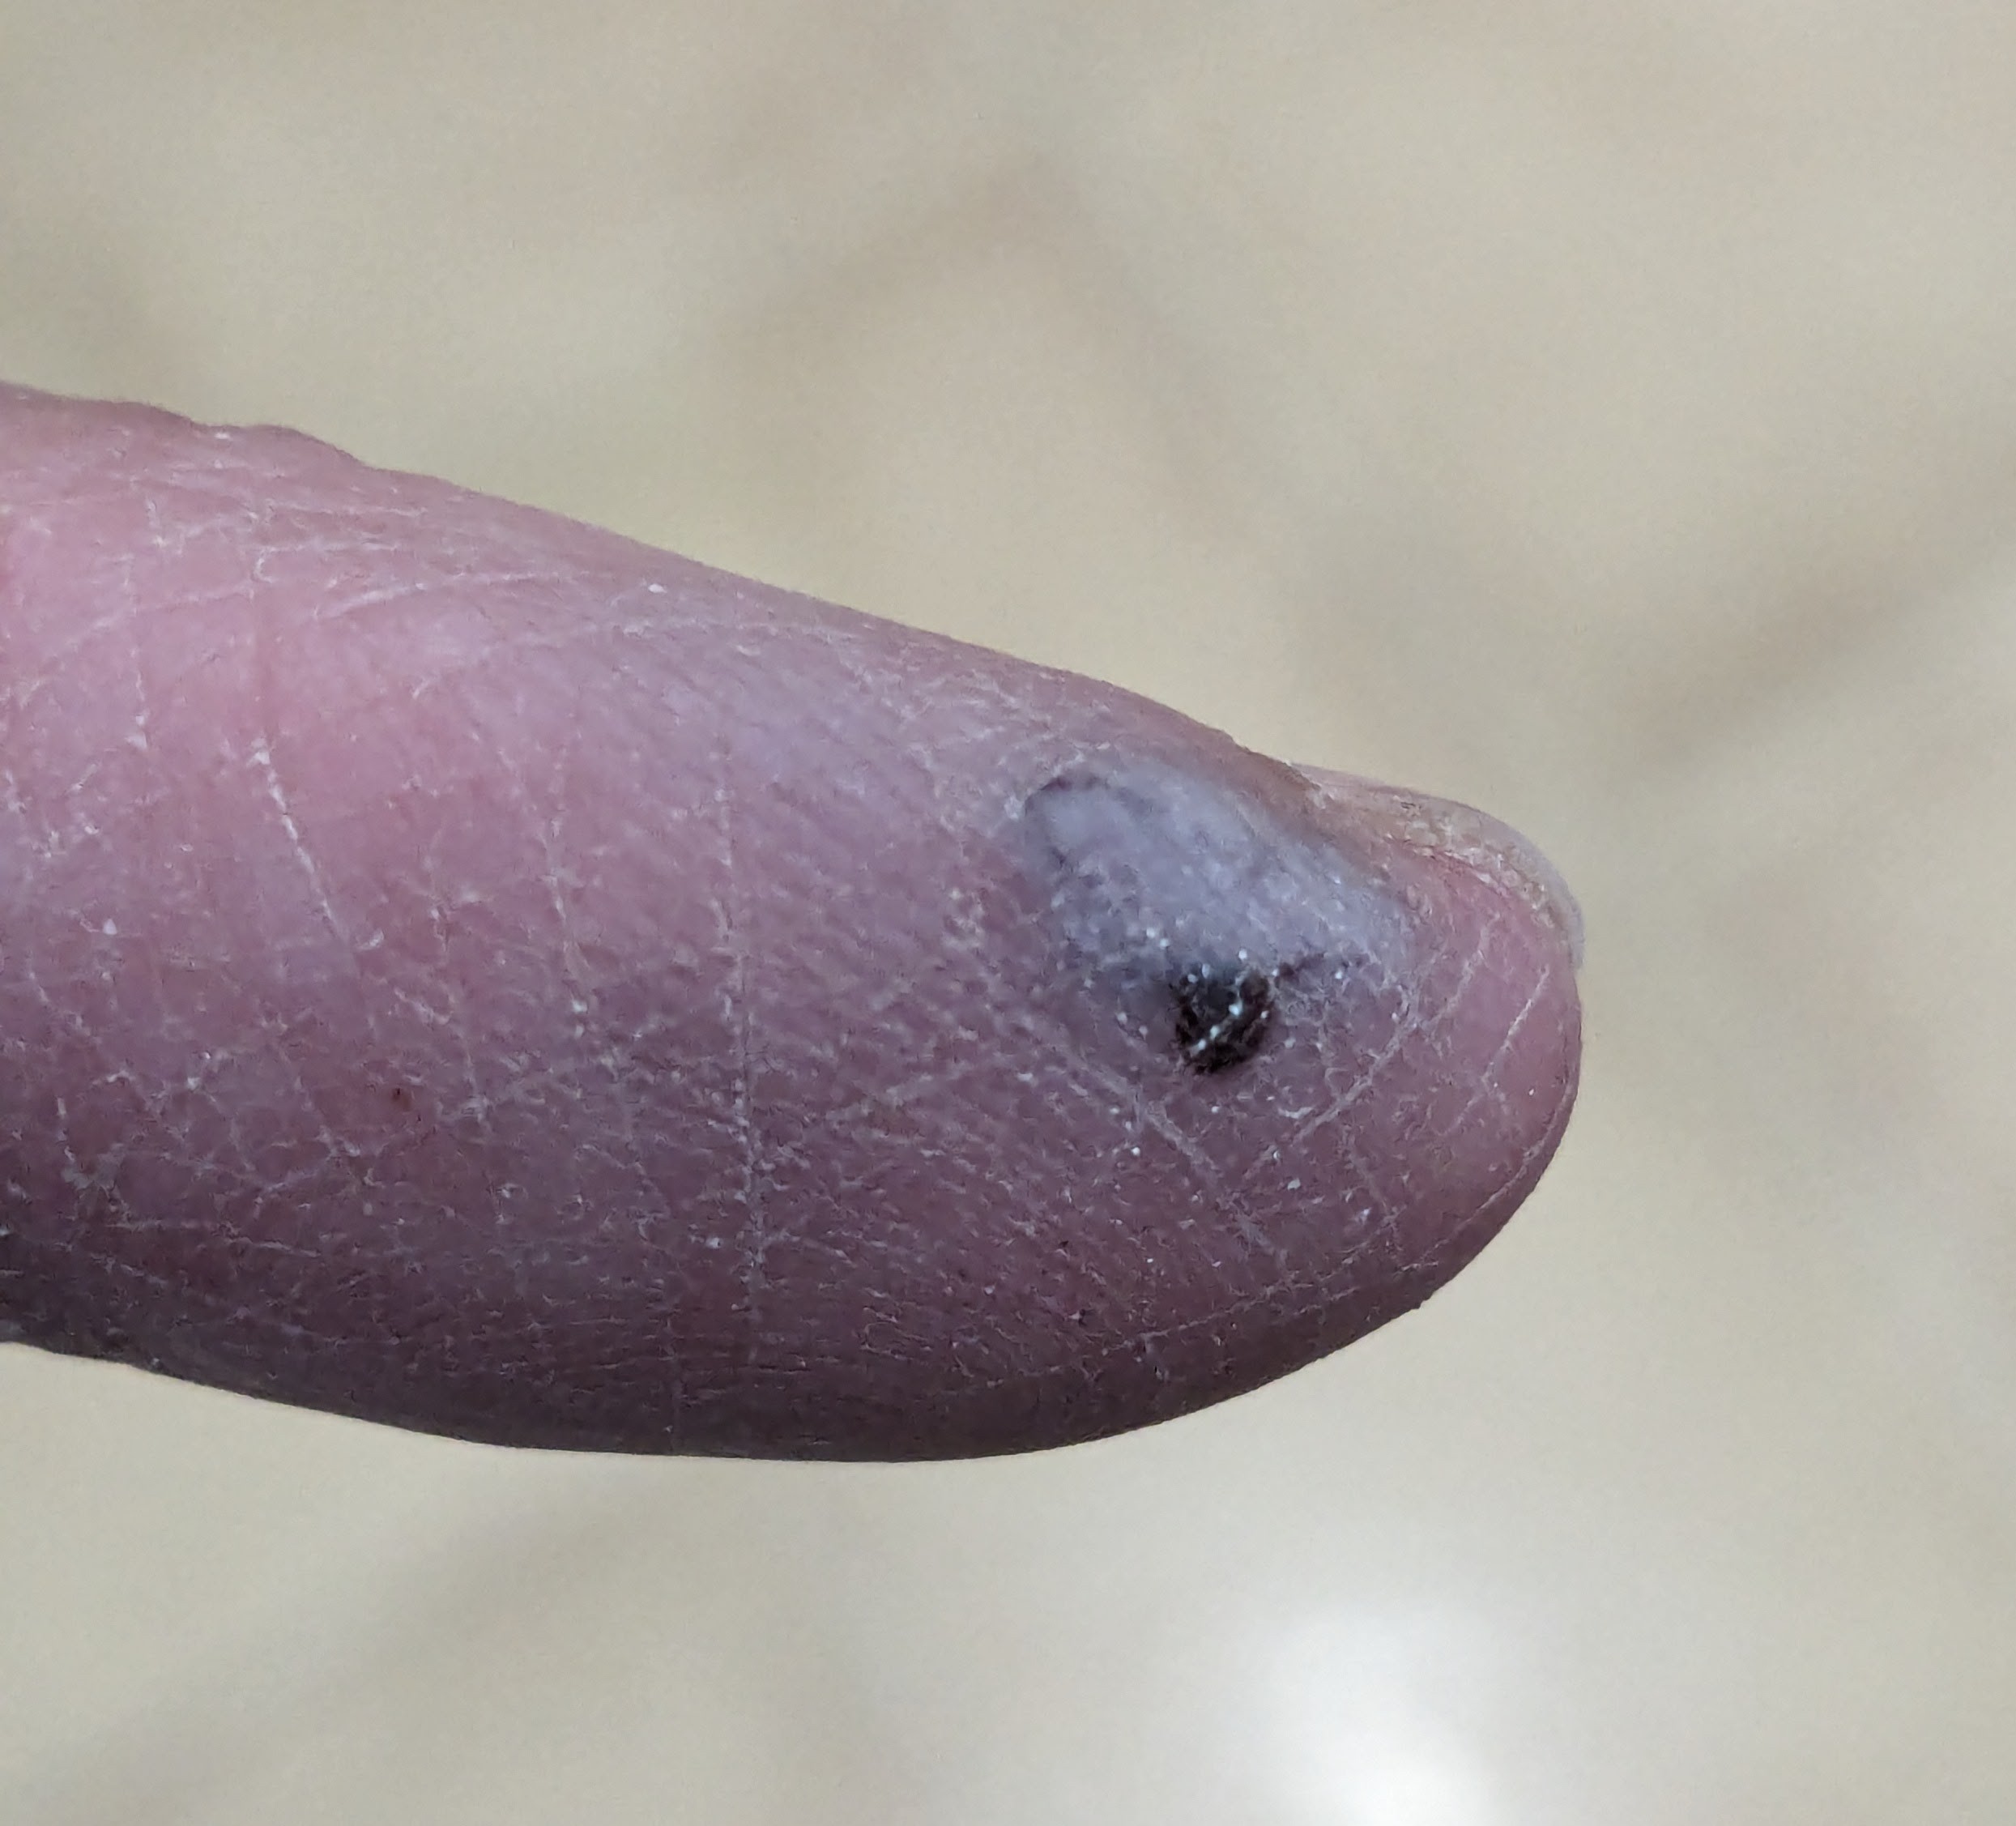
03/01/2024 at 17:12 • 0 commentsI got all the way through the demolition and quite a bit of the build-up prep for tile without anything more serious than some tiny splinters. I got what you see in the photo tightening up a nail in some nearby drywall that had come loose. It's not like I was holding the nail. My hand was just "in the area". My only excuse was that it was at the end of the day, so my hammer swinging accuracy was tuckered out. It's either that or some gangsters out for vengeance broke into my house, held me down, and bashed my finger. It's a toss-up.
![]()
By the next morning, things had gone pretty purple. Luckily, it doesn't hurt too much. Where do I file the workmen's compensation claim?
-
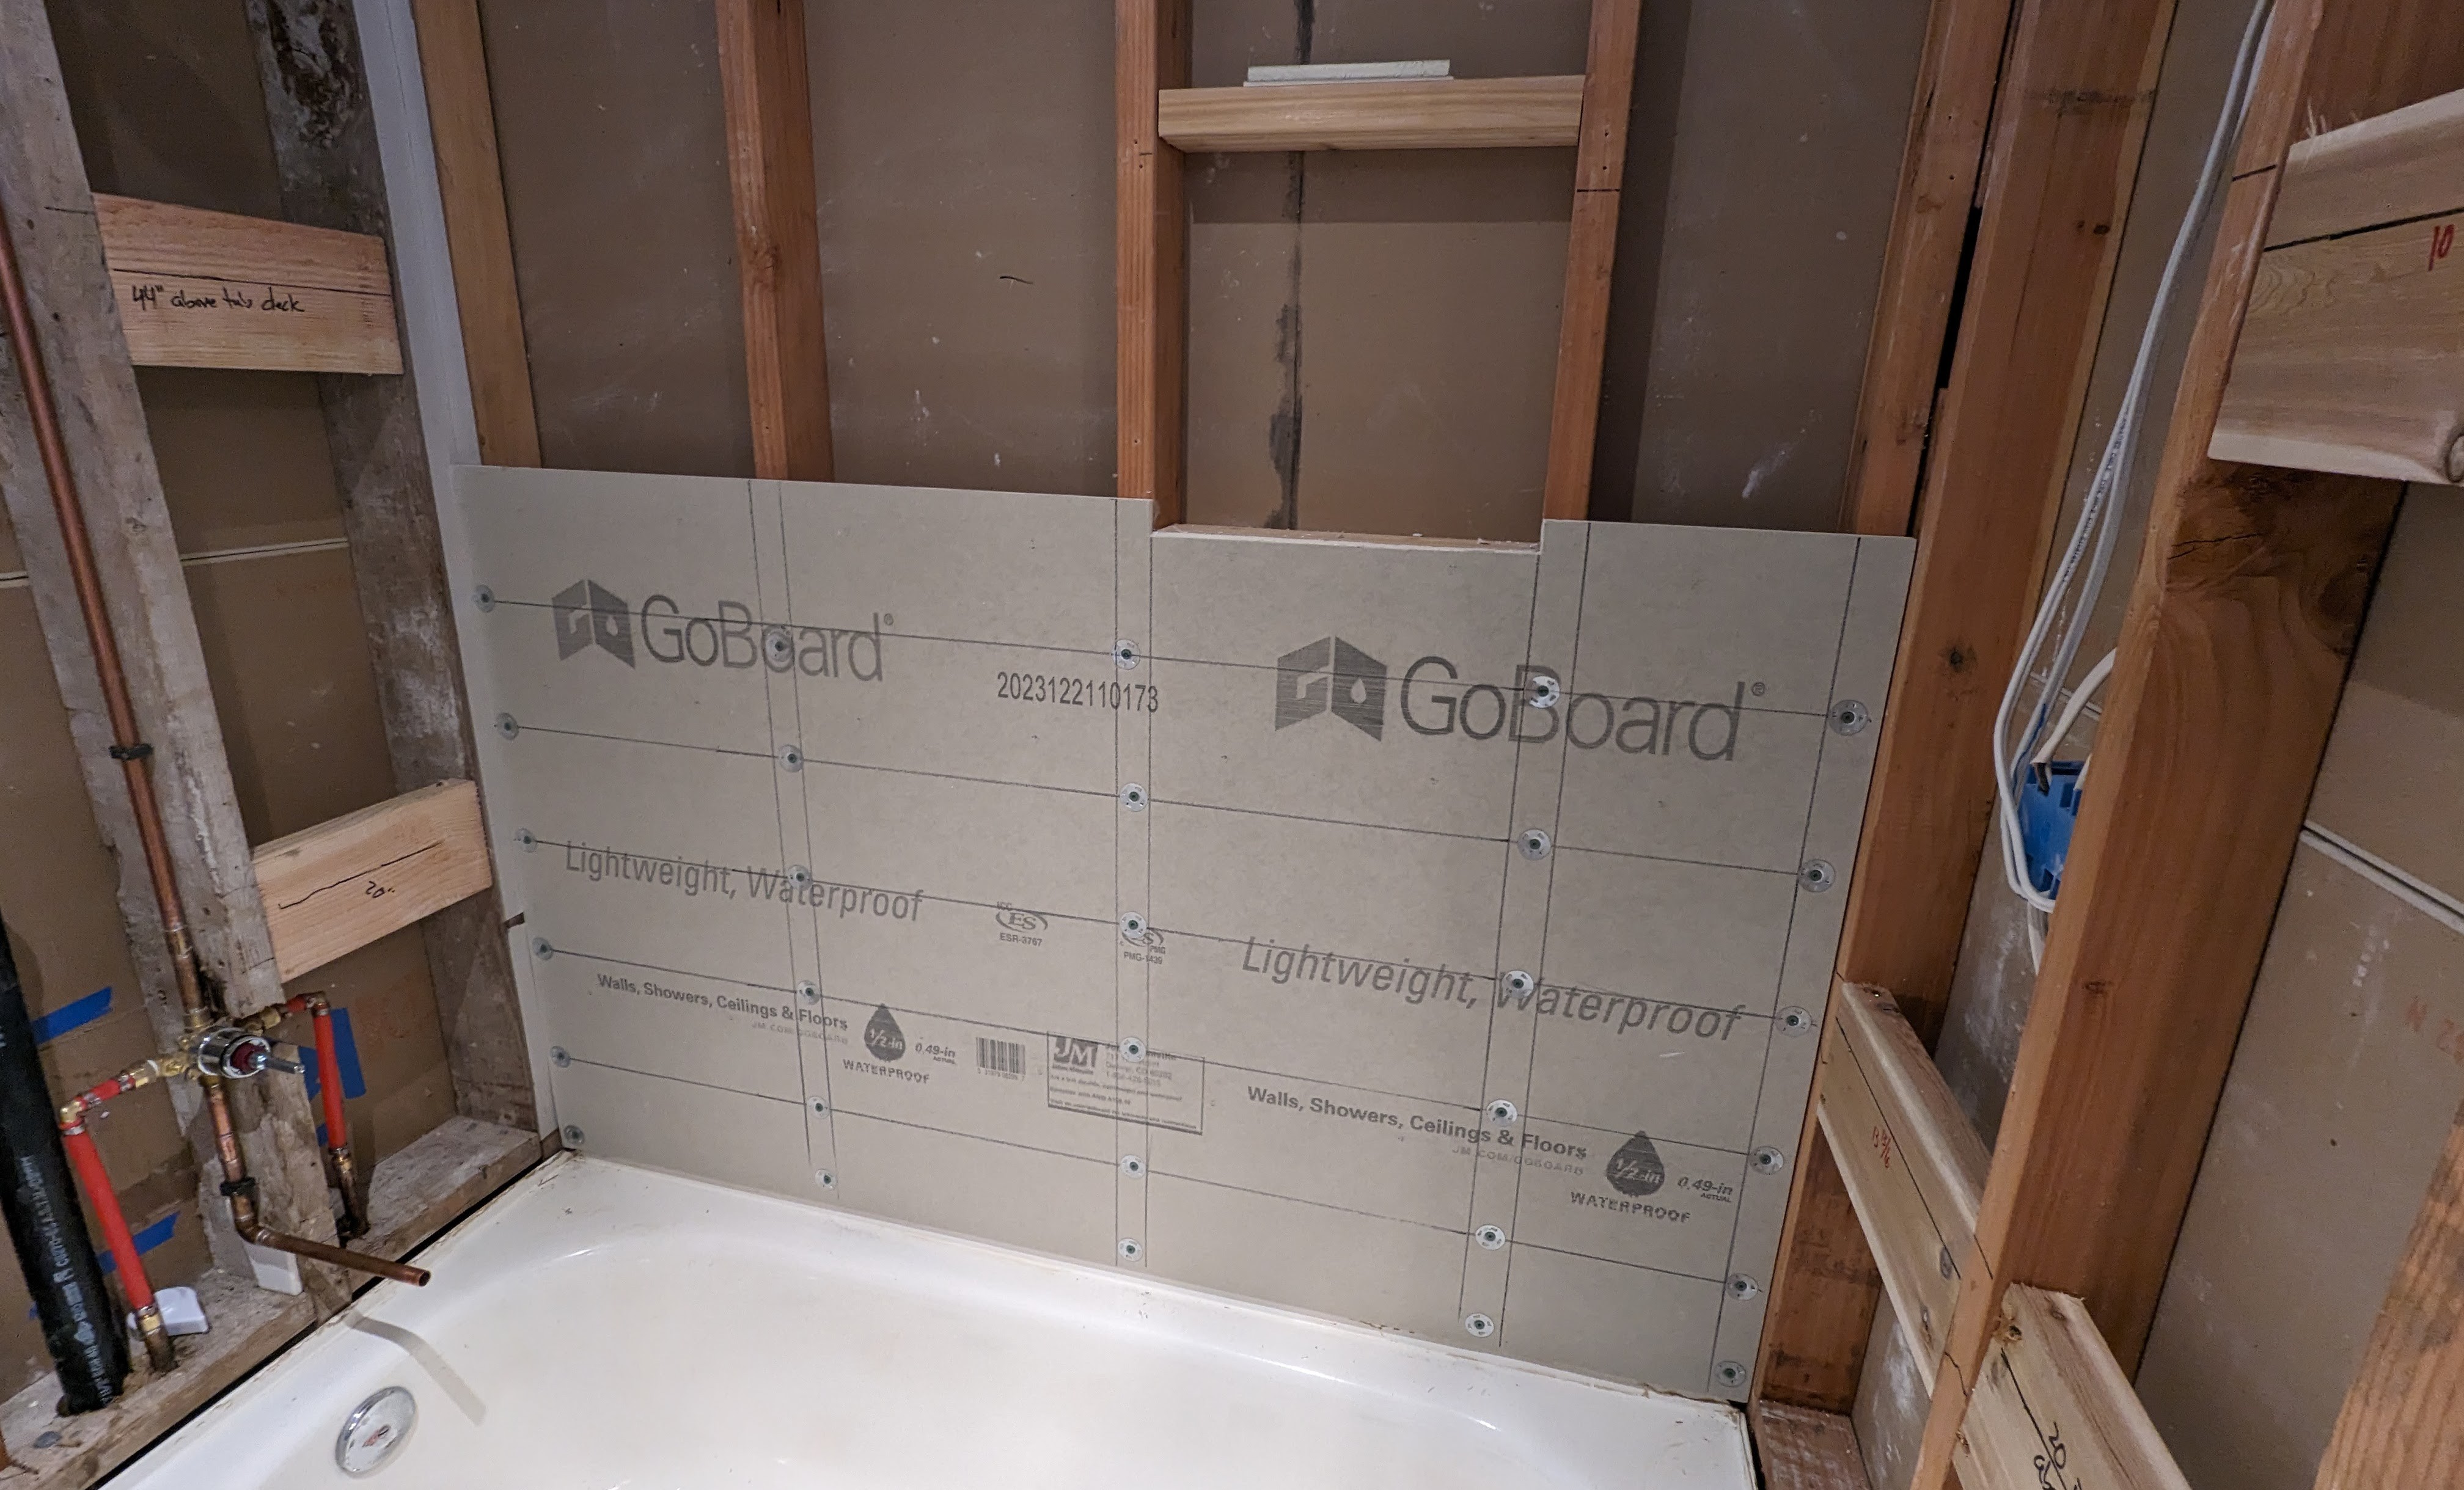
GoBoard
02/29/2024 at 04:18 • 0 commentsTiles get applied to some kind of surface, generically called backerboard. For a wet area like a shower, the traditional backerboard material is cementboard. It's a bit like drywall, but it's impregnated with cement (tile people call them "cementitious"; yup). The advantage over drywall is that cementboard will not degrade if it gets wet. However, cementboard is not waterproof (a common misunderstanding). In recent years, an alternative technology of closed-cell foam boards has been developed. There are several different manufacturers. The foam backerboards are completely waterproof except for places where you put a hole in it for screws or where two pieces meet in a seam. That's very appealing to me. The other advantage is that the foam boards are very light (5-10 pounds) compared to cementboard (30-40 pounds for a 3x5 foot piece). The disadvantage of foam backerboards is the price. In my area, cementboard in DIY quantities is about US$15 each, whereas the inexpensive foam boards are about twice that. There are more expensive brands that the pros use, and those are a lot more expensive.
For my little job, I will be using 5 or 6 pieces of backerboard, so the price difference was not a big deal. I chose to use GoBoard, It's readily available locally.
A little while ago today, I put up the first piece. I admit that I did the easiest piece first to give myself a little victory. In a standard tub alcove, one piece of backerboard mounted horizontally exactly fits the back wall. I only made the cut-out for the bottom part of my larger niche. I haven't yet done the cut-out for the smaller niche. Everything I read about this was true: I just used a plain old utility knife to trim out that piece. Easy as pie.
![]()
If you look closely, you can see that I'm using washers with the screws. The washers are also from Johns Manville. They say that if you use the washers and the matching screws, you can change the minimum vertical spacing from 6 inches to 12 inches. I wasn't able to find their matching screws locally, so I'm using backerboard screws intended to be used with cementboard, which are a little different. Their guidance doesn't address that combination, so I decided to stick with the 6 inch spacing. The grid of lines were done by me to keep track of the stud locations and the 6 inch vertical spacing. I didn't yet put screws along the top edge because a single screw can go in each stud where sheets meet if you are using washers. At the left end, you can see where I built up the two studs in that corner with cardboard strips to get them flush with their peers.
With this first backerboard in place, I finally feel like I've turned the corner and might even someday soon place some actual tiles. Woot.
Update: More progress.
![]()
The right end-wall was also fairly easy since I just had to make two straight-line cuts to make it the right size. If I had been more careful about removing some drywall with the old tiles, that interface would have been exactly 5 feet up and eliminated the need for one of those cuts. It's easier to trim GoBoard compared to drywall, so that's what I did.
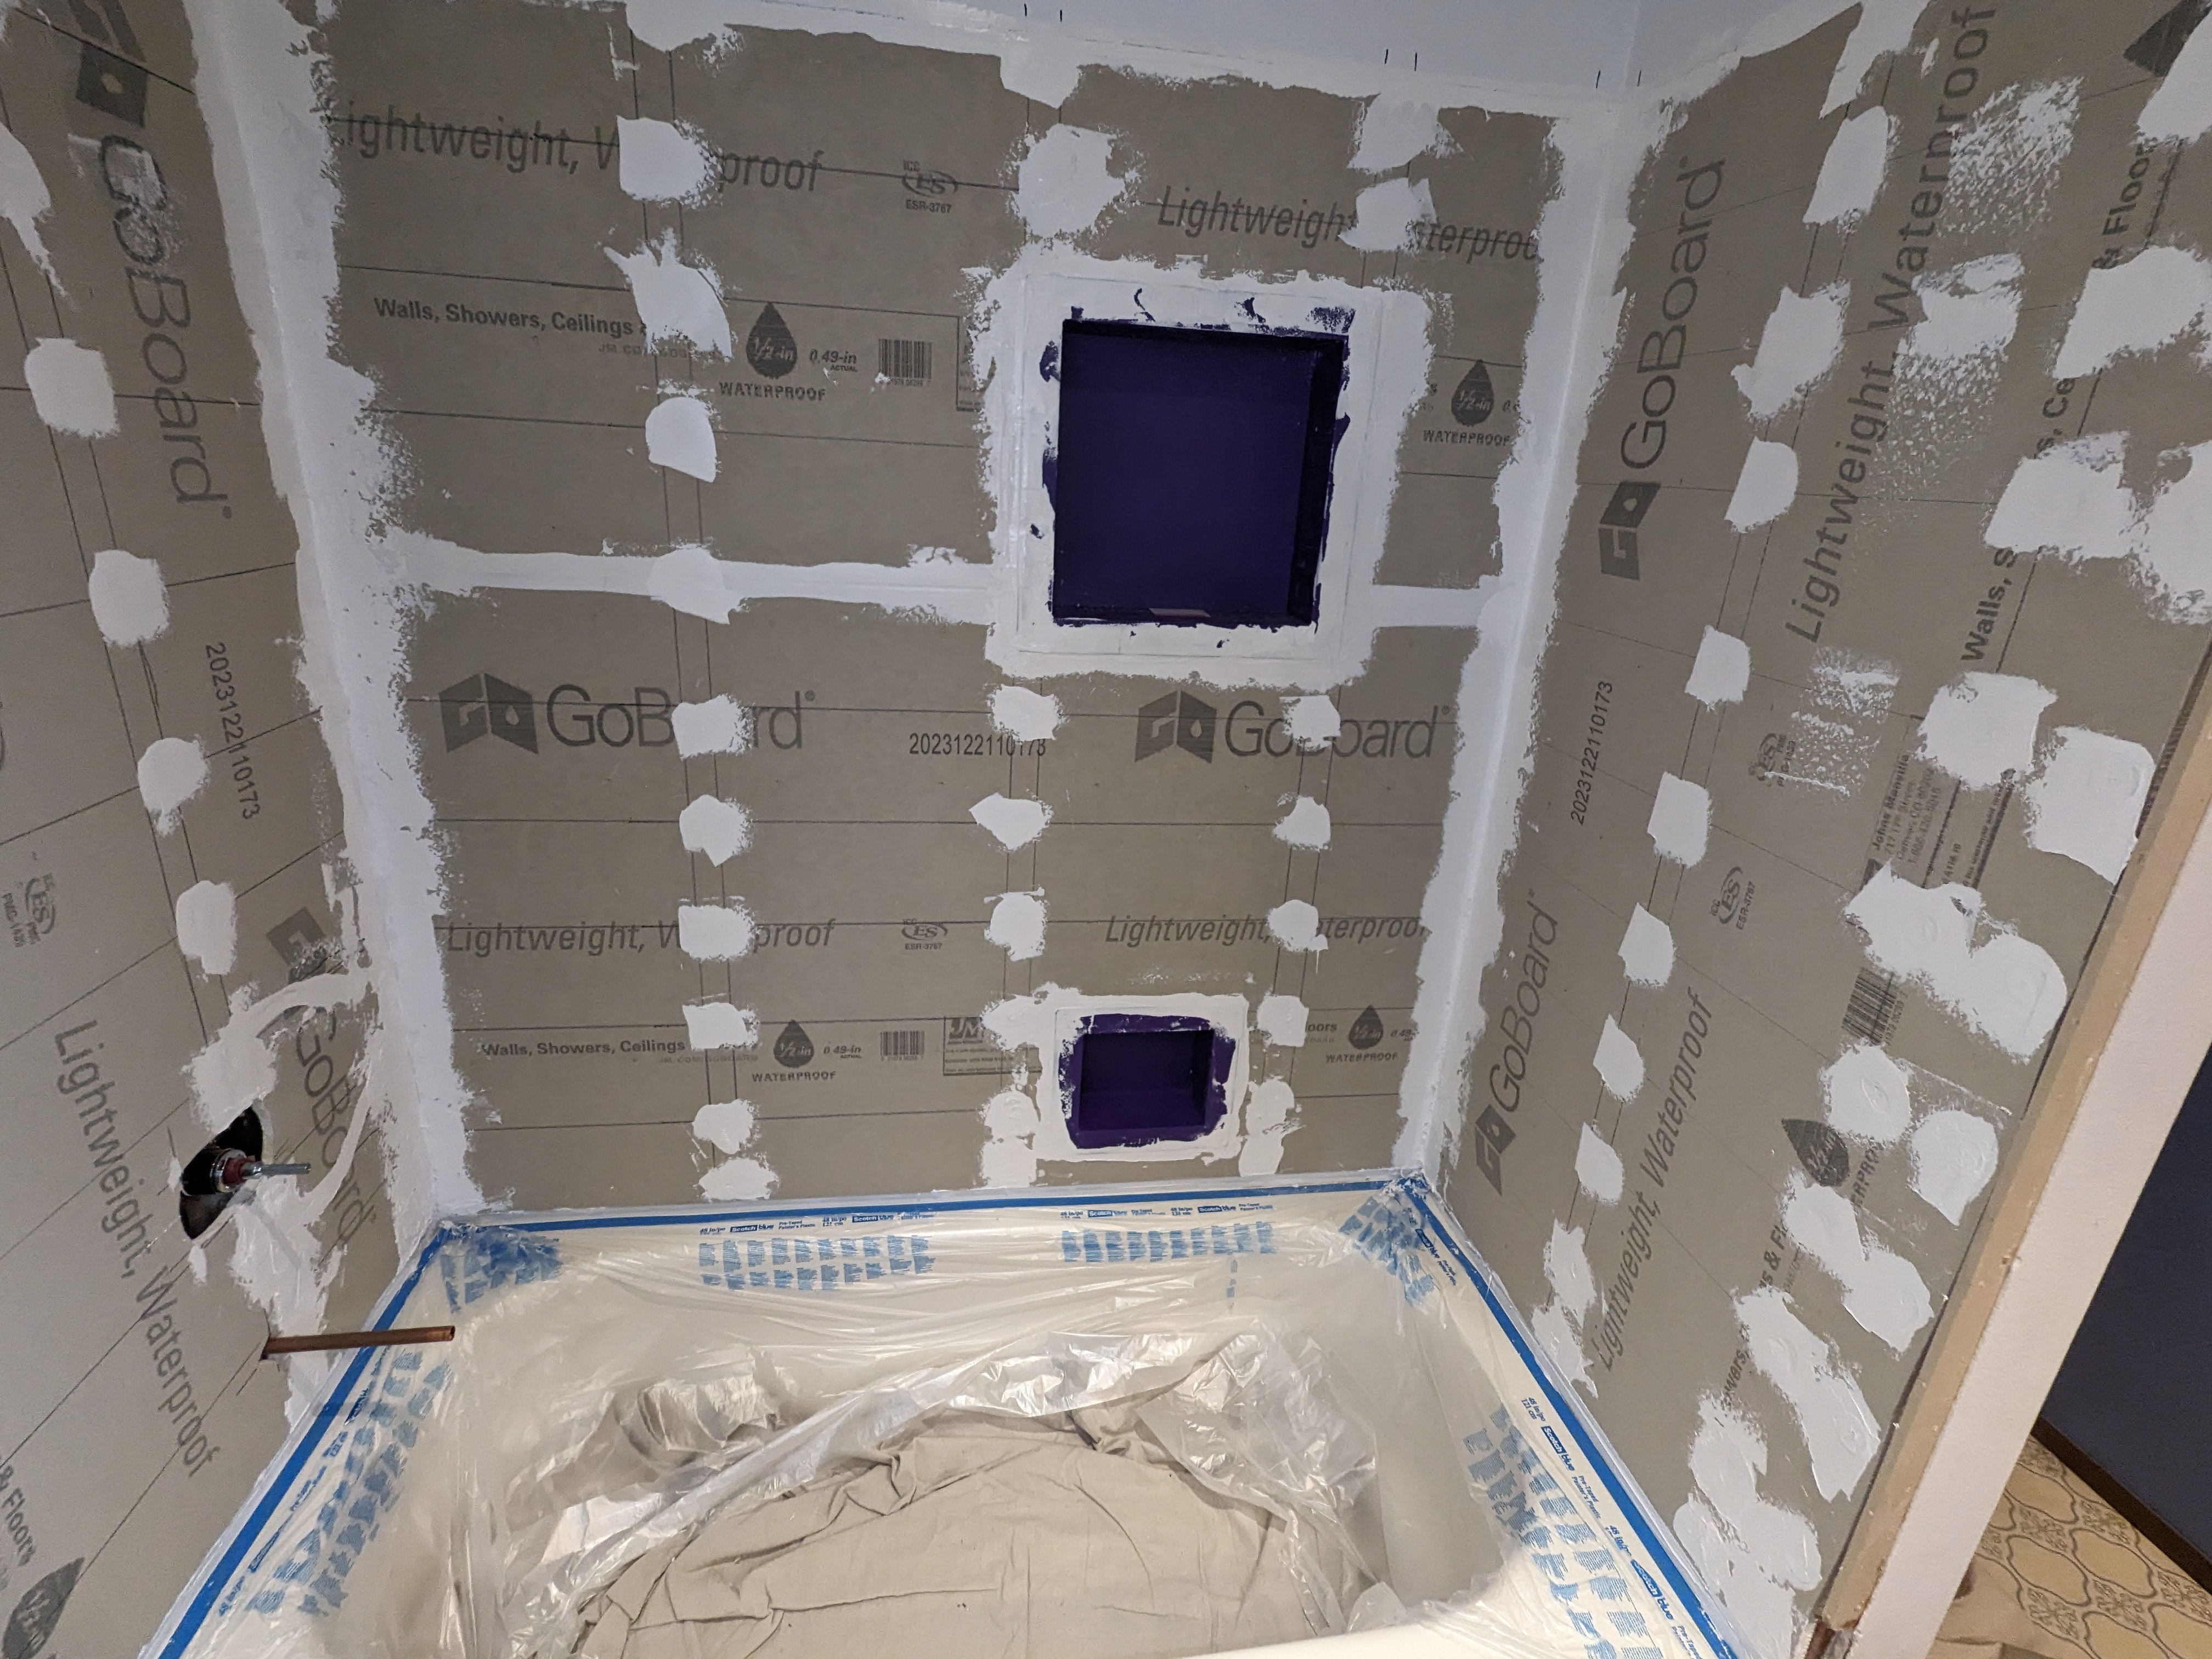
On the back wall, the two niches have been set in place but not fastened. The white sills on the bottoms are some pieces of manufactured stone that is also just set in place but not yet attached. The gap at the top of the back wall, where the GoBoard meets the drywall, is more than the intended 1/8 inch (due to poor craftsmanship by me). It's well above the wet area, but I still want to seal it with the GoBoard sealant. I'll fill that gap with some backer rod to make a good foundation for the sealant.
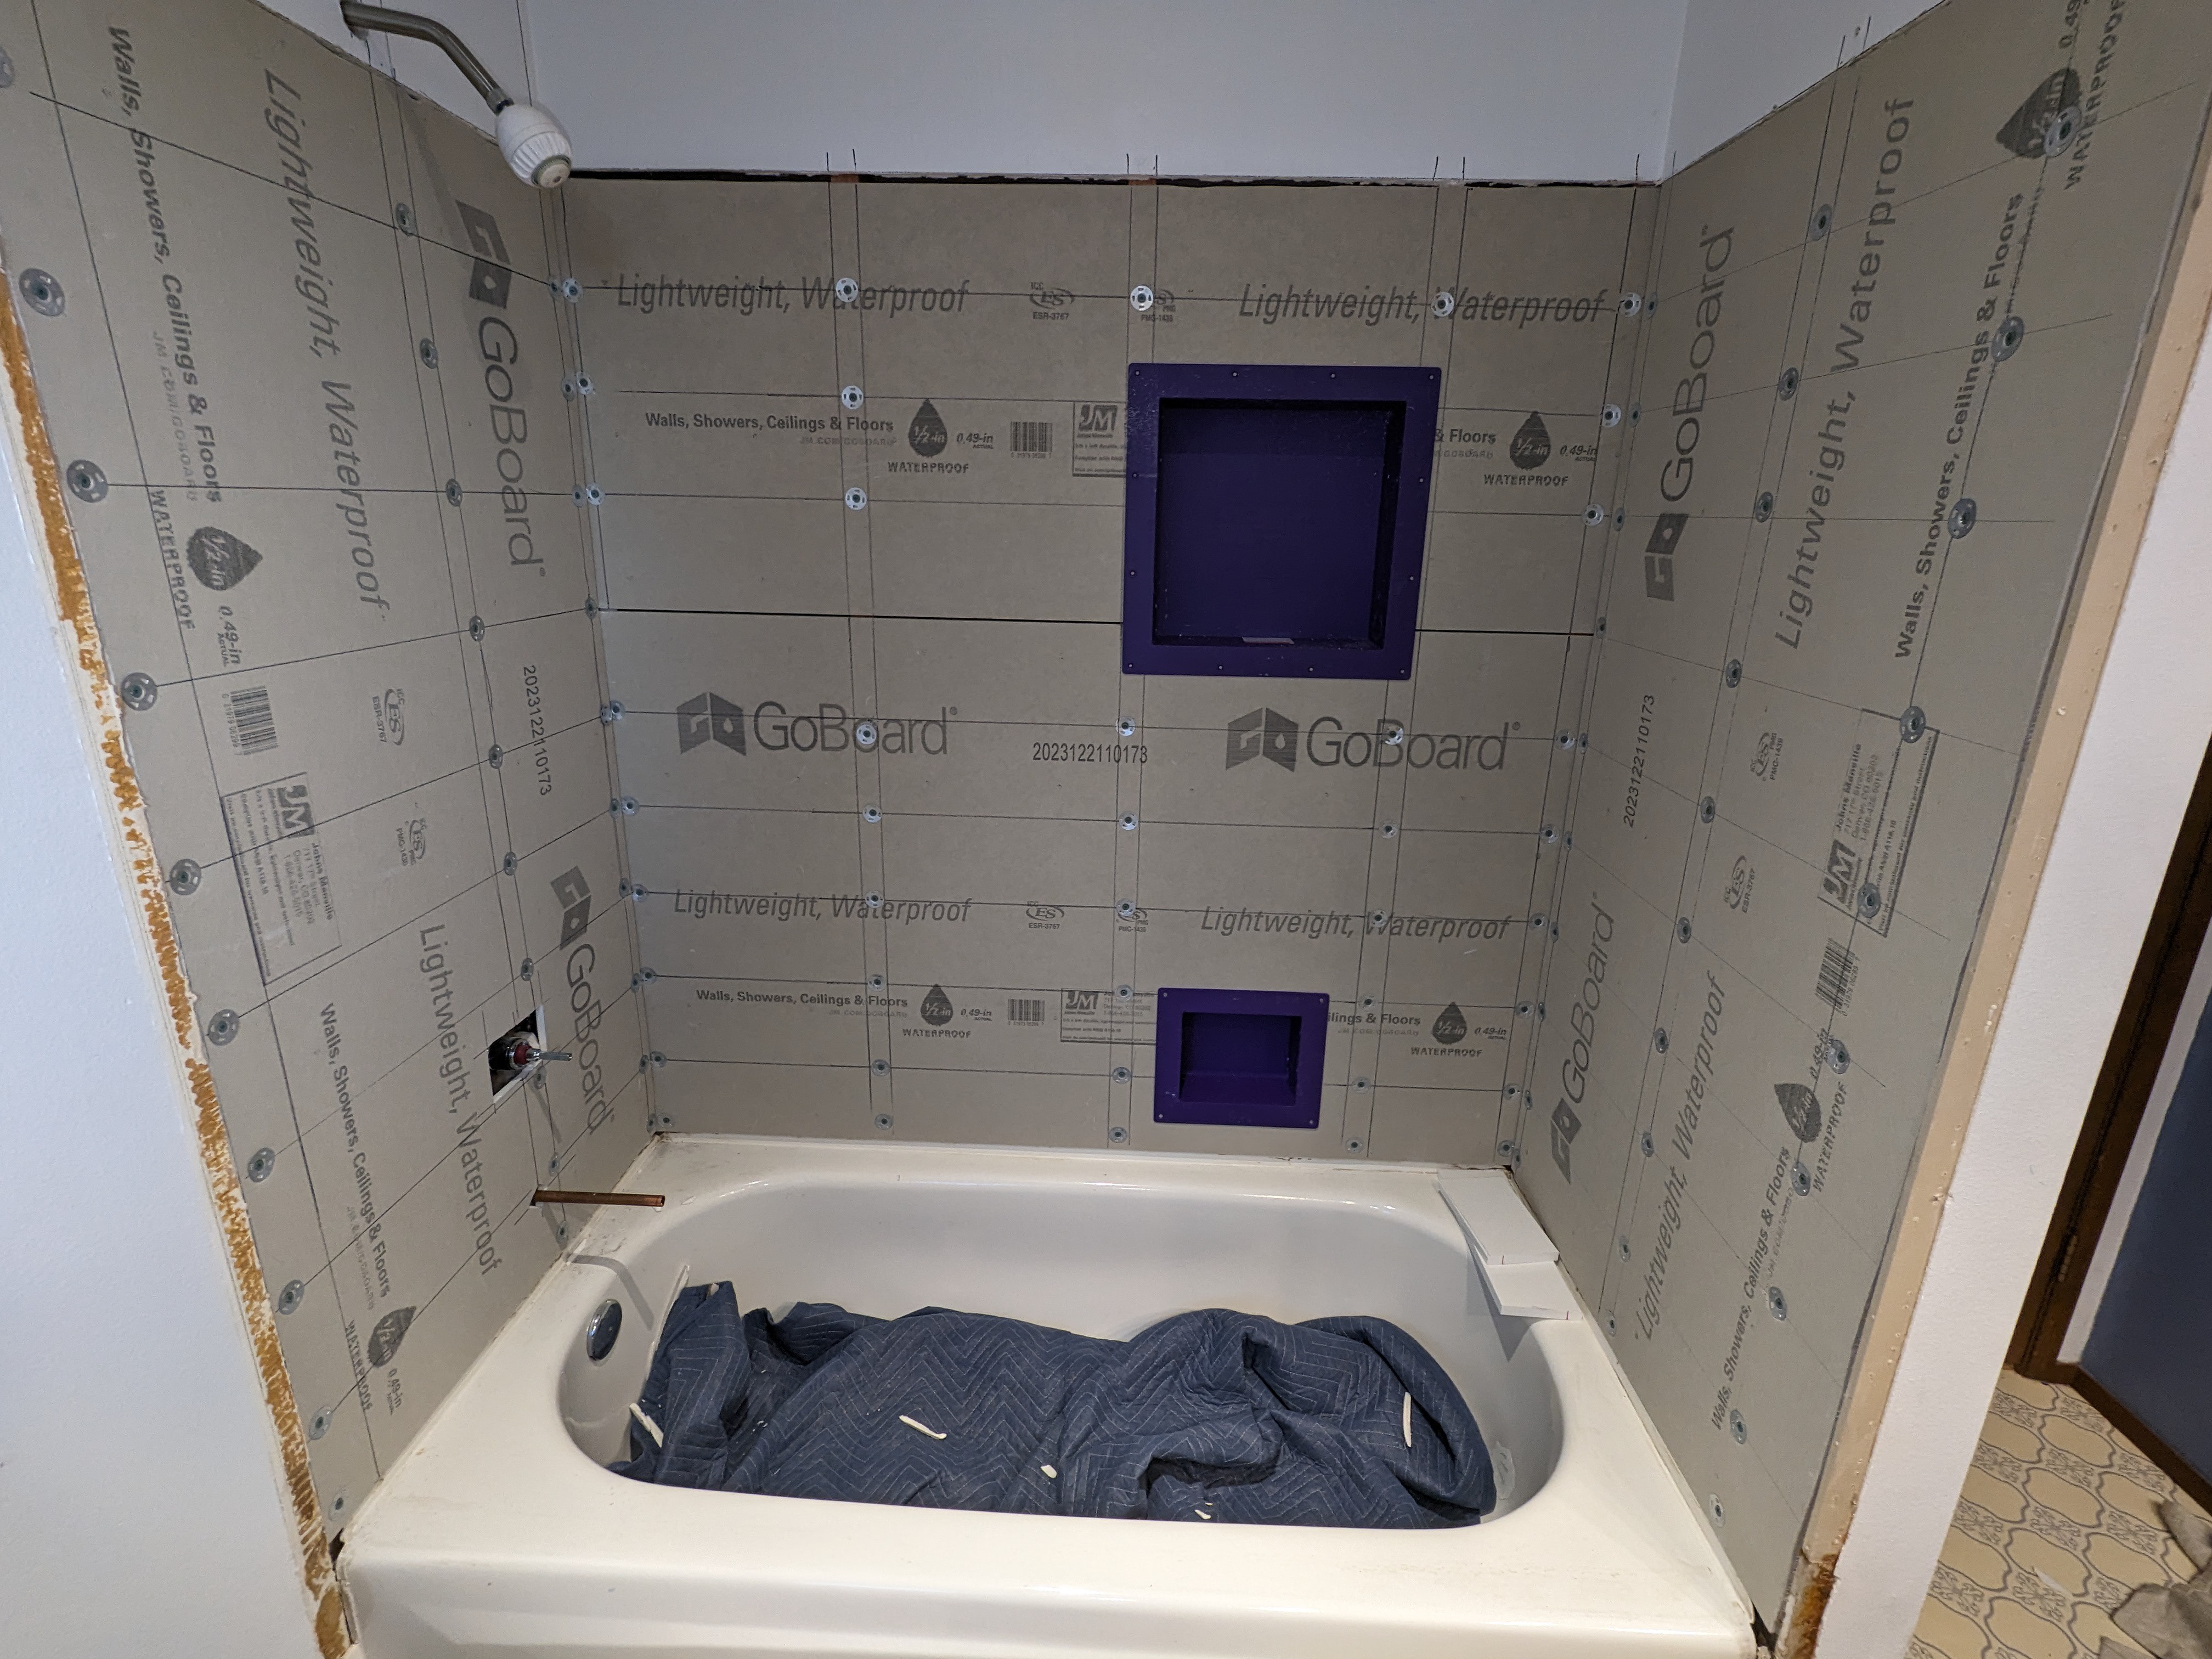
The remaining wall is the complicated left end-wall. Besides the trimming that was done on the right end-wall, I've got to measure and cut two openings for the plumbing. One opening will be a drilled hole for the tub spout, and the other will be some kind of cut-out shape for the faucet control. The installation instructions call for a fairly large circle (large enough to expose the integrated shut-off valves), but that amount of opening is not really needed above and below. I'll do some kind of smaller rectangle or some approximation. Before I do that, I've decided to make an adjustment to my earlier plumbing work that I've described in an update to an earlier project log.
![]()
And, finally, after the plumbing revision, all of the main GoBoard pieces are up. I just need to do some tiny pieces on the outside of the tub.
![]()
Update: I estimated that I might need 5 pieces of GoBoard, and I bought 6 pieces to be on the safe side so I wouldn't have to run back and get another one in a hurry. It turned out I only needed 4 pieces and have some substantial chunks left over from cutting those. It was two pieces for the back wall and one piece for each end wall. The reason my estimate was a little higher was because I wasn't sure if I would take out the drywall above the old tile (I didn't) and I thought I might fabricate the niches from GoBoard (I didn't). I returned the two extra pieces to the store.
-
Plumbing day
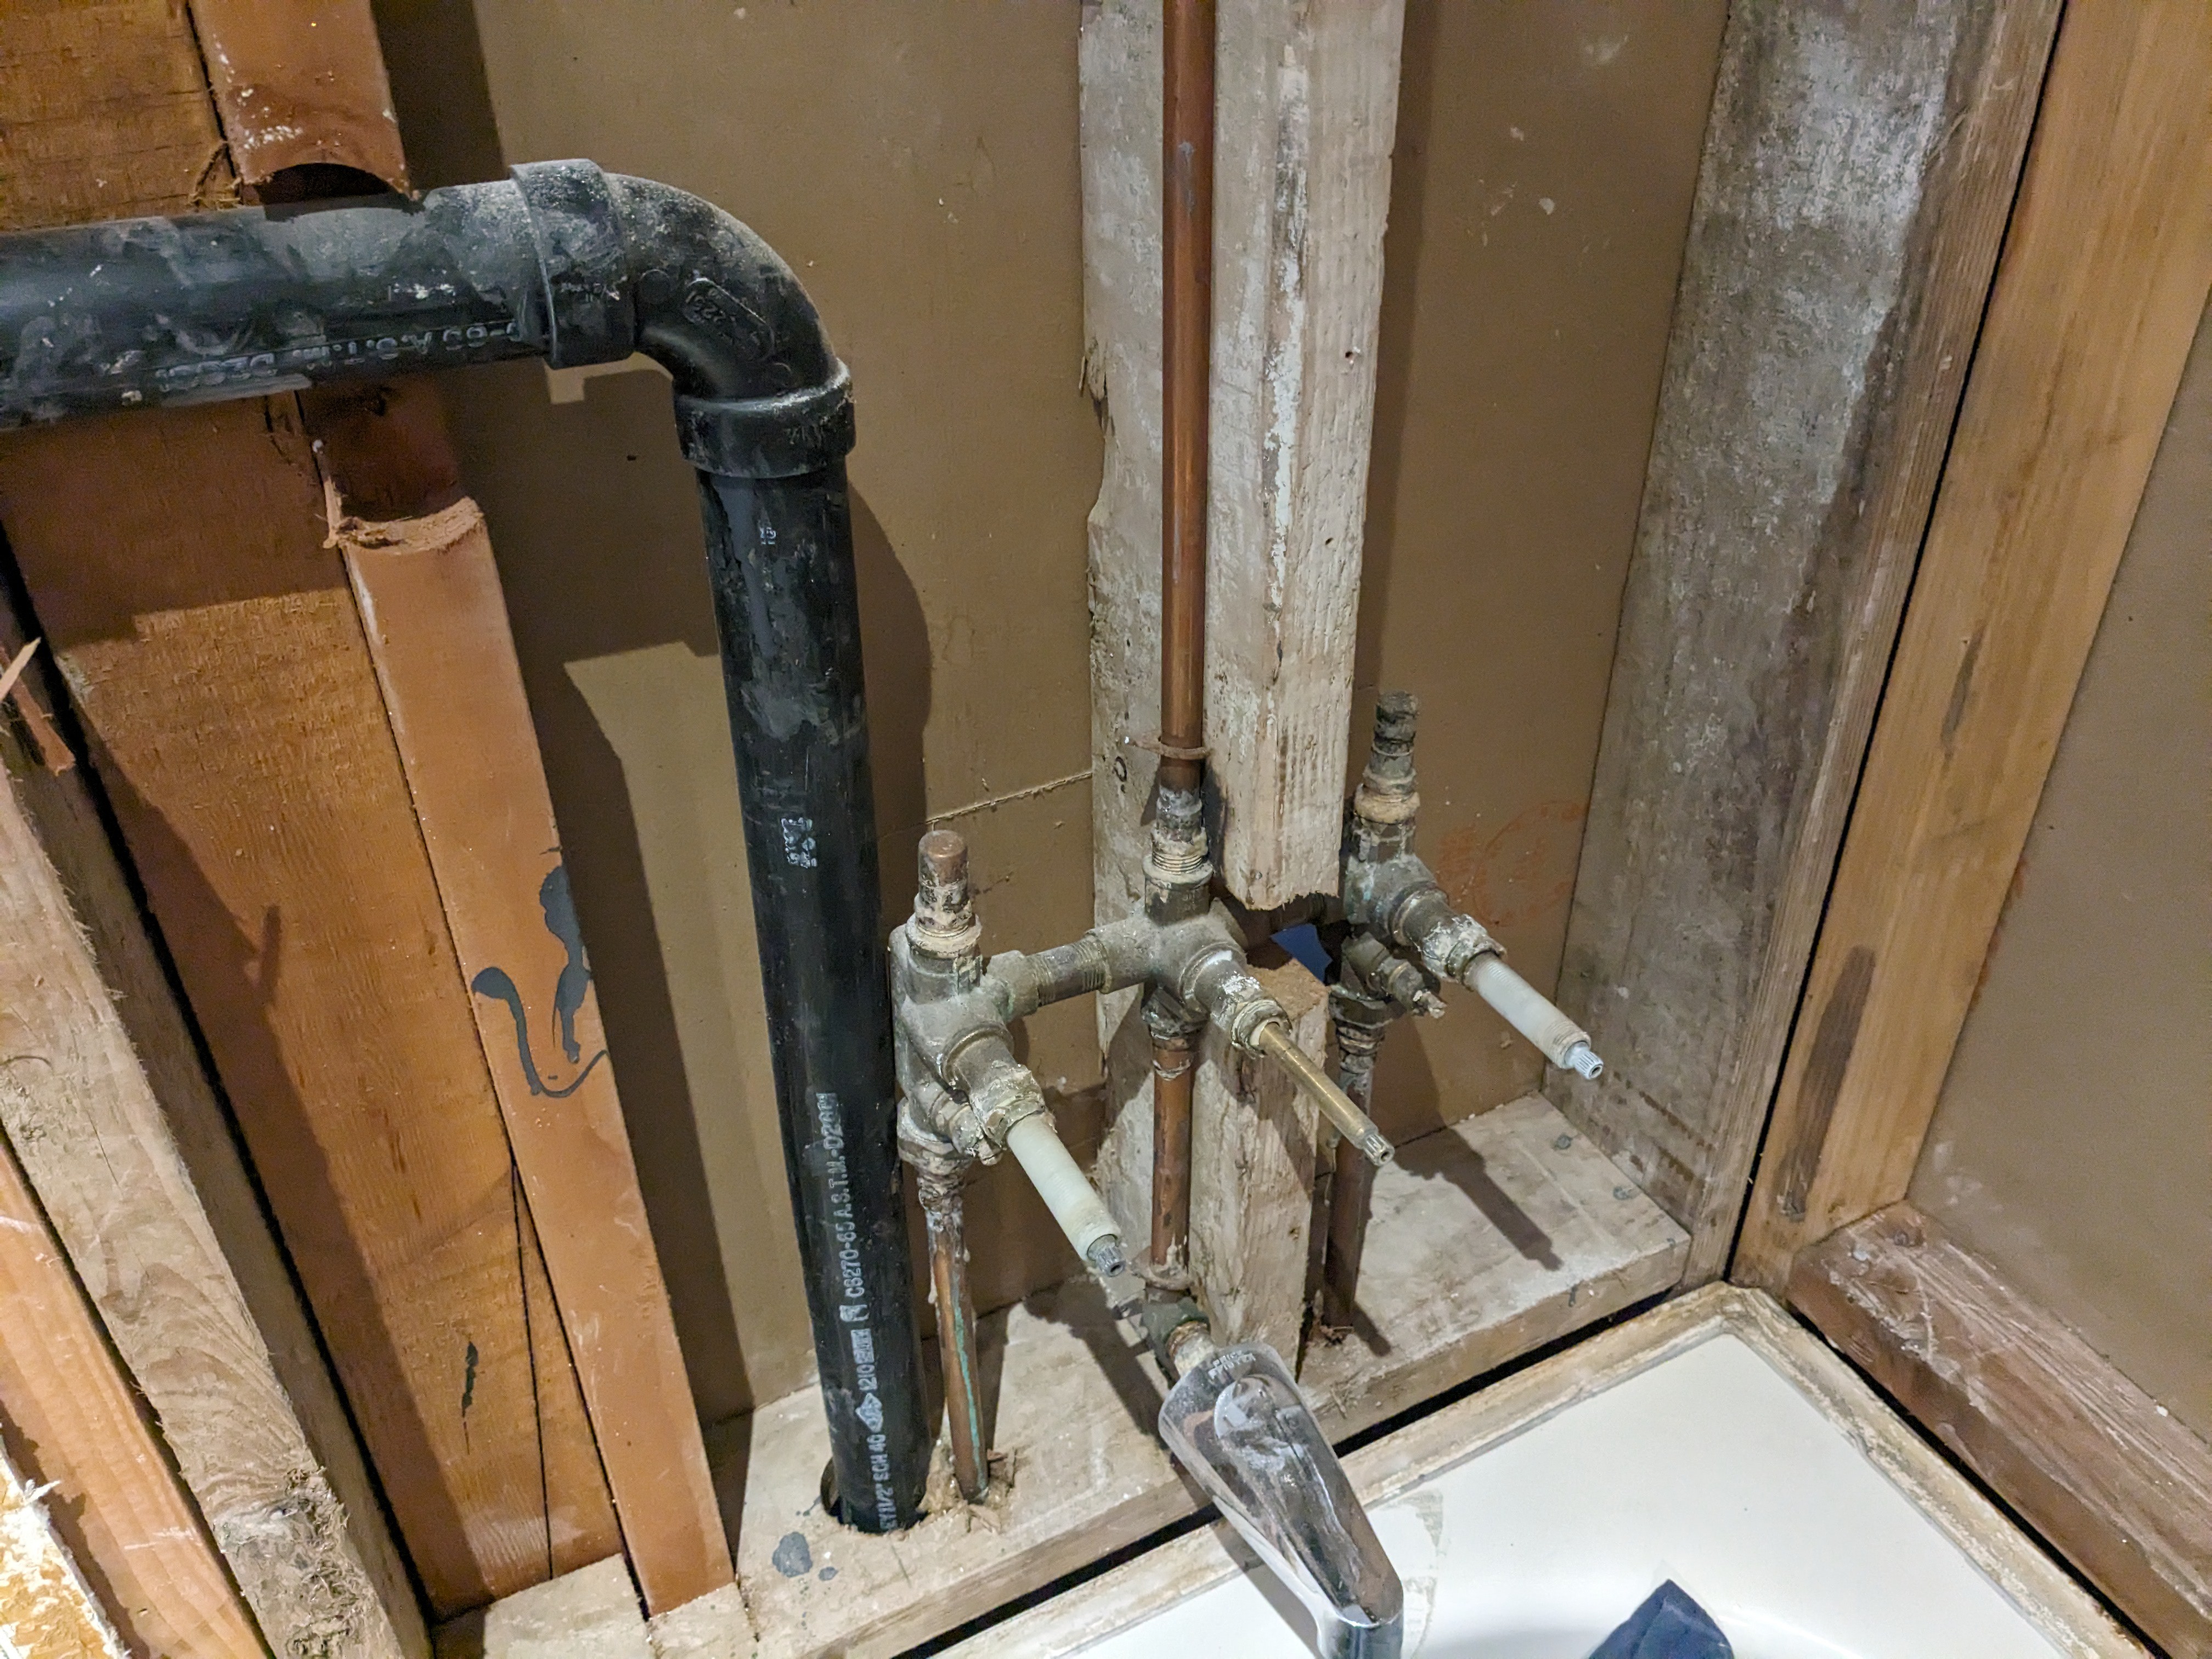
02/26/2024 at 17:04 • 0 commentsNow it's finally time to replace the tub and shower combination faucet. My motivation for the replacement is (a) to move from separate hot and cold controls to a single handle, and (b) move from ancient rubber washer technology to modern washerless goodness. I was initially planning to do the replacement myself, then I saw the cramped and crowded conditions of the current piping after I opened the wall up, then I got a quote from a licensed plumber, and then I went back to deciding to do it myself.
![]()
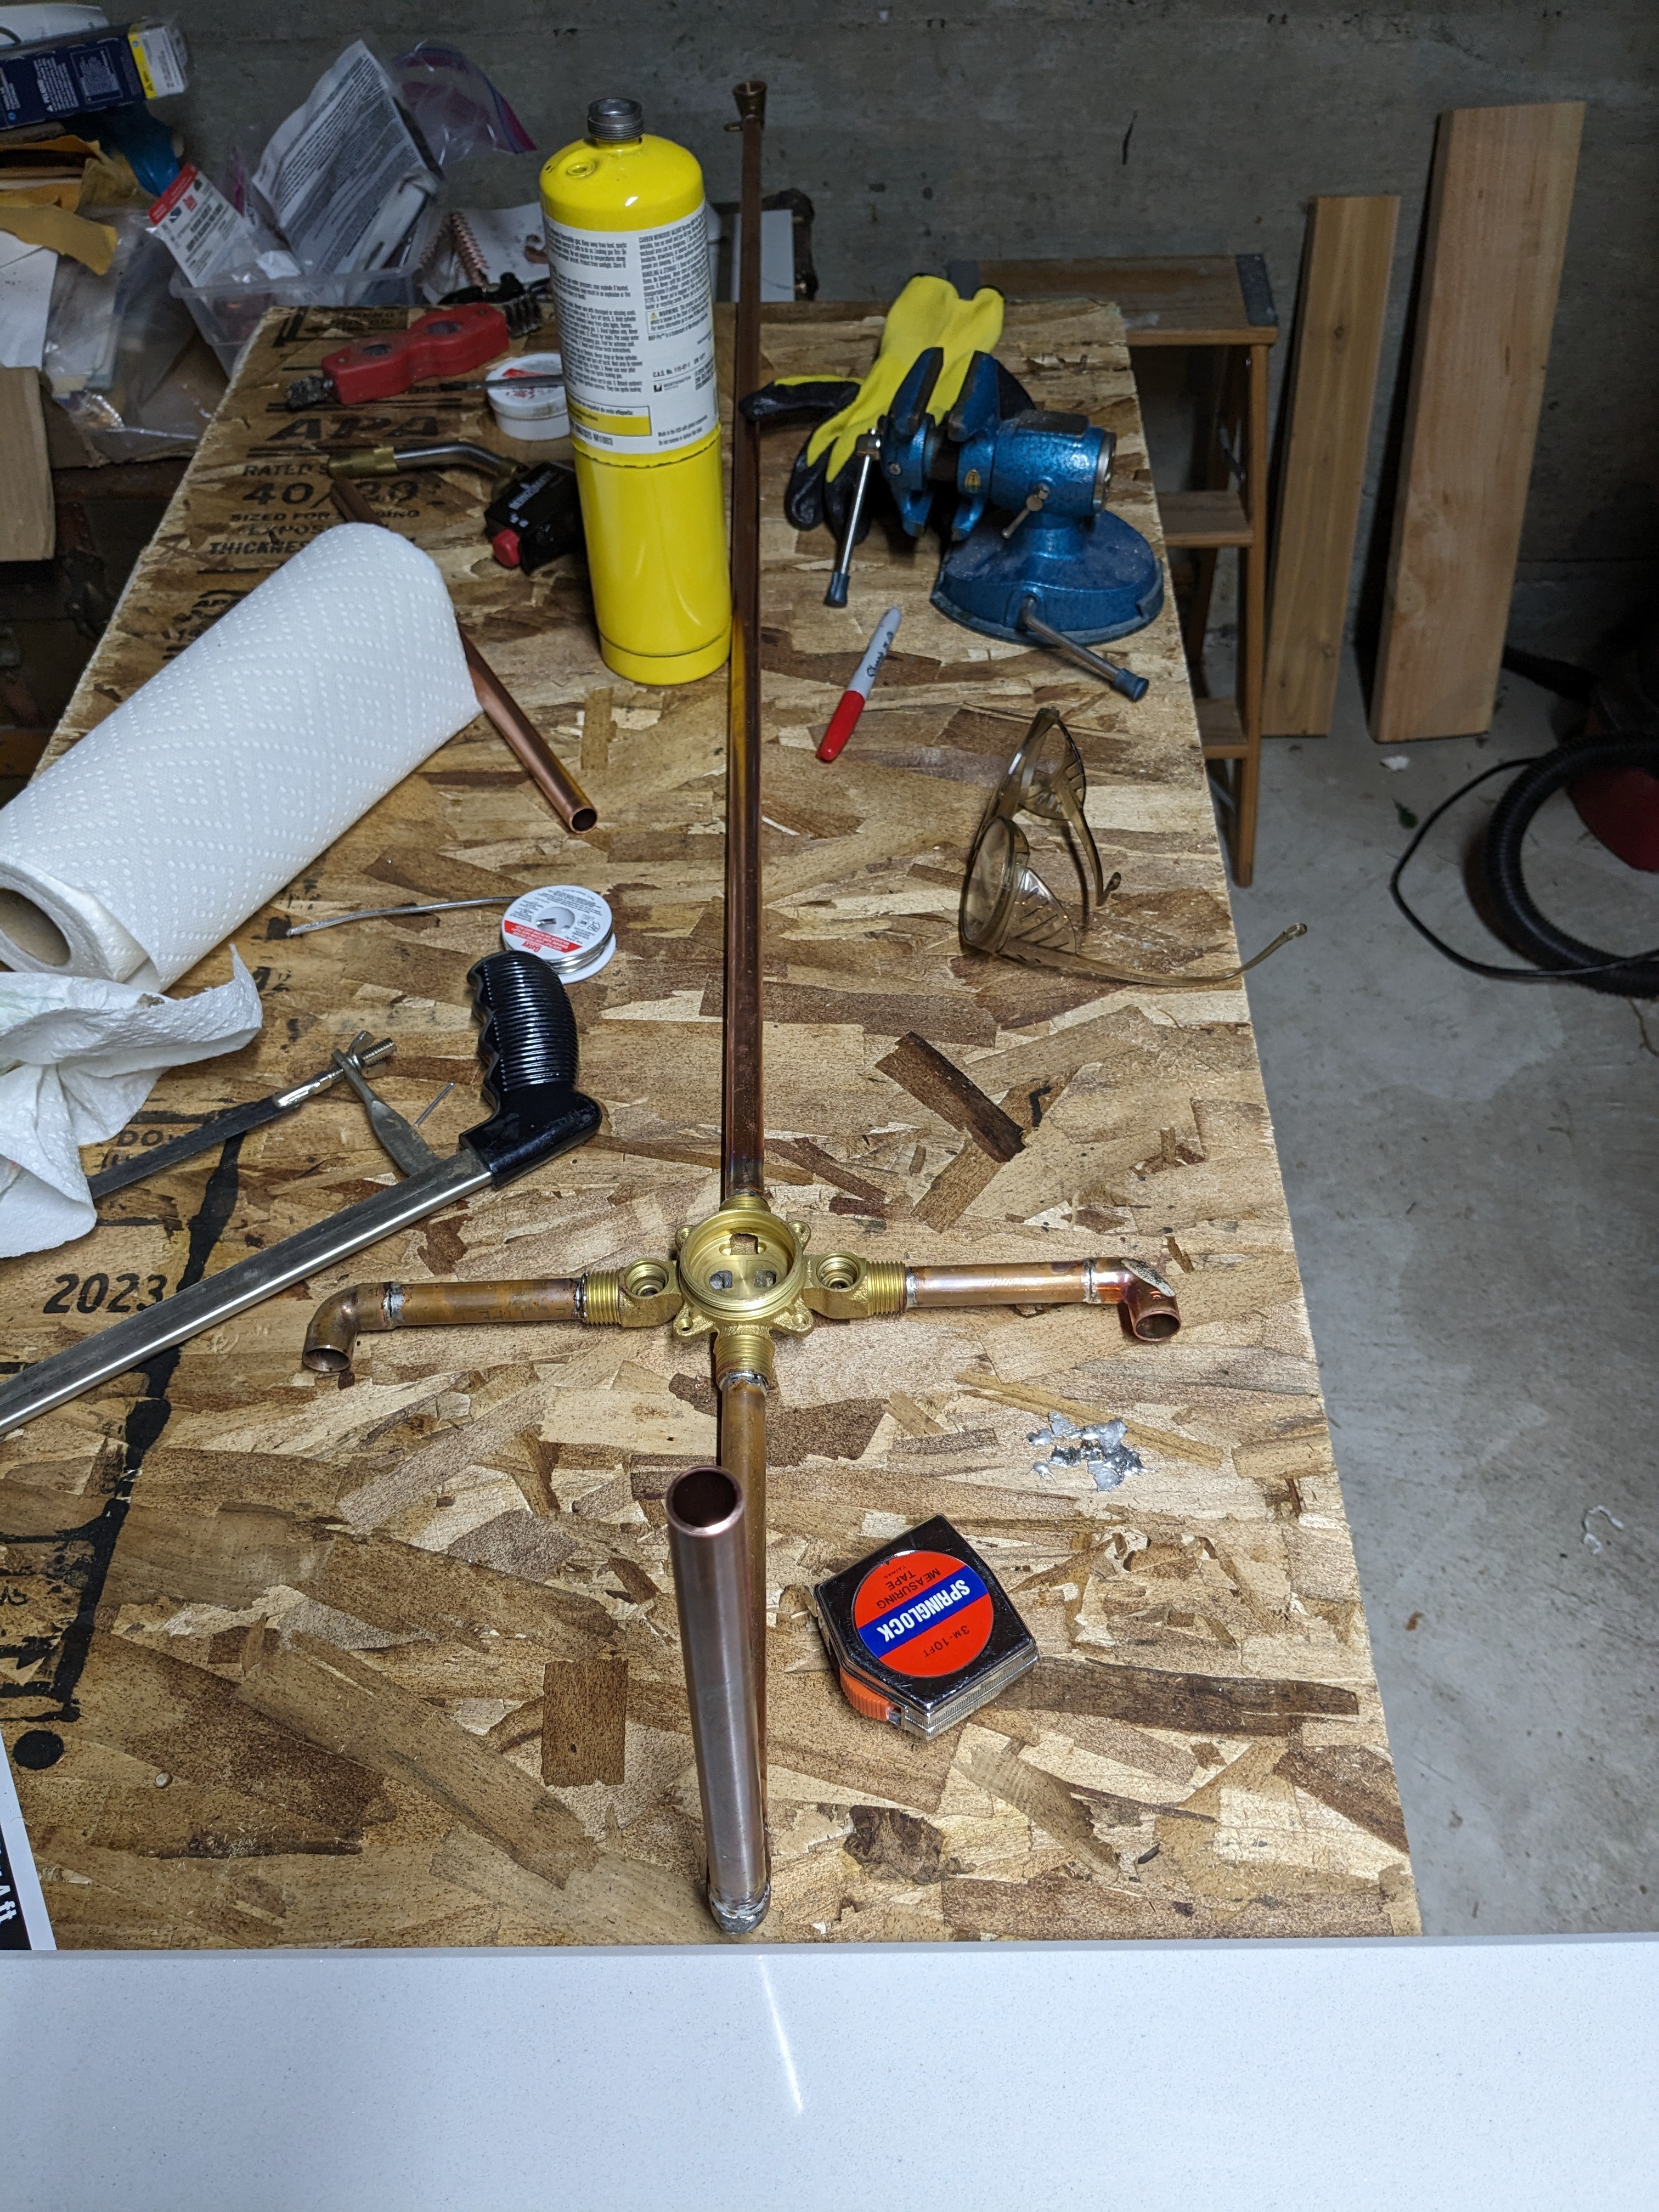
I originally planned to splice the new valve controls into the existing pipes. Both the shower tube and the tub spout proved to be especially steadfast in wanting to stay put. Replacing them both, to go from chrome to brushed nickel, was part of the plan. I eventually decided to replace everything. That means I can solder up almost everything on a convenient workbench, and I just need to splice into the supply lines as a last step.
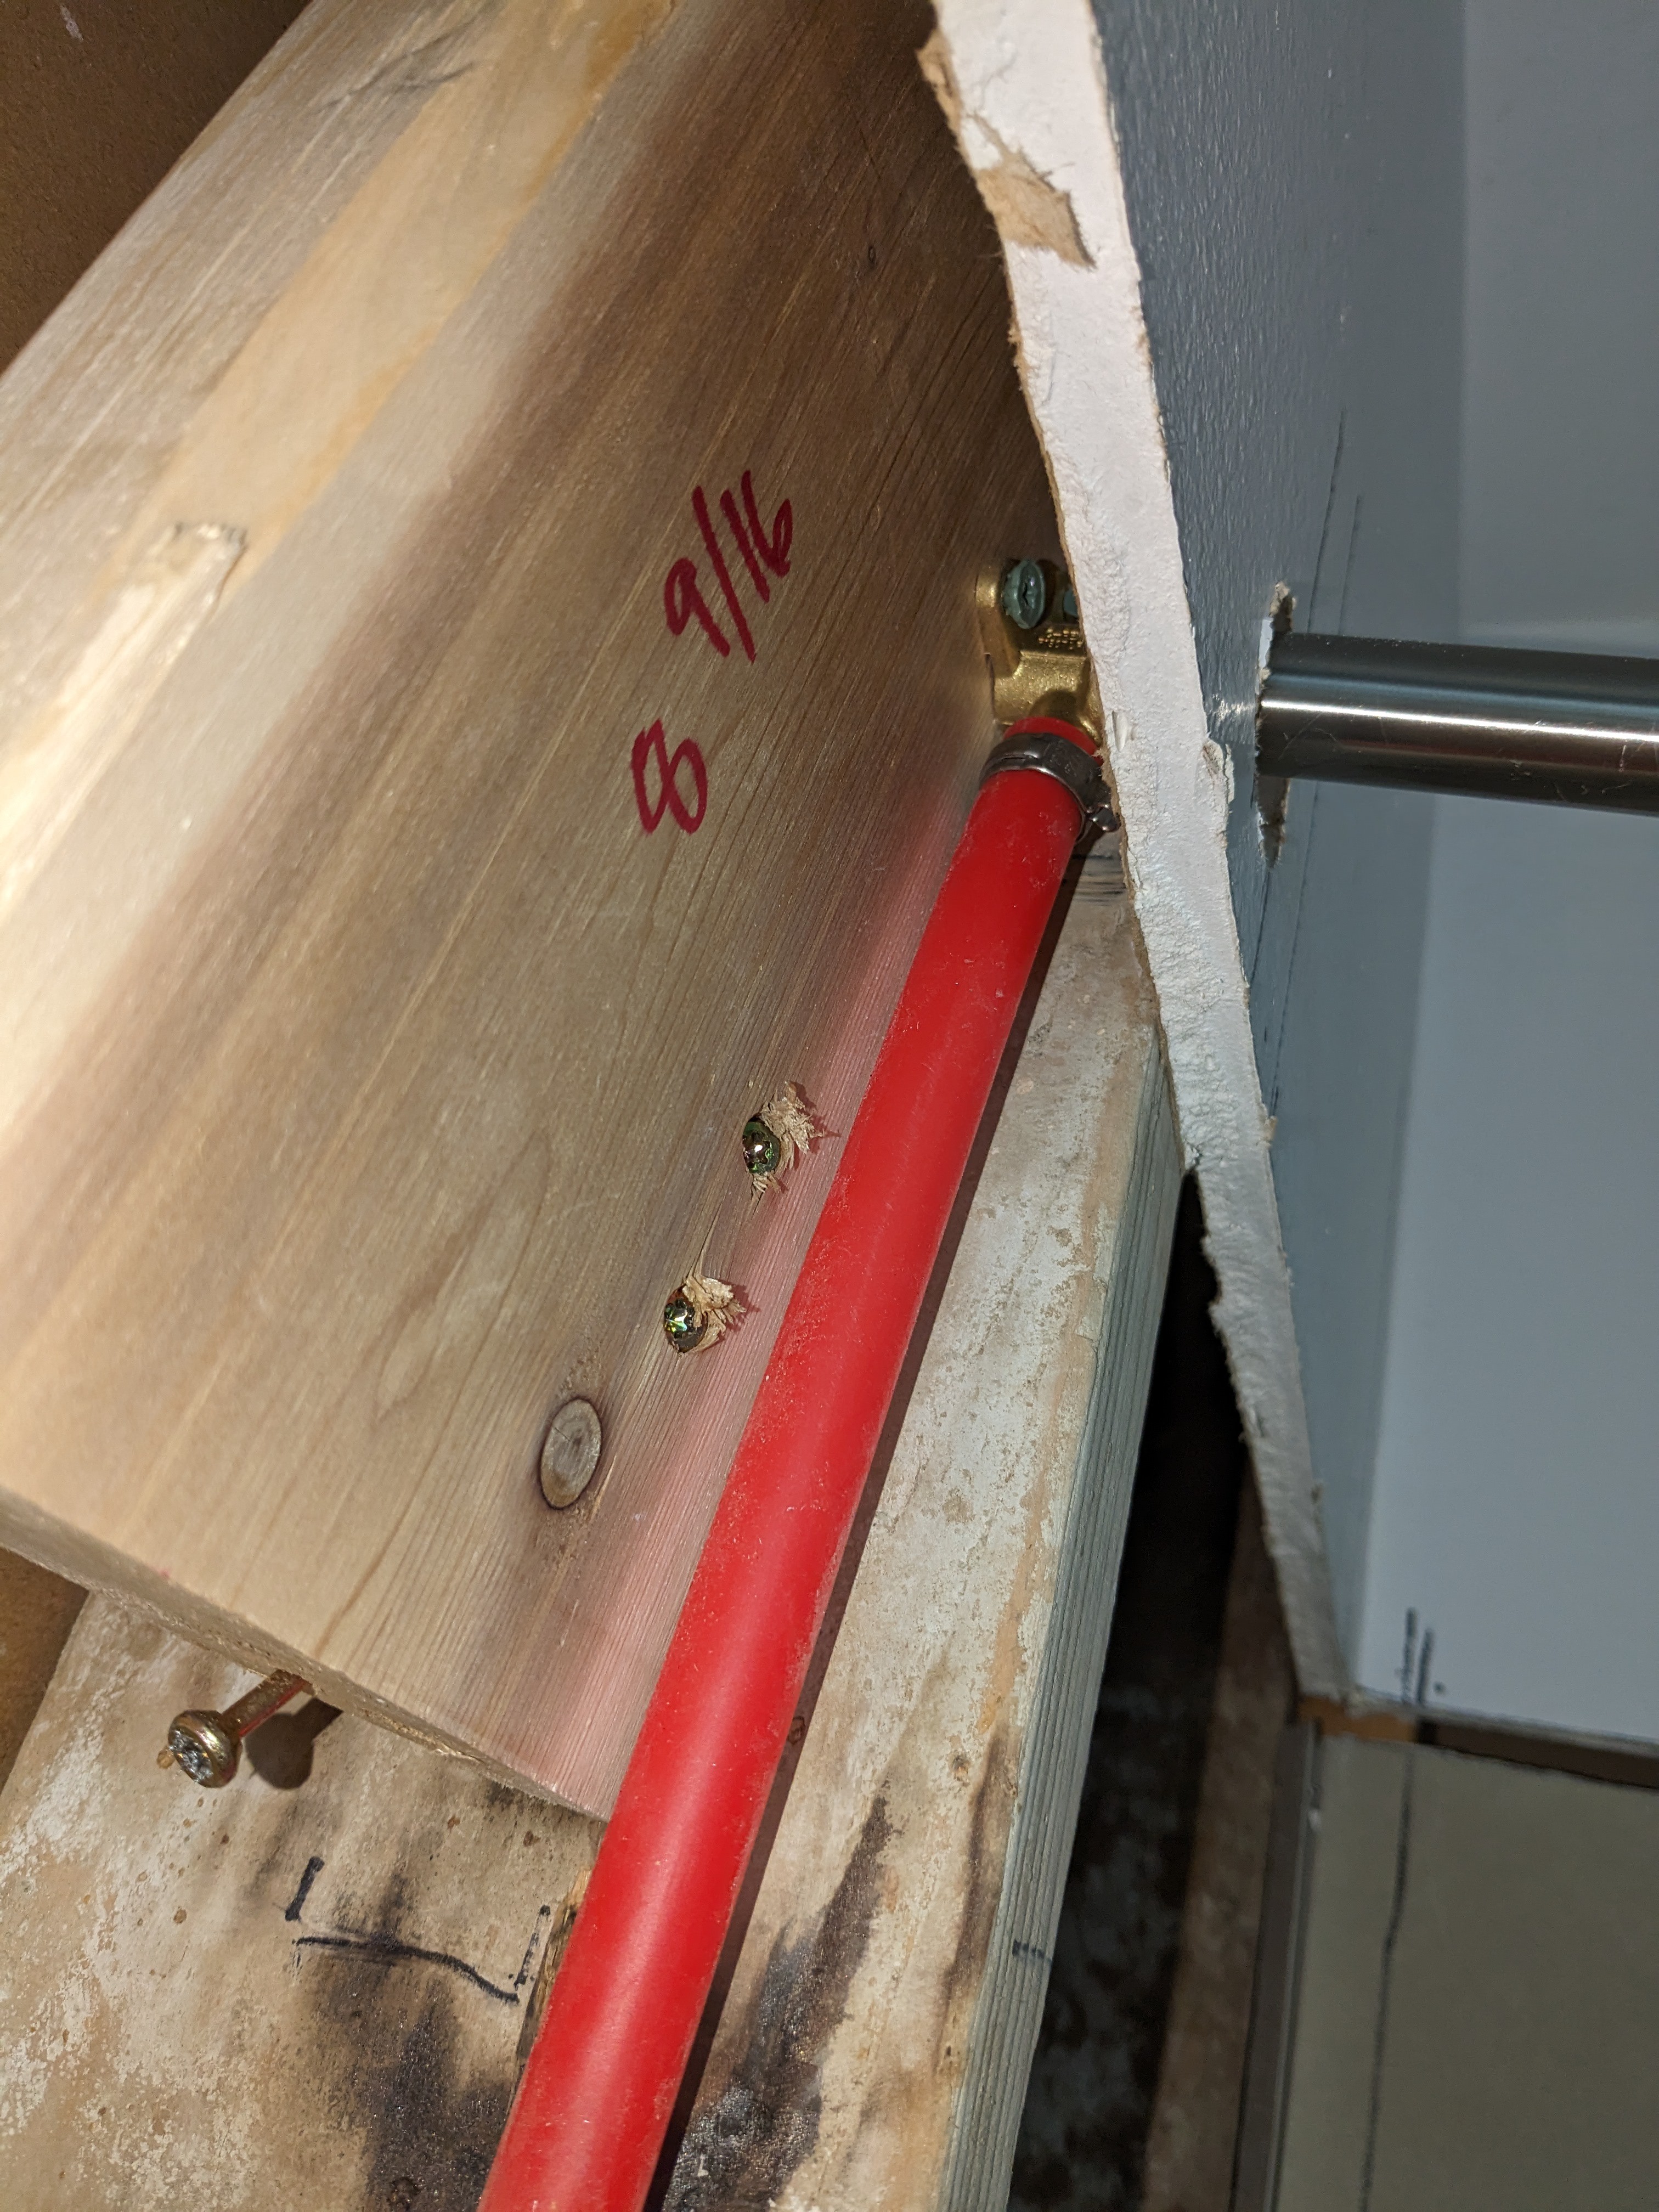
![]()
Except for the old supply line connections, I'll be able to remove the entire old contraption by just removing a few pipe clips on the stud. I think I can use my small tube cutter on the right-hand supply pipe, but the left-hand supply line is too close to that black vent pipe. I'll have to cut that one with a hacksaw or my grinder's cut-off wheel. (Update: I used my hacksaw, and it was a pain in the neck.)
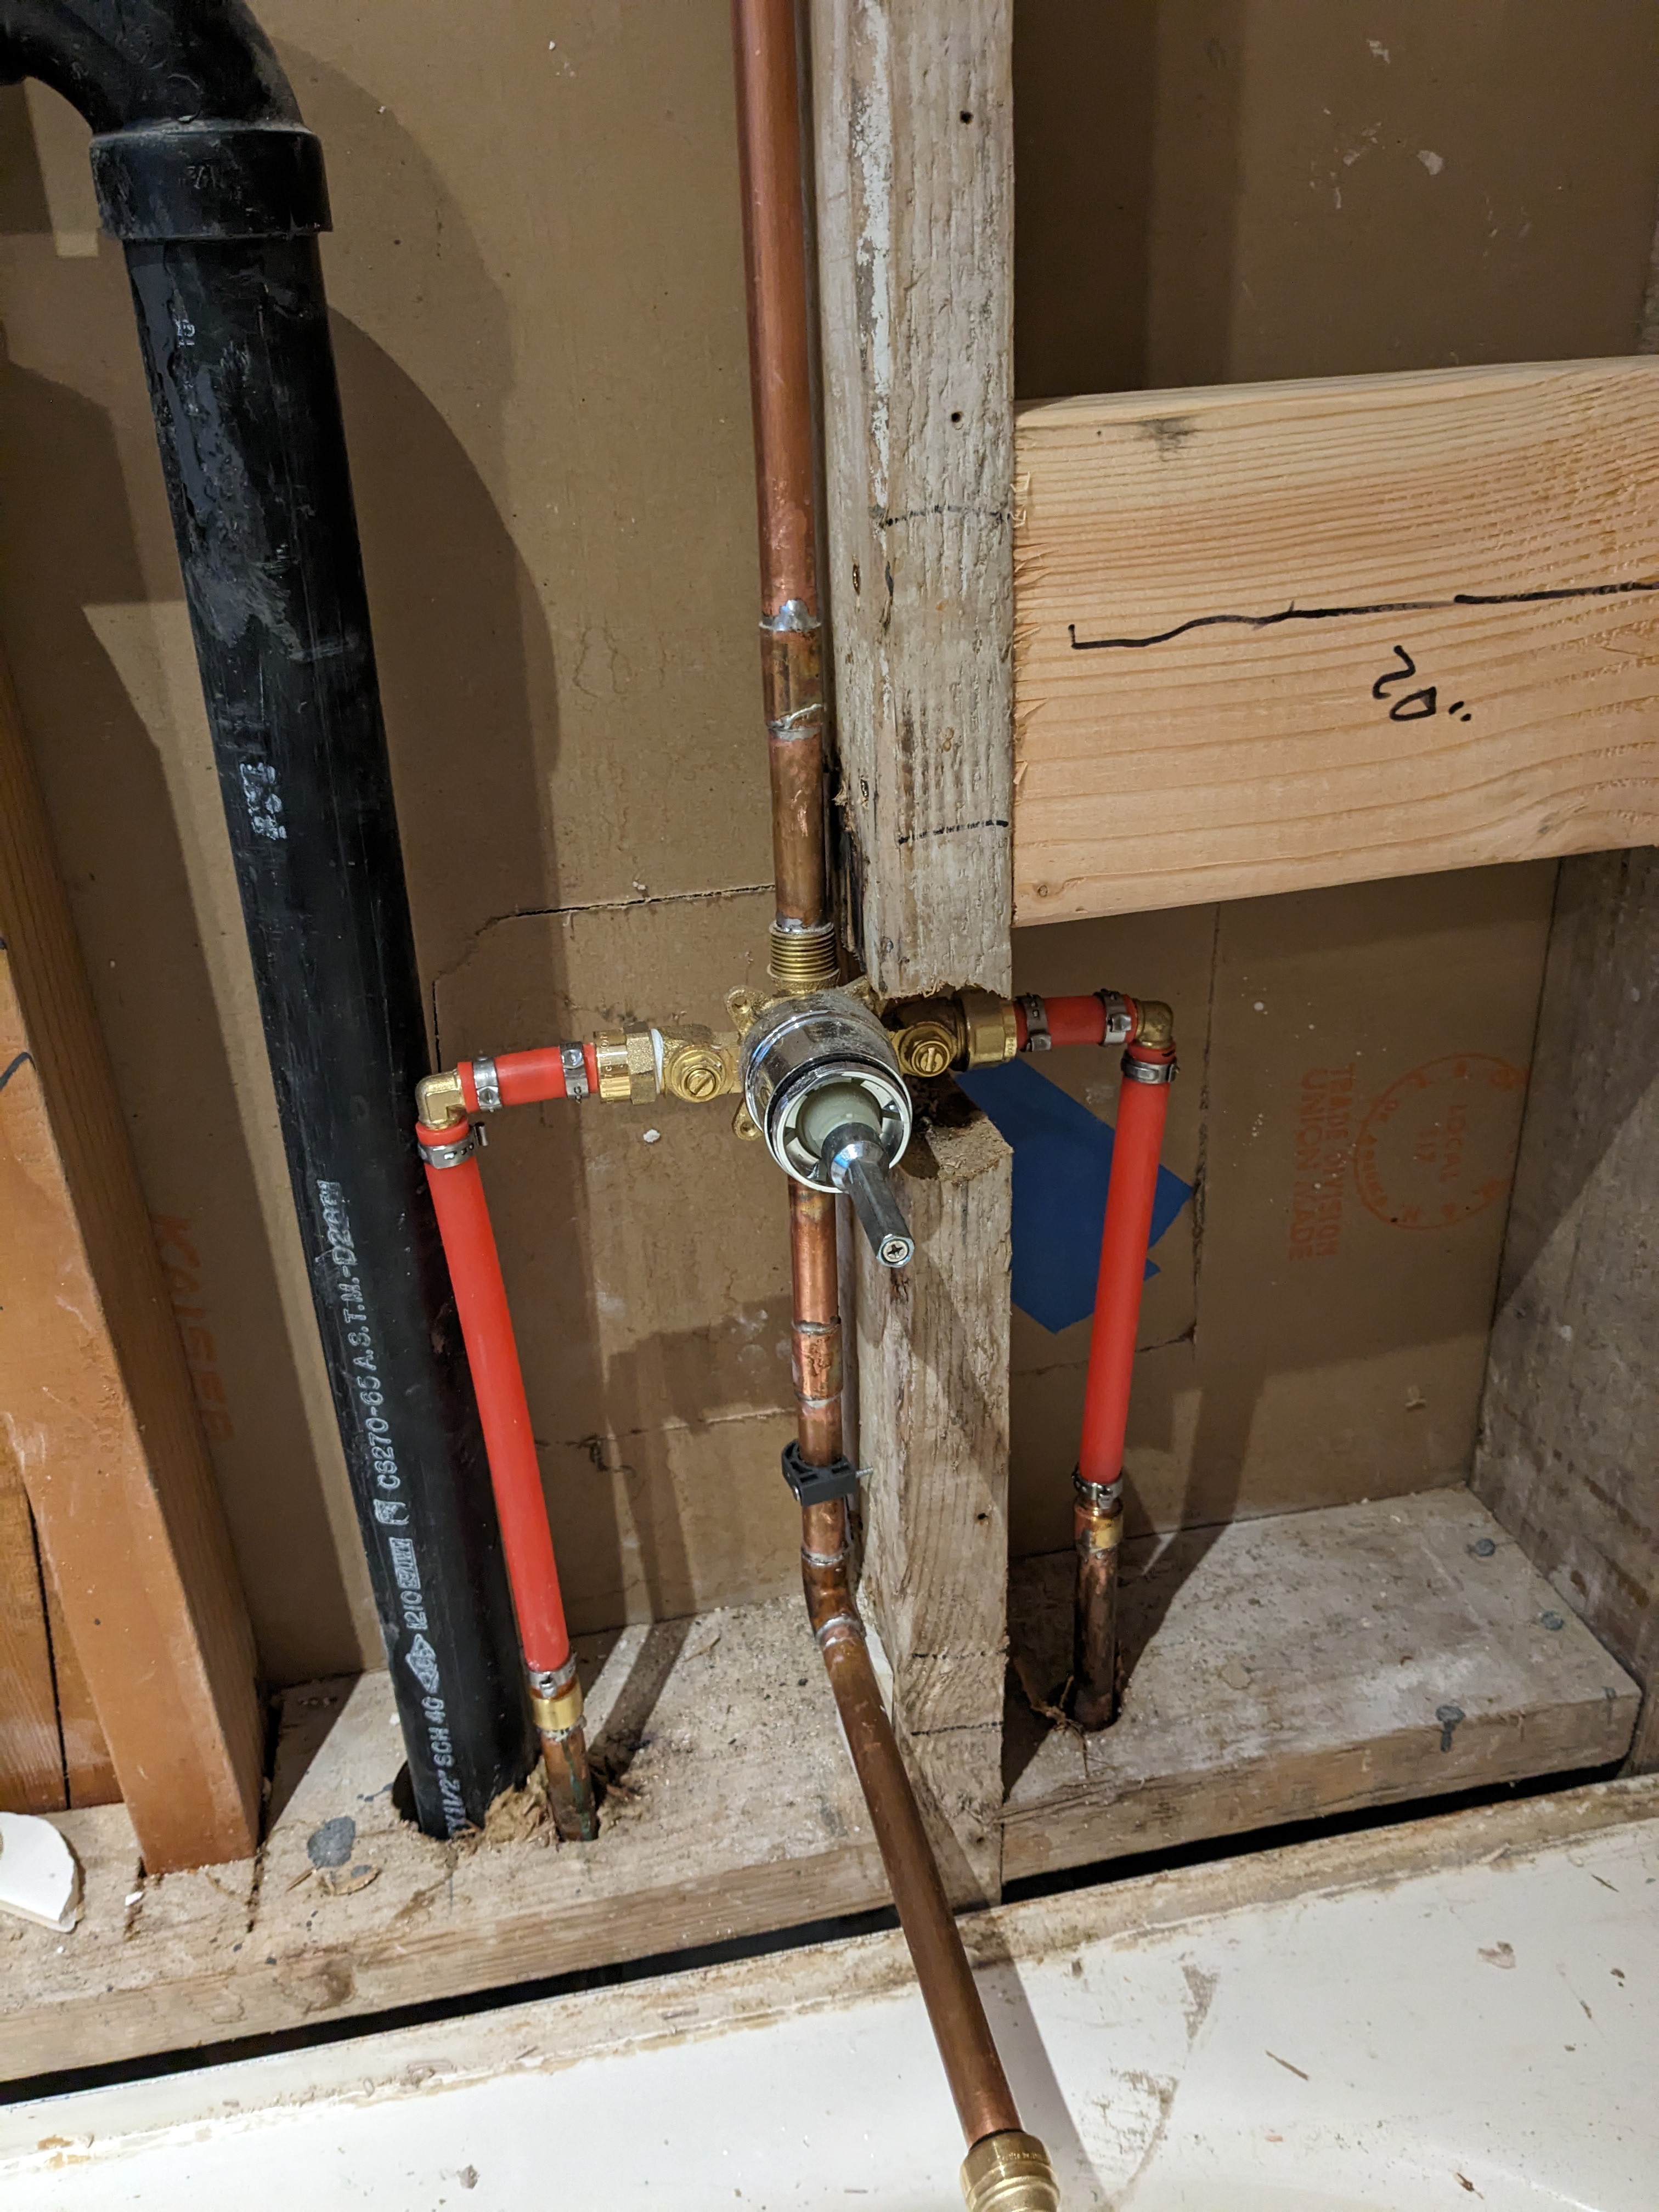
I have two "efficiency" goals in doing the swap. First, I want to minimize the amount of time that I have the main water supply to the house turned off. Second, I want to make it convenient to myself to do the soldering work. As seen in the photo above, I've already soldered up most of it, but I need to test it for leaks. If I put the whole new assembly in place and find a leak, it could be a pain in the neck to remedy the leak. That's because of the cramped space and because any soldering near the valve itself requires the removal of heat-sensitive components (already removed in the photo). How can I run water through this contraption to test it in a simple way? I'll use some push-to-connect fittings to run a short length of PEX-B tubing from each supply line to the intake lines of the valve. With the push-to-connect fittings, it's easy to undo the temporary connections. I can lay the new assembly down in the tub so I don't have to worry about water spraying into inappropriate places. If I find I need to do some leak remedies, I can use push-to-connect caps on the supply lines while I do the work. I'll still have to deal with adding and removing the heat-sensitive parts of the valve, but I can do that at the convenience of the workbench.
The instructions for the new faucet assembly warn that there is an "up" orientation. One of the connection fittings is marked "up". It's the connection point that goes to the shower head. I got tired of reading that repeated warning. What kind of dummy do they take me for? First class, apparently. You can guess the punch line here. In the photo above, the valve is upside down. I repaired the tub and shower lines by cutting them both, swapping the pipes, and using a straight copper connector to solder things back together (you can see those in the next photo below)). The two arms for the supply lines were more problematic since they already had elbows pointing in the wrong direction. I would either have to remove the elbows and re-solder them, or I would have to remove the entire arms and re-solder them. I opted for the latter. It's fairly easy to undo a soldered copper connection. Well, it's easy if you have three or more hands, but it's do-able with two hands if you're willing and able to act quickly. After taking it apart, there's a fair amount of solder layer on both the male and female parts of the coupling. With sandpaper and elbow grease, I got most of it off the pipe itself. The female connector on the valve was tougher. I could not get enough solder out so that the pipes would fit all the way into the connector. I was able to get things re-soldered, but I didn't really trust those connections.
The valve accepts either soldered copper connections or threaded brass connections. I had chosen solder as the more reliable connection method (based on many DIY plumbing projects where getting the last drips to stop consumes 90% of the time). After putting on the threaded adapter, I'd still have to solder the copper pipe into it. While I was pondering all of that, I was also studying up on PEX, which I had never really looked into before. PEX, specifically the PEX-B variant, is impressively easy to work with. You can cut it easily with a sharp knife. The brass fittings for elbows and so on are about the same price as the brass fittings for copper tubing. You do need one specific sort of tool, a crimper, for making connections. Those are readily available in different price ranges. My new plan was PEX to threaded coupling adapters at the valve end, PEX to sweated copper adapters where I cut the supply lines, and then a PEX elbow connector for making the right angle turns. The PEX-B minimum turning radius would not let me use just a single piece of PEX between the two brass ends.
It ended up looking like this:
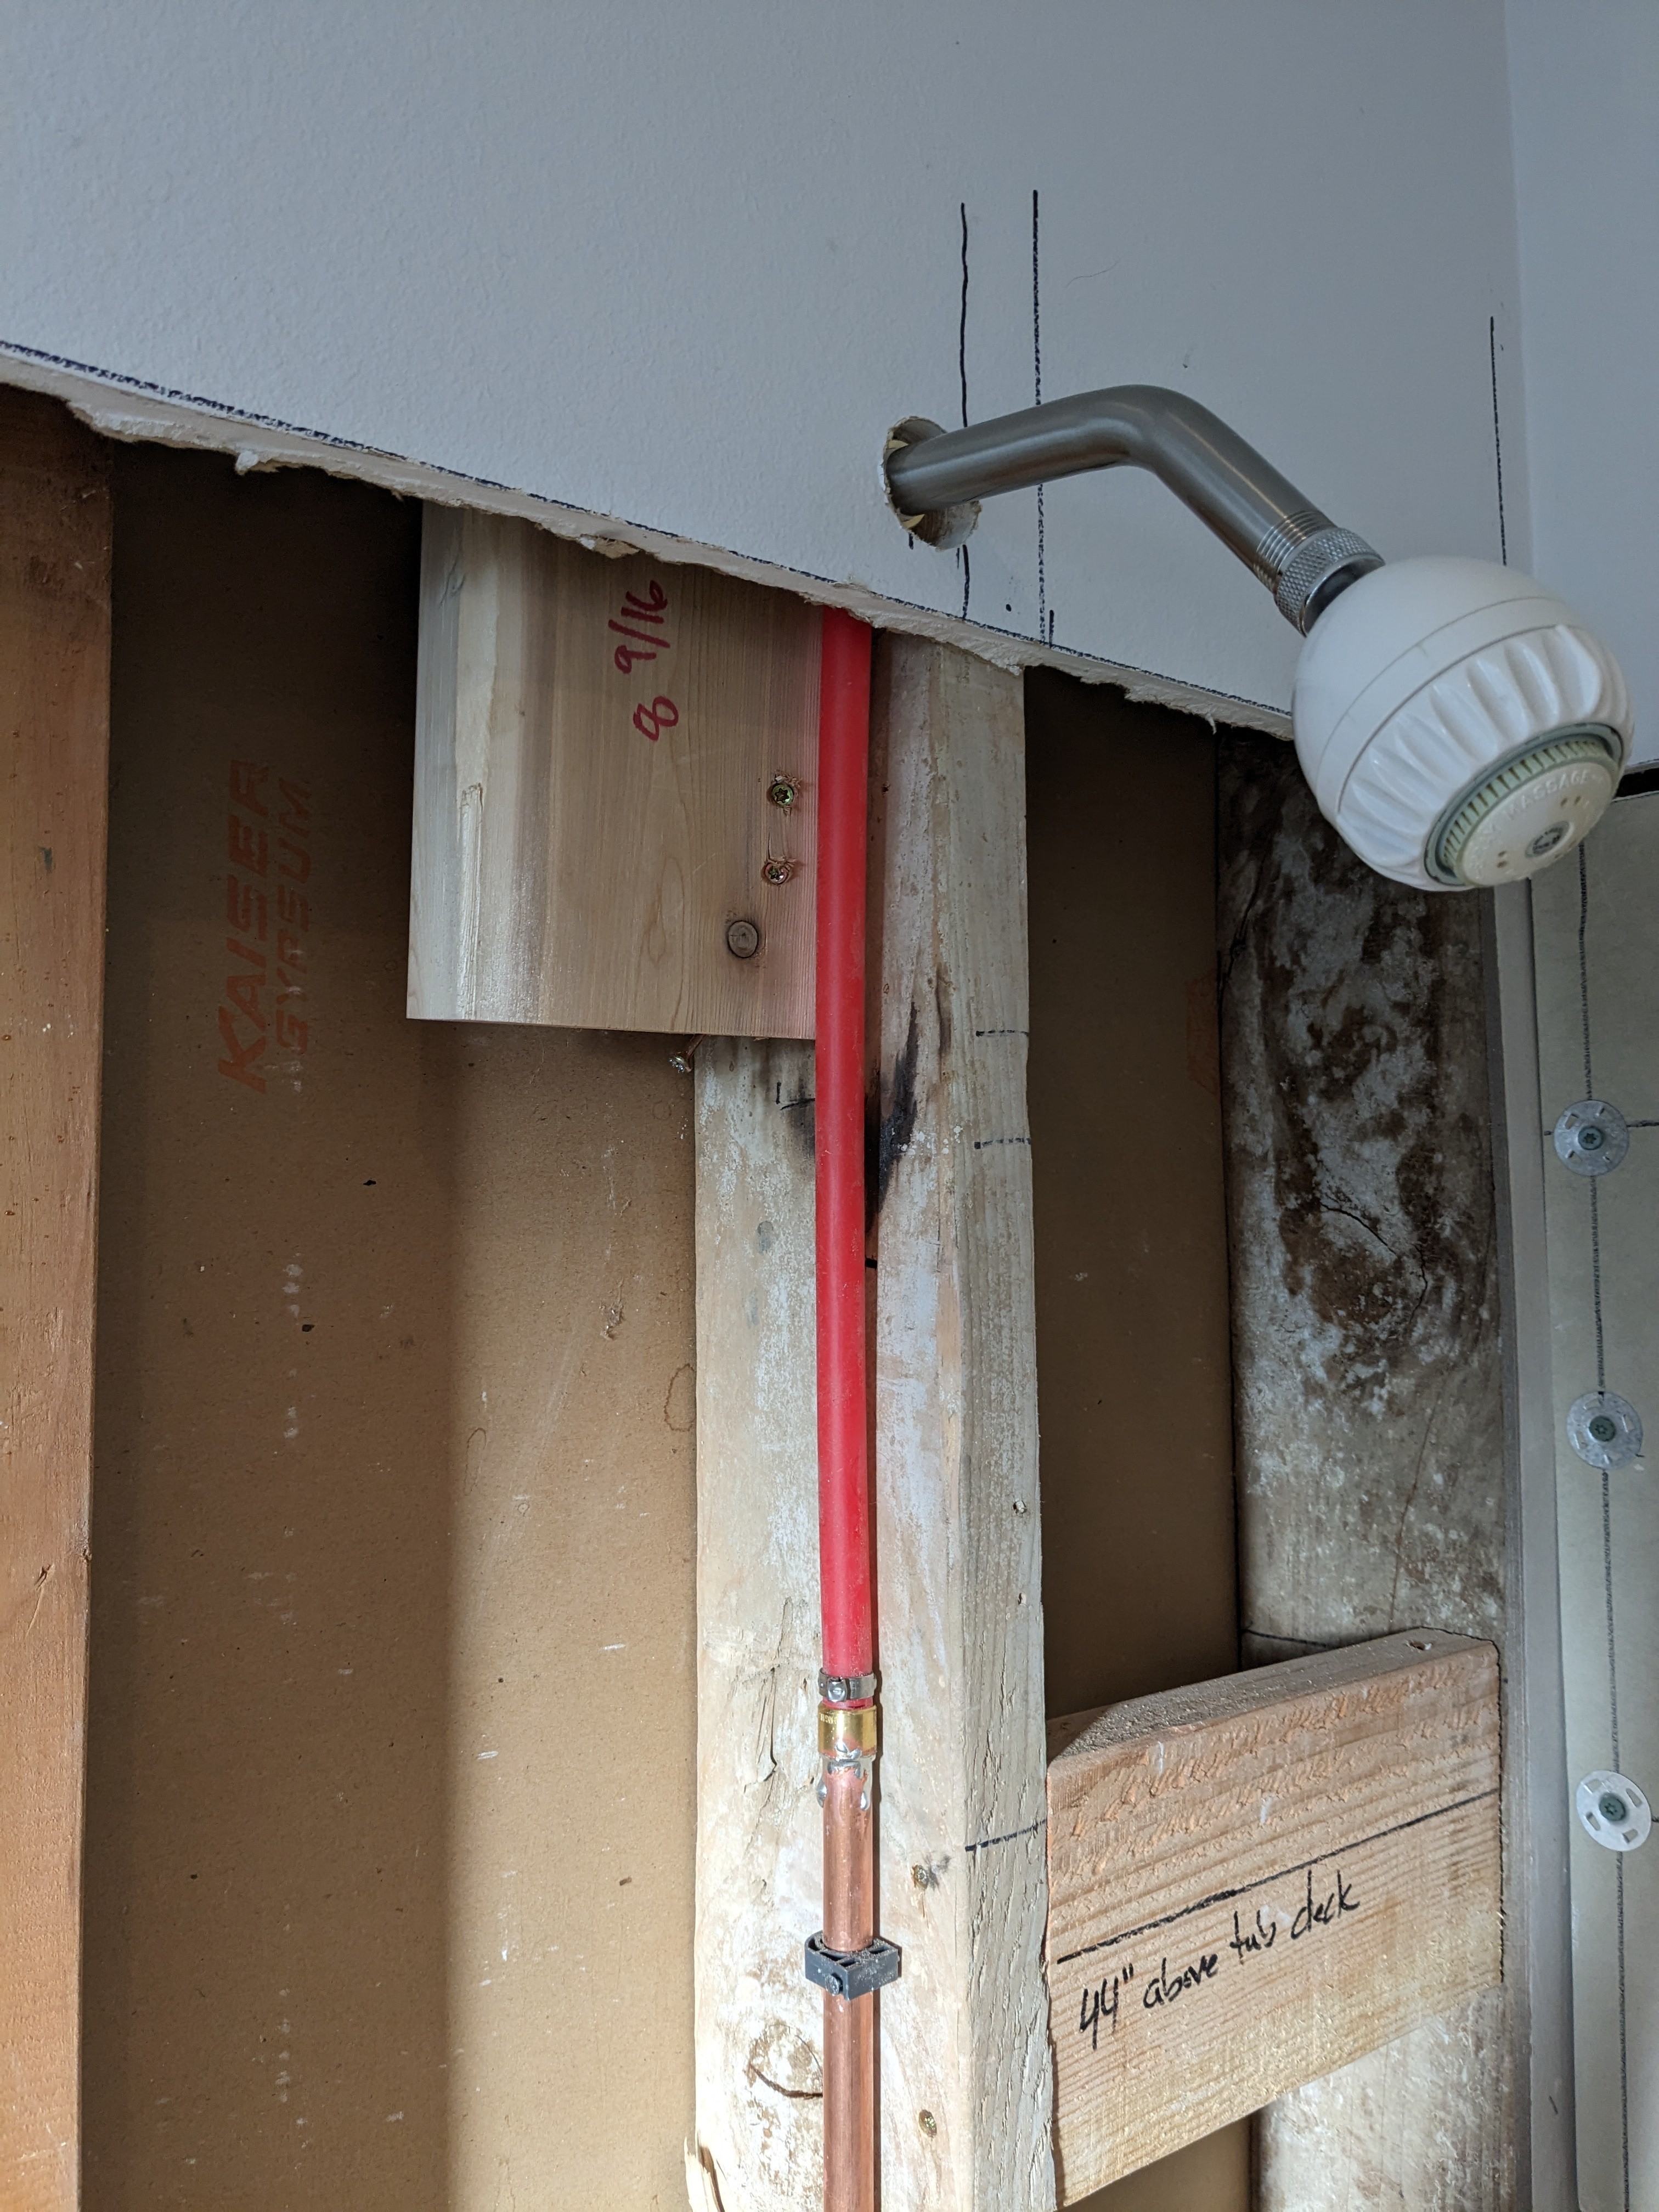
![]()
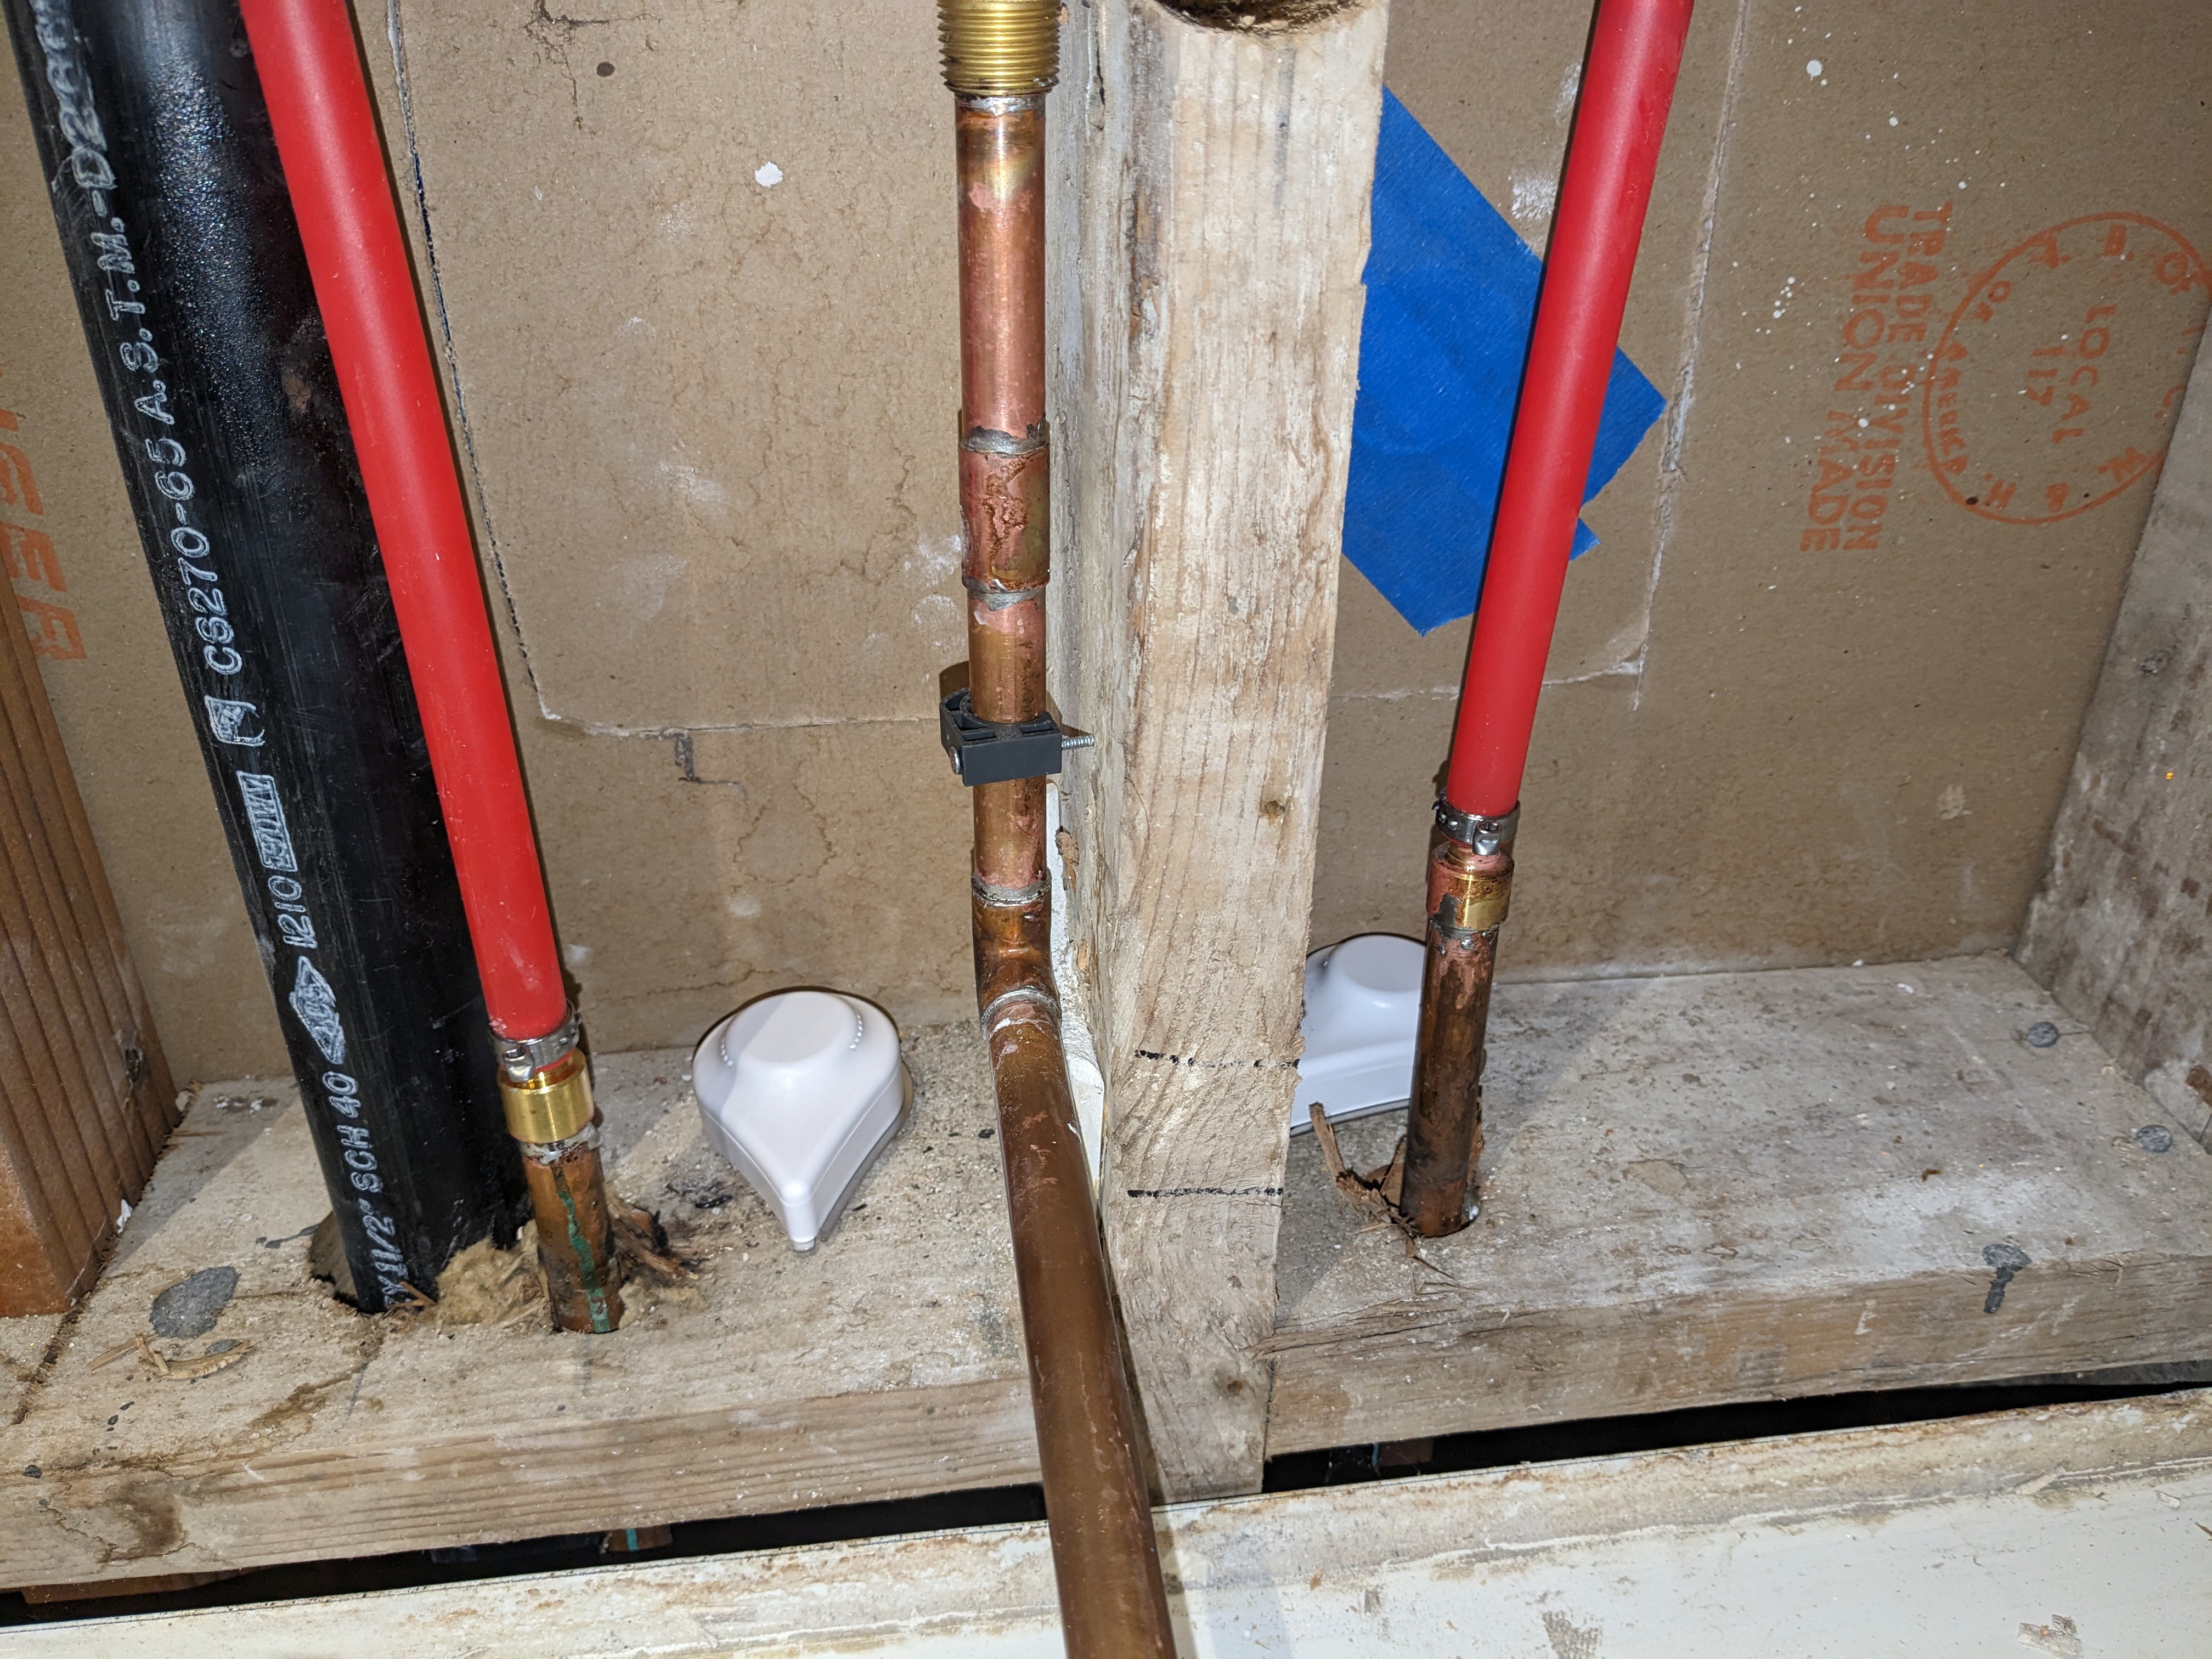
I had to make an educated guess about the mounting depth for the valve so that it will be right once the tile is on the wall. The tub spout is intentionally much too long. I'll trim that to the right size after the wall is finished. In the upper right of that picture, you can see that I put in the final piece of grab bar blocking. I waited for that so I wouldn't get in my own way while working on the plumbing..
I tested for leaks according to my original plan. During testing, you tend to get little splashes of water here and there. I waited overnight for things to dry out, and then I tested everything again while looking carefully for even the tiniest drips. No drips were seen. I'm still completely paranoid about those solder connections, though. Once the wall is closed up, a failure in a connection can do a lot of damage before the symptoms appear to the humans. I installed water leak sensors on each side of that stud (those white things that look like teardrops in the photo below). The Third Reality sensors I got have both an audible alarm and a Zigbee connection to my home automation server. Belt and suspenders. I'm not sure how long the batteries will last. Unlike many Zigbee sensors, these take two AAA batteries instead of a coin cell battery. I already have a cut-out panel in the drywall in a closet on the other side of that wall (done as part of my original investigation). You can just barely see the outline of the drywall cuts in the photo. When my home automation tells me that the sensors need a battery change, I can get to them through that panel.
![]()
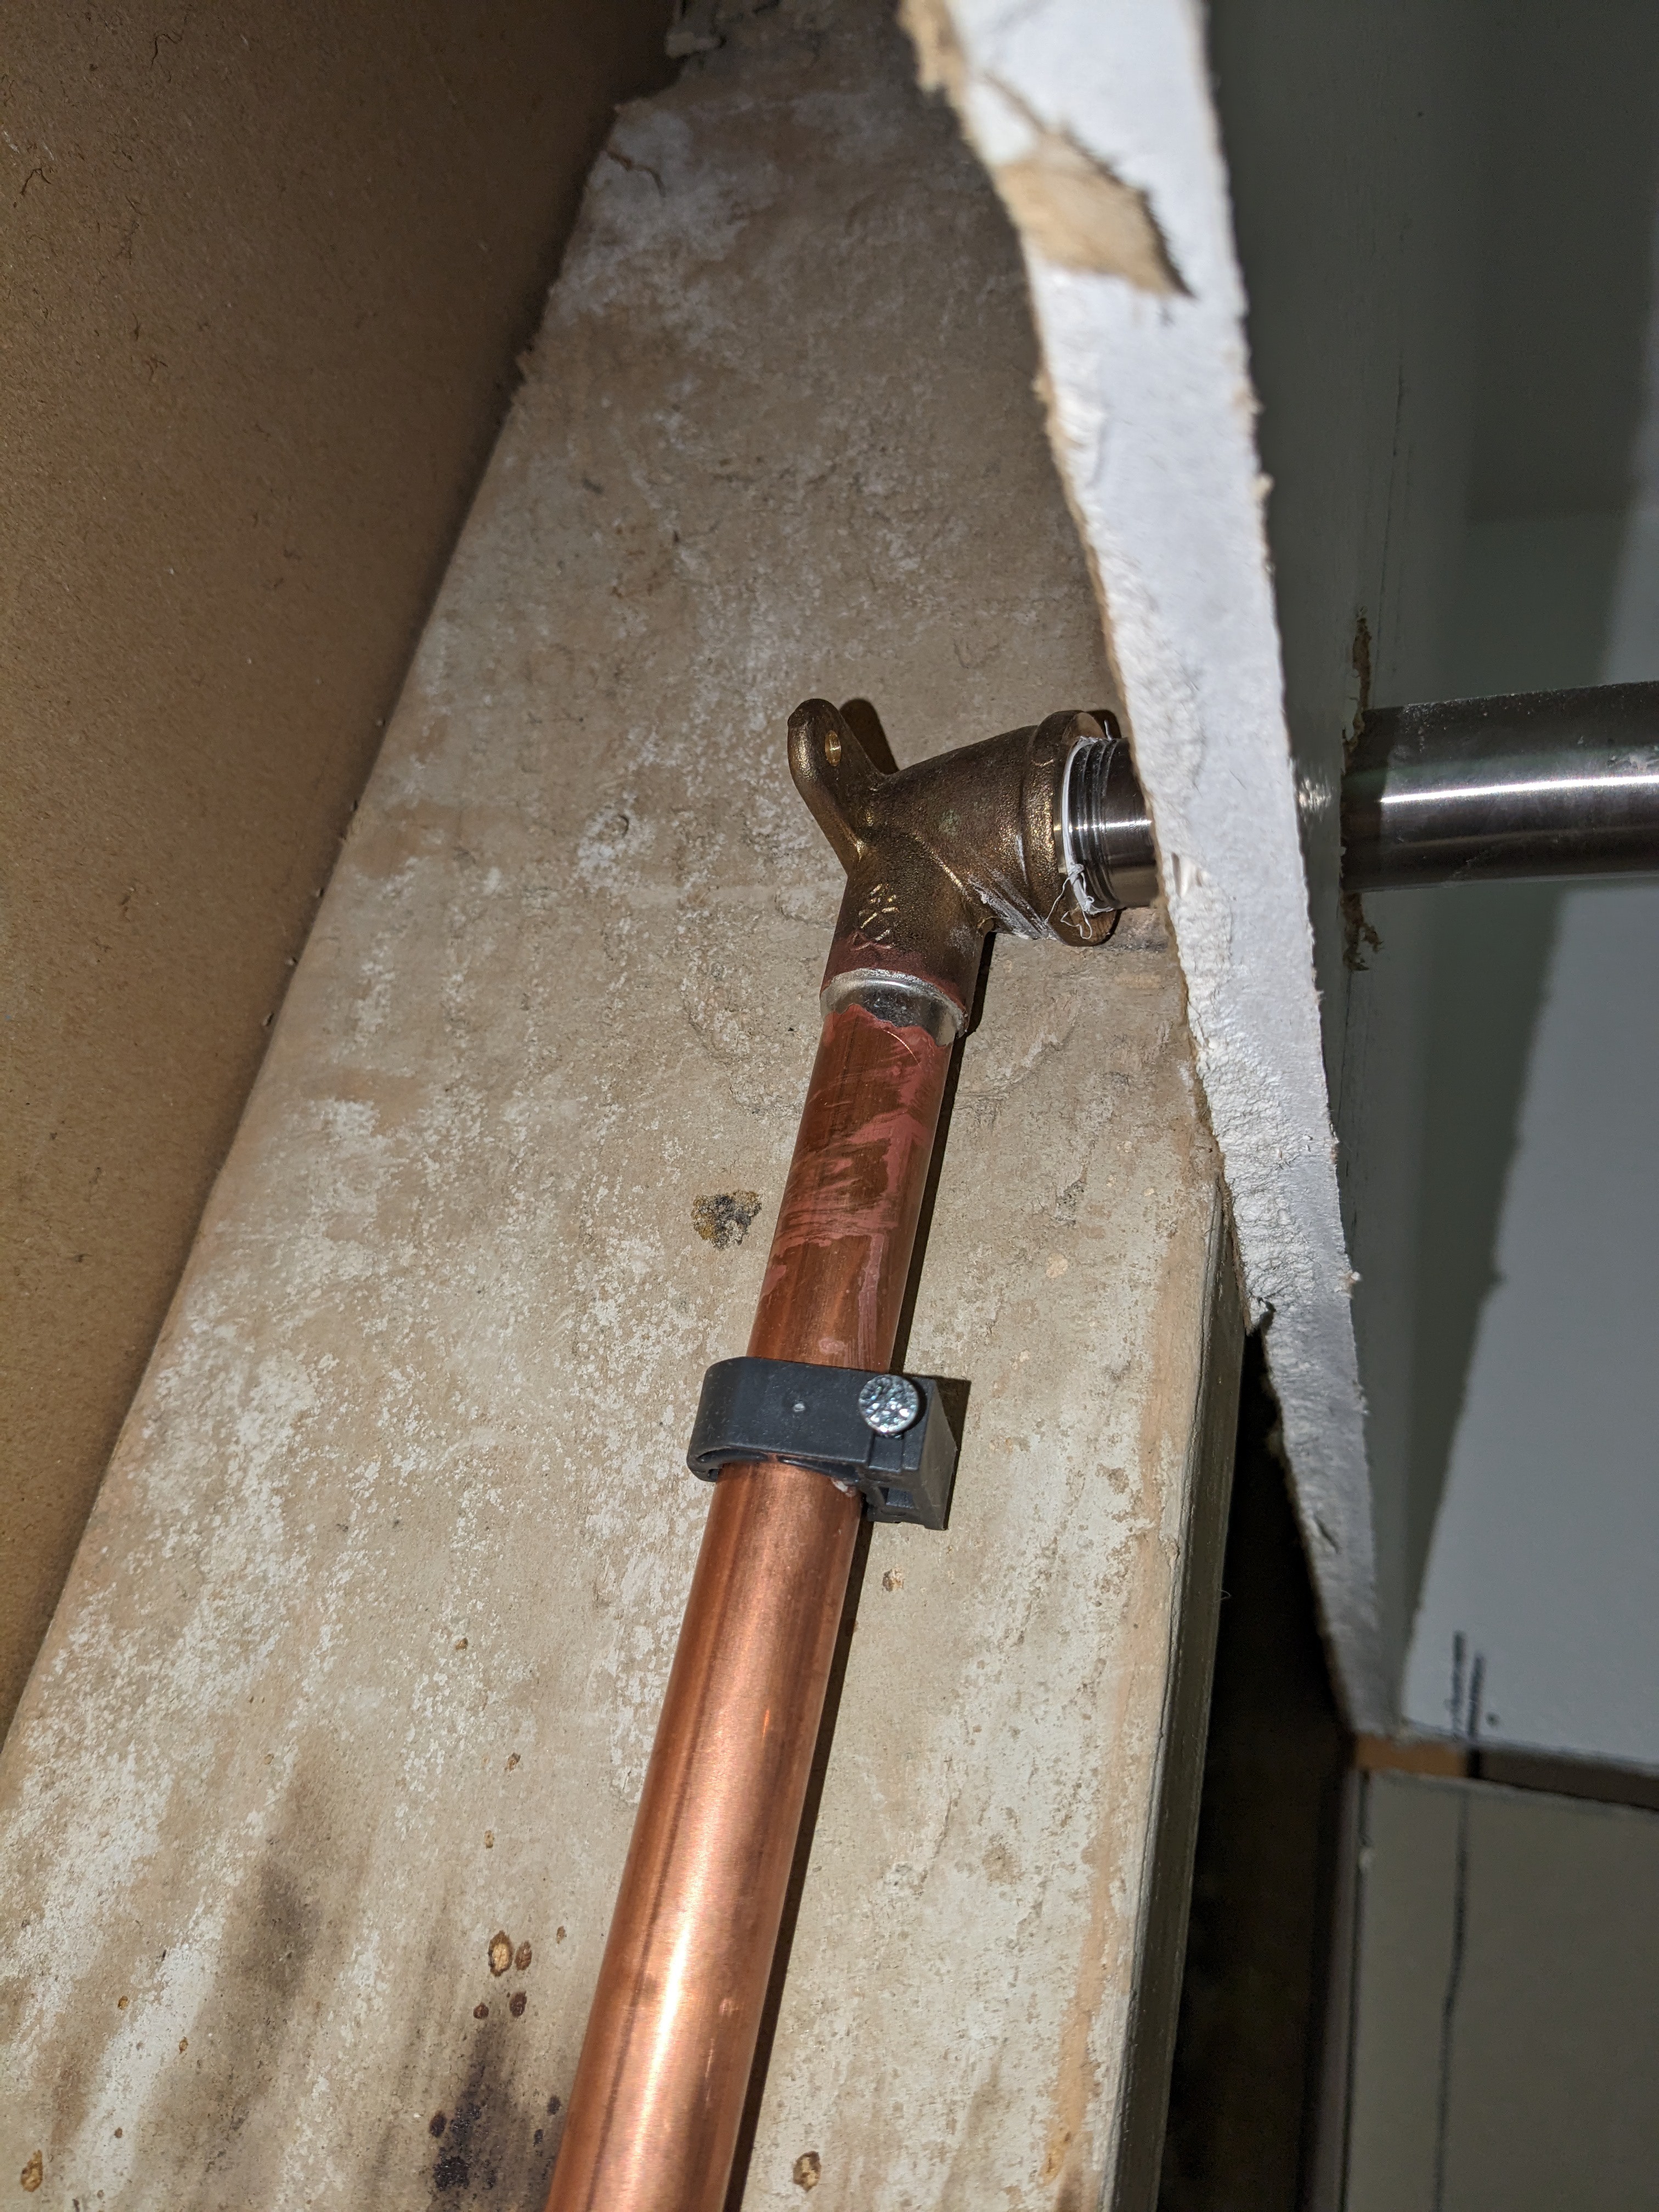
Update: I've decided to re-do/adjust part of this plumbing job. You can't see it too well in this photo, but the fitting at the top, where the arm for the shower head goes, is not at the correct angle compared to the valve and tub spout. As a result, the tube is about 20 degrees away from perpendicular to the wall. Shower heads these days have a built-in swivel, so I'm not worried about the water spraying off center. It's just that the looks of the thing will bug me forever if I don't fix it.
![]()
It will be easier to line things up with PEX compared to soldered copper, so I will cut that copper pipe at some convenient point and splice in a section of PEX, including a PEX version of the fitting at the top, which the plumbers call a "drop-ear cup". Here's the PEX revision. It doesn't have stiffness to hold the elbow in place, so I mounted it on a scrap of lumber.
![]()
![]()
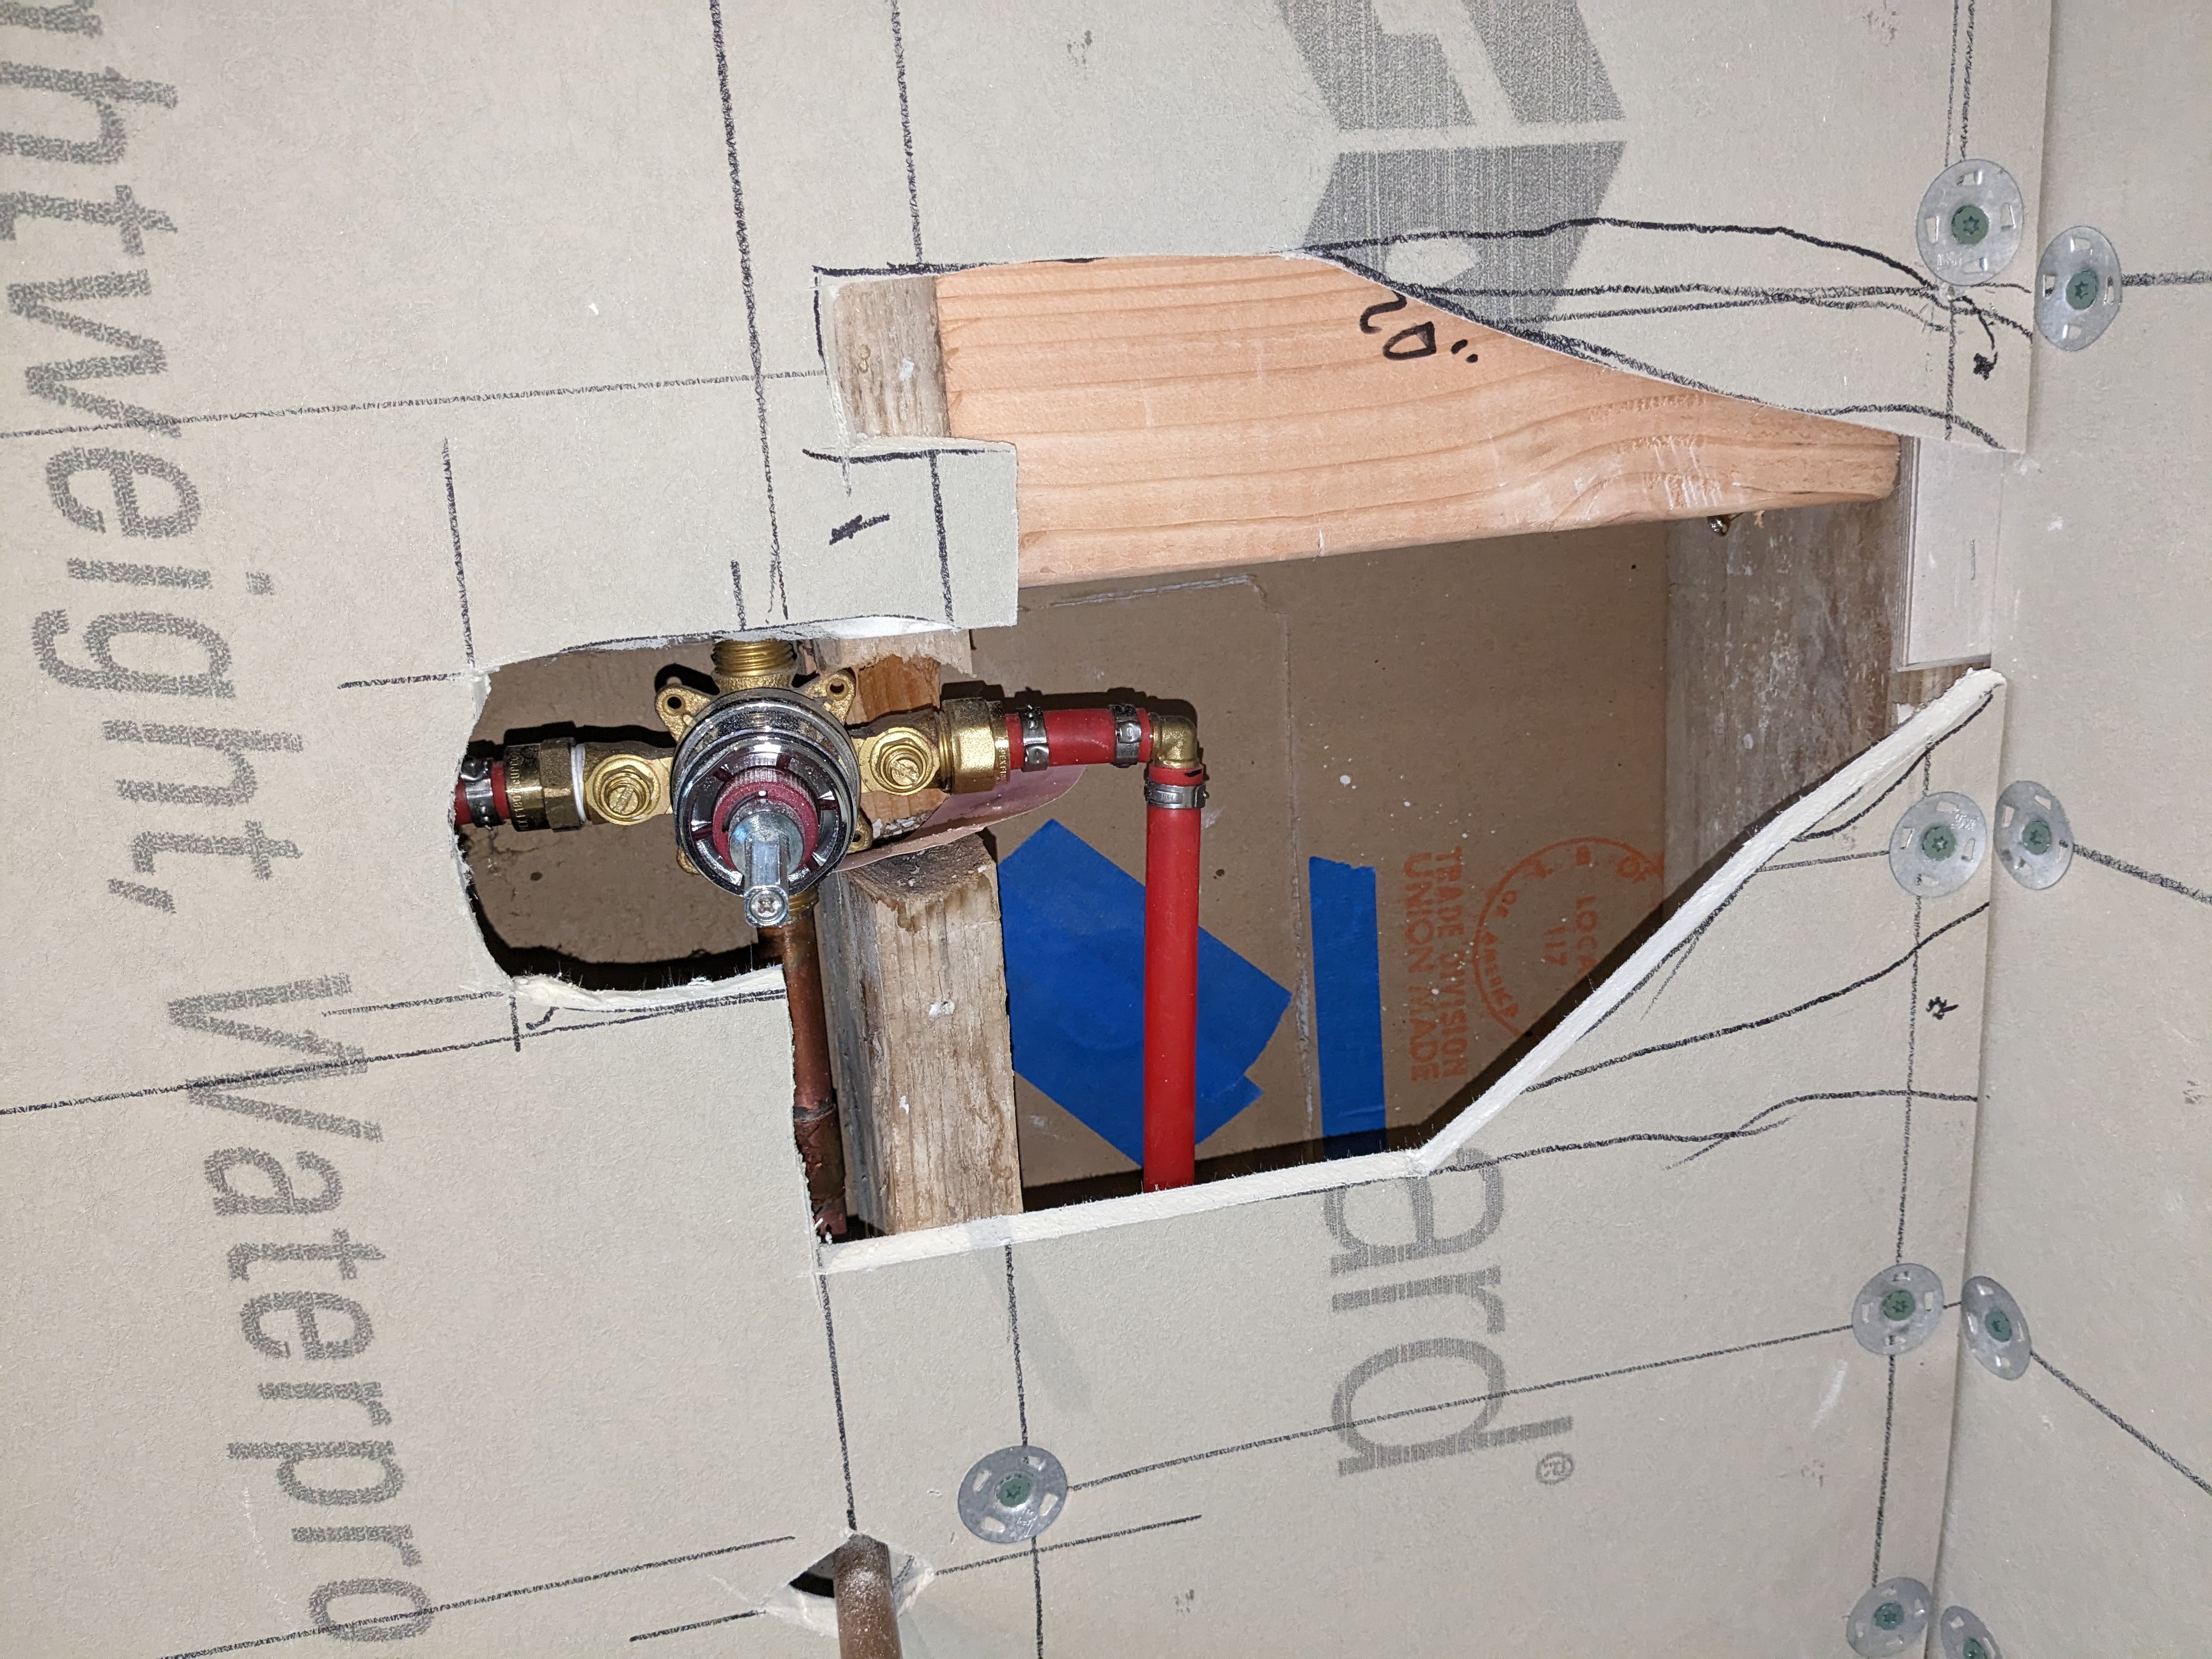
Update: After I got all the GoBaord installed, I discovered a very slow leak from one of the threaded connectors on the faucet valve. It was at the rate of about a drop every half hour, which is why I missed it before amongst all the ambient water from the plumbing work. My hypothesis was that it either wasn't tightened enough or that I hadn't used enough teflon tape around the threads. There wasn't enough room to swing a wrench in the small cut-out in the GoBoard for the faucet valve, so I had to remove a bigger chunk. The chunk was bigger than needed for the wrench work because I had to be able to secure everything to studs when I closed it back up. Re-taping the threads with an ungodly amount of tape resolved the problem.
I find it's fairly difficult to detect slow drips in a wood environment or an environment that has gotten wet during repair work. My trick is to use a tissue or stretch of toilet paper under the fixture. Any drips on that soft paper will usually show up pretty clearly. In this specific case, the tissue got damp, but I wasn't sure if it came from the nearby wood, which had gotten wet. My fallback trick is to use a piece of colored paper, the softer the better. Drips will usually cause some obvious bleeding of the color in the paper. In the photo below, you might be able to make out a small slip of pink paper under the right-hand threaded connector.
![]()
The mud guard that protects the faucet valve during tiling bumps into that cut-out stud before being fully seated. The mud guard is optional for the completed installation, but I would like to have it in place at least during tiling. My choice is to either cut a little more from the gap in that stud or trim the edge of the mud guard to go over the stud. It might not make any practical difference for a stud that has already been notched, but I'm not too crazy about the idea of cutting into it. I trimmed the edge of the mud guard instead.
-
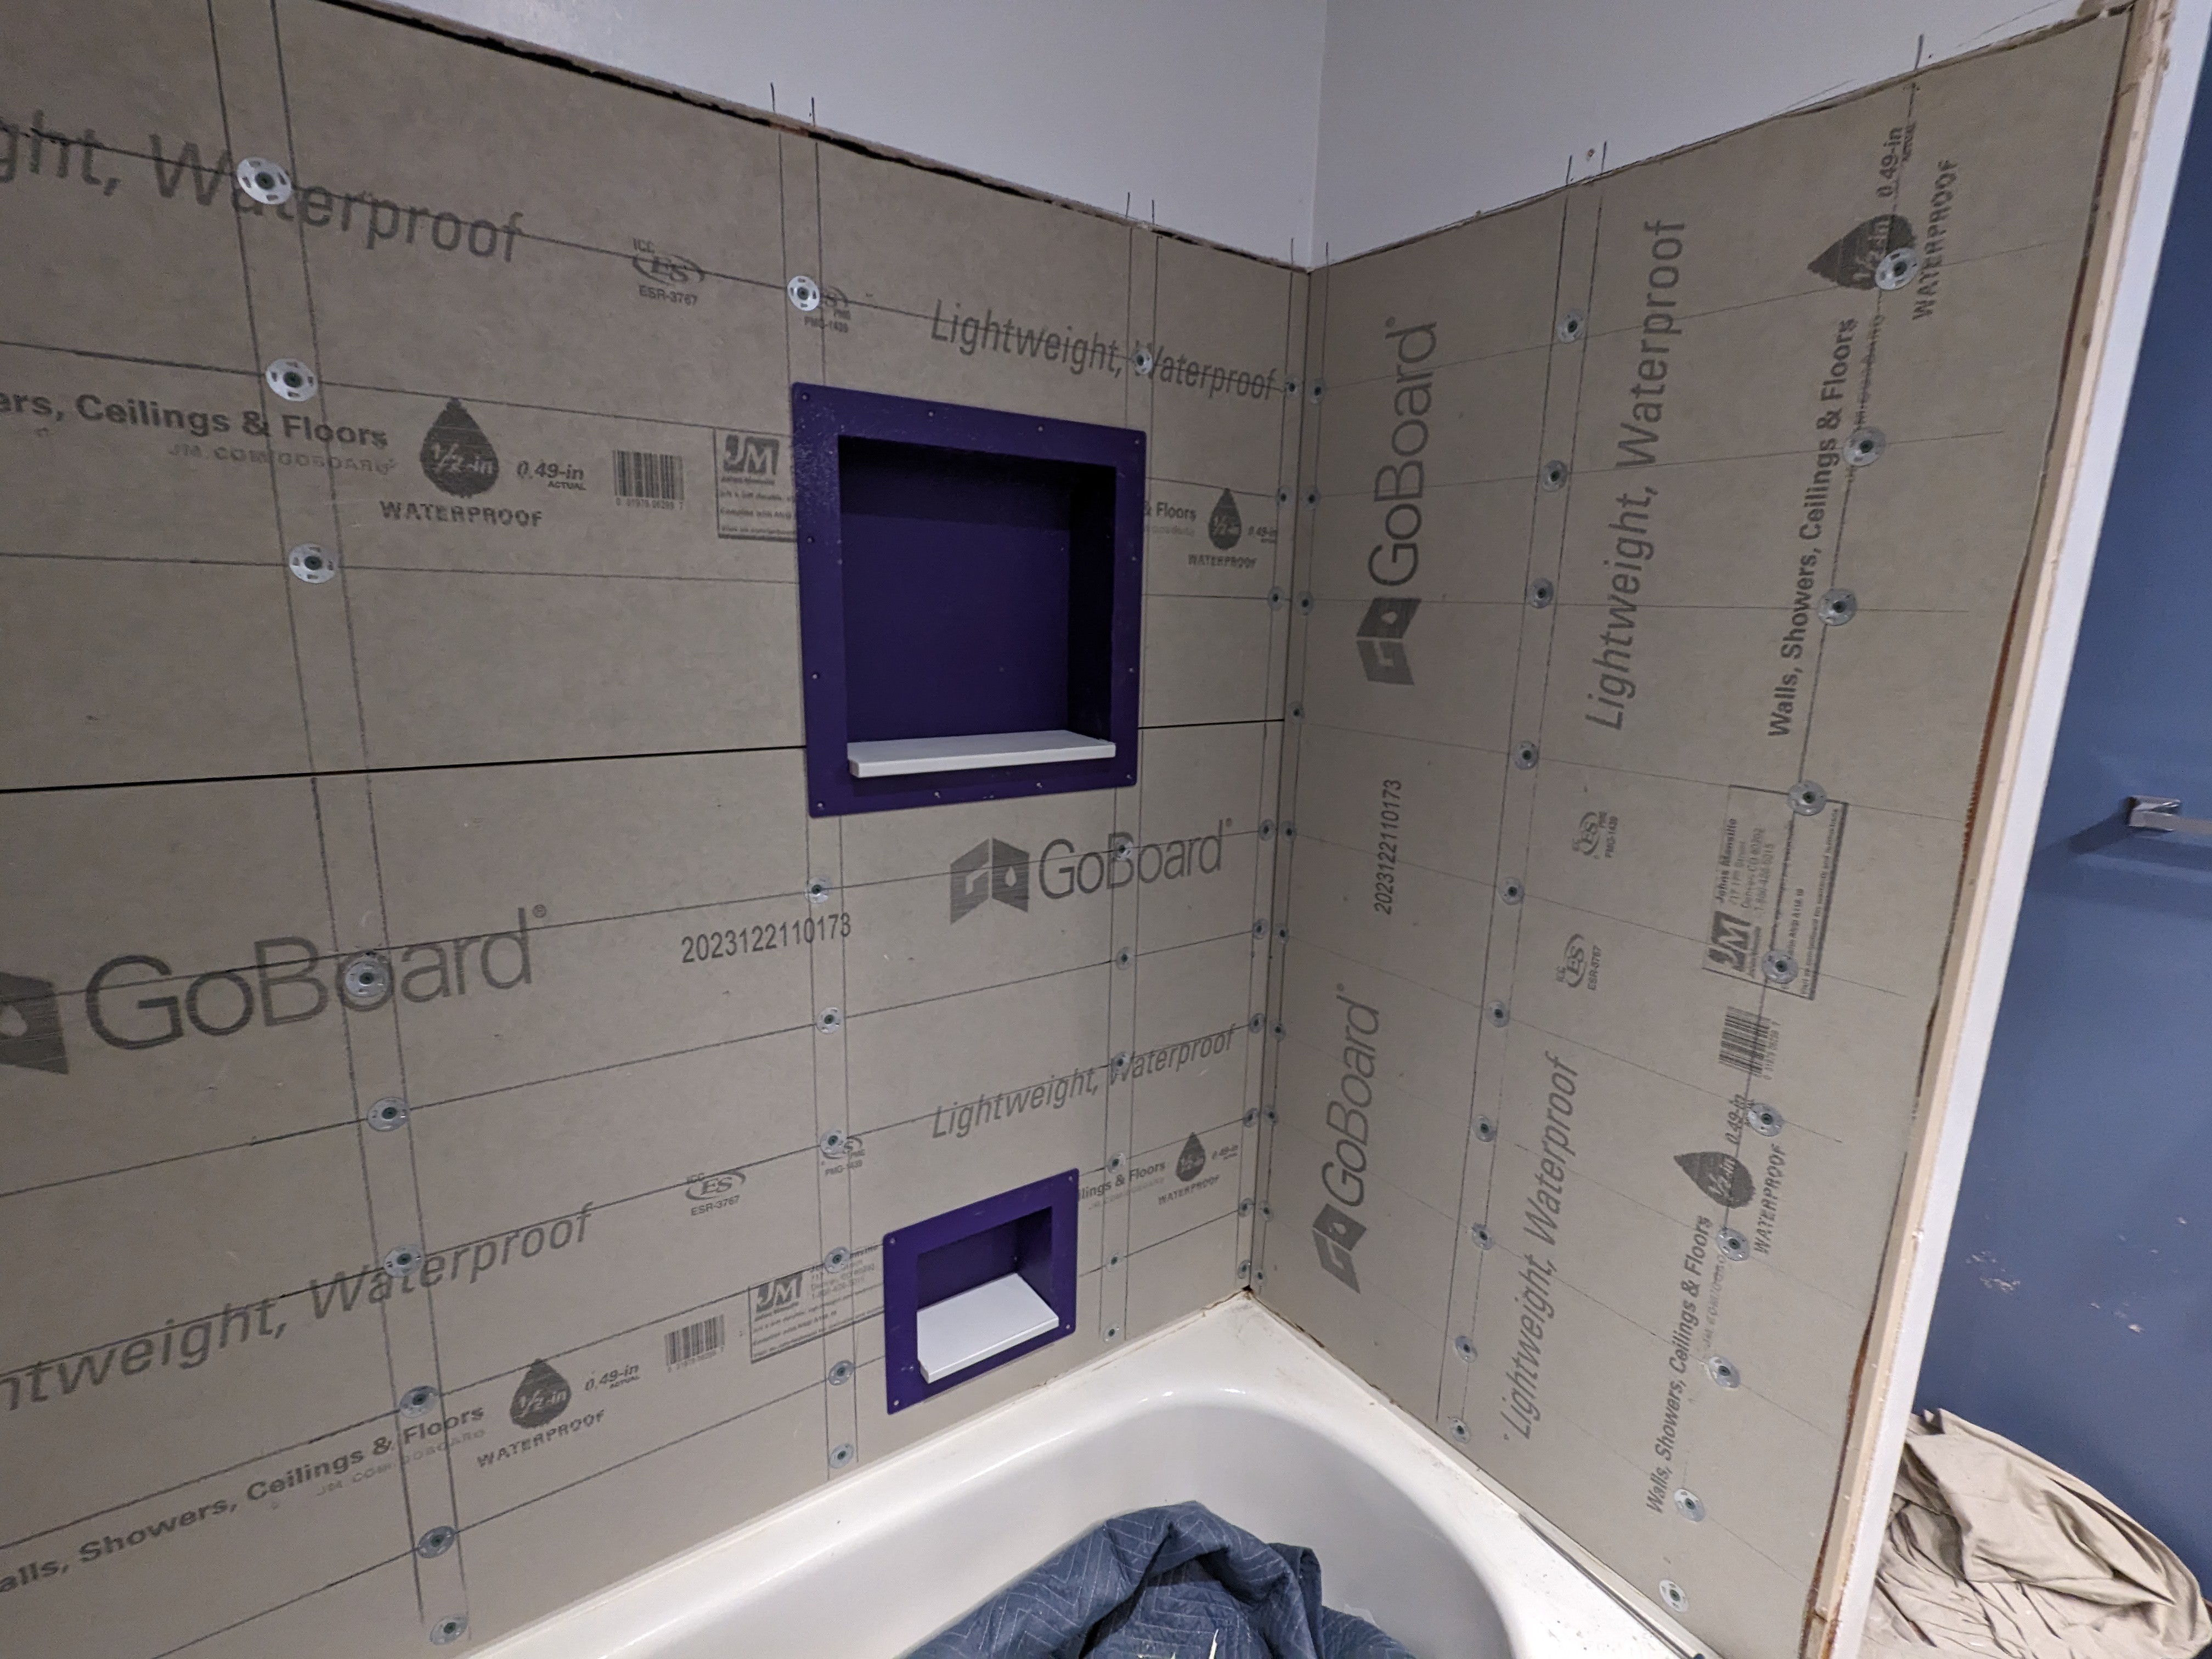
Niche placement
02/24/2024 at 19:52 • 0 commentsEvery tile job now must feature a niche. It's just one of society's rules. Fabricating a custom niche out of waterproof foam board seems straightforward, and that's the way I would do it if I had more experience with this. Instead, I've decided to go with the pre-fabricated niche option to have a better guarantee against leakage.
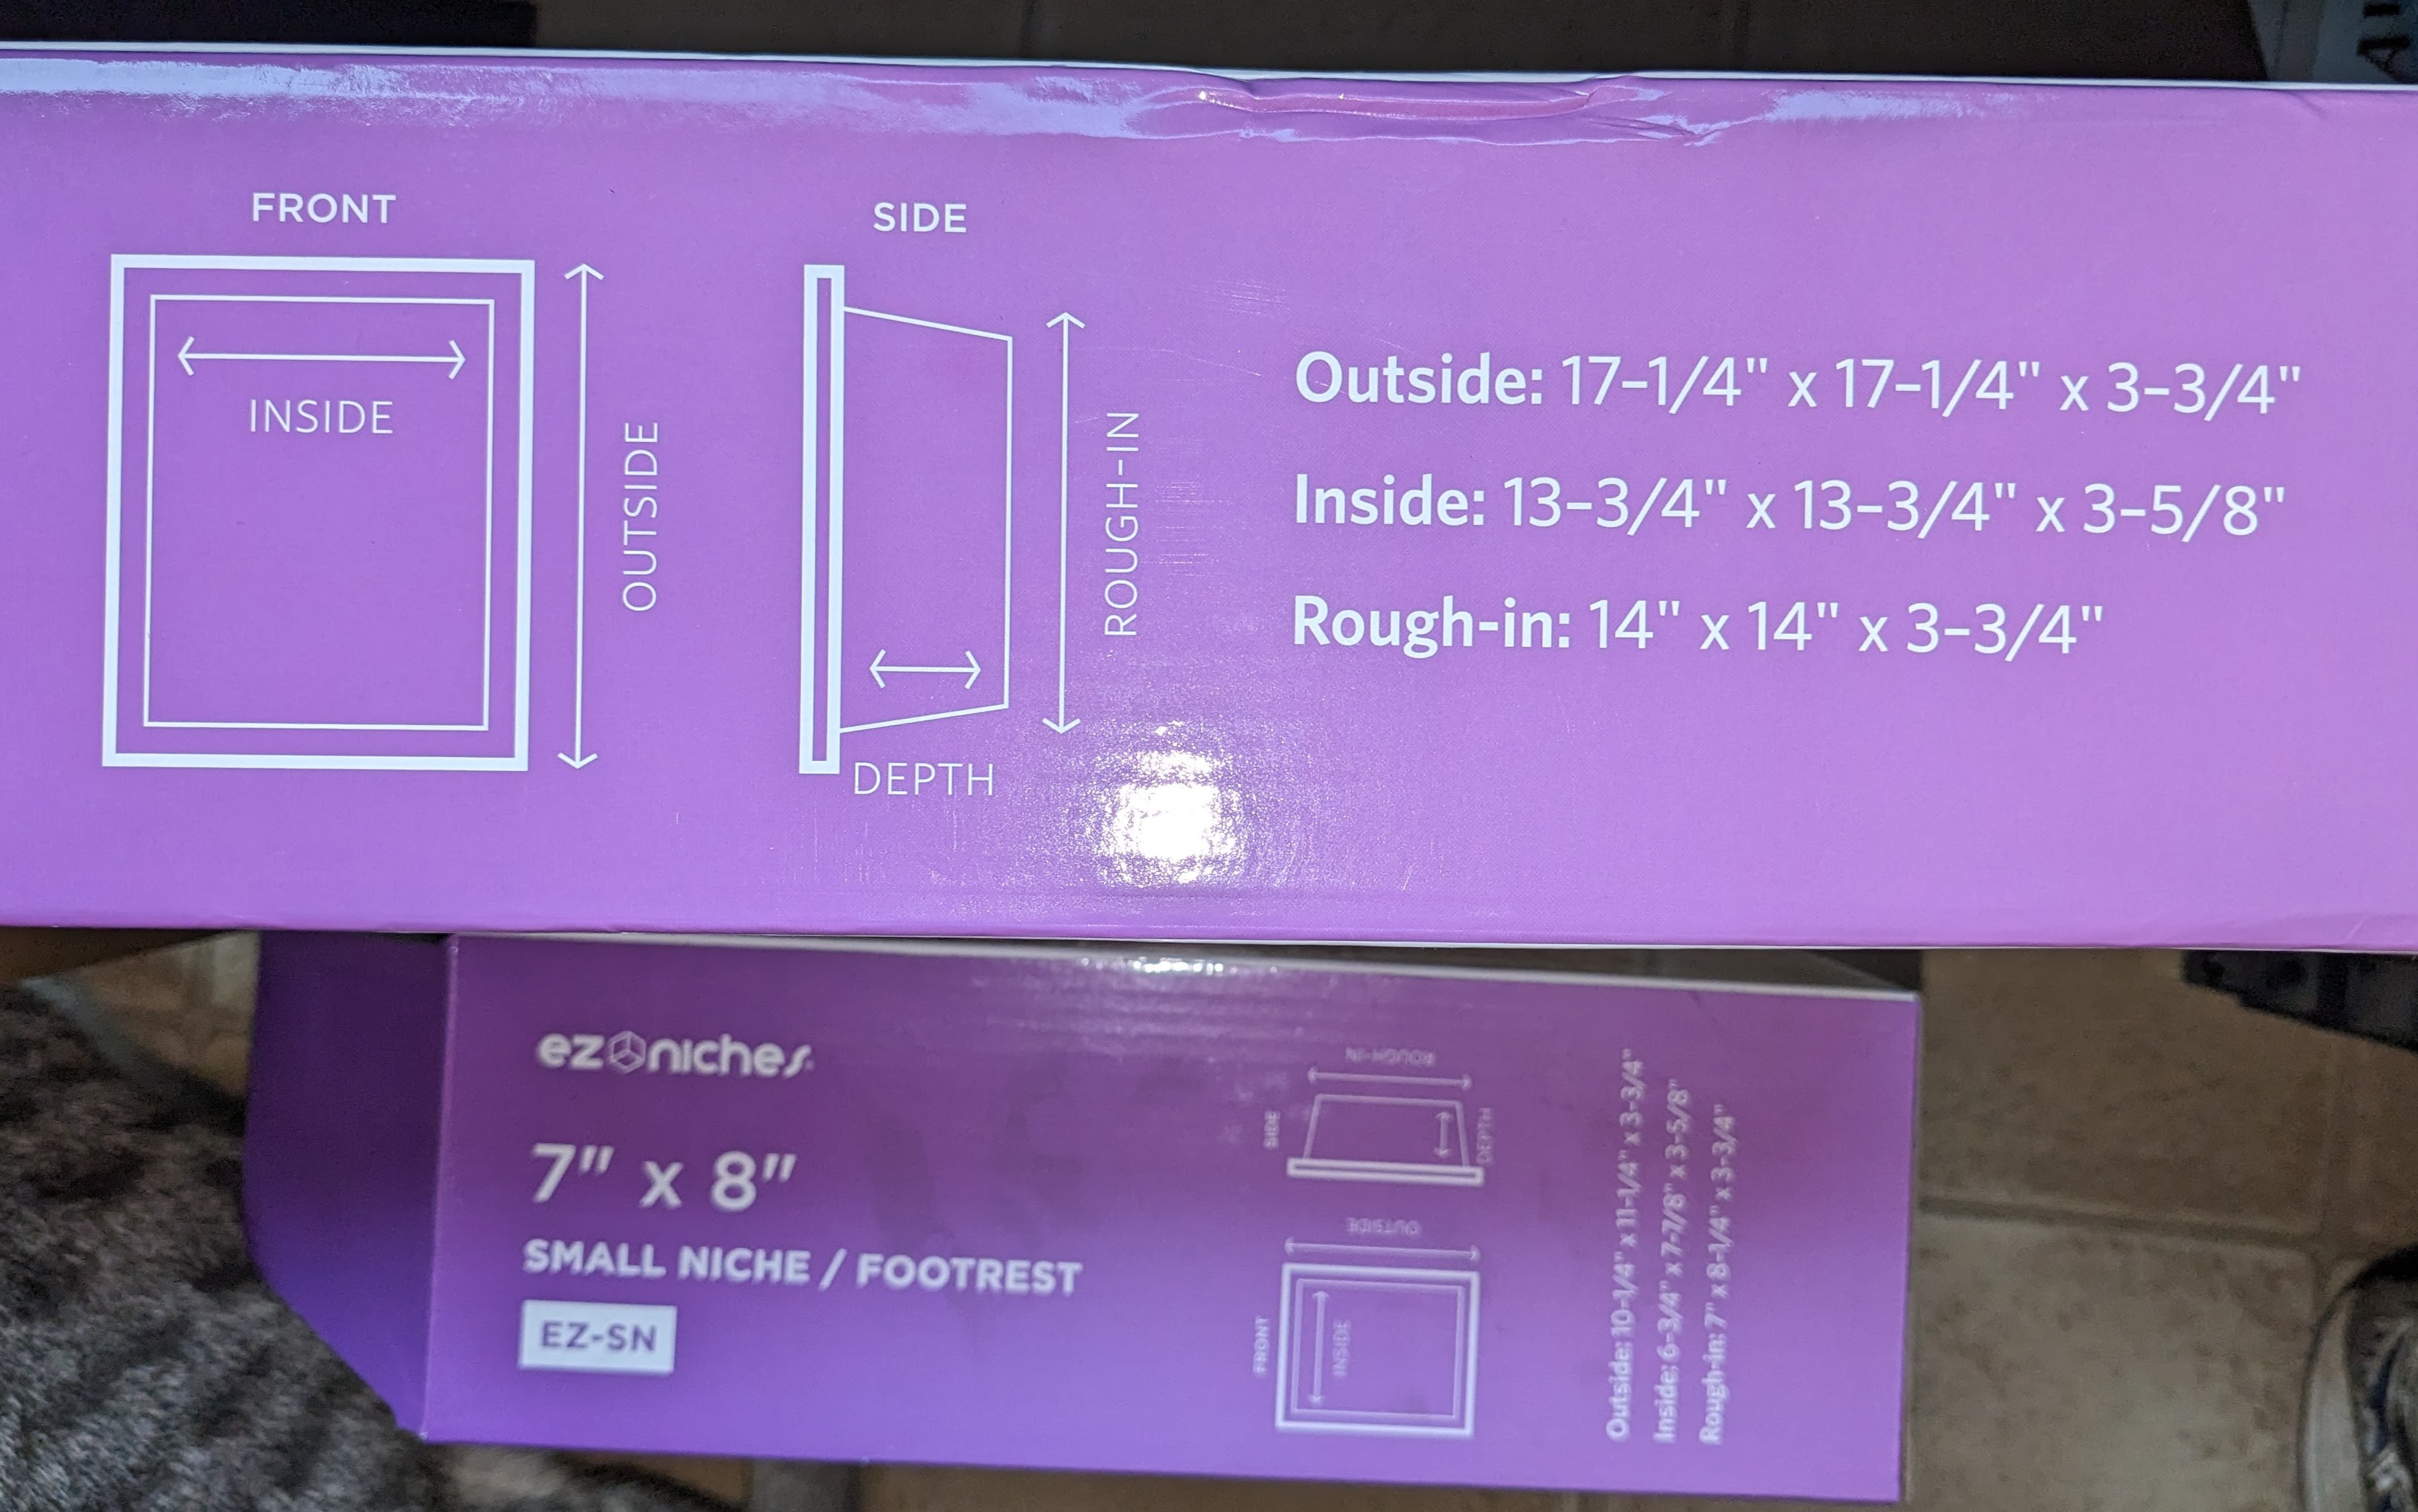
I'm planning two niches. A larger niche will be for holding shampoo and other doo-dads. A smaller niche will act as a soap dish. I found suitable models from EZ-Niches (the company web site is just an "under construction" tombstone, which is weird, so you have to find details at places that sell them). The larger niche is 14x14 inches and fits nicely into standard stud spacing. A smaller niche is 8x7 inches and will need some additional side supports.
![]()
![]()
Where to place them? Ideally, the soap dish niche should be in the center of the back tub wall, as was the old soap dish. However, I want the two niches to have a common center. The stud layout doesn't provide a way to center the larger niche. My plan is to shift to the next stud space away from the shower head. The large niche will attach directly to the vertical studs, and the smaller niche will be centered in that space. Vertically, the top of the soap dish niche will fall on the first tile grout line, roughly 12 inches from the tub top. With a height of 7 inches, that will put the bottom of the soap dish niche 4-5 inches above the tub top. I should be able to get away with just a single U-shaped tile cut for that niche. I haven't yet calculated the vertical position of the larger niche. At 14 inches, it will span either 2 or 3 tile rows. I should be able to get away with just two U-shaped cuts to fit that niche.
Schematically, they'll go here. The purple blobs are not to scale or precisely placed.
![]()
Here are the actual niche locations, framed in.
![]()
The smaller niche is held in center with some vertical 2x4 pieces. For the larger niche, I found that it fit just right with pieces of scrap drywall on both sides. The black marks on the right-hand stud in this photo are the anticipated grout line locations (fingers crossed).
![]()
Update: I didn't notice this until quite a bit later, but there actually is some dimension information printed on the boxes the niches came in. I had looked for it earlier but didn't see it for some reason.
![]()
-
Grab bars
02/24/2024 at 18:04 • 0 commentsI am not planning to install grab bars, but I want to prepare things so that they can easily be added in the future. I got some good ideas about this from the video Blocking Walls for Grab Bars. She also has some other pretty good videos related to grab bars. The idea is that you install blocking while the walls are open in locations that are potential grab bar anchor points. They'll be easier to find than studs after the wall is closed up, especially if the locations are clearly documented.
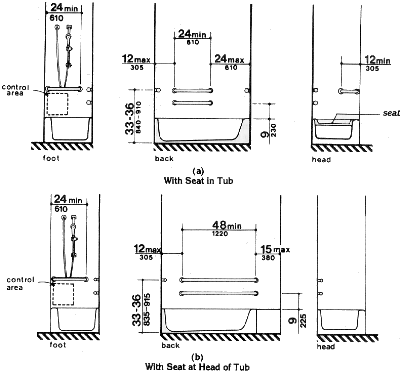
The ADA guidelines for horizontal tub grab bars is 33-36 inches from the floor. (I found this 3rd party web page more readable.)
![]()
I'll use 2x6 horizontal blocking that spans those 33-36 inch measurements. I'll put those between all studs on the back wall and the right-hand end wall. I may also put additional blocking for a vertical grab bar on the right-hand end wall, though it's a bit tricky due to the way the current studs are placed. For the left-hand end wall, there is plumbing in the way, but I might be able to put in blocking for a vertical grab bar.
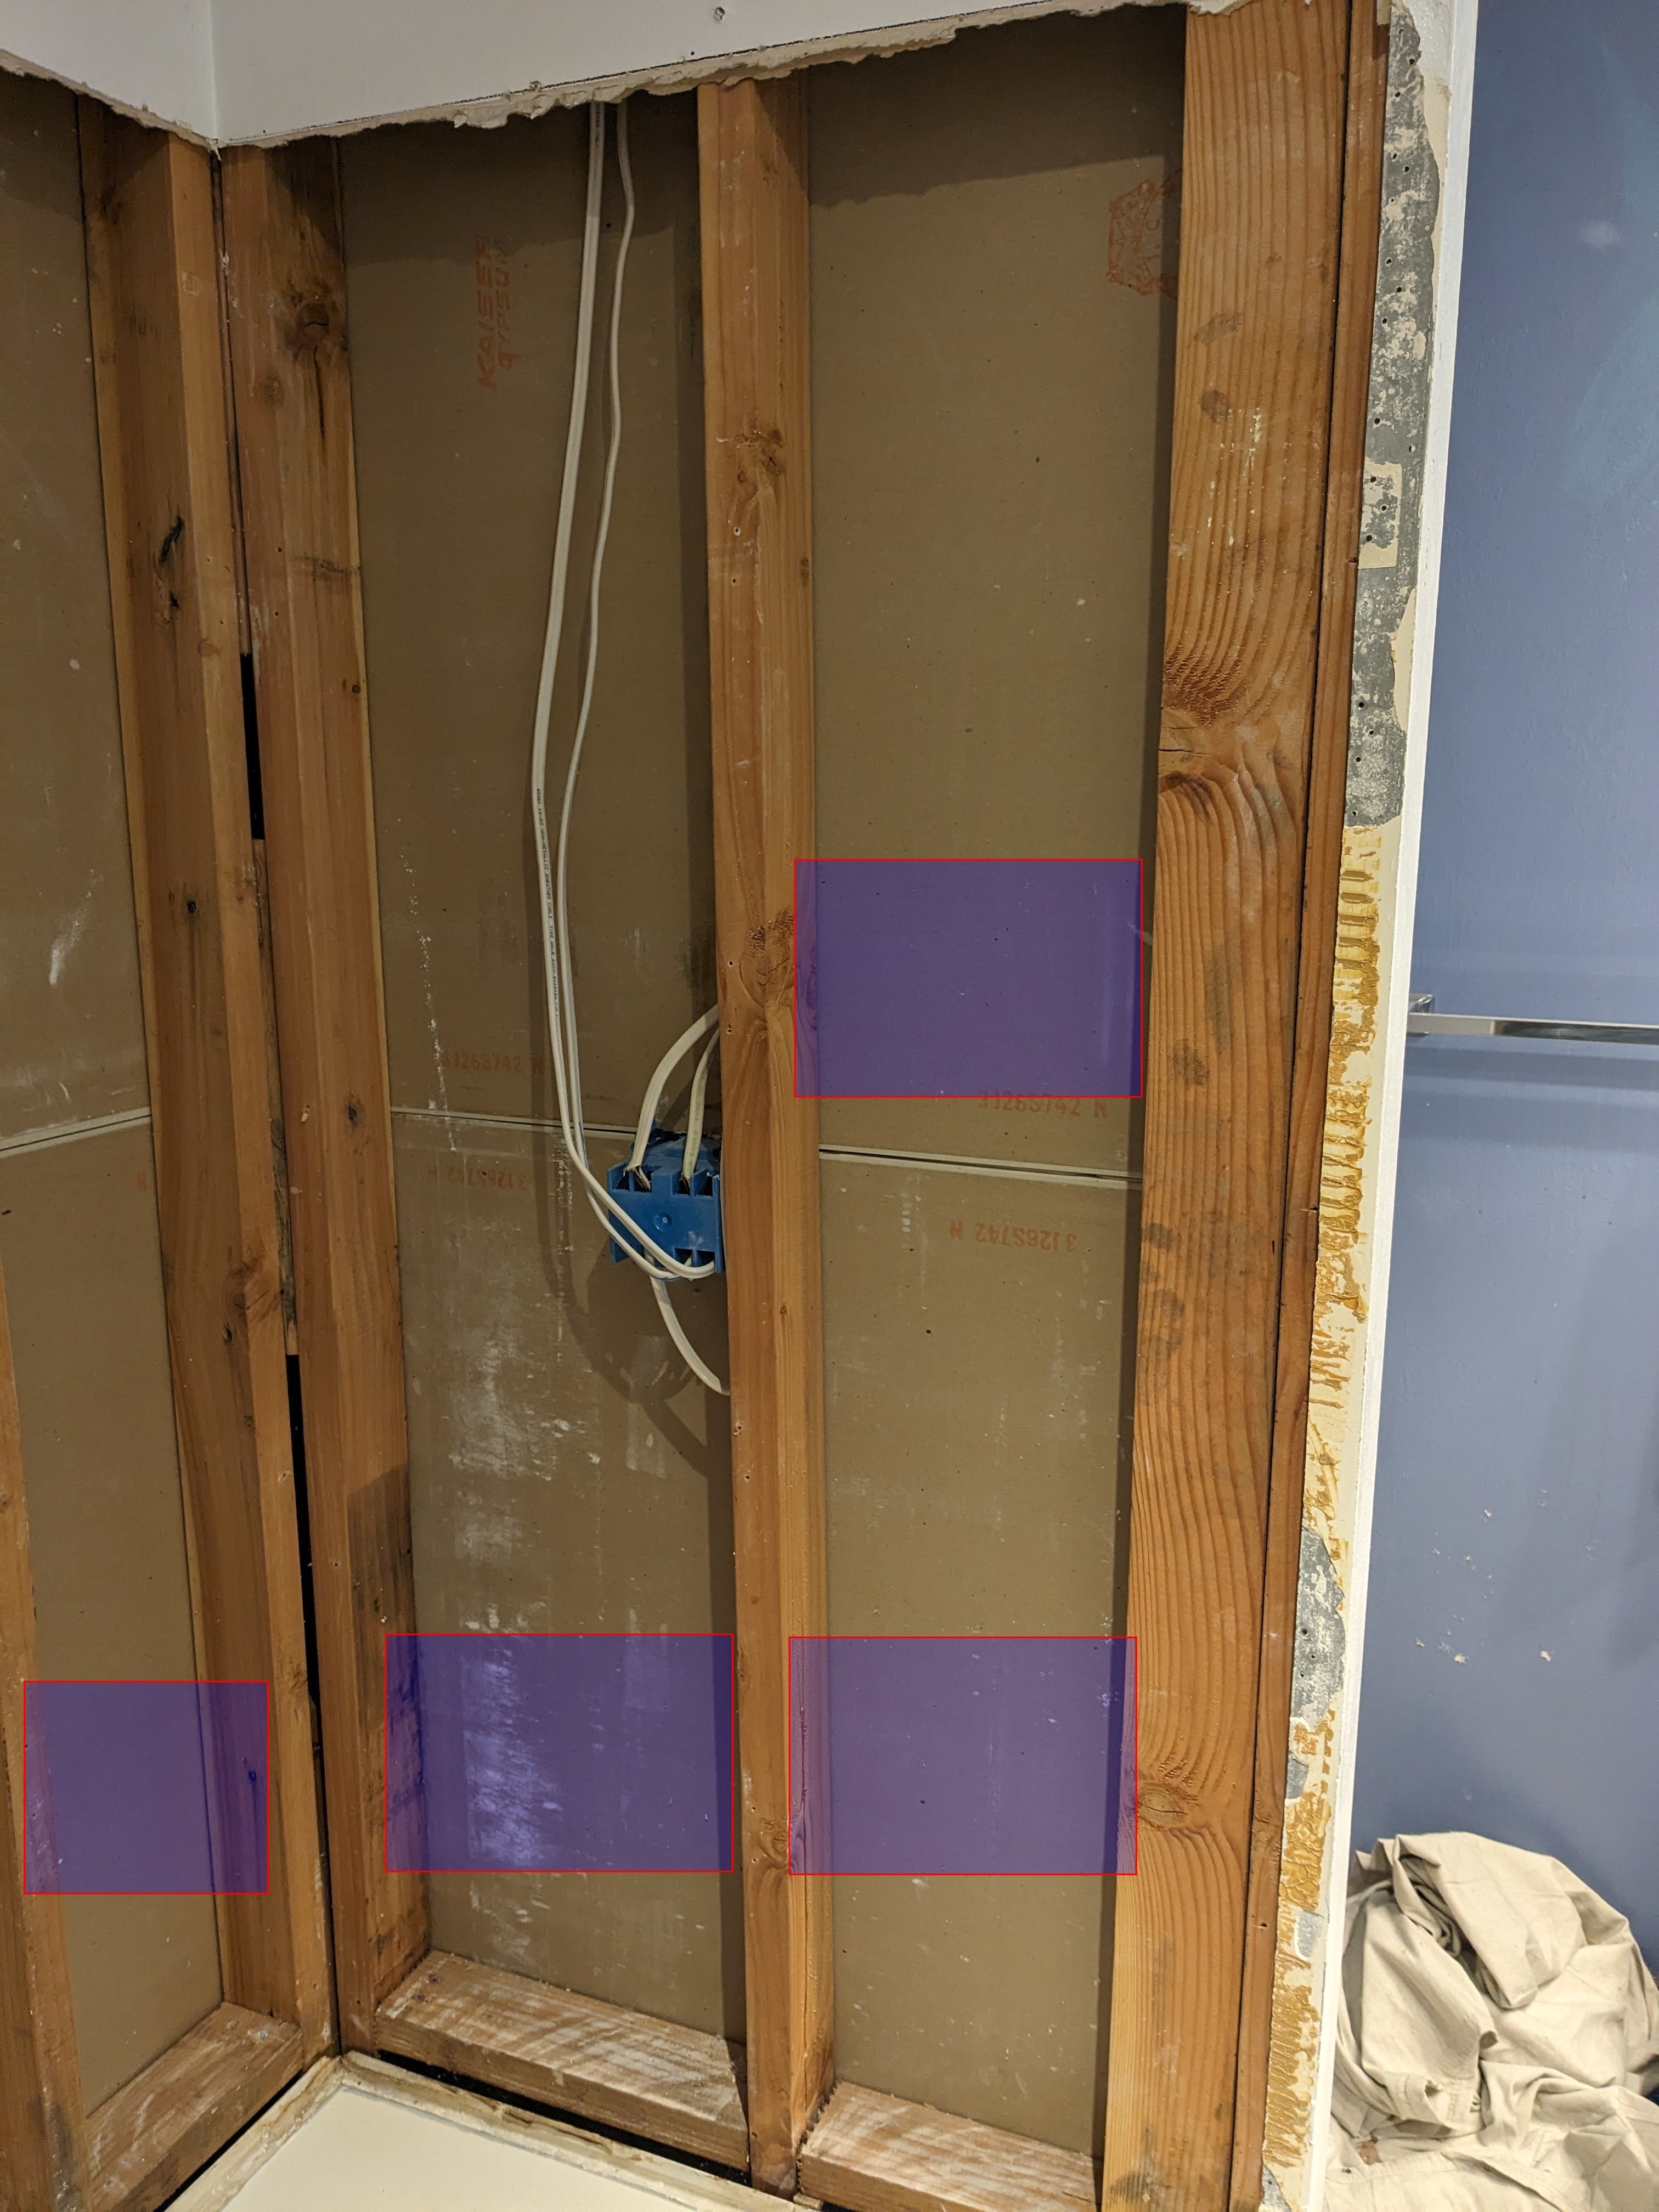
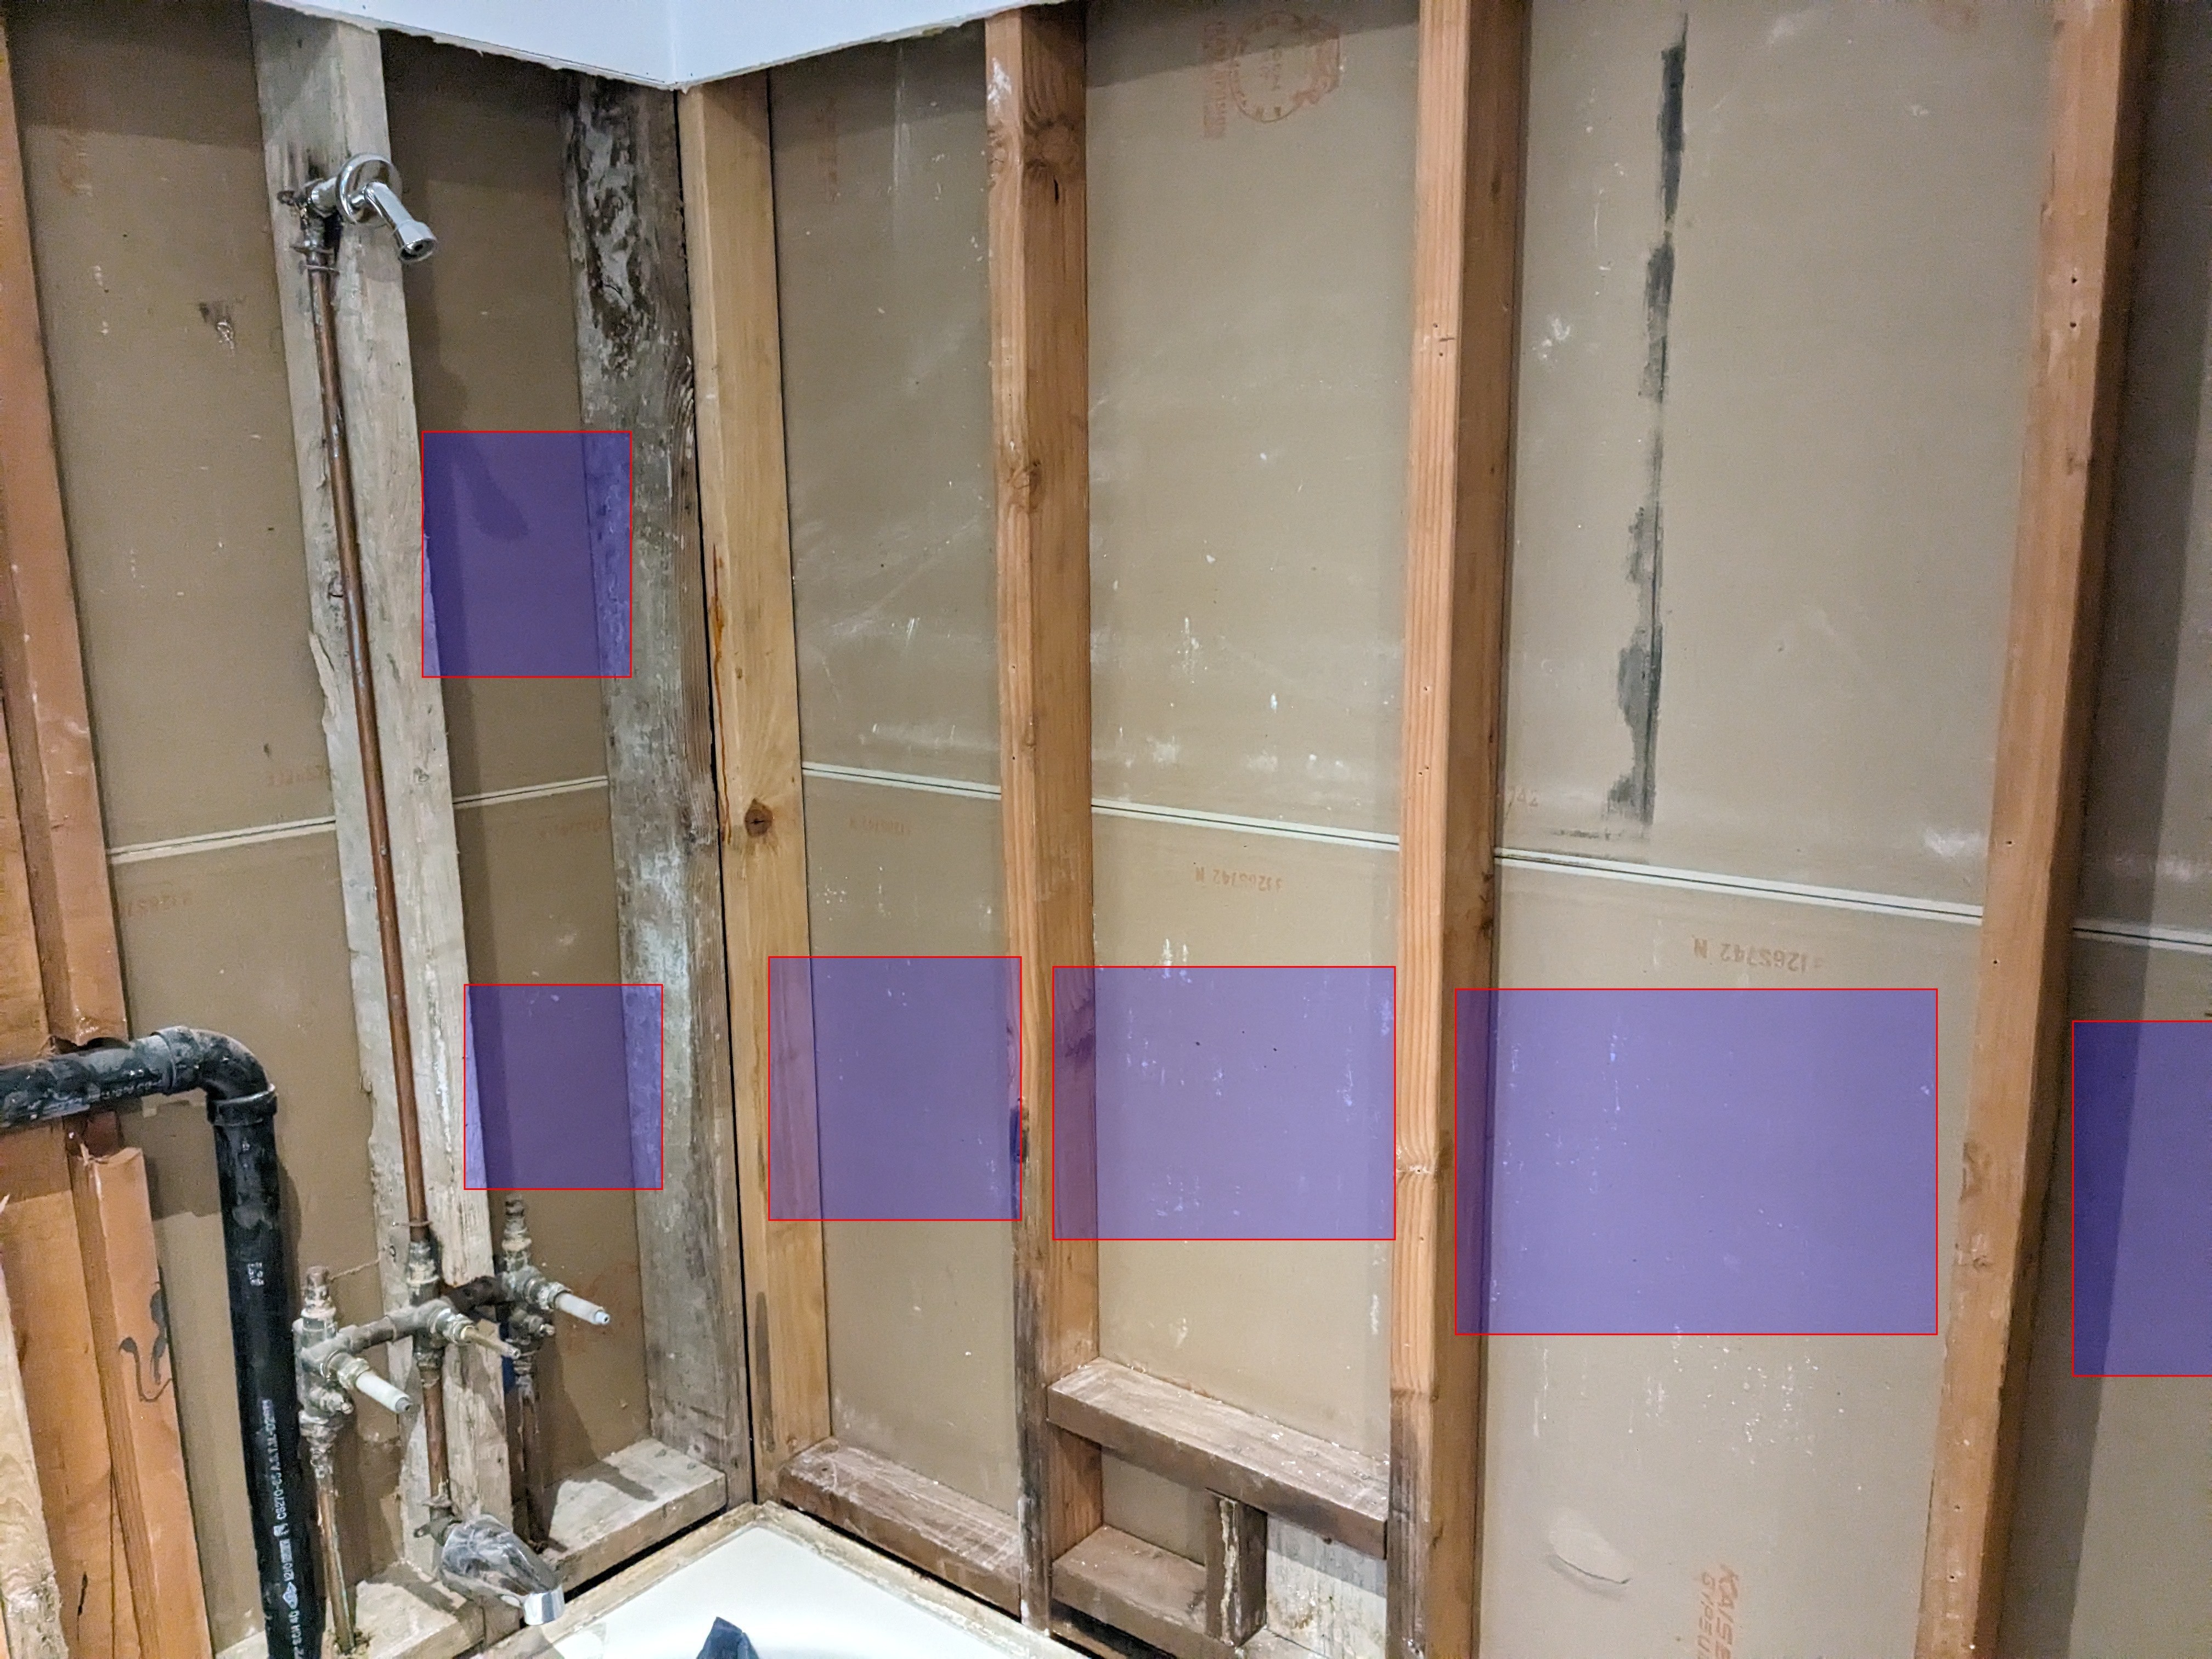
These marked up photos show the idea conceptually, though obviously the little purple blobs are not to scale or accurately placed. You might wonder why I don't just use that outside stud on the right-hand end wall as the blocking. It turns out to be overlapped with the location of the frame for the sliding door. I don't want someone to have to deal with that tight squeeze to install a vertical grab bar.
![]()
![]()
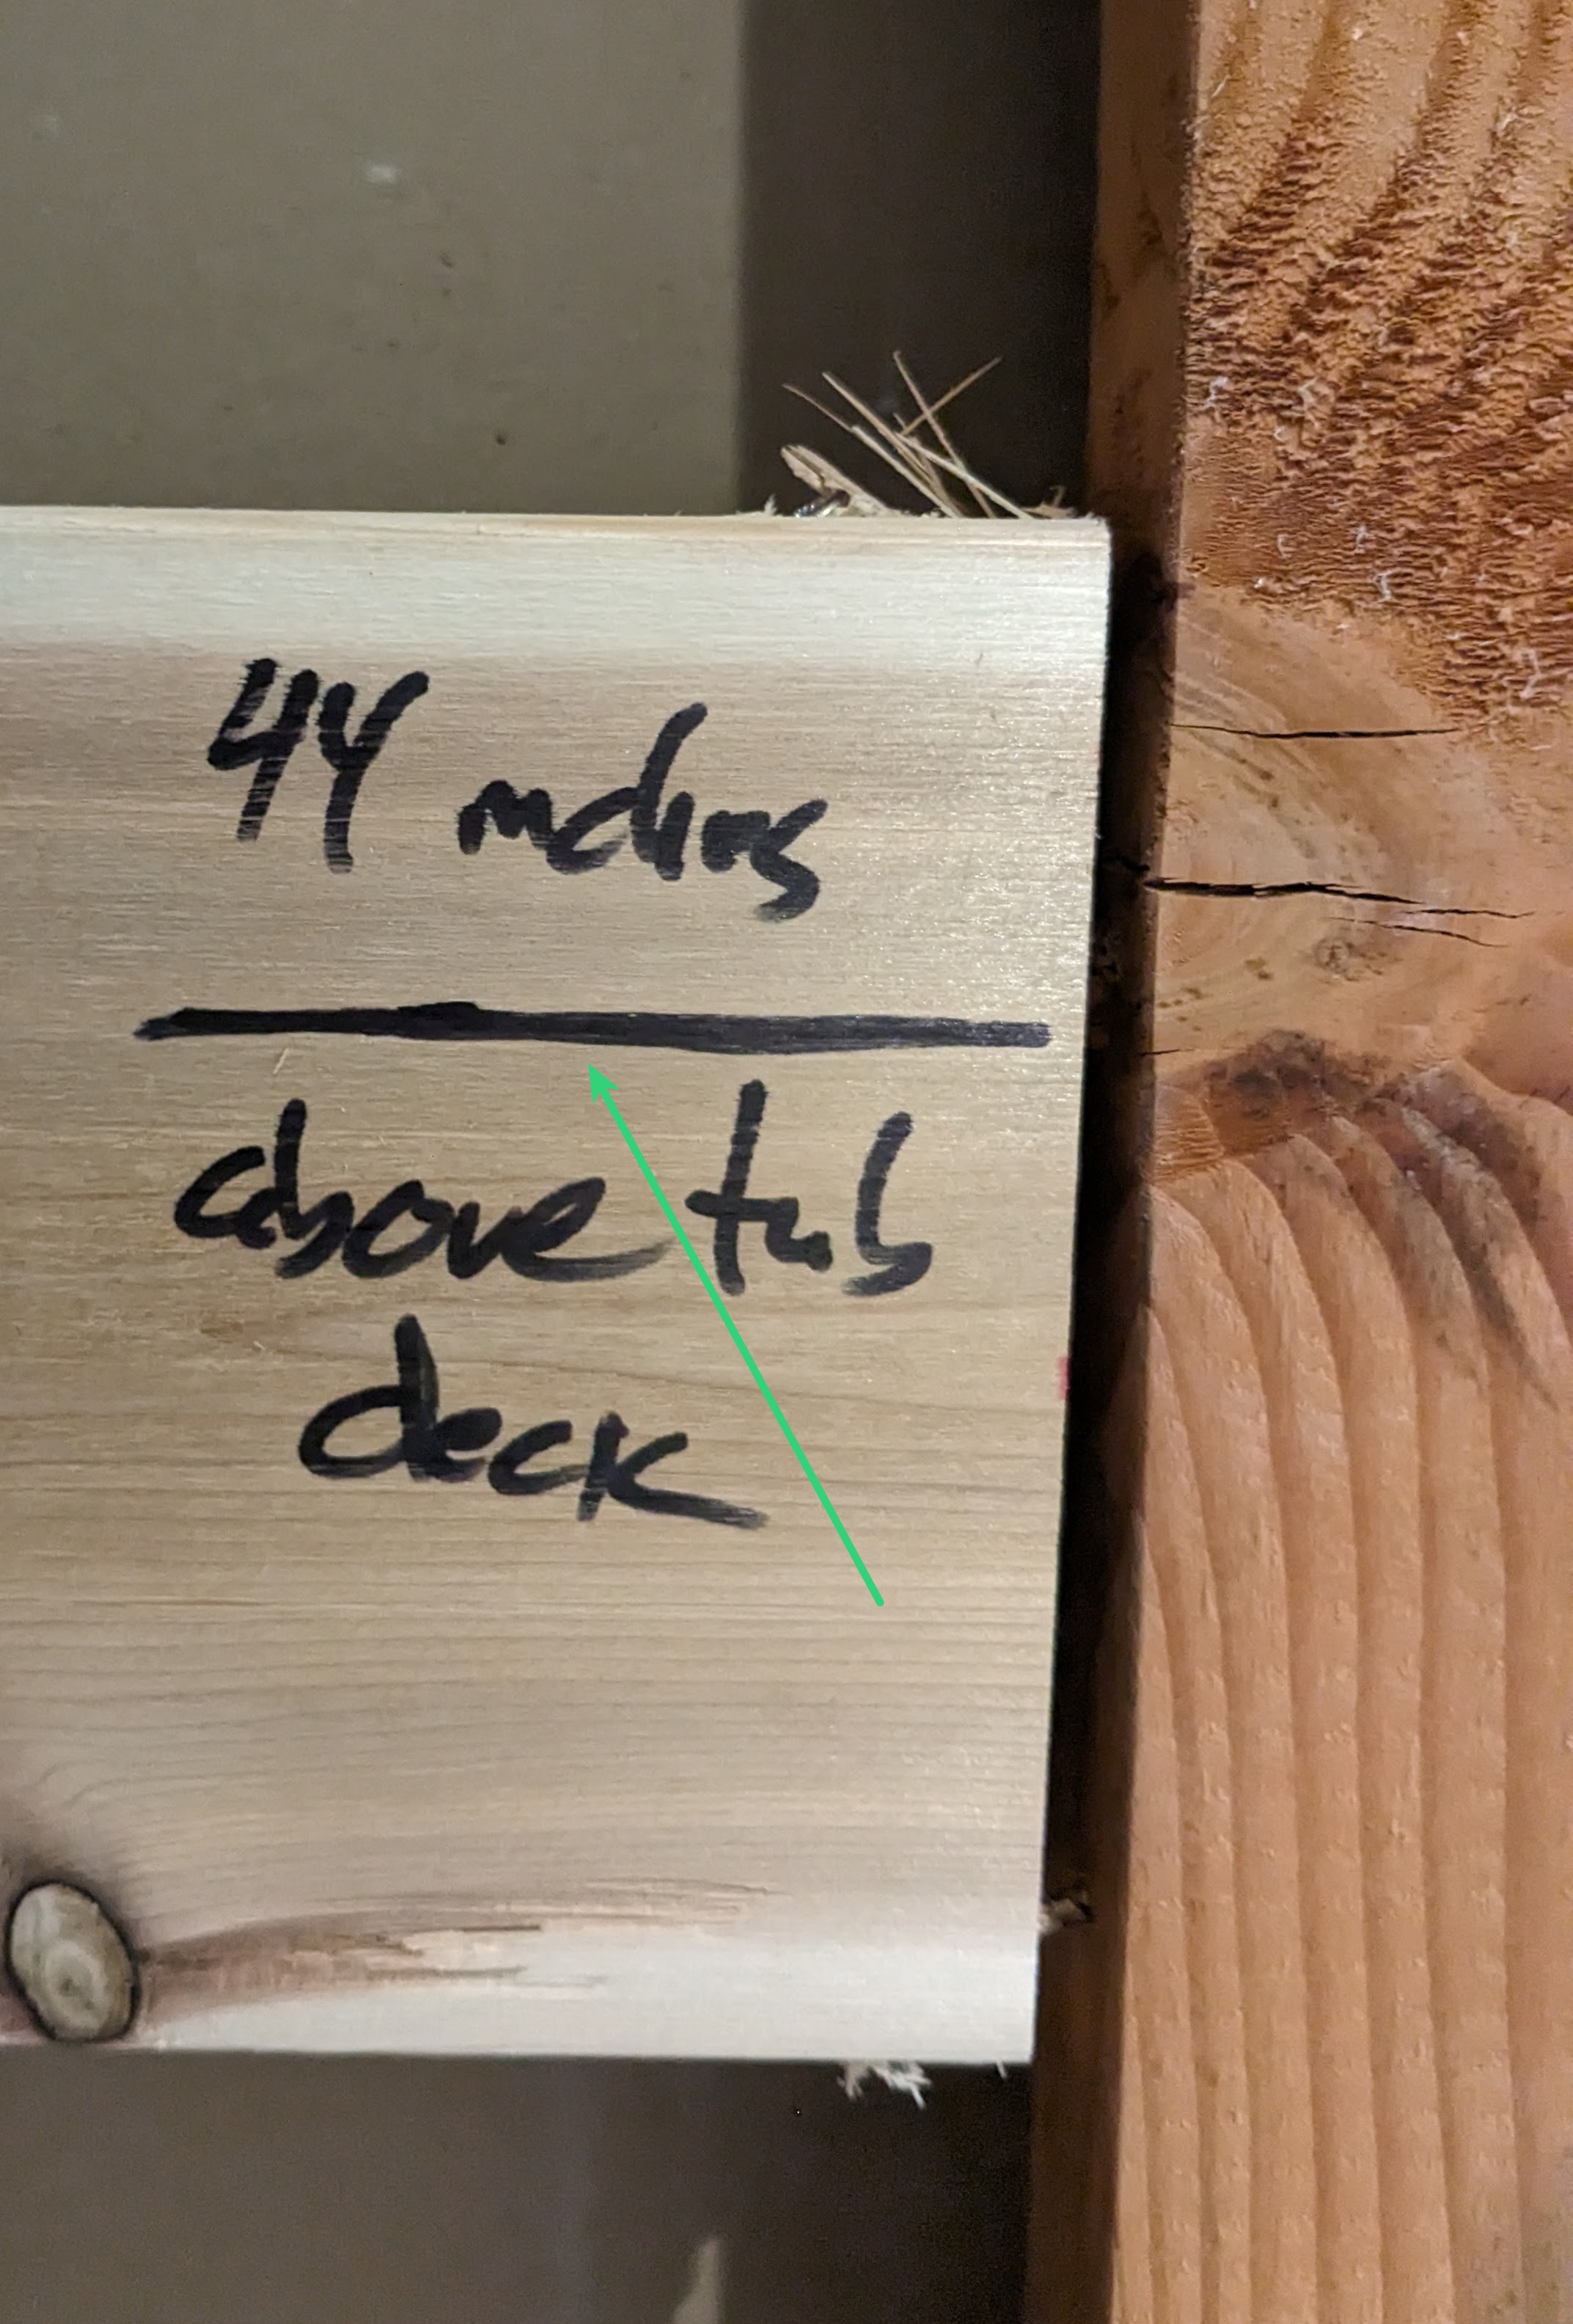
In practice, the placement of the blocking was also not as precise as it could have been. I measured and marked a line from the tub deck on each piece of blocking. The reference lines are at either 44 inches or 20 inches above the tub deck. (The tub deck is the flat top of the tub, not including the vertical nailing flange.) With a picture of it, each piece can be precisely located.
![]()
![]()
I added pictures showing all of the blocking to the project log that consolidates all of the measurements.
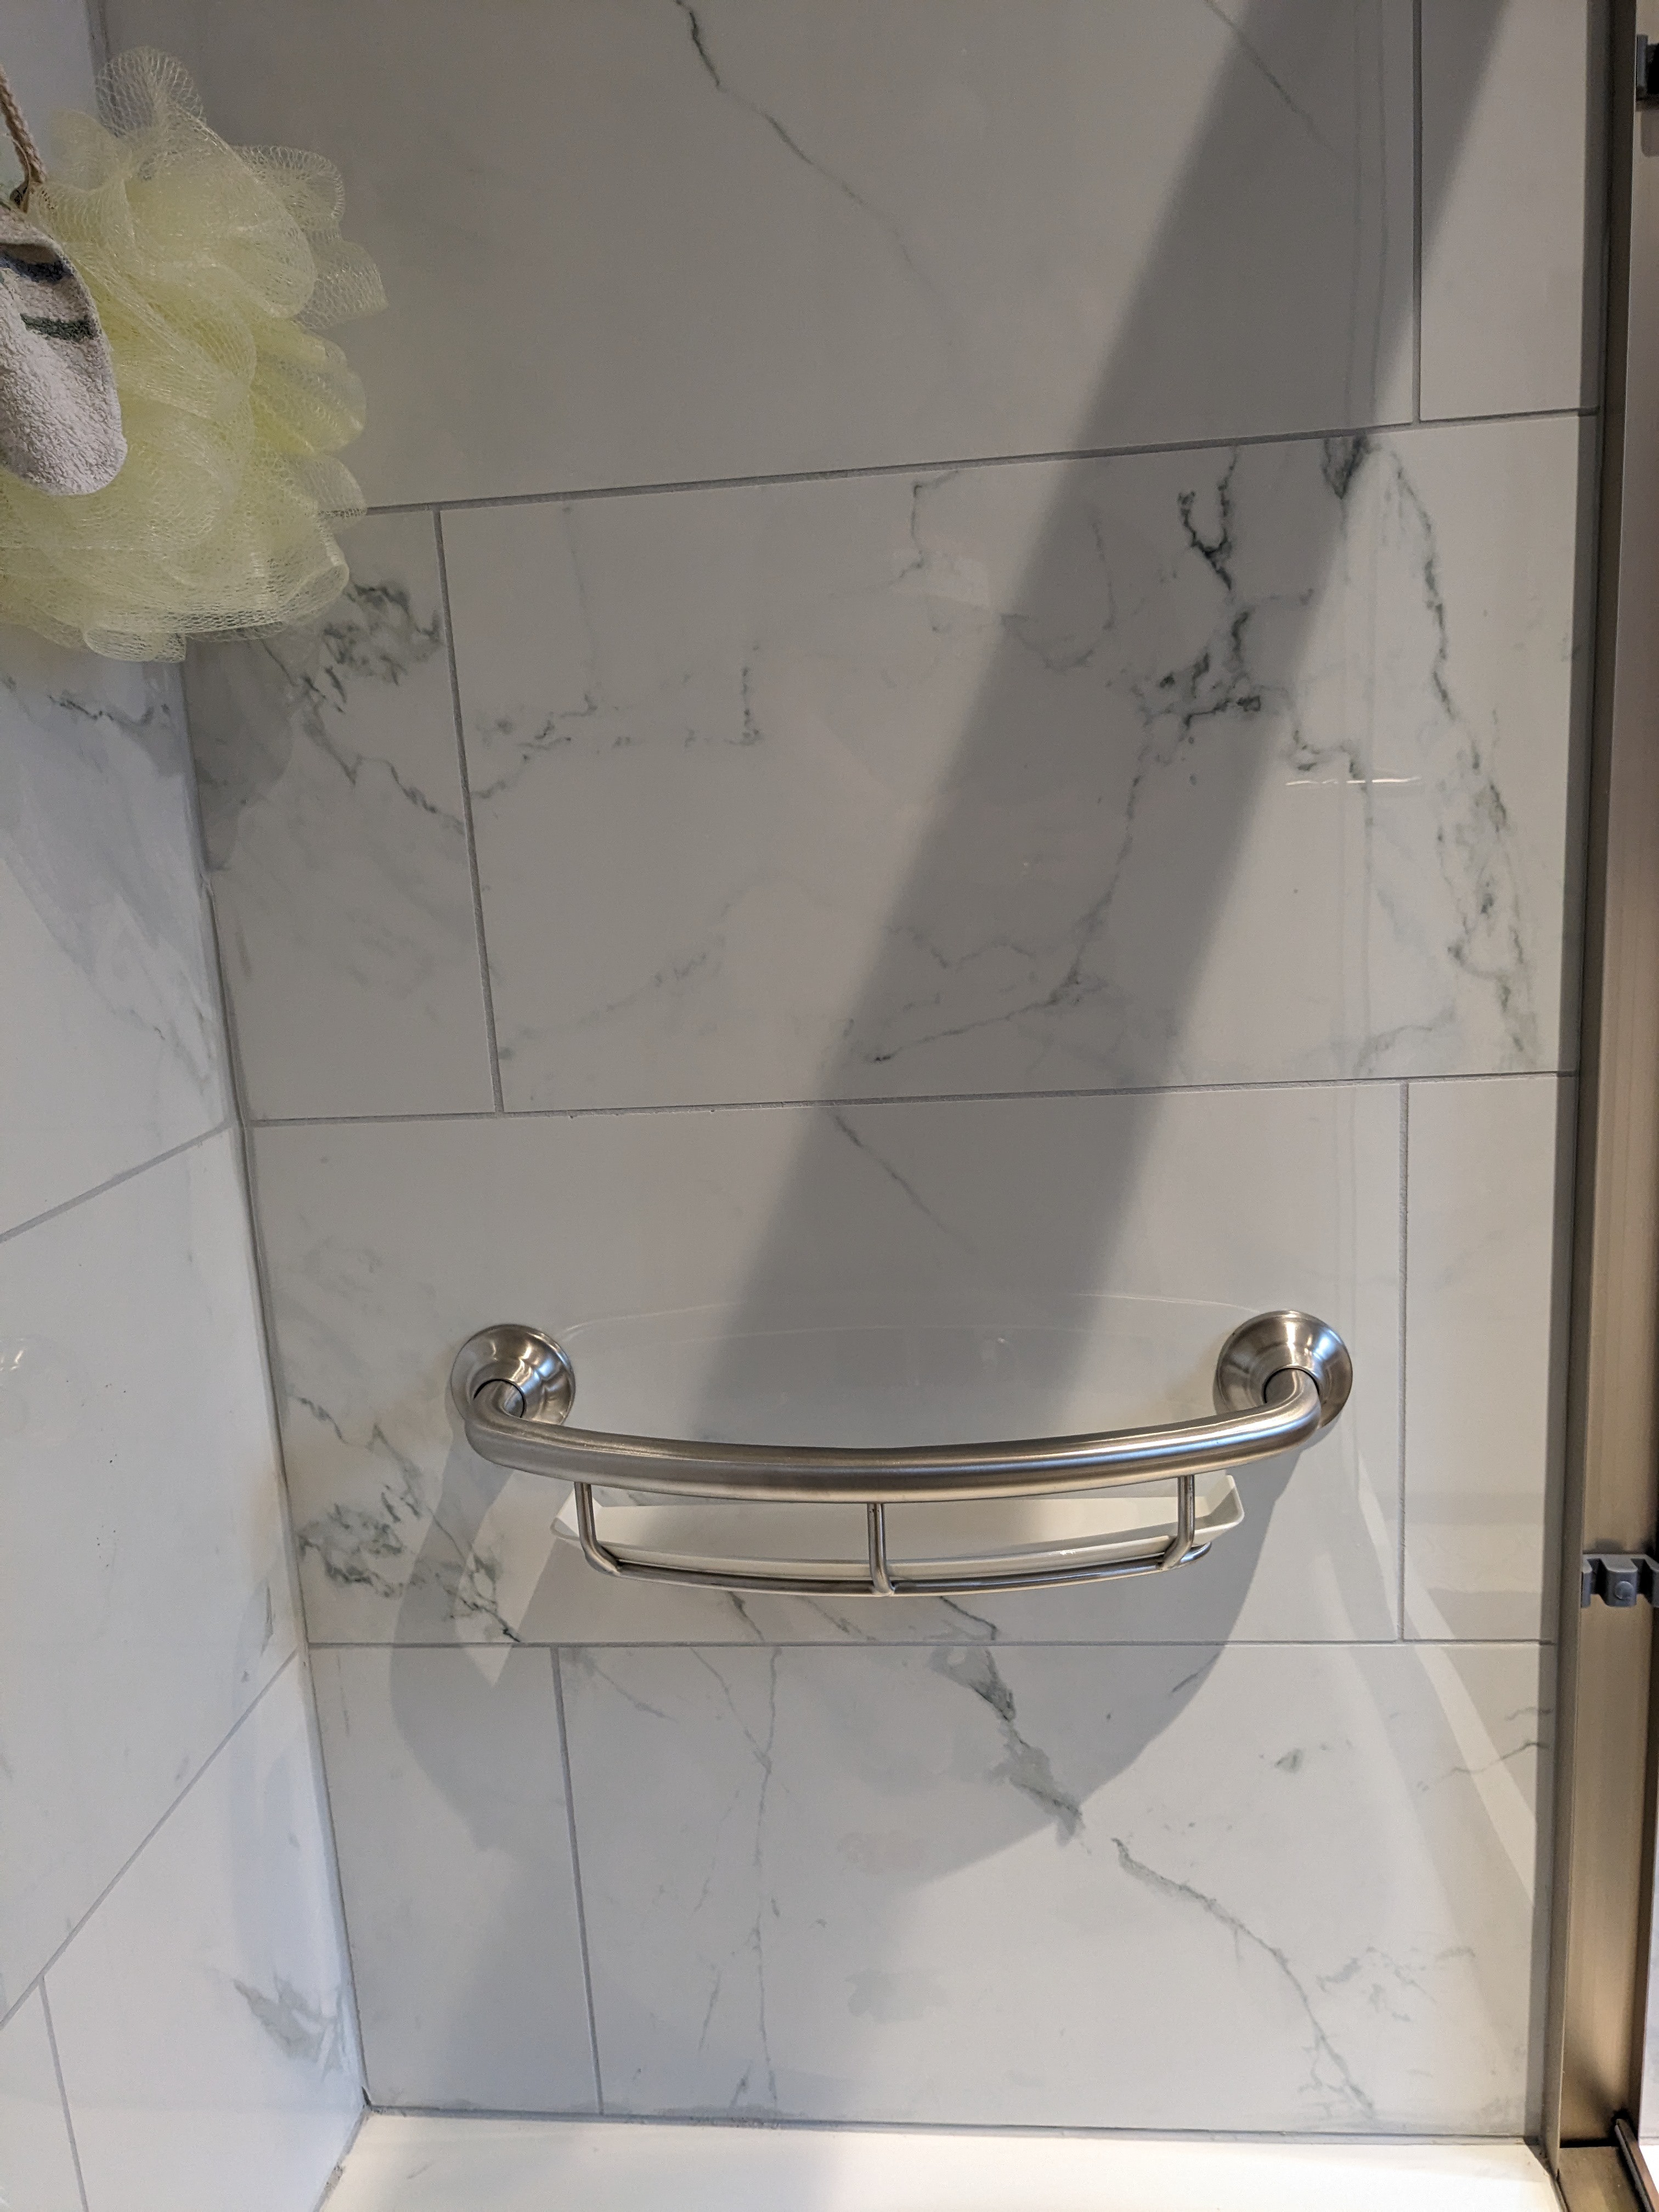
Update: Based on user feedback, I decided to go ahead with installing the grab bars now instead of some nebulous future.
For the right end wall, I found this interesting Brushed Nickel 16" Grab Bar With Shelf by Moen. It was a little pricey, but I really liked the idea and look of it. If I had known about this at the beginning, I might have skipped one or the other of the niches I put in the wall. It's rated at 250 pounds.
![]()
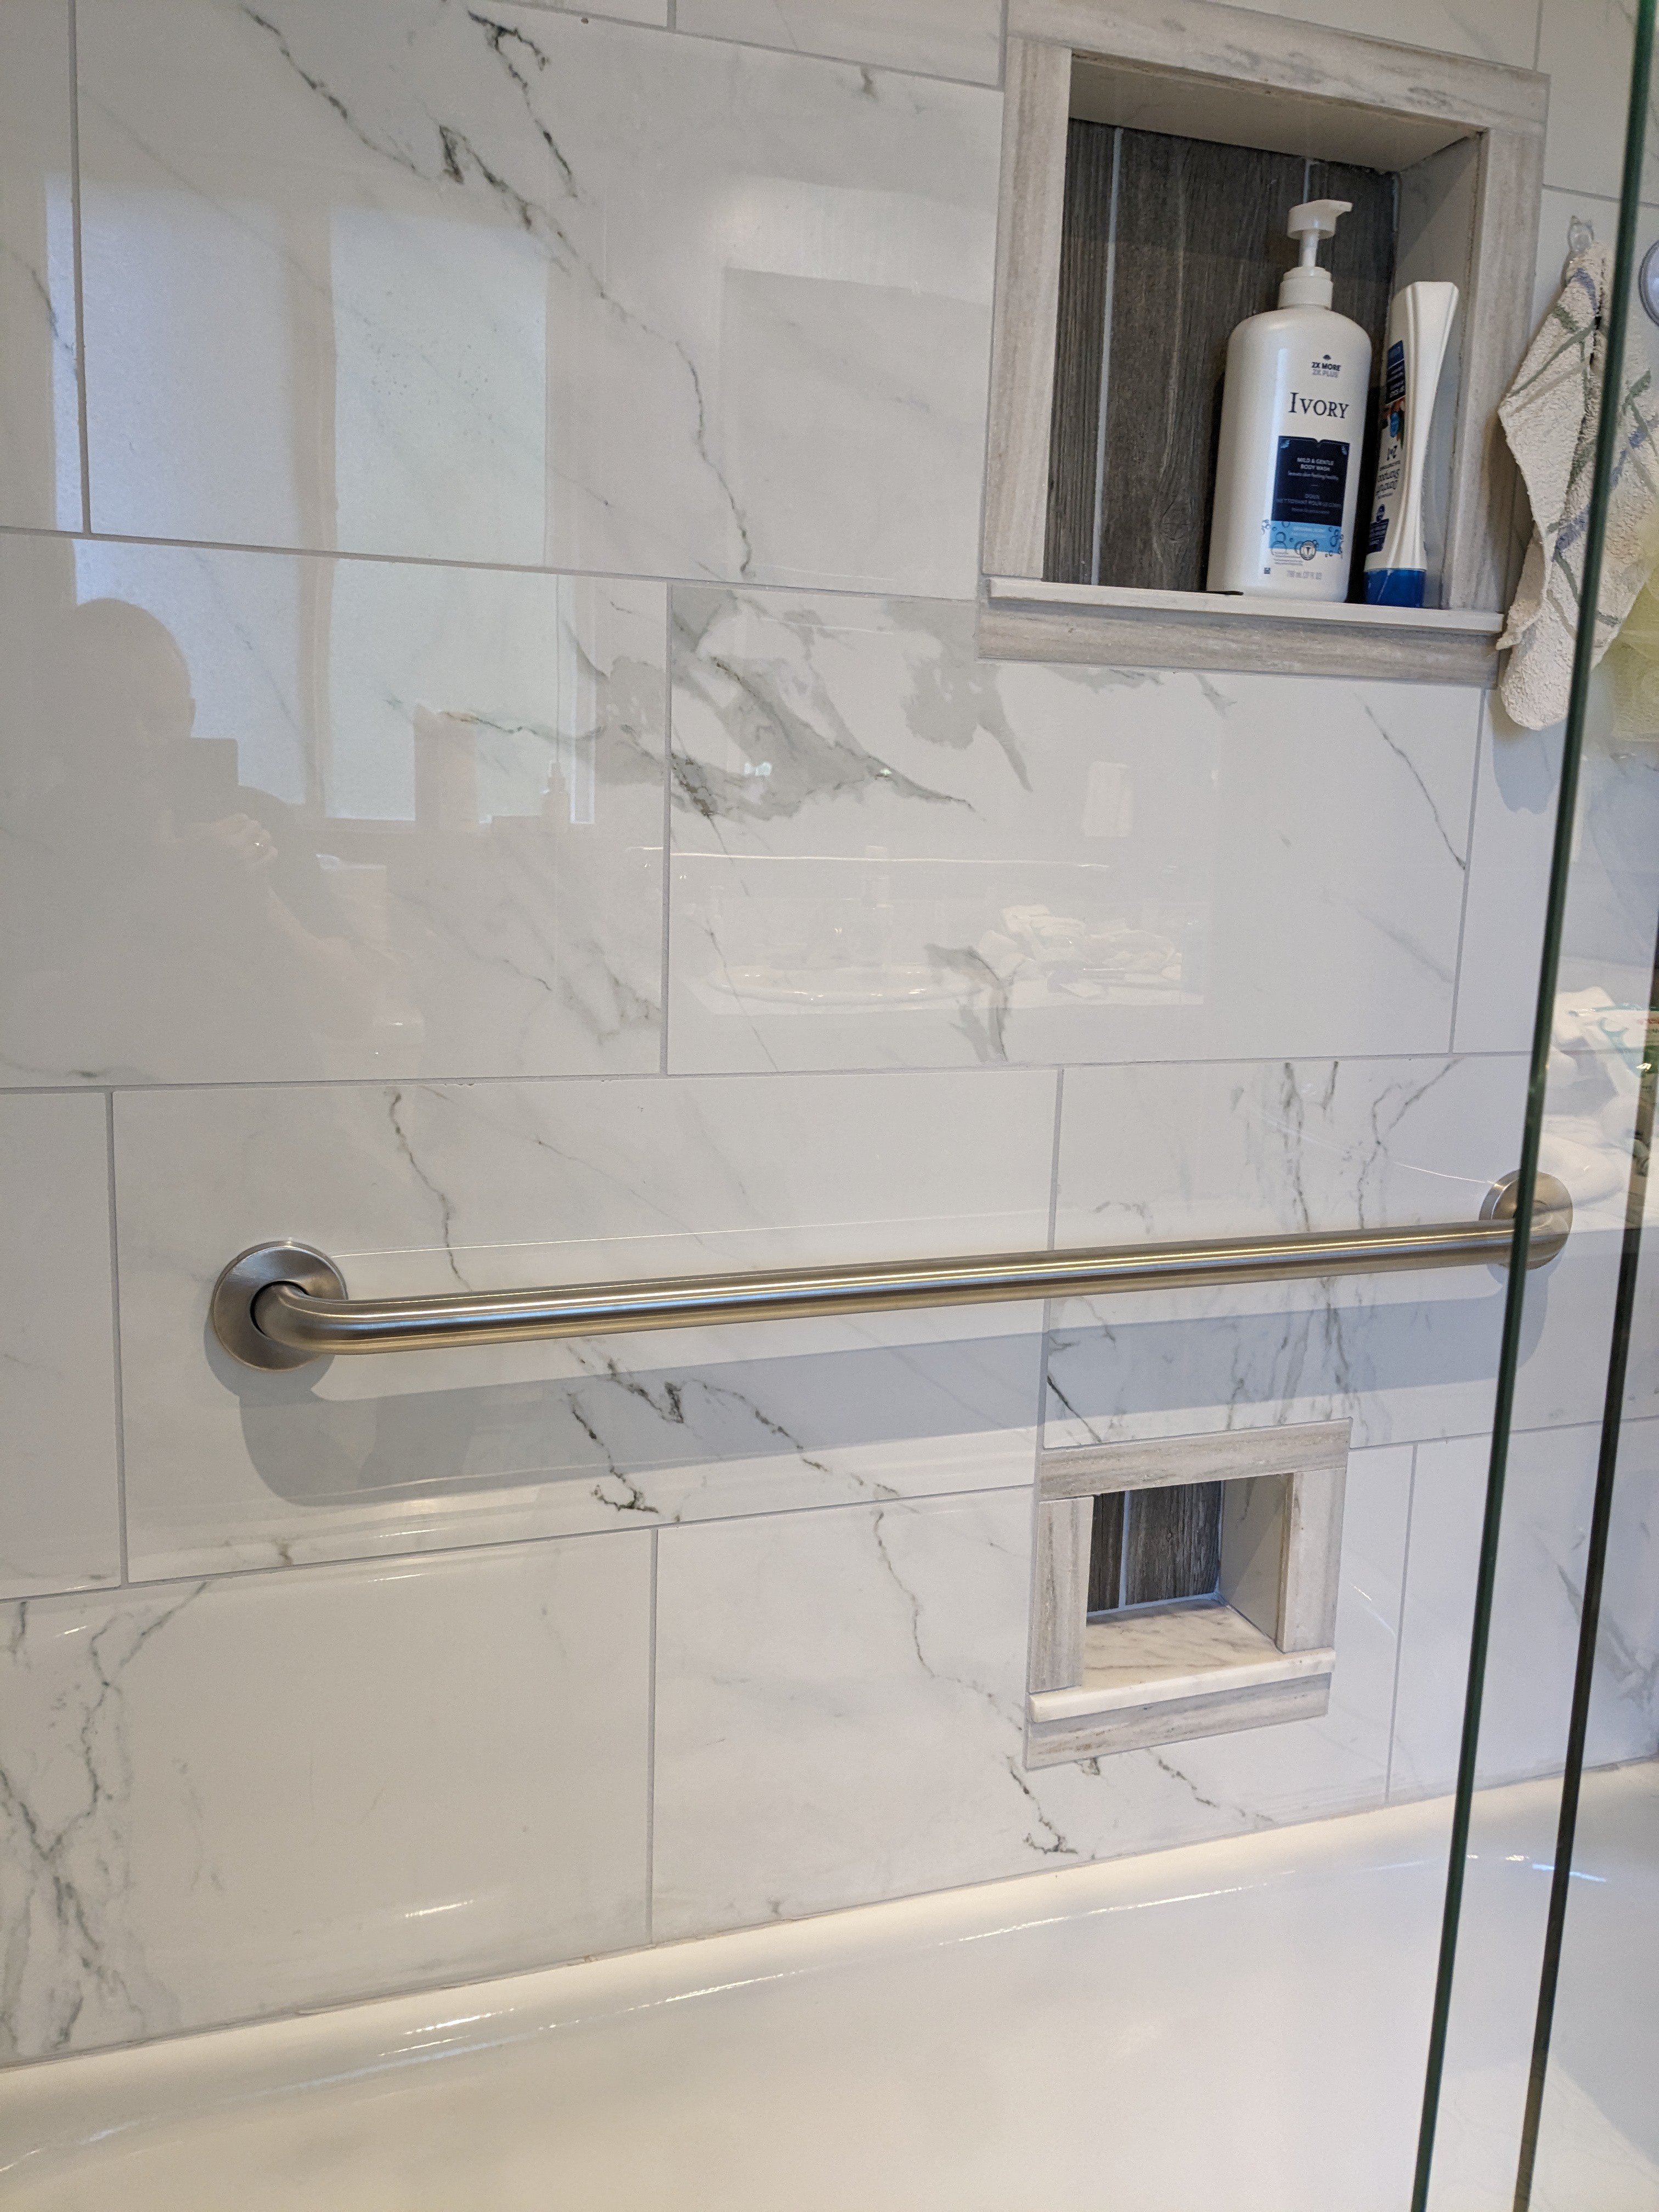
Along the back wall, I put a 36 inch Glacier Bay grab bar. It's stainless steel instead of brushed nickel, but I think it's close enough. It so happened that when I was shopping, Home Depot had some kind of "special buy" pricing for 3 or 5 of them. I bought the 3-pack and will use the other two as towel bars. It's rated at 500 pounds.
![]()
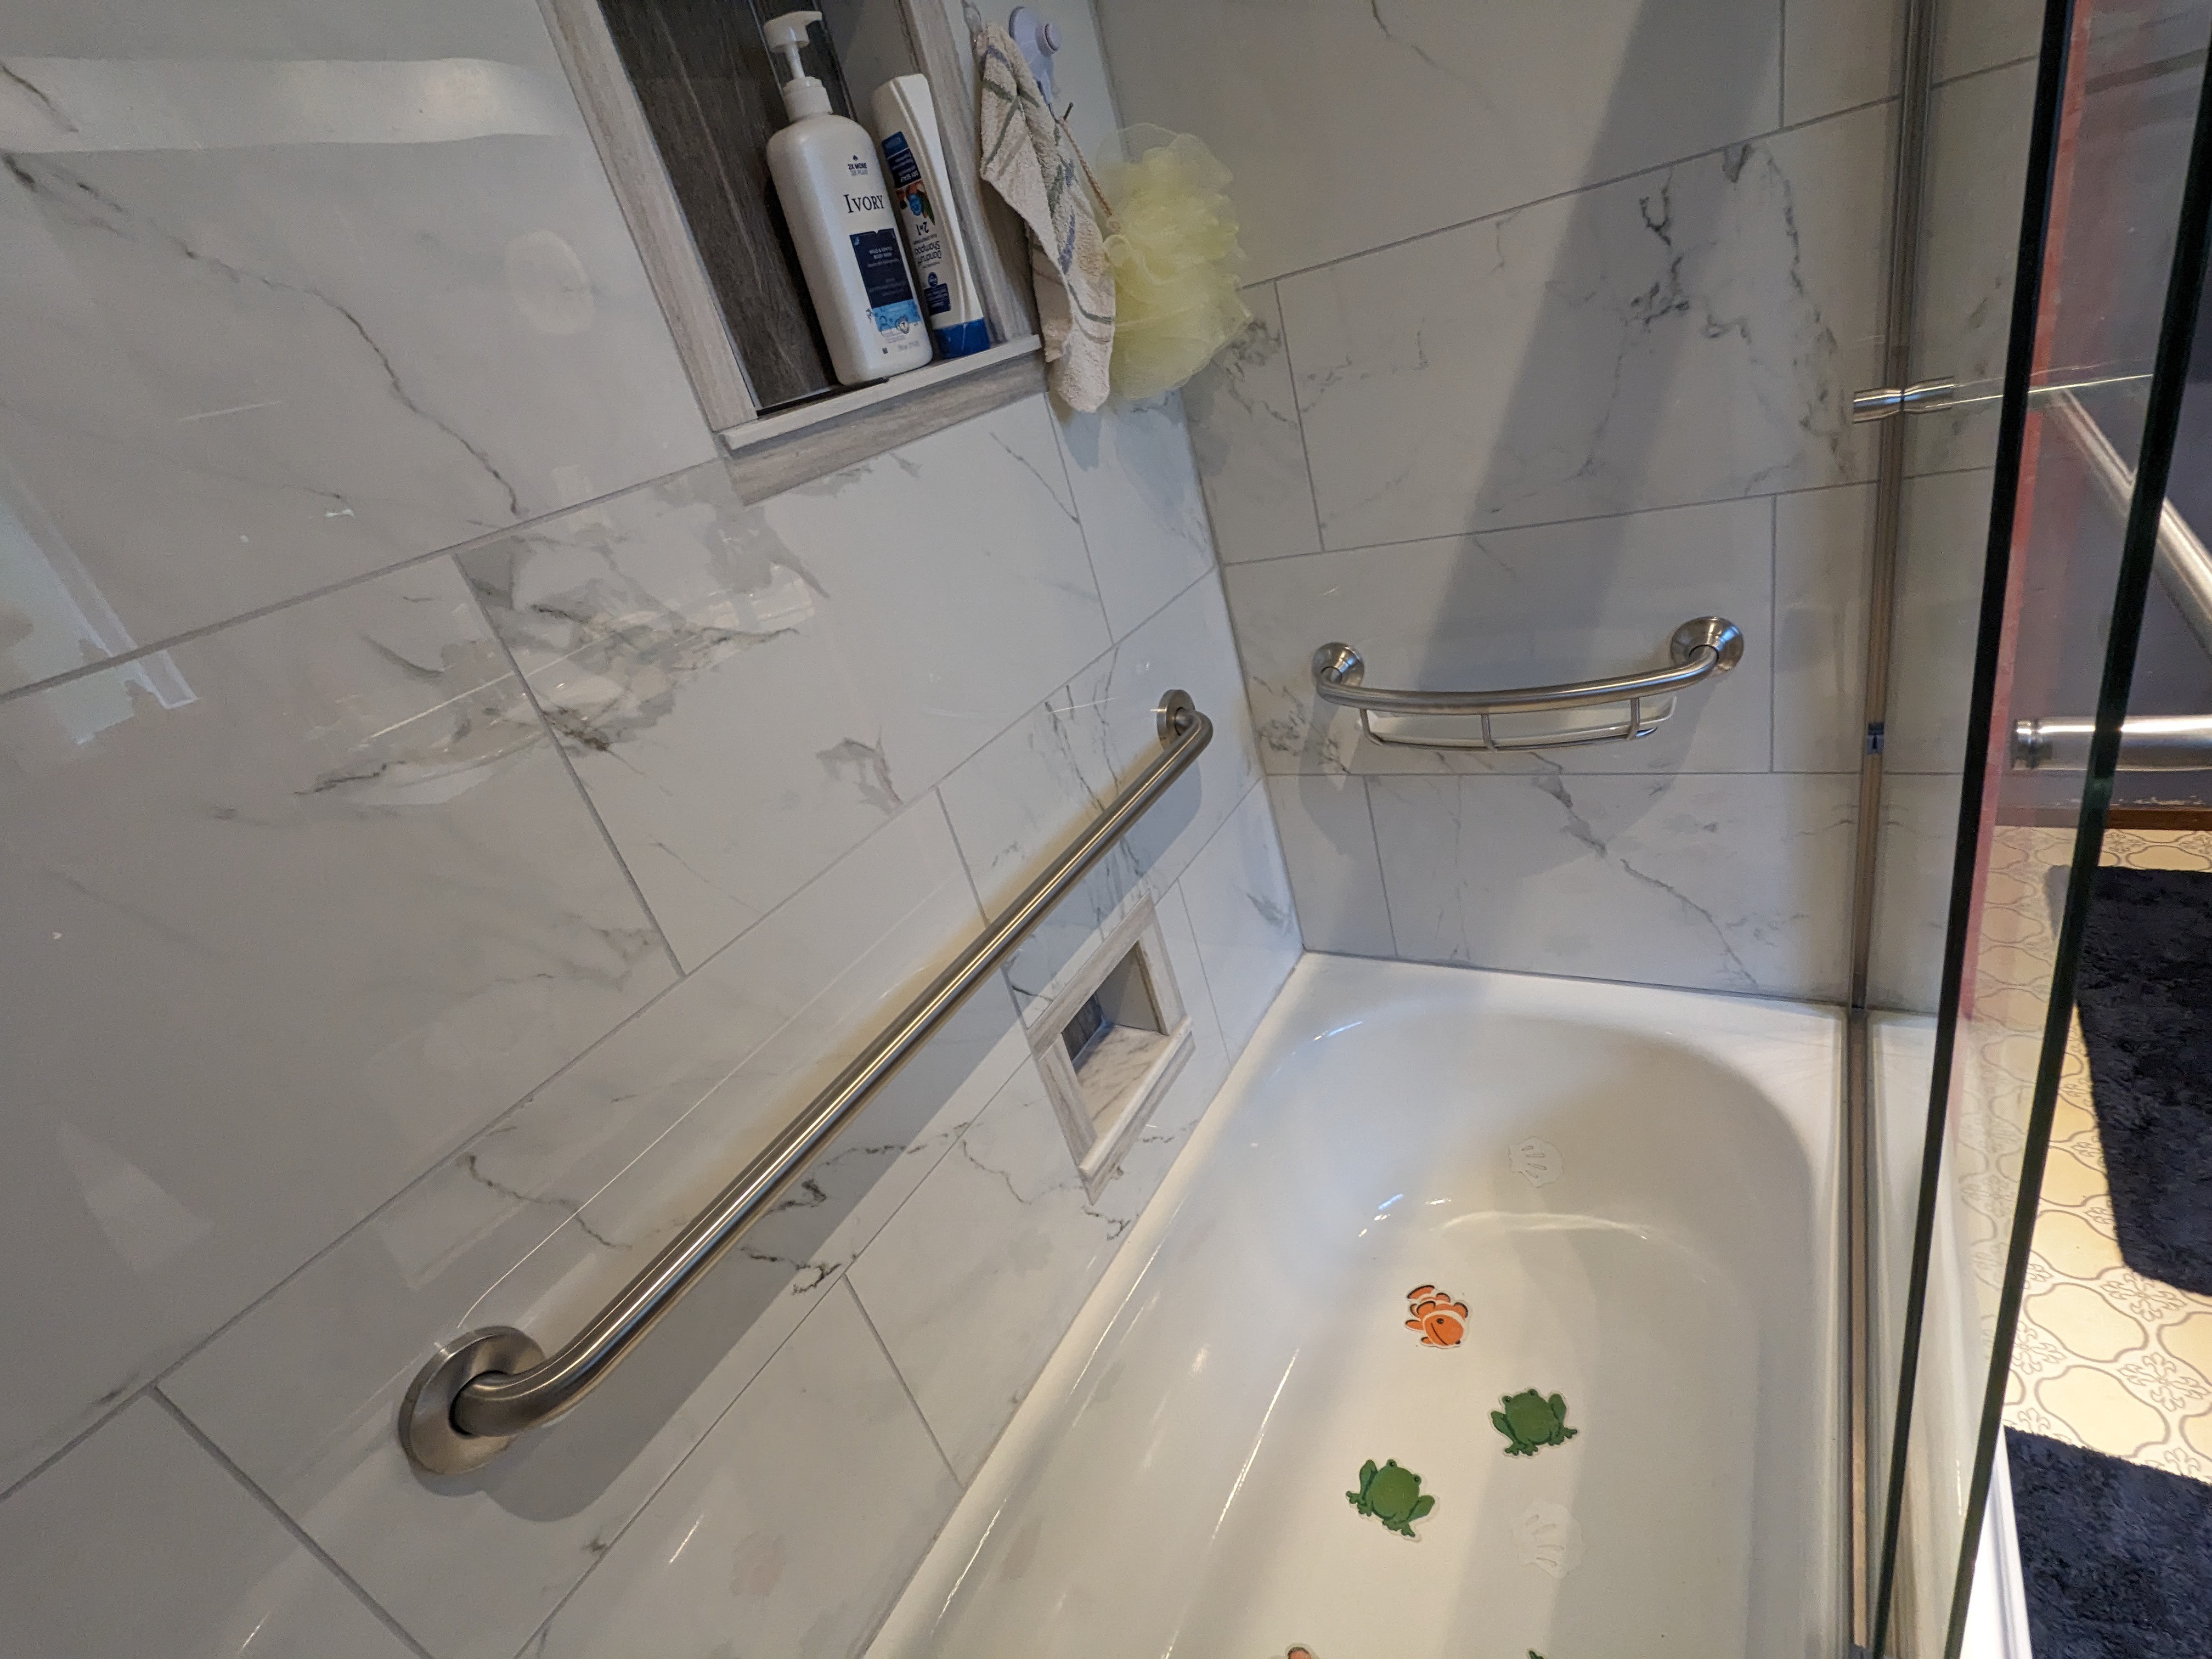
Here's a wider shot showing the two of them together.
![]()
Once again, I got to experience how tough porcelain tile is to drill through. While I was drilling, I had plenty of time to think, and one of the things I thought about was how it would be bad if one of the screw locations happened to be on top of one of the screws for the GoBoard. It was pretty unlikely, except that I had also used those metal washers around those screws. Of the 12 holes, I think I hit one of those washers.
The Tile Job
Adventures of a software guy doing his first bathroom tile re-do.