 akanzler007
There have been many innovations in technology which have changed the world. One of them is Infrared Technology. Now a days, an Infrared technology has a wide variety of wireless applications mostly in object sensing and remote controls.
Today we will talk about Infrared Obstacle Avoidance Sensor Module, its working and how to connect it with Arduino.
Infrared IR Sensor Obstacle Avoidance Sensor board is an inexpensive solution to avoidance detection for robotics, smart car and other electronic uses.

Infrared Obstacle Sensor Module has built in IR transmitter and IR receiver that sends out IR energy and looks for reflected IR energy to detect presence of any obstacle in front of the sensor module. The module has on board potentiometer that lets user adjust detection range. The sensor has very good and stable response even in ambient light or in complete darkness.
The Obstacle Avoidance Sensors usually come in two types – with 3 and 4 pins.
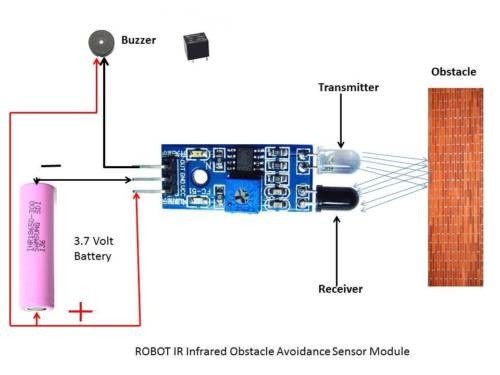
WORKING PRINCIPLE
The IR transmitter sends an infrared signal that, in case of a reflecting surface (e.g. white color), bounces off in some directions including that of the IR receiver that captures the signal detecting the object. When the surface is absorbent the IR signal isn’t reflected and the object cannot be detected by the sensor. This result would occur even if the object is absent.
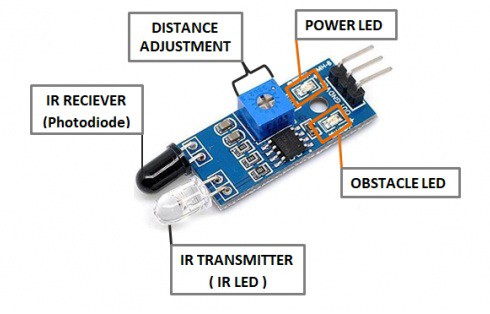
The module has 3 pins – Vcc, GND and the output. We also have 2 LEDs, one is for the power that is it turns ON when it is connected to the power. The other is for the obstacle detection.
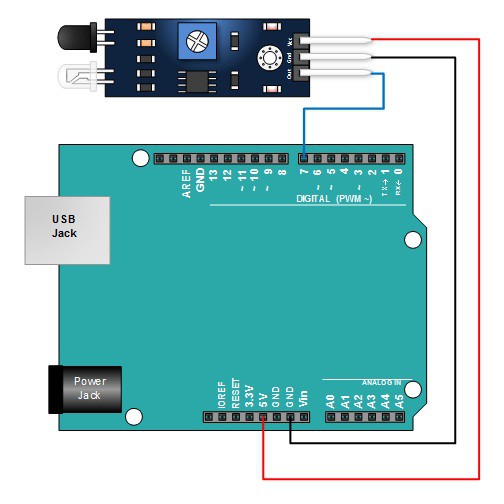
Connections
- Connect the Vcc of the Sensor Module to the Vcc of Arduino Board
- Connect GND of the sensor Module to the GND of the Arduino Board.
- Connect the output pin of the sensor module to pin 7 of the Arduino Board.
- When the Obstacle Avoidance Sensor detects an obstacle, the LED will be on. Otherwise it will be off.
Code
After above operations are completed, connect the Arduino board to your computer using the USB cable. The green power LED (labelled PWR) should go on.Open the Arduino IDE and choose corresponding board type and port type for you project. Then load up the following sketch onto your Arduino.
int LED = 13; // Use the onboard Uno LED
int isObstaclePin = 2; // This is our input pin
int isObstacle = HIGH; // HIGH MEANS NO OBSTACLE
void setup() {
pinMode(LED, OUTPUT);
pinMode(isObstaclePin, INPUT);
Serial.begin(9600);
}
void loop() {
isObstacle = digitalRead(isObstaclePin);
if (isObstacle == LOW)
{
Serial.println("OBSTACLE!!, OBSTACLE!!");
digitalWrite(LED, HIGH);
}
else
{
Serial.println("clear");
digitalWrite(LED, LOW);
}
delay(200);
}
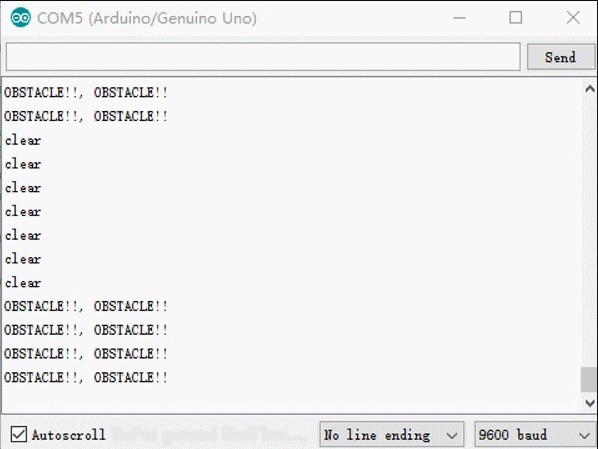
A few seconds after the upload finishes, place a board in front of the Obstacle Avoidance Sensor, and the LED attached to pin 7 on the Arduino Uno board will light up, the on-board obstacle led will turn on. It will turn off when there is no obstacle.
At the same time, choose the corresponding port type for you arduino board and open the Serial Monitor of the Arduino IDE, make sure the baudrate is same as your code, move the obstacle in front of the Obstacle Avoidance Sensor, you will see the serial output as below:
Thus using an Arduino and an Obstacle Avoidance sensor for your Smart cars, robots etc. and make your respective project successful.
For getting an IR Infrared Obstacle Avoidance Sensor Click Here.
To explore more such exciting sensors Click Here
Discussions
Become a Hackaday.io Member
Create an account to leave a comment. Already have an account? Log In.