Close
0%
0%

Automatic Infinite 3D Printer

The Automatic Infinite 3D Printer (i3D) gives anyone the power of a factory.

Similar projects worth following
Latest Build: https://youtu.be/gruBm8ppwgY

3D printing has the potential to democratize manufacturing. Since 3D printers are easy to use and low cost, they allow anyone to make incredibly complex things. I'm confident that anyone reading this has seen something cool made on a low cost hobby grade 3D printer. The technology has opened up new doors to makers and hackers.

However the capabilities of 3D printers are limited by requirement of human operation. The need of manual part removal prevents 3D printers from being used for mass production purposes. Therefore, the purpose of this project is to build a fully autonomous 3D printer. A 3D printer that can print a continuous stream of parts without user interaction. The finished machine is capable of independently ejecting and starting print jobs. Additional, the 3D printer's conveyor belt mechanism allows it make infinitely long prints.

**Latest build video**

Documentation: https://hackaday.io/project/183821-build-a-conveyor-belt-3d-printer-openbelt

**NOTE: If you are  hoping to get a quick overview of this project, please watch the videos list under Figure 1, Figure 2, and  Figure 3.

[Figure 1: Demo of Automatic Infinite 3D Printer Mk. IV]

[Figure 2: Demo of Automatic Infinite 3D Printer Mk III]

[Figure 3: Purpose of Project with Automatic Infinite 3D Printer Mk III]

The Problem

Even though 3D printing is a newly emerging technology, it has rapidly became mainstream in education, manufacturing and many other industries. 3D printers allow anyone to easily produce complex parts.

However, these machines have one critical flaw. After a 3D printer has finished printing a part, a person must physically go to the printer and remove the part from the print bed. A 3D printer cannot start its next print job, until the previous part is removed. This constraint cripples the productivity of 3D printers. If 3D printers could automatically eject their print jobs, then they could print out a constant stream of parts. The efficiency of the machine would drastically increase.

Many businesses already use 3D printers to manufacture products. Currently, their manufacturing capabilities are constrained by the need to manually remove/start print jobs. If this task was automated, it would be easier for more companies to complete volume manufacturing with 3D printers.

Personally, I work in a 3D printing lab that prints hundreds of parts for my fellow university students. From my position, it is obvious that this constraint significantly limits the number of print jobs our lab can complete per day.

[Figure 4: Problem Pitch Video]

The Solution

The purpose of this project is to build a fully automated 3D Printer: The Automatic Infinite 3D Printer. The Automatic Infinite 3D Printer has a conveyor belt module that autonomously ejects finished print jobs from the printer. With this novel feature, the 3D Printer is able to print a constant stream of print jobs without human intervention. This is a breakthrough for the 3D printing industry. Automatic part ejection will improve the functionality and capability of 3D printers. Within the next decade, autonomous part ejectors will be as ubiquitous to 3D printers as paper ejectors are to paper printers. 

Furthermore, the custom conveyor belt allows users to print infinitely in the y axis. This allows users to make a much wider variety of parts. The Automatic Infinite 3D Printer monitors print jobs with a computer vision program and a series of webcams. In the unlikely event that a print jobs fails, the machine will autonomously eject the failed print and restart the job. 

I have built four successful prototypes of the Automatic Infinite 3D Printer (Mk. I, Mk. II, Mk. III, Mk. IV). The features of Mk. IV are detailed below. Mk I, Mk II, and Mk III are discussed in the Previous Prototypes section.

Build Hope

Over the past few years, people around the world have been empowered by rapid prototyping. Affordable CNC machines, allow anyone to easily put together a prototype. All of the cool hardware recently developed by makers, students, and startups is only possible because of easy access to these powerful machines. However, mass production still remain out of the reach of most people. Currently, makers can only mass produce by placing an order in an overseas factory. This process is expensive, time consuming and prone to error.

Building an affordable automatic 3D printer will open up whole new doors to hackers. An automatic 3D printer will allow any to wield the power of a factory. Once automatic 3D printers become mainstream, conveyor belt lines will not be exclusive to large companies. The technology will truly be democratized. Providing this tool to DIY enthusiasts will once again allow them to make amazing things.

This...

Read more »

MK_IV_ASS.stp

Mk IV Assembly Step File

stp - 6.32 MB - 10/22/2018 at 12:41

Download

WORKHORSE_MK3.stp

Mk III Assembly Step File

stp - 3.30 MB - 07/19/2018 at 23:20

Download

  • 6 × NEMA Stepper Motors
  • 1 × Arduino Mega
  • 1 × 24 V E3D V6 Hotend
  • 1 × 24 V PSU
  • 50 × M5 T Slot Nuts

View all 17 components

  • The definitive, complete, sanctimonious guide on...

    Swaleh Owais02/03/2022 at 16:16 0 comments

    Made a video that fully summarizes conveyor belt 3D printing, enjoy! 

    Let me know what you think of the new design.

  • After three years.....AN UPDATE!

    Swaleh Owais11/20/2021 at 01:02 0 comments

    Hey Hackaday, it's a been a while!

    After a long time, I have decided to revisit my conveyor belt 3D printer project. Over the past few months, I have completed redesigned and rebuilt a brand new conveyor belt 3D printer. Here are some brief demos.

    When designing this conveyor belt 3D printer, my goal was to make it extremely easy for other makers/hackers to replicate the machine. That way the community can work together to iterate upon conveyor belt 3D printers and move the technology forwards. I am currently cleaning up the CAD and plan on posting it to GrabCAD soon.

    [Render of new conveyor belt 3D printer]

    If there is enough interest, I can also make a tutorial video explaining how to build a conveyor belt 3D printer. 

    Let me know if that is something you guys would like!

  • New Design Iteration

    Swaleh Owais10/22/2018 at 12:31 1 comment

    Here is the fourth iteration of the Automatic Infinite 3D Printer. 

    In future iterations, I hope to explore computer vision applications that automate 3D printing.

  • Testing Automatic Ejection

    Swaleh Owais05/29/2018 at 01:11 0 comments

    [3D Printer Automatically Ejecting Print Job]

  • Test Print with WorkHorse 3D Printer Mk. 3

    Swaleh Owais05/25/2018 at 05:18 0 comments

    I have managed to print quite a few parts with the integrated conveyor belt. Next up, I'll tinker with the infinite build capabilities.

  • Ejecting Parts from WorkHorse 3D Printer Mk. 3

    Swaleh Owais05/23/2018 at 05:51 1 comment

    I have finished making the belt of the WorkHorse 3D Printer and I ran a few quick 3D printing tests.

    I need to make multiple adjustments to the firmware to finalize the machine. For example, the y axis movement is not proportional. The printed object should be circular.

    I would also like to give  a shoutout to the Deltesian project. The Deltesian is an open source 3D printer designed by a crew of extremely knowledgeable and friendly hackers. I've spent a lot of time communicating with the team on advice and queries about 3D printing.

    https://github.com/bornity/deltesian-part-files

  • WorkHorse 3D Printer Mk. 3: Mechanical Construction

    Swaleh Owais05/17/2018 at 01:24 0 comments

    I have finished building most of the WorkHorse 3D Printer.

    I have a solid frame to test this design with. The last major component to build is the belt. 

    The next steps involve me making new firmware for the 3D Printer and then testing:)

  • CAD of WorkHorse 3D Printer Mk 3

    Swaleh Owais04/28/2018 at 17:39 0 comments

    I have finished a rough CAD mock up of my third prototype autonomous 3D printer.

    [Figure 1: WorkHorse 3D Printer Mk. 3 Rough CAD]

    The printer features a hybrid delta-conveyor belt design. The linkage system provides the X and Z Axes movement and the Conveyor Belt provides the Y Axes movement. The design change greatly reduces the complexity of the mechanism.

    I plan to allow the printer to print at an angle to provide infinite build volume functionality.

    A common aspiration of open source 3D printers is to be able to print all the components required for a printer. This allows the machine to be self replicating. With the new prototype 3D printer, hackers will finally be able to print long structural extrusion pieces.

    Image result for long aluminium extrusion
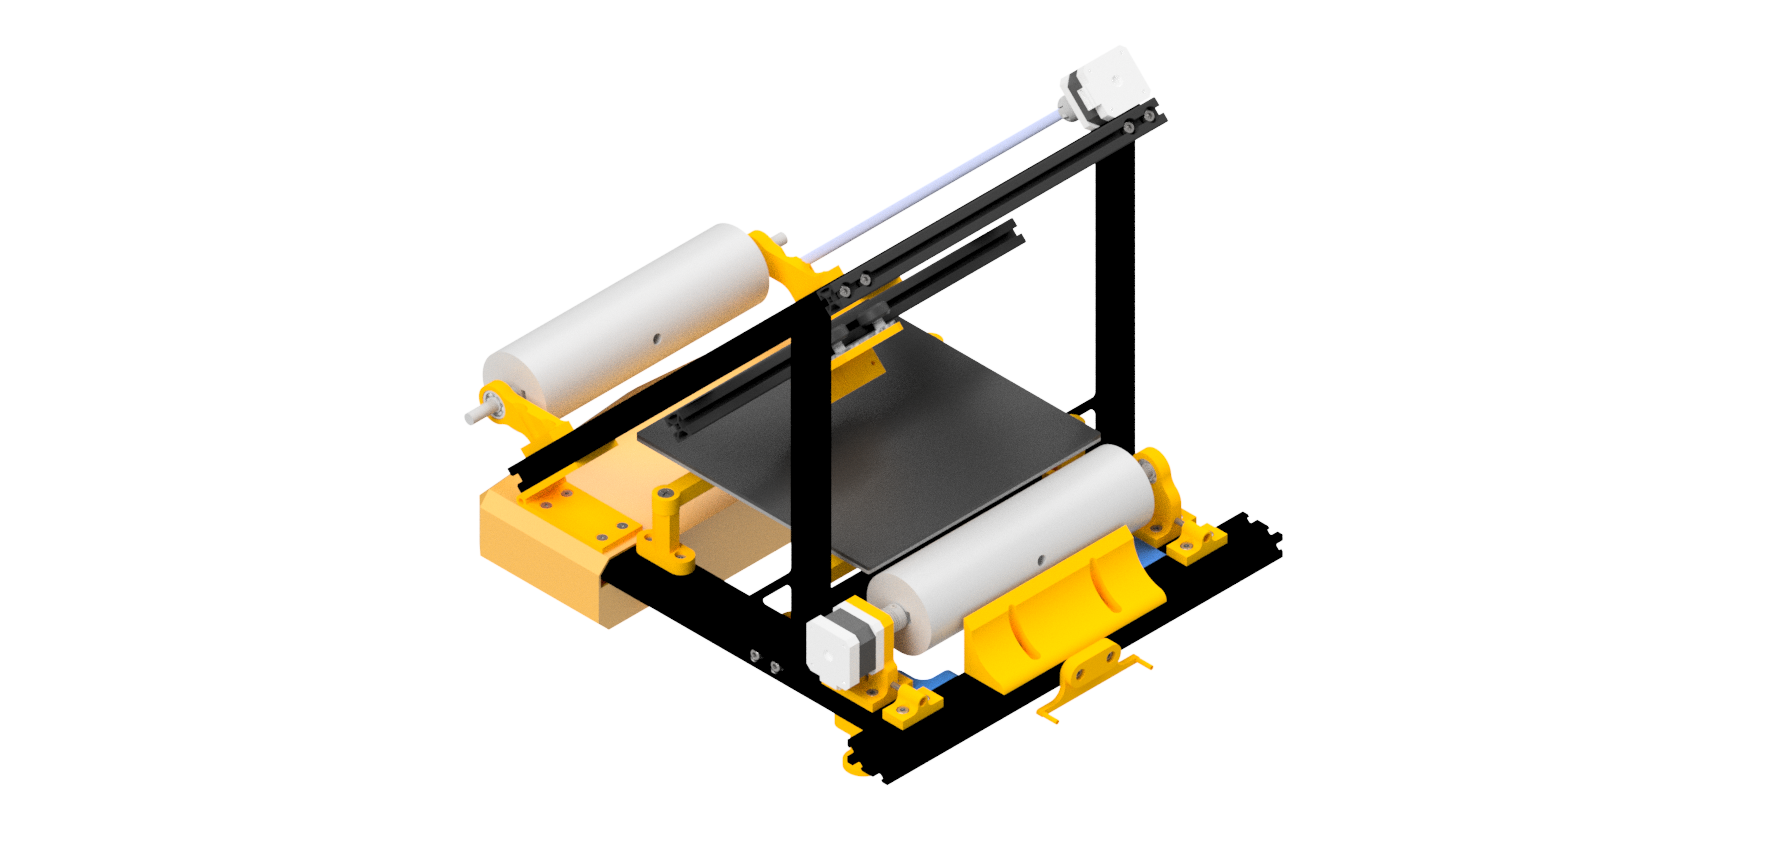
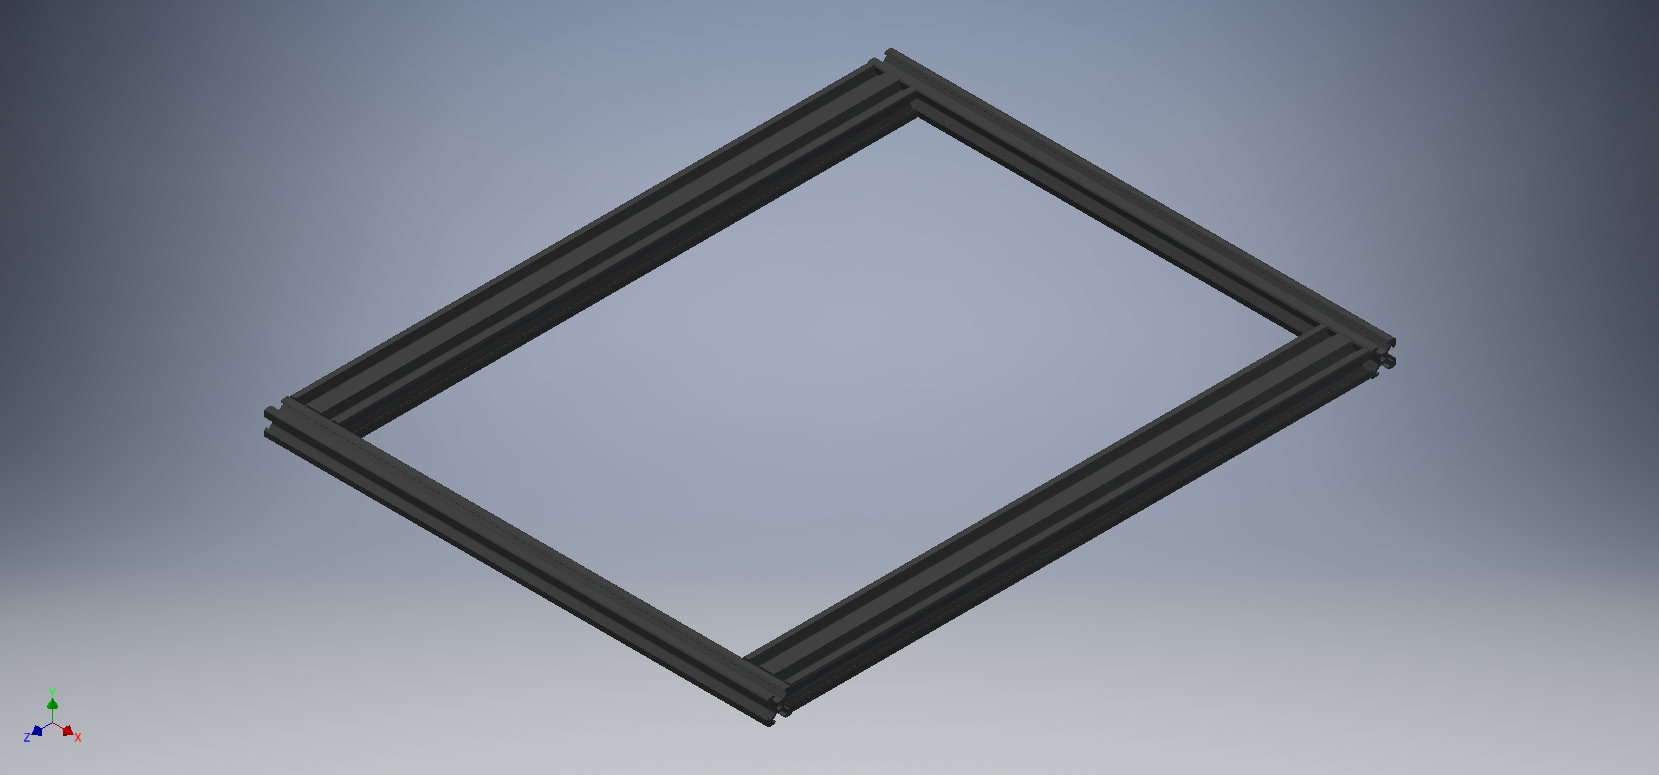
[Figure 2: Prototype Should be Able to Print Structural Pieces as Seen Above]

    References

    [2]RoverCNC. (2017). V-Rail Aluminium. Barrier, Ontario. [Electronic]. Available: www.rovercnc.com/ 

  • Revisions for WorkHorse 3D Printer Mk3

    Swaleh Owais04/24/2018 at 20:43 0 comments

    I am currently developing a third iteration of the WorkHorse 3D Printer.

    In this revision, I am placing a special emphasis on building an industry grade machine. NO MORE DUCT TAPE! I am still working on the new design, but I am quite happy with how I simplified many of the components.

    To pay for the high quality machine, I am hoping to be able to use the Hackaday Funding.

    So if I am lucky enough to have a judge read this post, I implore them to consider the below details while selecting the top 20 candidates.

    • Is this a unique solution to a particular challenge facing the world today?
      • 3D Printers have the potential to democratize manufacturing. Currently, mass production technology is only within the reach of large factories and businesses. Most hackers/makers lack the financial means and technological aptitude to use automation machinery. 3D printers are inexpensive and easy to use. Providing 3D printers with the ability to automatically eject/start print jobs would allow anyone to setup a small scale factory. Empowering tinkerers with this ability is sure to generate exciting and innovative hacks.
    • How thoroughly documented were the design process & design decisions?
      • I understand that this project is more likely to succeed with the help of the hacker community. Therefore, I am being completely transparent during project development. I am posting all notes, designs, and software online so that others can critique and improve my work.
    • How easily can this design be implemented by other people in future projects?
      • The project is completely open source. This will make it easy for others to incorporate my automatic print job ejection mechanism into other 3D printers. Furthermore, I am committed to making my automatic print job ejection mechanism into a single modular unit that can be easily attached to any 3D printer.
    • How complete is the project?
      • At this point, I have completed two successful prototypes of the WorkHorse 3D Printer and a robust software application. Both prototypes were able eject a consistent stream of print jobs automatically. My software application provides users with a simple interface to send print jobs to the printer. By my no means is this project complete, but I am satisfied by my progress to date. I strongly believe that my next prototype will exhibit the drastic usefulness of automatic 3D print job ejectors. Being a university engineering student, I do not have the largest budget to spend on this project. I am hoping to use the Hackaday Prize money to pay for expenses. I would know exactly how to spend the prize money, since I already have a refined parts list for building Mk. 3. 

    Also, I would like to thank everyone that liked my Hackaday entry for helping support this project.

    During the robotics module contest, I will attempt to turn my mechanism into an independent module.

    My next post will be on the CAD and design changes for Mk. 3.

  • Mass Production Test with Y-Axis Conveyor Belt

    Swaleh Owais04/15/2018 at 01:44 0 comments

         I printed a queue of parts on my integrated conveyor. The parts all printed and ejected successfully, but there were still some issues.

    [Figure 1: Printing Queue of Jobs with 3D Printer]

        I am currently printing on a roll of duct tape. While the print surface is fine, duct tape cannot withstand the high temperature of the nozzle. If the hot end touches the duct tape, the tape melts and fuses with the extruded plastic. This adhesion makes it more difficult for the part to be ejected later on.

    [Figure 2: Duct Tape Belt Damaged by Hot End]

        I plan on replacing the belt with a stainless steel shim.

View all 28 project logs

  • 1
    Laser Cut and 3D Printer Specified Components

    Lasercut and 3D Print all specified components founds in the Mk. IV cad directory.

    While 3D printing, I recommend using print settings of: 0.2, 10%, and PLA.

  • 2
    Machine Specified Components

    Machine the above three components as seen in the engineering drawings out of 6061 Aluminum.

  • 3
    Assemble Base Frame

    Using M5 bolts, assemble the base frame aluminum extrusion pieces as seen below.

View all 11 instructions

Enjoy this project?

Share

Discussions

mmiscool wrote 11/20/2021 at 04:06 point

https://github.com/Autodrop3d/BeltEngine

  Are you sure? yes | no

1163461133 wrote 08/22/2021 at 07:31 point

How do I get the code

  Are you sure? yes | no

mmiscool wrote 10/13/2020 at 13:08 point

The Autodrop3d is funding development of a command line version of the black belt slicer to be integrated in to its cloud bases queuing and billing system. It will be released open source after doing a public beta in the Autodrop3d platform coming up here in a bit. 

https://www.youtube.com/watch?v=HoKYfcvVcJM

  Are you sure? yes | no

Tobi wrote 05/11/2020 at 12:44 point

In the Instruction PArt you wrote:
"Lasercut and 3D Print all specified components founds in the Mk. IV cad directory"

Why is this "Mk. IV cad directory" not part of the Files Section ?

  Are you sure? yes | no

Jeremy wrote 05/05/2020 at 12:22 point

Any links to the Arduino/Marlin FW? Unfortunately this is the one place my skills are lacking to complete this kind of build.

  Are you sure? yes | no

Easton wrote 08/17/2019 at 20:06 point

Hey, great work! This is really impressive. Looking to tweak it for my own purposes, would you mind enlightening me on how you built your conveyor rollers?

  Are you sure? yes | no

Kikenzi wrote 07/30/2019 at 10:22 point

Can you describe more details about making of belt? what is best if metal shim with kapton tape or what you find out as best solution? or how rigid is that option, etc.
Tank you.

  Are you sure? yes | no

Lazaro Herrera wrote 07/19/2019 at 15:35 point

Can we get a kit together for this? I'd love to back something on Kickstarter or Indiegogo with a kit at the end. What's the max everyone would be in for in order to get one of these? $500 / $700 / $1000.

  Are you sure? yes | no

Hole Closer wrote 03/01/2019 at 18:18 point

Can it also be done with a dual Extruder.

  Are you sure? yes | no

Hole Closer wrote 03/01/2019 at 18:13 point

Where is this great Software?

  Are you sure? yes | no

Evilkanjevil wrote 02/27/2019 at 10:50 point

What about an Carbon Fiber Belt?  that would create a smooth first layer surface

  Are you sure? yes | no

John Erkhenhast wrote 12/06/2018 at 21:43 point

Could you elaborate on your process for the Kapton tape belt? The Components page specifies a 600mm X 1000mm roll of Kapton tape but your Instructions page lacks details on turning that roll of tape into a functional belt with a build area of 6 inches..

  Are you sure? yes | no

Patrick Ryan wrote 02/11/2019 at 05:48 point

I am curious about the belt as well. I am looking to convert an i3 to this style and use this for the 600x900mm machine I've been working on.

  Are you sure? yes | no

Jeremy wrote 05/05/2020 at 12:18 point

I've got a roll of kapton film, no sticky side.....figure that I might give this a try, as for joining the two ends I'll have to figure out some sort of flexible adhesive that won't add too much to the joint in case the printer tries to print in that spot.

  Are you sure? yes | no

D1plo1d wrote 11/27/2018 at 23:01 point

Hello, I've been developing a open source, secure 3D printer networking software built around this exact print queue concept for the last year and full time for the last 2 1/2 months. I was inspired by the Makerbot Conveyor almost a decade ago and back then I was the guy who modded ReplicatorG to included a build queue. I want to work with y'all on this. Can we set up a meeting to see if we can work together to make this even more awesome?

https://github.com/tegh/tegh

  Are you sure? yes | no

[deleted]

[this comment has been deleted]

Benjamin.dalton96 wrote 11/22/2018 at 08:27 point

Scam! 

  Are you sure? yes | no

Crowlee117 wrote 11/19/2018 at 19:52 point

I'm planning on modifying my first printer in your MK IV's Likeness. 

Where can I find your workhorse Print Queue software? It does not seem to be included in your Files tab nor in your Logs or Details tabs.

  Are you sure? yes | no

CameronLamont wrote 10/31/2018 at 11:55 point

I've downloaded the .step file, but i wasn't 100% clear on some of the materials or if I have everything

In the first set of steps 

"Lasercut and 3D Print all specified components founds in the Mk. IV cad directory." 

Wondering where the cad directory is or what its referring to? (looks to me you could also teardown a CR-10 as per the cad names)

Also what is the belt itself made of? is it literally just Kapton tape?  Needed something flexible that can handle the heat.  Wasn't sure which side was the sticky side of the tape? and guessing it sticks to itself to make a loop? (for the belt)

  Are you sure? yes | no

santiago.serrano.occofer wrote 10/31/2018 at 07:42 point

Hi! First of all, great project! I've been thinking in something like this in the last time, and I really appreciate the excellent work you made. I have experience with the design of 3D printers and would like to make something similar for my personal use here in Argentina. But I don't know if  I am able to use the software you use, is it posible? If so, is there any way of using it without  the laptop connected to the printer? I mean, using something like octoprint? Thanks in advance and I would really appreciate your answer! Greetings from Argentina!!

  Are you sure? yes | no

Benjamin.dalton96 wrote 10/31/2018 at 21:17 point

If you want something like his workhorse print queue software for octoprint, the blackbelt 3d printer people have made an octoprint plugin called "octoprint print queue". https://github.com/michaelnew/Octoprint-Print-Queue

I have yet to try it myself but I think it would work great

  Are you sure? yes | no

mydragons28 wrote 10/30/2018 at 14:48 point

You can help me make one of these printers.
Please.

  Are you sure? yes | no

mydragons28 wrote 10/30/2018 at 14:44 point

hi.

I wanted to make your project.
Will you give me that program?

  Are you sure? yes | no

Keova wrote 10/30/2018 at 11:16 point

Is it possible to buy one from you? 

  Are you sure? yes | no

Benjamin.dalton96 wrote 10/30/2018 at 12:37 point

Since Makerbot holds the patent on belt printers this printer probably can't be sold. Maybe it could be but I'm not sure how that would go. And Swaleh isn't exactly set up for production of these. 

  Are you sure? yes | no

Similar Projects

Does this project spark your interest?

Become a member to follow this project and never miss any updates