-
added mirroring feature to mlx90640
11/08/2018 at 17:17 • 0 commentsi'm now testing the mlx90640 for use as a thermal cam sensor. first thing i notices when i mounted it was that the image i saw in terminal needed to be inverted. so this feature has been added to test file setup and can be downloaded here:
https://github.com/jamesdanielv/thermal_cam_mlx90640/blob/master/fullsensorreadToterminal.zip
it is a simple setting
//#define MLX90640_mirror false
the code for it is almost as simple as we just reverse order memory is read from single 32 word line buffer
for (int i=0; i<24;i++){//this samples and draws entire page of data. sensor is
MLX90640_I2CRead(MLX90640_address, 0x0400+32*i, 32, mydata);//read 32 places in memory
#if MLX90640_mirror == false
for (int x = 0 ; x < 32 ; x+=1) //this is normal sensor mode
#else
for (int x = 32 ; x >0 ; x-=1) //this is mirrored sensor mode
#endif
{ //we compare active one row to see at output
int testx=(50+mydata[x]-startvalue[x]);
char outputx=46;
if (testx>60){outputx=44;}//+
if (testx>70){outputx=111;}//o
if (testx>80){outputx=79;}//O
if (testx>100){outputx=64;}//@
Serial.print (outputx);Serial.print(F(" "));
} -
how to buffer data for display writes from more complex sensors such as mlx90460 or flir 80x60
10/19/2018 at 05:01 • 0 commentsi have several methods to increase Arduino performance. i use non float interpolation. I use spi bursting, i sometimes used half pixel processing to allow every other line on big displays, and i use cell buffering to reduce changes to screen 2x-5x, and finally i control data bandwidth to allow most changed pixels priority because noise is also a factor otherwise. here is how i'm thinking some of this will play into the mlx90460
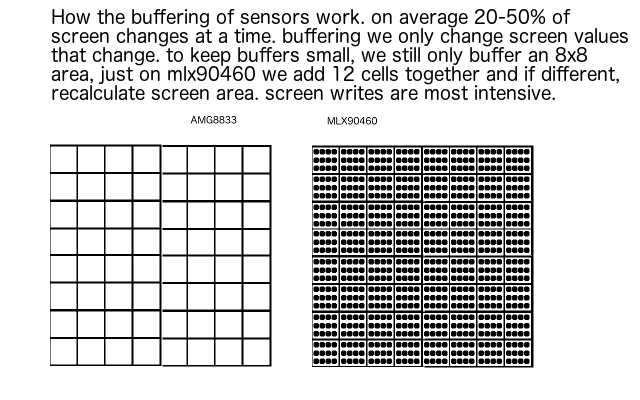
One of the ways i'm getting good performance from Arduino (in many cases on par with arm processors) is that i incorporate buffering at the level of the analog world. the input side, not the display resolution. we only write areas on the display that change, and when a lot is going on, only the areas that change the most because analog is noisy. to keep performance on a small memory footprint, we need to think of areas on screen as cells. this is similar to though processes of jpg imaging, and mpeg encoding. look for areas that change. however we will look at areas as a group of cells.
on amg8833 we use 2 bytes for each of 64 cells. but we only see a range of 1024 values.
the code i use for that sensor is if values are different in cell area we write cell. now with the more complex mlx90460 sensor we have 32x24 sensors. we still want to break up cells data into 8x8 areas for buffering, so what we do is add all 12 cells together, and store a 2 byte number of those values per cell. if number is different it will be updated on screen. this allows us to use the same buffer space as before, only difference is 12 numbers are higher. adding numbers together doesn't use much processing power and comparing number values with stored values is very low cost to code time. we are still doing the same thing looking for changes at input.
![]()
on another note, we will not be sub sampling as far up to get more detail with this sensor, so there may actually be less processing time to scale data. my goal with this sensor is to have it working at least at 64x48, and then at 128x96 resolution. and possibly higher. this only requires 2 levels of upscale which is very easy to do. (or so i think so far).
-
it is less work than i though to get mlx90460 sensor usable for thermal cam.
10/16/2018 at 21:44 • 0 commentsi've been trying to get the energy and time to convert all the commands to run on Arduino. the evil scientists at Melexis want you to purchase supercomputers to process float thermopile calculations (or at least a high end arm cortex). i think they did this as a joke. well i brought the bag to the doorstep, and lit fire a few weeks ago (just watched Billy Madison) with my no float test setup here:
https://github.com/jamesdanielv/thermal_cam_mlx90640
in data sheets for mlx90460 it states:
13.2. Using the device in “image mode”
In some applications may not be necessary to calculate the temperature but rather to have just and image (for instance in machine vision systems). In this case it is not necessary to carry out all calculations which would save computation time or allow the one to use weaker CPU.
In order to get thermal image only following computation flow is to be used:
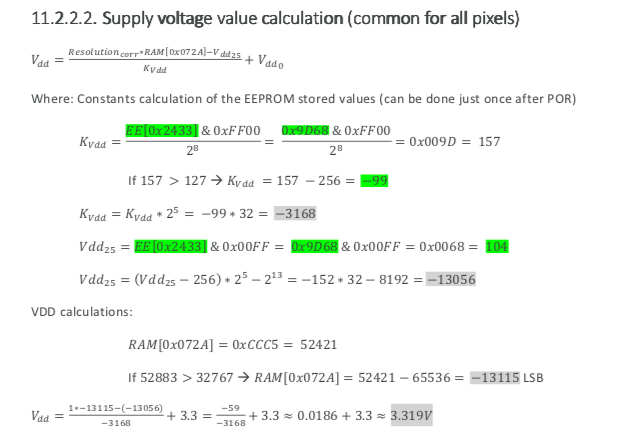
Supply voltage value calculation (common for all pixels) - 11.2.2.2
this means for now as a start all i would need to convert are the now epprom saved results from factory, and gather the latest voltage to chip readings from sensor for frame1, and frame 2.
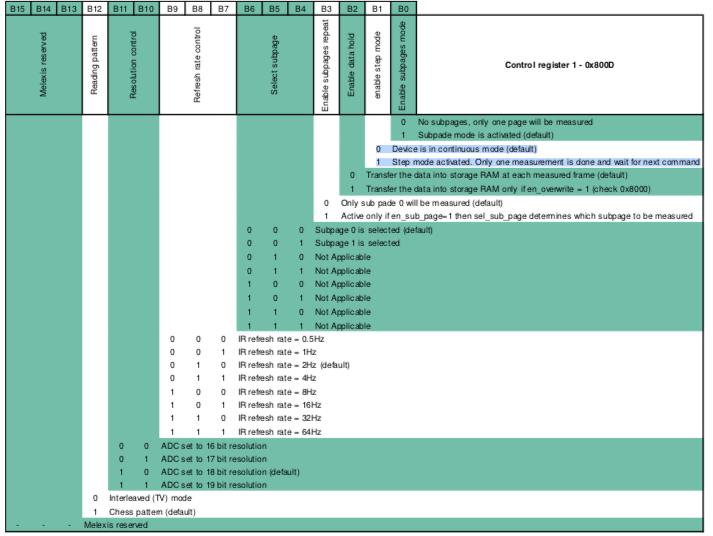
the process is this. capture 1st frame, store voltage to sensor, capture second frame, store voltages to sensor, read 32 columns, display results, read 24 rows down. and by the way. the memory can be read over and over again, as long as the sensor is in step mode, and you haven't ask it to sample sensors again. by the way i had to create my own command to do this, as melexis examples did not have a way to do it out of box. if i'm wrong about it let me know. one of the status registers is below.
![]()
eeprom results no longer need to be in ram and can be put into Arduino thru a table cut and paste with program i created here:
https://github.com/jamesdanielv/thermal_cam_mlx90640/blob/master/getEEpromDump.zip
and the following calculations below:
![]()
i'll upload the complete spec sheet into the files section of this project.
this looks scary, but it is really just AND compare and shift rights and a few bits of subtraction and manipulation of resolution 8bits to left for simulation of what would be float. Ok.. it is scary, but i've got my big boy pants on this week! :)
once this is tested, it will be added to setup files i have for the mlx90460 here:
-
added ability for changing ad sensitivity, hz and single shot mode
09/30/2018 at 06:38 • 0 commentshttps://github.com/jamesdanielv/thermal_cam_mlx90640
i modified the code to the files in the fullsensorreadToterminal file. now the file has settings at top that will be checked and if different rewritten into the sensor.
//below lines change important settings of sensor
#define continuousmode true //true is default when sensor is bought, however we want step mode. this is checked by the code and only written to if it is different than value here. it is here for experimentation.
#define hzMode 2//0=0.5hz,1=1hz,2=2hz,3=4hz,4=8hz,5=16hz,6=32hz,7=64hz
#define adSensorResolution 2 //0=16bit,it 1=17bit, 2=18bit, 3=19bthe sketch now can store the calibration data of the sensor in progmem. this will be useful after i setup to extract the calibration values. currently the flash has my sensor settings in it, but you can load yours by first installing the included sketch getEEpromDump. and in terminal copy the output (command c, or cntrl c) after highlighting everything it asks you to, then pasting into fullsensorreadToterminal sketch.
the code in sketch reads the sensor data and compares to what it finds in progmem to the data on sensor, if it is not a match it will throw out errors at you, but it will allow you to process currently.
after that it checks the hz setting and the analog resolution presets as well as the step or continuous scan mode. if settings are different on sensor it writes the settings in firmware sketch and verifites that they match after a quick reboot of Arduino.
I would like to add that adafruit and melexis do not include code for switching camera modes, so i'm excited to have it included in this sketch. next update will have things hidden away into functions and some simpler commands.
anyway currently using 9344 bytes flash and 630 bytes ram. flash can shrink about 1-2k , bytes can go down about 50-100 with placing new features into functions, and reducing the debug flash usage.
after this small clean up, ill begin making use of the calibration data. i don't expect much more ram usage but the sketch might go up to 14-15k short term.
these are the functions i need to reimplement for calibration to work on arduino:
void ExtractVDDParameters(uint16_t *eeData, paramsMLX90640 *mlx90640)
void ExtractPTATParameters(uint16_t *eeData, paramsMLX90640 *mlx90640)
void ExtractGainParameters(uint16_t *eeData, paramsMLX90640 *mlx90640)
void ExtractTgcParameters(uint16_t *eeData, paramsMLX90640 *mlx90640)
void ExtractResolutionParameters(uint16_t *eeData, paramsMLX90640 *mlx90640)
void ExtractKsTaParameters(uint16_t *eeData, paramsMLX90640 *mlx90640)
void ExtractKsToParameters(uint16_t *eeData, paramsMLX90640 *mlx90640)
void ExtractAlphaParameters(uint16_t *eeData, paramsMLX90640 *mlx90640)
void ExtractOffsetParameters(uint16_t *eeData, paramsMLX90640 *mlx90640)
void ExtractKtaPixelParameters(uint16_t *eeData, paramsMLX90640 *mlx90640)
void ExtractKvPixelParameters(uint16_t *eeData, paramsMLX90640 *mlx90640)
void ExtractCPParameters(uint16_t *eeData, paramsMLX90640 *mlx90640)
void ExtractCILCParameters(uint16_t *eeData, paramsMLX90640 *mlx90640)
int ExtractDeviatingPixels(uint16_t *eeData, paramsMLX90640 *mlx90640)
-
created a program that extracts calibration data, to be placed in progmem
09/29/2018 at 08:53 • 0 commentscreated a program that extracts specific calibration files from sensor, so we can store them in a const table in progmem (flash area). this data saves us a lot of calibration time, because setup and testing was done at factory. it can be found in download section, but current versions can be found here
https://github.com/jamesdanielv/thermal_cam_mlx90640/blob/master/getEEpromDump.zip
mlx90640 sensor works w 800 bytes
Everywhere i read people are excited to get mlx90640 working. here are examples using arduino w 800bytes ram, and 1k with calibrated DEG C