 deqing
-
1Step 1, convert Digispark to debugging probe
The Attiny85 firmware need to disable Reset. If you don't have a high-voltage programmer, you won't be able to program it anymore.
With a bootloader, you don't need a high voltage programmer to update the firmware. However, if your bootloader got damaged or you want to change the fuse, you still need a high voltage programmer.
I used micronucleus bootloader. You can get the hex file from here.
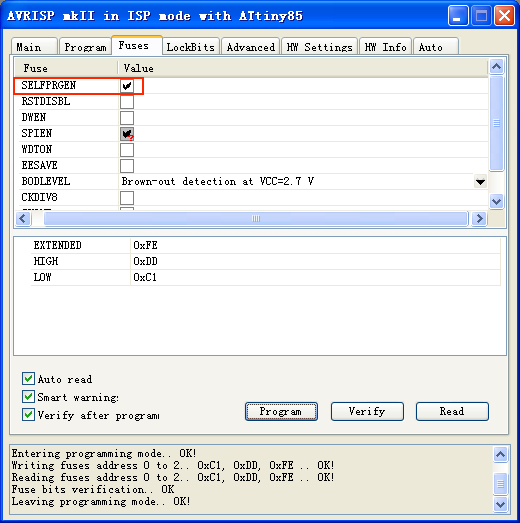
Before programming bootloader, use ISP programmer to set fuses correctly. I used
C1 DD FEfuses. Make sure you checked SELFPRGEN.![]()
Then you use the command-line tool in micronucleus's repo to upload the dwire-debug's firmware.
If you do it correctly, everytime you plug in the ATtiny85 board, it will appear as a Vendor-Specific Device with PID:0x0753 & VID:0x16d0. If you don't upload firmware, it will automatically become USBtinySPI with PID:0x0c9f & VID:0x1781 after 6 seconds.
After you confirm your bootloader is working, set fuse RSTDISBL with the ISP programmer.
-
2Step 2, prepare dwire-debug
I did some improvement on dwire-debug and created a release here.
If you are using Mac, you can download binary, add execute permission with
chmod +x dwdebug, install libusb withbrew install libusb libusb-compat.If you are using Windows, you need to use libusb-win32 driver for ATtiny85. Refer to Readme of dwire-debug repo for more info.
For other OS, try to compile the source in the release.
-
3Step 3, reprogram fuse on ATmega328p
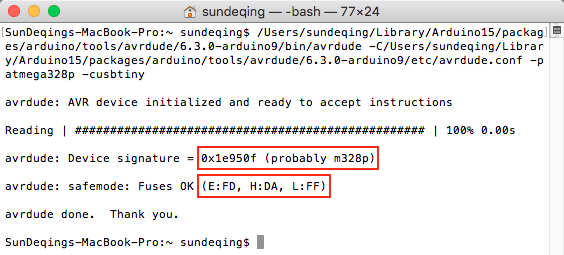
Connect all wires and USB cable. run the following command in terminal to read fuse. If the avrdude on your computer locates in a different location, change the path accordingly.
/Users/sundeqing/Library/Arduino15/packages/arduino/tools/avrdude/6.3.0-arduino9/bin/avrdude -C/Users/sundeqing/Library/Arduino15/packages/arduino/tools/avrdude/6.3.0-arduino9/etc/avrdude.conf -patmega328p -cusbtiny![]()
Check if the signature and fuses are read correctly.
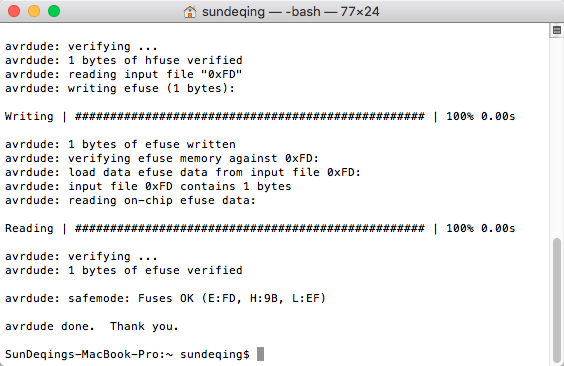
If so, program new fuse values to enable debugWIRE and disable bootloader.
/Users/sundeqing/Library/Arduino15/packages/arduino/tools/avrdude/6.3.0-arduino9/bin/avrdude -C/Users/sundeqing/Library/Arduino15/packages/arduino/tools/avrdude/6.3.0-arduino9/etc/avrdude.conf -patmega328p -cusbtiny -U lfuse:w:0xEF:m -U hfuse:w:0x9B:m -U efuse:w:0xFD:m![]()
Power cycle your board to make fuse change take effect.
-
4Step 4, check if dwire-debug is functional
In terminal, swtich to
dwdebug's location and run./dwdebug device usbtiny1. Check if ATmega328p can be connected. If so, pressControl+Cto terminate dwdebug.![]()
-
5Step 5, install VScode and Arduino extension.
First download VScode from https://code.visualstudio.com/
![download VScode]()
Enable extensions side bar.
![Enable extensions]()
Look for Arduino extension (the offical one from Microsoft, not a random person) and install it.
![Install Arduino]()
Then you install Arduino extension.
Click reload after you finish install.
![reload Arduino]()
Step 6, Add support for debugWIRE
Quit Vscode (not close the window)
![reload Arduino]()
In Mac, open finder, Click "Go"->"Go to Folder"
![gotoFolder]()
Open extension folder (you can copy & paste):
>td ###macOS
OS Path Windows ~/.vscode/extensions Linux ~/.vscode/extensions Paste path
![gotoFolder]()
Then you will arrive extension folder
![extension Folder]()
Go into the Arduino extension folder (
vsciot-vscode.vscode-arduino-0.2.22at this moment) -> "misc", you will finddebuggerUsbMapping.jsonandusbmapping.jsonfile.![extension Folder]()
Refering to this commit, add support of USBtinySPI and Uno into
debuggerUsbMapping.jsonandusbmapping.json -
6Step 7, load Blink Example
This repo contains a configured example. In VScode, open folder BlinkUno in this repo.
Change
miDebuggerPathanddebugServerPathlaunch.json. Make sure they are pointing to the correct files.Add breakpoints and you can start debugging the code.
![debug blink]()
Also tested on windows.
![debug blink]()
If debug server can not start, it may be caused by exiting debug while code is running. Kill running dwdebug will fix it.
-
7Step 8, disable debugWIRE and leave target for normal use
Exit any debugging session.
In terminal, swtich to
dwdebug's location and run./dwdebug device usbtiny1. Typeqito quit debugWIRE![quit debugwire]()
Then program fuse back with
/Users/sundeqing/Library/Arduino15/packages/arduino/tools/avrdude/6.3.0-arduino9/bin/avrdude -C/Users/sundeqing/Library/Arduino15/packages/arduino/tools/avrdude/6.3.0-arduino9/etc/avrdude.conf -patmega328p -cusbtiny -U lfuse:w:0xFF:m -U hfuse:w:0xDA:m -U efuse:w:0xFD:m![set fuse back]()
Then you can burn bootloader back and reuse the board as before.
Debugging Arduino Uno in VScode
Debug Arduino Uno in VScode with a ATtiny85 debugWIRE probe



Discussions
Become a Hackaday.io Member
Create an account to leave a comment. Already have an account? Log In.
Thank you so much for this hack. I was looking for a tool to debug my attiny85 project and had a digistump lying around, so this was the perfect tool to setup my dev environment for the attiny.
I then wanted to move to platformio. So modified code to integrate both the upload and debug to the board using platformio. It's trivial to setup. Please see https://github.com/faisyl/platform-atmelavr/blob/develop/dwire-debug.md on how to setup a project under platformio.
cheers!
Are you sure? yes | no