 uri.shani
I have been making sourdough bread for about 7 years now. I experimented with different formulas, learned what flours work for me, and most importantly - what me and my wife like (and dislike) in our bread. I make my breads about once every two weeks. Even though I like baking OK, I mostly end up mixing the dough at random hours - either when I've just woken up, or when I'm half asleep in the middle of the night. While it's nice to always have "surprise" bread, I'd like to have some degree of control over the ingredients. Other variables, namely time and temperature, are more often than not a given - rising, proofing, and sometimes even the baking itself occur between other chores and activities. The ingredients themselves are more or less constants (the same water and salt, sourdough that have been refreshed just before baking), and the flour is mostly chosen beforehand and stored in the fridge.
But weighing per my formulas is more often than not a case of grabbing an old piece of paper filled with notes and corrections, doing some math in my head while I get my trusty calculator (my cheap smartphone) out of my pocket, then calculating the main ingredients' relative weight. Then, while weighing the first ingredient, my smartphone darkens the screen. Anyway, it's a mess. And my phone is a most likely the most non-hygienic apparatus I use in the kitchen, which needs to stop.
What also happens while weighing and mixing the ingredients, is that I'll substitute some of the flour with another for experimentation, or that I'll use a bit more or less water because I feel the flour needs it, or because I know I need to lengthen the rising time. Stuff like that never gets written, since I can hardly remember doing it by the time I've washed my hands and go on with my day.
Since that's the way I bake for the last year or two, I settled on a couple of formulas that sorta works... I don't particularly like them, but they're easy enough to calculate mentally, or at least remember the weights of ingredients as they're multiples of each other in either two or ten. That is definitely the right way to ruin a hobby.
So, after trying to explain how to get the formula right to a friend and not doing a very good job at explaining baker's percentage, I decided to send my friend my spreadsheet (breadsheet? Yay, Star!), and doing that got me thinking that maybe I should replace my kitchen scale with a "smarter" one. There are already commercial kitchen scales out there that connect to the internet in some way or another, but I could not find one that would let me define my own recipes, and also let me save my measurements in a way that's meaningful to me. So, I picked a ESP32 dev board, an old dumpster find 2 kg scale, and an OLED screen, and started hacking.
I started off with a ESP32 dev board I had laying around, a Wemos Lolin32, and got an el cheapo especial HX711 breakout board off of Aliexpress. The reasons for the ESP32 were, to me, quite obvious - it provides both BLE and WiFi functionality, and a basic firmware can be easily prototyped in the Arduino environment. And besides, it's cheap. It does have other issues though, especially for battery powered devices - it consumes quite a lot of power when connected to WiFi (around 480 mA), and even worse, it is not a very "low power" BLE device, at 84 mA, according to Andreas Spiess. But I still believe that it is the right choice for this project, and especially so if it is going to be a maker product eventually, thanks to the many examples for it using the Arduino IDE.
The HX711 was selected for similar reasons. It has quite a few guides Arduino libraries, there are numerous projects using this load cell amplifier + ADC chip, and there are several good guides for using it, like this one from SparkFun for example, and even a ESP32 dedicated one from Andreas Spiess. And it's dirt cheap, costing less than 60 cents in quantity 1. It does have some issues, of course, but as Andreas...
Read more »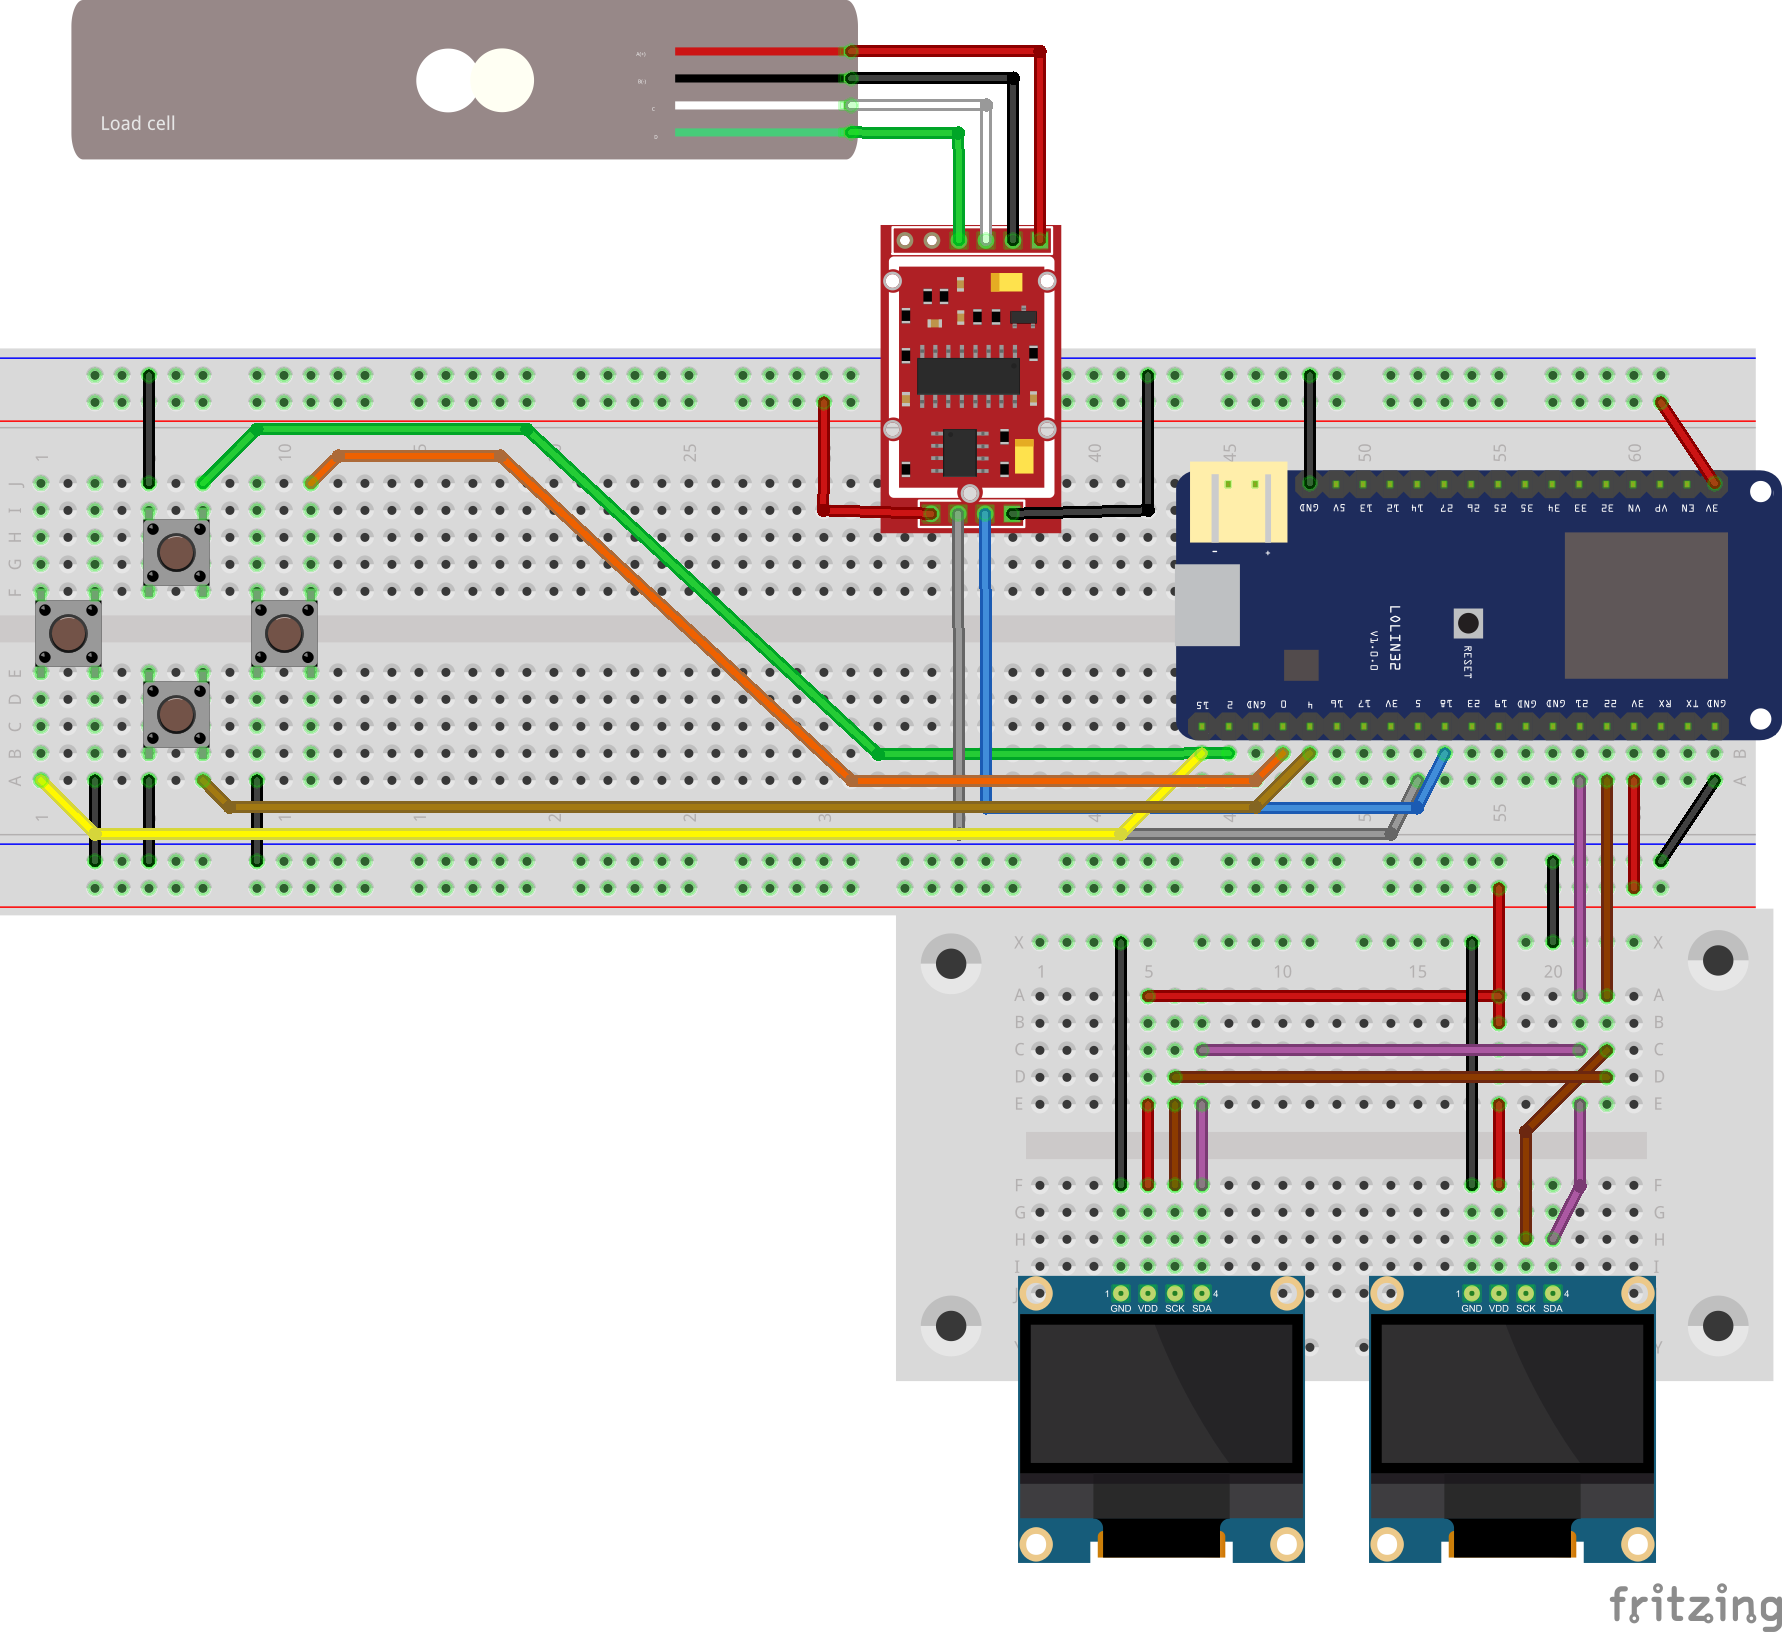
 zst123
 WJCarpenter
 Martin Fasani
Hi,
https://www.circuito.io/static/reply/index.html?solutionId=5da6ee4a9cfabe003054245f&solutionPath=storage.circuito.io
I am trying to build the above circuit powered by battery alone. Sparkfun HX711 is expensive and hence I am using Amazon HX711
HX711 module has Operating Voltage: 2.7V to 5VDC and Operating current: <10 mA
https://learn.sparkfun.com/tutorials/load-cell-amplifier-hx711-breakout-hookup-guide
Sparkfun HX711 has VCC and VDD. VCC is the analog voltage to power the load cell. VDD is the digital supply voltage used to set the logic level. In many cases, you can just short VCC and VDD together. If your microcontroller uses 3.3V logic however, you'll want to connect VCC to 5V and VDD to 3.3V.
https://www.amazon.in/Generic-HX711-Weighing-Dual-Channel-Precision/dp/B00OUZCS2Y/ref=asc_df_B00OUZCS2Y/?tag=googleshopdes-21&linkCode=df0&hvadid=396979667742&hvpos=1o1&hvnetw=g&hvrand=2244786411104874136&hvpone=&hvptwo=&hvqmt=&hvdev=c&hvdvcmdl=&hvlocint=&hvlocphy=9062038&hvtargid=pla-553388600392&psc=1
Amazon HX711 has only VCC and no VDD. Therefore, can I connect LoadCellHX711SF VCC to NodeMCU1 3V3 instead of connecting LoadCellHX711SF VDD to NodeMCU1 3V3?
Thanks and regards,
Rashmi