Explanations:
* Physical layout like the Toshiba T1100: The biggest problem with trying to build any laptop is that one objective is to make it thin enough not to dominate your book bag. What makes this difficult is that components, especially connectors, are thicker than you would prefer, but you're stuck with what is commonly available. The T1100 layout has a tilting screen as its central feature, with the keyboard in front of it and the electronics behind it. This allows the electronics PCB to use full-height connectors, while keeping the overall folded dimensions small. A picture of a T1100 is included in the gallery. This is just for visualization of the overall appearance - this project will not include dual floppy drives.
* 3D printed frame with FR4 panels: The frame uses copper-clad FR4 circuit boards, mainly for tough fiberglass panels, for ruggedness, and a 3D printed frame that these panels snap into magnetically.
* Raspberry Pi model 4B system-on-a-board: Using the basic B model means that this should be easily upgradable.
* Zotac ZBOX P1223 Pico Atom-based stick computer: Because sometimes you just can't get around it, and you need a Windows machine. This is to be incorporated into a module with a USB hub, since it has only one USB port.
* As much battery as will fit: Initially I'm lookng at four 18650 cells, for about 50 Watt*hours of energy.
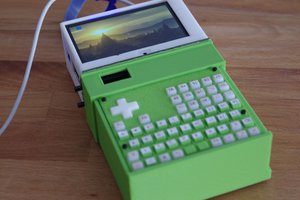
* 7" IPS screen with multitouch: 1024x600, which is the resolution that most Netbooks had, which I found to be sufficient when I used one of these as my daily driver.
* DIY very thin 40% or 50% keyboard using tact switches and 17mm grid key spacing: The "very thin" part is because the keyboard with the display folded down needs to fit into the same height as the Pi. 17mm spacing instead of standard 19mm is because I've used smaller keyboards before, and did not object, nor did I find it hard to move back and forth between 17mm and 19mm spacing, and 17mm lets me put 13 keys per row where only 12 would fit at 19mm. The grid layout rather than offset rows is just because it's time for the keyboard arrangement that was designed to keep typebars evenly spaced is no longer relevant. Sometimes it's good to let go of things that don't serve any purpose.
* DIY very thin touchpad with separate X and Y scrolling areas: It turns out, it's not that difficult to make a trackpad, and making my own means I can integrate it with the keyboard, leaving space to both sides available for more keys. The scrolling areas are because it has always annoyed me that when you want to move something direclty up, down, left, or right, mice and other other pointing devices have made those moves sloppy, because you can't restrict them to one axis of motion. I'll also be experimenting with the code here, to see if a single microcontroller can act as both a mouse and keyboard interface, so that only one USB port is used on the computer module. Since I already need one port for the display's touchscreen, I'd like to avoid having to add a separate USB hub just to handle the human interface.
* Cheap Chinese battery charger and boost converter modules: I will be using a USB-C connector for power input, which provides at least the possibility of using the Power Delivery protocol to provide enough power to both charge the internal batteries and run the computer, but this needs to have some options available to the user, so that if only a non-Power Delivery power bank or charger is connected, it can just run the computer. The batteries will be wired in parallel, so separate boost chargers will be used to power the computer and other devices such as a USB hub and the keyboard and mouse.
The Pi and the Zotac will not be mounted simultaneously - these are separate modules, and I don't want to use space within the machine for hardware that is not in use, and also don't want to take up even more space...
Read more »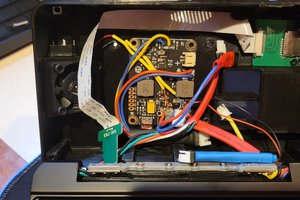

 Dylan Bleier
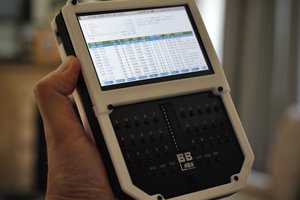
 Richard