 Sylwester
For this local home automation system we are going to use a Raspberry Pi which will act as a central WiFi device. Whereas for end nodes we are going to use IOT Cricket to make a battery powered WiFi devices e.g. temperature sensor and connect it to the RPi without writing a single line of code.
Our system is going to be based on MQTT communication protocol, which is hugely adopted in most home automation systems. To set it up we choose Mosquitto MQTT broker (server) and install it on Raspberry Pi (our central hub).
Prerequisites
- Raspberry Pi(we used ver. 3 for this project)
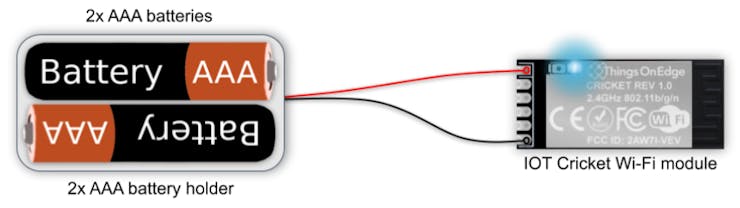
- IOT Cricket WiFi module
- 2xAAA battery holder
- 2xAAA batteries

What is MQTT?
The MQTT protocol provides a lightweight method of carrying out messaging using a publish/subscribe model. This makes it suitable for Internet of Things messaging such as low power sensors or mobile devices such as phones, embedded computers or microcontrollers. (source: mosquitto.org)
We can use as many devices as we want to subscribe to topics and listen for messages to arrive. If some device(s) publish a message on that topic then all devices, which are subscribed to the topic, receive that message instantaneously.
The topic can be any arbitrary string usually concatenated with / characters to allow to build hierarchical topics.
The most typical use of MQTT is to have a one central server to which devices can subscribe and publish messages. It facilitates all communication between devices connected to that server. In this project we will use RPi to act as our central MQTT broker and all other devices will be sending messages via this broker.
The best way to learn about it, is obviously by doing it by ourselves. There are plenty of resources available on the internet on MQTT. However, for this project you should be okay with a basic introduction, which we provided above.
Installing MQTT broker on Raspberry Pi
For this project we use an open source Mosquitto MQTT broker. It is lightweight and is suitable for use on all devices from low power single board computers to full servers.
Before we start installing, it's a good practice to update the system components first:
$ sudo apt-get update
$ sudo apt-get upgrade
Install Mosquitto broker. Open a terminal and type the following command:
$ sudo apt-get install mosquitto -y
Configure Mosquitto broker. Edit config file:
$ sudo vi /etc/mosquitto/mosquitto.conf
and add the following lines at the top:
port 1883
allow_anonymous true
Restart RPi to apply changes:
$ sudo reboot
That's it! Our MQTT broker is up and running now!
NOTE: for the sake of simplicity of this project we are not creating accounts. So anyone within our local network can connect to this MQTT broker without credentials. If you want to add user authentication and make it more secure, there are plenty of tutorials on the internet how to do it.
Now, we just need to obtain IP address so we can send messages to our Mosquitto broker from other devices in the network:
Obtain IP address:
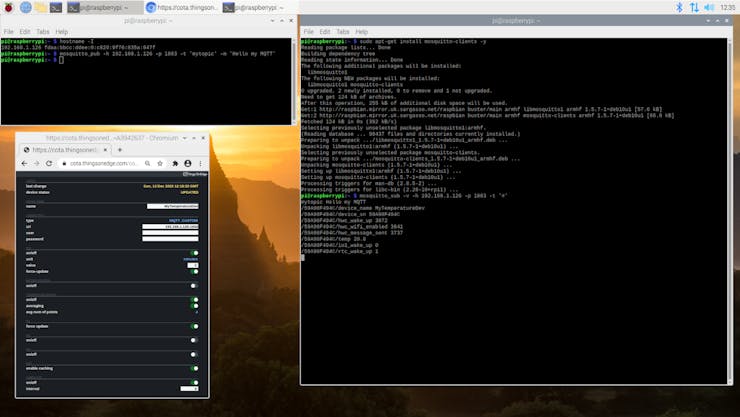
$ hostname -I
your_RPi_IP_address (e.g. 192.168.1.10)
Connect IOT Cricket to RaspberryPi over MQTT
In this project we use the IOT Cricket WiFi module for a simple sensor to report a temperature every 30 seconds to our system. It will run on a battery so we can stick it anywhere at home or a garden. Later you can use IOT Cricket to build various battery powered sensors, alarms, buttons, switches and connect them too to our RPi MQTT broker out of the box.
In the first step connect batteries to Cricket.
Cricket comes with a built-in temperature sensor. We just need to configure it to send temperature value to our MQTT broker by setting the RPi IP address.
In order to do that open Cricket's configuration panel (see the steps here) and apply the following settings (as shown on the image below, please adjust IP address in "url"...
Read more »
 Amine Mehdi Mansouri
 Saad_u_rehman
 Sumit
Sumit
 Wassim
Hi,
The lighter dashboard to use will be Crouton : https://github.com/edfungus/Crouton
With pleasure to read this next step on this share point.
Have a nice day and take care.