 Nick
NickInspiration
The release of the Raspberry Pi pico finally tempted me away from 8-bit AVR development under Windows. These are a few notes on my experiences in case they are of use to anyone else. Let me say straight away that all I've done is followed the instructions in the official pico documentation so all of the cleverness is theirs not mine (please follow this link to the official home page!).
The new RP2040 chip is a big leap-up from an ATMega328 but the promise of VS Code compatibility and Raspberry Pi quality hardware was too much to resist. On both counts, first impressions have been very positive.
The pico board itself (about £3.60) is a cut-above a lot of similar boards. The fit and finish is as good, if not better, that the premium third-party brand Arduino boards and way ahead of unbranded maker-market clones. I won't repeat the chip specs here because there is plenty of detail on the official site but it provides more processing power, memory and IO capabilities than I can imagine using in a typical home project.
The pico documentation is just excellent. No, really - you might think you've seen good documentation but this will change your mind. From the low-level chip datasheet, right up the stack to the Getting Started Guide, it is clear, consistent and easy to follow. Do yourself a favour, download if from the Pico site and get reading.
So, why this project note if the official docs are so good?
Here's the first thing I learned: When you document one board, three editors (VSCode, Eclipse, CLion), multiple tools (OpenOcd, PicoProbe, gdb and others) and three operating systems (RPi Linux, Windows and Mac), you generate a lot of combinations. The challenge for me was pulling together the right sections in the right order to create the build/debug environment I wanted.
Here's the second thing I learned: The Linux descriptions in the docs are (sometimes) specific to Linux on the RPi. In fairness, this is clearly stated in the docs (in many places) but as a Linux newbie I made some very basic errors in translating the instructions from Linux on the RPi to standard Debian on a laptop. I hope this note will save some fellow newbies from falling into the same trap!
My Target Environment
This is what I was aiming for:
- Linux Laptop development host (running Debian)
- VS Code editor and debug gui
- PicoProbe programmer/debugger.

The PicoProbe
First step was to wallop-up a programmer using one of the two Pico boards I'd bought. Appendix A of the "Getting Started with Raspberry Pi Pico" manual has step-by-step instructions for building the software and flashing the board. This was my first experience of the Pico's drag-and-drop programming capability and it really was as easy as advertised. Hold down the bootsel button, plug in the usb cable and the pico boots as a removable storage device. Drag and drop an executable and the pico automatically reboots itself and runs the newly loaded code.
Appendix A.3 has a very simple wiring diagram and I followed this to connect my picoprobe-flashed pico to a USB lead at one end and some flying leads at the other.

As you can see, like all the best projects, this relied heavily on shrink-wrap and hot-melt glue.
The same section of the Getting Started Guide covers config of the target board. This was also very easy, but one wrinkle to watch out for here is that the Pico won't actually fit onto a standard breadboard in the way that most boards will.
The middle of the three debug pins on the board (the debug label is visible in the picture above) aligns with the centre gutter of most breadboards. This means that you can't have the long side of the header pins downwards for the debug connection as you can for the other connections.
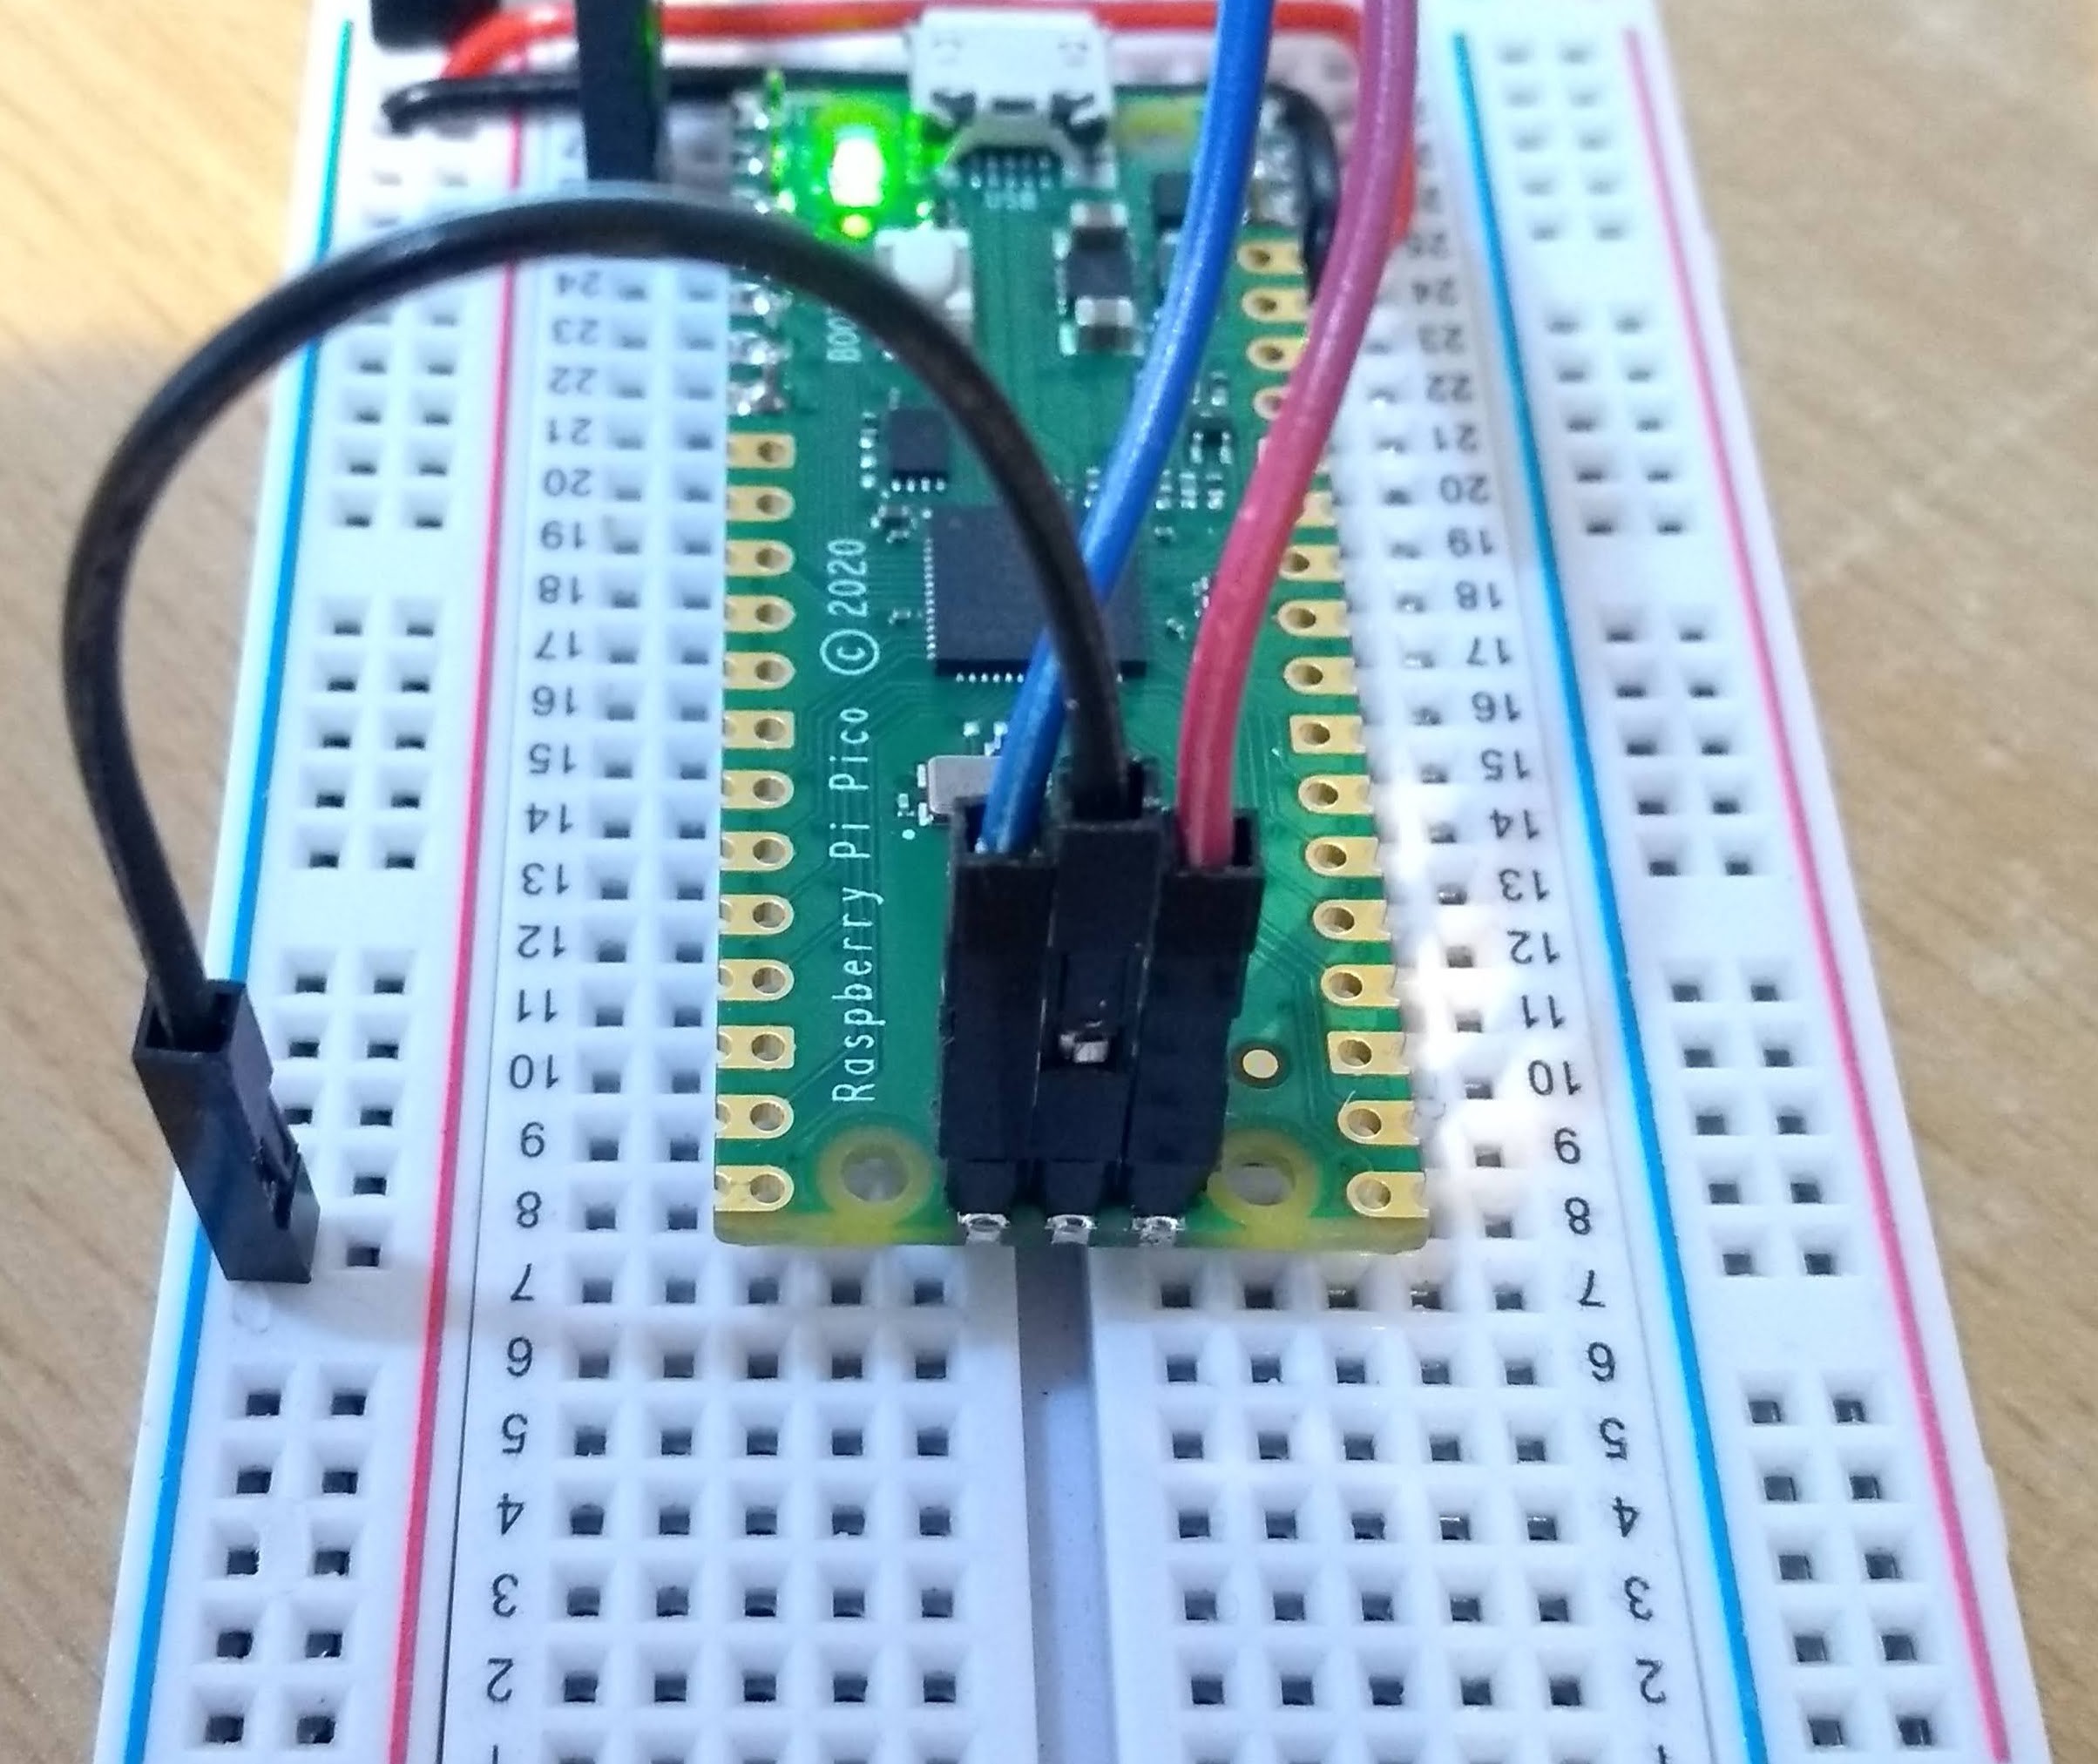
Not a big deal of course, just use female jumper wires, but something I missed in my enthusiasm to get a board connected. (A note in passing though... you really appreciate the build quality of the board when you can de-solder a wrong connection and not have problems with the solder tabs de-laminating.)
So, with that error corrected, I connected the target pico to the PicoProbe board and the USB cable into the laptop. So far so good...
OpenOcd
Another mistake I made first time around... If you work from the start of the Getting Started Guide and follow the command line examples, you build OpenOcd in the correct config to use on an RPi. If you continue to work through the guide and get to Appendix A a lot later (and you're a bit dim like me), it's quite easy to skip over the very clear statement that says "For picoprobe to work you need to build openocd with the picoprobe driver enabled." I mean, in fairness, they couldn't have made it any clearer but I missed this and lost time figuring out why I wasn't getting an openocd connection to the picoprobe.
My mistake was that because I had cloned the main branch of openocd earlier, the clone of the picoprobe branch failed and I mistakenly re-built the main branch (and no, I didn't notice the terminal error - so dim and shortsighted). Anyway, Linux newbie error... I'm sure no one else will do that.
VS Code
Chapter 6 of the Getting Started Guide is what you need here. It would all have been straightforward except for a few silly mistakes I made in the first pass.
- Obviously, don't follow the instructions and install the ARM version of VSC unless you are running on a RPi (I mean, who would be dim enough to make a mistake like that :-) Once I figured that out, I installed VSC from snap and things went a lot better.
- (This one's a bit embarrassing, so I'd like to pause and just mention that I've only been using Linux for a week. As the newbieist of newbies. I think I can be forgiven). Throughout the docs you will see "export PICO_SDK_PATH=/home/pi/pico/pico-sdk". This is entirely correct if your host machine is a RPi because the default user is "pi". I spent far longer than I should have done diligently typing this and wondering why it didn't work. Obviously, if you are not on a RPi, or your user name is anything other than "pi" - change this to: PICO_SDK_PATH=/home/<your user name here>/pico/pico-sdk".
Once I got this right, I continued working through the manual... and nothing worked.
Here's what I should have done...
My First Pico Project
Section 7.3 of the Guide explains the project creation tool. It's works, it's wonderful and I can almost forgive it for being written in Python. Which reminds me.. if you install Debian you get Python 2 and Python 3 by default but not tkinter for Python 3. So, you need to install it manually and make sure you get the Python 3 version.
sudo apt install python3-tk
If you miss this and install tkinter for python 2 instead the project generator won't work. (Big thank you to my son, a python magician, who put me right on this one).
With the project generator working it is very easy to build a VS code project with all of the right options selected (SPI, I2C etc). One point to watch out for here is that you set the uart/usb flag correctly. You can check this by looking for the following lines in the resulting CMakeLists.txt file when you open the file in VSC
pico_enable_stdio_uart(gt2 0)
pico_enable_stdio_usb(gt2 1)
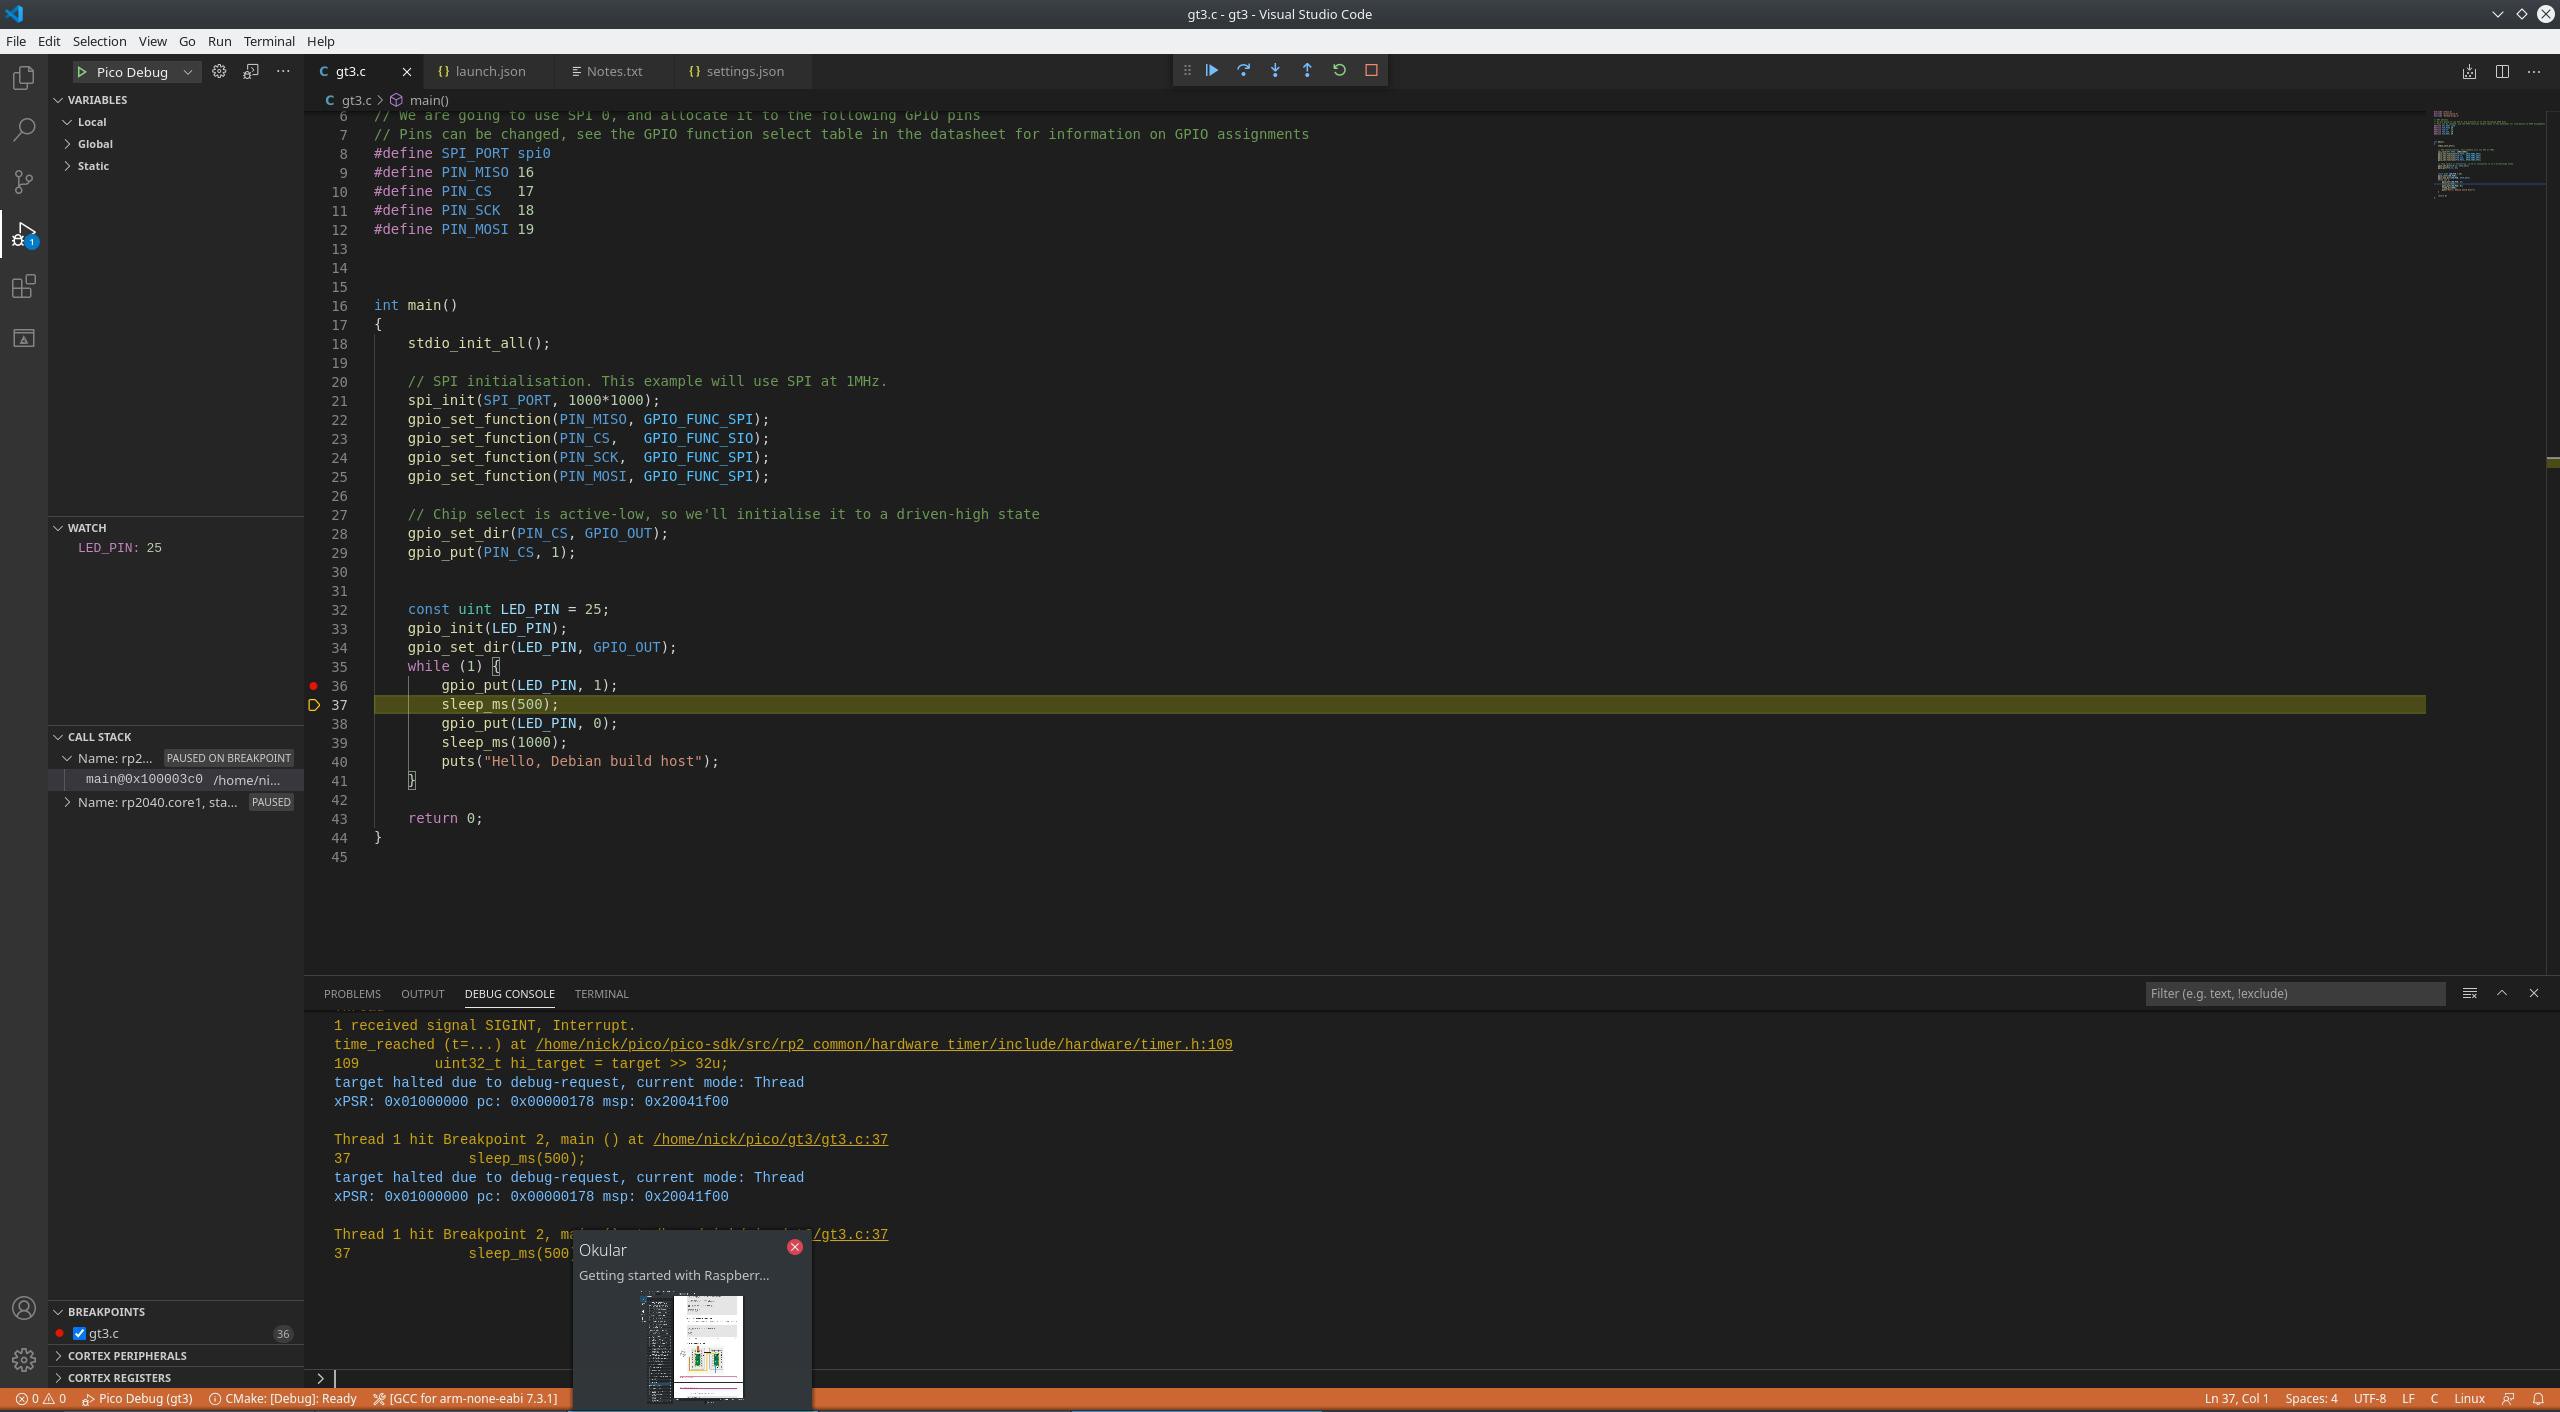
At this point I got over excited and tried to use the usual VSC Ctrl-Shift-B command to build the file. Wrong. You need to use the CMake extension commands via the control palette: Ctrl-Shift-P CMake:Configure, followed by Ctrl-Shift-P CMake:Build. This (finally!) builds your elf file and you should see the Output terminal finish with something like:
[main] Building folder: <your project name>
[lots of stuff here]
[build] [100%] Built target gt3
[build] Build finished with exit code 0
Are we there yet? Not quite.
Where it got tricky
Remember earlier, where I said there are a lot of combinations in the docs? Let's take stock - we have:
- VS Code (x64 version not ARM version) with the recommended extensions (Section 6.1) running on a laptop
- openocd compiled with the picoprobe driver
- An auto-generated CMakeLists.txt file in a VS Code project
- VS Code settings.json and launch.json also auto-generated but configured by default to run on a RPi
This last point meant that the invocation of openocd by VSC was wrong and the launch terminated with a message about being unable to open libusb.
To cut a long story short...
Go to the examples repo ( pico-examples) and get the latest launch.config for a remote openocd. This is called launch-remote-openocd.json. Copy this into your launch.json.
Just for reference, here is what I am currently using (but please, go to the official repo because it may change). Don't forget to change your user name in the svdfile path. [Updated: see later}
{
  "version": "0.2.0",
  "configurations": [
    {
      "gdbPath": "gdb-multiarch",
      "name": "Pico Debug",
      "cwd": "${workspaceRoot}",
      "executable": "${command:cmake.launchTargetPath}",
      "request": "launch",
      "type": "cortex-debug",
      "servertype": "openocd",
      "device": "RP2040",
      "configFiles": [
        "interface/picoprobe.cfg",
        "target/rp2040.cfg"
        ],
      "svdFile": "/home/<yourusername>/pico/pico-sdk/src/rp2040/hardware_regs/rp2040.svd",
      "runToMain": true,
      "postRestartCommands": [
        "break main",
        "continue"
      ]
    }
  ]
}
Nearly there...
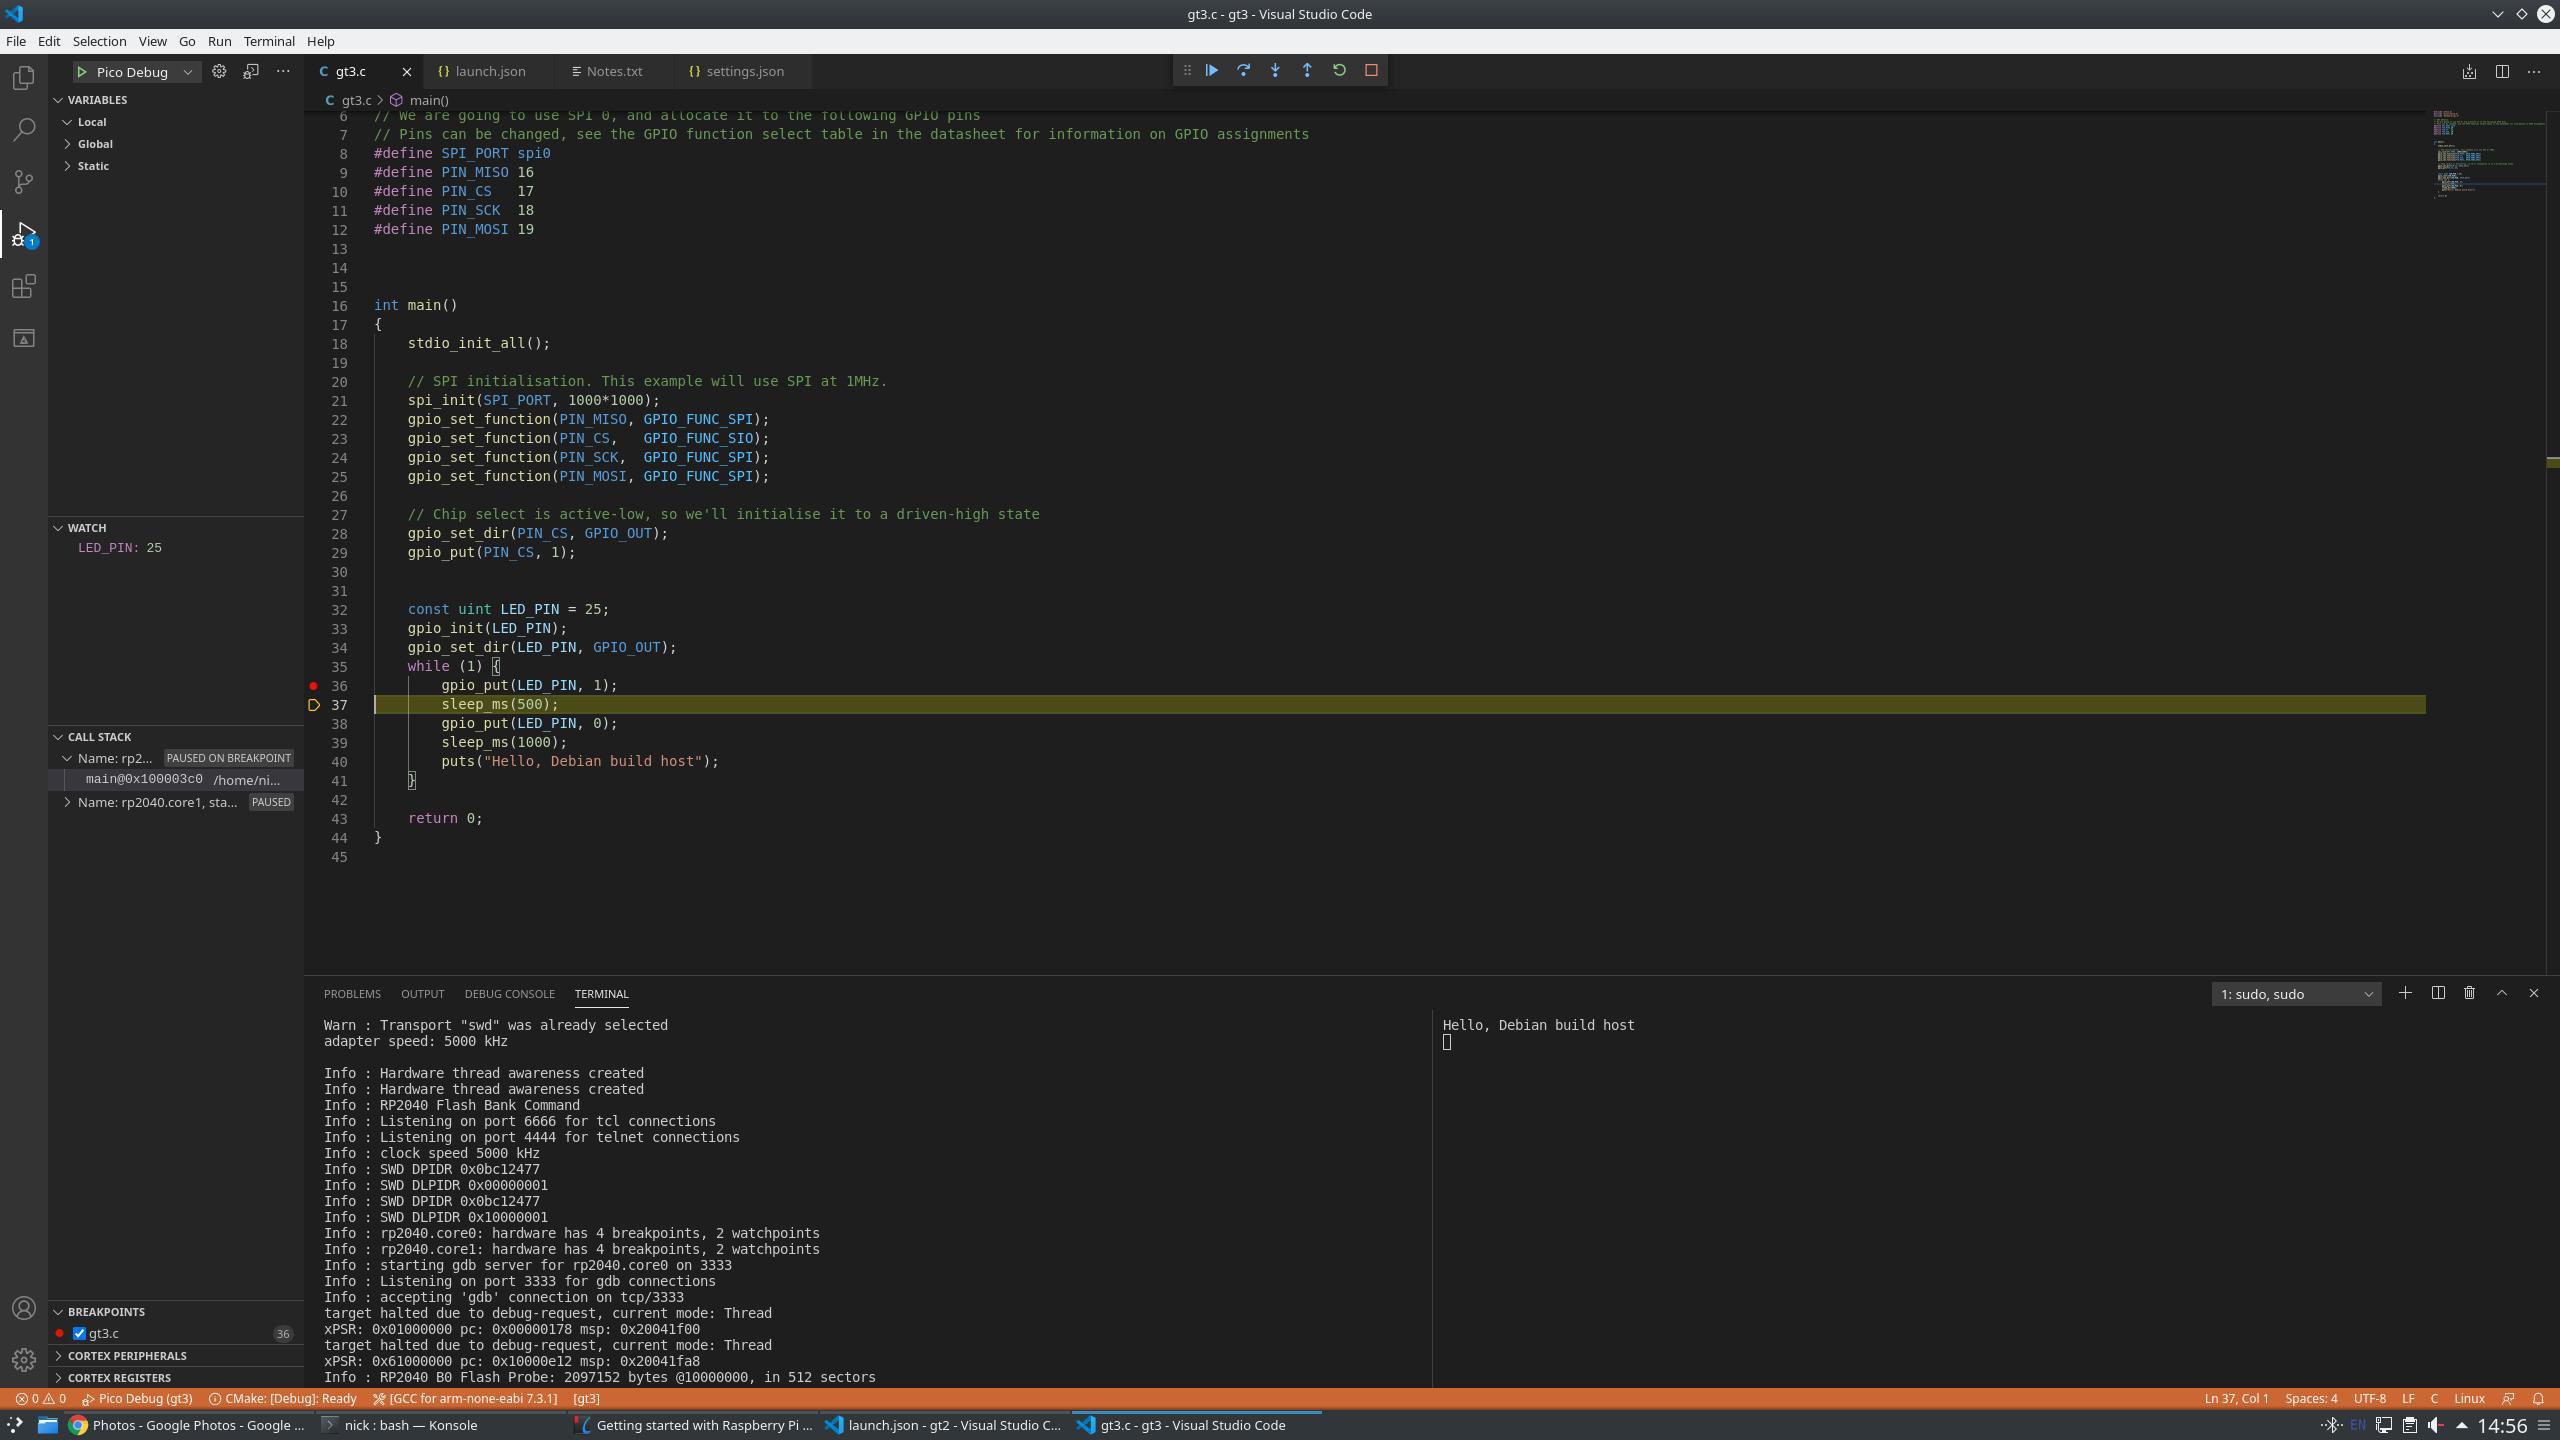
It lives!
Open a terminal from within VSC and start openocd with a variation of command for the PicoProbe option given in Appendix A.6. (Note: I had to use sudo openocd, even though I set user execution permission. I'm hoping that a proper Linux developer will be able to tell me why!) [Updated: see later].
sudo openocd -f interface/picoprobe.cfg -f target/rp2040.cfg -s tcl
All being well you will see something like this
Open On-Chip Debugger 0.10.0+dev-g14c0d0d-dirty (2021-01-29-18:11)
Licensed under GNU GPL v2
For bug reports, read
        http://openocd.org/doc/doxygen/bugs.html
Info : only one transport option; autoselect 'swd'
Warn : Transport "swd" was already selected
adapter speed: 5000 kHz

Info : Hardware thread awareness created
Info : Hardware thread awareness created
Info : RP2040 Flash Bank Command
Info : Listening on port 6666 for tcl connections
Info : Listening on port 4444 for telnet connections
Info : clock speed 5000 kHz
Info : SWD DPIDR 0x0bc12477
Info : SWD DLPIDR 0x00000001
Info : SWD DPIDR 0x0bc12477
Info : SWD DLPIDR 0x10000001
Info : rp2040.core0: hardware has 4 breakpoints, 2 watchpoints
Info : rp2040.core1: hardware has 4 breakpoints, 2 watchpoints
Info : starting gdb server for rp2040.core0 on 3333
Info : Listening on port 3333 for gdb connections
Now, the big moment... Go to the debug panel, select Pico Debug (green triangle top left) and... yes!
GDB starts, connects to the already running openocd and you have a debug GUI.
For the icing on the cake, split the terminal window (in VSC) and open minicom. As always, instructions in the Getting Started Guide (section 4.4 for example).
minicom -b 115200 -o -D /dev/ttyACM0
(I had to use sudo again but I expect that's just me). Minicom setup is covered here ( minicom ) and it is well worth saving the config file with the -s option.
sudo minicom -s
That done, we have finally reached our destination. A debug gui and fprint output on one screen, all within VSC.
We've Arrived!
In summary, we now have:
- VS Code running on a standard Debian laptop
- VS code projects generated by the project generator (with a minor tweak to the launch.json file)
- A pico running PicoProbe as the programmer and debug link
- A gdb GUI within VSCode
- fprint output to the VS Code terminal.
What more could you want!
In Conclusion
What a great little board, what a fantastic set of documentation, what a change to find a working SDK and environment setup tools this early in a product life-cycle. I've had experience of AVR development and VSC on Windows but this was my first attempt at Linux and my first exposure to an ARM chip.
That I've got this far in a day and a half is a tribute to the team that put the pico together and documented it all. Thank you all! Can't wait to get started with the SDK.
Update - Improving launch.json
In the description above, I was using an instance of openocd that was launched manually. Not a big issue, given that it can be started and left running but not ideal. So, after a bit of rummaging around in the pico openocd repo and the VSC cortex-debug settings, I have made some improvements.
First, we need to make sure openocd has access to picoprobe. Find the udev rules file in the pico/openocd folder; it should be here:
/home/<your path>/pico/openocd/contrib/60-openocd.rules
Scroll to the very bottom of the file and make sure if has these lines:
# Raspberry Pi Picoprobe
ATTRS{idVendor}=="2e8a", ATTRS{idProduct}=="0004", MODE="660", GROUP="plugdev", TAG+="uaccess"
If these are present, copy the 60-openocd.rules file to /etc/udev/rules.d/ folder
sudo cp 60-openocd.rules /etc/udev/rules.d/
To reload, try
sudo udevadm control --reload
or just re-start. All being well, openocd should now have access to the picoprobe.
The improved launch.json file is this:
{
  "version": "0.2.0",
  "configurations": [
      {
        "name": "Debug",
        "searchDir": [
         "/home/<your path>/pico/openocd/tcl"
        ],
        "cwd": "${workspaceRoot}",
        "executable": "${command:cmake.launchTargetPath}",
        "request": "launch",
        "type": "cortex-debug",
        "servertype": "openocd",
        "gdbPath" : "gdb-multiarch",
        "device": "RP2040",
        "configFiles": [
            "/interface/picoprobe.cfg",
            "/target/rp2040.cfg"
        ],
        "svdFile": "${env:PICO_SDK_PATH}/src/rp2040/hardware_regs/rp2040.svd",
        "runToMain": true,
        "postRestartCommands": [
            "break main",
            "continue"
        ]
    }
  ]
}
The added "searchDir" values are passed to openocd and included in the locations that are searched for config files.
Now, instead of having to launch openocd manually, everything should get started automatically when you press the green triangle in the Debug panel.