 Andy Birch
-
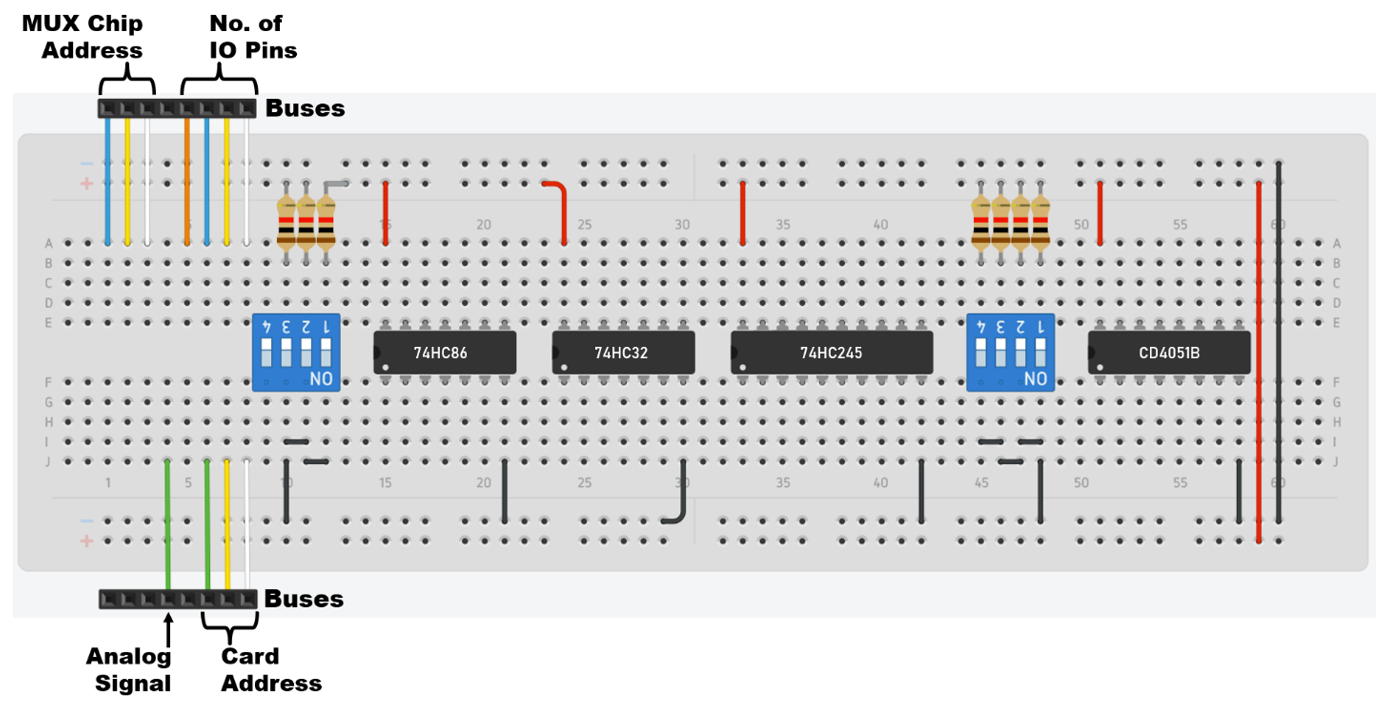
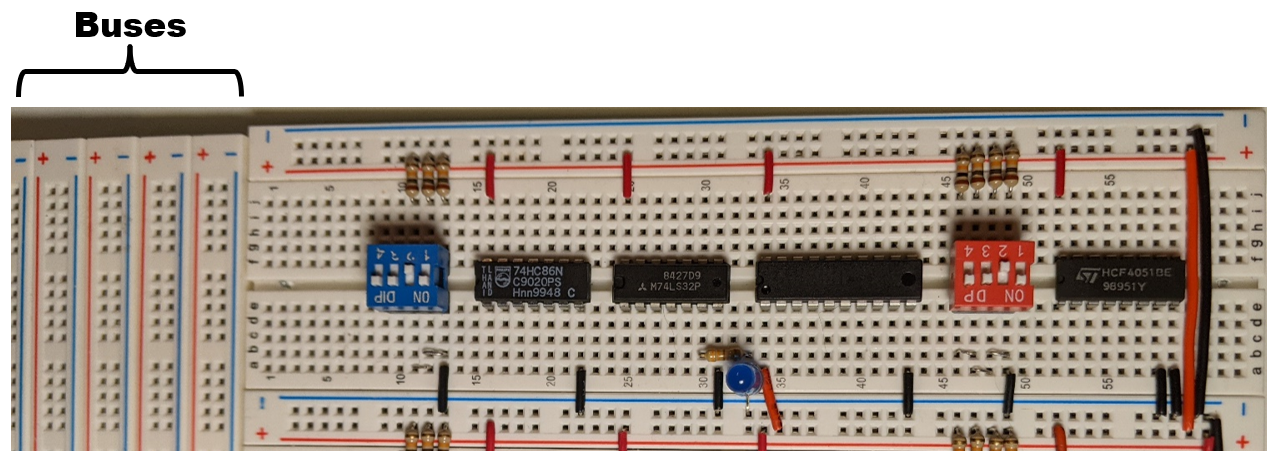
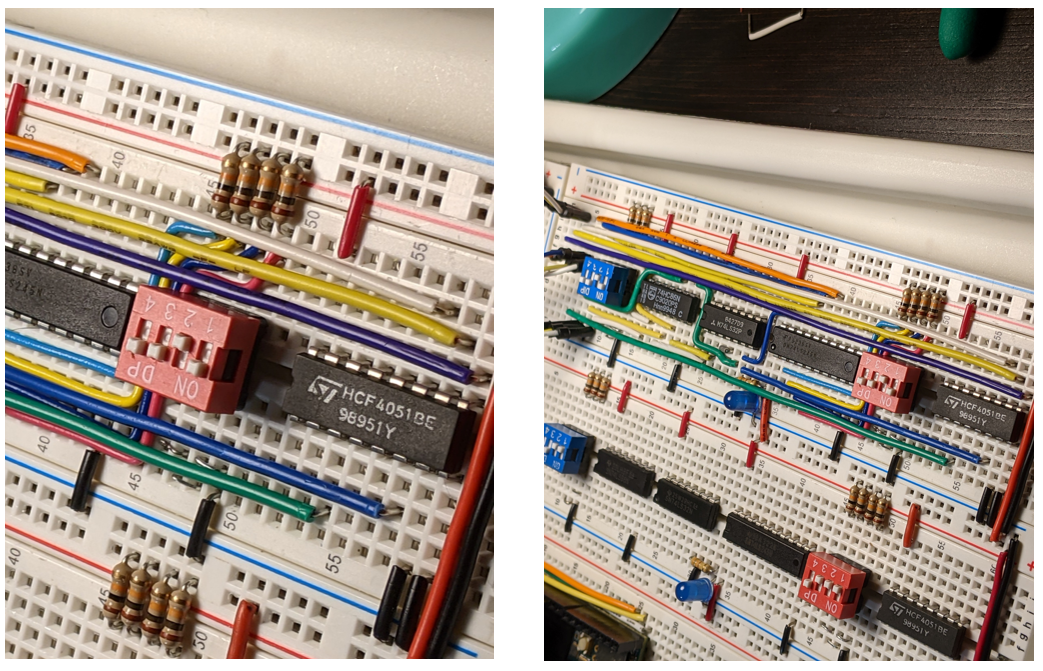
1Place the DIP switches, resistors, chips and power lines.
![]()
![]()
-
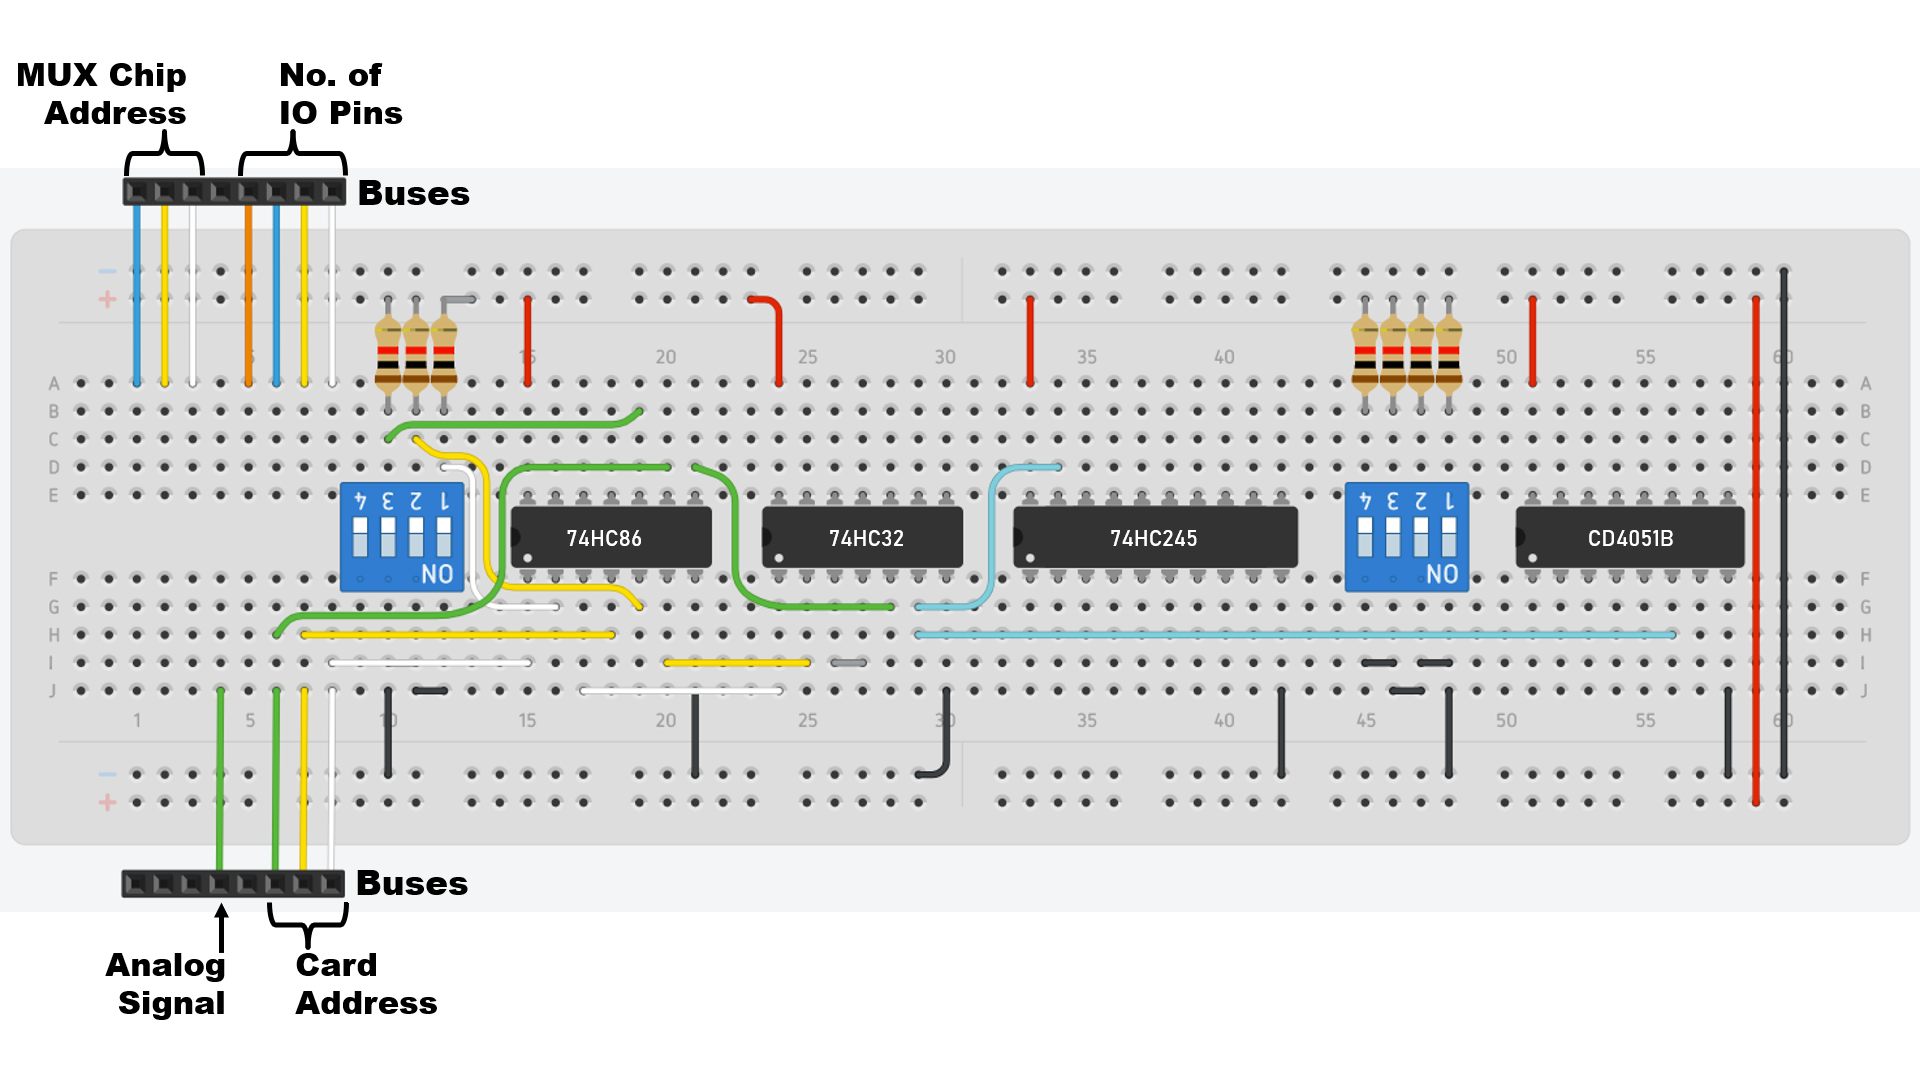
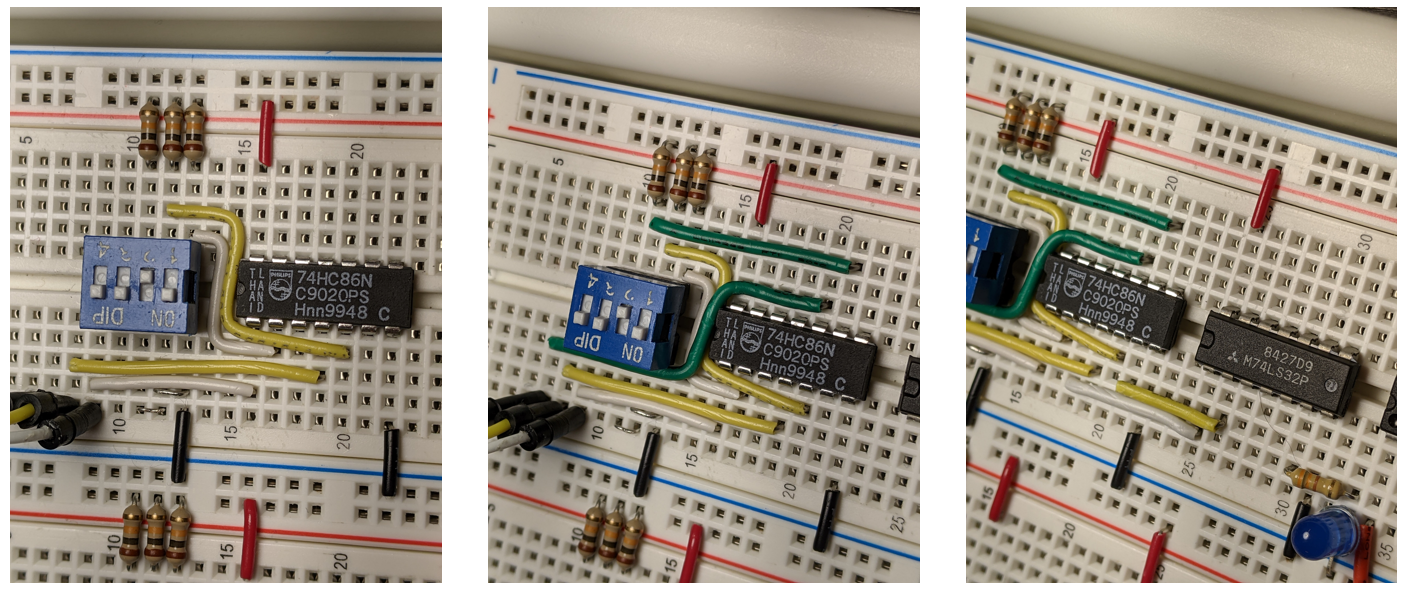
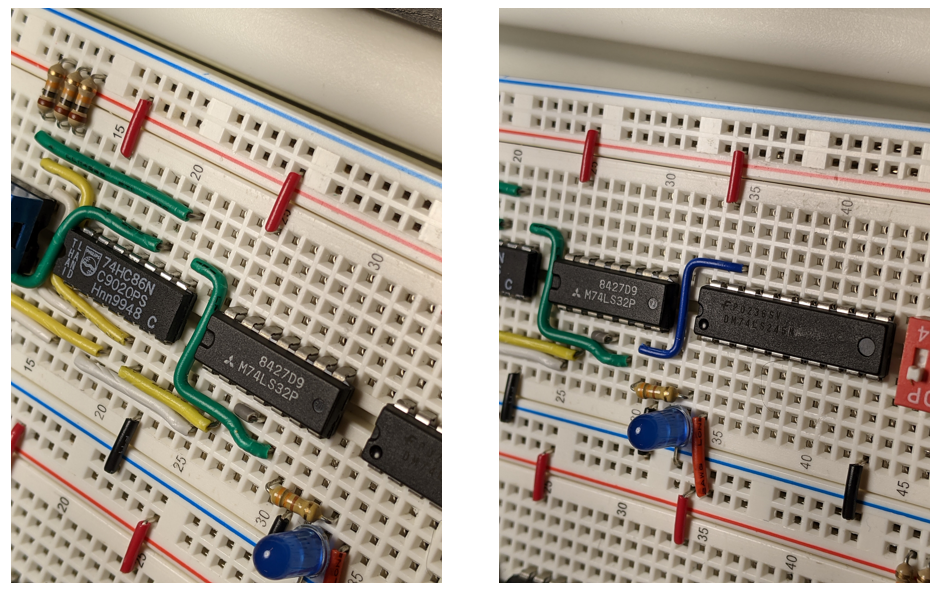
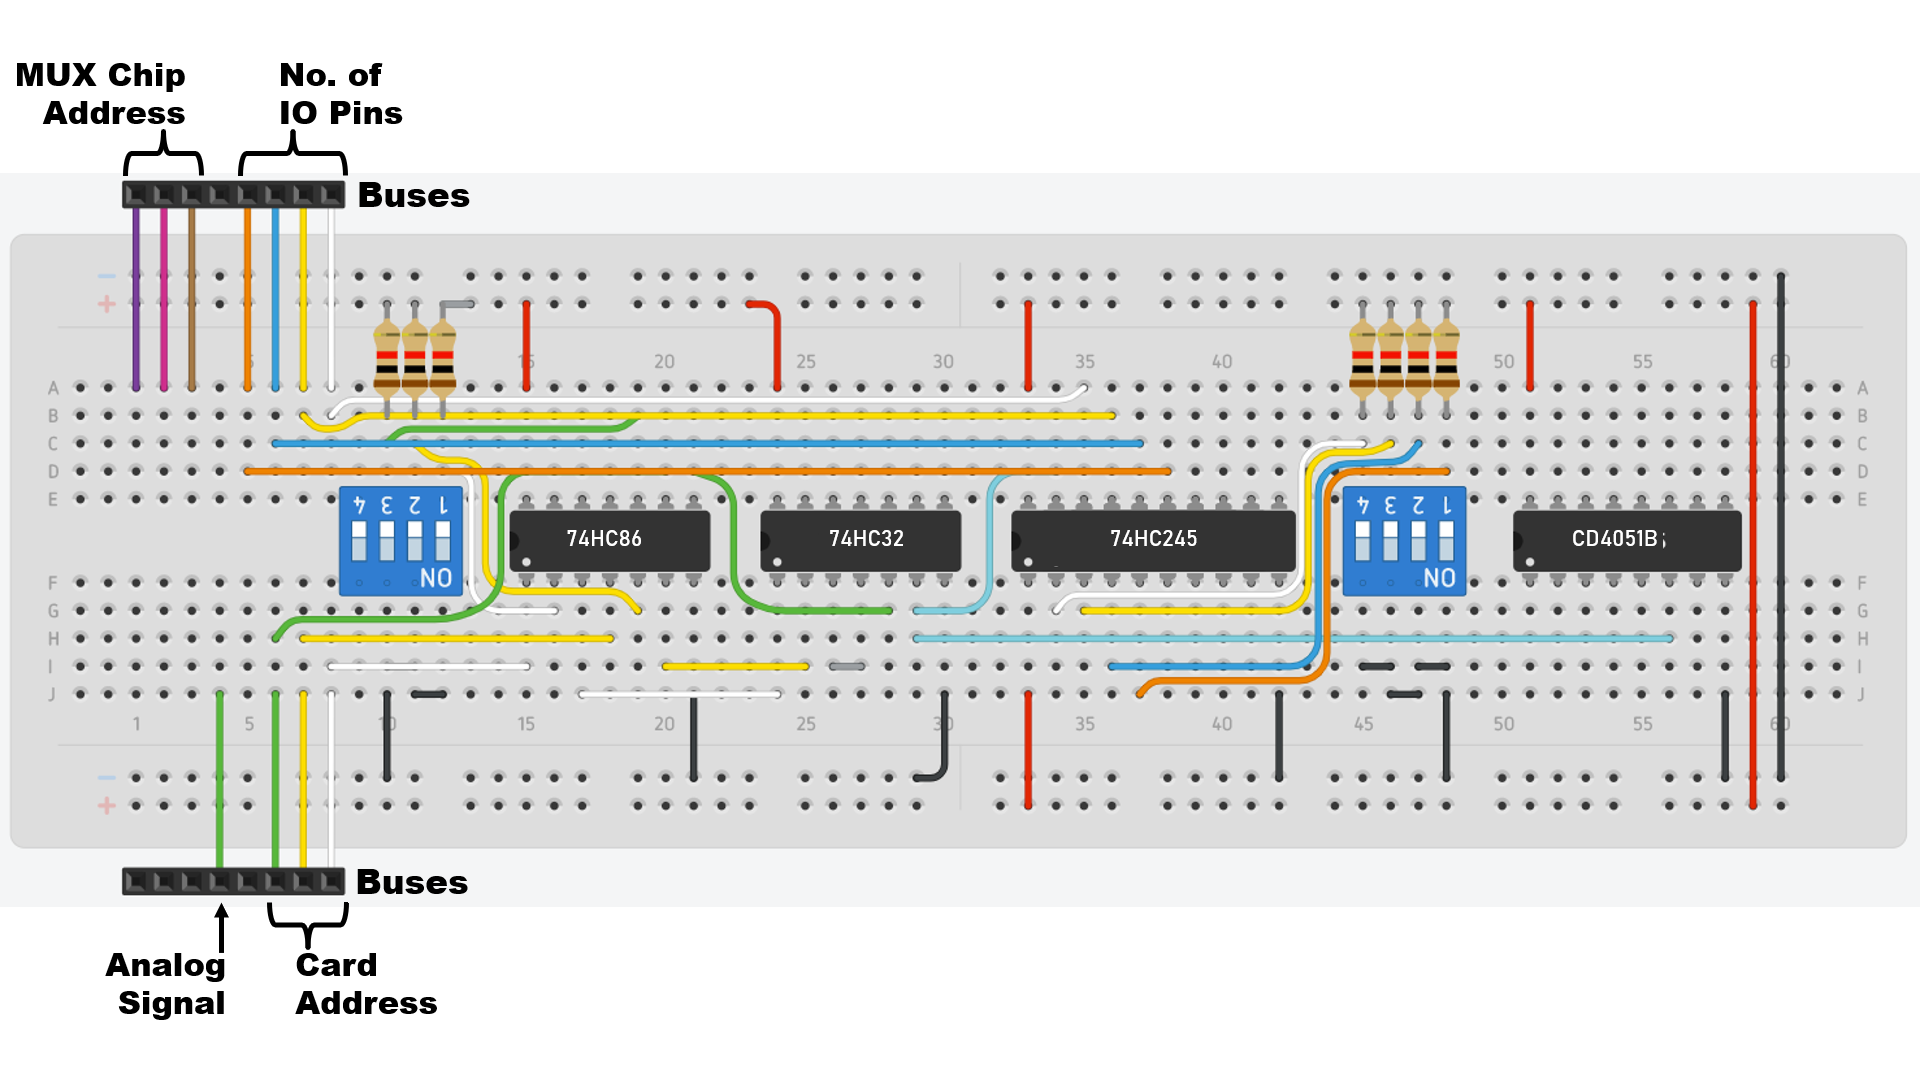
2Wire up the address decoder circuit.
![]()
![]()
![]()
-
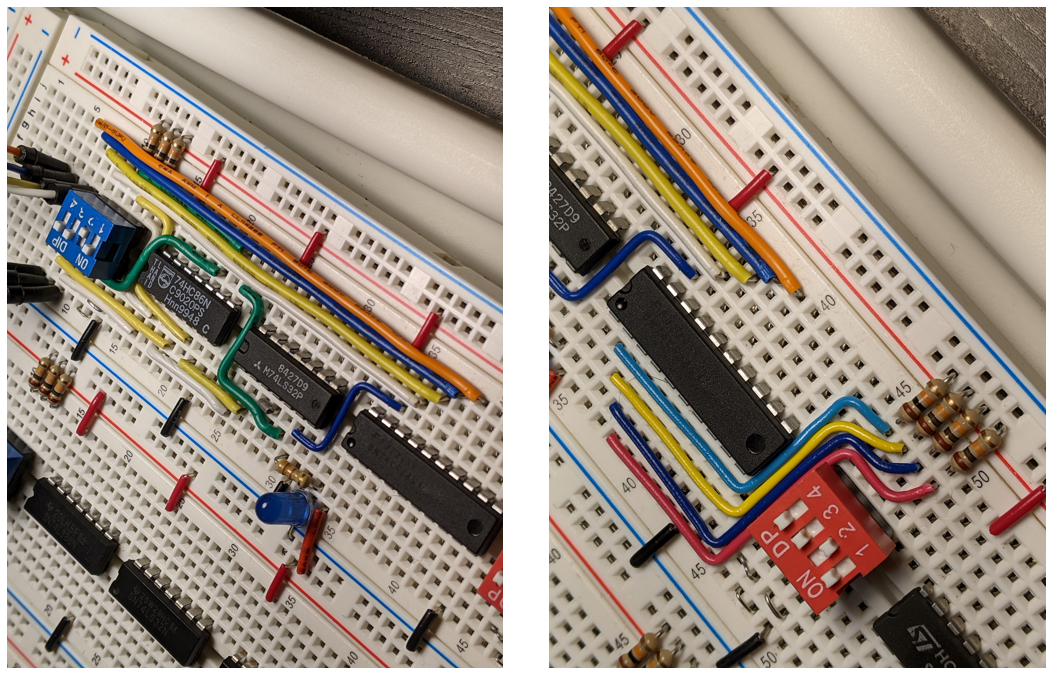
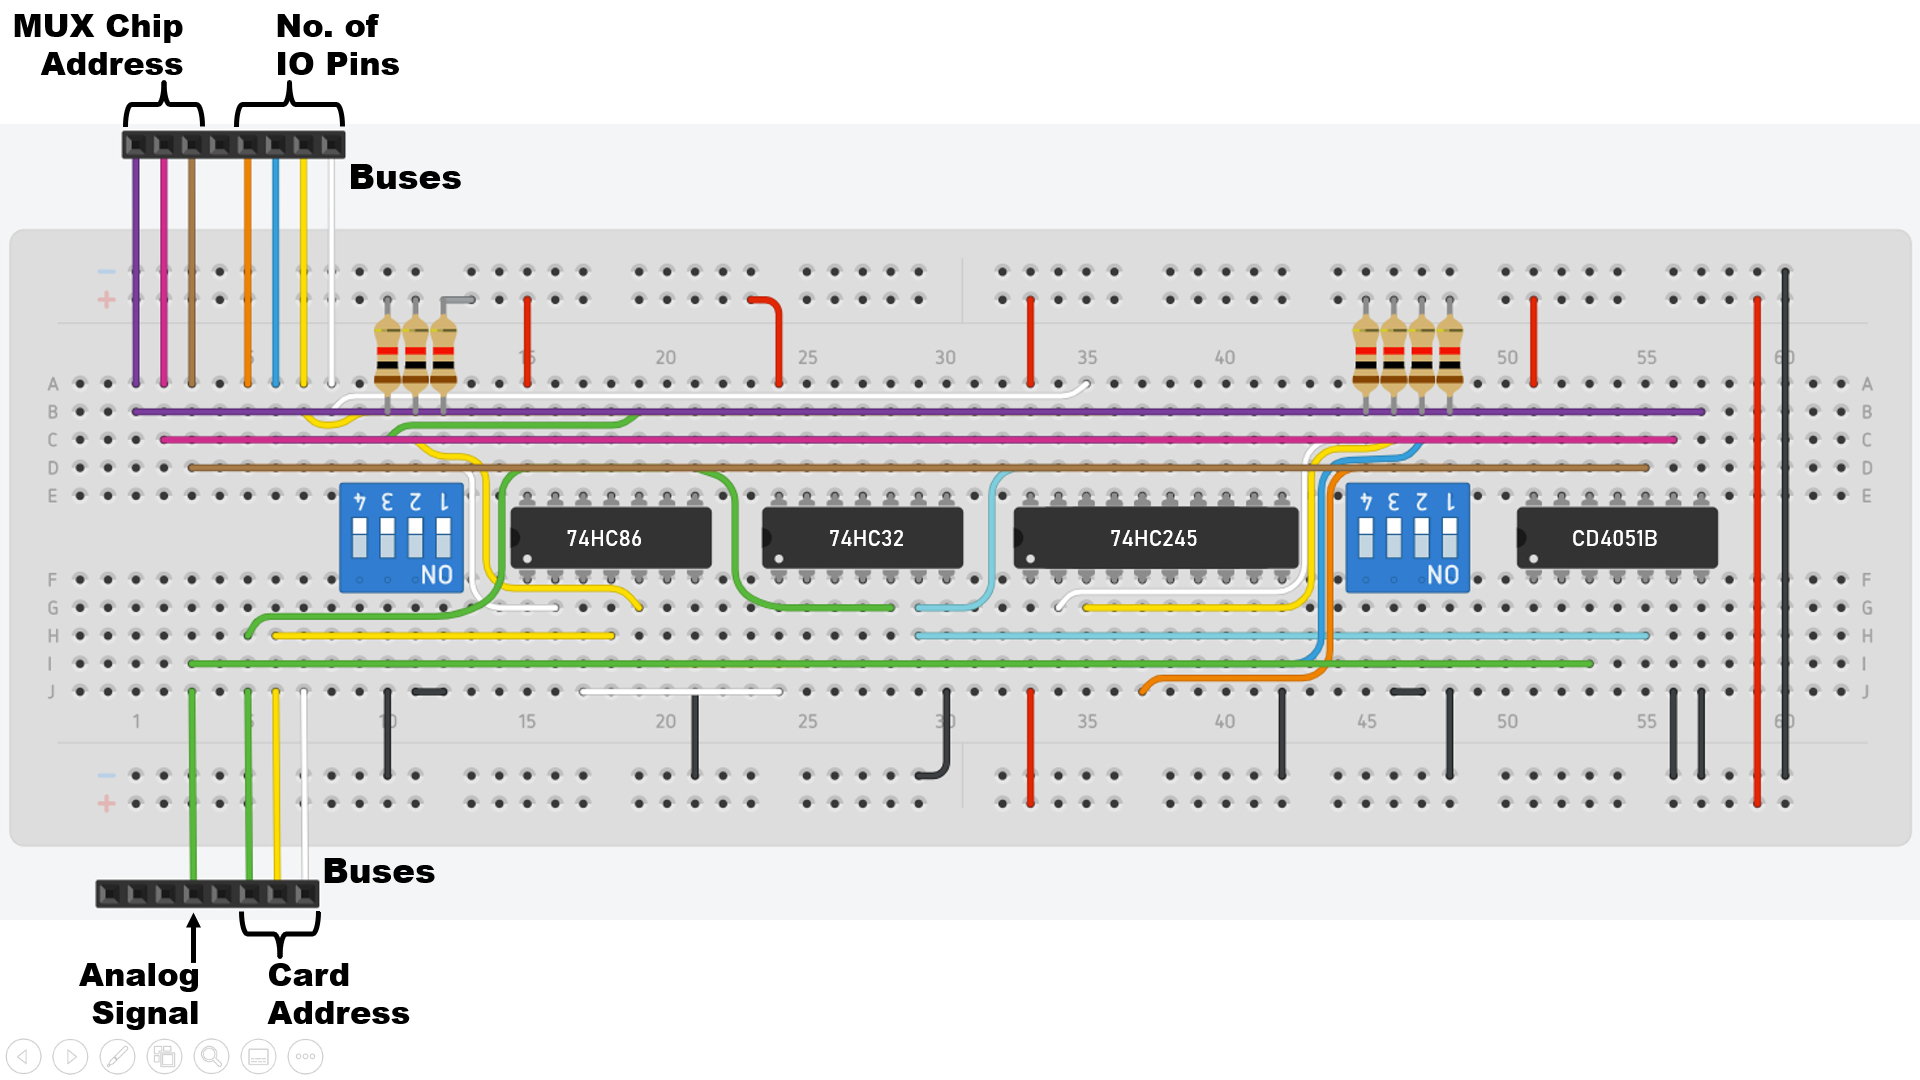
3Wire up the IO pins circuit.
![]()
![]()
-
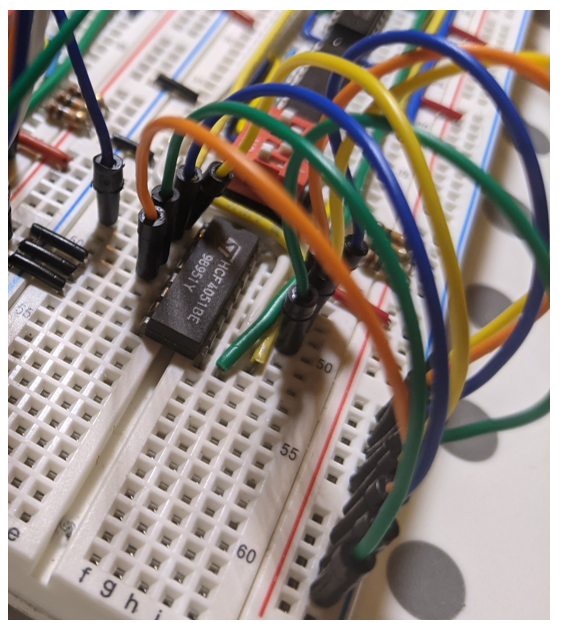
4Wire up the MUX address and the MUX common (analog signal).
![]()
![]()
-
5Wire up the MUX inputs Y0 to Y7.
![]()
![]()
-
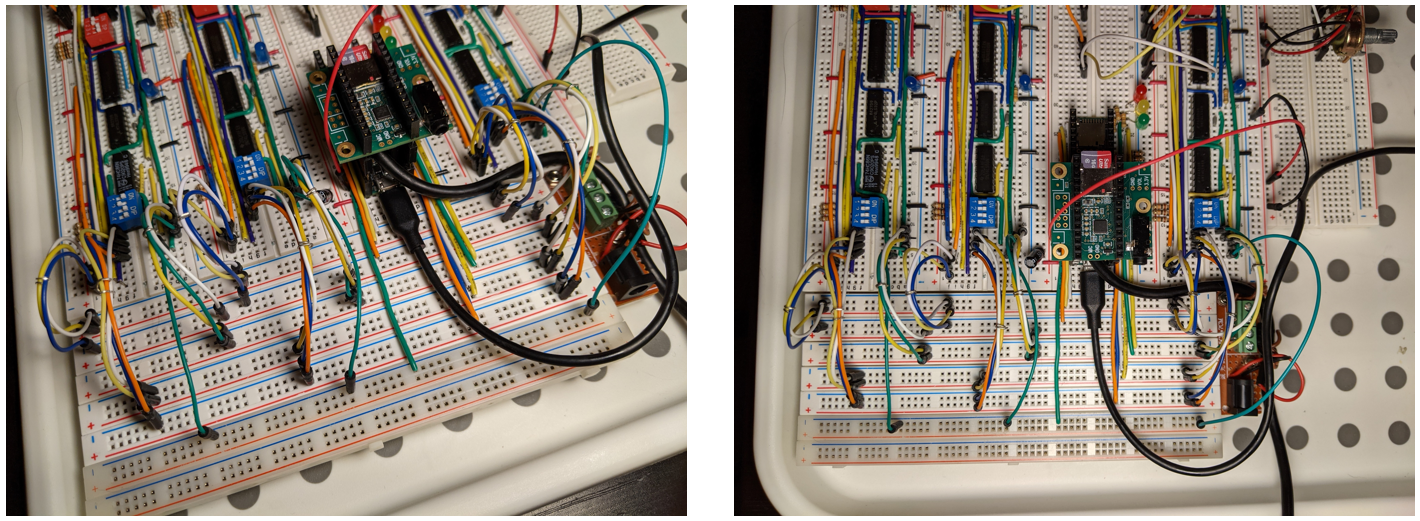
6Connect the microcontroller to each bus.
I am using a Teensy 3.6.
Here are the pins I used for each bus.
![]()
![]()
I decided to use powerlines to create the buses. Above you can see how the microcontroller and each card connects to the buses.
The hardware side of this project is now complete.
-
7Addressable MUX code
As mentioned, one of the reasons for developing this system is that I do not want to rewrite code every time I start a new synth project.
The idea with this project is that when initialised the microcontroller will poll each possible card address and read back the number of IO pins being used.
The system will then know how many cards are connected plus their addresses and how many pins need to be read for each card.Polling Cards for number of IO pins
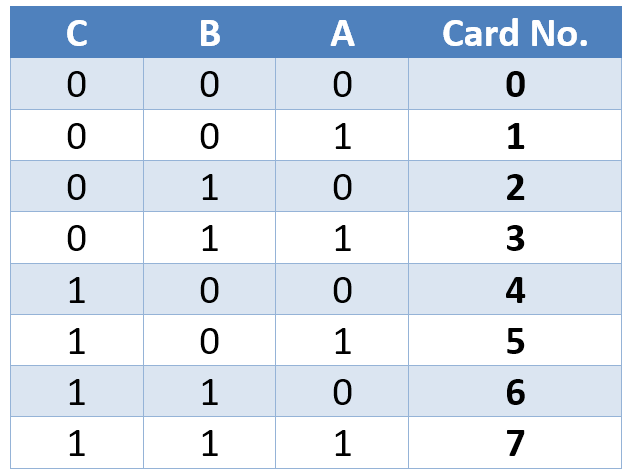
With three address lines there is a maximum of 8 cards 0 to 7.
The microcontroller needs to send the following Addresses.![]()
This could be done in via nested loops.
// nested Loops for address control

for (int C = 0; C < 2; C++){
    for (int B = 0; B < 2; B++){
        for (int A = 0; A < 2; A++){
    Serial.print (C);    // this would give you the
Serial.print (B);    //  correct values of C, B  & A
Serial.println (A);
        }
    }
}
But I found a MUX library that will do this for you.
#include "Mux.h"                  // add mux library to easily controll multiplexer chips
using namespace admux;            // admux is a register to use ADC

// create new muxCard object, to control Card Address bus
//  note: I am using the mux object to just control the bus (C, B, A)
//        there is no data to read.  This could be done with a set of nested for loops instead
//  so set to pin A18, type - INPUT, Analog, Address ABC pins 30,31,32)
Mux muxCard(Pin(A18, INPUT, PinType::Analog), Pinset(30, 31, 32));

// look at each possible address of the cards using loop 0 to <8
for (int i = 0; i < 8; i++) {
muxCard.read(i);             // use muxCard.read to set muxCard Address i
        delay(20);                   // pause to allow data to settle
}
Now for each polled address, the IO pin number bus must be read.
The easiest way to do this is with a loop and bitWrite.
Here is the code to read the number of IO pins for each card.
// array to store the number of IO pins on each card MUX - 9 means card not found
//  you cannot change the size of an array in Arduino – therefore I have to setup this array fully
int cardRead[] = {9, 9, 9, 9, 9, 9, 9, 9};

int dipPins[] = {27, 26, 25, 24};          // an array for the Card IO Bus pins on the Teensy
int pinNum = sizeof(dipPins) / 4;      // divide the size of the array by 4 to get the number of slots                        //  I used a variable in case I need to change the number of pins


//-----------------------------------------------------------------------------------
// Find what cards are connected, their address and how many pins are used by each card
//  Check each card address to see if a card is connected
//  If a card is connected
//   read the number of IO pins and store in cardRead[]
//   the number of IO pins will be on the following Teenay inputs
//   A = p24, B = p25, C = p26, D = p27
//-----------------------------------------------------------------------------------
void readCards() {
  // look at each possible address of the cards using loop 0 to <8
  for (int i = 0; i < 8; i++) {
    muxCard.read(i);                 // use muxCard.read to set muxCard Address i
    delay(20);                       // pause to allow data to settle

    // use loop to read each wire of the card IO bus
    for (int j = 0; j < pinNum; j++) {
      // add the read value to the correct bit of the number in cardRead[i]
      bitWrite(cardRead[i], j,  digitalRead(dipPins[j]));
    }
    if (cardRead[i] == 0)         //  check to see if the read value is 0
    {                                 //   this means no pins used
      cardRead[i] = 9;                //   so store 9 instead to show no IO pins to read on this card
    }
  }
}
To check the read values, I created this
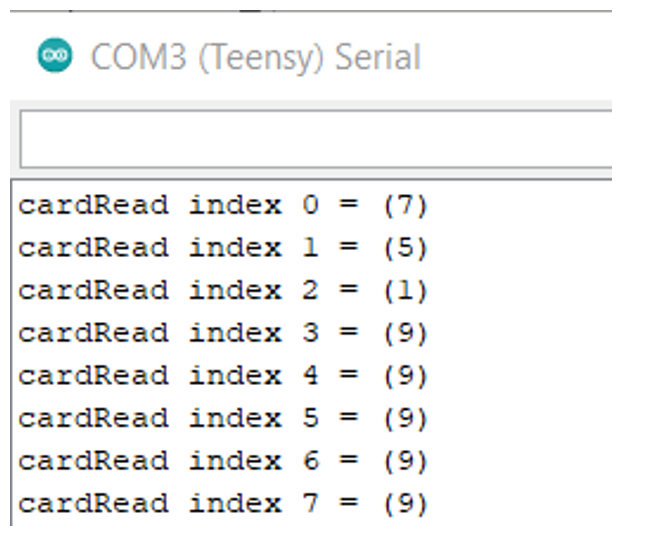
//-----------------------------------------------------------------------------------
// Print out all 8 possible cards and their IO pin number values
// It will look like this
//   "cardRead index 0 = (4)"
//-----------------------------------------------------------------------------------
void printCardRead() {
  for (int i = 0; i < 8; i++) {
    Serial.print("cardRead index ");
    Serial.print(i);
    Serial.print(" = (");
    Serial.print(cardRead[i]);
    Serial.println(")");
  }
}
This is an example output.
![]()
You can see that in my system I have three cards with addresses 0, 1 & 2. The other cards still have a value of 9 showing that a card is not available at that address.
Next, I created code to calculate how many elements are needed to store all the read values from the MUX’s and how many cards are available).
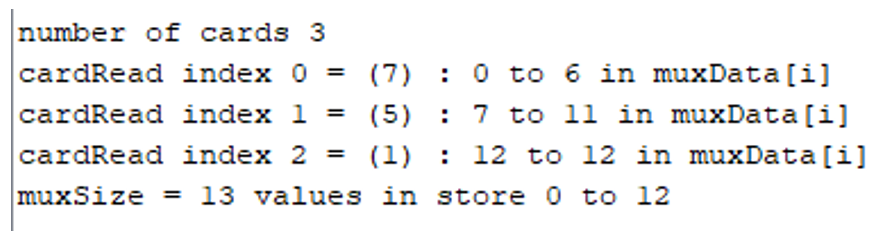
//-----------------------------------------------------------------------------------
//   Calculate the
//     number of elements needed to store data from MUX's
//     number of cards found
//-----------------------------------------------------------------------------------
void calcDataMuxSize() {
  //  again 0 - 7 possible cards
  for (int i = 0; i < 8; i++) {
    // only values less than 9 are valid
    if (cardRead[i] < 9) {                      //  if card found
      noCards++;                                //    add 1 to noCards
      muxSize = muxSize + cardRead[i];      //    add no. of IO pins to mux Size
    }
  }
}

//-----------------------------------------------------------------------------------
// Print out the card setup values
// It will look like this
//   "number of cards 2"
//   "cardRead index 0 = (4) : pins 0 to 3"
//   "cardRead index 2 = (3) : pins 4 to 6"
//   "muxSize = 7 values in store 0 to 6"
//-----------------------------------------------------------------------------------
void printCards() {
  Serial.print("number of cards ");
  Serial.println(noCards);                    //  no. of cards found
  int indexCount = 0;
  for (int i = 0; i < 8; i++) {               //  use loop to print out no. of IO pins on each card

    if (cardRead[i] < 9) {                    //  only values less than 9 are valid
      Serial.print("cardRead index ");    //  The following code prints outb the current card
      Serial.print(i);                        //   index,
      Serial.print(" = (");
      Serial.print(cardRead[i]);              //   no. of IO inputs expected
      Serial.print(") : pins ");
      Serial.print(indexCount);               //   start index in array
      indexCount += cardRead[i];
      Serial.print(" to ");
      Serial.println(indexCount - 1);     //   end index  in array
    }
  }
  Serial.print("muxSize = ");                 //  Then print how many values are to be stored
  Serial.print(muxSize);
  Serial.print(" values in store 0 to ");
  Serial.println(muxSize - 1);
  Serial.println("");
}
Here is an example printout.
![]()
Now that the code has worked out how many cards and IO pins are to be read on each card, we can use this information to read the data coming into the MUX pins.
// create new muxRead object to control mux and read data on each card
//  analog in pin A17, type - INPUT, Analog, Address ABC pins 33,34,35)
Mux muxRead(Pin(A17, INPUT, PinType::Analog), Pinset(33, 34, 35));

//-----------------------------------------------------------------------------------
//  Setup Global Variables to work with mux
//   note - because you MUST setup arrays when code is compiled for Arduino
//   the arrays to store the mux values have to have 64 slots available (just in case)
//   8 cards x 8 inputs = 64 slots
//-----------------------------------------------------------------------------------
int muxData[64];            // main array storing read mux values from inputs
int muxOld[64];             // store previous value
int noCards;                // store the number of cards found
int muxSize;                // store number of spaces used in muxData
int muxChanged;             // store if mux value has changed

//-----------------------------------------------------------------------------------
// Find what cards are connected, their address and how many pins are used by each card
//  Check each card address to see if a card is connected
//  If a card is connected
//   read the number of IO pins and store in cardRead[]
//   the number of IO pins will be on the following Teenay inputs
//   A = p24, B = p25, C = p26, D = p27
//-----------------------------------------------------------------------------------
void readCards() {
  // look at each possible address of the cards using loop 0 to <8
  for (int i = 0; i < 8; i++) {
    muxCard.read(i);                     // use muxCard.read to set muxCard Address i
    delay(20);                               // pause to allow data to settle

    // use loop to read each wire of the card IO bus
    for (int j = 0; j < pinNum; j++) {
      // add the read value to the correct bit of the number in cardRead[i]
      bitWrite(cardRead[i], j,  digitalRead(dipPins[j]));
    }
    if (cardRead[i] == 0)             //  check to see if the read value is 0
    {                                             //   this means no pins used on this card
      cardRead[i] = 9;                    //   so store 9 instead to show card not used
    }
  }
}

//-----------------------------------------------------------------------------------
// To see if the Teensy needs to be updated with values
// Two functions
//  1. Store previous values of muxData in muxOld
//  2. Check if new values are different to previous values - 0 = no 1 = yes
//  used to only update teensy if changes have occured
//-----------------------------------------------------------------------------------
void storePrevious() {
  // loop through the muxData array upto the number of slots in muxData
  for (int j = 0; j < muxSize; j++) {
    muxOld[j] =  muxData[j];              // store current value in muxOld
  }
}
void muxValueChanged() {
  muxChanged = 0;                     //reset the muxChanged flag

  // loop through the muxData array upto the number of slots in muxData
  for (int j = 0; j < muxSize; j++) {
    //check to see if new data is not the same as old data
    if ( muxData[j] != muxOld[j]) {
      muxChanged = 1;                 // if data has changed muxChanged = 1
    }                                             //  and Teensy needs to be updated
  }
}
Finally, I created this code to print out the values read from the MUX’s
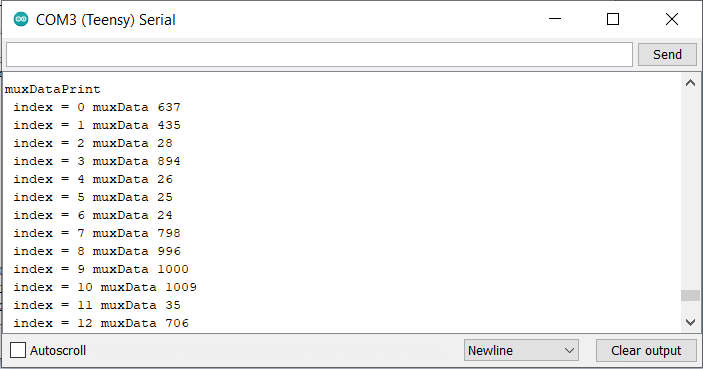
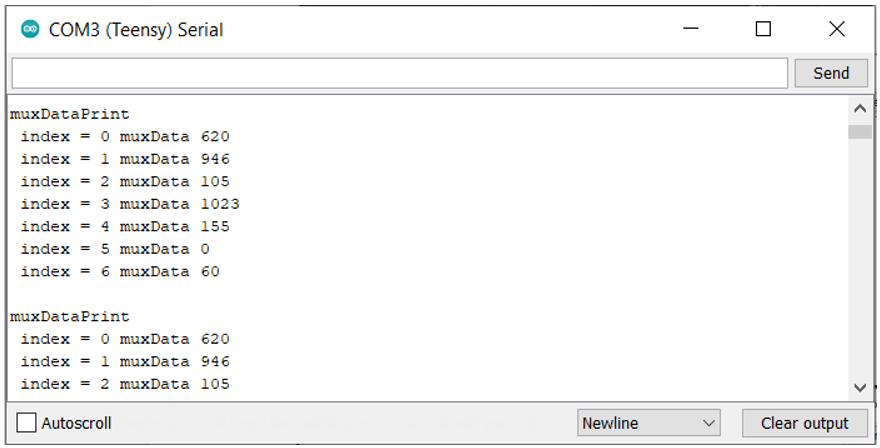
//-----------------------------------------------------------------------------------
// print the values in muxData
//-----------------------------------------------------------------------------------
void muxDataPrint() {
  Serial.println("muxDataPrint");
  // loop through the muxData array upto the number of slots in muxData
  for (int i = 0; i < muxSize; i++) {
    Serial.print(" index = ");
    Serial.print(i);                          // print out the data and text
    Serial.print(" muxData ");
    Serial.println(muxData[i]);
  }
  Serial.println("");
}
Here is an example printout.
![]()
-
8Step 8
Now I can use the values in muxData[i] to control my synthesizers.
There are three cards.
- Card [0] has 4 IO pins connected to potentiometers.
- Card [1] has 0 IO pins connected to buttons – this is to show that the card will be ignored
- Card [2] has 3 IO pins connected to potentiometers.
![]()
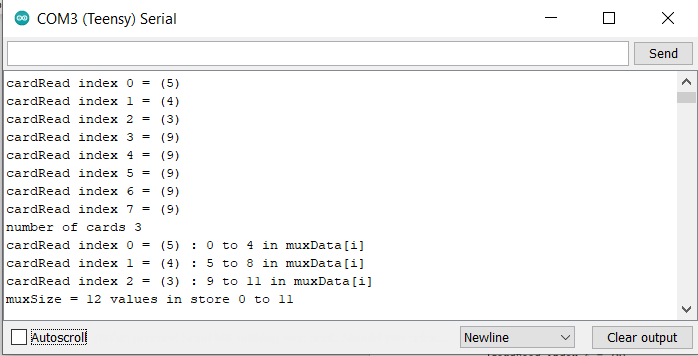
SerialPrint of the cards and IO pin numbers.
This printout is useful to see what parts of the muxData array holds the data from each card.
![]()
SerialPrint of values read into the microcontroller.
![]()
-
9Synth Design
Now I can use these values to control the inputs of any synth I design using the Teensy 3.6.
There are lots of tutorials to explain how to use the Teensy to make a synth. I will give a brief overview.
Here is the Audio System Design Tool for Teensy Audio Library
![]()
When exported the following code is created.
// GUItool: begin automatically generated code AudioSynthWaveform waveform1; //xy=482.5555953979492,232.6666784286499 AudioSynthWaveform filter_LFO; //xy=488.8889617919922,271.66662979125977 AudioFilterStateVariable filter; //xy=636.5555458068848,239.00004768371582 AudioMixer4 filter_mixer; //xy=776.388916015625,245.16670608520508 AudioOutputI2S i2s1; //xy=925.0556049346924,247.0000514984131 AudioConnection patchCord1(waveform1, 0, filter, 0); AudioConnection patchCord2(filter_LFO, 0, filter, 1); AudioConnection patchCord3(filter, 0, filter_mixer, 0); AudioConnection patchCord4(filter, 1, filter_mixer, 1); AudioConnection patchCord5(filter, 2, filter_mixer, 2); AudioConnection patchCord6(filter_mixer, 0, i2s1, 0); AudioConnection patchCord7(filter_mixer, 0, i2s1, 1); AudioControlSGTL5000 sgtl5000_1; //xy=686.4365005493164,163.16664505004883 // GUItool: end automatically generated code -
10Final Code
I split the code up into three by putting the MUX code and the Teensy settings in library files.
Main Program Synth_USB_Modular_MUX.ino calls the libraries
- MUXController.h
- TeensyAudioDesignTool.h
Main Program: Synth_USB_Modular_MUX.ino
//-----------------------------------------------------------------------------------
// libraries to load
//-----------------------------------------------------------------------------------
#include "USBHost_t36.h"              // USB host library to allow use of USB devices
#include <Audio.h>                    // Teensy Audio Library
#include <Wire.h>                     // Library to communicate with I2C / TWI devices
#include <SPI.h>                      // Library to communicate with SPI devices
#include <SD.h>                       // Library to allow SD cards to be used
#include <SerialFlash.h>              // Library to allow access to SPI Flash memory

#include "Mux.h"                      // add mux library to easily controll multiplexer chips
using namespace admux;                // admux is a register to use ADC

#include "TeensyAudioDesignTool.h"      // Library containing Teensy Design Tool settings
#include "MUXController.h"              // Library containing addressable MUX code


//-----------------------------------------------------------------------------------
// Setup Global Objects
//-----------------------------------------------------------------------------------
USBHost myusb;                // create new USBHost
USBHub hub1(myusb);           // create three hubs
USBHub hub2(myusb);
USBHub hub3(myusb);
MIDIDevice midi1(myusb);      // create new midi device object

//-----------------------------------------------------------------------------------
// Setup Global Variables
//-----------------------------------------------------------------------------------
// array of note frequencies to use when notes are received from midi device
const float noteFreqs[128] = {8.176, 8.662, 9.177, 9.723, 10.301, 10.913, 11.562, 12.25, 12.978, 13.75, 14.568, 15.434, 16.352, 17.324, 18.354, 19.445, 20.602, 21.827, 23.125, 24.5, 25.957, 27.5, 29.135, 30.868, 32.703, 34.648, 36.708, 38.891, 41.203, 43.654, 46.249, 48.999, 51.913, 55, 58.27, 61.735, 65.406, 69.296, 73.416, 77.782, 82.407, 87.307, 92.499, 97.999, 103.826, 110, 116.541, 123.471, 130.813, 138.591, 146.832, 155.563, 164.814, 174.614, 184.997, 195.998, 207.652, 220, 233.082, 246.942, 261.626, 277.183, 293.665, 311.127, 329.628, 349.228, 369.994, 391.995, 415.305, 440, 466.164, 493.883, 523.251, 554.365, 587.33, 622.254, 659.255, 698.456, 739.989, 783.991, 830.609, 880, 932.328, 987.767, 1046.502, 1108.731, 1174.659, 1244.508, 1318.51, 1396.913, 1479.978, 1567.982, 1661.219, 1760, 1864.655, 1975.533, 2093.005, 2217.461, 2349.318, 2489.016, 2637.02, 2793.826, 2959.955, 3135.963, 3322.438, 3520, 3729.31, 3951.066, 4186.009, 4434.922, 4698.636, 4978.032, 5274.041, 5587.652, 5919.911, 6271.927, 6644.875, 7040, 7458.62, 7902.133, 8372.018, 8869.844, 9397.273, 9956.063, 10548.08, 11175.3, 11839.82, 12543.85};

// the following two constants are used to convert input data to a percentage
const float DIV127 = (1.0 / 127.0);             // some midi data is between 0 and 127
const float DIV1024 = (1.0 / 1024.0);           // analog inputs are between 0 and 1024
unsigned long oldtime;                          // store the time since last mux checkup
//-----------------------------------------------------------------------------------
// Setup Function
//-----------------------------------------------------------------------------------
void setup() {
  // initial setup of Teensy Audio
  AudioMemory(20);                      // amount of memory to put aside for Teensy Audio
  Serial.begin(9600);                   // setup and start serial comunication
  myusb.begin();                        // start usb object - used by Teensy for 2nd USB port
  delay(200);                           // let serial communication  initialise/settle

  // setup input pins for card address
  for (int i = 0; i < pinNum; i++) {
    pinMode(dipPins[i], INPUT);
  }

  // Run Addressable Mux setup
  readCards();              // check how many cards there are and how many IO pins for each card
  printCardRead();          // print out the cards and IO pins for each card
  calcDataMuxSize();        // calculate how many locations are needed to store data from Main MUX
  printCards();             // print number of cards found, IO pins for each card, number of values stored


  //*************************************************************
  // Teensy Synth setup
  //   this section will change depending upon the system designed with the Audio Design Tool
  //*************************************************************
  // link actions of midi1 to functions to allow control via a midi keyboard connected via USB
  midi1.setHandleNoteOff(OnNoteOff);                        // when key is released
  midi1.setHandleNoteOn(OnNoteOn);                          // when key is pressed
  midi1.setHandleControlChange(OnControlChange);        // when a control signal changes

  // Teensy Initial Sound Settings
  sgtl5000_1.enable();                   // enable Teensy sound output
  sgtl5000_1.volume(0.7);           // set master volume

  // waveform1 settings – Sawtooth waveform, amplitude 0, frequency 82.41Hz, pulse width 0.15
  waveform1.begin(WAVEFORM_SAWTOOTH);
  waveform1.amplitude(0.0);
  waveform1.frequency(82.41);
  waveform1.pulseWidth(0.15);

  // filter LFO settings – Sine waveform, amplitude 0, frequency 20Hz, pulse width 0.15
  filter_LFO.begin(WAVEFORM_SINE);
  filter_LFO.amplitude(0.0);
  filter_LFO.frequency(20);
  filter_LFO.pulseWidth(0.15);

  // filter mixer settings – each input set to 0.25 gain
  filter_mixer.gain(0, 0.25);
  filter_mixer.gain(1, 0.25);
  filter_mixer.gain(2, 0.25);

}

//-----------------------------------------------------------------------------------
// Main Loop Program
//-----------------------------------------------------------------------------------
void loop()
{
  myusb.Task();          // poll connected usb devices for updates to their status
  midi1.read();           // read USB midi signals

  // using millis to only check the IO via mux every so often
  if ( (millis() - oldtime) > 100) {  // if 100ms has passed do the following
    oldtime = millis();       // store current time
    storePrevious();         // run storePrevious function to store muxData values
    readmuxRead();         // run readmuxRead function to get new IO values
    muxDataPrint();            // run muxDataPrint to print out the current muxData values
    muxValueChanged();    // run muxValueCheck to see if muxData values have changed since last read

    // check if muxData values values have changed since last time read
    if (muxChanged = 1) {
      updateControls();       // run updateControls to update the Teensy control values
    }
  }
}

//*******************************************************************************
//Edit following section to use the muxData values to control the Teensy settings
//*******************************************************************************
// Help
//   frequency 20Hz - 20KHz
//   LFO freq below 20Hz  around 10Hz
//   mixer values 0 - 1 - 3 (above 1 amplifies)
//   filter outputs
//    0 - low pass
//    1 - band pass
//    2 - high pass
//   filter resonance 0.7 - 5.0
//   amplitudes 0 - 1
//
//*******************************************************************************
//-----------------------------------------------------------------------------------
// update the teensy control settings with the latest values from the IO
//-----------------------------------------------------------------------------------
void updateControls() {
  // filter settings
  filter.frequency(10000 * muxData[2] * DIV1024);           // filter frequency - 0 - 10000 is a good range
  filter.resonance((4.3 * muxData[3] *DIV1024) + 0.7);      // resonance value needs to be between 0.7
//   and 5.0
  // filter LFO settings
  filter_LFO.frequency(20 * muxData[0] * DIV1024);          // LFO frequency 0 - 20Hz is a good range
  filter_LFO.amplitude(muxData[1] * DIV1024);               // LFO amplitude 0 - 1

  // filter mixer settings - each input of the mixer connects to three filter outputs
  filter_mixer.gain(0, muxData[4] * DIV1024);           //  filter: Low Pass
  filter_mixer.gain(1, muxData[5] * DIV1024);           //  Filter: Band Pass
  filter_mixer.gain(2, muxData[6] * DIV1024);           //  Filter: High Pass
}

//-----------------------------------------------------------------------------------
// code to control note when note on is recieved
//-----------------------------------------------------------------------------------
void OnNoteOn(byte channel, byte note, byte velocity)
{
  // check note is between sensible values
  if ( note > 23 && note < 108 ) {

    float velo = (velocity * DIV127);             // calculate new velocity value
    waveform1.frequency(noteFreqs[note]);     // use key pressed to grab note from array
    waveform1.amplitude(velo);                    // set amplitude using new velocity value
  }
}

//-----------------------------------------------------------------------------------
// code to control note when note off is recieved
//-----------------------------------------------------------------------------------
void OnNoteOff(byte channel, byte note, byte velocity)
{
  // check if note is a sensible value
  if ( note > 23 && note < 108 ) {
    waveform1.amplitude(0);                       // set amplitude to zero as key is released
  }
}

//-----------------------------------------------------------------------------------
// use this function if midi conrols are to be used
//-----------------------------------------------------------------------------------
void OnControlChange(byte channel, byte control, byte value)
{
      //empty on purpose as midi controls not being used
}
TeensyAudioDesignTool.h
// GUItool: begin automatically generated code
AudioSynthWaveform       waveform1;              //xy=482.5555953979492,232.6666784286499
AudioSynthWaveform       filter_LFO;               //xy=488.8889617919922,271.66662979125977
AudioFilterStateVariable filter;                    //xy=636.5555458068848,239.00004768371582
AudioMixer4              filter_mixer;               //xy=776.388916015625,245.16670608520508
AudioOutputI2S           i2s1;                      //xy=925.0556049346924,247.0000514984131
AudioConnection          patchCord1(waveform1, 0, filter, 0);
AudioConnection          patchCord2(filter_LFO, 0, filter, 1);
AudioConnection          patchCord3(filter, 0, filter_mixer, 0);
AudioConnection          patchCord4(filter, 1, filter_mixer, 1);
AudioConnection          patchCord5(filter, 2, filter_mixer, 2);
AudioConnection          patchCord6(filter_mixer, 0, i2s1, 0);
AudioConnection          patchCord7(filter_mixer, 0, i2s1, 1);
AudioControlSGTL5000     sgtl5000_1;             //xy=686.4365005493164,163.16664505004883
// GUItool: end automatically generated code
MUXController.h
//-----------------------------------------------------------------------------------
// created by: Andrew Birch
// date: 20-01-2021
// start date: 12/12/2020
//-----------------------------------------------------------------------------------
// Teensy Modular Multiplexer (Mux) Synth
//-----------------------------------------------------------------------------------
//  Modular system to allow easier control of Multiplexers
//  Aims of system:
//     each mux is on a seperate card - making the system easier to manage
//     additional cards can be added with minimum changes to the code
//     each card has its own address to allow the Teensy to talk to just one card at a time
//     each card returns the number of used IO pins to the Teensy
//  There are three busses to allow the cards to connect to the Teensy
//   card address - used to select individual cards
//   no of IO pins - used to return number of IO pins being used by a card
//   MUX address - used with card address to select card and control the mux on the card
//
// The system automatically checks to see how many cards are connected
//  and how many IO pins are used on each card
// This information is then used to:
//     only check available mux cards one at a time
//     only check avalable IO pins on each mux card
//     this saves processing time of the Teensy
//
//-----------------------------------------------------------------------------------
//  Mux Bus Pins - see circuit schematic for full information
//-----------------------------------------------------------------------------------
//   MUX Read Bus           Card Address Bus
//   OUT      Teensy  wire colour    OUT      Teensy   wire colour
//    A ...... 33 ...... White        A ...... 30 ...... White
//    B ...... 34 ...... Yellow       B ...... 31 ...... Yellow
//    C ...... 35 ...... Orange       C ...... 32 ...... Green
//    Z ...... 36 (A17). Green
//
//  Card IO Pins Bus
//  OUT      Teensy   wire colour
//   A ...... 24 ...... White
//   B ...... 25 ...... Yellow
//   C ...... 26 ...... Blue
//   D ...... 27 ...... Orange


//-----------------------------------------------------------------------------------
//  Setup mux's
//-----------------------------------------------------------------------------------
// create new muxRead object to read data from each sub mux
//  analog in pin A17, type - INPUT, Analog, Address ABC pins 33,34,35)
Mux muxRead(Pin(A17, INPUT, PinType::Analog), Pinset(33, 34, 35));
// create new muxCard object, to control mux bus
//  analog in not needed but set to A18, type - INPUT, Analog, Address ABC pins 30,31,32)
Mux muxCard(Pin(A18, INPUT, PinType::Analog), Pinset(30, 31, 32));

//-----------------------------------------------------------------------------------
//  Setup variables to work with mux
//   note - because you MUST setup arrays when code is compiled for Arduino
//   the arrays to store the mux values have to have 64 slots available
//   8 cards x 8 inputs = 64 slots
//-----------------------------------------------------------------------------------
int muxData[64];    // main array storing read mux values from inputs
int muxOld[64];     // store previous value
int noCards;        // store the number of cards found
int muxSize;        // store number of spaces used in muxData
int muxChanged;     // store if mux value has changed

// array store for the number of IO pins on each card MUX - 9 means slot can be igno
int cardRead[] = {9, 9, 9, 9, 9, 9, 9, 9};


int dipPins[] = {27, 26, 25, 24};  // an array for the Card IO Bus pins on the Teensy
int pinNum = sizeof(dipPins) / 4;  // divide the size of the array by 4 to get the number of slots


//-----------------------------------------------------------------------------------
// Find how what cards are connected and how many pins are used by each card
//  Check each card address to see if a card is connected
//  If a card is connected
//   read the number of IO pins and store in cardRead[]
//   the number of IO pins will be on the following Teenay inputs
//   A = p24, B = p25, C = p26, D = p27
//-----------------------------------------------------------------------------------
void readCards() {
  // look at each possible address of the cards using loop 0 to <8
  for (int i = 0; i < 8; i++) {
    muxCard.read(i);         // use muxCard.read to set muxCard Address i
    delay(20);               // pause to allow data to settle

    // use loop to read each wire of the card IO bus
    for (int j = 0; j < pinNum; j++) {
      // add the read value to the correct bit of the number in cardRead[i]
      bitWrite(cardRead[i], j,  digitalRead(dipPins[j]));
    }
    if (cardRead[i] == 0)     //  check to see if the read value is 0
    {                         //   this means no pins used
      cardRead[i] = 9;        //   so store 9 instead to show no IO pins to read on this card
    }
  }
}

//-----------------------------------------------------------------------------------
// Print out all 8 possible cards and their IO pin number values
// It will look like this
//   "cardRead index 0 = (4)"
//-----------------------------------------------------------------------------------
void printCardRead() {
  for (int i = 0; i < 8; i++) {
    Serial.print("cardRead index ");
    Serial.print(i);
    Serial.print(" = (");
    Serial.print(cardRead[i]);
    Serial.println(")");
  }
}

//-----------------------------------------------------------------------------------
//   Calculate the
//     number of elements needed to store data from MUX's
//     number of cards found
//-----------------------------------------------------------------------------------
void calcDataMuxSize() {
  //  again 0 - 7 possible cards
  for (int i = 0; i < 8; i++) {
    // only values less than 9 are valid
    if (cardRead[i] < 9) {              //  if card found
      noCards++;                        //    add 1 to noCards
      muxSize = muxSize + cardRead[i];  //    add no. of IO pins to mux Size
    }
  }
}

//-----------------------------------------------------------------------------------
// Print out the card setup values
// It will look like this
//   "number of cards 2"
//   "cardRead index 0 = (4) : pins 0 to 3"
//   "cardRead index 2 = (3) : pins 4 to 6"
//   "muxSize = 7 values in store 0 to 6"
//-----------------------------------------------------------------------------------
void printCards() {
  Serial.print("number of cards ");
  Serial.println(noCards);            //  no. of cards found
  int indexCount = 0;
  for (int i = 0; i < 8; i++) {       //  use loop to print out no. of IO pins on each card

    if (cardRead[i] < 9) {            //  only values less than 9 are valid
      Serial.print("cardRead index ");//  The following code prints outb the current card
      Serial.print(i);                //   index,
      Serial.print(" = (");
      Serial.print(cardRead[i]);      //   no. of IO inputs expected
      Serial.print(") : pins ");
      Serial.print(indexCount);       //   start index in array
      indexCount += cardRead[i];
      Serial.print(" to ");
      Serial.println(indexCount - 1); //   end index  in array
    }
  }
  Serial.print("muxSize = ");         //  Then print how many values are to be stored
  Serial.print(muxSize);
  Serial.print(" values in store 0 to ");
  Serial.println(muxSize - 1);
  Serial.println("");
}

//-----------------------------------------------------------------------------------
// Read the values from the mux on each card
//  values stored in muxData[]
//-----------------------------------------------------------------------------------
void readmuxRead() {
  int dataMain;       // store read value from muxRead
  int muxDataIndex = 0; // index to store data in muxData
  // cycle through each card address 0 - 7
  for (int i = 0; i < 8; i++) {
    // check that a card has been read at that address i - if value is 9 - no card
    if (cardRead[i] < 9) {
      // if card was found
      muxCard.read(i);              // set card address to current card
      delay(20);                    // pause to allow data to settle

      // check only the needee number of IO pins on card
      //  readCard[i] is the number of IO pins used on card MUX
      for (int j = 0; j < cardRead[i]; j++) {
        dataMain = muxRead.read(j);         // using MUX to read main analog in

        // to remove data jitter from the mux, check to see if new value read
        //   is within +5 to -5 of previous value
        if (dataMain < muxData[muxDataIndex] - 5 || dataMain > muxData[muxDataIndex] + 5) {
          if(dataMain < 15){            // if read data is less than 15 set to 0
            dataMain=0;                 // so that low values become 0
            }
          muxData[muxDataIndex] = dataMain;   // store read value into muxData store
        }
        muxDataIndex ++;                    // move to nex location in muxDataStore
      }
    }
  }
}
//-----------------------------------------------------------------------------------
// To see if the Teensy needs to be updated with values
// Two functions
//  1. Store previous values of muxData in muxOld
//  2. Check if new values are different to previous values - 0 = no 1 = yes
//  used to only update teensy if changes have occured
//-----------------------------------------------------------------------------------
void storePrevious() {
  // loop through the muxData array upto the number of slots in muxData
  for (int j = 0; j < muxSize; j++) {
    muxOld[j] =  muxData[j];          // store current value in muxOld
  }
}

void muxValueChanged() {
  muxChanged = 0;         //reset the muxChanged flag

  // loop through the muxData array upto the number of slots in muxData
  for (int j = 0; j < muxSize; j++) {
    //check to see if new data is not the same as old data
    if ( muxData[j] != muxOld[j]) {
      muxChanged = 1;         // if data has changed muxChanged = 1
    }
  }
}

// print the values in muxData
void muxDataPrint() {
  Serial.println("muxDataPrint");
  // loop through the muxData array upto the number of slots in muxData
  for (int i = 0; i < muxSize; i++) {
    Serial.print(" index = ");
    Serial.print(i);              // print out the data and text
    Serial.print(" muxData ");
    Serial.println(muxData[i]);
  }
  Serial.println("");
}
Synth Design System - Addressable MUX Circuit
Microcontrollers have a limited number of IO pins. This design uses an addressable MUX circuit to add multiple inputs.


Discussions
Become a Hackaday.io Member
Create an account to leave a comment. Already have an account? Log In.