 Vince
VinceI heard a lot of very bad feedback about the SPX-WFG01 and Hi-kumo app.
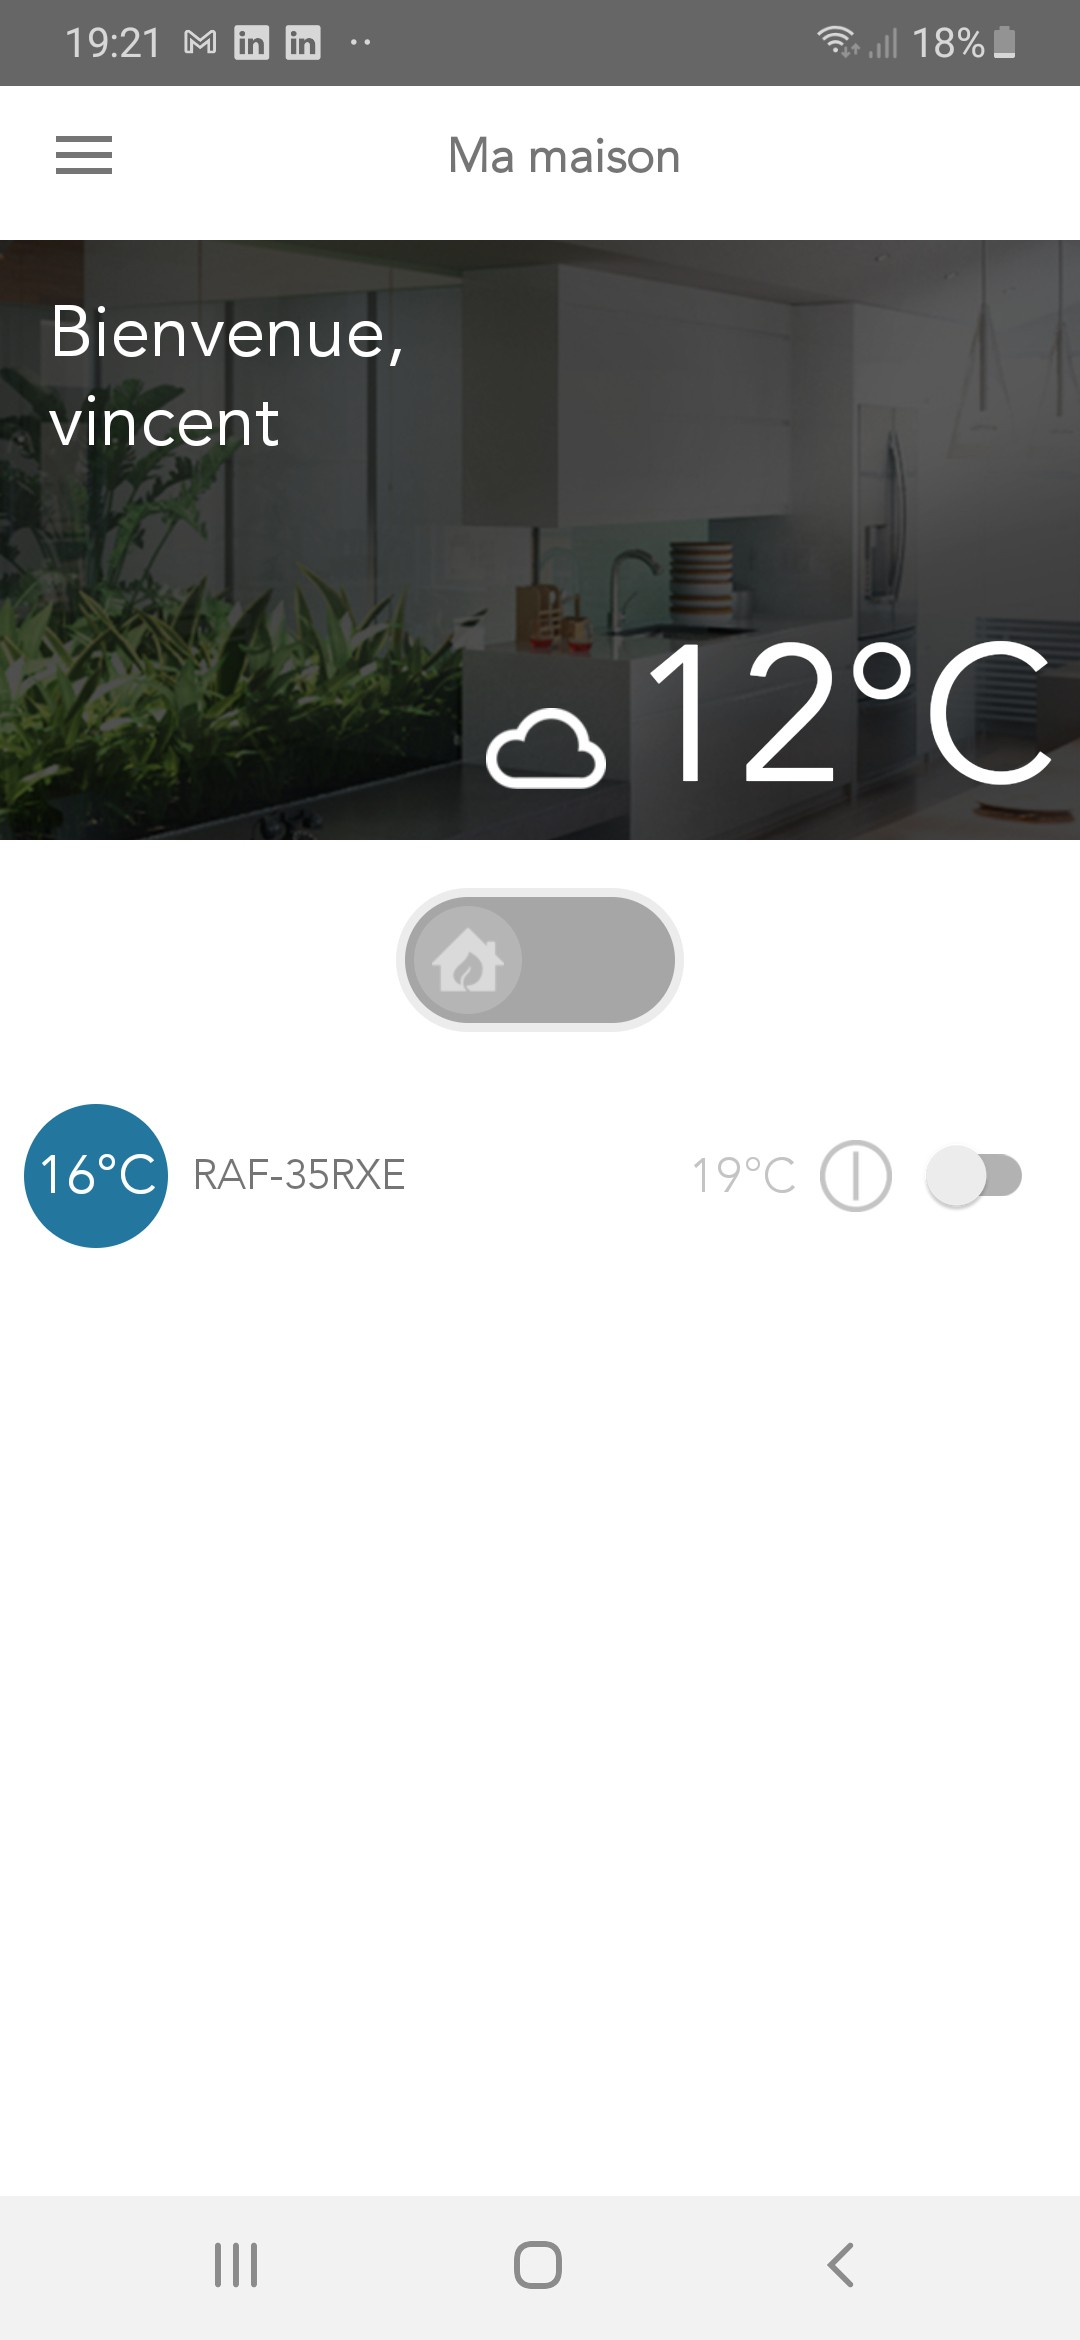
But after the full reset, I was able to create the new account and to connect the gataway to the A/C. The app works well
I don't understand all the critics on play store ...
The purpose of this project is to manage my hitachi air conditionners with the Home Assistant using ESP-8266.
Already have an account? Log in.
To make the experience fit your profile, pick a username and tell us what interests you.
I heard a lot of very bad feedback about the SPX-WFG01 and Hi-kumo app.
But after the full reset, I was able to create the new account and to connect the gataway to the A/C. The app works well
I don't understand all the critics on play store ...
|
sheet - 11.79 kB - 10/04/2021 at 15:05 |
|
|
|
JPEG Image - 1.51 MB - 10/04/2021 at 15:04 |
|
|

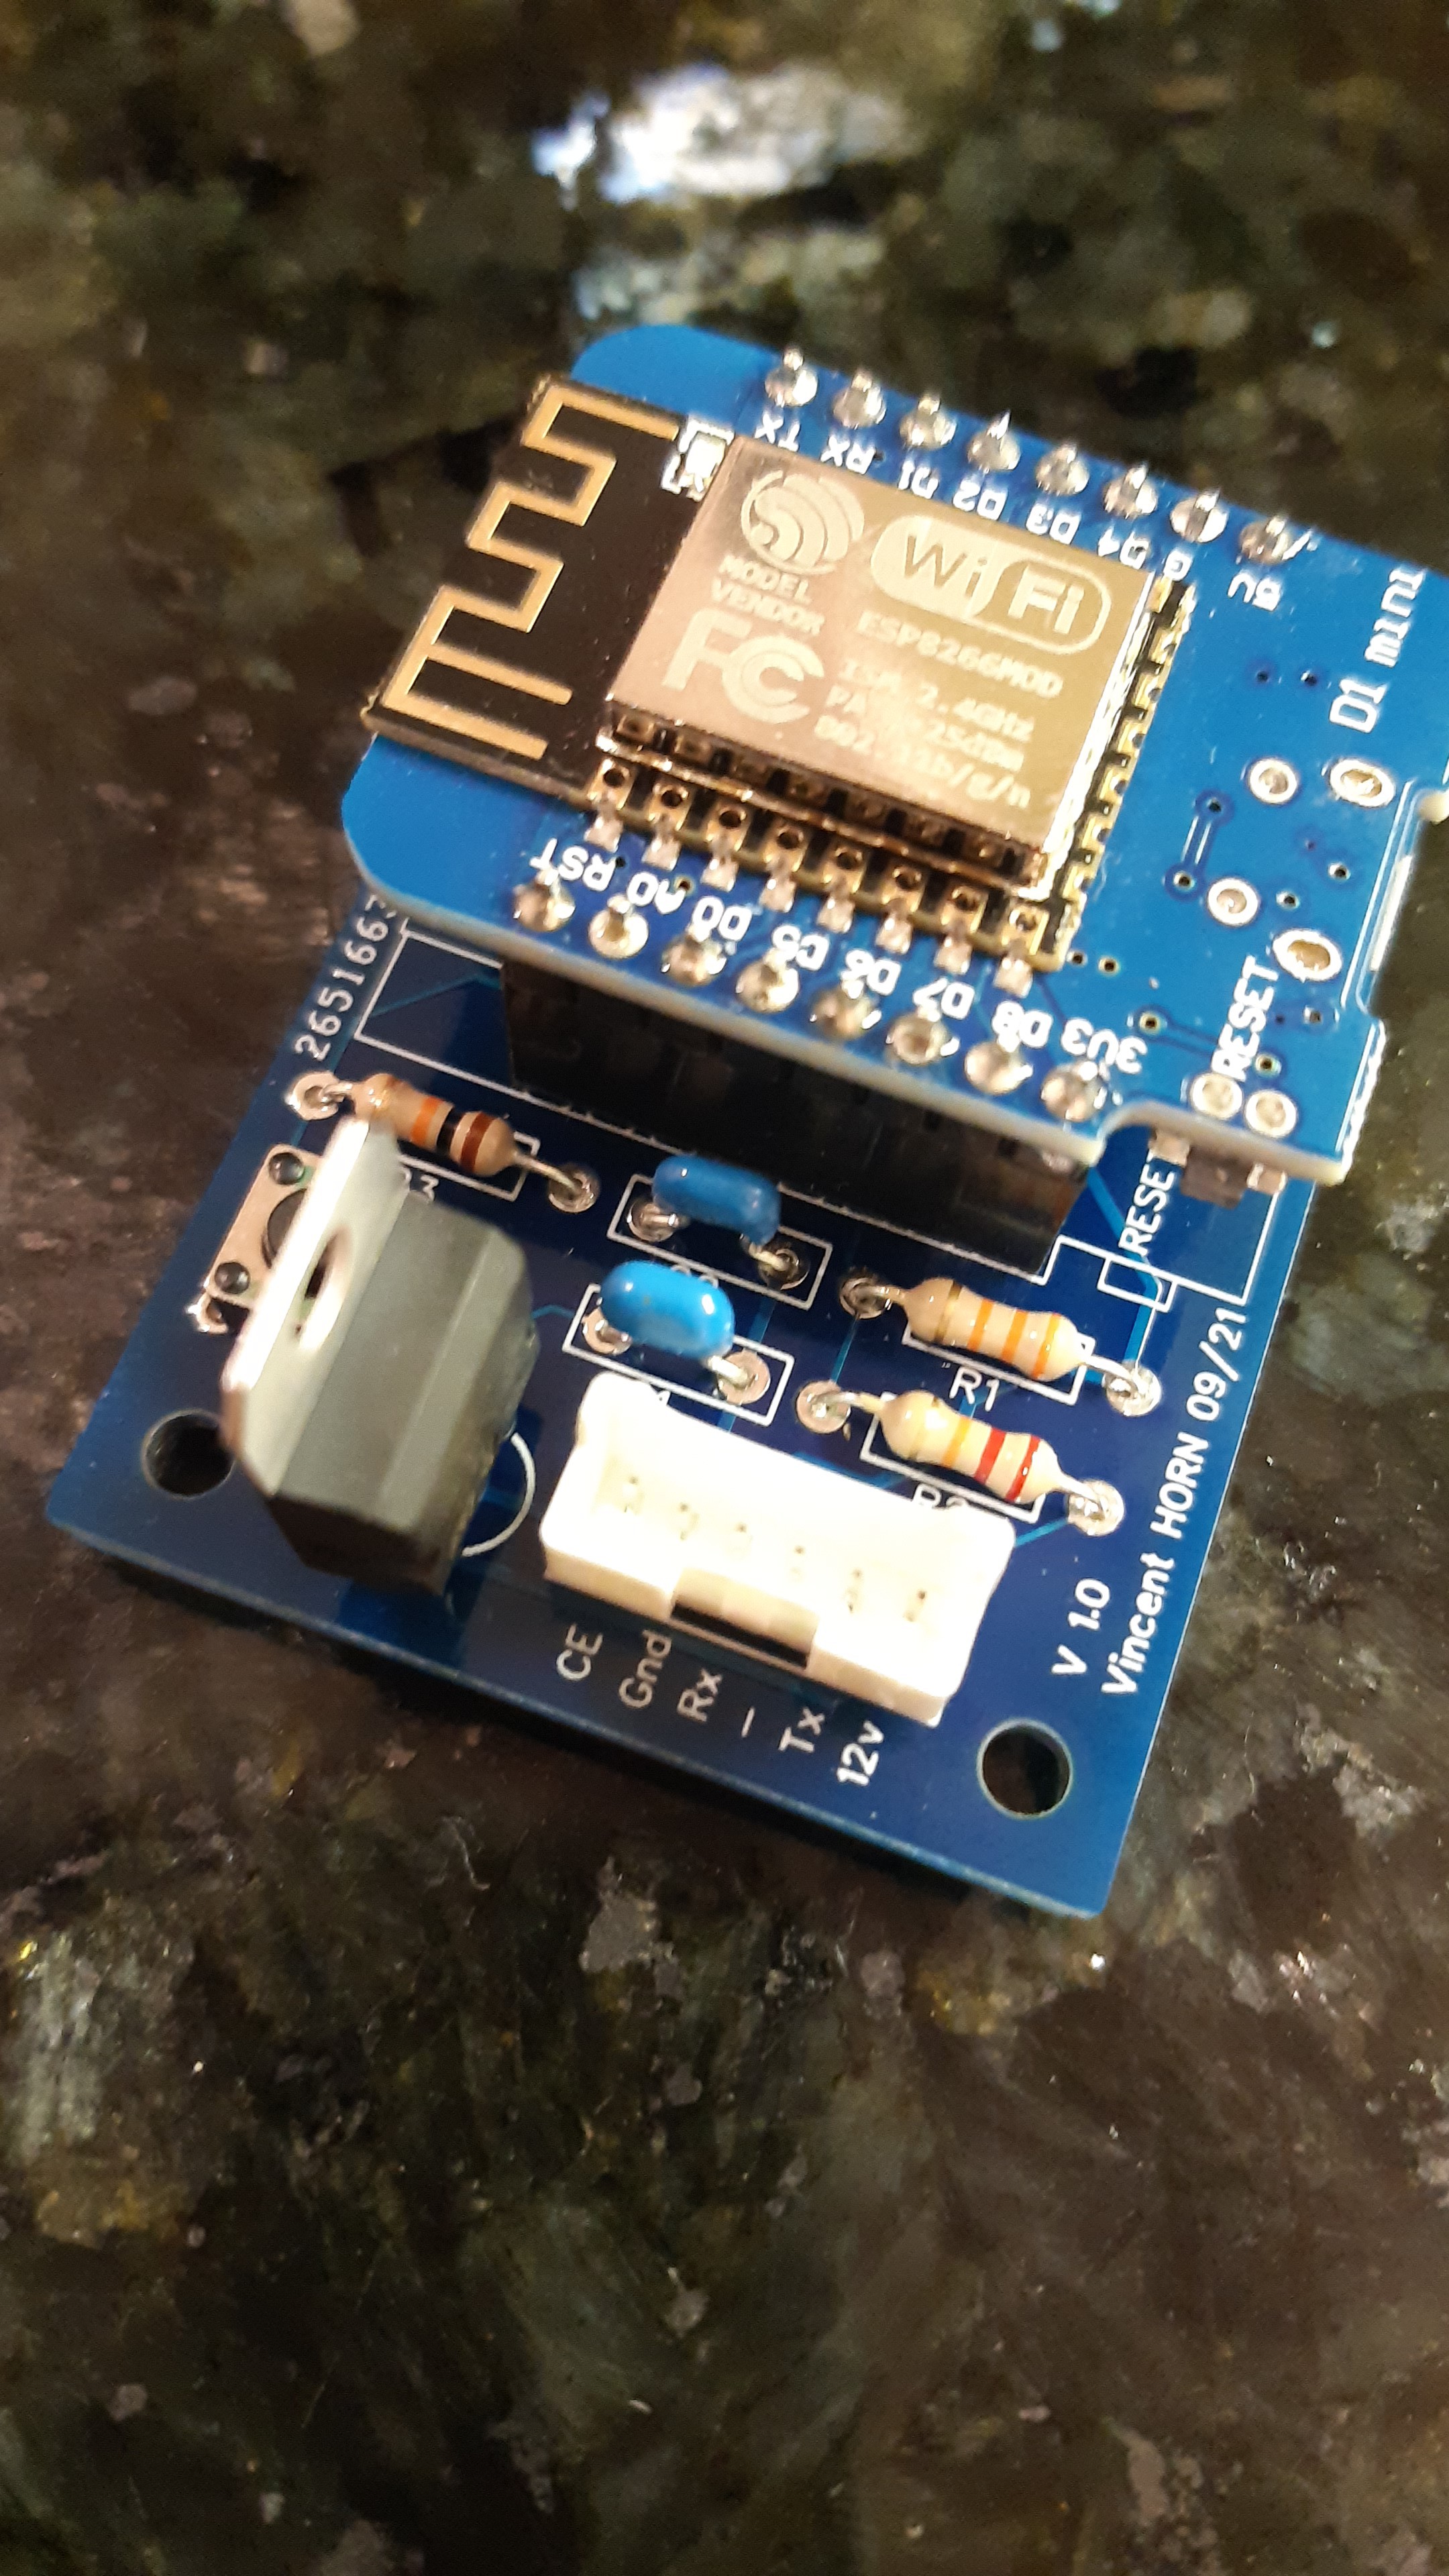
Here the final PCB & schematic. Very basic...
Let's go to HomeAssistant now.
First add this to configuration.yaml
climate:
  - platform: mqtt
    name: "Clim grand mur"
    unique_id: "clim_1"
    modes:
      - "off"
      - "heat"
      - "dry"
      - "cool"
#     - "auto"
    swing_modes:
      - "on"
      - "off"
    fan_modes:
      - "auto"
      - "high"
      - "medium"
      - "low"
      - "silent"
    power_command_topic: "device_7/cmnd/POWER"
    mode_command_topic: "device_7/cmnd/OPMODE"
    mode_state_topic: "device_7/STATE"
    mode_state_template: '{{ value_json.op_mode }}'
    temperature_command_topic: "device_7/cmnd/TEMP"
    temperature_state_topic: "device_7/STATE"
    temperature_state_template: '{{ value_json.temperature }}'
    fan_mode_command_topic: "device_7/cmnd/FAN"
    fan_mode_state_topic: "device_7/STATE"
    fan_mode_state_template: '{{ value_json.fan_speed }}'
    current_temperature_topic: "device_7/STATE"
    current_temperature_template: '{{ value_json.room_temp }}'
    swing_mode_command_topic: "device_7/cmnd/SWING"
    swing_mode_state_topic: "device_7/STATE"
    swing_mode_state_template: '{{ value_json.swing_mode }}'
    max_temp : 32
    min_temp : 16
    precision: 1.0
    availability_topic: "device_7/LWT"
    payload_available: "Online"
    payload_not_available: "Offline"
and the card setup :
type: custom:thermostat-card
entity: climate.clim_grand_mur
title: Clim grand mur
step: 1
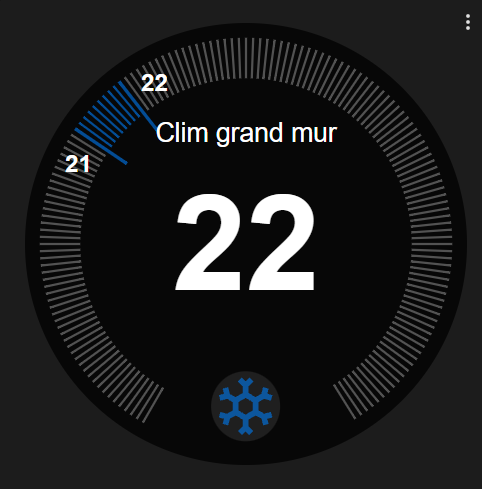
no_card: falseHere the result :
HVAC OFF :
HVAC in COOL mode
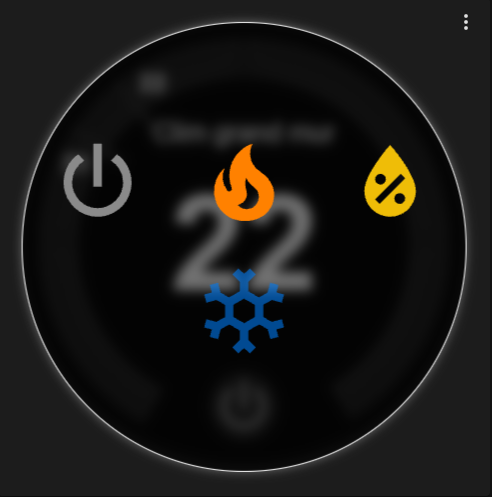
HVAC mode list :
Here the main HVAC_status object that containts all properties (even those I not understood...)
struct HVAC_status {
    word power;        //power (on, off)
    word op_mode;        //mode (auto, hot, dry, cool, fan)
    word fan_speed;        //fan speed (auto, high, medium, low, silent)
    word temperature;    //temperature (16~32°C)
    word param_6;        // ?
    word param_11;        // ?
    word param_12;        // ?
    word swing_mode;    //swing mode (on, off)
    word room_temp;        //room temperature
    word param_102;        // ?
    word param_201;        // ?
//    word param_300;        // ?
    word param_301;        // ?
    word param_302;        // ?
//    word param_304;        // ?
//    word param_800;        // ?
//    word param_900;        // ?
} Hitachi_status;
Here the mode list and fan_list table.
const char mode_list[10][10] = {
    {"off"},        //0x0000
    {"heat"},        //0x0010
    {"dry"},        //0x0020
    {"-"},
    {"cool"},        //0x0040
    {"fan_only"},            //0x0050
//    {"auto"},        //0x8000
    {"auto_heat"},            //0x8010
    {"auto_dry"},            //0x8020
    {"-"},
    {"auto_cool"},            //0x8040
};
const char fan_list[5][7] = {
    {"auto"},        //0x00
    {"high"},        //0x01
    {"medium"},        //0x02
    {"low"},        //0x03
    {"silent"},        //0x04
};
I add 2 timers to trigger :
- HVAC write/scan : write to HVAC if neede or ask for status
- Send MQTT to HomeAssistant
/********************* Function management *****************/

if (millis()-scan_timer_counter > scan_timer) {
    scan_timer_counter = millis();
    if(things_to_write){                                            // write to HVAC id request by callback
        set_HVAC(0x0800,0x07, false);                                // Enter setup mode
        set_HVAC(address_list[1], Hitachi_status.op_mode, true);    // Op mode
        set_HVAC(0x0300,0x0000, true);                                // Unknow
        set_HVAC(address_list[3], Hitachi_status.temperature, true);// desired temp
        set_HVAC(address_list[1], Hitachi_status.op_mode, true);    // Op mode
        set_HVAC(0x0300,0x0000, true);                                // Unknow
        set_HVAC(address_list[3], Hitachi_status.temperature, true);// desired temp
        set_HVAC(address_list[2], Hitachi_status.fan_speed, false);    // fan speed
        set_HVAC(address_list[4], Hitachi_status.swing_mode, false);// swing mode
        set_HVAC(address_list[0], Hitachi_status.power, false);        // power
        set_HVAC(0x0006,0x00, false);                                // Unknow
        set_HVAC(0x0007,0x00, false);                                // Unknow
        things_to_write = false;                            // done
        delay(500);                                            // wait a while before send status
        request_HVAC_status();                                // read status
        Send_fct();                                            // send status to HA
    } else {                                                // read from HVAC en send if needed
        request_HVAC_status();
        if (need_to_send_MQTT) Send_fct();                    // send status to HA
        need_to_send_MQTT = false;
    }
}

/********************** Function send **********************/

if (millis()-send_timer_counter > send_timer) {
    send_timer_counter = millis();
    Send_fct();                                            // send status to HA
}
I choose finaly to communication with HomeAssistant via the MQTT integration.
MQTT is extremely light and reliable for this purpose.
I'll add also a custom thermostat-card. I'll show you this late...
Here me MQTT communication protocol :
I also add a frequently a STATE information in JSON format
device_7/STATE :
{"power":"OFF","op_mode":"off","swing_mode":"off","fan_speed":"auto","temperature":21,"room_temp":22,"RSSI":-55}
and a MQTT last will message to be able to check if the device is on or offline.
device_7/LWT :
Online
After a huge summer break, I'm back to finalize this project.
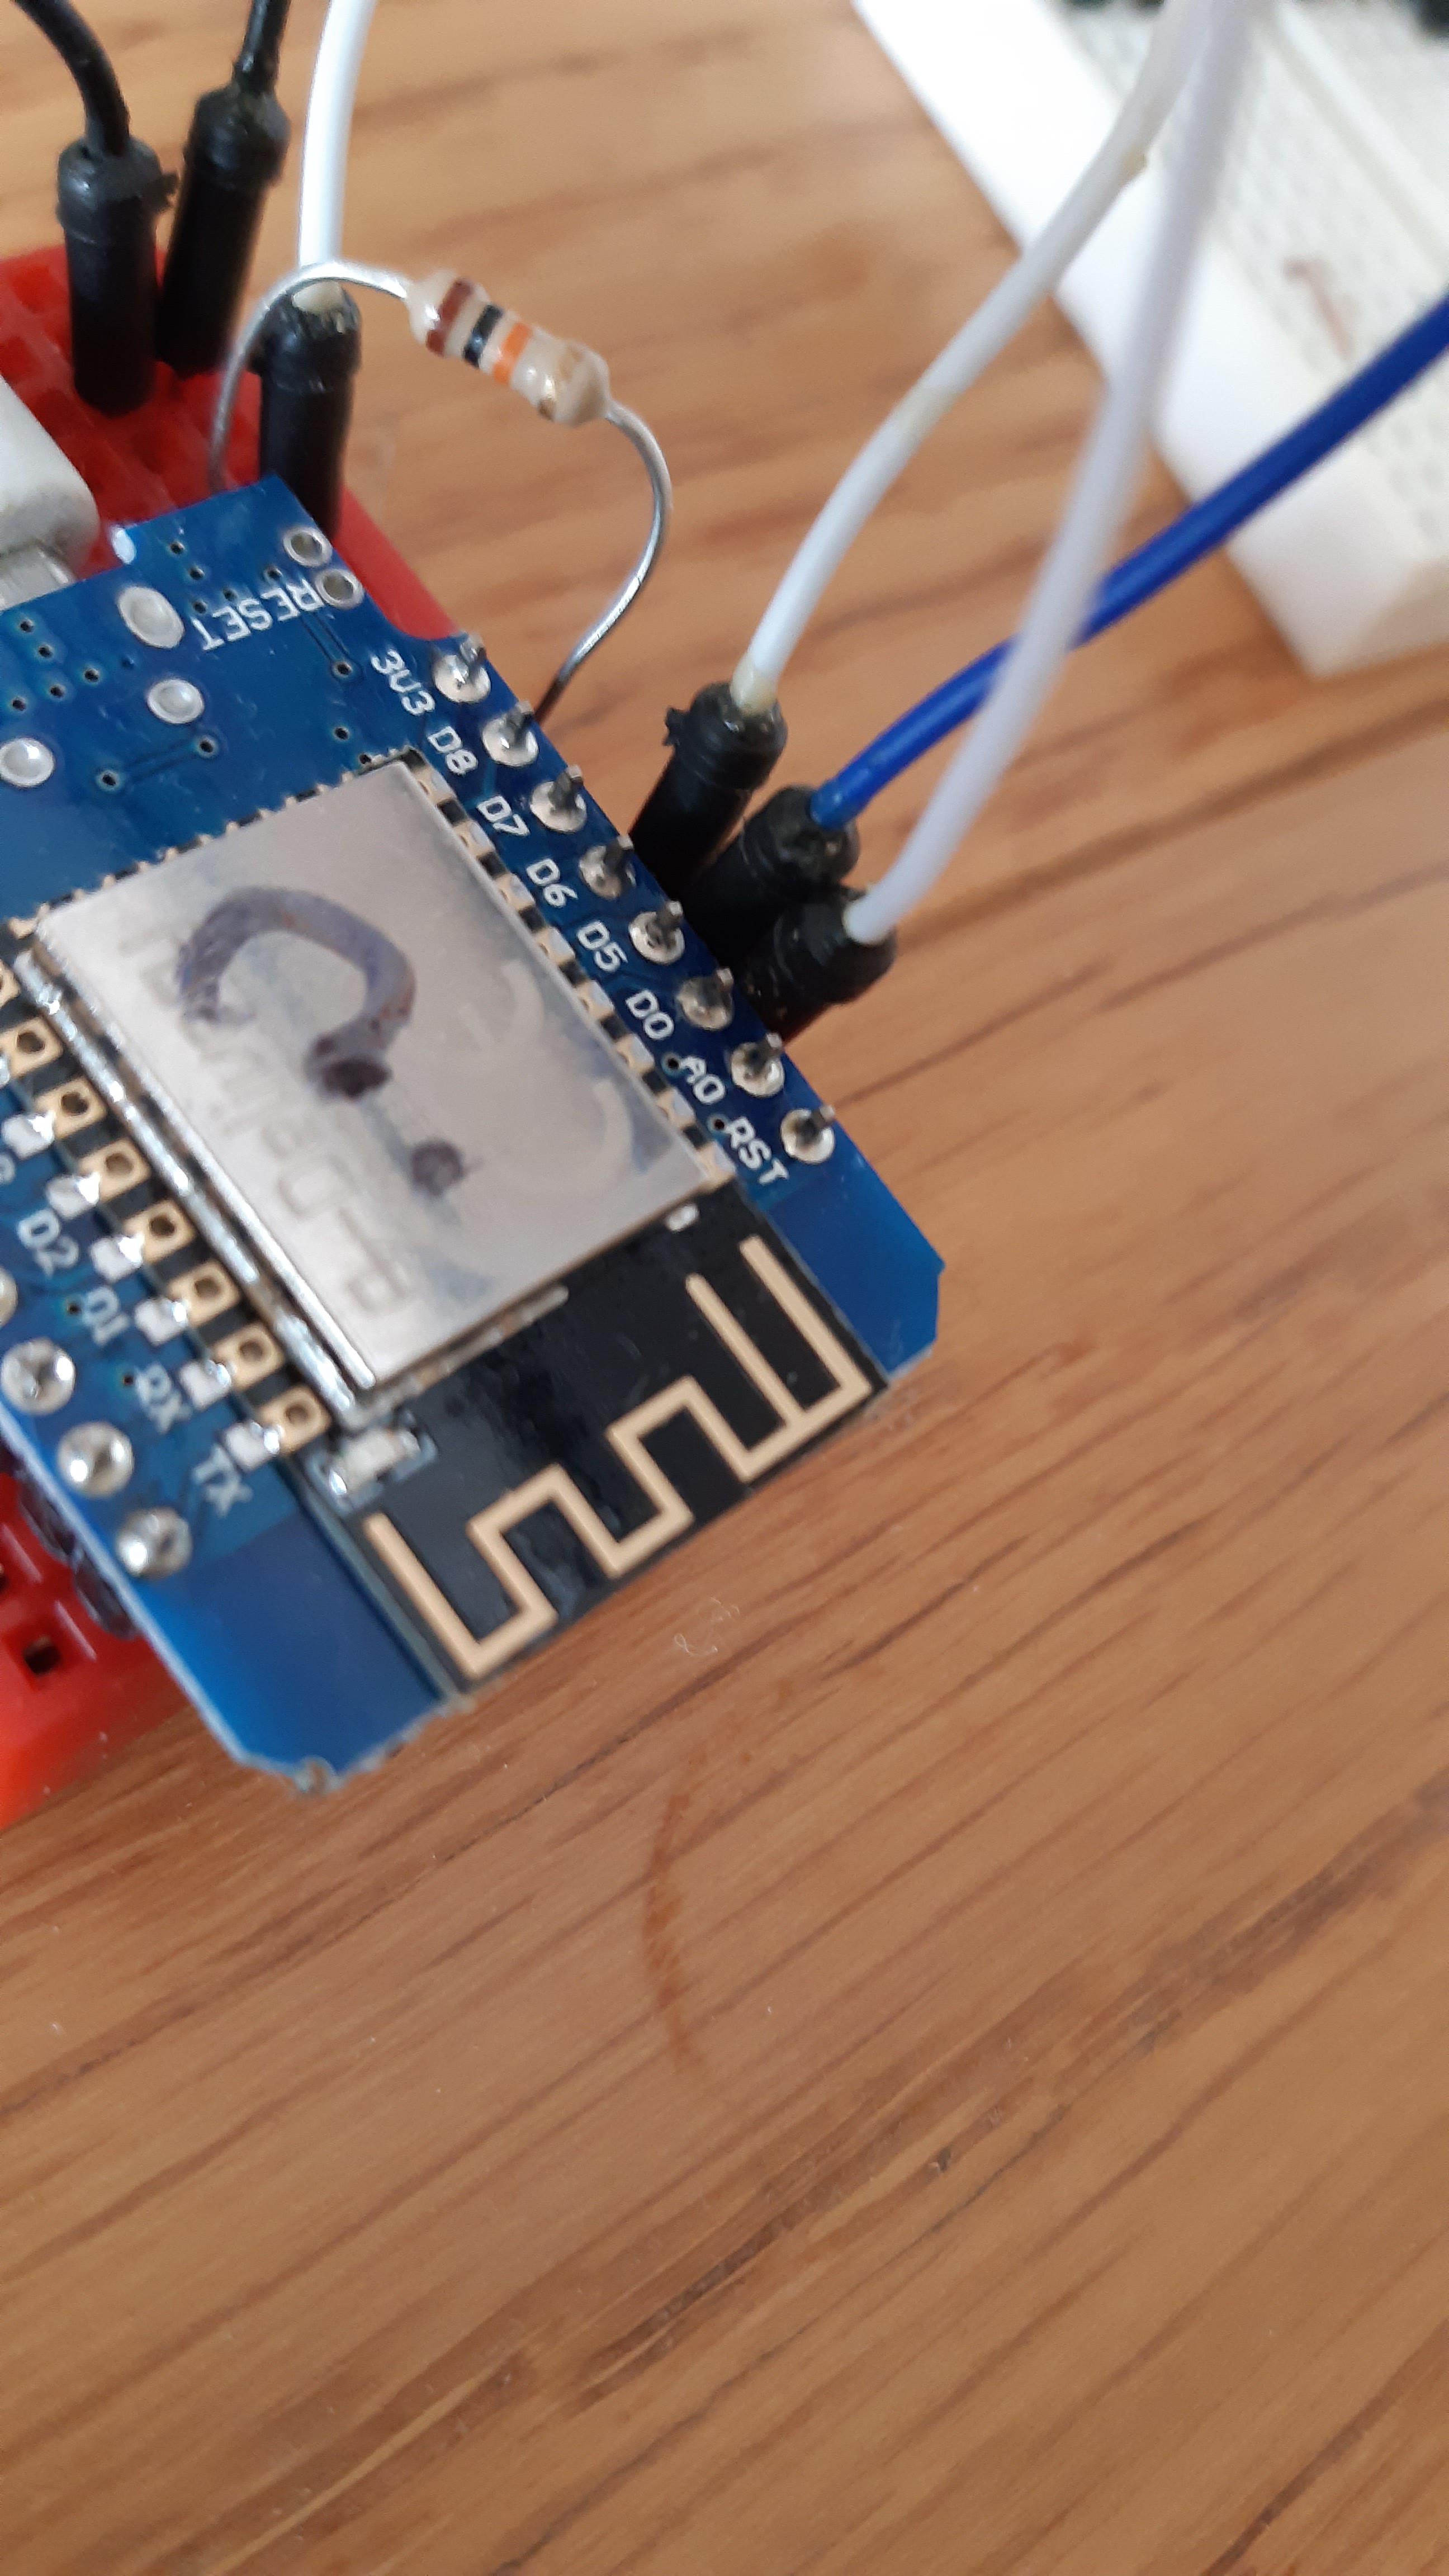
Next step is to write a simple sketch to be able to communicate with the HVAC. With a wemos D1 mini it's quite easy and with a telnet communication you can follow the communication remotely.
You need the SoftwareSerial library setup to :
HVACSerial.begin(9600, SWSERIAL_8O1, 13, 14, false); // baud raute: 9600, data size: 8 bits, parity: odd, stop bits: 1, RX:D7=13, TX:D5=14I need some additionnal resistors to dop the serial input from 5V to 3.3V to be compliant with ESP8266.
After many hours spend to snif the paquets here the first sharing. It was quite easy so far with the basic functions. I found 7 commands/informations out of 15. I add my investigation file
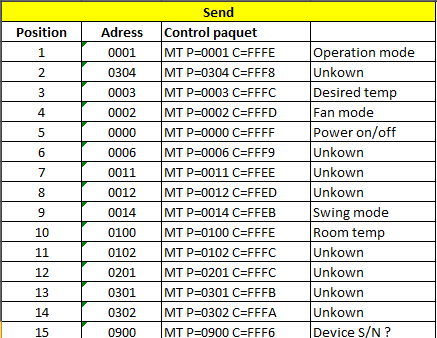
First we can find below the regular exchanged paquets every 6 sec. (Without any command)
Send by the SPX-WFG01 :
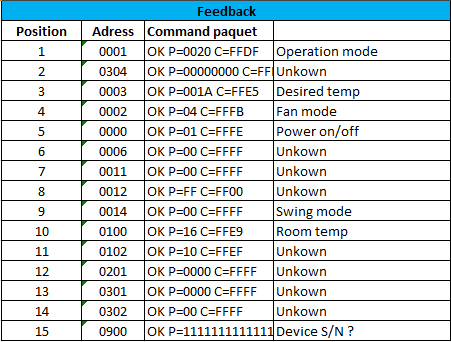
The A/C feedback
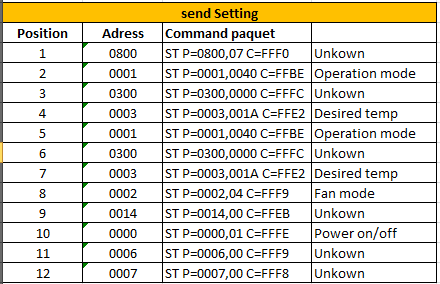
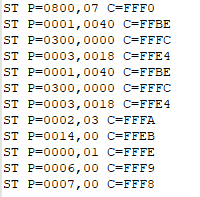
And now the command
So to here the list of adresses and content that I was able to catch.
There are still some question marks that have to be confirmed. And also 8 unkown information in the paquet. Maybe you have an idea ?
There are some functions that combined several of the command.
In addition, all the timer functions are managed by the the remote control itself. So only the basic commands (On/Off) are send by the remote control as scheduled previously.
According to the Hi-humo App description I should find also adresses releated to alarm functions. At this stage I'm not able to figure out how to trigger any alam from the A/C
Here the first analysis of the serial communication between the SPX-WFG01 and the A/C catch with 2 serial adaptators connected to my laptop.
The communication consist of ;
- A paquet sent by the gateway containing 15 lines starting with MT, where P is the adress.
- The response from the gateway containing 15 lines starting all with OK and where P is the containt at this adress.
in addition :
I connect my smartphone to the Hi-humo app and try to catch some commands between
In this case a very diffrent paquet is sent to the A/C containing 12 lines staring all with ST, P contains the adress followed by the value.
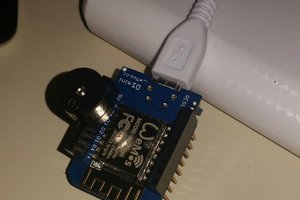
My first step was to open the gateway and to check the pinout.
I can confirm the pinout posted by Florian (https://hackaday.io/project/168959-let-me-control-you-hitachi-air-conditioner)
Nevertheless the function of pin N°6 is still unclear for me. Let's check that later.
I mesured 5V for Rx & Tx echanges.
I'll come up soon with the first paquets...
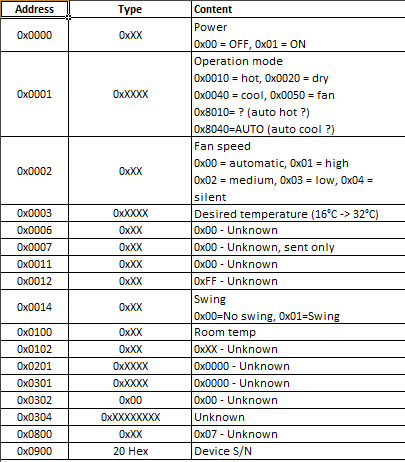
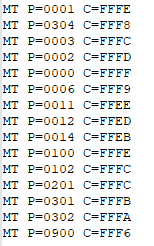


 4 adress are missing and one (0007) is not only use in this message frame. I noticed that some adress are used several time in the same paquet and the adress sequence is also not the same.
 At this stage I noticed that the communication for this A/C unit is very similar to the one used and hacked by Florian in this project (thks to him). There are more containt, more lines in the paquet and probably at the end more function to manage.
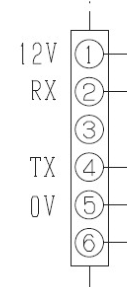 Every thing is ready to use my own tools that I've made to monitor and hack serial communication.
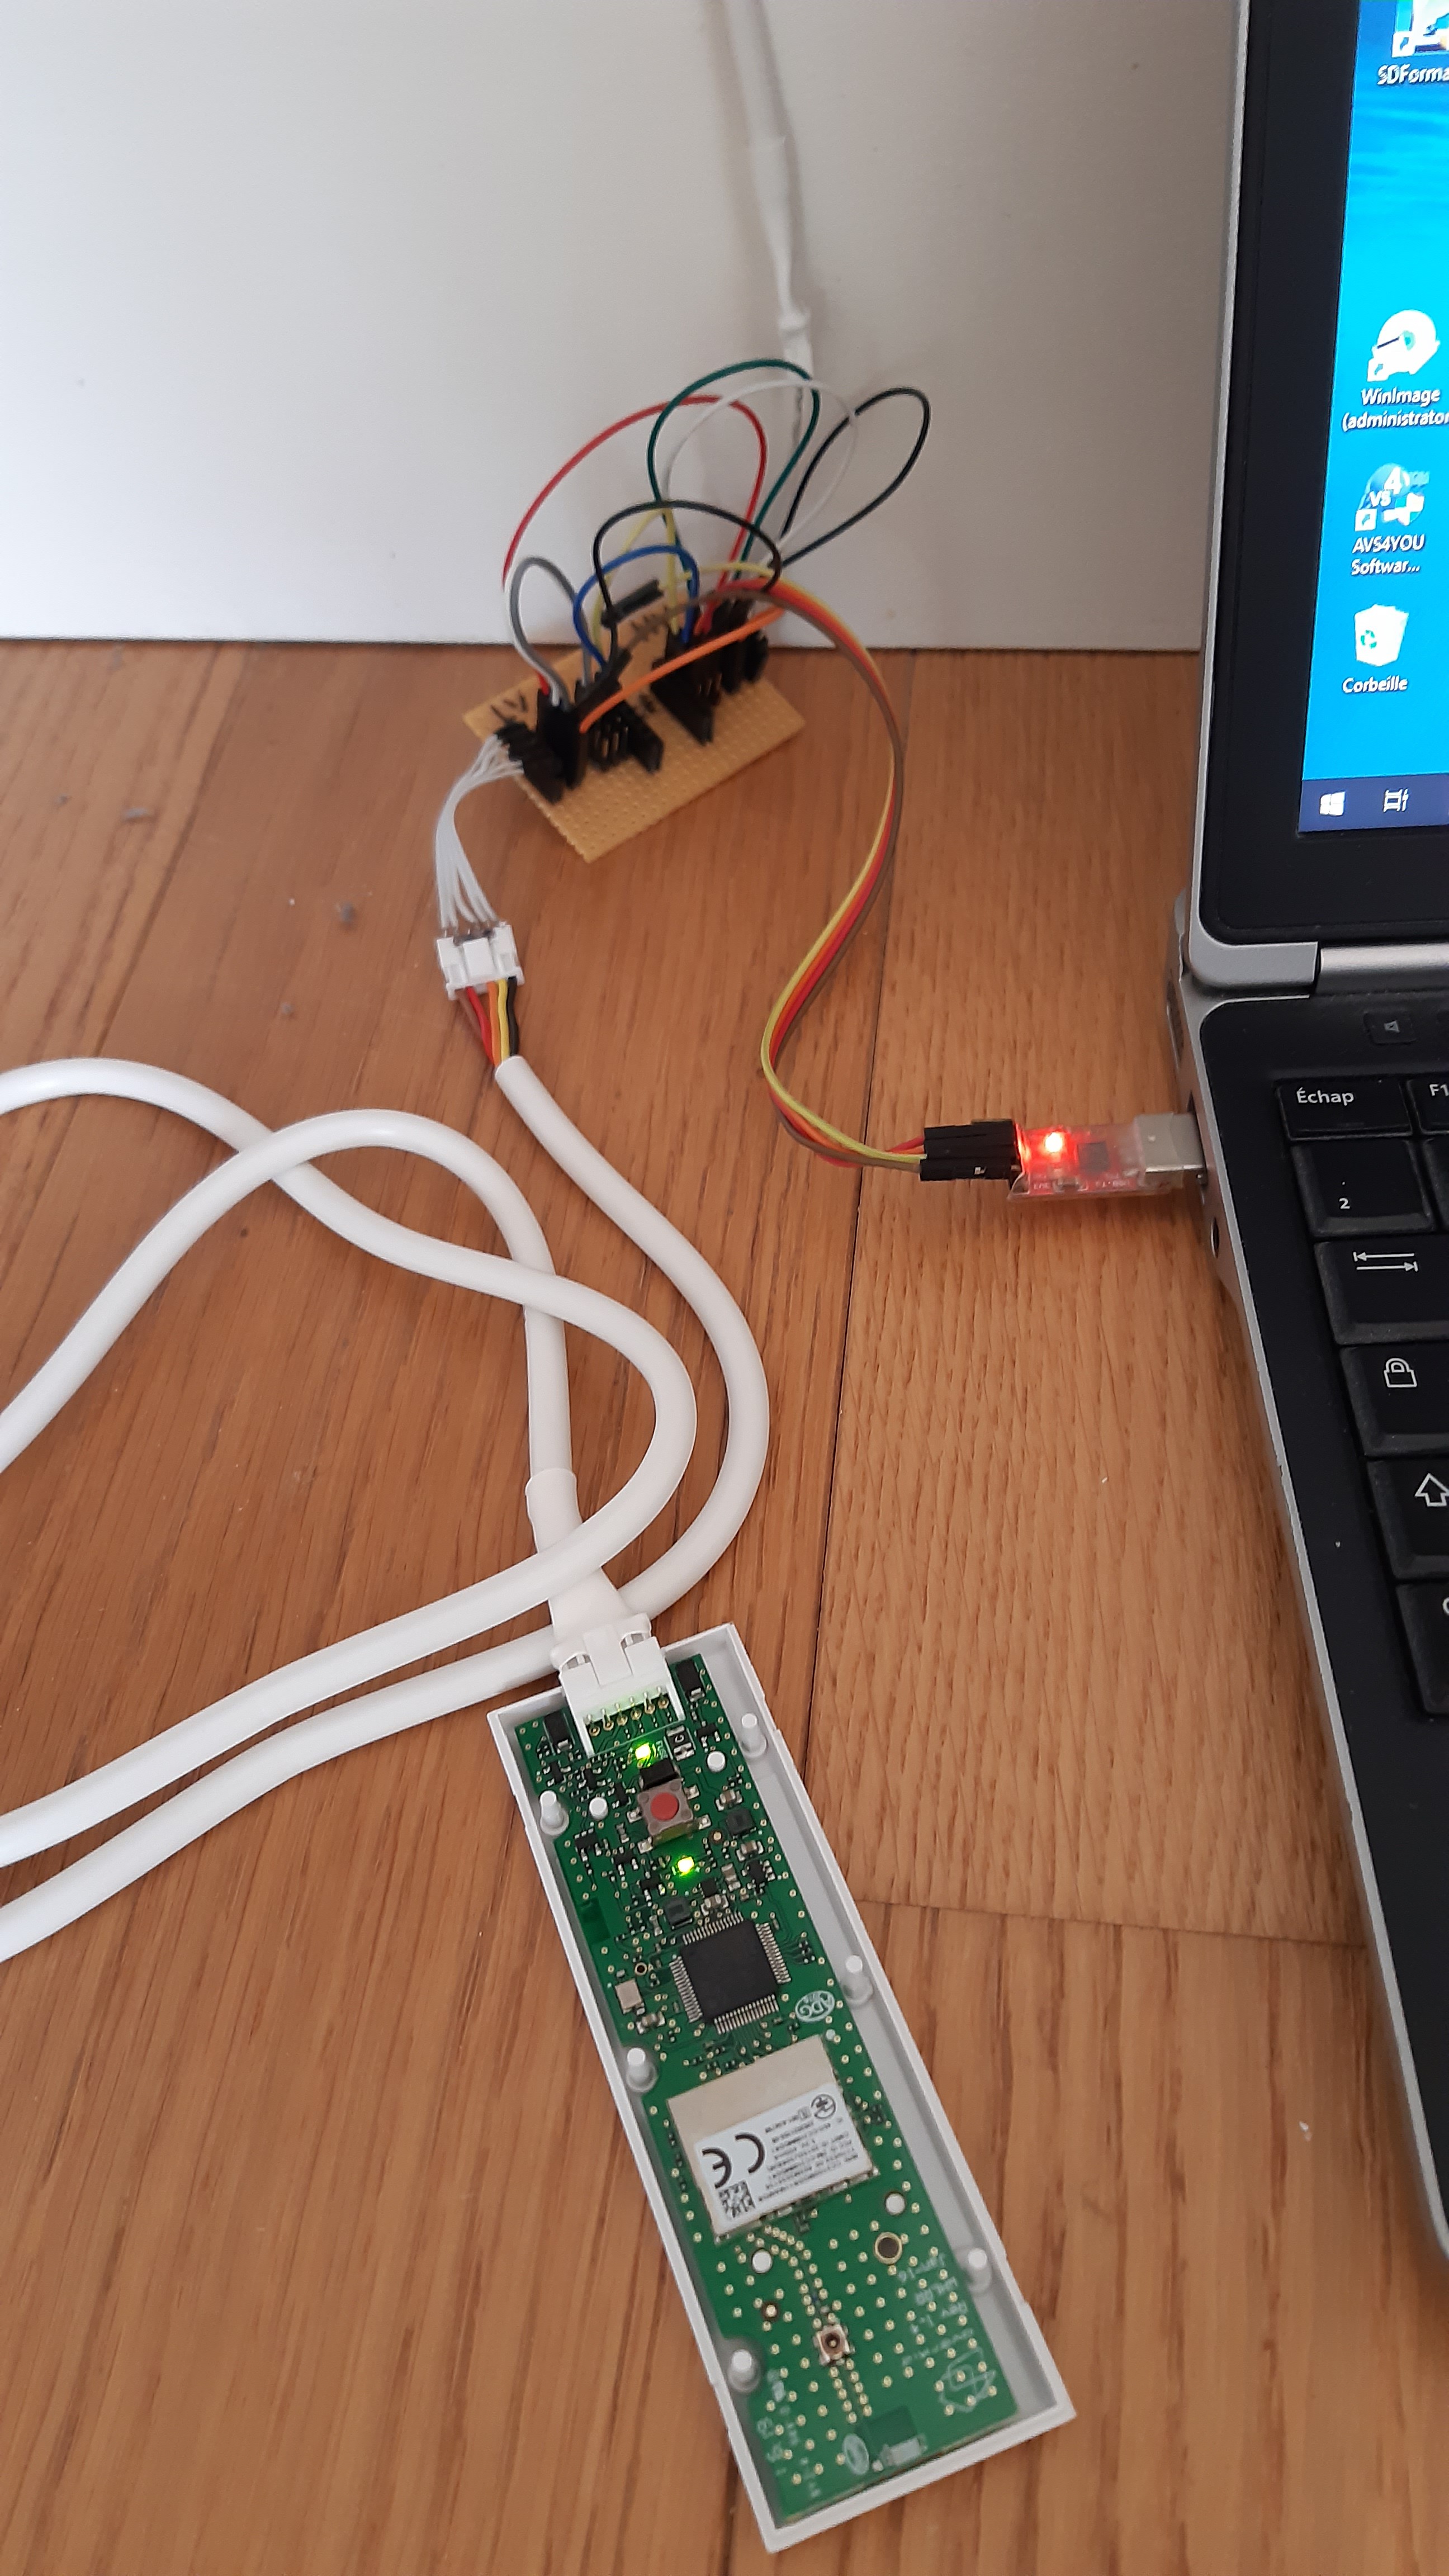


 agm777
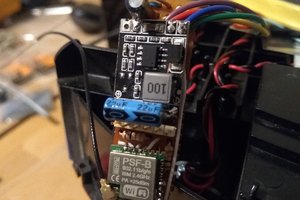
 jaime
jaime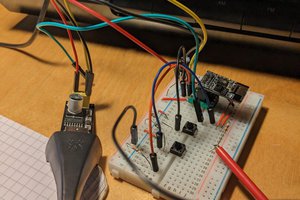
 schlion
Hello Vincent,
Do you have any idea of the differences between the SPX-WFG01 and SPX-WFG02? In order to do the same project for SPX-WFG02.
Lionel