 Wajid Ahmad
See the demo here:
Most educational robots available today run on small computers which include raspberry pi, Jetson, and arduino which are amongst the most popular.
Some of the added functionalities we are going to look at are face recognition and conversational AI.
Install Virtualenvwrapper on Raspberry Pi Model 3, 4
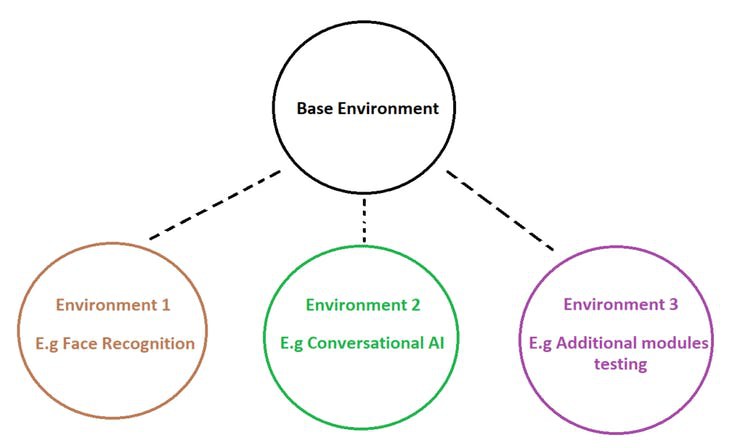
Before we start any AI/ML projects on our raspberry pi, we have to setup the environments first.
It is best practice to always create virtual environments so that we leave our base environment untouched and use it for administrative purposes only.
Another reason is to avoid conflicts between the different applications. It is very common that applications use different versions of the same module, so to avoid these conflicts we use different environments.
We will be using virtualenvwrapper:
https://virtualenvwrapper.readthedocs.io/en/latest/
We will call Environment 1 – facrec (short for face recognition)
and
Environment 2 – cbot (short for chatbot)
virtualenvwrapper 5.0.1.dev2
First, some initialization steps. Most of this only needs to be done one time. You will want to add the command to source /usr/local/bin/virtualenvwrapper.sh to your shell startup file, changing the path to virtualenvwrapper.sh depending on where it was installed by pip or your package manager.
$ pip install virtualenvwrapper...
$ export WORKON_HOME=~/Envs
$ mkdir -p $WORKON_HOME
$ source /usr/local/bin/virtualenvwrapper.sh
$ mkvirtualenv facrec
Installing
setuptools.................................................................................................................................................................................done.
virtualenvwrapper.user_scripts Creating /Users/dhellmann/Envs/facrec/bin/predeactivate
virtualenvwrapper.user_scripts Creating /Users/dhellmann/Envs/facrec/bin/postdeactivate
virtualenvwrapper.user_scripts Creating /Users/dhellmann/Envs/facrec/bin/preactivate
virtualenvwrapper.user_scripts Creating /Users/dhellmann/Envs/facrec/bin/postactivate  New python executable in facrec/bin/python
(facrec)$ ls $WORKON_HOME
facrec hook.log
Create another environment call it cbot
(facrec)$ ls $WORKON_HOME
facrec hook.log
(facrec)$ mkvirtualenv cbot
Installing setuptools...............................
....................................................
....................................................
........... ...............................done.
virtualenvwrapper.user_scripts Creating /Users/dhellmann/Envs/cbot/bin/predeactivate
virtualenvwrapper.user_scripts Creating /Users/dhellmann/Envs/cbot/bin/postdeactivate
virtualenvwrapper.user_scripts Creating /Users/dhellmann/Envs/cbot/bin/preactivate
virtualenvwrapper.user_scripts Creating /Users/dhellmann/Envs/cbot/bin/postactivate New python executable in cbot/bin/python
(env2)$ ls $WORKON_HOME
facrec cbot hook.log
Switch between environments with workon:
(cbot)$ workon facrec
(facrec)$ echo $VIRTUAL_ENV
/Users/dhellmann/Envs/facrec
(facrec)$
List all of the environments:
lsvirtualenv [-b] [-l] [-h]
Show the details for a single virtualenv:
showvirtualenv [env]
Remove an environment, in the WORKON_HOME:
rmvirtualenv ENVNAME
You must use deactivate before removing the current environment.
(mynewenv)$ deactivate
$ rmvirtualenv mynewenv
$ workon
$
Switch from a virtual environment to the system-installed version of Python:
deactivate
The environments are located in :
cd ~/.virualenvs
Now we can start installing inside the environments :))
Setup Face Recognition on Raspberry Pi Model 3, 4
Now that our virtual environment is setup , let us move on to install the face recognition packages in virtual environment (facrec).
STEP 1 In (facrec) environment, install OpenCV. Here is a documented link: https://www.pyimagesearch.com/2019/09/16/install-opencv-4-on-raspberry-pi-4-and-raspbian-buster/
STEP 2 Install dlib, face_recognition, imutils: https://www.pyimagesearch.com/2018/06/25/raspberry-pi-face-recognition/
Phewww that was some work! Now that our raspberry pi can detect our face , we can get it to say hello and start talking to us!
Setup Python Chatbot on Raspberry Pi Model 3, 4 (Part 1 of 2)
In this post we will create a chatbot on our raspberry pi that will have a conversation with us as displayed below:
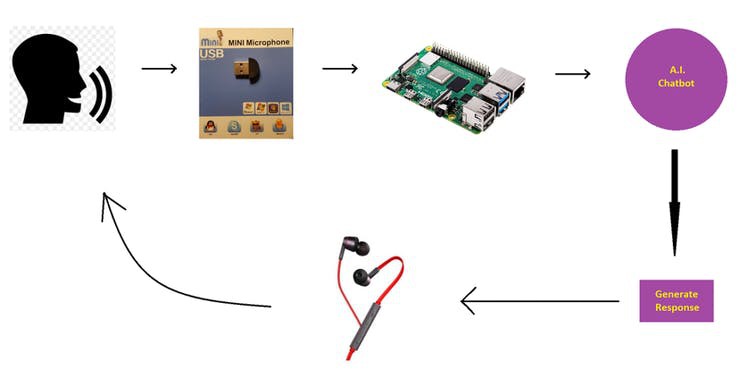
You may use any mic. In STEP 4 the setup of above mic is illustrated. Just edit the main chatbot code (Part 2 of this post) for any other mic you may have.
In Part 1 we will setup the environment first.
In our virtual environment cbot (which we created in an earlier post), let us follow the below steps to setup the necessary packages required for our chatbot.
STEP 1
We have to install Tensorflow 2.x version but issuing command:
pip install tensorflow
only installs an older version. So to install the latest version run the commands:
sudo apt-get install -y libhdf5-dev libc-ares-dev libeigen3-dev
python3 -m pip install keras_applications==1.0.8 –no-deps
python3 -m pip install keras_preprocessing==1.1.0 –no-deps
python3 -m pip install h5py==2.9.0
sudo apt-get install -y openmpi-bin libopenmpi-dev
sudo apt-get install -y libatlas-base-dev
python3 -m pip install -U six wheel mock
Pick a tensorflow release from https://github.com/lhelontra/tensorfl… (I picked 2.0.0):
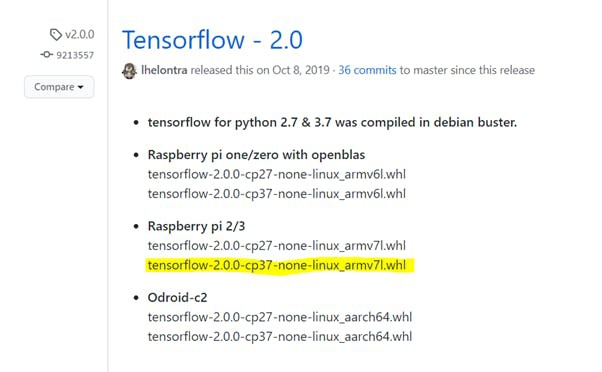
Now copy the link address of corresponding:
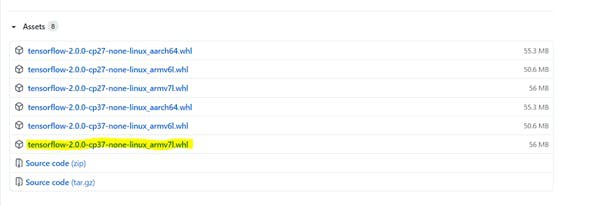
wget ‘paste_link_address_here’
python3 -m pip uninstall tensorflow
python3 -m pip install ‘whatever_package_name’
for example:
python3 -m pip install ‘tensorflow-2.0.0-cp37-none-linux_armv7l.whl’
RESTART YOUR TERMINAL
Tensorflow 2.3 was installed successfully in cbot environment
STEP 2
Install the following packages:
pip install chatterbot==1.0.0
pip install regex==2019.11.1
pip install python-dateutil==2.7
pip install PyAudio
pip install nltk
pip install Keras
STEP 3
Next we setup the speech recognition to convert what we have said to text. This will be input to the chatbot model to generate a response.
Mini microphone is plugged into USB port and settings adjusted:
http://wiki.sunfounder.cc/index.php?title=To_use_USB_mini_microphone_on_Raspbian
Running below command records audio for 5 seconds:
arecord -D plughw:1,0 -d 5 the_audio.wav
STEP 4
Next we install espeak , used for speech output (to earphones or speaker).
Install espeak:
https://howtoraspberrypi.com/make-talk-raspberry-pi-espeak/
To test espeak, create text file for example speakthis.txt and write sentence inside “hello my friend”.
To speak from a file, run the command:
espeak -f speakthis.txt –stdout |aplay
You should hear whatever you wrote in your speakthis.txt file (in my case it said “hello my friend”)
For a list of espeak commands refer to:
http://espeak.sourceforge.net/commands.html
Hooray! Our environment is good to go, now we can move on to creating the AI python chatbot and glue everything together.
Setup Python Chatbot on Raspberry Pi Model 3, 4 (Part 2 of 2)
Now that our python chatbot environment is all setup on our raspberry pi, let us start running the code.
First download the trivchat folder which contains all the necessary code and files:
https://github.com/wajidahmad89/rexythebot/tree/main/trivchat
Save it to Desktop so the location will be Desktop/trivchat
Let us quickly go through the files of importance in trivchat
1. First we have intents.json
This file will contain all the questions and answers you can possibly think of. Go ahead and add to it!
2. Second we have the trainchatbot.py
This one trains the neural network and creates the chatbot_model.h5
3. Third we have the cbot_main.py
All the listening, processing and speaking happens from the cbot_main.py
4. Fourthly the_audio.wav is the audio input, the last recording of what you have spoken is overwritten on this file.
5. Fifth, the userinput.txt file has the converted speech to text written here. The botresponse.txt has the answers to your speech written inside of it.
6. Sixth, we have the hello_camera-output.txt which initiates the conversation with “Hello John” as what we have written in it. Likewise the goodbye_camera-output.txt has the conversation ending, so we have “Goodbye John” written inside it.
Note
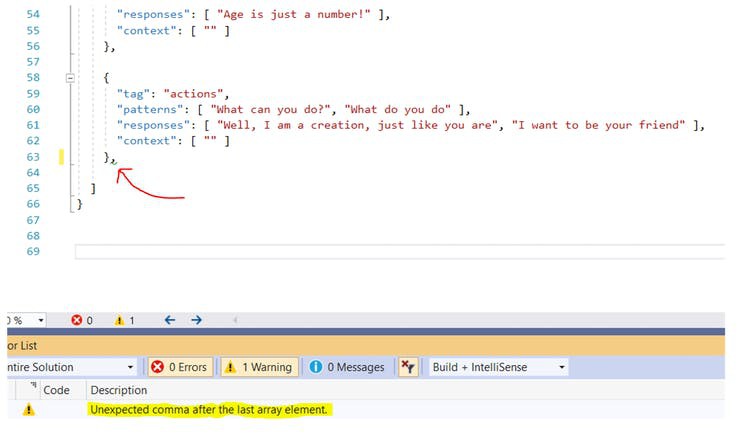
When you edit the intents.json be sure to not leave any bugs!
Visual Studio is a good choice for finding errors for example:
STEP 1
In command prompt:
pi@raspberrypi:~ $ cd Desktop/trivchat
pi@raspberrypi:~/Desktop/trivchat $ workon cbot
( As can be seen below cbot environment is activated which contains the necessary packages )
(cbot) pi@raspberrypi:~/Desktop/trivchat $ pythontrain_chatbot.py
It should print “model created“
STEP 2
Now we run the cbot_main.py
(cbot) pi@raspberrypi:~/Desktop/trivchat $ python cbot_main.py

Now it should display ” Playing … ” for audio output so you have to listen to what it is saying through your earphones / speaker
and
” Recording … ” for audio input , this is when you talk , it listens for 5 seconds.
The file userinput.txt will contain all the speech YOU speak andthe file botresponse.txt will contain all the bot responses
Have fun talking to your raspberry pi
xD
Note
If you have a different mic to the one used you can edit the cbot_main.py on line 135 , to record your speech and save it as the_audio.wav

Run Face Recognition And Python Chatbot on Raspberry Pi Model 3, 4
In this post we will merge the face recognition + python chatbot functionalities together. When someone is recognised the raspberry pi will say “Hello” and start a conversation.
STEP 1
First download the fareg folder below:
https://github.com/wajidahmad89/rexythebot/tree/main/fareg
PLACE FAREG FOLDER ON THE DESKTOP
Create a folder with the name of the person,
in fareg/dataset
The pictures of the person will be located in this folder
In command prompt:
workon facrec
cd Desktop/fareg
python encode_faces.py –dataset dataset –encodings encodings.pickle –detection-method hog
This will create encodings.pickle file in fareg folder
We will run facrec_main.py in a script later on.
What facrec_main.py does , is that it writes recognised name from the camera to camera-output-raw.txt in the trivchat folder. If one name is repeated more than 3 times (inside the camera-output-raw.txt) , it is a good measure that the correct person is identified, so this confirmed name is written to hello_camera-output.txt , to say “Hello %name%” ,
as well as written to goodbye_camera-output.txt , to say
“Goodbye %name%”
hello_camera-output.txt and goodbye_camera-output.txt are also located in trivchat folder.
STEP 2
Secondly download the rexy_master file to the desktop:
https://github.com/wajidahmad89/rexythebot/tree/main/rexy_master
Finally to run the face recognition + python chatbot :
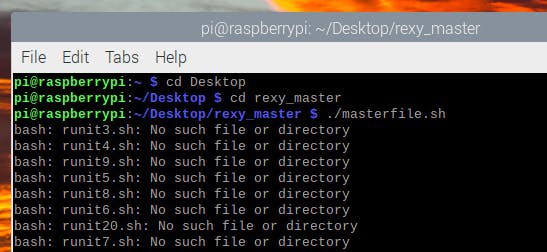
Once below shows
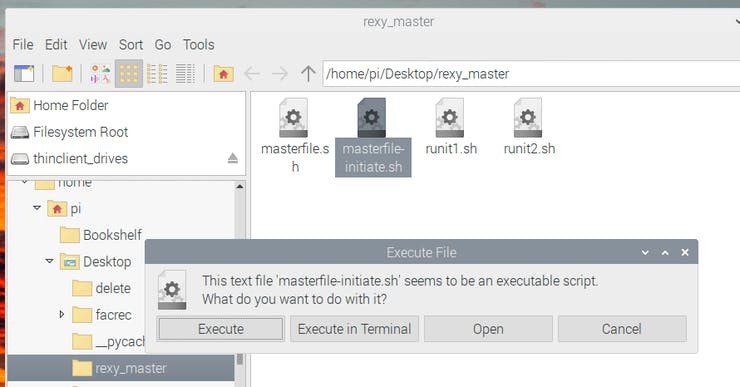
go to the ” masterfile-initiate.sh ” file and double click to execute it
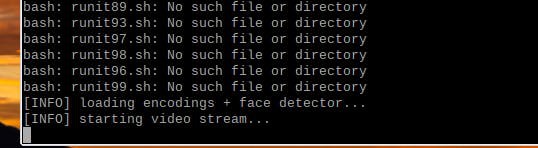
As before the camera is started and once face is recognised, the bot will start conversation.
Once face recognised, chatbot will start conversation.
Yippy!
Seeed Fusion team is launching a Raspberry Pi CM4 Sponsorship Program to support CM4-powered designs. Manufacture your custom Raspberry Pi CM4 Carrier Board with the Seeed PCB Assembly Service and get up to $500 Off!
The campaign link is : https://seeedstudio.com/blog/2020/10/19/free-raspberry-pi-compute-module-4-carrier-boards-with-seeed-fusion-pcb-assembly/