 Jithin Sanal
Robotic Bartender
This weekend you can make your next cocktail party an even bigger success by building this DIY Cocktail Mixer using Arduino. The best part about the project is how creative and unique it will be for each individual maker! You’ll learn all of the steps needed to create their own mixers, but they should feel free to incorporate any touches that work well with them too.

A robot bartender is going to mix you a drink without getting tipsy. Why not try one out for yourself?
A future where we can have our own bot-bartenders serving us alcohol at parties sounds pretty great! As soon as this technology becomes more widely available, I’ll be looking forward to taking advantage of all their benefits – namely being able to make sure no guests get too inebriated before they head home together (which would lead to someone else’s bad time).
Arduino Projects and Tutorials
You are new to the world of Arduino? Do you want to learn how programming works with this cool electronics platform? You have come at a perfect time because our free Beginner’s Guide will show everything from scratch. In it, we take an Introduction to what is really needed for getting started (Arduino IDE and different kinds of boards), through various projects that require little experience – all while keeping things interesting! So check out this helpful guide today. Lets start learning Arduino
Robotic Bartender Complete Video Tutorial
For those who don’t want to read, we’ve got the video for you. Watch it down here and learn about this project in just over 6 minutes!
So you like this video and want more of the same? Check out my Arduino project tutorial videos! While you are at it hit subscribe so we can keep bringing awesome content right into your feed. There’s plenty in store for all our subscribers who love what they’re watching just as much or even more than me – I guarantee that!”
How does Robot Bartender Work?
DIY Cocktail Mixer Using Arduino is an easy way to create tasty cocktails right out of your own kitchen – no bartender license required! If you’re looking for a fun project, try making some interesting ingredients like tequila-lime juice, or even better – make them ultra-strong and enjoy with friends.

The bot is really an Arduino that controls some pumps. A simple program allows the pumps to turn on for a certain time and make drinks using different ingredients! The machine comes with 5 recipes set, but you can change them if needed by changing input switches or programming it yourself – which would allow your DIY cocktail mixer to come out exactly how YOU want it to look because every person has their own style of the bar set up shop in their house…
If you’re looking for an easy way to mix the perfect drink, look no further than this electronic circuit. All that’s left now are a few simple steps and your bar is ready! Pour each ingredient into its corresponding container then turn on the pump at the top which releases just enough liquid from the bottle while preserving all precious alcohol content. Better yet? You won’t have any clean-up duties either since everything can slide right back onto their shelves once the mixing process has been completed – saving time in sauce prep AND re-shelving afterward too!
Things Needed to make a Cocktail Mixer
- Arduino Nano RP 2040
- 12 V Pumps
- Relays
Why not make a PCB for your Project?
Making a PCB for your DIY project is not hard nowadays. PCB helps to get rid of all messy wires and stuff and gives your project an awesome look. And it’s cool to make your own PCB for your project right?
Ordering High-Quality PCB for Cheap Price
I usually order our PCBs from PCBWay. PCBWay is a PCB manufacturer specializing in PCB prototyping, low-volume production, and neat and tidy PCB Assembly for a very low price. They have a very friendly customer support team and even perform a free PCB Design Review before payment and inform us if there is some issue with the design. Feel free to check out their website below. Make your own PCB for your Project
The Circuit
I’ve always been interested in electronics and technology, but never really knew how to get started. Then I discovered Altium Designer! It’s an incredible tool for designers of all levels – from beginners that want something simple like a circuit diagram or PCB layout up to industrial level professionals who need complex boards with thousands upon millions combinations possible per second (that is what they’re designed).
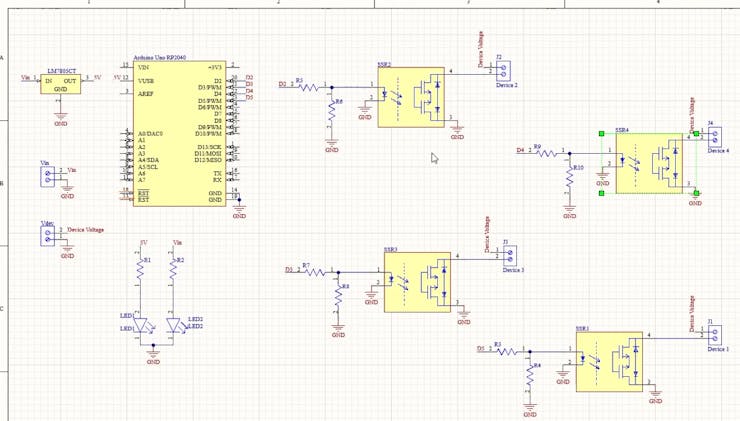
Here we are in Altium designer. Input voltage is connected to a 7805 regulator which converts an incoming voltage of up to 32v into 5 voltages. For powering the Arduino and operating the relays, I will be using a 9v battery.
To pump drinks. I will be connecting pumps that work on 12 v, so to power it up, a dc adapter is required. Four GPIO pins of Arduino are connected to SSR or solid-state relays which is a type of relay that switches on and off when an external voltage is applied across its control terminals. These relays can be used in our project for controlling pumps and mixing our cocktails.
My design is just a starting point. You can redesign the entire thing, customize it and then make your own version of this project!
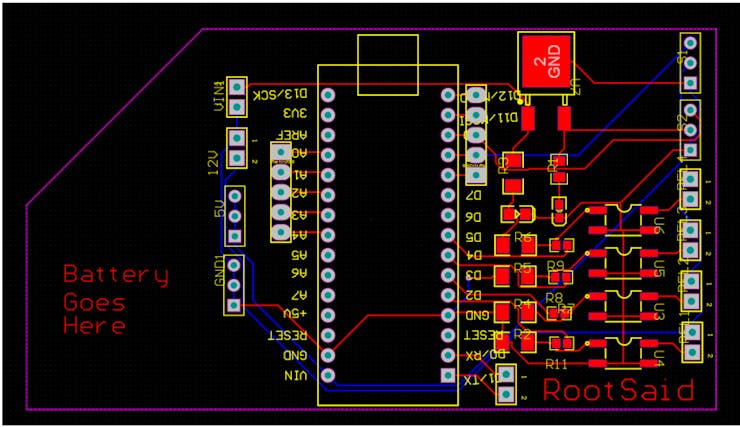
For me though, I decided to go with an Arduino Nano as the controller needs because its compact size means less weight in addition to being able to run off rechargeable batteries instead of bulky batteries, which will be more expensive upfront but much cheaper long term. Thanks to their low operating costs over time (energy cost).
Getting PCB done
Making a PCB for your DIY project is not hard nowadays. PCB helps to get rid of all messy wires and stuff and gives your project an awesome look. And it’s cool to make your own PCB for your project right?
I ordered PCB from PCBWay. PCBWay is a PCB manufacturer specializing in PCB prototyping, low-volume production, and neat and tidy PCB assembly.
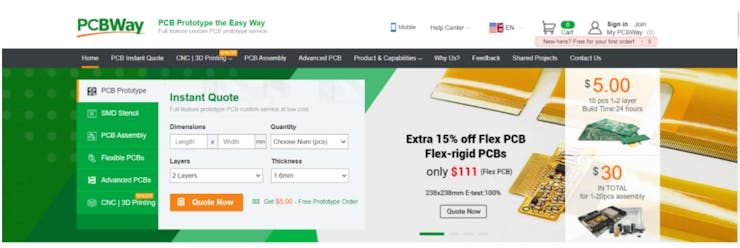
To order your PCB from PCBWay, go to the PCBWay website and fill in the basic board details in the instant order form. From there you will be directed to a form where you can provide more elaborate board details. Update your board information in the PCB specification screen. On the next screen, you should be able to upload your Gerber file and submit it for review. Once the review is completed, all that is left is to add to the cart, make payment, and wait for your PCBs to arrive.
Once you get all the components and the PCB, it’s time for you to solder them together. Solder all the components onto the board and make sure to check the polarity of the components. After soldering the PCB looks like this.
The Software Part – Arduino IoT Cloud
Let’s get down to the software part. Here I’ll be programming the board using Arduino IoT cloud. The first thing to do is log into the Arduino IoT cloud.
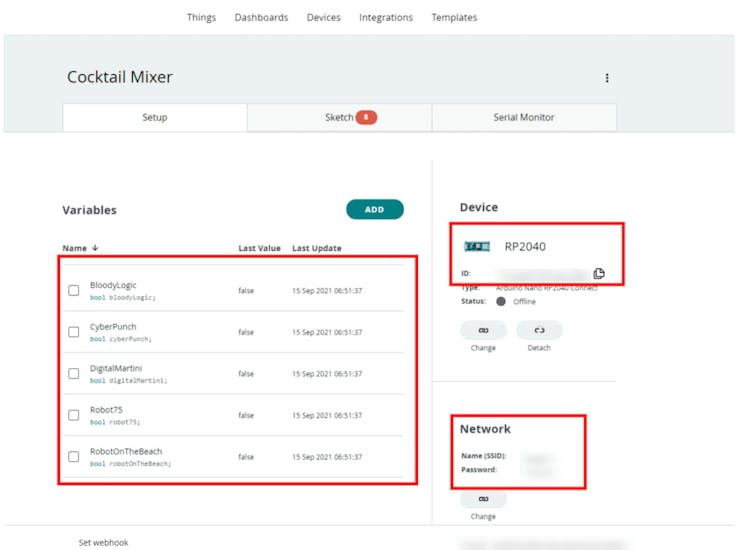
Under the ‘things’ you should be able to see all the projects that you have done before and there is our project the cocktail mixer. Simply click on that and under setup you should be able to see all the properties that are linked to this project – the five variables that are linked to five buttons, the microcontroller board that is linked to this project, is Arduino Nano RP 2040, and the wi-fi network.
If you are not familiar with Arduino IoT cloud make sure you watch our previous video where I explained everything in detail.
The Variables for our Arduino Project
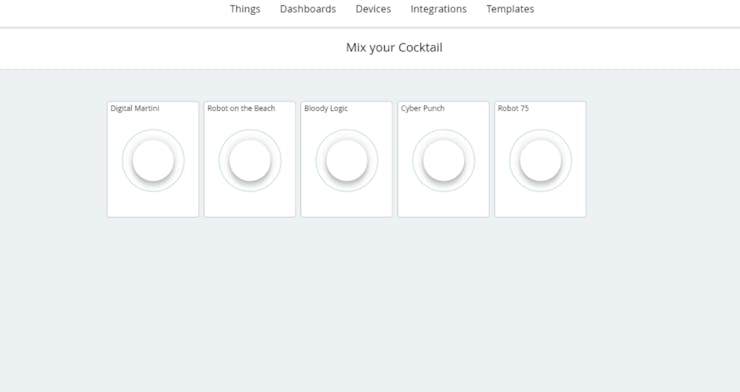
Here, under variables, you should be able to see five different boolean variables with the name of five different cocktails and each variable will be linked to a push button in our dashboard.
Dashboard for Creating Cocktails
This is our dashboard. Here you can see five different push buttons attached to these variables.All right, now let’s start coding.
Coding Our Arduino Project
#include "thingProperties.h"void setup() { Serial.begin(9600); delay(1500); initProperties(); ArduinoCloud.begin(ArduinoIoTPreferredConnection); setDebugMessageLevel(2); ArduinoCloud.printDebugInfo(); pinMode(LED_BUILTIN, OUTPUT); pinMode(2, OUTPUT); pinMode(3, OUTPUT); pinMode(4, OUTPUT); pinMode(5, OUTPUT);}void loop() { ArduinoCloud.update();}void onBloodyLogicChange() { if (bloodyLogic == true) { Serial.println("Preparing Bloody Logic"); Serial.println("Preparing Digital Martini"); digitalWrite(LED_BUILTIN, HIGH); pumpOn(2, 2); pumpOn(3, 2); pumpOn(5, 1); Serial.println("Bloody Logic Ready!"); digitalWrite(LED_BUILTIN, LOW); }}void onDigitalMartiniChange() { if (digitalMartini == true) { Serial.println("Preparing Digital Martini"); digitalWrite(LED_BUILTIN, HIGH); delay(1000); pumpOn(3, 1); pumpOn(4, 3); pumpOn(2, 1); Serial.println("Digital Martini Ready!"); digitalWrite(LED_BUILTIN, LOW); }}void onRobot75Change() { if (robot75 == true) { Serial.println("Preparing Robot 75"); digitalWrite(LED_BUILTIN, HIGH); delay(1000); pumpOn(5, 3); pumpOn(2, 1); pumpOn(4, 1); Serial.println("Robot 75 Ready!"); digitalWrite(LED_BUILTIN, LOW); }}void onRobotOnTheBeachChange() { if (robotOnTheBeach == true) { Serial.println("Preparing Robot on the Beach"); digitalWrite(LED_BUILTIN, HIGH); delay(1000); pumpOn(5, 2); pumpOn(2, 1); pumpOn(3, 1); pumpOn(4, 1); Serial.println("Robot on the Beach Ready!"); digitalWrite(LED_BUILTIN, LOW); }}void onCyberPunchChange() { if (cyberPunch == true) { Serial.println("Preparing Cyber Punch"); digitalWrite(LED_BUILTIN, HIGH); delay(1000); pumpOn(2, 1); pumpOn(4, 2); pumpOn(3, 1); pumpOn(2, 2); Serial.println("Cyber Punch Ready!"); digitalWrite(LED_BUILTIN, LOW); }}void pumpOn(int duration, int pin){ Serial.println(""); digitalWrite(pin, HIGH); Serial.print("Turning On Pump - "); Serial.print(pin); Serial.print(" For "); Serial.print(duration); Serial.println("Seconds"); Serial.println(""); delay(duration); digitalWrite(2, LOW); delay(1000);}
First, we will be adding the header files that include all the functions and codes that will initiate the connection to the Arduino IoT cloud from our network.
In the setup function, we will initialize the serial communication, communication with Arduino cloud, set the pin mode, and then prepare the board to run the remaining code. These are the 5 functions that will run when there is any change in the corresponding variables. When one of the values changes, the corresponding function will run.
For example, when the digitalmartini variable changes, the ondigitalmartinichange function will run. If the value is 1, it will turn on curtain pumps in a certain sequence, once it finishes, it exits the loop and constantly looks for any change in variable value.
And here is the function that will turn on and off the pumps. That was really simple, right? Now, how do we change the variable? That’s right using a dashboard!
Lets Mix Some Cocktails
The code has been uploaded successfully now I will open the dashboard in another tab okay now let’s try pushing some buttons now when I click digital martini it will run all digital martini change functions and create a cocktail for me. Now let’s connect all our pumps and test our cocktail mixer.
Once you’ve put your creative DIY cocktail mixer together, it’s time to test the whole system out. Make sure that you follow all safety precautions and make sure everyone is wearing their protective gear before testing this device!
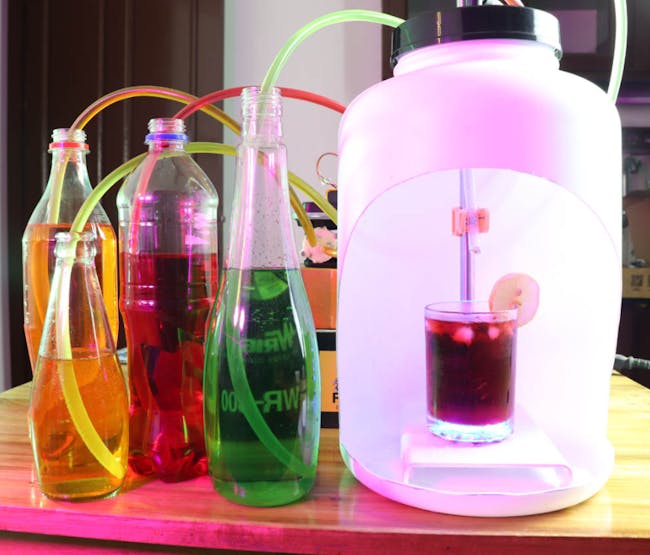
To start up the mixer, plug-in each of its components into a power supply, then flip on the switch. Now let’s tap on a cocktail in the dashboard and Voila! Here is your drink!
Conclusion
Let’s be honest. You have an idea for a fun and interactive project that’s perfect, but the timing just isn’t right yet! The DIY cocktail mixer is such a versatile device because it can serve many purposes from making drinks with friends or turning this into some kind of business venture in order to get more creative ideas off your plate (and onto theirs). So what will YOU do? Post them below so we know where you stand on our next question: Are there any other tasks keeping you busy at work today – aside from writing these articles?!