 Leonardo Ward
Why is MultiMPPT a solution? yet another MPPT to be added to the list?

The MPPT is designed to be competitive with the current market of charge controllers. Therefore, the targeted voltage input would be 48V or higher, a voltage output of 12V or 24V and a 10A or higher current.
But this device will differentiate itself from other alternatives by having multiple MPPT inputs that will increase the efficiency under shading conditions, a feature that can be seen on a few expensive MPPT solutions found in the market. A budget priced MPPT with multiple inputs has the potential to create a great impact in the market of charge controllers and push it to achieve lower costs and higher efficiency.
Components of the Solar Panel System

A charge controller is used to limit the electric current that goes IN and OUT of a battery. In photovoltaic systems, the charge controller is connected to the solar panels (input), the battery pack and the load (output). A common load used in these systems is an inverter, a device that converts constant current (DC) to alternating current (AC). In this context, an MPPT is a charge controller that uses the technique named maximum power point tracking, a technique used to maximize the energy extracted from a source (in this case the PV modules).
How to connect MultiMPPT to the other components in the Solar Panel Setup
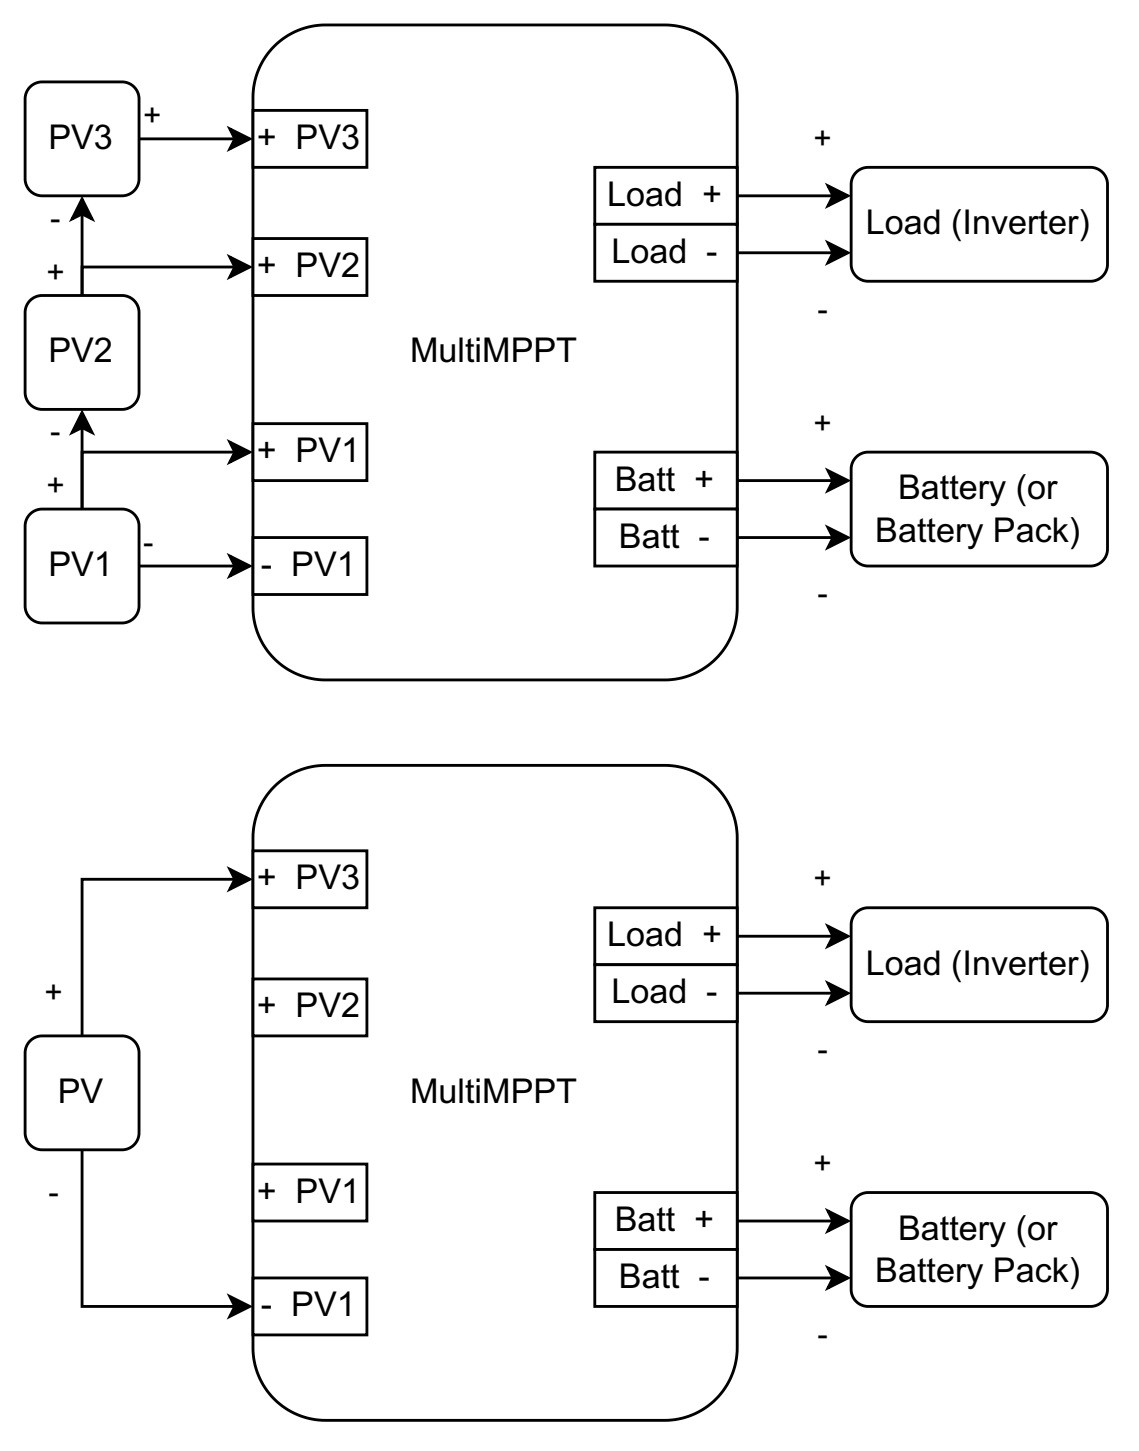
The following image presents how the proposed MPPT is used. In the image a group of solar panels (PV) modules connected in series is used as the source of energy, but a single PV can be used. The MPPT is also connected to the battery (or battery pack) and the load (e.g. an inverter).
Proof of Concept - Simulation
The benefit of the architecture that will be used in the design is that provides a higher efficiency under shading conditions. To create a proof of concept a simulation was designed where the input source are two solar panels serially connected (PV string), and one of them receives an irradiance considerably lower than the other one (i.e. shading). The following graph shows the results, where the blue line represents the power curve of the system when the PV string is connected in the conventional way (only + and - inputs for the PV), and the orange line represents the power curve when extra MPPT inputs are being used.

Proof of Concept - PCB Design
Once the DPP architecture is tested in simulation, the following PCB was design to perform real world tests of the DPP architecture, which is the most important element of the MPPT, it allows the connection of multiple inputs and the overall performance and maximum power point of the solar panels.
Even though the DPP architecture is not the complete circuit of the MPPT, it is important to mention that the goal is to finish the complete MPPT with connections for the PV circuit, the load and the battery (or battery pack). Since this is one of the most important parts of the design, it was simulated first, and I am focused on performing tests with the DPP Architecture PCB to verify the efficiency of the solar panel setup.

For more information about the PCB design check the following log, or the repository.
The following image shows how to connect a serially connected solar panels (with additional bypass diodes) to 2 DPP Architecture PCBs, and the expected output of the circuit.

For more information about the connections check the instructions on How to connect the DPP Architecture PCB to the Solar Setup, more information about this topic will be added in the future.
Next Steps
- Finish the design of DPP Architecture Test PCB
- Design support circuits to measure voltage and current on the MPPT
- Prepare a test bench for the DPP Architecture with solar panels
- Solder and test the DPP Architecture Test PCB
- Design the full MPPT PCB: including the DPP architecture (one or more circuits), a microcontroller, circuits to measure voltage and current, a charge circuit for the 12V (or 24V) battery with different protections and a connection for the load.
- Prepare a test bench for the full MPPT PCB with solar panels, a battery (or battery pack) and an inverter
- Test the full MPPT PCB and measure the efficiency on different scenarios
- Design an interface to monitor and track the efficiency of the solar setup
Interested in the project? Check the following logs and instructions:
- Increasing the efficiency under shading conditions
- Market Size and Consumer Considerations
- Proof of concept (simulation) - Validating the claims of higher efficiency
- DPP Architecture Test - PCB Design and Bill of Materials
- How to connect the DPP Architecture PCB to the Solar Setup
- What does it mean to be a low cost solution?
Notes: this is an open source project, and all the related files, and repositories are under the GNU General Public License v3.0.