Close
0%
0%

Prensa de escritorio 2.0

Prensa de escritorio multifuncional y resistente para realizar diversos trabajos de manera fácil y eficiente.

Public Chat
Similar projects worth following
0 followers
Una prensa de banco es una herramienta que nos permite sujetar de forma rápida, sencilla y temporal cualquier componente que se desee mecanizar o trabajar, así nos ahorra esfuerzo para mantenerlo en una posición fija. Una prensa de banco suele tener un diseño sensillo que consta de dos mordazas para sujetar la pieza, una fija y una móvil que se desplaza gracias a un tornillo accionado manualmente por una palanca, esta prensa va montada en una mesa o cualquier banco de trabajo y puede tener anclajes fijos o ser transportable.

A bench vise is a tool that allows us to quickly, easily and temporarily hold any component that we want to mechanize or work on, thus saving us effort to keep it in a fixed position. A bench vise usually has a simple design that consists of two jaws to hold the piece, one fixed and one mobile that moves thanks to a screw manually operated by a lever, this vise is mounted on a table or any workbench and it can have fixed anchors or be t

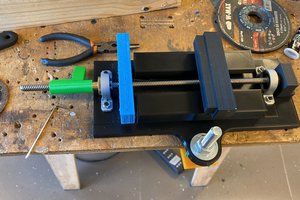
El proceso de impresión fue realizado en el software Ultimaker Cura y se dividió en 3 partes: la primera en imprimir las bases de la prensa, debido a que sus dimensiones son más grandes y por lo tanto implica más tiempo de impresión. La segunda parte consta de imprimir los tornillos de la prensa por separado, esto es debido a que al poseer hilos, éstos deben quedar hechos de forma más precisa y por lo tanto el modo de impresión fue con más precisión y más lento. Y en la tercera parte se imprimieron el resto de las piezas de la prensa, con menor precisión para tardar menos en el proceso. 

Al simular el proceso, el tiempo de impresión para la placa base es de 5 horas y 57 minutos, en la segunda parte del proceso, es decir, la impresión de los tornillos se tiene un tiempo de 6 horas y 17 minutos y finalmente para la tercera parte se tiene un tiempo de impresión de 4 horas y 11 minutos.

El peso de la prensa es de 107 gramos.

----------

The printing process was carried out in the Ultimaker Cura software and was divided into 3 parts: the first to print the press bases, due to their larger dimensions and therefore more printing time. The second part consists of printing the press screws separately, this is because having threads, they must be made more precisely and therefore the printing mode was more precise and slower. And in the third part, the rest of the parts of the press were printed, with less precision to take less time in the process.

When simulating the process, the printing time for the motherboard is 5 hours and 57 minutes, in the second part of the process, that is, the printing of the screws takes 6 hours and 17 minutes and finally for the Third part has a printing time of 4 hours and 11 minutes.

The weight of the press is 107 grams.

7 tornillo cabeza ranura.png

tornillo para sujetar el tornillo principal

Portable Network Graphics (PNG) - 61.71 kB - 12/02/2022 at 20:55

Preview
Download

base principal.png

base principal o cuerpo del ensable

Portable Network Graphics (PNG) - 50.69 kB - 12/02/2022 at 20:55

Preview
Download

2 mordaza movil.png

Mordaza para apretar piezas

Portable Network Graphics (PNG) - 46.07 kB - 12/02/2022 at 20:55

Preview
Download

3 vicel.png

Soporte para la base

Portable Network Graphics (PNG) - 13.57 kB - 12/02/2022 at 20:55

Preview
Download

Tope manilla.png

Tope para la manilla

Portable Network Graphics (PNG) - 31.24 kB - 12/02/2022 at 20:55

Preview
Download

View all 20 files

  • 1 × Base de la prensa Cuerpo de la prensa en donde se sujetan todos sus componentes.
  • 1 × Mordaza móvil Elemento móvil de la prensa que sirve para apretar o sujetar elementos.
  • 1 × Tornillo principal Tornillo para mover la mordaza móvil.
  • 1 × Tornillo ranura Tornillo para sujetar el tornillo principal
  • 2 × Soporte de la base Piezas que soportan la base de la prensa

View all 8 components

  • 1
    Ensamble / Assembly

    Unión entre la base principal y los soportes inferiores mediante los tornillos M6, luego corresponde el ensamble de la mordaza móvil y su unión con la placa de sujeción en la parte inferior con el mismo tipo de tornillos, prosigue el montaje del tornillo mordaza, atravesando la base principal para conectar con la mordaza móvil fijando esta unión con su correspondido tornillo ranura, finalmente ensamblar la palanca con el tornillo barra y su tope.

    Fastening between the main base and the lower supports by means of M6 screws, then the assembly of the mobile clamp corresponds and its union with the clamp plate in the lower part with the same type of screws, it continues with the assembly of the clamp screw crossing the main base to connect with the mobile jaw, fixing this union with its corresponding slotted screw, finally assembling the lever with the bar screw and its stop


View all instructions

Enjoy this project?

Share

Discussions

Similar Projects

Does this project spark your interest?

Become a member to follow this project and never miss any updates