 Peter Sinclair
When deciding on the software for this project I wanted to avoid the need for a custom phone application. This was to avoid developer licensing and costs maintaining such an app in android and IOS. It would also result in a more complex system that could not be easily modified by users. Instead I decided to use an ESP32 microcontroller as a wifi access point that would serve a simple web page. That web page would communicate with the micro-controller through a web-socket and JSON for a nice simple responsive system.
ESP32 [C Code] <-- Web Socket [JSON]--> User Phone [HTML + Javascript].
In this post we're going to focus on the user interface design. Originally I wanted it to be as simple as possible so I could start testing the system. The general workflow was influenced from screenshots of the Baddy UI I had seen in reports and online. The user could select from a series of 9 shots that could be calibrated individually in a separate section. Changing the shot in that section would be done by adjusting the 4 parameters: Left Feed Wheel Speed, Right Feed Wheel Speed, Trajectory, and Rotation.
This UI was operating successfully but was never polished up as I decided to abandon it for a shiny new generation UI. While perfectly functional, this version had limited adjustability and required a lot of user testing to find the right shot parameters. The hope with the new UI is that the user will tell the system what kind of shot they want and the code will do the heavy lifting to determine the wheel speeds and all other functions.
Here is where the user would enter in a shot pattern for training. The user could click on the shot ID buttons to add them to the shot sequence or manually edit the shot sequence. The delay selected would be used between all shots. They could also chose the shot order: play the pattern once, repeat the pattern continuously, use the entered shots but randomize them, or do a random selection of any of the 9 shots.
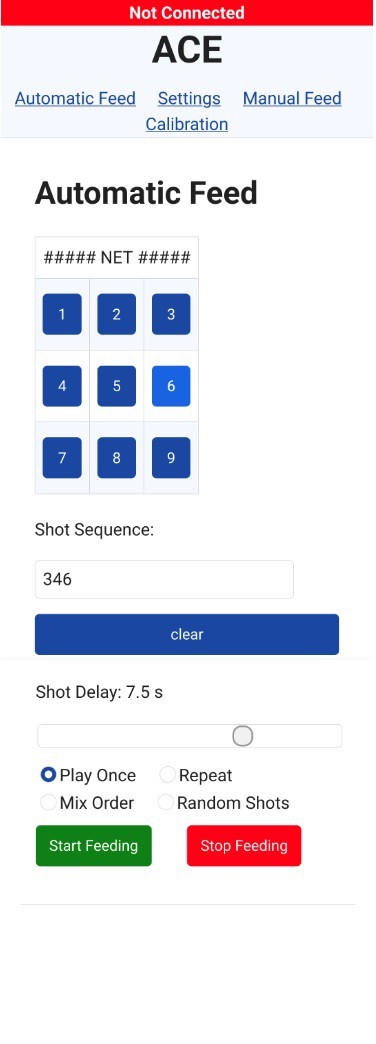 Automatic Feed
On this page the user would adjust the settings for each of the standard shots. Selecting the shot would have the shot parameters load into the lower sliders where they can be adjusted. To simplify the entry the sliders calculate the balance (speed mismatch between the two feed wheels) and the max distance the system can achieve (based on max RPM) so that the user does not need to work directly in RPM. The custom shot option could be used for testing new shots before over-writing values on the standard shots. Shot parameters could be saved to memory for future use.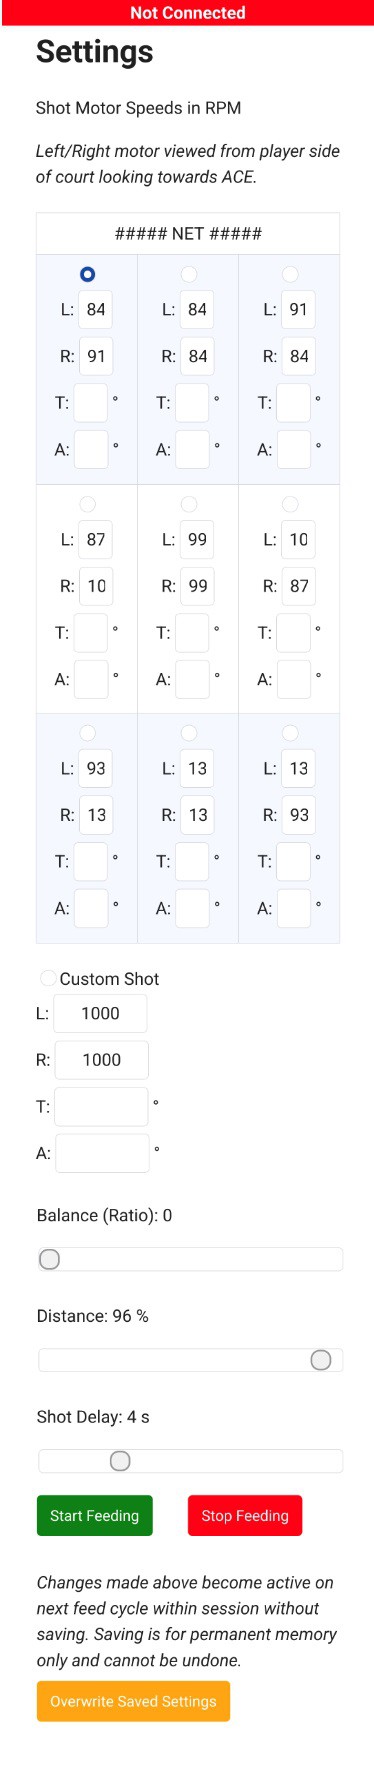
Manual Feed
This was mainly used for testing but ultimately wasn't required because of the custom shot option on the settings page. Users can set the wheel motor speeds directly on this page, but it was never expanded to include trajectory and rotation.

Calibration
This page was used to prepare the system for first use. The servo arms need to be attached at the correct positions to avoid any jams or other issues during startup and the rotation amounts adjusted. The ESC's also need to be calibrated.

Discussions
Become a Hackaday.io Member
Create an account to leave a comment. Already have an account? Log In.