 JP Gleyzes
Sensors selection
Depending on the sensors you have soldered to your board you will have to comment/uncomment a few lines of code... Open the GTW1 .ino file
Full Weather Station
Here is the sensors selection for my "full weather Station"
//sensors selection
#define HAS_HX711       //uncomment for weighing rain gauge
#define HAS_ANEMOMETER  //uncomment for anemometer
#define HAS_AS5600      //uncomment for Wind Direction sensor
#define HAS_BME280      //uncomment for temperature + pressure + humidity BME280 sensor
#define HAS_DS18B20   //uncomment for DS18B20 temperature sensor
//#define HAS_DHT22     //uncomment for DTH22 temperature + humidity sensor
//#define ENABLE_WIFI   //uncomment to enable wifi debugging (avoid this when ESPNow in use)
As you can see everything is selected but the DHT22 which is useless when you have a more precise BME280 !
WInd Only Weather Station
And here is the sensors selection for the Wind Only Weather Station installed at your airfield in Deyme France
//sensors selection
//#define HAS_HX711       //uncomment for weighing rain gauge
#define HAS_ANEMOMETER  //uncomment for anemometer
#define HAS_AS5600      //uncomment for Wind Direction sensor
//#define HAS_BME280      //uncomment for temperature + pressure + humidity BME280 sensor
#define HAS_DS18B20   //uncomment for DS18B20 temperature sensor
//#define HAS_DHT22     //uncomment for DTH22 temperature + humidity sensor
//#define ENABLE_WIFI   //uncomment to enable wifi debugging (avoid this when ESPNow in use)
It has "wind" but also a cheap temperature sensor !
You can compile GTW1 and values will be sent via Lora to your GTW0 that you shoulmd confiure as well !
Adding a ThingSpeak Channel to your Weather Station
Now open the GTW0 .ino file
Search for "ThingSpeak" and change this line with your API Write key
// ThingSpeak settings
char thingserver[] = "api.thingspeak.com";
String writeAPIKey = "YOUR_API_WRITE_KEY";
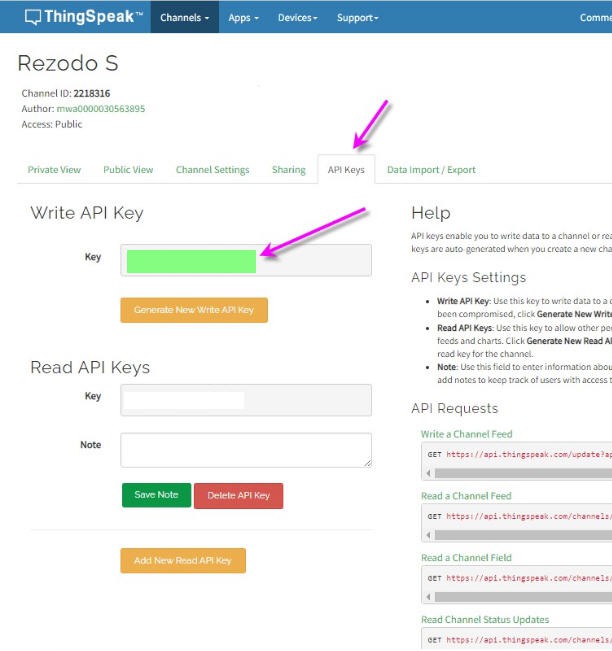
You should first create an account and create a new channel.
Then you can access the "API Keys" tab and fetch the Write key (here in green)
Verify the fields to be updated by your sensors
Now you can search for the ThingSpeakPost() function and check the fields updated on ThingSpeak
It's a simple http post :
 String data =  "field1=" + String(sensorValues[1][0][0])
+ "&field2=" + String(sensorValues[2][0][0])
+ "&field3=" + String(scaledValue)
+ "&field4=" + String(sensorValues[1][1][0])
+ "&field5=" + String(sensorValues[1][2][0])
+ "&field6=" + String(sensorValues[1][3][0])
+ "&field7=" + String(sensorValues[1][4][0])
+ "&field8=" + String(sensorValues[1][5][0])  ;
//shows how to include additional field data in http post
You can post what you want !
Here is the full procedure
void ThingSpeakPost(void)
{
    Serial.print("temperature = ");
      Serial.print(sensorValues[1][0][0]);
      Serial.print(" °C   humidity = ");
      Serial.print(sensorValues[1][1][0]);
      Serial.print(" %   pressure = ");
      Serial.print( sensorValues[1][2][0]);
      Serial.println(" hPa");

      Serial.print("rot speed = ");
      Serial.print(sensorValues[1][3][0]);
      Serial.print(" km/h   wind direction = ");
      Serial.println(sensorValues[1][4][0]);

      Serial.print("rain weight = ");
      Serial.print(sensorValues[1][5][0]);
      Serial.println(" g");
  WiFiClient client;
  if (!client.connect(thingserver, 80))
  {
    Serial.println("Connection failed");
    client.stop();
    return;
  }
  else
  {
    // Create data string to send to ThingSpeak.
    float scaledValue = mapf(sensorValues[2][0][0], 50, 370, 100, 0); //remap values from 100 to 0
    String data =  "field1=" + String(sensorValues[1][0][0]) + "&field2=" + String(sensorValues[2][0][0]) + "&field3=" + String(scaledValue) + "&field4=" + String(sensorValues[1][1][0]) + "&field5=" + String(sensorValues[1][2][0]) + "&field6=" + String(sensorValues[1][3][0]) + "&field7=" + String(sensorValues[1][4][0]) + "&field8=" + String(sensorValues[1][5][0])  ; //shows how to include additional field data in http post

    // POST data to ThingSpeak.
    if (client.connect(thingserver, 80)) {
      client.println("POST /update HTTP/1.1");
      client.println("Host: api.thingspeak.com");
      client.println("Connection: close");
      client.println("User-Agent: ESP32WiFi/1.1");
      client.println("X-THINGSPEAKAPIKEY: " + writeAPIKey);
      client.println("Content-Type: application/x-www-form-urlencoded");
      client.print("Content-Length: ");
      client.print(data.length());
      client.print("\n\n");
      client.print(data);
      delay(300);
#ifdef DEBUG_TELNET
      TelnetStream.print("temperature = ");
      TelnetStream.print(sensorValues[1][0][0]);
      TelnetStream.print(" °C   humidity = ");
      TelnetStream.print(sensorValues[1][1][0]);
      TelnetStream.print(" %   pressure = ");
      TelnetStream.print( sensorValues[1][2][0]);
      TelnetStream.println(" hPa");

      TelnetStream.print("rot speed = ");
      TelnetStream.print(sensorValues[1][3][0]);
      TelnetStream.print(" km/h   wind direction = ");
      TelnetStream.println(sensorValues[1][4][0]);

      TelnetStream.print("rain weight = ");
      TelnetStream.print(sensorValues[1][5][0]);
      TelnetStream.println(" g");
#endif
    }
    else
    {
#ifdef DEBUG_THINGSPEAK
      Serial.println("==> ThingSpeak: failed to connect ");
#endif
    }
#ifdef DEBUG_THINGSPEAK
    // Just for testing, print out the message on serial port
    Serial.println("==> ThingSpeak POST message ");
    Serial.println(data);
#endif
    client.stop();
  }
}
Bear in mind that all the sensors can arrive from the GTW1 but also from other gateways when the GTW0 is connected to a wider Rezodo network...
Values are stored into this array:
float sensorValues[100][100][1]; //sensorValues[GTW, sensorIndex, value];
100 gateways, 100 sensors per gateway and only one value per sensor !
If you want to setup a "big" Rezodo network, please read all the details into this project: https://hackaday.io/project/190577-rezodo-long-range-irrigation-and-weather-station
Discussions
Become a Hackaday.io Member
Create an account to leave a comment. Already have an account? Log In.
Hi, thanks for this comment.
I was aware of drift due to internal self heating of BME280 but not permanent offset. (reason why I perform temp measurement just after powering the board).
Here is an interesting article on BME280 accuracy : https://www.kandrsmith.org/RJS/Misc/Hygrometers/absolutetemperature.html
Could you please post a link for the recalibration process ?
However I made an "on the desk" comparison of various sensors including labs mercury thermometers and did not discovered high inconsistencies on my devices !
Are you sure? yes | no
It is well known that the BME280 is not recommend for use in weather stations as the temperature, and therefore humidity, calibration is often thrown out during the soldering process. That is the senor can be accurate, or can be recalibrated, but is typically has poor accuracy when supplied on modules from Aliexpress or similar. For this reason many weather stations will use SHT3x, SHT4x or similar sensors for temperature and humidity as these don't seem to lose their calibration when soldered onto boards. The recalibration process for the BME280 is a fair complex process.
Are you sure? yes | no