 Tsjakka
I can't say we live on a busy street, but cars do pass by even at night. And because the street is not very wide, sound is reflected by the houses on the opposite side of the street. That's why we usually sleep with our bedroom window closed, albeit contrecoeur. But, we could sleep with our window open if it were to open automatically after, say, 0:30 in the morning (12:30am) because at that time no cars usually pass anymore. And if they were, we are asleep anyway so we may not hear them if they are not too loud. On this web page you can read all about how I created the hard- and software for an automated window opener. You can find all the information you need to build one yourself. It's not easy to do, but if you are somewhat experienced with tools such as a soldering iron, a saw and screwdrivers, you should be able to do it. The hardware is cheap and, as it turns out, pretty reliable (in a trial of one).
How it started
I started out with putting my requirements on paper. In a nutshell:
- I want the window to be closed when we go to bed and are trying to fall asleep. Before 0:30 cars still drive in our street, so it should stay closed before that time.
- I want to keep the window open as long as possible for fresh air, but close it before cars start driving in the morning. In our case this means that the window has to close around 6:00.
- It must be possible to configure the open position of the window.
- The system must be robust for situations where the window cannot open or close, for example when the latch has been engaged.
- It must be possible to open or close the system 'manually', e.g. by using a remote control.
The design
On the internet I found a linear motor and I figured that would be a good starting point. I started making some sketches in PowerPoint to figure out what would be a workable angle between the window and the linear motor. Here an example of the drawings I made:

In the end, I decided for a linear motor with a stroke of 150 mm. This would mean the window would open around 28 cm, which we thought would be enough.
The next step was to figure out how to make the system robust for things like the latch or our shutter being closed when the system tries to open the window. I though about using sensors on the window, but ultimately rejected that idea for being to complicated. Then, I came up with the idea to test if the motor would start using more power if it runs into to a blockage. This was easy to test with e multimeter and I soon found out it does. So I ordered a current measurement print based on the INA226 chip for checking the power usage. I looked for an Arduino library and created a test program to discover the characteristics of the linear motor. It took quite some experimenting before I figured out the right configuration for the system, but in the end I found a reliable one.
Another important element is the microcontroller that is used to control the system. I selected an ESP8285 for this task and it works well. It is also extremely cheap, just a few euros on the well known Chinese websites. A serious downside of these boards is that there are quite a few limitations to the use of the GPIO connections. You have to be very careful when selection ports for connecting stuff. Fortunately, there are some good sites that collect information on these things, such as https://randomnerdtutorials.com/esp8266-pinout-reference-gpios/. This page describes the ESP 8266, but the info should be the same for the 8285.
The next step was to figure out how to control the motor from software. Googling led me to this website, that describes how to use a transistor as a switch. Since the motor uses 12 V, I also needed a relay to switch the 12 V to the motor and one more to switch the direction. Unfortunately, it is hard to mount relays on a breadboard, so I decided to put them on a PCB without creating a breadboard setup for the whole system. As you can imagine, because of the intricasies of the ESP8285,...
Read more »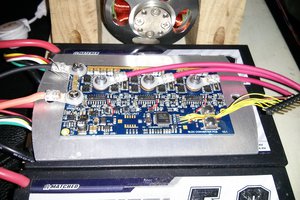
 Jarrod
 AdaCore
 Andy Geppert