 eGuidezhan
Project use code
// Define the pin for the LED
int ledPin = 13;

// Define the pin for the touch sensor
int touchSensorPin = 2;

// Define a variable to store the LED state
int ledState = LOW;

// Define a variable to store the previous touch sensor state
int lastTouchState = LOW;

void setup() {
  // Set the LED pin as an output
  pinMode(ledPin, OUTPUT);

  // Set the touch sensor pin as an input
  pinMode(touchSensorPin, INPUT);

  // Initialize serial communication
  Serial.begin(9600);
}

void loop() {
  // Read the state of the touch sensor
  int touchState = digitalRead(touchSensorPin);

  // Check if the touch sensor state has changed
  if (touchState != lastTouchState) {
    // If the touch sensor is touched
    if (touchState == HIGH) {
      // Toggle the LED state
      ledState = !ledState;
      // Update the LED state
      digitalWrite(ledPin, ledState);

      // Output the LED state to the serial monitor
      if (ledState == HIGH) {
        Serial.println("LED ON");
      } else {
        Serial.println("LED OFF");
      }
    }
    // Update the previous touch sensor state
    lastTouchState = touchState;
  }
}
Code fragment explanation
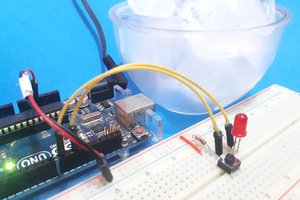
This Arduino code creates a simple project that uses a touch sensor to control an LED. The LED will turn on when the touch sensor is touched and turn off when touched again. The code starts by defining the pin numbers for the LED (pin 13) and the touch sensor (pin 2). It also declares variables to store the LED state (HIGH for on, LOW for off) and the previous state of the touch sensor.
In the setup() function, the LED pin is set as an output, and the touch sensor pin is set as an input. The Serial.begin() function initializes serial communication, allowing us to monitor the LED state through the serial monitor.
In the loop() function, the code reads the current state of the touch sensor using digitalRead(). If the touch sensor state has changed since the last reading, the code checks if the touch sensor is currently touched (HIGH state). If it is touched, the LED state is toggled using ! (NOT) operator. The LED state is then updated accordingly using digitalWrite() to turn the LED on or off.
Finally, the LED state is output to the serial monitor using Serial.println(), providing a message indicating whether the LED is ON or OFF. The previous touch sensor state is also updated to match the current state, ensuring that the LED is only toggled once for each touch event. The loop() function continues to run repeatedly, continuously checking for changes in the touch sensor state and controlling the LED accordingly.
 Silícios Lab
 ElectroBoy
 vmorant
 Hulk
Hulk