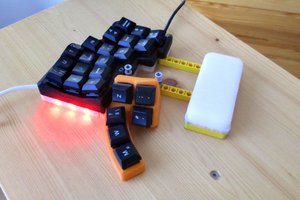
 Kārlis
Project goals:
* make a keyboard which is sufficiently thin to fit inside steamdeck official case
* experiment with making flex PCBs using copper tape and a vinyl cutter (both as cheap flex PCBs and rapid PCB prototyping in general)
Keyboard stackup:
* OHP transparency film (layer 1 backing)
* copper tape
* OHP transparency film (middle layer with holes for making switch connections)
* copper tape
* OHP transparency film (layer 2 backing)
* vinyl stickers/labels
Usefulness as a PCB prototyping/ cheap DIY flex PCB creation method.
While the cutting process was relatively quick, weeding process (removal of unwanted parts) was quite slow (~20min for each layer). Copper tape held better than expected. Not sure what plastic the transparency film is made of, but it started melting at ~240 oC. With soldering iron at 220-225 melting it isn't too much of a problem. But the glue holding copper tape will loosen at that temperature, so you have to be very careful to avoid lifting or sliding the traces around. Not sure how easy it would be with lead free solder, since with it temperature window between melting solder and the plastic would be very narrow. This would be less of an issue with proper materials like kapton.
In theory the glue of copper tape was supposed to be somewhat conductive. With bigger overlapping patches it somewhat worked, but with thinner traces it was somewhat unreliable. Had to add small dots of soldering to connect the strips of copper tape together more reliably. Uses as wide copper tape as you can get to reduce amount of joints required. 50mm tape is most commonly available, 100mm is somewhat less common. It is also possible to find 20x30cm sheets of copper tape sold for shielding electric guitars, that would probably avoid the issue of having a joint across the middle of PCB, although I am not sure how easy it is to smoothly apply foil that is so wide.
Switch geometry:
One of the initial iterations used ~5mm diameter holes in the middle layer. Those almost didn't work. After making a test with different hole sizes it turned out that ~9-10mm works best. Smaller holes require a lot of force to push, bigger holes have a risk of unintentional connection.
Cutting process
There are two approaches for cutting the tape.
a)
1) apply copper tape with backing paper on the sticky cutting mat
2) cut out with vinyl cutter
3) perform weeding
4) transfer to final backing material using transfer tape
b)
1) apply the copper tape to backing material
2) cut out using vinyl cutter (use of cutting mat optional)
3) perform weeding
The weeding process is much faster and easier using approach a) while the copper tape is still on the slippery backing paper. Downside is that it only worked for very large shapes. Trying to cut smaller details was nearly impossible, copper tape would lift off, or slide bunch up and tear. When attached to the OHP film the copper tape held in place much better. Using approach b) I was able to cut 0.5mm traces and pads for 0805 smd components, although for reliability I would recommend at least 1mm trace/0.5mm spaces. For the cutting settings instead of trying to adjust proper blade depth, I just set the minimal cutting pressure to minimum while cutting copper tape and maximum for overall outline. That way everything can be done in one go without having to remove the blade and attempt to align the offset in multiple operations.
Exporting PCB to SVG for cutting
In kicad export as SVG. Use the options "Current page size" and "Print one page per layer". Unfortunately when exporting as single SVG the resulting file is quite messy and it's difficult to separate things into the layers. In inkscape import all the svg as pages using Import/select svg file/"Add svg as new page in current file". Once each layer is processed stack up everything back together, it's much easier to do if you used "current page size" as that way you can just shift the objects by page...
Read more »
 JohSchneider
 Simon Merrett
 Peter Lyons
 David McEwan
This is a great proof-of-concept and getting-started for the *technique*, which I'll definitely be throwing in the ol' toolbag.
Sometimes I think the HaD blog articles are intentionally written as to miss the point.... weed-out the spectators from the actual creator-sorts. Happened to me more than once, too.
Thoughts of where this technique could be very useful: weird-spacing "breakout boards" made in an evening rather than waiting weeks for a PCB... Even if it's hard to solder fine-pitch, it could still be used with conductive epoxy, z-axis tape, or "zebra strip" in certain applications. Also, maybe, replacement flex cables/breakouts.
Thanks for taking the time to write up some pointers.