owhite
On behalf of the MP2-ESC design team I am please to report on a new open source version ESC that was originally described at Endless-sphere.
I did not design this board. I adopted it from the MP2-ESC design. This board absolutely would not have been possible without the intellectual work of the MP2-ESC team. I gratefully offer many many thanks to:
- mxlemming for his infinite patience, mentorship, MESC code, and help with testing
- badgineer for assistance with circuit design, part selection, support and original MP2-ESC design
- netzpfuscher for the MESC terminal
This is a new version of that board which uses NVMTSC4D3N15MC MOSFETs but still is a MP2:
- Designed to run 300A at 150v (so far only tested at 100v)
- Fully compatible with VESC using the STM32F405 pill
- Cheap to order -- manufacturing files ready to upload to JLCPCB
- Compact design, great for ebikes / medium-large electric scooters
Unlike the original, this board is likely to be much more expensive than the MP2-ESC. But on the other hand it's features include:
- No more TO-220s, no more wonky heatsinks
- Updated bulk MLCCs to 250v rating
- 12v DC-DC and 5v DC-DC flipped to underside of the board
- Easy to order busbars for assembly and heatsinks for assembly
Github information:
- Main repository: [LINK]
- Github branch for this release: [LINK]
- JLCPCB files: [LINK]
- Circuit diagram: [LINK]
Additional items you'll need:
- 160VDC 470uF caps, MFR#: EKXJ161ELL471MMN3S
- 20 pin headers: MFR# 929850-01-20-10
- 12VDC-DC converter: MFR# PQDE6W-Q110-S12-D
- 5VDC-DC converter: MFR# VR05S05
- Thermal pad material: COH-4000LVC-200-05
- Consider ordering laser cut sendcutsend.com busbars and heatsinks. DXF files: [LINK]
Note that the holes on the busbars and tombstone phase connectors are sized to be threaded for 5mm bolts, heatsinks for 3mm. If you dont have taps or dont want to do threading, just drill the holes out and use bolts with nuts.
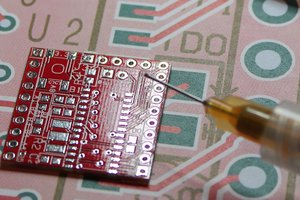
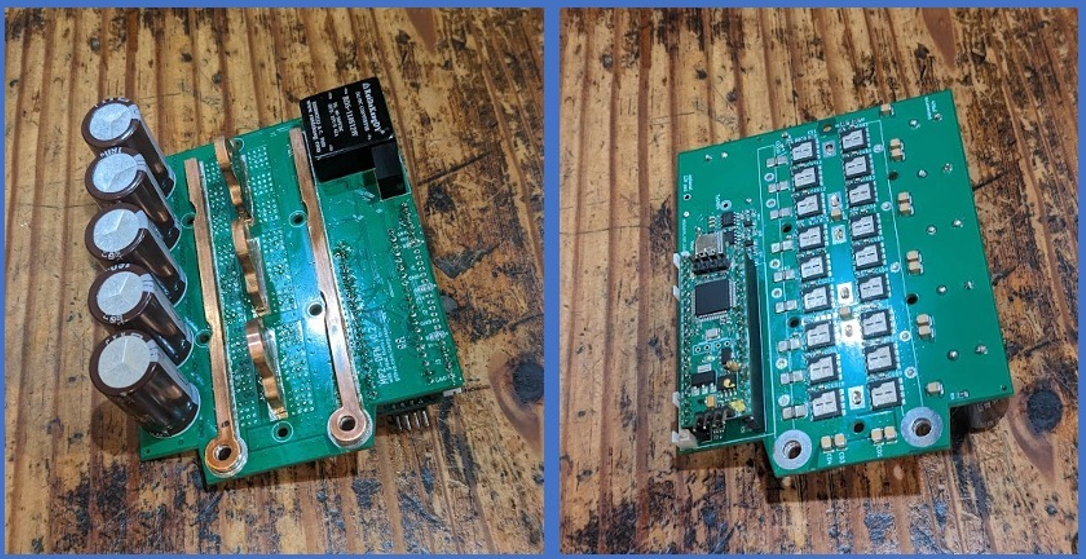
Assembly. To construct, I ordered the board from JLCPCB complete with the NVMTSC4D3N15MC MOSFETs. Everything was loaded on the board except the through-hole parts. Before adding through-holes, smear solder paste on the flat bus bars, put in place then drop on hot plate with busbars facing down. Busbars are on the bottom side of the board, you cant really see the solder melting, so put a blob of solder paste on the top side and wait til the board is hot enough to melt the paste. Switch off hot plate and let it cool. To solder in the tombstone shaped phase connectors, you have to file the tabs a bit to fit into the slots on the board. Then carefully use a butane torch to heat the tombstones with paste between their base and the board. Finally solder in through-hole components, and the assembly should look like this:
Firmware. Theoretically this board will work with the VESC but has not been tested so far. You'll have to ask some nice person to make you the correct header files for that firmware. So use MESC! There's a tutorial, using MESC and the open source F405 pill. This video is fine for most steps, just note to run on MESC, this board has a different vsense voltage divider than previous MP2-ESCs, requiring you to set these variables in MP2_V0_1.h:
#define R_VBUS_BOTTOM 3300.0f
#define R_VBUS_TOP 150000.0f
Cooling. The NVMTSC4D3N15MC MOSFETs are basically a millimeter thick and red hot pin heads probably dissipate heat faster than these things. They get hot fast. Other strategies may work but I use a laser cut chunk of aluminum [LINK] with the thermal pad. No thermal grease was used. A pic of it assembled: [LINK]. One important new design element is that the MOSFETS are now on the top region of the board exposing the FETs so at least in my case it is easier to expose the heatsink to the forward airflow on my bike. Airflow is imperative. This graph shows it's performance when the MOSFETs are bare, covered with a heatsink, and when a fan is pointed at the heatsink. The good news is it looks like running continuously at...
Read more »
 Ray Olsen
 Torbjörn Lindholm
 Bob Coggeshall