Close
0%
0%

Space Invader's

Create an immersive Space Invaders game experience with a laser gun for shooting and an adaptable ship. Intuitive, universal design for all

Similar projects worth following
314 views
0 followers
The Space Invaders Physical Controller project seeks to revolutionize gaming by introducing a specially crafted controller designed exclusively for the Space Invaders game. At its core is a laser gun, featuring a laser module, trigger mechanism, and a microcontroller for processing laser input. This sophisticated setup not only enhances functionality but also aims to provide a more immersive and realistic gaming experience.

The laser gun's precision, ergonomic trigger design, and integrated microcontroller work in tandem to create a seamless connection between the physical and virtual worlds, promising an unparalleled level of engagement for players navigating the Space Invaders universe.

The project is divided into three crucial components, each handled by a dedicated team member:

  1. Axel: Project Implementation and Execution : Axel is tasked with overseeing the overall project implementation and execution. This includes coordinating the efforts of the entire team, ensuring that timelines are adhered to, and managing the seamless integration of each component into the final product. Axel's role is pivotal in bringing together the work of Georges and Theo, ensuring a cohesive and successful Space Invaders Physical Controller.
  2. Georges: Creation of 3D Pieces : Georges is responsible for the creation of the 3D pieces that constitute the physical components of the Space Invaders Physical Controller. This primarily involves designing and modeling the gun controller in Solidworks. The focus is on achieving a visually appealing and ergonomic shape that not only enhances the user experience but also aligns with the aesthetics of the Space Invaders game. Georges' work contributes significantly to the tangible and tactile aspects of the controller.
  3. Theo: Component Programming : Theo takes charge of the component programming aspect of the project. This includes programming the internal electronic circuit of the gun controller. Theo's responsibilities extend to configuring the Arduino laser, integrating the vibrator for haptic feedback, and programming the speaker to generate sound upon pressing the shoot button. Through Theo's expertise, the electronic components are synchronized to deliver a cohesive and immersive gaming experience.

Project Components: "Space Invader’s"

  1. Controller (Gun) The gun controller is the focal point of the project. Designed in Solidworks by Georges, it incorporates essential features such as the infrared (laser) for shooting accuracy and a meticulously crafted trigger for an intuitive gaming interface. Axel ensures that the implementation and execution of this component align with the overall project goals.
  2. Target While not explicitly detailed in the division of work, the target is a fundamental part of the project. Though not directly assigned to a team member, its functionality is closely tied to Theo's programming work. The target's role is to register hits from the laser gun, triggering responses such as vibrations and sound, providing feedback to the player.

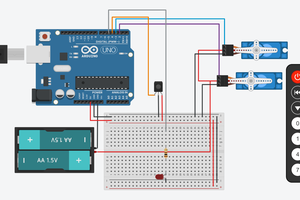
Parts of the Gun Controller:

  • Laser: Arduino laser with 3 pins and a resistor for precise targeting.
  • Vibrator: An "Output" component with 2 pins and 2.5V, providing haptic feedback upon hitting the target.
  • Speaker: Another "Output" component generating sound when the shoot button is pressed.

The gun controller's internal electronic circuit, Theo's domain, harmonizes these components to create a seamless and engaging gaming experience for Space Invaders enthusiasts.

Arduino-Uno-Receiver.jpg

Laser on the receiver

JPEG Image - 411.37 kB - 01/09/2024 at 14:23

Preview
Download

Arduino-Uno-Receiver-laser.jpg

The starts to shine

JPEG Image - 435.62 kB - 01/09/2024 at 14:23

Preview
Download

arduino-nano.jpg

The arduino card that we're using.

JPEG Image - 423.81 kB - 12/12/2023 at 13:51

Preview
Download

vibreur-manette-arduino.jpg

The vibrator for the first Output.

JPEG Image - 432.78 kB - 12/12/2023 at 13:51

Preview
Download

laser-arduino.jpg

The laser to shoot towards target.

JPEG Image - 368.01 kB - 12/12/2023 at 13:51

Preview
Download

View all 8 files

  • 1 × Laser Arduino To send information (shooting)
  • 1 × Vibrator Output
  • 1 × Speaker Output
  • 1 × Arduino Nano The motherboard and the heart of the controller
  • 1 × Wires soldered wires to connect the different components

View all 9 components

View all 3 project logs

  • 1
    Different Steps of the Project : Space Invaders

    Different Steps of the Project : Space Invaders

    Step 1: Project Planning and Team Coordination

    1.1 Define Project Scope and Objectives: Clearly outline the goals of the Space Invaders Physical Controller project. Identify key functionalities, features, and the overall gaming experience you aim to achieve.

    1.2 Team Coordination: Ensure effective communication among team members (Axel, Georges, Theo). Establish regular meetings to discuss progress, challenges, and adjustments to the project plan.

    Step 2: Designing the Gun Controller (Georges)

    2.1 Solidworks Design: Utilize Solidworks to design the 3D model of the gun controller. Focus on ergonomics, aesthetics, and accommodating the essential components.

    2.2 Internal Structure: Create a detailed internal structure within the gun controller to house the laser, vibrator, speaker, and the electronic circuit.

    Step 3: Component Programming (Theo)

    3.1 Arduino Programming: Program the Arduino board to control the laser, vibrator, and speaker. Define the behavior of each component based on user interactions (e.g., pressing the shoot button).

    3.2 Integration of Components: Ensure seamless integration between the Arduino board and the individual components. Test and troubleshoot to guarantee smooth operation.

    Step 4: 3D Printing (Georges)

    4.1 Material Selection: Choose appropriate materials for 3D printing that balance durability and aesthetics.

    4.2 Printing Process: Use a 3D printer to bring the Solidworks-designed gun controller to life. Pay attention to printing quality and precision.

    Step 5: Assembling Components (Axel)

    5.1 Gather Components: Collect all 3D-printed parts, the Arduino board, laser module, vibrator, and speaker.

    5.2 Assembly: Assemble the gun controller by carefully integrating the 3D-printed parts with the internal structure. Connect the electronic components according to the design and wiring specifications.

    Step 6: Testing and Calibration (Axel, Theo)

    6.1 Functional Testing: Conduct comprehensive tests to ensure that the laser accurately registers hits, the vibrator provides feedback, and the speaker generates sound as intended.

    6.2 Calibration: Fine-tune the system for optimal performance. Adjust parameters as needed to enhance accuracy and responsiveness.

    Step 7: User Interface and Experience (Georges)

    7.1 User Interface Design: Consider any additional elements, such as buttons or indicators, to enhance the user experience.

    7.2 Aesthetic Finishing: Apply finishing touches to the 3D-printed parts for a polished appearance.

    Step 8: Documentation and User Manual (Axel)

    8.1 Documentation: Create detailed documentation that includes assembly instructions, troubleshooting tips, and any technical specifications.

    8.2 User Manual: Develop a user-friendly manual that guides users through setup, gameplay, and maintenance.

    Step 9: Final Presentation (Team Collaboration)

    9.1 Assemble Final Product: Put together the fully functional Space Invaders Physical Controller, incorporating all components and refinements.

    9.2 Presentation: Showcase the completed project to stakeholders, demonstrating its features, functionality, and the unique gaming experience it offers.

    Step 10: Feedback and Iteration (Team Collaboration)

    10.1 Collect Feedback: Gather feedback from team members and potential users. Identify areas for improvement.

    10.2 Iterate: Make necessary adjustments based on feedback to enhance the controller's performance, usability, or aesthetics.

View all instructions

Enjoy this project?

Share

Discussions

Similar Projects

Does this project spark your interest?

Become a member to follow this project and never miss any updates