Close
0%
0%

Customizable 5 Buttons WiFi Smart Home Switch

Customizable 5 Buttons WiFi Smart Home Switch using ESP8266 (Arduino Compatible + Open Source!)

Similar projects worth following
Recently I am renovating my room and I start looking into IoT / smart home devices. However, I am not the kind of person that willing to handle complex setup process and linking multiple device to a bunch of hubs just to make them turn on a light or another electronic devices. Besides, I am both a hardware and software developer, designing & manufacturing a new device is not that difficult. So I decided to make one myself.

Recently I am renovating my room and I start looking into IoT / smart home devices. However, I am not the kind of person that willing to handle complex setup process and linking multiple device to a bunch of hubs just to make them turn on a light or another electronic devices. Besides, I am both a hardware and software developer, designing & manufacturing a new device is not that difficult. That is why I decided to make myself one which has the following properties

  • Privacy (Do not send your data over the internet)
  • Robust (Able to handle network architectural change with no / easy to update device settings)
  • No hub required (as my room is just too small to put a hub)

After considerations, I settle on WiFi as my primary way to connect the smart devices in my room. I do worry about power consumption. However, as I am renovating my room anyway and I can easily pull power cables all over my room during the renovation, it is a no brainier to using power saving protocols like Bluetooth or Zigbee which require an extra hub to work with my already setup homelab servers.

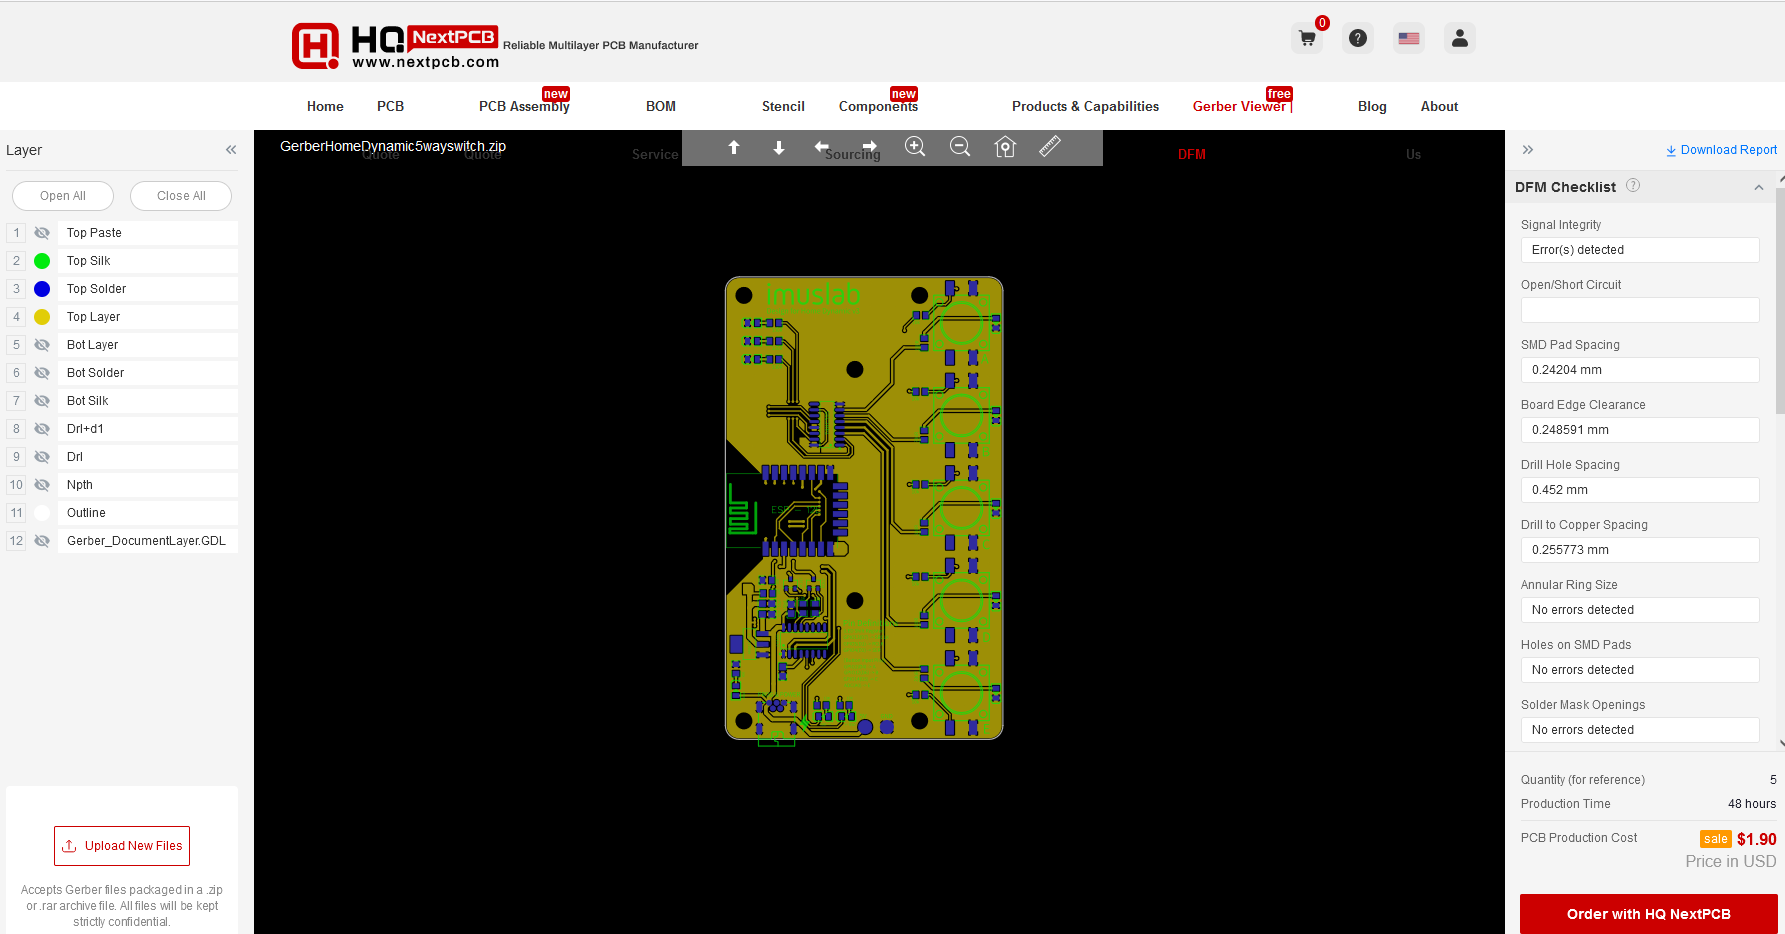
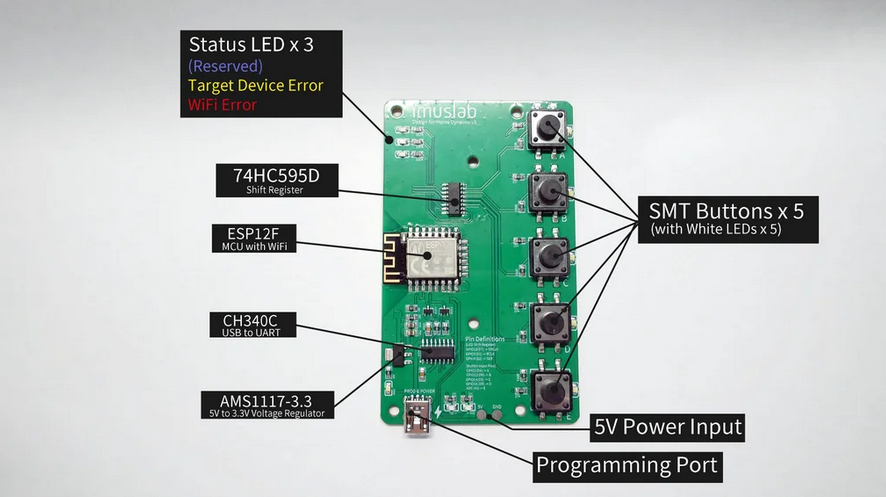
This switch can also be modified to act as a physical RESTFUL API call client or whatever that pings server or grab data from the internet. If you know how to program an esp8266 with Arduino IDE, you can try duplicate this yourself and have fun with my reference designs :)

x-zip-compressed - 275.27 kB - 11/23/2023 at 11:39

Download

case.ipt

Switch cover model file (source)

ipt - 396.50 kB - 11/23/2023 at 11:39

Download

case.stl

Switch cover model file (ready to print)

Standard Tesselated Geometry - 205.26 kB - 11/23/2023 at 11:39

Download

  • Viewing / Editing PCB / Gerber Files

    tobychui11/24/2023 at 09:19 0 comments

    How to view the Gerber File?

    Many of the email I got is about how to view / edit the PCB. In fact, you can easily view the PCB  Gerber with online gerber viewers. 


    By uploading the Gerber file on NextPCB Gerber viewer, you'll able to see all the errors in order to make sure your design is ready for manufacturing. Feel free to try that out!
    https://www.nextpcb.com/free-online-gerber-viewer.html

    If you want to edit the PCB, the source file are also included in the repo where you can open with another online editor. So don't hestiate to try out and make yourself a special edition of the switch ! (e.g. add a type C port)

View project log

  • 1
    Supplies & Parts

    As I am designing this board with parts that is available on most of the PCB manufacturer, you just need the followings to make your own

    • A computer with Arduino IDE (with ESP8266 installed in the board manager)
    • A PCBA manufacturer like NextPCB to manufacture the switch for you
    • A 3D Printer
    • Soldering iron (if you plan to build it yourself)
    • SMD components (See the attached diagram)
    • 4 x M3 x 5 screws
    • The other things you want to control which accept RESTFUL API (e.g. the relay module I am using, I will show you in later steps)
  • 2
    Send the Switch PCB to Print

    If you are good at soldering, you can print the PCB using any PCB manufacturer you like. However, as I am busy renovating my room, I don't have time to work on SMT soldering. Recently NextPCB approach me and ask if I am interested to accept a sponsorship from them and try their services. So I ask them if they could make the switch for me with their PCBA service.

    The PCB gerber files can be found on my Git server over here.

    https://git.imuslab.com/TC/HomeDynamicv3/src/master/hardware/hds_5-way-switch/pcb

    Why NextPCB?

    I personally do recommend their service as they do really have a great team of engineer to handle problems for you. If you are first time PCB maker and want to try all sorts of interesting design while making sure it is possible to produce, you can ask their engineer directly and they will give you recommendations on how to make it cheaper like sourcing alternative parts from China or how to pick another chip so it is generally faster to build.

    They also help me to get this UR Mark that is really helpful if you are building commercial products.

    Manufacturing

    I ordered 5 pieces for my room which should be able to cover all my room's lighting and automation devices. After the boards arrive, you can start the 3D printing process and programming!


  • 3
    3D Printing & Installing Switch Panel

    The step is quite straight forward. I designed a flexible PLA pieces that can be screw on top of the PCB to act as a front cover while provide enough flexibility so you can press the pieces and activate the SMD button below.

    There are also tiny holes next to each of the switch so you can know if the press is registered or not. You can also program them to show the status of the device being controlled.

View all 8 instructions

Enjoy this project?

Share

Discussions

Similar Projects

Does this project spark your interest?

Become a member to follow this project and never miss any updates