Close
0%
0%

In search of a real Tricorder

TRICORDUINO - 4.0 _ Scientific Tricorder with Arduino technology

Public Chat
Similar projects worth following
Starting from
$49.95
onehorse has 5329 orders / 178reviews
Ships from United States of America
This project describes the development of a multi-mode scanner platform. A device like this is close to what is known in the Science Fiction of the Star Trek universe as Tricorder. Obviously it is far from having the capabilities shown in the series, but it can be extremely useful in everyday life. This version, very miniaturized and compact, promises great versatility and discretion, even for urban use.

1.0 - INTRODUCTION

When I decided to build Tricorduino 4.0, I felt more or less like Mr. Spock in the classic series episode called, “The City on the Edge of Forever”, when he was trying to make modifications to his broken Tricorder. I don't mean the feeling of building the first mnemonic circuit in history, but rather of working with little more than soft clay and chipped stone. As I explained before, Tricorduino is far from being a Tricorder because the idea of a real Tricorder involves a miniaturization of systems that are currently very large. In the episode in question, Spock used thermionic valves to recover the damaged Tricorder. Of course, this is just fiction, but the plastic of the film wants to show precisely the fact that technology evolves both, concept and in miniaturization. Even for Spock's brilliant Vulcan mind, it was quite complicated to carry out repairs on the Tricorder in New York during the Great Depression of the 1930s. Perhaps it would be much easier if it were today in 2023, in Silicon Valley. To summarize the situation, it is not impossible to build a real Tricorder with current technology, but it is still impossible for it to be the size conceived in the Star Trek series. We cannot contain a precision spectrograph or a database of the complete history of the earth in detail inside a multimeter box. Let's say that between 1930 and 2023, we evolved from galena diodes and thermionic valves to something like polymers and processed silicon. However, a lot still has to happen between 2019 and 2260, the year in which the classic Star Trek series takes place.

As was very evident, for those who read the posts regarding tests with Tricorduino 3.0, the degree of miniaturization is essential to have an instrument that can be used anywhere and at all times. It is also essential to have a screen that can be viewed during the day in intense sunlight. Solving all these problems and still having energy for at least 4 or 5 hours of continuous operation is quite challenging. A practical Tricroder should have the dimensions of a cell phone. With this in mind, I decided to completely reformulate this project and set out to create Tricorduino 4.0.

2.0 - DESCRIPTION

2.1 - Processor

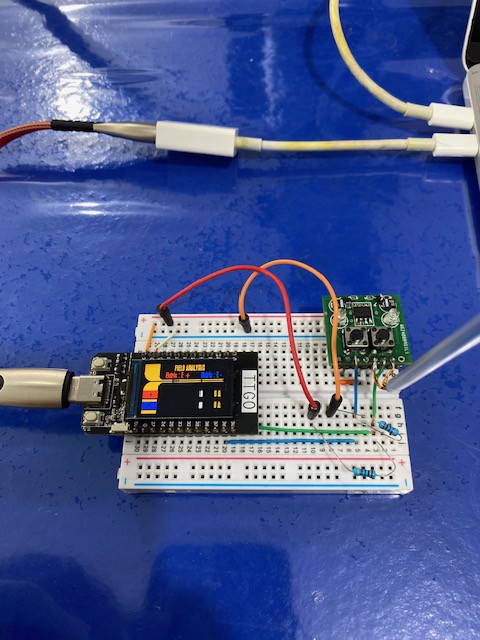
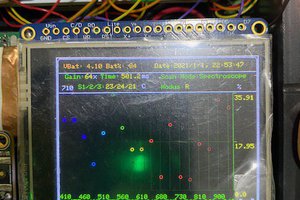
Tricorduino 4.0 uses the TTGO T-Display which is an excellent development board, incorporating an ESP32 processor (with support for WiFi and Bluetooth) and a small OLED display. Okay, the first thing you might be thinking is that it's really small. Yes, it's very small, but it's surprisingly efficient. The screen is bright enough to view during the day, even in sunlight. Because it is very small, the degree of miniaturization allows us to build something that can be carried in your pocket without any problems. Furthermore, since the OLED display is inserted into the processor block, we have enough free pins to connect all possible and imaginable types of sensors and switches. By switching the Feather-MO processor for a TTGO Esp32, I lost the advantage of using a micro SD card to record observational data, which is sometimes of utmost importance. However, I can still solve this problem by transmitting information via ESPNow from the TTGO processor to a mobile unit with an Esp32 attached to a micro SD card reader. In fact, the possibility of using the ESPNow protocol opens up a series of prospects for readings from probes that can be scattered in the environment to be researched.

2.2 - Hardware

A very important thing I learned while building Tricorder prototypes is that it is essential to use printed circuit boards. If you assemble a prototype using wires, sockets, breadboards, and the like, your device is destined to fail at the most critical moments. So, after conducting all the basic tests on breadboards, I decided to purchase professional printed circuit board fabrication services. The investment is not too expensive, and the return is very good. Contact failures during field operations completely disappear....

Read more »

TESTE28.zip

This sketch is quite extensive and a bit complicated. Obviously, it is not properly debugged yet. I've been working on it for almost a whole year, and it's easy to forget the operational details of certain parts. So, if you intend to test this sketch, keep in mind that a series of issues may arise. Problems with libraries and driver issues can be common when trying to use the TTGO processor for the first time. Therefore, I suggest starting with simpler things for an initiation. A good starting point could be a read-through of Jeroen Maathuis' work at: https://sites.google.com/site/jmaathuis/arduino/lilygo-ttgo-t-display-esp32/arduinomenu-demo-ttgo-t-display If you can reproduce the basic tests with the menu for TTGO, then it becomes easier to use my sketch. In the near future, I will clean up the sketch and list the libraries I used to make it easier for you to use.

Zip Archive - 80.28 kB - 12/20/2023 at 17:55

Download

  • 1 × TTGO T-Display ESP32 (https://www.amazon.com/-/pt/dp/B0CJM9VN4D/ref=sr_1_6?__mk_pt_BR=ÅMÅŽÕÑ&crid=3HCV8NOISQBFX&keywords=TTGO+es Microcontroler with WiFi E Bluetooth Module Development Board for Arduino 1.14 Polegada LCD
  • 1 × Generic SI1145 (https://www.amazon.com/dp/B07MY2TPNV) UV Index IR intensity sensor board
  • 1 × Panasonic GridEye (https://www.tindie.com/products/onehorse/grid-eye-8-x-8-ir-array/ ) 8x8 array thermal IR sensor board
  • 1 × RadiationWatch Pocket Geiger (http://www.radiation-watch.org/p/english.html ) Radiation sensor board
  • 1 × VL53L1X Time-of-Flight ranging sensor (https://www.amazon.com/-/pt/dp/B08J1K9T5P/ref=sr_1_3?__mk_pt_BR=ÅMÅŽÕÑ&dchild=1&keywords= Time-of-Flight (ToF), laser-ranging sensor

View all 13 components

  • Electrostatic Field Sensor

    Antonio Cesar de Oliveira04/07/2024 at 14:04 0 comments

    As far as I could verify, there is no electrostatic field sensor for Arduino with an affordable price and miniaturized size. However, I can't imagine a Tricorder without a sensor of this type. Therefore, I decided that I should build a sensor that was small and efficient at detecting electrostatic fields. This doesn't seem very simple. My first attempt was a simple circuit with 3 BC547 npn transistors in cascade. I used this on several prototypes including this last one. The result is not remotely satisfactory as this circuit is good for detecting moving charges and not electrostatic fields. So I recently discovered a circuit that has been replicated by several makers and seems to work very well for electrostatic fields. The original circuit can be found at the following link;   "" by Thomas Kim.
    The great difficulty was building this circuit on a printed circuit board in a completely miniaturized way. Obviously it took several attempts with circuit boards made using homemade techniques. However, a professional circuit board with good certification and quality control was required. I am very grateful to PCBWay for kindly offering to manufacture a small professional board. The quality of PCBWay's work is undeniable and the result was very good as you can see in the photos. After assembly, the tests showed excellent results as you can see in the videos. You will see that these tests were not done with the tricorder but rather in isolation with a TTGO board separately. In the coming weeks I intend to install the sensor on the tricorder and carry out more detailed tests.

View project log

Enjoy this project?

Share

Discussions

Similar Projects

Does this project spark your interest?

Become a member to follow this project and never miss any updates