Bonjour aujourd'hui nous allons vous présenter notre projet, le jeu que nous créons nommé Laser tag. Le jeu est basé sur Aim Lab. Pour ceux qui ne savent pas ce qu'est Aim Lab, Aim Lab est un jeu dans lequel vous avez des cibles qui apparaissent sur votre écran et votre objectif est de leur tirer dessus avec vos armes, et lorsque vous touchez les cibles, elles disparaissent et une autre apparaît . Le principe du lazer tag est le même vous avez cinq cases qui représentent les cibles avec une LED sur le dessus de chaque case, lorsque la LED est allumée, cela veut dire que c'est la cible que vous devez viser.
0%
0%
Lazer tag
Laser device shooting at targets.
Become a Hackaday.io member
Already have an account? Log in.
Just one more thing
To make the experience fit your profile, pick a username and tell us what interests you.
Pick an awesome username
hackaday.io/
Your profile's URL: hackaday.io/username. Max 25 alphanumeric characters.
Pick a few interests
Projects that share your interests
People that share your interests
 Adam Jensen
 Vinicius
 Peter Victoratos
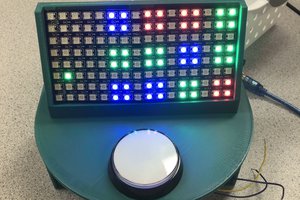
 Fischer Ryan