• Result

    Makerfabs12/13/2023 at 01:54 0 comments

    Result
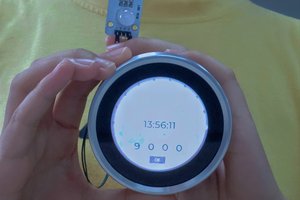
When I open the switch, the WS2812 lights up, and the LED's color changes with the color of the colorwheel knob. I can change the colorwheel knob position by touching the screen or rotating the encoder. And when I click the button,the light will be turn off at the setting time .

  • Step 3: Firmware

    Makerfabs12/13/2023 at 01:53 0 comments

    • The MaTouch ESP32 S3 2.1 Rotary TFT with Touch is not compatible with the TFT_eSPI library, so I use the GFX_Library_of_Arduino library instead of the driver.

    Since I did not use the TFT_eSPI library, it is needed to delete or comment all the codes related to the TFT_eSPI library.

    #include <tft_espi.h>
    
    TFT_eSPI tft = TFT_eSPI(screenWidth, screenHeight); /* TFT instance */
    
        tft.startWrite();
        tft.setAddrWindow( area->x1, area->y1, w, h );
        tft.pushColors( ( uint16_t * )&color_p->full, w * h, true );
        tft.endWrite();
    
        tft.begin();          /* TFT init */
        tft.setRotation( 3 ); /* Landscape orientation, flipped */</tft_espi.h>
    

    When I use the GFX library, it is needed to define the GFX Library For the Arduino Interface pin.

    Arduino_ESP32RGBPanel *bus = new Arduino_ESP32RGBPanel(
        1 /* CS */, 46 /* SCK */, 0 /* SDA */,
        2 /* DE */, 42 /* VSYNC */, 3 /* HSYNC */, 45 /* PCLK */,
        11 /* R0 */, 15 /* R1 */, 12 /* R2 */, 16 /* R3 */, 21 /* R4 */,
        39 /* G0/P22 */, 7 /* G1/P23 */, 47 /* G2/P24 */, 8 /* G3/P25 */, 48 /* G4/P26 */, 9 /* G5 */,
        4 /* B0 */, 41 /* B1 */, 5 /* B2 */, 40 /* B3 */, 6 /* B4 */
    );
    
    // Uncomment for 2.1" round display
    Arduino_ST7701_RGBPanel *gfx = new Arduino_ST7701_RGBPanel(
        bus, GFX_NOT_DEFINED /* RST */, 0 /* rotation */,
        false /* IPS */, 480 /* width */, 480 /* height */,
        st7701_type5_init_operations, sizeof(st7701_type5_init_operations),
        true /* BGR */,
        10 /* hsync_front_porch */, 8 /* hsync_pulse_width */, 50 /* hsync_back_porch */,
        10 /* vsync_front_porch */, 8 /* vsync_pulse_width */, 20 /* vsync_back_porch */);
    
    • Modify the touchpad function according to the pre-set functions in touch.h, and pass the state of the touchpad to the LVGL graphics library.
      void my_touchpad_read( lv_indev_drv_t * indev_driver, lv_indev_data_t * data )
      {
         int touchX = 0, touchY = 0;
      
          if (read_touch(&touchX, &touchY) == 1)
          {
              data->state = LV_INDEV_STATE_PR;
      
              data->point.x = (uint16_t)touchX;
              data->point.y = (uint16_t)touchY;
          }
          else
          {
              data->state = LV_INDEV_STATE_REL;
          }
      }
    • Initialising the input device,and we need to associate the encoder with the color wheel

    To create a group use lv_group_t * g = lv_group_create(), to add an object to the group use lv_group_add_obj(g, obj), and to associate a group with an input device use lv_indev_set_group(indev, g)

    /*Initialize the (dummy) input device driver*/
        static lv_indev_drv_t indev_drv;
        lv_indev_drv_init(&indev_drv);
        indev_drv.type = LV_INDEV_TYPE_POINTER;
        indev_drv.read_cb = my_touchpad_read;
        lv_indev_drv_register(&indev_drv);
    
    
        // encoder
        static lv_indev_drv_t indev_drv2;
        lv_indev_drv_init(&indev_drv2);
        indev_drv2.type = LV_INDEV_TYPE_ENCODER;
        indev_drv2.read_cb = my_encoder_read;
        lv_indev_t *encoder_indev = lv_indev_drv_register(&indev_drv2);
    
        lv_group_t *g = lv_group_create();
        lv_group_add_obj(g, ui_Colorwheel1);
        lv_indev_set_group(encoder_indev, g);
    
    • Encoder pin level change triggers interrupt to change color wheel value
    void pin_init()
    {
        pinMode(TFT_BL, OUTPUT);
        digitalWrite(TFT_BL, HIGH);
    
    
        pinMode(ENCODER_CLK, INPUT_PULLUP);
        pinMode(ENCODER_DT, INPUT_PULLUP);
        old_State = digitalRead(ENCODER_CLK);
    
    
        attachInterrupt(ENCODER_CLK, encoder_irq, CHANGE);
    
    
        Wire.begin(I2C_SDA_PIN, I2C_SCL_PIN);
    }
    
    void encoder_irq()
    {
        State = digitalRead(ENCODER_CLK);
        if (State != old_State)
        {
            if (digitalRead(ENCODER_DT) == State)
            {
                counter++;
            }
            else
            {
                counter--;
            }
        }
        old_State = State; // the first position was changed
    }
    
    void my_encoder_read(lv_indev_drv_t *drv, lv_indev_data_t *data)
    {
        if (counter > 0)
        {
            data->state = LV_INDEV_STATE_PRESSED;
            data->key = LV_KEY_LEFT;
            counter--;
            move_flag = 1;
        }
    
    
        else if (counter < 0)
        {
            data->state = LV_INDEV_STATE_PRESSED;
            data->key = LV_KEY_RIGHT;
            counter++;
            move_flag = 1;
        }
        else
        {
            data->state = LV_INDEV_STATE_RELEASED;
        }
    
    
        // if (enc_pressed())
        //     data->state = LV_INDEV_STATE_PRESSED;
        // else
     // data->state = LV_INDEV_STATE_RELEASED;
    ...
    Read more »

  • Step 2: Hardware

    Makerfabs12/13/2023 at 01:49 0 comments

    • Cconnect J2 to WS2812 LED:

    3V3 to +5V;

    GND to GND;

    RX to DIN;

    • This share uses a light board as an example, but it also applies to ws2812 strip lights.

  • Step 1: SquareLine Design

    Makerfabs12/13/2023 at 01:32 0 comments

    • Create a new product

    Choose the Arduino and enter in parameters. According to the features of MaTouch ESP32 S3 2.1 Rotary TFT with Touch, the resolution is 480*480, the shape is a circle, and the color depth is 16-bit.

    • Design the screen

    Add the colorwheel, switch, and buttons on the interface, the color wheel for getting colors, the switch for light switch, and buttons for timed triggers,and you can modify the parameters of them on the Inspector panel. After that, you can select some other widgets to decorate your interface, all is determined by your preference.

  • Supplies

    Makerfabs12/13/2023 at 01:31 0 comments

    It has a rotary encoder, which can be used as a control trigger for colour fine tuning.

    • WS2812 LED

    Intelligent control LED integrated light source

    • Software support: Arduino, SquareLine