Close
0%
0%

Continuous Rotation Camera Turret

The project shows a system I designed and built as part of my studies (in 2011). It is a camera turret capable of continuous rotation.

Similar projects worth following
In 2011, as part of my studies I was asked to design and build a turret capable of continuous rotation. The turret would hold a pre-specified camera that required a live data feed.

The final design was built out of aluminium, and made use of two stepper motors to provide precise position and speed control. Two hall effect sensors were included to provide positional accuracy, although my final design only made use of open loop control. Two slip rings (supplied by Moog) were used to allow data and power to flow to the camera.

Custom made PCBs were designed for both the stepper motor drivers and the hall effect sensors to allow for a smaller product footprint. The electronics were tied together with an Arduino (this was 2011), and a custom GUI was designed for control and sensor readings that communicated with the Arduino via a serial connection.

Unfortunately I have few photos and no video of the final product. I had a crappy phone at the time.

All schematics, CAD models, manufacturing drawings, source code, circuit schematics and PCB designs are linked.

The project's main objectives were:

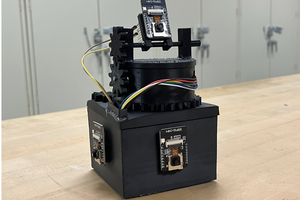
  • Build camera turret capable of 2-axis rotation
  • Rotation must be continuous
  • Speed in either axis must be >6.7 RPM
  • Requires position accuracy of < 1 degree
  • Full data stream must be received from camera (31MBps Firewire)

These goals were achieved by:

  • Making use of Moog slip rings to allow data and power connections
    • allowed for continuous rotation
    • powered camera and carried data (>31MBps)
    • Carried power and clock signal for motor control
  • Making use of two 200 step stepper motors in half-step mode
    • results in 0.9 degree steps
    • achieved drive in excess of 50RPM for both axes
  • Used an Arduino
    • Communicated with GUI on computer
    • Received position data from hall effect sensors
    • Sent step motor commands to controllers


  • 1 × SRA-73526-6 Moog 6 wire slip ring
  • 1 × AC6438 Moog 12 wire slip ring
  • 2 × AS5040 AMS hall effect sensor
  • 2 × L297 Power Management ICs / Motion, Motor and Servo Control
  • 2 × L298N Interface and IO ICs / Peripheral Drivers and Actuators

View all 8 components

  • 1
    Step 1

    Mechanical Assembly

    Everything is designed to assemble as easily as possible. All the aluminium parts bolt together, and the motors and slip rings also just bolt on. The holes were designed with a slight clearance fit, so the bearings should fit easily.

  • 2
    Step 2

    Electrical Assembly

    PCBs to be manufactured as provided in linked files.
    Arduino, Hall effect sensors and motor controller all operate off 5V from USB powering the Arduino

    An additional 12V is supplied to the motor controller which it switches to control the stepper motors.

    The 6 wire slip ring only transfers the Firewire data and power.

    The 12 wire slip ring transfers the FireWire data and power as well as power and data for the pitch motor controller and hall effect sensor

  • 3
    Step 3

    Software

    All software is available on the github that is linked

    Arduino

    • The Arduino communicates with a PC based GUI. It sends position information from the hall effect sensors to the PC, and it accepts speed or position data from the PC.
    • The Arduino uses SSI to communicate with the two hall effect sensors.
    • The Arduino sends a clock signal each time it wants the motor to move a step, and a separate line is used to indicate if the step must be CW or CCW

    GUI

    • The GUI was designed in Python
    • It uses a package to deal with the serial communication which I could only get to work with Python 2.7
    • It gives you the a reading from the sensors, as well as an estimated position of the motor from a step count
    • It allows you to set either a position or speed at which the turret must go to.
    • All data is logged to a CSV file for analysis

View all 3 instructions

Enjoy this project?

Share

Discussions

Similar Projects

Does this project spark your interest?

Become a member to follow this project and never miss any updates