Close
0%
0%

NFC E-Ink Business Card

Use NFC to transfer your business card design to the e-ink screen

nazNaz
Similar projects worth following
An e-ink based business card that uses NFC and an iPhone to update what the e-ink display shows. Bonus: Setting NDEF to share information (website, email) when you give it to someone and they bring it near their phone.

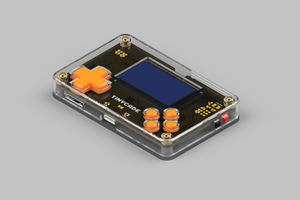
This project integrates an e-ink screen (2.9 inch flex monochrome) with a NFC IC (NT3H2111W0FHKH) and a STM32(L432KCU6) to make a business card that you can update with your phone via the NFC field.

This project is inspired by the plethora of e-ink battery-less phone cases and other battery-less devices that are available on Amazon and elsewhere that have e-ink screens updated and powered over NFC without a battery. This project uses a battery. I would like to one day figure out how to make a reliable device that can change its display without a battery. I write more about this in my opening log entry.

Demo Video

This card also doubles as a standard NDEF compatible tag. In the beginning of this video I demonstrate this by being able to get the "Website NFC Detected" notification when I hover my phone over the card that links me to my website. See more about NDEF and the Compatibility Container mechanism that is used to make this interaction work in this log entry.

Afterwards I transfer a set of different designs over to the cards back and forth and end with a cat. See more images in this log entry.

Hardware

This circuit is electrified with a CR2032 3V coin cell battery that is wired to a TPS610981DSET power management IC. The TPS610981DSET has two different power outputs (VMAIN and VSUB) and one control pin (MODE). VMAIN is always on, and powers the NFC chip. VSUB powers the MCU and the e-ink display, and is only on when MODE is driven HIGH. The MODE pin is wired through some business logic (logic gates) to the NFC "FD" interrupt pin to enable the NFC chip to turn on the VSUB (MCU + E-ink) power line when a NFC field is detected. See more in this log entry.

The MCU for this project is a STM32L432KCU6 picked for its low power features.

A 2.9 inch flexible Waveshare monochrome e-ink screen is used for the display.

The NTAG I2C Plus NT3H2111W0FHKH is used as the NFC chip with a custom made antenna using https://github.com/nideri/nfc_antenna_generator

View the schematic for the design here: https://codeberg.org/wsqnyc/pcb-160-eink-card/src/commit/de1f44bc5fa77c327a22e172a4ca7371b458612f/Schematic.pdf

I explored how much this device costs in this log entry and estimate the cost of components is $25. Cost is hard to estimate, and the most expensive piece is the e-ink display which is $15+ depending on where you get it.

Software

This circuit would not work without the software, and there are two sides: the iPhone app that updates the screen and the software on the board that interacts. I talk about this interaction in this log entry where I link to the code for each side at a high level. Another blog posts talks about the React Native code that processes the image and applies the dithering a bit further in this log entry.

Physical Dimensions

The thickness of this board is mostly contributed by the battery connector. It measures 90mm x 50mm and about 7mm in depth.

The screen is attached to the PCB with double sided scotch tape.

Schematic.pdf

PCB-160

Adobe Portable Document Format - 297.23 kB - 06/22/2024 at 17:34

Preview

  • 1 × STM32L432KCU6 (MCU) $3
  • 1 × 2.9" e-ink flex (Display) $15
  • 1 × TPS610981DSET (Power management) $1.67
  • 1 × NT3H2111W0FHKH (NFC TAG IC) $0.80
  • 1 × CR2032 (Battery) $1.75

View all 6 components

  • Affixing the e-ink screen to the PCB

    Naz4 days ago 0 comments

    I got two PCBs assembled, and I had only been using the one so far. Well the day has come for the other to come out and be prepped and given a screen, so I took the chance to catalog how I assemble it.

    Materials needed: the PCB, double sided scotch tape, and e-ink screen.

    Here's where I put the tape strips, I put one close to the connector in hopes that it stays flat in that area because the folded cable is trying to pull it off the tape on my previous attempt.

    And then affix the screen, press down equally and it turned out alright.

    And now I have two! And they both work!

  • NuCurrent? NFC WLC?

    Naz4 days ago 0 comments

    In looking up NFC today, I stumbled onto this standard NFC WLC (Wireless Charging).

    https://en.wikipedia.org/wiki/Near-field_communication#NFC_wireless_charging_(WLC)

    https://nfc-forum.org/learn/use-cases/wireless-charging/

    Which is different from Qi charging, hmm.

    https://nfc-forum.org/news/2023-05-power-harvesting-using-nfc-to-design-affordable-and-resource-efficient-devices/

    Smart padlocks are one of the most advanced use cases of power harvesting currently in production. A user can simply hold their mobile phone within range of the lock to activate it, allowing seamless, secure access with just a tap. Furthermore, by enabling key storage on a user’s phone, NFC technology frees the lock manufacturer from the responsibility of storing all credentials in a centralized database. This greatly mitigates the risk of cyberattacks against the lock manufacturer since, even in the event of a breech, hackers will not be able to access individual locks. The end product is more secure for both users and manufacturers.

    This NuCurrent website shows the lock https://www.nucurrent.com/nfc-power-harvesting-explained/ from Infineon that locks and unlocks, which is very cool. They use a NAC1080 which I think is meant to drive motors? Actuators? Sounds about right. I think I've look at this IC out but didn't know how to change H-bridge output to drive the e-ink? https://www.infineon.com/cms/en/product/power/contactless-power-sensing-ics/nfc-tag-side-controllers/nac1080/

    The article from NFC-forum is from 2023 so I think this is fairly recent development, compared to NAC1080 which I think is from 2022?

    Anyways, just a bunch of links yes, but this is the stuff that gets me hopeful that an e-ink screen without batteries is possible!

  • CCs (capability containers) and whirlwinds

    Naz5 days ago 0 comments

    Yesterday June 24th 2024 in NYC was super windy which matched how I felt many times throughout the  happenings of this log entry. 

    So the programming log entry talked about the IDE setup and so now that I had that all configured, I wanted to add a new feature: to have the e-ink business card work like other NFC cards that I've seen where you hover your phone over the nfc card, and you are shown a URL to visit.

    Naively I opened up the NFC tools app and tried to write a URL to the e-ink device, and it gives me an error.

    On attempting to make this work and write a URI record, I thought I lost my NTAG because I wrote the wrong byte value to its address byte register!

    Let me start from the beginning.

    "NFC is a set of telecommunication standards, NDEF is a data format." from stackoverflow (source)

    So to get the end result of hovering over the NFC card, the proper NDEF data has to be in the EEPROM. The first step in this called the "CC" file. Now I can't tell if this is serious or not but I expect that it is, but is this right, you have to pay to get the PDF of the NFC standard? https://nfc-forum.org/build/specifications/type-2-tag-specification/ Also the T2T in the "NTAG I2C plus: NFC Forum T2T with I2C interface, password protection and energy harvesting" thats on every page the NTAG manual stands for Type 2 Tag. Good to have figured that one out.

    "To detect and access NDEF data, the NFC reader uses the capability container (CC) file that is contained inside the NDEF tag application." from nordicsemi (source)

    The CC file is by standard accessible at address 03h and I think in the NFC communication standard you deal with 4 bytes each page? You have to read a page. Yeah, so the page at address 03h via NFC is the CC container.

    So I use the NTAGI2CDemo app and "Read tag memory" under the "CONFIG" tab. Aha, so the 03h byte is all 00.

    On the NTAG the CC file when accessed via I2C is the last four bytes of the first block. The registers are read/write blocks at a time, and so reading 00h block yields 16 bytes, and the last 4 bytes is the CC container bytes.

    So, what should the CC file values be? NXP AN11786 has some details for us.

    Great, so the CC container from the factory is set to 00h for all bytes (as we saw) so that explains why none of my NFC tools apps are treating this device as a NFC card.

    Alright, so let's set the values. Here's where things started to go downhill. 


    So there I was trying to set the CC file bytes over to I2C so that the tag is setup to be a NDEF containing device. And all of a sudden WHAM what happened to my I2C device? I'm getting HAL_ERROR on my I2C DeviceReady query. Where'd it go? The chip doesn't look like I damaged it, is it the power? Got new batteries, no. What is going on. I am so glad that I have a STM32 debugger with line by line step through and then just viewing buffers, it's times like these where I'm glad to be in the presence of a good reliable debugger.

    Just look at these crazy lines I wrote thinking I was chasing a device that was changing it's I2C address on me every write!

    // #define NT3H_DEFAULT_I2C_ADDRESS 0x02
    
    uint8_t NT3H_DEFAULT_I2C_ADDRESS = 0x02;
    
    HAL_StatusTypeDef readRegister(uint8_t *responseBuffer, uint8_t *TX_Buffer,
        uint8_t requestSize, uint8_t responseSize) {
    
      HAL_StatusTypeDef result = HAL_I2C_IsDeviceReady(&hi2c1,
          NT3H_DEFAULT_I2C_ADDRESS, 1, 1000);
    
      if (result != HAL_OK) {
        if (NT3H_DEFAULT_I2C_ADDRESS == 0x02) {
          printMessageToUART("trying 0x04");
          NT3H_DEFAULT_I2C_ADDRESS = 0x04;
        } else if (NT3H_DEFAULT_I2C_ADDRESS == 0x04) {
          printMessageToUART("trying 0xAA");
          NT3H_DEFAULT_I2C_ADDRESS = 0xAA;
        } else if (NT3H_DEFAULT_I2C_ADDRESS == 0xAA) {
          printMessageToUART("trying 0x55");
          NT3H_DEFAULT_I2C_ADDRESS = 0x55;
        } else {
          printMessageToUART("trying 0x02");
          NT3H_DEFAULT_I2C_ADDRESS = 0x02;
        }
    
        return result;
      }
    
      result = HAL_I2C_Master_Transmit(&hi2c1, NT3H_DEFAULT_I2C_ADDRESS, TX_Buffer,
     requestSize,...
    Read more »

  • Cost per device

    Naz7 days ago 0 comments

    I have been contemplating how to evaluate cost here. I'm not sure how to calculate it when I'm using a PCB assembly service ... but at this point that is what I've used. I've seen others compare BOM cost and that seems like one number but there are other auxiliary numbers to consider, right?

    Excluding the past PCBs that I've ordered, just coming down to the current board that I have, in that PCB order I had two different PCB designs. I'll only include prices for the board for this project. I paid $23 shipping for extra fast DHL and the PCB boards was $3 and assembly was $65. And I decided to assemble two boards not 5, so the price per board is $23 (DHL) + $3 (pcb fab) + $65 (assembly) + $7 tax = $98 / 2 = $49 for each board. This doesn't include the e-ink screen.

    Moving past that, lets look at the the largest cost in terms of components. I will be using JLCPCB pricing .. because that is what I'm using to make these boards.

    From there it decreases and its some logic gates, caps, inductors, resistors. The invoice reads $16 in terms of BOM for two boards, so roughly $8 full of components? And $1.75 for the CR2023. And $15 for the flex screen.

    So component cost, is low ball estimate $25. Is it reasonable to estimate that this device could be made at large volume for a cost of $30/piece? 1.5x for safety, $45? Maybe not because of the screen assembly?

    The e-ink phone cases on Amazon around roughly $45 a piece so seems like I'm in the right ball park?

    Anyways these are all open questions, but I think part of the contest is considering how much these devices cost, and so I figured I try to get some rough estimates.

  • programming & debugging

    Naz7 days ago 0 comments

    I did not show yet how I program these boards. Meet my favorite Adafruit product for prototyping: the Pogo Probe https://www.adafruit.com/product/5433

    There was a period of months that I was so enamored by these pogo pins, I drew a KiCad footprint with hearts as pads and used the Pogo Pins on them. Look here:

    I have since abandoned this only because sometimes ... I like having the through holes so I can solder my other favorite Adafruit prototyping product: rainbow headers https://www.adafruit.com/product/4154

    This project's board I use two 1x6 clips to connect the SWD connector pin out and the various power pins on the other side. I have a tiny breadboard there just for keeping the pins in order.

    To program this board I use the https://www.st.com/en/development-tools/stlink-v3pwr.html which connects over USB-C and for this device, I connect a coin cell battery and don't use the Power output feature of the device. The device also doubles as a debugger in the STM32CubeIDE. I ordered this for $100 from the ST website and I think it's cheaper than the J-Link but has lots of the the features I need on a day to day ... and it simply works!

    The thing I wanted to tackle with this sit down was fixing the "Oh no!" at the end of the transfer that the iPhone says.

    The Oh no! I think is a "tag connection lost" that I'm seeing in the logs, and its coming while the eeprom is being read by the iPhone. The code was intended to wait for the connection to be complete while the render is occurring. This is old code from back when I was still attempting to get the NFC power energy harvested to update the screen. Since the battery does the all the work now, the iPhone does not need to wait for the NFC device because it'll do  the render by itself and turn itself off.

    Here's the change, basically commenting out the read EEPROM behavior https://codeberg.org/wsqnyc/nfc-says/commit/a41a4fa91d11095a11eac09450e147a602d58cfd

    And finally a screenshot of the various IDEs I keep open when debugging iPhone and STM32 at the same time:

    From the top left clockwise: STM32CubeIDE, Visual Studio Code (for the JS for the App), Xcode (for running the iOS app on device), and finally the terminal window which shows the console output from the iPhone. This time I did not open a Serial monitor for the STM32, but if needed, I'll open up one of those as well.

  • dithering is so cool

    Naz06/23/2024 at 15:04 0 comments

    Now that I have an app and a working PCB I have been having fun putting up new things on it just to see how the screen works.

    I used Photopea to make a new canvas 296x128 to make a fun business card:

    The original image this was remixed from had some red in the logo but the dithering function transformed it and it's so cool you can get a visual gray fill with just black and white and spacing. How cool is that math.

    I have noticed that the display does not do as well with smaller fonts and really under a certain size it is not legible but ... you sort of have to fill in the blanks because the lines are so thin.

    Here's a different logo without adjustment:

    The text is just a bit too small, but you can sort of make out the numbers. The italic "We're Ready To Believe You" is not legible.

    And while I'm at it, here's a bunch of different updated cards. I went through my Photos and added some fun ones to try out. I took these photos in succession and the each update took maybe 20 seconds to do and it failed once because I moved away too soon. Pretty good performance because there is a battery!

    My favorite font right now Fun Sized:

    Cool dithering with an image that originally had a gray background:

    Nice ticket number from a Knicks game

    An emoji:

    And to close out this post, a lounging cat sighting:

    Very cute cat.

  • MODE selection on the TPS610981DSET

    Naz06/21/2024 at 18:04 0 comments

    In this log entry I want to talk about the specific power management IC I used. 

    The TPS610981DSET with the long description "TPS61098x Ultra-Low Quiescent Current Synchronous Boost with Integrated LDO/ Load Switch":

    Power goes into VIN and there's some additional components for the SW/VIN but then power comes out VMAIN and VSUB. MODE can be brought HIGH to enable VSUB. MODE on low, VSUB is turned off. VMAIN is usually around 3.3V and the VSUB is usually a little less, around 3.0V. Totally fine for the business card use case.

    See this schematic for more details: https://codeberg.org/wsqnyc/pcb-160-eink-card/src/branch/main/Schematic.pdf 

    There is a bit of logic to control when the "MODE" pin is brought high.

    I use logic ICs to do this. The OR gate is a NXP 2-input OR gate (https://www.nexperia.com/products/analog-logic-ics/logic/gates/or-gates/74AHC1G32GV.html) And the U2 IC is a https://www.ti.com/product/SN74AUP1G14 logic inverter. The NFC_GPO is active low, so when there is no NFC field active, the pin is HIGH. For the OR gates, I need active high, and so I used a logic inverter. If NFC GPO is HIGH, U2 outputs LOW. If NFC GPO is LOW, U2 outputs HIGH. This wiring diagram of the chained logic gates shows how the MODE switch goes HIGH. So Either BUTTON or MCU_EN can be high or NFC_GPO can be low.

    What this works out to is the "turn on" sequence. Either I can press the button to "wake" the device, or the NFC_GPO can become active and now the MODE is on. 

    The last pin in this logic diagram is MCU_EN pin which is controlled by the STM32.

    MCU_EN is the "POWER_EN" in this image (I should clean up my schematic to make the labels consistent). With the OR gate, any condition will keep MODE on, however the button press is momentary and the NFC_FD is somewhat momentary (and we change NFC_FD behavior once we start the transfer) so MCU_EN is there to go HIGH and keep the MODE enabled, until we are done.

    See this happen in https://codeberg.org/wsqnyc/pcb_160_sketch_a/src/branch/main/Core/Src/main.c#L710 as the first thing turned on once the peripherals are setup and then https://codeberg.org/wsqnyc/pcb_160_sketch_a/src/branch/main/Core/Src/main.c#L845 to see the device turn itself off.

    In the past I attempted to make a circuit that could keep itself on and off with https://randomnerdtutorials.com/power-saving-latching-circuit/ but I was not able to get it work successfully. I don't mind the additional TPS component, it seems to manage things for me.

    I don't have an idea of how long this battery will last but going to take some voltage measurements after a few days and see how it holds up. I may have to activate some sort of "sleep" on the NT3H or hopefully it magically just turns off. Who knows!

    Lastly I want to comment on why this approach allows for a better transfer experience. With the Waveshare battery-less screens, I had a bit of a struggle getting the correct placement of my phone to get enough power dissipated to get it to work. Read: I had to try a few times to get it to show my new image.

    Using an always on circuit with NFC makes the transfer way less finicky and increases the reliability. Yes, it introduces a battery, but the decrease in frustration the user experiences when attempting to update the screen seems to be worth a good chunk.

    Nevertheless I don't like the battery on it, but it works and so here we are. Thanks for reading!

  • How the react-native app interacts with the e-ink device

    Naz06/21/2024 at 16:23 0 comments

    I decided to use react-native because I know how to write JavaScript, and react-native has the promise of keeping the business logic written once and forking out within the methods that integrate with the OS. React native vs writing native apps is a whole industry of opinions. There are many articles that talk further about the hurdles of making cross-platform apps, here's a recent article that captures the dilemma if you are more curious. However, moving past the languages and platforms, let me talk about the app itself.

    I will talk about these two different chunks of code:

    • Adding new images that get converted and stored
      • They need to be cropped to the screen dimensions
      • They need to be converted to monochrome
    • Image gets transferred over NFC
      • The app needs to initiate the NFC feature of the phone
      • And then once connected, the code needs to transfer the images and wait for the render to complete

    Here's a sequence of screenshots showing adding a new image and putting it on the device.

    A blank screen greets the user when they start, encouraging them to add an image. This app does not require an internet connection, meaning, the device processes the images on device and does not ping a server for anything. This is an important consideration for privacy and overall just keeping the user's data on their device. When the user "adds" an image, it is stored in the apps "documents" folder as a binary file containing the final monochrome image data ready to be transferred to the e-ink device.

    The code for this screen is here: https://codeberg.org/wsqnyc/nfc-says/src/branch/main/components/HomeViewEmoji.js which has a main component that loads the initial state (the list of images) via this line:

    setEmojis(await getHashList(displayCount));

    The "Add Image" button is another component available here: https://codeberg.org/wsqnyc/nfc-says/src/branch/main/components/AddImage.js

    Adding an image drops the user into a "crop" tool which forces them to crop the image to the aspect ratio of the e-ink screen. (296x128).

    In the AddImage.js file, the first function is the atkinsonDithering() function that transforms the uploaded image data.

    The image upload itself is facilitated by the library `react-native-image-crop-picker` which takes in options for cropping.

    const pickerOps = {
      width: 296,
      height: 128 * displayCount,
      cropping: true,
      includeBase64: true
    };
    
    ImagePicker.openPicker(pickerOps).then(newImage => {
      setSelectedImage(newImage);
    });

    Once it's uploaded, the next process is using `react-native-canvas-master` library, which I've brought over into this project. The reasoning for this is that the canvas library does not deal well with the "device pixel ratio" which means that every real pixel you see, is actually 2-4 pixels on the device. What happens with that, is an image that is 296x128 actually comes out to 1184x512, which is way too much pixel information. The modifications were made in the built index.html to hardcode the device pixel ratio to 1 so there is no auto scaling that occurs. I'm sure the autoscaling feature of this library is needed in other cases, but for my needs, I need to force a ratio of 1 and not use window.devicePixelRatio. https://codeberg.org/wsqnyc/nfc-says/src/branch/main/react-native-canvas-master/src/index.html.js#L361

    This is an area of improvement for this code, as ideally I'd like to not modify the library but the change I made did make the project work.

    The way this works with the HTML file is that it's loaded inside of a WebView within iOS which runs Safari and the entire browser engine. From there, the react-native-canvas-master bridges the JS interface to the native WebView component to access the Canvas API.

    With the Canvas access in the AddImage component, the code takes the newly uploaded image and transforms it with the Atkinson dithering.

    function handleCanvasRef(canvas, selectedImage, completeCallback) {
      if (!canvas) {
        return;
      }
    
      const image = new CanvasImage(canvas);
    ...
    Read more »

  • Another failed attempt at achieving a working VNFC

    Naz06/21/2024 at 02:10 0 comments

    I didn't want to use batteries for this project, actually, I'll admit, I've been avoiding integrating batteries into this for a long time. And the reason was pretty simple for me: I wanted a device without batteries because then the PCB to drive it with the antenna would be just a slim as the e-ink screen.

    I was stubborn, and it wasn't until this Hackaday contest that I decided to integrate a battery. My stubbornness did stop me from making this fun toy, and I feel a bit defeated in integrating a battery.

    The other board that was sent for fabrication was the PCB-168 VNFC https://codeberg.org/wsqnyc/pcb-168-vnfc which did not seem to succeed. See this log entry. In that board, I integrated 4 different voltage detectors, and tried to have the TPS power supply turn on when the power in the capacitors reached a certain level. I tried replicating the wiring in the NFC WISP project and I'm not sure what I'm doing wrong. For one, the voltage out of the NTAG is 3.3V which is fine but maybe I need to do something where I wait for 3.0V and then turn on the regulator and wait for the regulator to reach 2.5V out? The regulator seems to be doing an OK job without load but as soon as the MCU is plugged in, the voltage conks out. I think there is some finessing here that might get me to the solution.

    Ah, another choice is the 2.9 inch flex screen that I've used, and that was because I have lots of the flex screens. It could be that all my energy harvesting tests have failed because I am using the flex screen which has stricter voltage requirements compared to the hard shell ones.

    Anyways, I just want to write out some notes on why I have been attempting to get rid of batteries, and the latest test the PCB-168 is a step closer, but still not there yet.

  • it works!

    Naz06/21/2024 at 01:21 0 comments

    Hooray! The board works, and with a minor adjustment (e.g. adding a longer delay) I was able to get the app to turn on the device with the NFC connection long enough for the STM32 to turn on and toggle the power supply.

    I will fill out the various sections and write some more blog posts and submit for the Hackaday prize!

View all 18 project logs

Enjoy this project?

Share

Discussions

Similar Projects

Does this project spark your interest?

Become a member to follow this project and never miss any updates