Close
0%
0%

DIY smart home doorbell for less than $40!

Make a smart doorbell for less than $40 with simple components, no special skill and in just 1 hour!

Similar projects worth following
This project will show you how to create your own DIY smart doorbell that cost very little (~$40), can be done easily (no tech/crafting/coding skills needed) and all in around 1 hour.

This project is based on our Prota OS, a free OS based on Raspberry Pi and dedicated to the smart home automation.

This project will let you create your own DIY smart home doorbell for less than $40 with very easy-to-follow instructions, no need for any tech/crafting/coding skills and all in less than an hour!

Check this video to see the final result:

Follow the steps below to see how you can do it yourself at home ;)

  • 1 × Raspberry Pi Version 2 or 3 // $20~$35
  • 1 × 8Gb SD card ~$6
  • 1 × GPIO breadboard + wires and button ($5)
  • 1 × An old webcam $0
  • 1 × [OPTIONAL] MicroBot Push - wireless button pusher To automate your door - https://prota.info/microbot/push/index.html

View all 6 components

  • 1
    Step 1

    Step 1: REQUIRED MATERIAL

    • Raspberry Pi 2, 3 ($20~$35) // for RPi 2, you will need Bluetooth & WiFi dongles
    • 8Gb SD card ($6)
    • GPIO breadboard + wires ($5)
    • 1 GPIO button
    • An old webcam

    Optional: Philips Hue bulb (link), MicroBot Push ( link)

    The entire installation should take less than 1 hour.

  • 2
    Step 2

    Step 2: SET UP YOUR PROTA PI

    You first need to build the smart hub that will control the automation of your ring bell and connect all devices together. Prota OS for Raspberry Pi is our free smart hub OS which is very easy to install. In no time you will turn your Raspberry Pi into a smart home automation hub!

    You can download Prota OS here. Then burn it on the SD card.
    We made an easy guide you can follow to set up your Prota Pi.
    Alternatively, you can check this Instructables.

  • 3
    Step 3

    Step 3: SET UP YOUR GPIO BREADBOARD AND BUTTON

    We will now set up the breadboard and its button that will officiate as the ringbell of our project!

    To avoid getting lost with your breadboard, follow this visual to remember which dedicated role has each pin.

    Position your wires and button as it is on the picture below:

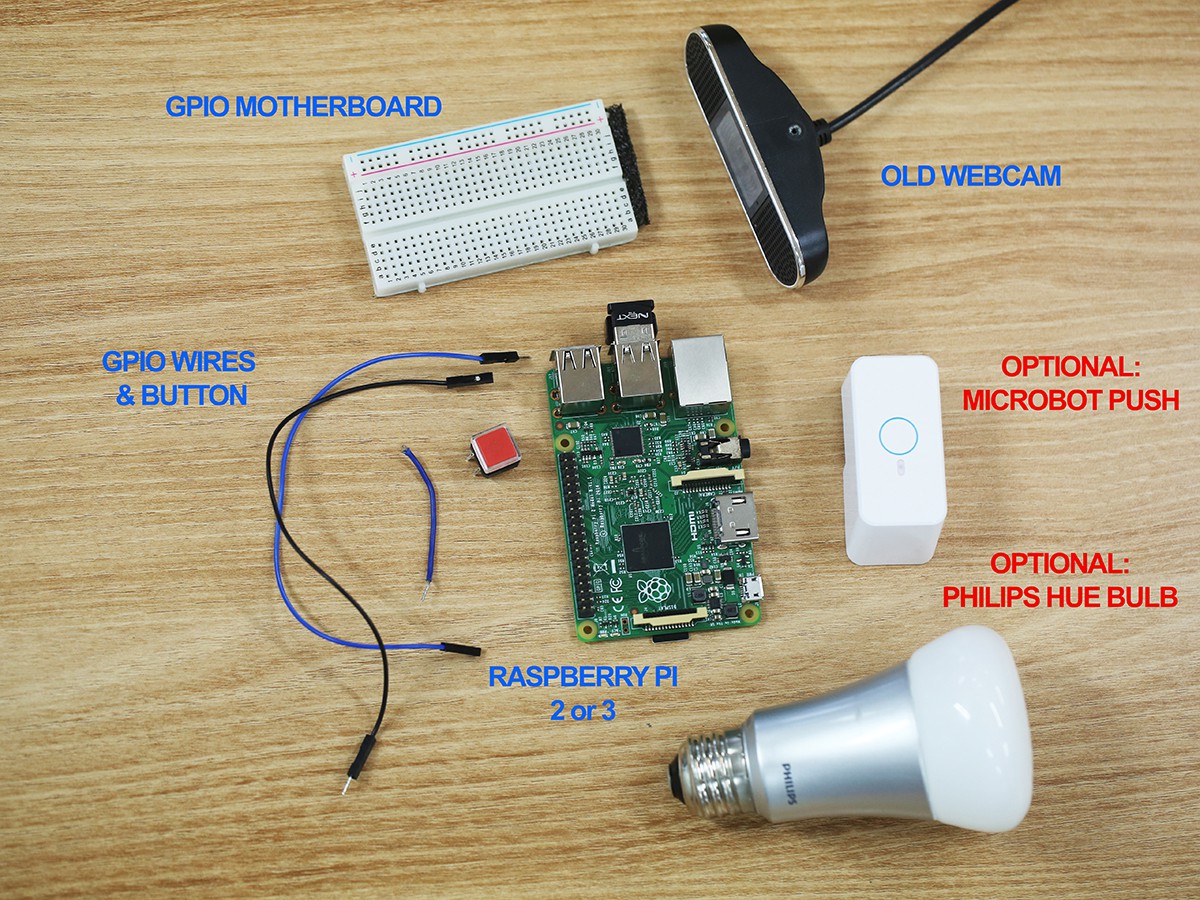
    Now connect the ground wire to a ground pin and the other one to (for instance) GPIO18.

    • Now let’s open Prota Space.
    • If you haven’t done it yet, download the GPIO app in App Libraries.
    • In GPIO app, click on GPIO18.
    • Select “Interrupt” and “Pull up”. Click on “set”.

    The button is now set up.

View all 6 instructions

Enjoy this project?

Share

Discussions

Similar Projects

Does this project spark your interest?

Become a member to follow this project and never miss any updates