Close
0%
0%

MiFrame - Yet Another (Raspberry) Pi Smart Frame

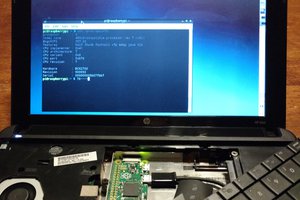
MiFrame is a Python Smart Photo Frame application. Supports sharing database across multiple frames, marking favorites, thumbs up etc

Similar projects worth following
MiFrame is a client-server architecture for displaying your photo library. System supports multiple MiFrames being served photos from a single MiFrame-Server. Use your phone or other network device with a web browser to Liked, Blocked, or Rotated photos from your library.

Code implmented in Python 3 and is intended to be run on a Raspberry Pi with an external drive connected to a display. MiFrame display implemented via Python/TkInter. Images and database control served via Flask web-server.

Current code for MiFrame available on GitHub MiFrame Repository

Current installation instructions available via ReadMe on GitHub.

  • History of YAPS Frame v1

    tklenke12/10/2022 at 17:52 0 comments

    Here's my original description from YAPS Frame v1 circa 2017

    Raspberry Pi Photo Frames have been done to death.  YAPSFrame is customized for my needs.  Things I wanted:  Cheap hardware, my software, use my existing Windows Shared directory of all our photos.  Things that would be cool: a clock, rotate images appropriately, show the weather at home and in Tahoe, show our upcoming family calendar, use Alexa to move to next photo or mark as favorite "Alexa, next photo"! Written in Python 3 using tkInter.  Code initially based on https://github.com/HackerHouseYT/Smart-Mirror  But has been extensively modified.

    After five years of use, I've finally made time to dig back into YAPS frame to address some of the major issues and upgrades we wanted to have.

    A few thoughts on living with YAPS Frame v1.0

    • YAPS would crash from time to time and I was not sure what was crashing.  
    • Calendar was great feature and will want to include in future versions
    • Our photo library was really just a big dump of photos.  No categorization, or curation of the content has been performed.  As such, we often saw images that we didn't really need or want displayed on the frame.  Also, images that we liked had no priority.  We also thought having images relative to current family events would be nice.  For example, leading up to birthdays, show photos from prior years birthdays, or holidays.
    • Ability to rotate photos that had incorrect or incomplete orientation flags
    • The random number generator did not seem to be working correctly.  Though we have over 30k images we kept seeing what seemed like the same images over and over again.
    • It would be nice to have ability to show images on a screen with matching orientation (portrait images on portrait displays, landscape on landscape)  
    • As Moore's Law marched forward, our whole photo library can reside on a $30 thumb drive and having to connect the Raspberry Pi to our NAS system seemed less of a hard requirement.

    With these in mind, I started on version 2.  I decided to change the name to MiFrame. 

  • Rev 3 - Google Calendar

    tklenke03/08/2017 at 05:17 0 comments

    Google calendar integration is live in the kitchen!

    I started with the Google Calendar API quickstart https://developers.google.com/google-apps/calendar/quickstart/python and got that running on it's own. That was pretty straight forward, just pay attention to the credentials recipe on that page. Once I got the API running on my dev machine, I took a close look at SmartHouse implementation of the news feed. The way I wanted to display our calendar items is similar to how they did the news stories. I started with that framework and pretty much just plugged in the relevant sections of the quickstart.py code.

    I didn't really like how the date was displayed, so I google-fu ed a function to display the date as "March 5th" "May 2nd" etc.

    When displaying a landscape photo, there really isn't too much space on the right side. Instead of changing the font size, I just hide the upcoming calendar events when displaying a landscape photo. How I hacked getting a pointer to the switch function seems very kludgy, maybe some pythonic savant can refactor that for me. Eventually, I'd like to put the weather in that tight vertical space.

    I've hardcoded the time between updates of the calendar to be 30 minutes.

  • Rev 2 - Basic Rotation using EXIF tags

    tklenke03/02/2017 at 05:20 0 comments

    In Rev 1, I used the image width and height that ImageTk returned to determine whether it was a portrait or landscape photo. If width was the larger = landscape, else = portrait. Once I knew it was portrait, then I knew to scale the image so that the height matched the frame height. If it was landscape, then I scaled using the width as the constraint.

    Using this method works great for landscape photos. For portrait photos, the initial success rate was probably about 1/3. I'd walk by the kitchen table to see my wife smiling with her head tilted over on it's side looking at a photo rotated 90 degrees from where it should be. Not bad, but not good enough.

    My initial thought was, hey, let's use OpenCV to look at the photo and let it decide whether it's portrait or landscape. Cool, google... starting recipe .... http://stuporglue.org/automatically-orient-scanned-photos-correctly-with-opencv/

    But then, I thought...why do most of the image viewers show the image in the correct orientation? Certainly they aren't using image processing...it must be in the jpg file. Google...EXIF tags...humm, is there a python EXIF tag module, yes, sweet. https://www.blog.pythonlibrary.org/2010/03/28/getting-photo-metadata-exif-using-python/

    EXIF gives an orientation field. It's a numeric value 1-8. Here's a quick explanation http://jpegclub.org/exif_orientation.html

    Version 2 uses EXIF tags to orient the photos. I may still add OpenCV for images that don't have an orientation EXIF tag, but for now I've gone from 2 of 3 portrait photos being incorrectly displayed to 9 out 10 being good. Big improvement for not much CPU cycles.


  • Rev 1 Released

    tklenke03/02/2017 at 05:03 0 comments

    After figuring out a hack to read from my Windows Our Pictures share, I installed the first version on the actually Pi and let it rip. Pretty quickly, I realized that I wanted some more configuration. I added a configuration for length of time each photo shows before flipping to the next photo. I also added a list of directories within the Our Photos directory that I don't want to display or dig through looking for photos.

    Family was pretty happy to see some of the old photos roll by. The Raspberry Pi, old monitor, keyboard and mouse were granted another few days on the kitchen table as long as they kept flipping puppy and baby photos!

  • SMB on the Pi

    tklenke03/02/2017 at 04:56 0 comments

    I'm writing this a couple of weeks after the fact. Really, what I wanted to do was to just mount my Windows Share on the Pi as just another directory. With my Ubuntu instance it was done after about 5 minutes of Googling. "Mount windows share on ubuntu"

    But when I went to do it on the PIXEL instance...not so much. Yes, it seems trivial, mount -t cifs yada yada. It didn't work for me. Maybe something with my Windows setup, maybe something with the PIXEL i386 kernel (that's what I concluded, but when the googling got to "modprobe" I knew that I was in over my head/interest)

    Anyway, the hack I fell back on was to use the smbconnection module in python. Even that was a bit of screwing around, but I got it all working.

    One of the things you might notice in the code is that I read the file from the Windows Share into an IO stream. The example for SMBConnection actually writes to a file. I did not want to write to a file...I'm thinking that if every time we look at a new image we'd have to write that image from the share to the Pi's disk would be bad for the long term heath of the Raspberry Pi's sd card. I used an IO stream and read the image file from the Share into memory then loaded the image into TKinter's ImageTk module from that memory.

  • Step One - Development Environment

    tklenke03/02/2017 at 04:28 0 comments

    Windows is my daily driver. I'm pretty horrible at Linux, but can get around. So for web projects I typically spin up an Ubuntu instance on Virtual Box. For this project, I started from HackerHouseYT's awesome Smart Mirror project https://hackaday.io/project/13466-raspberry-pi-smart-mirror I cloned the git repository and got it running on Ubuntu pretty quickly. So now I needed to get it up on a Pi.

    The Pi I've been using is sitting on the kitchen table hooked up to a keyboard, mouse and monitor. It's not a comfy place, I'd rather use my desk. Desk space is limited and didn't really have space for a third monitor, second keyboard...too lazy to disconnect...reconnect. Hey, can I run a Virtual Box of Raspian on my Windows machine?

    Mostly, yes. I seem to recall an article about Debian+PIXEL for i386 systems....Just download the i386 version from here https://www.raspberrypi.org/blog/pixel-pc-mac/

    Cool, now I can code either in Ubuntu, deploy to the PIXEL i386 vm and make sure it works and figure out what additional dependencies I might need on PIXEL. Then once it's all working, I can sit down at the kitchen table and deploy to the real PI.

    So far, the i386 PIXEL is 95% the same as the PIXEL running on the real Pi.

  • Initial Thoughts - Why another Pi Photo Frame

    tklenke03/02/2017 at 04:13 0 comments

    To expand on what I wrote in the description. I've long had a server in the house with a network share to keep all the family data. We've got thousands, possibly tens of thousands of photos in the Our Photos directory. Many of them great, and we just don't see them very often. I've long wanted to have display in the house that showed our photos. I've bought a few photo frames. Some of them used a memory stick, some of them would pull off of a Flickr or Dropbox folder. Those are fine, but we've got 30 to 40 gigs of photos and putting them up on the web is a task I neither want to tackle, nor pay for the storage.

    So, I wanted a photo frame that connected via the home network to the shared drive and pulled the photos from there. I've thought of repurposing an old laptop, but never found the time.

    With Raspberry Pi, I of course saw a great hardware solution. Just a monitor and a single board. All I needed was the time...

    Once I got into it, I thought of other things I would want.

    1 - Clock

    2 - Local weather and forecast. Ideally for home and for Tahoe

    3 - Family Calendar

    Other stuff that would be cool.

    Ability to favorite certain photos so that they appeared more often. Likewise ability to down vote certain photos. Ability to recognize photos that needed to be rotated and automatically rotate them.

View all 7 project logs

View all instructions

Enjoy this project?

Share

Discussions

Similar Projects

Does this project spark your interest?

Become a member to follow this project and never miss any updates