Close
0%
0%

Homemade IoT electrical outlets (sort of)

IoT remote control outlets for cheap

Similar projects worth following
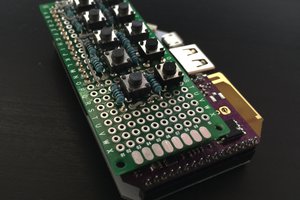
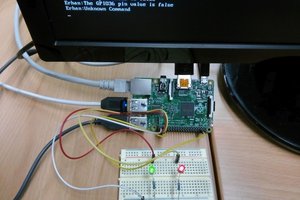
Using a raspberry pi 3, some transistors, resistors, a breadboard, a little wire, and a pack of remote control outlets for $10 I made three outlets that I can turn off and on over the internet for cheap
**Additional benefits of the raspberry pi are that I can create cron jobs for lighting schedules**

Materials used:

  • 6x female jumper wires
  • 8x 3904 transistors
  • 8x 22KOhm resistors
  • 16x 4" pieces of small gauge stranded core wire
  • solder
  • breadboard
  • raspberry pi3 w/AC adapter and internet access
  • 3 pack indoor wireless remote system by Westinghouse (will work with other wireless devices that function in a similar manner)

How it works:

  • Basically I'm using the GPIO pins on the RPi and the transistors to "electronically push the buttons" on the remote, something that you would normally do with your finger but your fingers can't always stay at home but a RPi can! Uses a web server on the RPi to allow local and remote connections to turn the outlets off and on (or you can use the command line and SSH). Additionally you can set schedules to automatically turn them off and on with cronjobs.

Inefficiencies Addressed

  • I'm aware that there's probably a better way to do this and some electronic engineer will have some advice for me on improvements, (I also didn't analyze the remote control's PCB closely to make the build more efficient) but who cares? It works and if it ain't broke don't fix it.

Known Improvements

  • Additional improvements that could be made: the use of an 8 channel digital decoder chip to reduce the number of GPIO pins used from 10 to 5 (3 to represent the numbers 0-7, one to supply power to the chip and remote, and one for the ground. I don't have any of those lying around so I didn't do it. I'm also using a different GPIO package for the web server's interface that I will eventually implement into the python script.

Project is complete, I'm fine tuning a few thing and getting this write up together

I'm also figuring out Hackaday because I've never done this before

Will continue to update...

outlet.py

Python script used for scheduling automation, also contains additional code used by the web interface to store the state of the outlets and properly configure the switches

py - 1.65 kB - 03/25/2017 at 17:42

Download

index.php

Very simple and basic web interface to control the outlets, it can be improved by using css, or other buttons.

php - 1.75 kB - 03/25/2017 at 18:11

Download

gpio.php

used by the java script to switch the outlet off or on and to store the state of the outlet (OFF/ON)

php - 1.81 kB - 03/25/2017 at 18:20

Download

script.js

Java script used to control the buttons and display the appropriate images, calls on gpio.php to perform the actual switching and saving the outlet states.

javascript - 2.90 kB - 03/25/2017 at 18:26

Download

off_0.jpg

Image file used by the web interface, represents first half of the switch in the OFF position

JPEG Image - 19.21 kB - 03/25/2017 at 17:44

Preview

View all 8 files

  • 6 × Female jumper cables
  • 8 × 2N3904 Transistors
  • 8 × 22k Ohm Resistors
  • 1 × proto board/bread board

  • 1
    Step 1

    Gather all materials and make sure you have plenty of time, the soldering isn't too difficult but it is quite tedious. Working with the Raspberry Pi and troubleshooting everything will also take a bit of time if you're altering my code to fit your needs and getting everything to look and work the way that you want it to.

  • 2
    Step 2

    First we'll get started on setting up the RPi, it is assumed that it already has internet access and everything will be performed headless using SSH and your RPi has a fresh image

    The basics, let's make sure everything is current

    sudo apt-get updates -y sudo apt-get upgrade -y
    Next the essentials for our web server, well be using apache and php
    sudo apt-get install apache2 -y && sudo apt-get install php5 libapache2-mod-php5 -y
    Now lets create our outlet script in python so we can test our hardware as soon as we put it together
    cd /home/pi && nano outlet.py

    This is the code I'm currently using, paste it into outlet.py then save and exit ( [ctrl] + [X], the [Y], and then [enter] ). The two on and off functions are not needed. The onOff function is the only one used, the delays are necessary but you may want to play around to find the fastest time that works reliably for switching outlets off and on, especially in rapid succession. My outlets are numbered 1-3, 0 represents the ALL button in the array. The update server function is so that my webserver knows how to position the switches when the webpage is loaded if the switches are turned off or on using this python script and a cron job.

    #!/usr/bin/env python
    
    ##Syntax: "outlet.py [all,1,2,3] [on,off]"
    
    import RPi.GPIO as GPIO 
    import time 
    import sys 
    import os 
    
    ##format: [outlet number (0 = all),pin to turn ON, pin to turn OFF,output format to use]
    outlets=[[0,7,11,0],[1,18,22,1],[2,15,16,1],[3,12,13,1]]
    output=[["Turning "," outlets "],["Outlet "," is now "]]
    # turns pin on and then off for specified time
    def onOff(pin,on,off):
       GPIO.output(pin,GPIO.HIGH)
       time.sleep(on)
       GPIO.output(pin,GPIO.LOW)
       time.sleep(off)
       return 
    # only turns pin on
    def on(pin):
       GPIO.output(pin,GPIO.HIGH)
       return 
    # only turns pin off
    def off(pin):
       GPIO.output(pin,GPIO.LOW)
       return
    
    #updates webpage with latest state
    def update_server(outlt,state):
       if (state == "on"): state = 1
       else: state = 0
       if (outlt == "all"):
          for i in range(len(outlets)-1):
             command="echo "+str(state)+" > /var/www/html/perm/outlet_"+str(i+1)+".txt"
             os.system(command)
       else:
          command="echo "+str(state)+" > /var/www/html/perm/outlet_"+str(outlt)+".txt"
          os.system(command)
       return
    
    # to use Raspberry Pi board pin numbers
    GPIO.setmode(GPIO.BOARD)
    # initialize variables
    if (sys.argv[1] == "all"):
       outNum=int(0)
       if (sys.argv[2] == "on"):
          pin=int(outlets[outNum][1])
       else: 
          if (sys.argv[2] == "off"):
             pin=int(outlets[outNum][2])
    else:
       outNum=int(sys.argv[1])
       if (sys.argv[2] == "on"):
          pin=int(outlets[outNum][1])
       else:
          if (sys.argv[2] == "off"):
             pin=int(outlets[outNum][2])
    GPIO.setup(pin, GPIO.OUT)
    onOff(pin,.45,.05)
    update_server(sys.argv[1],sys.argv[2])
    print output[(outlets[outNum][3])][0] + sys.argv[1] + output[(outlets[outNum][3])][1] + sys.argv[2]
    GPIO.cleanup()
  • 3
    Step 3
    1. Let's schedule our lights to turn off and on automatically throughout the week with a cron job, before we schedule anything lets make sure our timezone is correctly set with
    sudo raspi-config
    The timezone settings are under internationalization options, now onto creating our cron jobs for scheduling
    sudo crontab -e
    If it's your first time editing cron choose your editor, I prefer nano ( press [2] )

    Let's schedule our outlets to all turn off at midnight Sunday-Thursday and 2 AM on Friday and Saturday because we might be staying up later on the weekends

    0     2     *     *     5-6     python /home/pi/outlet.py all off
    0     0     *     *     0-4     python /home/pi/outlet.py all off
    Now let's have them automatically turn on at the time we would like to get up on the weekdays, we'll assume 7 AM
    0     7     *     *     1-5     python /home/pi/outlet.py all on
    

    The python script I wrote allows us to control all of the outlets at once or individually, let's say one outlet controls a light near the front door and we would like it to be on when we get home from work so it won't be completely dark, we'll do 5:30 PM outlet #3 turns on only on week days again

    30    17    *     *     1-5     python /home/pi/outlet.py 3 on

View all 8 instructions

Enjoy this project?

Share

Discussions

Similar Projects

Does this project spark your interest?

Become a member to follow this project and never miss any updates